Close
0%
0%

Replacement Battery for Ryobi 7.2v Drill

This old drill is still handy for light use around the house, but the NiCd battery pack is long dead. Why not use 4x AA NiMH cells in it?

Similar projects worth following
The original drill was powered by 6 NiCd cells wired in series. Speed control was provided by providing a tap on the 6-cell battery pack such that low speed used 4 of the 6 cells in the series, while high speed used all 6 cells in series. A gearbox allowed the relatively low voltage battery pack to provide a usable amount of power.

My replacement battery pack uses 4 very common AA NiMH rechargable batteries. For simplicity sake, my battery will only support 1 speed - the max speed. 4 AA cells provides more than enough wattage for drilling and screwdriving for most of my light repair or crafting work. Mostly I built this thing as an experiment for DC motor power supplies.

The shape for the battery pack was modeled from scratch in Fusion 360 based on measurements using a digital caliper, reference photos, and test fit prints. Parts are designed to be assembled to maximize print quality, reduce overhangs/supports, and support modular modifications and remixing.

Possible future modifications:

  1. Smaller battery body
  2. Simpler AA cell holder design
    1. the current design was a prototype design intended to test viability of different types of batteries in the drill.
  3. 2-speed control using 6 AA cells instead of 4, like in the original battery pack.
    1. only if i feel like i need 2 speeds, which so far has been never.

Notably impossible / difficult / unknown to me modifications:

Using 18650 cells - I feel unsafe using unprotected 18650 cells, but protected 18650 cells will not work (tested). I think the protection PCB is shutting off the connection when the motor is first connected due to essentially a short circuit state when the motor is connected but not spinning. Perhaps this can be done with a high power resistor attached to the low speed battery contact so when connection is first made by the drill trigger, low speed setting presents some resistance and when high speed is triggered, the drill will already be spinning so back-EMF will provide the resistance needed to avoid triggering the protection PCB.

Things I learned building this battery pack:

Motor speed and power is controlled by wattage of the battery pack. Learned this after experimenting with various buck and boost converters in the battery pack. Digital control of the drill speed/power will have to be done through PWM on e.g. a 555 timer.
Body34.stl

The battery cage that holds the AA cells in place.

Standard Tesselated Geometry - 197.15 kB - 01/22/2018 at 05:24

Download

batterystalk.stl

The thin part of the battery pack that extends into the drill body.

Standard Tesselated Geometry - 438.46 kB - 01/22/2018 at 05:24

Download

cap.stl

The very tip of the battery pack. This cap covers the contacts that relay current to the battery. Hosts a hole through which a 19mm M3 bolt connects to the batterystalk. The hole has a small support plug which is to be printed against the bed, and snapped off before use.

Standard Tesselated Geometry - 139.83 kB - 01/22/2018 at 05:24

Download

battbody.stl

The main chassis of the battery pack.

Standard Tesselated Geometry - 337.58 kB - 01/22/2018 at 05:24

Download

rearbar.stl

A thinner spacer bar to help maintain proper spacing when tightening the batterystalk to the battbody. This will go near the battery door (celllid.stl)

Standard Tesselated Geometry - 39.34 kB - 01/22/2018 at 05:24

Download

View all 10 files

  • 2 × Battery pack latches salvaged from the original battery pack
  • 2 × Battery pack latch springs salvaged from the original battery pack
  • 2 × M2 screw, 10mm
  • 3 × Battery pack contacts and wire salvaged from the original battery pack
  • 5 × Shrink tubing 1cm (optional) For making and insulating electrical connections

View all 11 components

  • 1
    3D print all STL files

    Recommend PETG for elasticity, ease of print, chemical resistance, strong interlayer adhesion.

    Supports are needed for batterystalk.stl and celllid.stl only. Remember to orient all the other parts in a reasonable manner as they are not necessarily oriented correctly in the STL files (sorry!)

    Post processing: remove supports and the small breakaway support cylinder from cap.stl using small flat screwdriver.

  • 2
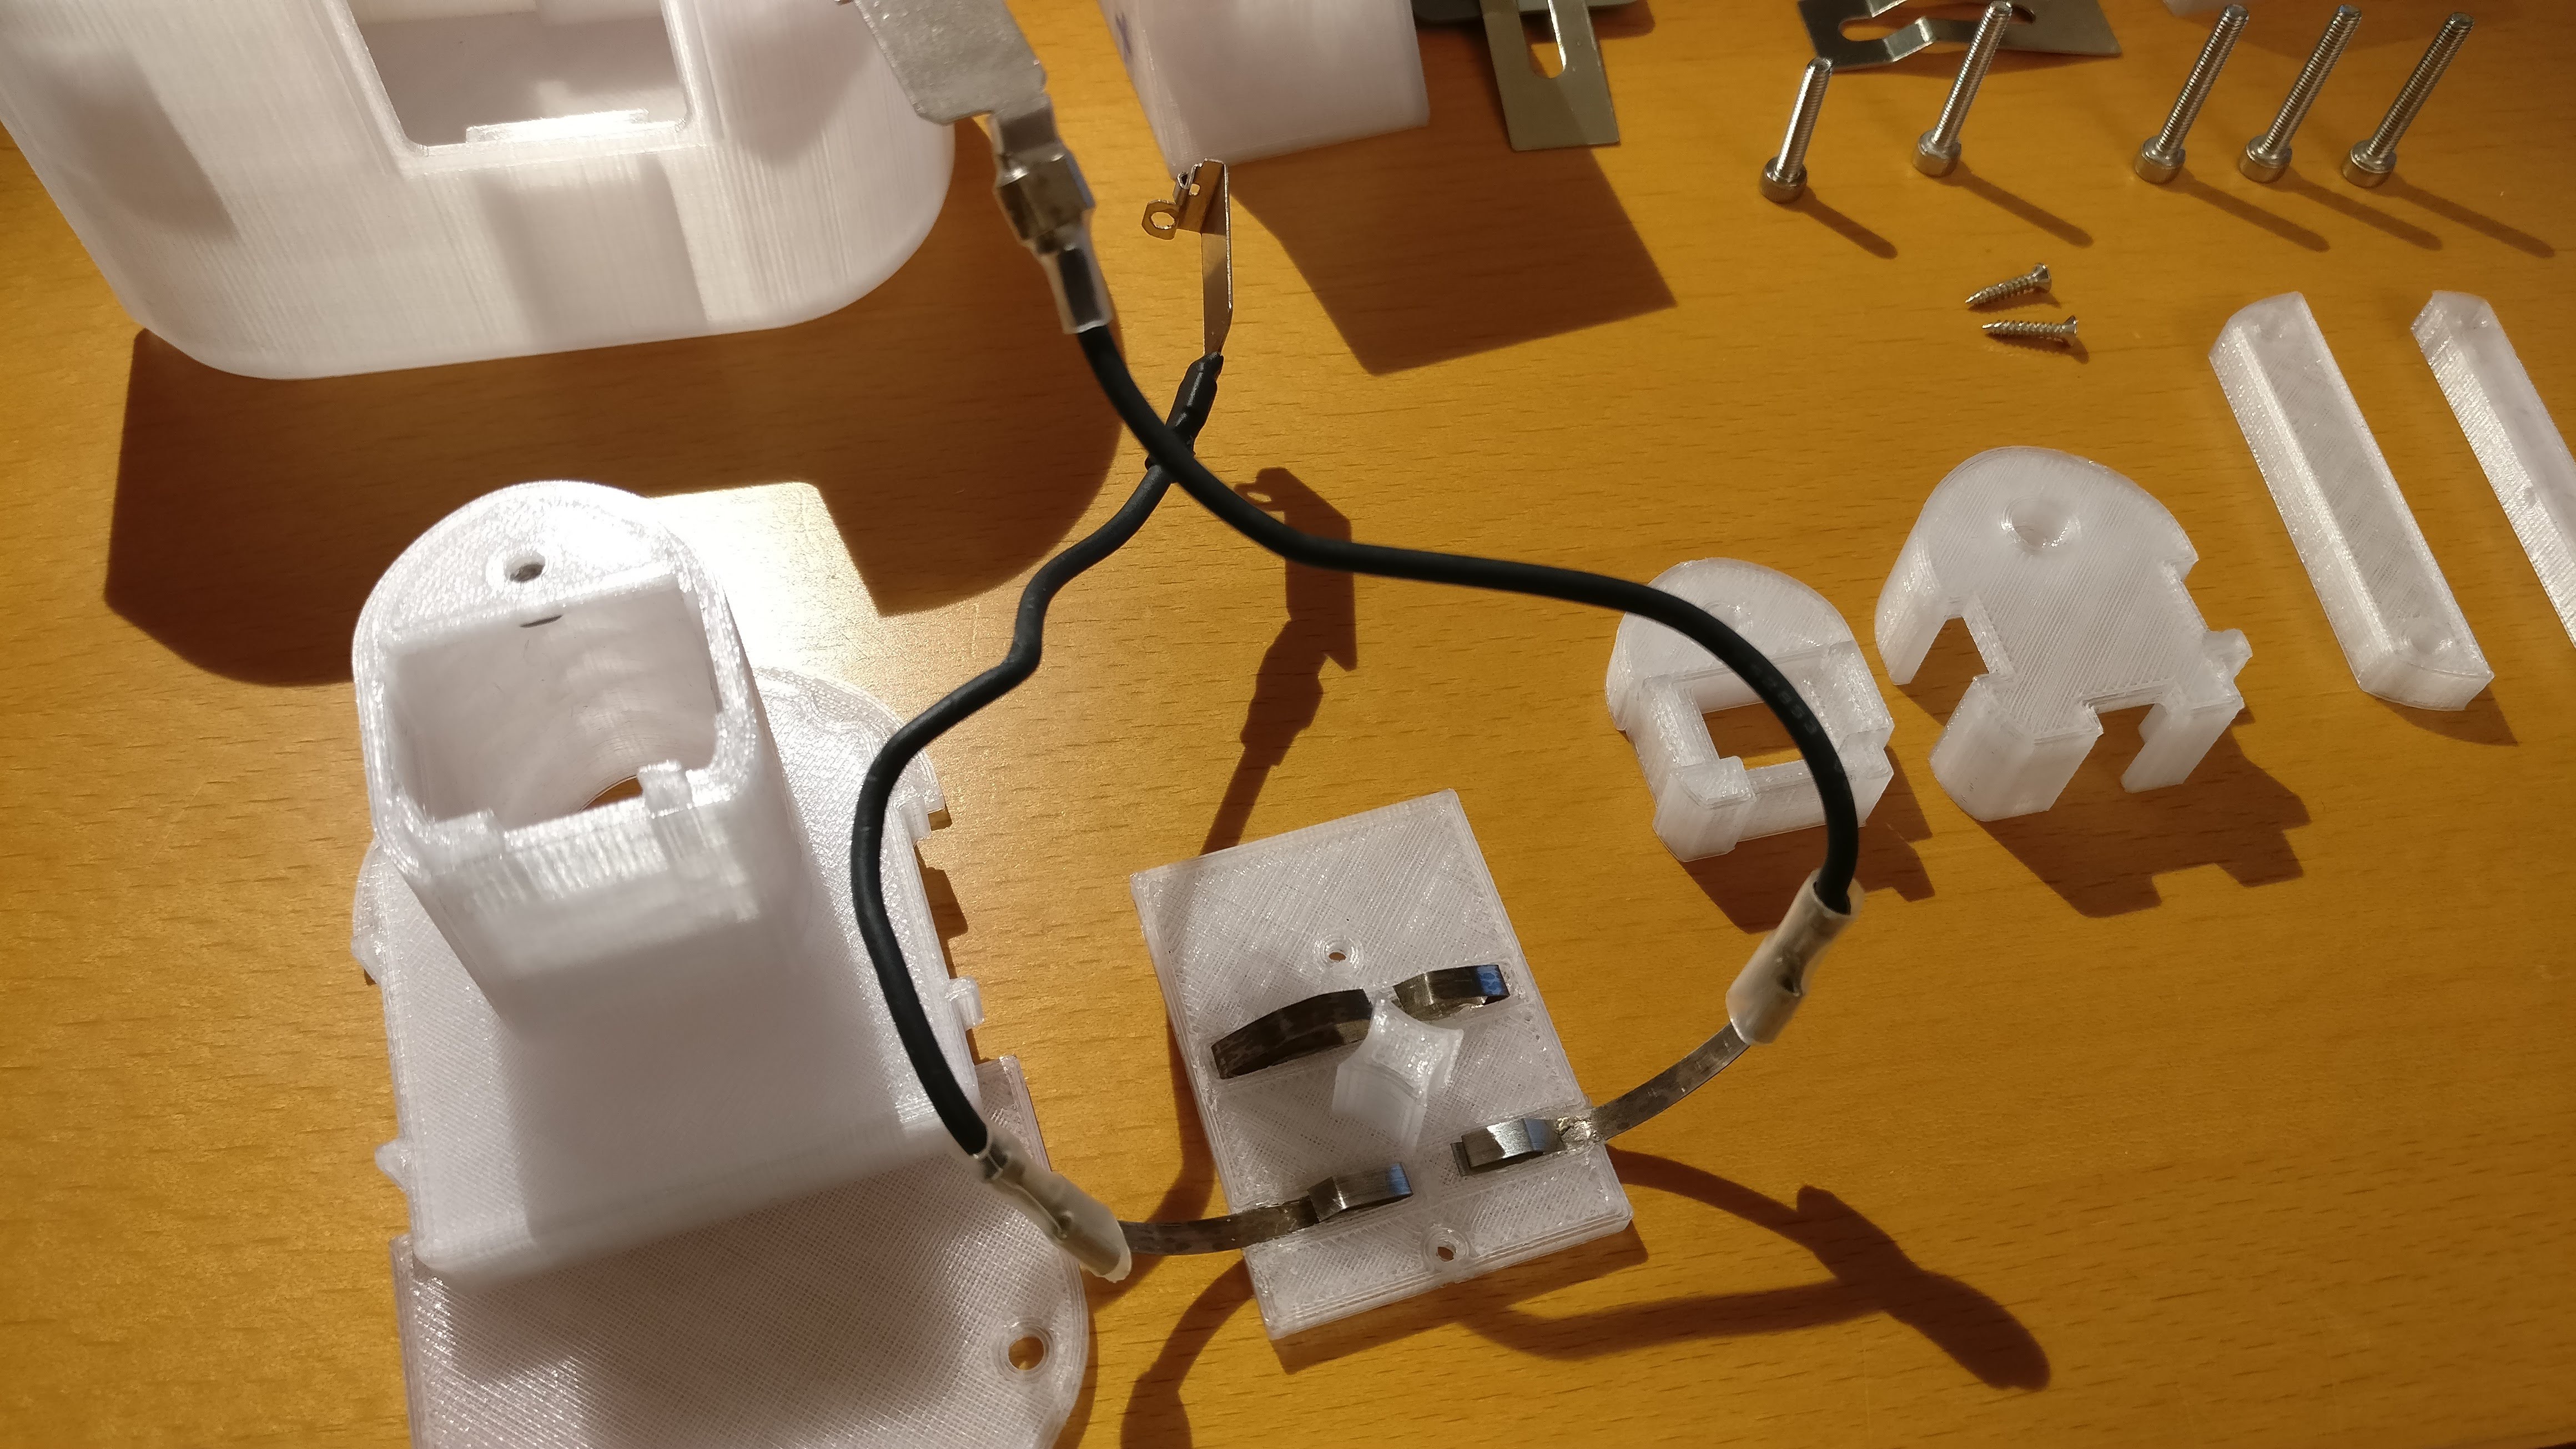
    Prepare the wiring and glue the spring strip AA contacts onto Body35.stl (the internal AA cell lid)

    Orientation doesn't matter at this point but if you can make it look like what i have in the photo, that will work well. Note that the top sprint strip is one connected strip even though it doesn't look like it in the photo (it will connect two AAs together). If you are using an alternative connection method, the spring's flex distance should be about 3mm. I know the connector pictured is not ideal, but what can I say, it's a hack, not NASA-approved. FYI the sprint strip came from a retracting cord lanyard. Hot melt glue gun was used here.

  • 3
    Disassemble the old battery pack

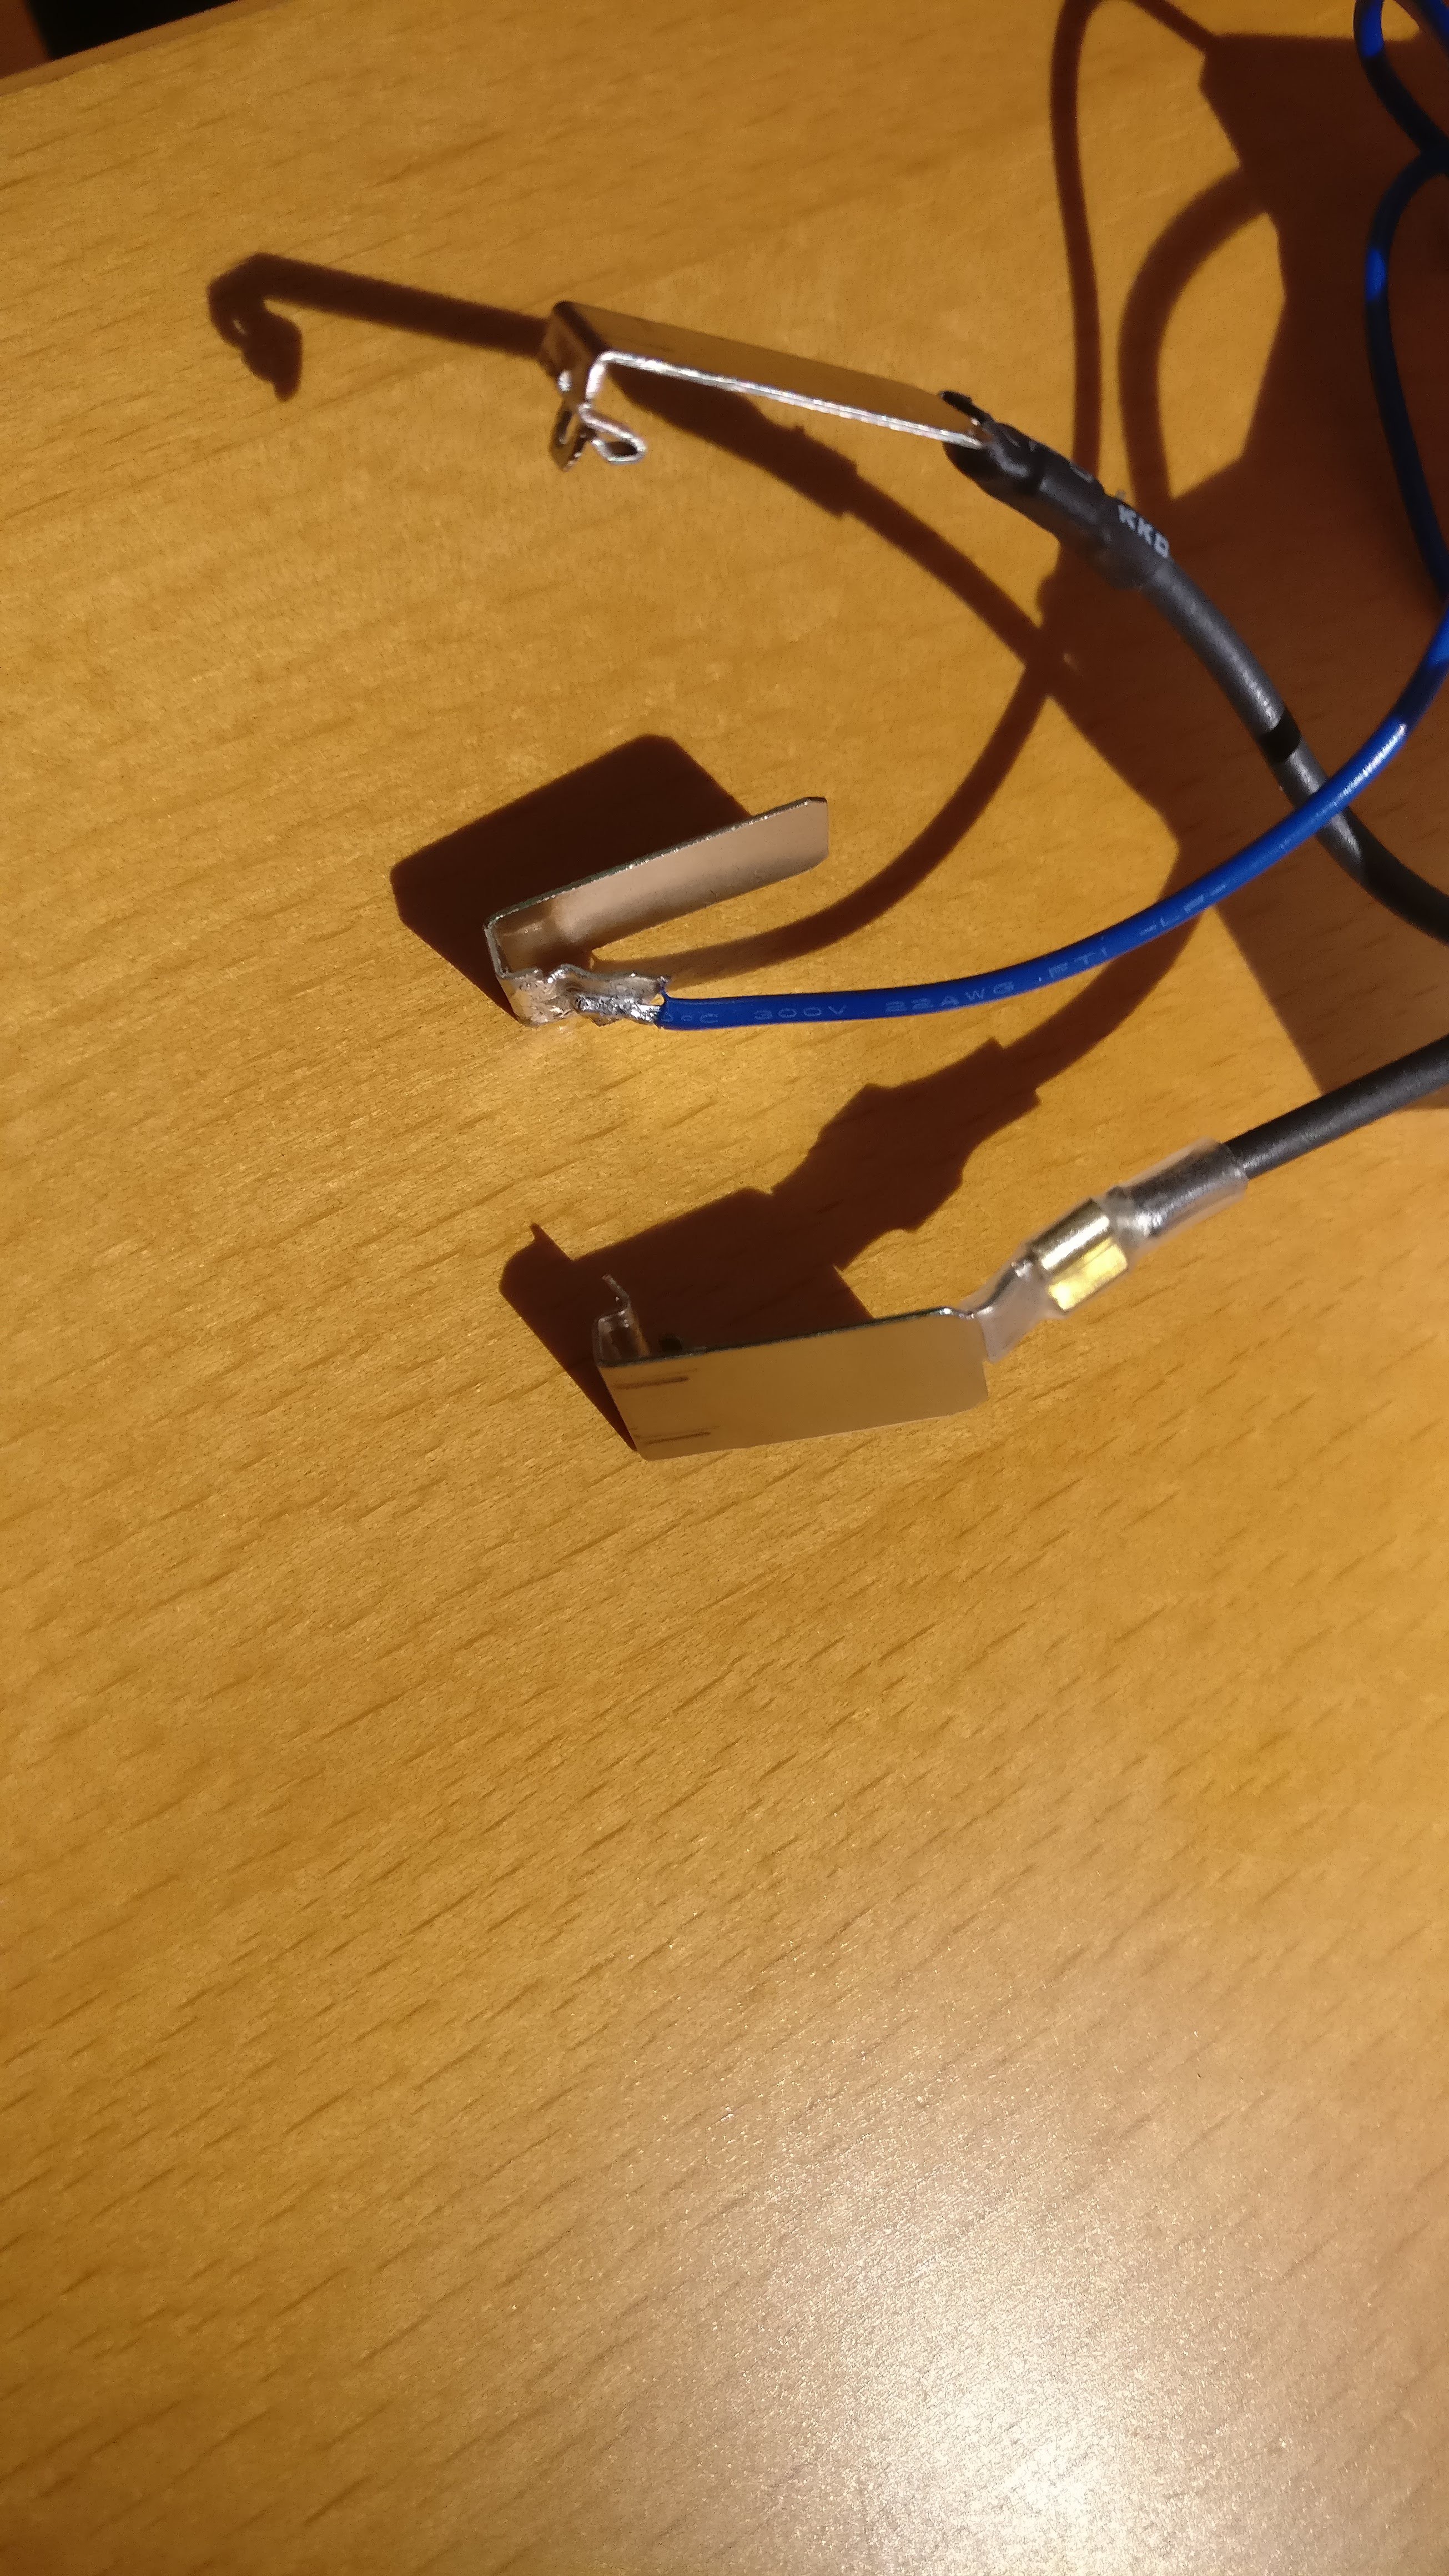
    Desolder the contacts from the stalk of the old battery pack, but leave some wiring attached so we can reuse them. The salvaged contacts should look like in the picture below (the thick black wires are original, the blue wire is my addition).

    Recycle the old NiCd cells.

View all 13 instructions

Enjoy this project?

Share

Discussions

Klima wrote 01/23/2018 at 22:06 point

Why didn't you use a li-po battery pack for RC models? They can provide significant currents.

  Are you sure? yes | no

Larry G wrote 01/23/2018 at 23:18 point

This is a great idea. Those packs should have higher C rating too which might overcome the whole protection PCB problem. However 1) it would cost to buy, 2) i don't have a charger for them. I wanted to use what I had on hand. The 3D printed parts are designed to be adaptable for that kind of build - crimp a connector onto the two battery contact wires and leave out the STLs with "body" in the names. The lid of the battery will still go on since it is held in place by a groove in the battery body and does not depend on the presence of the AA battery block.

  Are you sure? yes | no

Klima wrote 01/24/2018 at 16:34 point

Any li-poly charger from ebay will work, you just have to charge one cell at a time. It is perfectly doable and easy - the batteries are charged through so called balance connector, which breaks out all the cells separately.

And yes, the price of a battery gets close to half of the cost of a cheap drill.

  Are you sure? yes | no

Martin wrote 01/26/2018 at 11:10 point

The LiPo packs for RC models are not protected at all and they are much less safe than even unprotected 18650 cells (which have a steel casing).  But you can get separate LiIon protection PCBs for 2 cells (7,2V nominal), e.g. on Aliexpress. Some are good for 2A some for 6A or more. There are also different types of 18650 cells: high capacity (2C discharge at 2..3Ah) and high current (1,5Ah but >=10A).

A LiPoly charger for RC models does not really charge the individual cells one at a time or charge through the balance connector (at least not with more than 0,5A). It charges through the main connector and monitors/balances through the balance connector.

Tapping a battery pack in the middle for slower speed is a good way do damage the pack very quickly. The partially discharged cells will become overcharged the next time you charge the pack. This can really only be done with NiCds at low charge currents. Even NiMH cells are less robust and less tolerant to overcharging.

A speed control should be done with PWM.

  Are you sure? yes | no

Alex Rich wrote 01/23/2018 at 13:57 point

nice design, couldn't you handle the initial burst of current with some ultracaps in parallel with your batteries?  The li-ion cells would last a lot longer.

  Are you sure? yes | no

Larry G wrote 01/23/2018 at 23:17 point

Probably would work. Will have to experiment.

  Are you sure? yes | no

davedarko wrote 01/22/2018 at 20:59 point

now that's a good entry!

  Are you sure? yes | no

Similar Projects

Does this project spark your interest?

Become a member to follow this project and never miss any updates