Digital Holga
Conversion of a Holga 120S to digital format with SD card output.
Conversion of a Holga 120S to digital format with SD card output.
To make the experience fit your profile, pick a username and tell us what interests you.
We found and based on your interests.
Updated Teensy 3.1 pin layout for faster single single cycle 8-bit register reads on 'PORTD' (GPIOD in Freescale terminology). Other pins moved as needed to accommodate for the Teensy layout where these pins (on GPIOD) are spread out.
At the start of this project I had picked up this SD card reader off EBay. For the cost, it can't be beat, as otherwise you can end up paying 5x the price for something comparable from SparkFun. The real important point with SD modules is all the 'interesting stuff' happens in the software, and more or less the hardware portion is simply breaking out the pins from the card.
However, as this is not a card from any 'official' supplier, I wasn't sure yet if it would work with the standard Arduino SD/SPI libraries.
Instead of finding out at the end there would need to be a lot more hardware/software work done to complete the image file output portion, I decided to test it out tonight.
First Test: Limor Fried / Tom Igoe's 'Card Test'
This simple sketch will both check your wiring elements (i.e. you've connected MOSI, MISO, and SCK correctly, or that is they are responding as expected) but will also detect what type of card is present, the total volume size and file system type, as well as reading out a root directory of any files present on the card.
It passed this test quickly and without troubles. Just make sure to reconfigure the pin numbers in the sketch for the SPI (Serial Peripheral Interface) pins you will actually be using on your particular board.
Second Test: David A. Mellis / Tom Igoe's 'SD Read/Write'
Another simple sketch, though this time after checking whether an SD card is present it tries to open (or, if not present then create) a new file, writes data to that file, closes it, opens it up again and then displays the context out on the serial monitor. Again, passed no problems.
One final bit of good news. All tests were performed on the 3.3V input pin of this particular card reader, so in addition we won't need a 'step-up' converter to 5v to otherwise readily incorporate it into this project.
In the end, most of the SD related work will be dealing with any speed bottlenecks when writing image data to a file and implementing buffers accordingly, as well as ensuring the proper image format is preserved in the file format at write time.
I am presently working on finalizing the general register read/write routines for the camera module so as to be able to easily adjust the settings at any time during use.
The first thing one will notice though is that the default configuration register set is truly a long list. The initial impression might be hours ahead slogging through the datasheet.
However, thankfully Aptina (which now own's Micron's imaging line) has produced a Register Configuration Wizard, which is basically a GUI that much more easily allows one to choose the configuration setup one wants and then easily outputs those settings, with corresponding page and register lists plus settings.
Even if the default settings I will be using may be working 'at first' for you it is worth downloading the Register Configuration Wizard to ensure other portions of the start-up procedure match your particular device and settings (i.e. you have to set/configure the input clock, XCLK, in the Register Wizard).
---
Looking at first at Aptina's support page, it is a little difficult to determine which software to download as the MD9T111 sensor is not directly listed. The appropriate Register Wizard can thus be downloaded either via this link or by going to the Aptina website and in the Support Section, after clicking on 'Demo Kits' one will see that they are now in the Aptina DevSuite download page.
For this camera, we want to download the version at the bottom that says 'Generic Software'.
Once downloaded and installed, going through the 'Aptina Imaging' program group one will find a subfolder labeled 'Tools' and from there 'Register Wizards'. Notice the MT9D111 is not listed by name, but SoC type. For this camera we want to select the 'A-2010SOC'. Once loaded you should see a screen like the following:
From there, just select the default Register and Variable settings you want for your setup, save to a file, and then you're ready to go.
Seeing as http://Hackaday.io is not that great (nor was it meant to be) of a repository for code I will be moving my codebase for this project to my GitHub page found either here, or via the 'octocat' logo on the left of the page.
Project explanation and code notes will remain on http://Hackaday.io
// Anthony Balducci - 05/15/2015
// MT9D111 16-Bit Register Read Example Arduino/Teensy 3.1 code

#include <i2c_t3.h> // Brian (nox771)'s I2C Library for Teensy, works much better than standard wire library.
                    // Configure the Teensy for 72 MHz (no overclocking) for most reliable results

void setup() {

 analogWriteFrequency(20, 8000000); // Teensy 3.x specific code -- Specifies a 8 MHz clock out signal for XCLK on MT9D111 on pin 20
 analogWrite(20, 128); // Starts PWM output with ~50% duty-cycle

 Wire.begin(I2C_MASTER, 0x00, I2C_PINS_18_19, I2C_PULLUP_EXT, I2C_RATE_400); // Configures I2C to run as master, pins 18 (SDA) / 19 (SCL), external pull-up resistors and 400 KHz I2C Rate
 Serial.begin(9600); // Open serial port at 9600 baud
 delay(5000); // Optional delay -- Provides user five seconds to open serial monitor

 Serial.println("MT9D111 Camera Module + Teensy 3.1");
 Serial.println("Read 16-bit register value example");
 Serial.println("---------------------------------------------");
 Serial.println("*  Instantiation of pseduo-code example found on pages 9-10 of MT9D111 Developer Guide");
 Serial.println("*  SoC chip Chip Version register (Reg0x00:0)");
 Serial.println("*  Expected value = 0x1519");
 Serial.println();
}

void loop() {
  delay(5000); // Optional delay between read tests

/* The MTD9111 Developer Guide states that 0xBA and 0xBB are the default read/write addresses respectively.
   However, it is important to note, while converting 0xBA and 0xBA to binary at first 'appears' to give us
   two distinct addresses:

   (Write) 0xBA --> 10111010
   (Read)  0xBB --> 10111011

   The two values only different in their LSB (least significant bit), or in this case, the first value on the
   'right'. The '0' / '1' in this position is what specifies the write (0) or read (1) condition accordingly.
   In the Arduino language the LSB read/write portion is already built into the Wire.write / Wire.read commands,
   thus the original register addresses specified must be truncated by the read/write bit to seven bits, leaving
   us with 1011101 --> Ox5D in both cases.


*/
  Wire.beginTransmission(byte(0x5D)); // Begin I2C transmission at MT9D111 default I2C device address
  Wire.write(byte(0x00)); // Specify register to be read
  Wire.finish(); // Wait to ensure transmission is complete
  Wire.endTransmission(I2C_STOP); // End transmission, including required 'stop' command

  Wire.requestFrom(byte(0x5D), 2, I2C_STOP); // Listen back for two bytes of data, with required 'stop' command once transmission complete
  int16_t result = ((Wire.read() << 8) | Wire.read()); // Bit-shift the first byte, concatenate and store

  // Output results
  Serial.println("Result Read");
  Serial.print("  Hex: ");
  Serial.print("0x");
  Serial.println(result, HEX);
  Serial.print("  Decimal: ");
  Serial.println(result);
  Serial.println();

} // Loop till canceledPossibly, I believe, the most difficult portion of this project so far. Or if I had it to 'do all over again', rather than modding certain parts of the original Holga casing, I think would take measurements, design a new, custom back cover, and then 3D print it accordingly.
Having no such equipment at my disposal, I first went to my drill press.
Before that, a few mentions of what I have learned. Though of course not 'everything' can be 'easily corrected', but from the point of view of general design, I think it is always important to, to what degree one can, take one's mistakes and thus incorporate them, actually, as 'features'.
Describing the mod process I think will make this revelation more clear.
---
My first step was to try to add the LC Technology battery charger module to the rear cover of the Holga (other placements, perhaps more practical, are possible, but this seemed the most 'intuitive' placement to me following standard practices).
Further (at least at first) this module seemed to fit quite 'nicely' between the ribs on the outer casing of the camera, being, it seemed, just the right size.
Seeing as this particular power module has some nice in-built red/green SMT LED's to represent the batteries charging state I wanted to take advantage of this in my final design, and this soldered on the pins on the 'back side' of the board or in an inverse fashion.
Knowing I would need an appropriate side hole in the case where the USB charging connector would fit, I decided to tape a piece of thread onto the center point of the board and then pull it around to the other side to mark off, with a little bit of 'white out', in this case, my pilot hole.
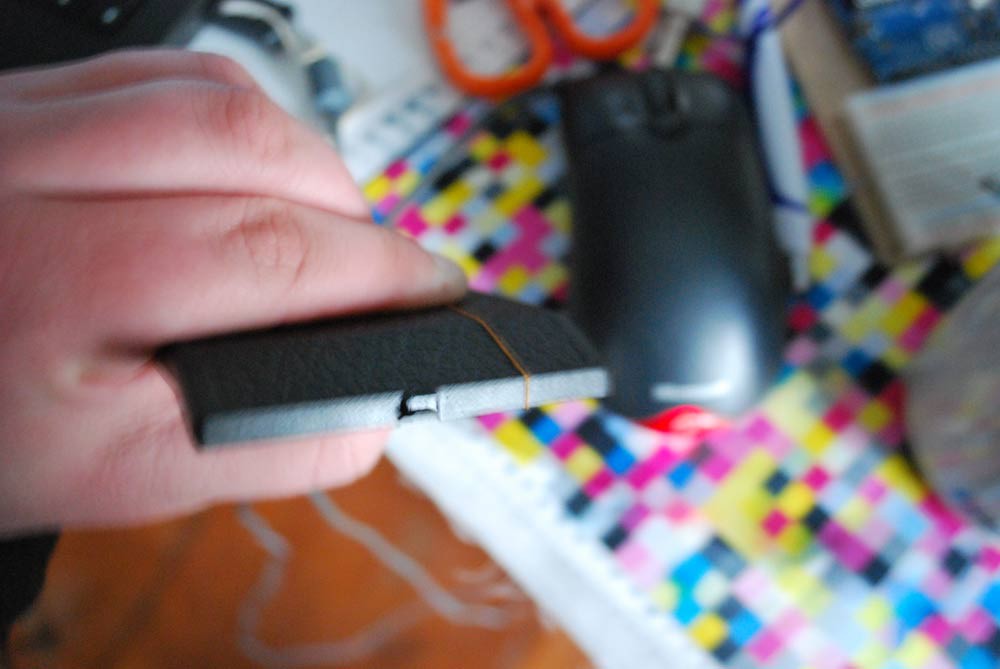
Then on to the drill press.
Aside from tightly clamping the plastic, it is also important to have some 'sacrificial support' below any drill points.
Also, ensure you have a 'pilot hole' in place first and then gradually expand the size, or the plastic is at risk of cracking (not on this series of cuts, but this did happen to me at one point).
This portion worked pretty cleanly/pretty easy.
However it was still not enough space for me to mount the charging board flush with the back (unless you place it at an angle) and also work in other elements of the design as planned.
At this point I realized the entire side component of the casing would need to be removed which I facilitated by hand with a file.
Once completed, one can readily make a good, straight USB connection with a variety of cable styles/sizes.
At present, I realize I am actually a number of stages (or tough lessons, though with true progress) ahead at this point, but just as yet do not have the 'photos' recorded to show.
Like many a journey, to be continued...
An important note to keep in mind from the Micron User Guide/Datasheet. In addition to having registers that run up to the range of 0xFF (255) instead of your more common 0x7F (127), the registers for various functions are divided into three pages (0, 1, and 2) as described in the manual:
"Hardware registers are organized into several pages. Page 0 contains sensor controls. Page 1 contains color pipeline controls. Page 2 contains JPEG, output FIFO and more color pipeline controls. The desired page is selected by writing the desired value to R0xF0. After that all READs and WRITEs to registers 0..255 except R0xF0 and R0xF1, is directed to the selected page. R0xF0 and R0xF1 are special registers and are present on all pages."
Meaning, of course the 0xF0 (page register) and 0xF1 (byte-wise address) must be set to the proper page to gain access to the specific hardware register.
Thus, consider the following standard (at boot) hardware reset instructions:
"A soft reset to the camera can be activated by the following procedure:
1. Bypass the PLL, R0x65:0=0xA000, if it is currently used
2. Perform MCU reset by setting R0xC3:1=0x0501
3. Enable soft reset by setting R0x0D:0=0x0021. Bit 0 is used for the sensor core reset
while bit 5 refers to SOC reset.
4. Disable soft reset by setting R0x0D:0=0x0000
5. Wait 24 clock cycles before using the two-wire serial interface"
Thus, considering the above, step one, register 0x65 lies on (and can only be accessed from) page zero. Similarly "R0xC3:1" translates that "Register 0xC3 lies only on page one", etc.
Finally, one last item to consider: The majority of Mt9D111 registers are 16-bit, thus with the most common 8-bit i2c libraries at least, a read/write will require two calls to the corresponding operation (i.e. two subsequent 'write' commands, 8 bits each), with the data being sent out appropriately bitshifted.
A few notes:
It is worth paying attention that at least the MT9D111 module I have has two power ground pins. While one is obviously (and right next to) VCC, the connection for the second ground pin is not entirely clear or explained in the EBay description of the pinout. Looking at the Micron datasheet itself, my guess this would be the 'analog ground', though those features don't appear to be pinned out here. In any case, I decided, at first, not to take any chances and spliced two wires into one coming off the pins into common ground just to be safe.
Also worth noting is that while many i2c devices utilize addresses in the 1-127 range (the typical range of most i2c scanners), this device utilizes a range at least up to 0xFF (255), so when testing for good comm (Ack/Nack) make sure to alter your scanner code accordingly.
Almost every model of 'Ebay Module Camera' out there (perhaps with the exception of those which are UART based, but my guess would be their CMOS interface is the same, only there is an external clock already 'on board', require a 'heartbeat', or a steady external clock-in signal provided, even when 'powered up', before they will wake up and talk to you over i2c (needed for setting essential configuration registers and properly initializing the camera). [More on this particular topic in a later post]
However, once you've got the 'blood pumping', the first thing to do is establish a connection over i2c (the SDA/SDL lines). I was struggling with this quite a bit though as the official Micron datasheet suggests the hardware register for the device lies at 0x65. However, after numerous attempts at communicating over the bus I was simply not getting any response.
A bit perplexed, I finally resorted to using an i2C scanner script, which basically scans all 127 potential addresses in range and looks for a ping back, or response.
And, aha! Low and behold, finally a response (again, keep in mind if there is no steady clock signal going into the board at XCLK, this technique won't work)! Only the address is 0x5D, totally different from 0x65 specified in the datasheet.
Yet another reason to take a 'curious', rather than 'blind' approach to any components you purchase off EBay.
As part of a number of posts I plan to write on this issue, while I have generally found EBay to be an excellent resource for certain, quality, inexpensive parts, purchased from a reputable seller (which would cost much more if purchased in the states-- presuming you are willing to 'wait' for the 2-3 week shipping times), it still never 'hurts' to take the provided datasheets with a certain curious 'grain of salt'.
Almost all the camera modules available, even from different manufacturers, are fundamentally quite similar, both in communication, data transfer, and structure (all topics I am looking to get into more detail later).
Another common similarity they share is typically some form of on-board voltage regulation, usually to bring things down to the typical 1.8 today's CMOS sensors use.
In the datasheet I was provided with the item, max input voltage was listed as 3.3V. Curious, however, I decided to locate the regulator on the board and look it up (Note: Your regulator on any specific Mt9d111 module from various vendors may differ, and thus it is worth double checking and looking it up).
In this case the regulator provided is the AMS117 (datasheet) from Advanced Monolithic Systems. A quick glance shows this regulator is rated at a max of 15V.
And so, moral of the story though the provided EBay datasheet suggests only 3.3V max power (which the Teensy provides), a look at the actual hardware says this would be powered quite fine by a 5V source from an Arduino type board or similar.
Always check out what you actually have in your hand-- It may turn out to perform better than you think.
Create an account to leave a comment. Already have an account? Log In.
Become a member to follow this project and never miss any updates
 Eric Herbers
 Emilio P.G. Ficara
 Anders Nielsen
 Anders Helgesson