Close
0%
0%

5g Aquaponics

indoor, modular, small scale growing, aquaponics

emEm
Similar projects worth following
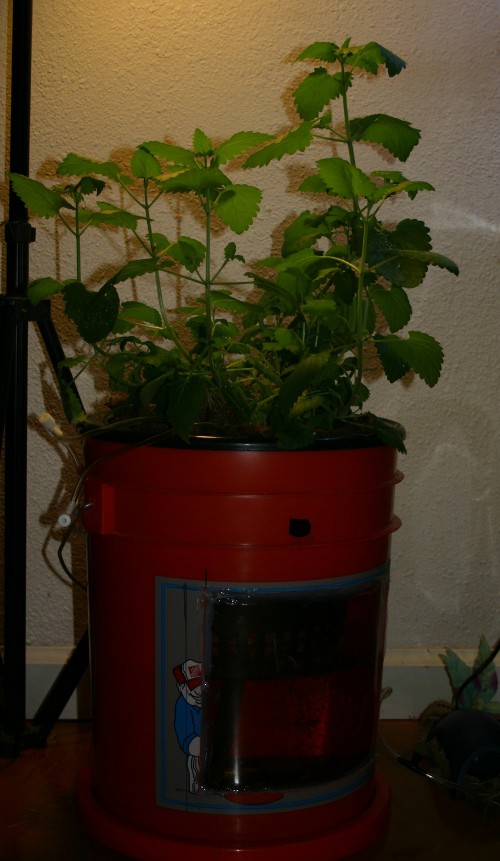
Aquaponics system using 5 gallon buckets. Air-lift pump for both aeration and water movement. Dual-root zone. Fish or other bio-nutrient source (aqua, bio, hydro-ponics). Expandable/modular.

This is a project geared specifically to be low investment (sub $100 total, currently around $80) and small scale.
I just wanted a cherry tomato plant always available in my kitchen area. I also wanted to get a simple system that I could 'export' to friends/family of mine in the midwest for not much, that's easy to run and keep running.

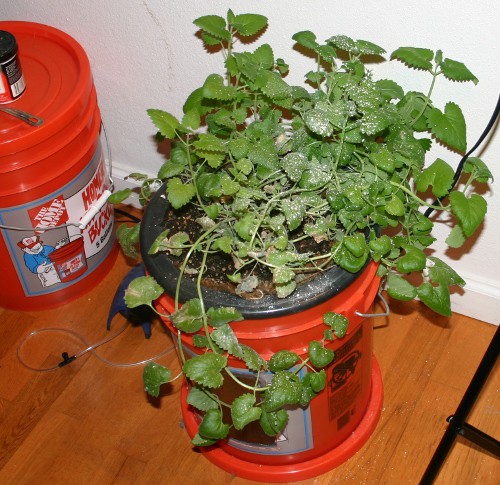
Started after xmas 2014, ran great until tiny fish got strangled in large root system. Need to do my initial "nice idea" of a view window and feeding port on the 5g bucket. Will start the project log when I begin a new system. Letting the one in the photo um, "rest", or seeing how long it takes the tomato to die. Busy with other things.

Update (4/26/15): So, that tomato. Not dead. I've been trying to kill it. Unsuccessful. It's gone at least 2 months only getting a smidgen of light from a half-covered window. It kept growing new little shoots, and setting fruit. I'd turned off the fan in there too, though the window was slightly open. I turned off the air pump, so no water movement. I occasionally tossed more water at it, like, once a month. It had gotten about 2-3' taller than the main project picture before I let it go. It tipped over soon after. Still growing. I'm yanking shoots off it to start new plants. Zombie tomato. It is dropping leaves quickly, but keeps creating more new branches.

I eventually fully destroyed that tomato.

  • 1 × 5 gallon bucket
  • 1 × Air pump using a "10g aquarium" size pump presently
  • 1 × Netpot for 5g bucket lid
  • 1 × Mesh fabric barrier between dirt and growing medium
  • 1 × Airline, airstone, airflow valves

View all 10 components

  • End of 2015 - Still Going

    Em12/17/2015 at 07:41 0 comments

    Man, two jobs, holidays, big projects.

    Anyway, the 5g bucket still lives, though I had a plant-crash - possibly due the diatomaceous earth, but I also sprayed lavender essential oils at it, and it was closer to that, that it crashed. It was an attempt at flea, well, it turned out just to be flea-mild-repellent.

    I need to 'reboot' my plants, but the fish are still fine. I've just tossed in Chia seeds in the meantime.

  • Long-Delayed Update

    Em08/09/2015 at 05:01 0 comments

    Its been a while, I got an additional job which has required some brain-time investment.

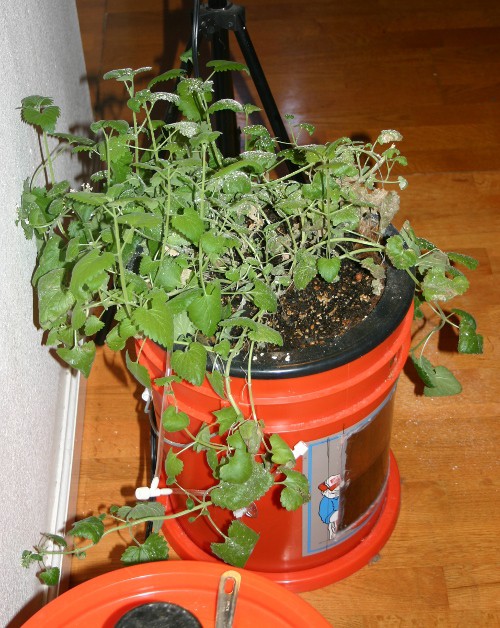
    Photos! White speckling is the diatomaceous earth again.

    Its gotten super leggy, and I've yanked off some sprigs (well, 12" long ones) to try drying them out. I haven't peeked into the fishtank part in the last two weeks, but I see the fish when I feed them, and they act as they have been the whole time. I checked chemistry (ammonia) a week or two ago, all good on that front. Have added water w/in the last two weeks, and need to again:

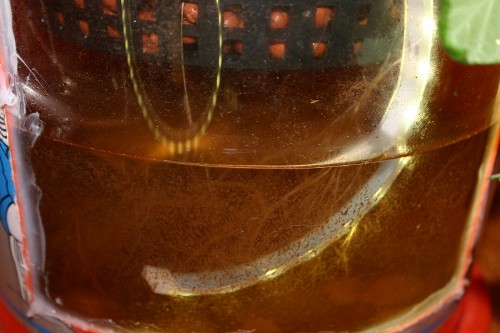
    The lightsource is a water/weather-proof LED strip, it was too long to fit all into the bucket, so there's a reflection outside it. You can see the ghosty roots, and the algae on the window-panel.

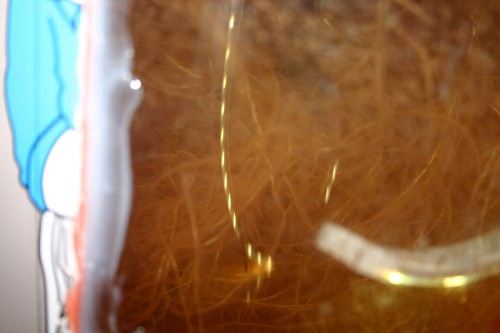
    A little closer/better view of the root-forest. Soon as you pull the pot out of the water, it looks *way* less impressive, hah.

  • June 24, Certain Growth

    Em06/25/2015 at 04:43 0 comments

    Last update was 24 days ago! Well, had many foster kittens and got a new additional job! Which causes lack of updates.

    However:
    June 15 -

    June 24 -

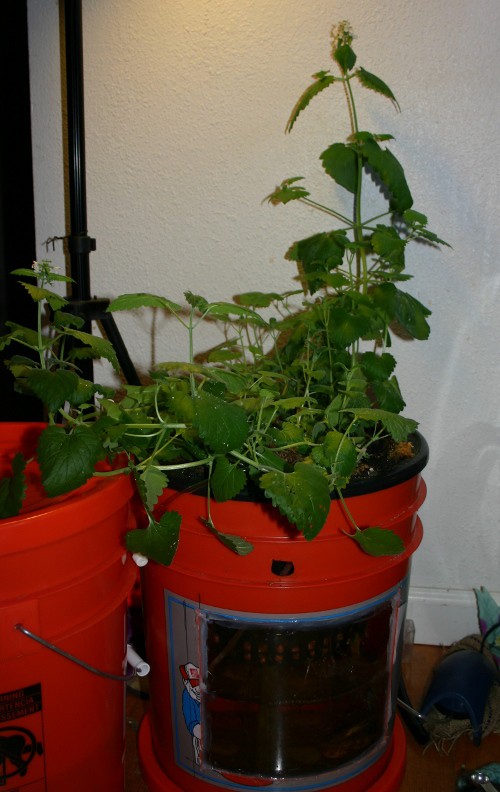
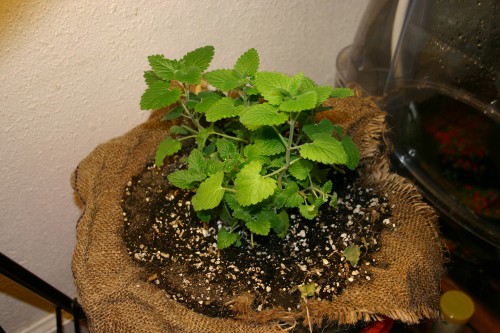
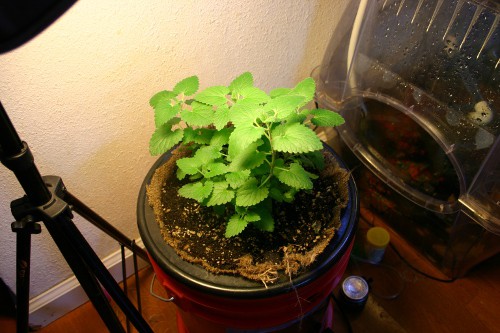
    My job and kitten wrangling didn't stop the catnip. Its blooming now. Yes, the torn/holey leaf is from cat noms. The white speckles are diatomaceous earth (cats, possible fleas, bad!) The leaves are enormous, and until the cats try investigating/nomming, the stems stay upright. After they tip, the tops keep aiming for the light. There's a lot of new growth in the 'center' of the pot/grow area, small leaves, lovely dark green.

    Not very visible in the picture, are roots shooting down into the water in the bucket. The roots are also getting some 'fuzz'/algae growth on them - which the upper portion of the plant doesn't seem to mind at all. Since the water-circulation method isn't high throughput, sediment (from food) does seem to accumulate easily. The minnows don't seem to care much.

    Water Science Data:
    San Diego tap water, dechlorinated w/aquarium water dechlor stuff (chloramines, mostly)

    Hardness (GH) - somewhere between 150 and 300ppm, hard/very hard

    Alkalinity (KH) - between 40 and 80ppm, which is low/moderate

    PH - a good 7'ish, not more than a half point off 7 right now

    Ammonia - between 0 and 0.25, so perfect

    Nitrite (the bad one) - a pretty 0

    Nitrate (the good one) - an awesome 200ppm or more

    Phosphate - between 2 and 5ppm, not actually sure what this means, but for the liquid-based test kit I got the "pond" version instead of the "aquarium" one, so I have Phosphate instead of Nitrate. My nitrate number is from a little dip-strip thing (along with GH and KH). I was hoping it would give me an indicator for blooming/fruiting capacity.

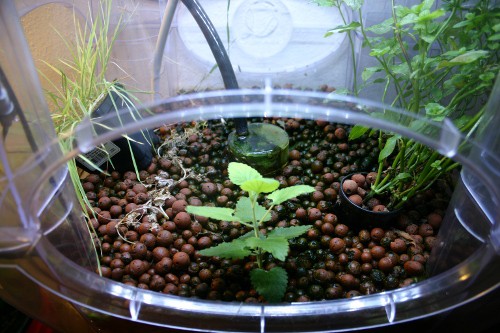
    So, one big advantage to dual root zone - aka - DIRT ON TOP indoors and with lights on, is that you don't get:

    Algae/mold/etc growing all over. That green sprig in front/center of the photo is the top bit of a broken-off branch of the catnip plant, and I just pushed it into the hydroton in the Aqualibrium system that sits next to my 5g bucket. The thing on the right is a mint plant, its all leggy and fairly yellowish (though still green) compared to the catnip. The cat-grass (wheat) is very yellow and dying. This system has guppies, and guppy fry, at the moment - which means its got plenty of chemistry working for it, but I think the algae/etc is 'eating' a lot of what the plants want. And its such a pain to clean this thing. The tank-section also has algae, though the water-science is ok yet. I need to do work with this thing to make it better.

  • End of May, Dual Root Zone

    Em06/01/2015 at 02:30 0 comments

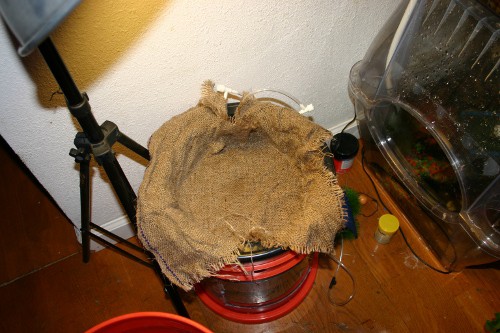
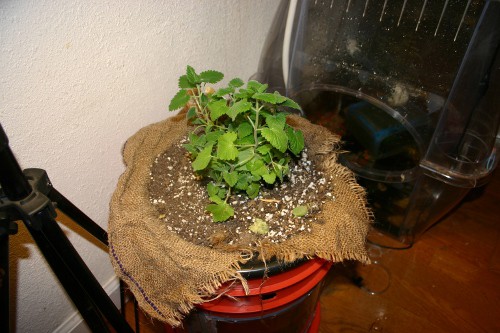
    May 31 - earlier this week actually got some burlap, cut to size'ish, and made the grow 'bed' dual root zone. Plopped in a catnip plant (one of those pre-starts from the pet store), so that something easy/resilient and prolific could keep the system running right.

    That slightly darker spot in the burlap, near the center, is the water burbling up through the air-lift tube. It doesn't need to 'wick' into much of the burlap, a tiny amount will get where it needs.

    Plant plopped in.

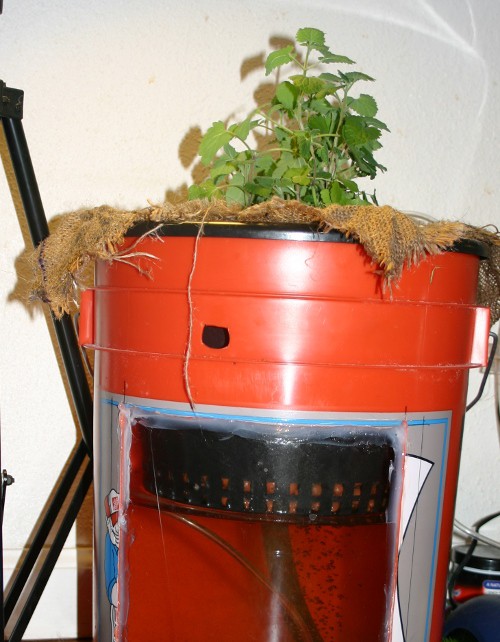
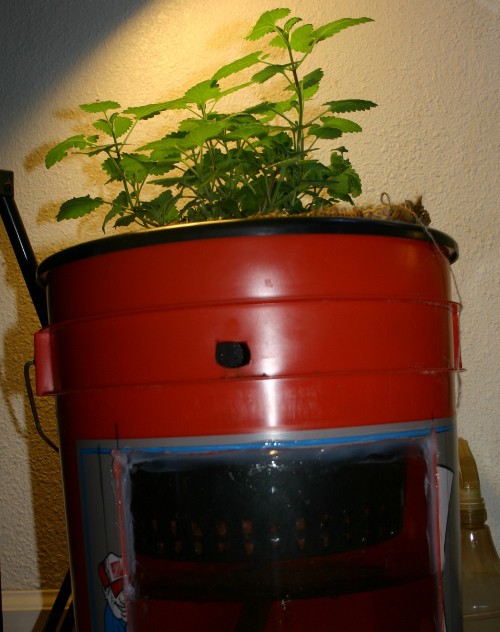
    Side/tank view of same, the water level is *just* under the netpot. This went down about 1/2-1" fairly quickly (2 days), due water being held in the soil - AND the burlap.

    This was the next day, and the burlap is obviously damp. The plant is doing better of course. I did tear off the bottom bound-up layer of roots when I planted. I added some water from my aquarium (goldfish, 30g).

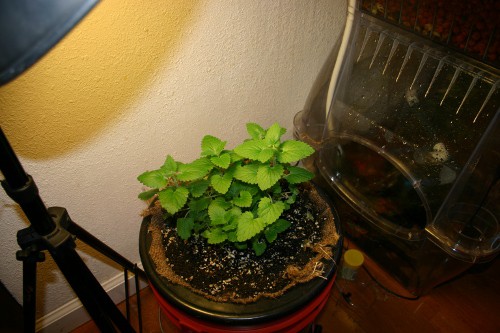
    Plus 2 days. I trimmed the burlap, to stem evaporation as the fabric never went 'dry'. Possibly could trim further, but might have dirt-into-grow-media issues then.

    Plus 3 days. Added water 'yesterday', to about the initial water level seen in first 'side/tank view' photo. Plant has been spun around a little for light (light is a single CFL).

    And here's the side/tank view (same day as previous photo), good spread, and damn it, I need to add water again! Silly plant and/or burlap.

    My other issue is the simple feeding-tube-hole. Condensation inside the bucket means food will stick in the tubing - or the side of the bucket. I'll need to use a little scoop/spoon or something perhaps.

  • May 3rd work on v2

    Em05/04/2015 at 04:30 0 comments

    Had time and motivation to do more work today.

    Installed a better/longer airlift tube, created the feeding/water-adding/water-testing um, tube.

    Tossed in some hydroton while I find some fabric to use, I'm thinking hemp would be optimal (mildew/mold resistance), in a weave typical of burlap fabric.

    I got two 'Rosy Red Minnows' from the pet store, which feels so weird to my brain, hah. BAIT SHOP! Nope, not out here, not like what my brain thinks of anyway. 0.15/each. I've mostly only run goldfish before (feeders or large pond comets), am running guppies currently in the Aqualibrium system sitting next to the 5g bucket, so figured why not, lets try minnows.

  • Restart, March 2015

    Em04/26/2015 at 22:12 0 comments

    Restarted for version 2 this month.

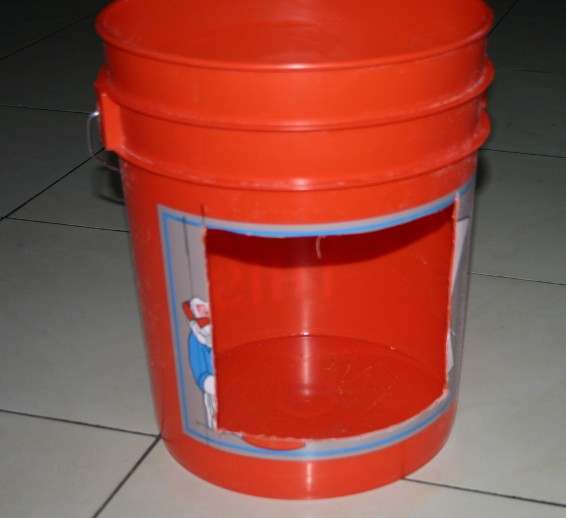
    Cut the 'window' in the 5g bucket, made it large. Marked on bucket w/sharpie, at the outer-edges of the lexan sheet held about where I wanted it. Then marked corners in from that. Used a dremel to not-quite-cut-through the plastic along the lines, and used a knife to slide along those dremel'd grooves. Smoother edges that way on the window-hole.

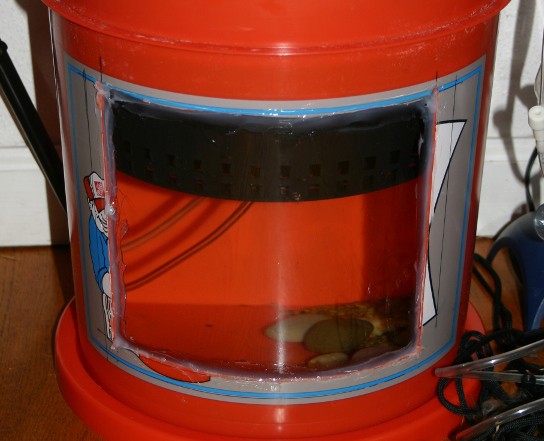
    Siliconed the window to the window-hole, on the inside. First try, leaked at a corner. Second try added more at the leak point, but didn't fix it. Third try put silicone around the entire inside edge of the lexan, fixed!

    Filled with water, let sit overnight, no leaks. Setup next to the Aqualibrium system, so its in my face to get looked at and checked on and fish fed. Hopefully I will have it running in a couple-three weeks. It'll be staring at me to finish it.

View all 6 project logs

  • 1
    Step 1

    Creating the Fish Tank / Water Reservoir.

    Decide if you're going to have a view window. Depending on the plants grown - short term herbs, sprouting or likewise, it may not be necessary. If you're going to try to do a longer-term plant (w/wo fish), like I want to do tomatoes, I heartily recommend doing a window. If no window - skip the rest of this step and just GET A BUCKET, step done! The nice black 5g buckets from hydro stores would work the same/better as what I got here.

    Creating a View Window

    I used a lexan/polycarbonate clear sheet for the window. You can find these at r/c hobby stores generally (Parma lexan sheet) and of course on amazon. I'm sure other things could work, but I'm not going to test that. I work at a store that has the lexan.

    Cut the 5g bucket using whatever method you have available, the main thing to keep in mind is that you want the inside of the bucket to be smooth, and not hurt yourself. I used a dremel, but I did not cut all the way through, as it melts and warps the plastic. I touched it lightly to the outside where I'd drawn lines, enough to get it warm and make it easy to cut through with a sturdy knife.

    Make sure you're cutting the window *smaller* than your window-material! I used the whole lexan sheet, and made the window-hole about 1" smaller on all sides than it. You could do a more tall-skinny window, it would be as effective at monitoring. I wanted to try a full size window for more fish-viewing and easier inspection.

    Silicone that window in (on the inside)! (picture below has water, netpot, etc in)

    I used GE "100% Silicone Sealant, for plastics", clear, but *not* mold/mildew resistant stuff (additives). It says its not "FDA compliant", if that would bother you get the stuff branded for aquarium use. I strung a bead of silicone all around the outside 1/2" of the sheet, and then pushed it onto the window-hole (from the inside). The bucket is curved, and sheet likes to be flat - problem!

    I filled my bucket with some cat litter (well, chicken feed) and rested it at an angle (window down) so that it'd cure and stay tightly bonded to the bucket. Since I'd only done a bead of silicone that didn't smoosh-out from under the lexan, this was fine. Otherwise the feed/litter would stick to the silicone. However, once filled partway with water, it leaked at one corner from water pressure pushing water up between the lexan and bucket.

    So after you have the window on with that initial attachment, run/smear a bead of silicone around the outside edge of the window-sheet/lexan, inside the bucket. Run/smear another bead on the outside of the bucket, along the window edge. Leaks solved. I have it resting in its lid, just in case!

  • 2
    Step 2

    Air-Pump and Air-Stone Harness (to be filled in, and have "in progress" photos of, not my finished harness already installed, heh)

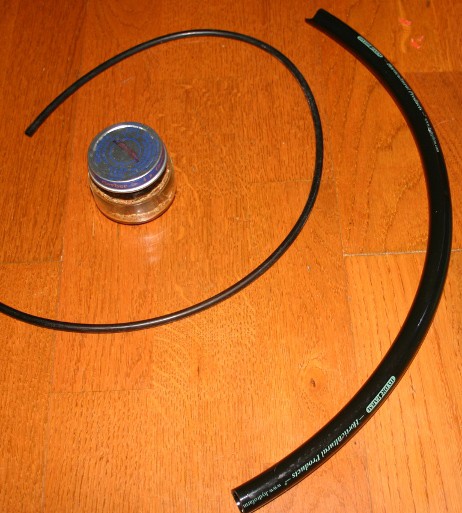
    The larger black hose for the air-lift pump (and food-tube), with a baby food jar and standard aquarium airline hose for scale.
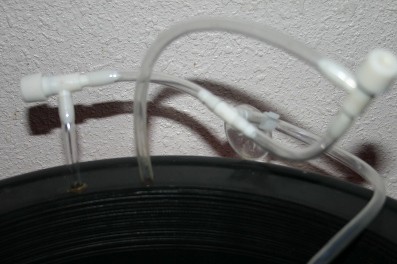
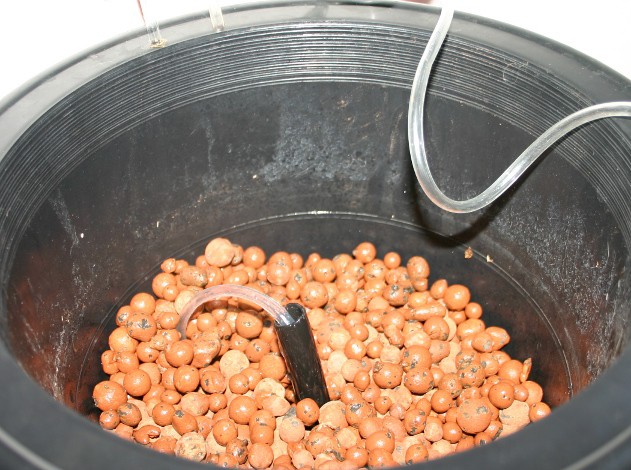
    3x valves, 1 T connector, airstone

  • 3
    Step 3

    Creating the Dual-Root Zone Growing Bed. (to be filled in)

    Acquire a netpot meant for a 5g bucket (link), or any ledge-top (nursery no. 2 worked for me) pot + the bucket's lid w/a hole cut smaller than the top diameter of the pot.

    Add water to the bucket. (I'll have a fill line, but *just* under the netpot/pot works)

    Dechlorinate the water, if it has chlorine. Well water is fine, city water not so much. San Diego has chloramines in addition to chlorine, and it doesn't "offgass" by just sitting outside, so I have to buy dechlorinating stuffs (apparently Vit C tablets work? check)

    Netpot: It is very useful to use a drill, or something that will make circular holes into plastic. I used a "body reamer" used in radio control car hobby'ing myself. You'll want to make a hole in the bottom, center, of the pot. If it already has one, you will need to check its size versus the diameter of the black tubing. It should be snug, you should have to smoosh the tubing to get it to fit, otherwise it might slide out of place.

    Cut a length of the black tubing so that it touches the bottom of the bucket, and reaches about 3-4" short of the top rim of the bucket (while threaded through the netpot).

    Create two small airline-sized holes in the 'rim' of the netpot, these don't have to be 'snug' like the larger tubing, but doesn't hurt if they are. Thread the two open ends of the airline harness though the holes.

    One airline gets an airstone, and can sit on the bottom of the bucket.

    The other airline is the 'power' for the air-lift water pump. I pulled it through a hole in the net-pot, and then threaded it down the larger black tubing. You want to push it through all the way, so that you see air bubbles coming *out* of the black tubing. Then, you pull it back just a little, so that the air bubbles stop. At this point, water should start gurgling/burbling/bubbling up out of the top of the black tubing. Its doing so in this photo, but it might be hard to tell.

    Some tweaking of the amount of air going to each thing (airstone and air-pump) with the valves is required. I'll post a video when I'm setting one up to ship out, of what I think works well. It also depends on what lives in the tank. Some fish will require a higher dissolved oxygen level than others. Always err on the side of more air!

    Nursery Pot:

    Basically the same thing, however the air-pump line can run "from the top" (not through the pot) and you'll set its final location after you add growing medium/soil.

    Add Growing Medium:

    Really. Nothing fancy. Add it till its just covering the air-lift tube from sight.

View all 7 instructions

Enjoy this project?

Share

Discussions

Similar Projects

Does this project spark your interest?

Become a member to follow this project and never miss any updates