-
Entry 5: Four Years In...
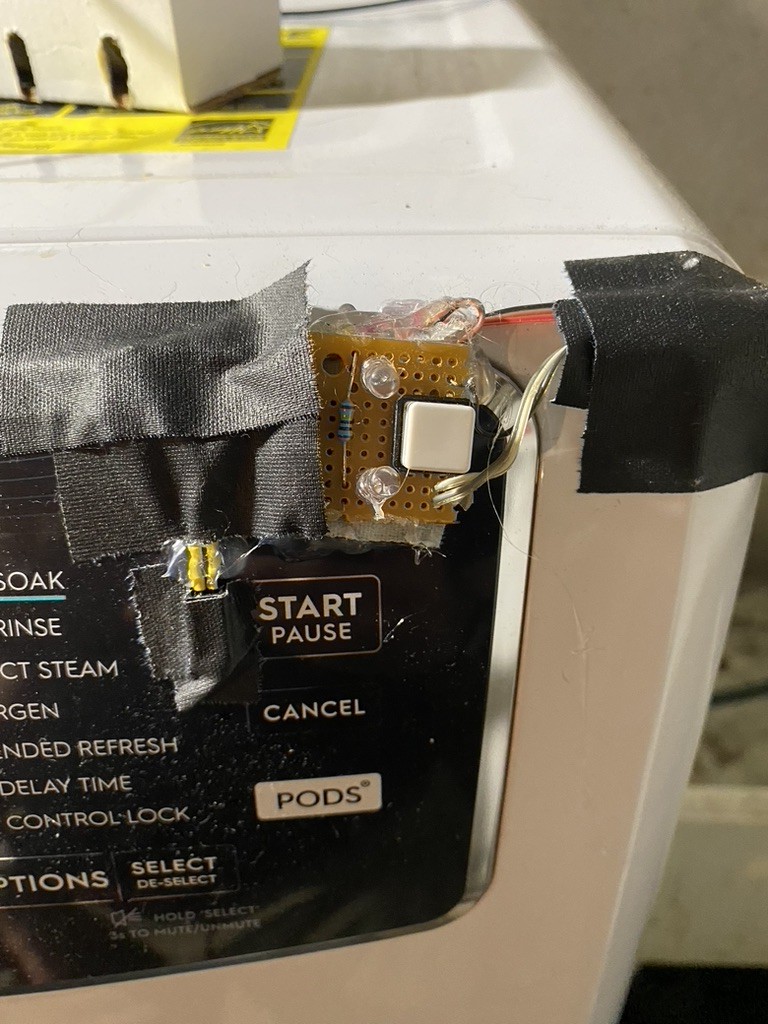
06/25/2022 at 01:04 • 0 commentsFour years after the WashIsDoneInator saw life, we replaced the washer and dryer. The new ones also don't make enough noise to alert us, and the good ol' DoneInator has been doing its thing for a few months in a new home.
![]()
But...
- It's ugly
- It doesn't take in to account the dryer, which also has the same interface, so we still run a phone timer for the last load
- It's using a custom wireless protocol, which means a custom remote
So I present you with the WashIsDoneInator v2...
![]()
![]()
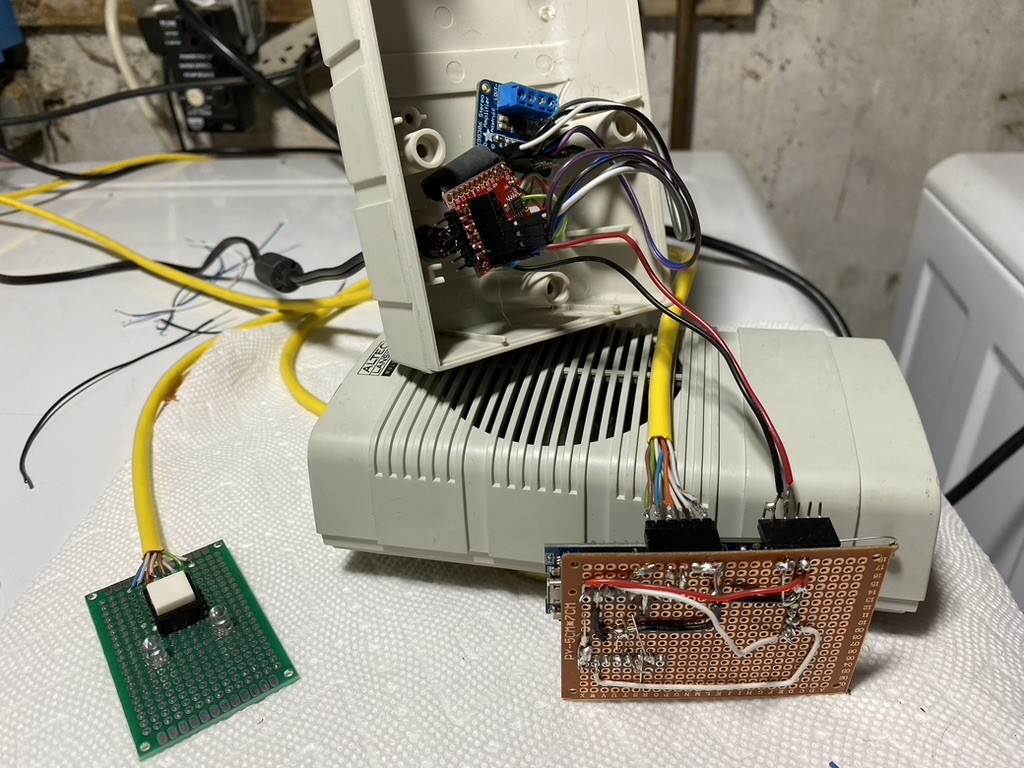
(Pictured: the original wash-is-done-inator with a separate amp, still in the speaker housing; and he new v2, on the two perfboards I'm still wiring in this photo.)
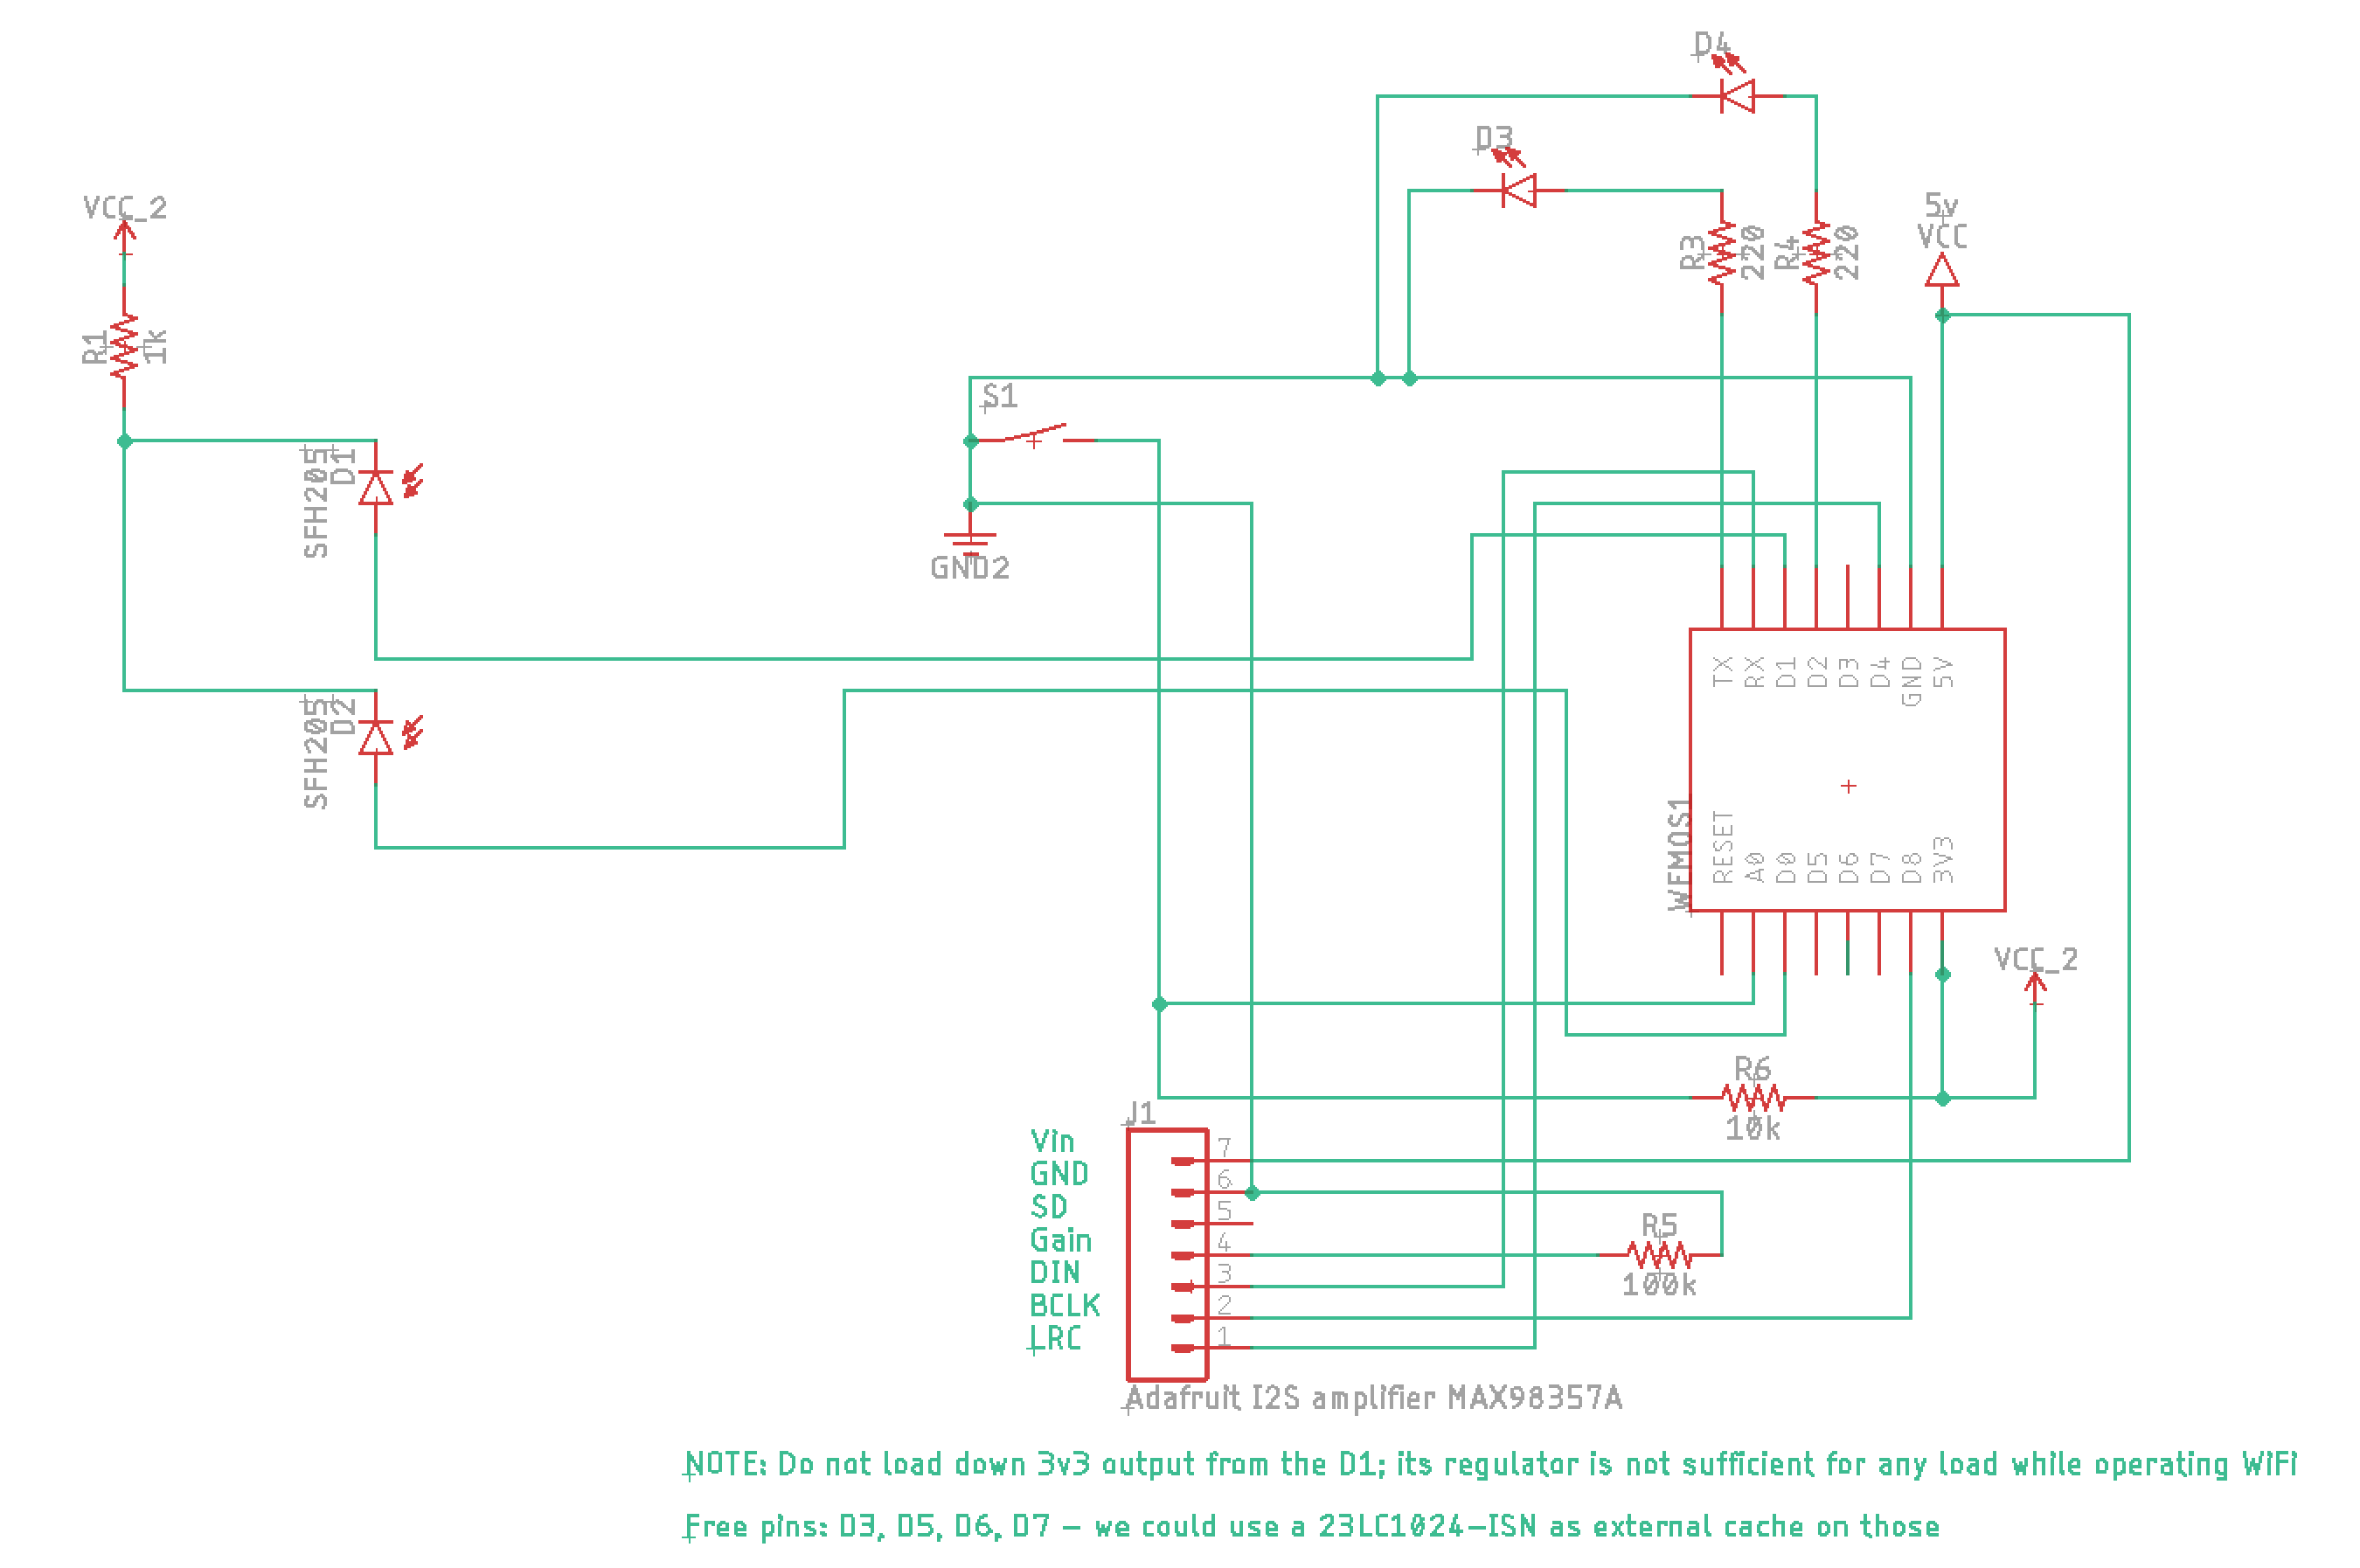
Based on the WEMOS D1, this ESP8266 variant has two sensors (one for the washer and one for the dryer). Audio uses I2S, to an Adafruit MAX98357A set to its max gain (+15dB). It's almost as loud as the first version, but it's got a great backup: HomeKit integration.
As far as HomeKit is concerned, this is a contact sensor. When the 'inator is alerting it sends HomeKit alerts that the contact sensor is open; our iPhones are configured to send us notifications on state change, so it's all good.
I'm not exactly sure how the logic is going to all come together. Right now it's ignoring the dryer sensor and just treating the washer as-was. Ideally I'd like to find a HomeKit accessory that has multiple different kinds of possible notifications but there seems to be little documentation out there; I'm still researching.
But it's got all the right moving pieces.
The audio generator I was using had to go. It was based on timers in the Arduino. Instead I'm using ESP8266Audio. My first pass played .mp3 files out of SPIFFS - but that eats up too much RAM (can't run HomeKit + audio + web server without crashing). So I fell back to WAV files. It's not as nice as the mp3 but it's functional.
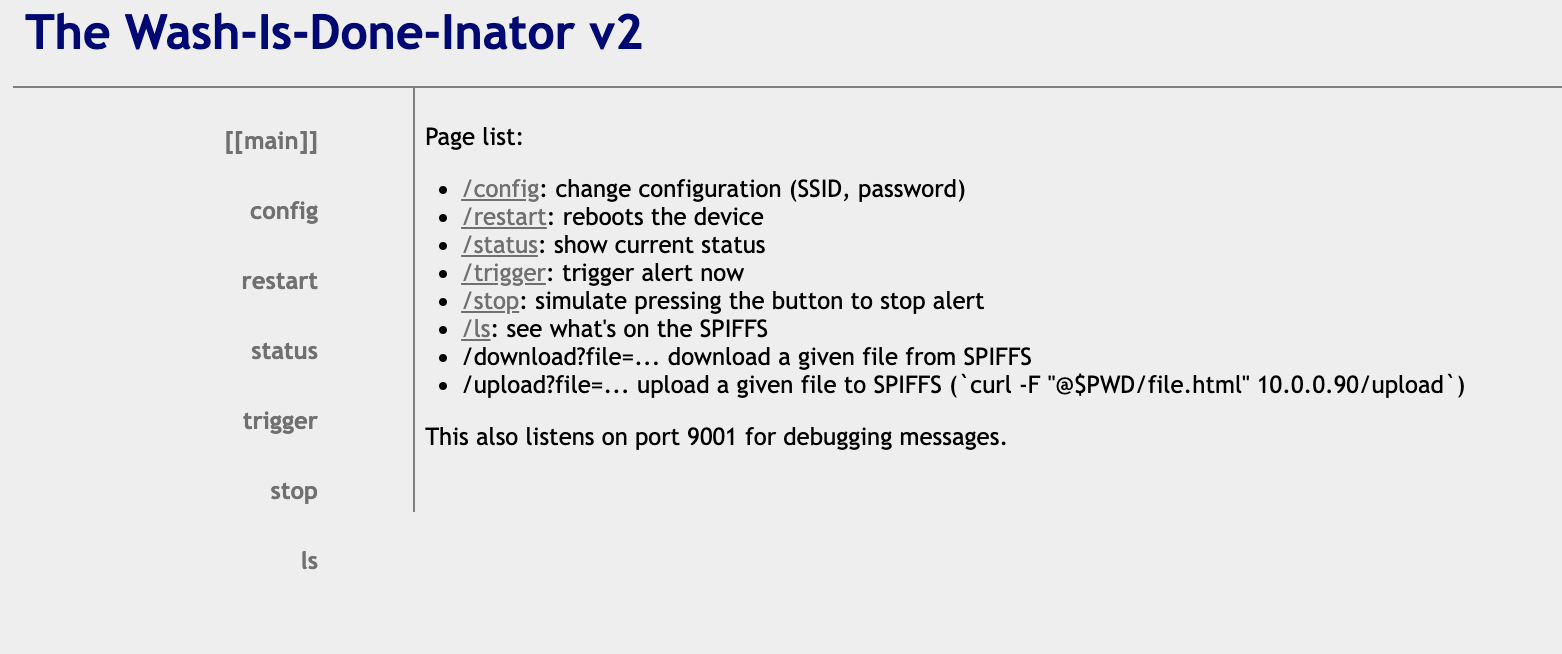
The whole thing has its own web interface. No longer do we need the single-purpose remote!
![]()
Next on my list: fabricating a PCB to replace the perfboard, maybe? It's still ugly, although there's less intrusion on the washer and dryer now that the button's stuck on the speaker instead...
-
Entry 4: It's Been Two Weeks
02/20/2018 at 00:26 • 0 commentsNo, not the Bare Naked Ladies. We've been living with the sensor for a couple weeks, and I thought I'd post a quick update.
First: here it is, tripping after a cycle...
I've gutted that old Altec Lansing speaker for parts. Long ago. The speaker used to be embedded in Dalek Bob; when Bob was retrofitted with old laptop speakers, I put the speaker back in this enclosure; waiting for the right opportunity to be hot-melt-glued to a spare Arduino Uno and wired up to a sensor for our washing machine, apparently!
Speaking of the sensor board: the two status LEDs are blinding. I plan to move them to PWM output pins so we can turn them down a smidge.
The sensor itself seems to randomly trip occasionally - rarely, but always at some ridiculous time like 2 AM. I think it's just the analog nature of the sensor; if it's floating just below the threshold of a digital "high", and some random high energy particle hits it, then maybe it trips long enough for it to register as being on? No idea; that's not my kind of physics. Or electronics, really.
So instead of fixing up the hardware, I've built a longer delay in to the alarm priming so the door has to be latched for a good 2 minutes before the alarm is primed. (It's not working, but that's just a code issue. Nothing to see here, move along.)
The next version of this will be built on a Moteino – if I can manage to jam this on to pins that don't conflict with the RFM69 radio. Then I can build a partner remote with a more high-tech LCD display and put it in our dining room; less travel time when you're in the middle of a business call and suddenly *diddle-diddle, diddle-diddle* there's the Gravity Falls theme music! Fun the first time. Not so fun thereafter...
-
Entry 3: Prototype Two is Born
02/03/2018 at 03:50 • 0 commentsThe second prototype is built. A dedicated daughterboard now houses the sensor, two LEDs, and a pushbutton; it's been hot melt glued on the face of the washer, over the "Door Locked" light.
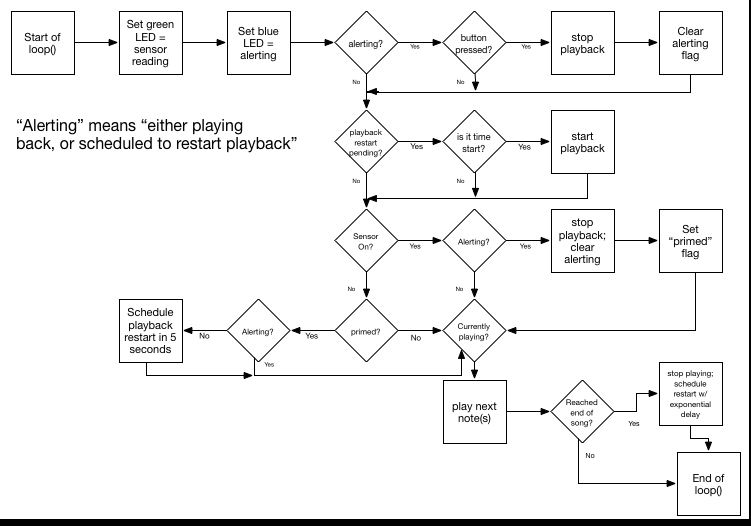
Anyhoo: One LED is green, and shows whatever the current state of the "Door Locked" LED is. The other is blue and shows if the -inator is in an "alerting" mode.
The button *could* be a self-destruct button – what kind of inator would this be without one? – but, at least for the moment, I think I'll use it as an "acknowledge alert" button to make it stop playing music.
Some fairly simplistic logic ties all of this together:
![]()
There are some more hardware changes. Since I went the "more I/O" route, I'm embracing the Uno and forgetting about going back to the ATTiny85. I'll probably use an Arduino Pro Mini (5v, 16MHz) in this; I've got a couple still lying around.
The audio is now differential output (pins 3 and 11). And I'm using the Shutdown pin on the amp to power it off when I'm not playing back; saves power and, more importantly, limits the hiss coming out of the quick-and-dirty audio output. To rights, it should have some basic filtering (a couple capacitors and resistors). I'm running filter-free at the moment and damning the consequences. We'll see how long it is before that bites me in the ass.
This build's raison d'etre? More testing: does the sensor stand up to real world use, or does it accidentally trip (positively or negatively)? What should the alert restart backoff delay be? Is a single button interface sufficient? I hope to answer all of those this weekend so I can move this toward finished.
And what, exactly, will "finished" be like?
It probably won't be pretty. This washer is over 15 years old; I don't know how much longer it will last. We've had to repair it a few times already and I'm tired of opening it up. The next failure might be the deal-breaker for me, which makes me think spending a lot of time on this probably doesn't make sense.
But it does deserve a better notification system than just blaring music in the basement, hoping someone hears it. At very least, some LED pulsing while it's getting ready to play; I'd like it to not take me by surprise. And I suppose I'd also like to turn down the intensity of the LEDs with some PWMs. They're kind of blinding at the moment.
Ideally? I want this to notify us on our phones.
I'm working on a simple SIM800L GSM module interface that should be able to text us easily enough. When Hologram announced their developer program with a free 1MB/month data transfer, I happily spent $5 for a SIM - waiting for the day that I'd want to embed lightweight cellular comms in something. And here's a fine candidate! If I can move away from SMS and get the SIM800 to use that 1MB of data, I can bootstrap off of one of my servers at a hosting company and have that machine send an SMS to our phones.
If that doesn't pan out, I've got another possibility sitting in a junk drawer: back in 2009, I picked up a WiFly GSX breakout board from SparkFun. I used it for a capture-the-flag type event once. It's a fiddly mess of a product, but would probably do fine in this particular application...
-
Entry 2: Leave Well Enough Alone... Not.
01/30/2018 at 02:09 • 0 commentsA simple buzz was a good start for notification, but it's not enough. I mean, obviously, if I'm going to have to listen to this thing going off then I don't want it to annoy the bejeebers outta me. So yeah, I can make it do a square wave PWM tone. But that's not where it's going to wind up.
Which brings us to tone(). We ditch the ATTiny for the moment, because it's easier to do this on an Uno...
#define SPEAKER 2

loop() {
  tone(SPEAKER, 440);
  delay(1000);
  noTone(SPEAKER);
  delay(1000);
}
A lovely 440Hz square wave, just as I always wanted it. And, of course, that's not enough. It goes something like this:
uint16_t notes[] = { NOTE_F5, NOTE_D5, NOTE_A4, NOTE_D5, NOTE_F5, NOTE_D5, NOTE_A4, NOTE_D5, NOTE_F5, NOTE_C5, NOTE_A4, NOTE_C5, NOTE_F5, NOTE_C5, NOTE_A4, NOTE_C5 };

uint16_t notePos = 0;

loop() {
  uint16_t currentNote = notes[notePos];
  tone(SPEAKER, currentNote);

  notePos++;
  notePos %= sizeof(notes);

  delay(200);
}
which, of course, becomes
typedef struct _note {
  uint16_t frequency;
  uint32_t duration;
} note_t;

#define EIGHTH 1
#define QUARTER 2
#define DOTTEDQUARTER 3
#define HALF 4
#define DOTTEDHALF (QUARTER*3)
#define WHOLE (QUARTER*4)

note_t treble[NUMTREBLE] = {
  // First bar
  { NOTE_F5, EIGHTH },
  { NOTE_D5, EIGHTH },
  { NOTE_A4, EIGHTH },
  { NOTE_D5, EIGHTH },
  { NOTE_F5, EIGHTH },
  { NOTE_D5, EIGHTH },
  { NOTE_A4, EIGHTH },
  { NOTE_D5, EIGHTH },

  // Second bar
  { NOTE_F5, EIGHTH },
  { NOTE_C5, EIGHTH },
  { NOTE_A4, EIGHTH },
  { NOTE_C5, EIGHTH },
  { NOTE_F5, EIGHTH },
  { NOTE_C5, EIGHTH },
  { NOTE_A4, EIGHTH },
  { NOTE_C5, EIGHTH },
};

uint32_t songClock = 0;
int8_t nextTrebleTime = 0;
uint32_t treblePos = 0;
int8_t nextTrebleTime = 0;

#define BASETIME 120

loop()
{
  if (millis() >= songClock) {
    songClock = millis() + BASETIME;
    if (--nextTrebleTime <= 0) {
      tone(SPEAKER, treble[treblePos].frequency);
      nextTrebleTime = treble[treblePos].duration;
      treblePos++;
      treblePos %= sizeof(treble);
    }
  }
}
And it's at this point that one realizes that, although it's fairly easy to transcribe the Gravity Falls melody, that's not what I want.
What I want is a polyphonic sound engine playing, at minimum, a melody and harmony.
So quickly, we switch to the old and obsolete Tone third-party driver -- which lets me add a second voice on a second pin, throw a couple resistors in, and drive one speaker with the combined waveforms from both. And just as quickly, it becomes clear that's also not sufficient. No, I want the real deal. If you take a gander at https://github.com/dzlonline/the_synth , you'll find a polyphonic waveform generator for Arduino. Nice. So now the code suddenly blossoms in to
setup()
{ // ...
  edgar.begin(DIFF);
  edgar.setupVoice(0,SINE,60,ENVELOPE0,80,64);
  edgar.setupVoice(1,SINE,62,ENVELOPE0,100,64);
  edgar.setupVoice(3,NOISE,60,ENVELOPE2,60,64);
  // ...
}


void toneMaint()
{
  if (millis() >= songClock) {
    songClock = millis() + BASETIME; // time for the next eighth note to strike
    songTick++;

    if (--nextBassTime <= 0) {
      if (bass[bassPos].frequency != REST) {
        edgar.mTrigger(0, bass[bassPos].frequency + 22);
      }
      nextBassTime = bass[bassPos].duration;
      bassPos++;
      bassPos %= NUMBASS;
    }

    if (--nextTrebleTime <= 0) {
      if (treble[treblePos].frequency != REST) {
        edgar.mTrigger(1, treble[treblePos].frequency + 22);
      }
      nextTrebleTime = treble[treblePos].duration;
      treblePos++;
      treblePos %= NUMTREBLE;
    }

  }
}
The Synth has four voices; this sets up 0 and 1 as short and long duration (0 used for the bass line, and 1 for the treble). Voice 3 is a nice bass-y snare, which I'm starting to code up now; and I hope to configure voice 2 as a kick drum just as soon as I figure out how to make a square wave sound kick-y using this synth driver.
None of this, of course, has anything to really do with alerting us about laundry. It's all a temporary distraction, because the real notification system is still in the mail! Maybe this weekend...
-
Entry 1: the One-Day Hack
01/29/2018 at 01:40 • 0 commentsEvery weekend works pretty much the same way. No matter whether it's me or my wife doing the laundry, it goes something like...
1. Put laundry in washing machine
2. Put detergent in laundry machine
3. Start washing machine
4. Yell at Siri until the alarm is set correctly
5. ... forget about the alarm, because it didn't get set properly, and then remember the laundry's done like four hours later.
Wouldn't it be nice if this 20-year-old washing machine could, y'know, IoT its way in to my life? And with all the time we'd save, I'm *sure* we'd finally be able to take over the tri-state area!
This build has been on my back burner for ages. Sure, I could wire in to the control circuit board to grab the seven-segment display outputs (both of them) and figure out how many minutes are left. But that seems ... inelegant. And if I'd put something over the display, it seems like that would reduce the general usefulness of the display itself. So I've left this on the back burner, waiting for my brain to come up with a better plan.
Well, that time came this weekend.
It occurred to me - while thinking about how I should be cleaning up all the crap in the basement so I can actually find things in my workshop again - that I don't actually care how much time is left. It would be nice, sure. But what I really want to know is: Is It Done?
That's a much easier problem. Monitor power draw, perhaps. But there are quiet periods, so that would mean heuristics that I'd rather not touch. (Plus, not really thrilled with tapping the power mains - or splitting the wires so I can monitor flux, for that matter.) OCR, maybe, with a camera? Too much trouble, and too fiddly - the camera would probably lose alignment easily.
No, today's epiphany was that all I need to do is monitor one LED.
The power LED, for example. A couple minutes after the wash cycle is complete, the whole front panel goes dark. It's on solid through the wash cycle. And I'm certainly not losing any information while blocking it - the rest of the control panel is lit up like a Christmas tree.
A quick raid of supplies, then, and maybe I can make this a one-load-of-laundry hack!
* One Adafruit Trinket. An ATTiny85, packaged with a Mini USB port and bootloader.
* One photo interruptor.
* One Adafruit MAX98306 3.7 Watt Class D amplifier.
* One crappy speaker salvaged from a noisy birthday greeting card.
* Some blue painter's tape, some wires, USB cables and USB power supply.
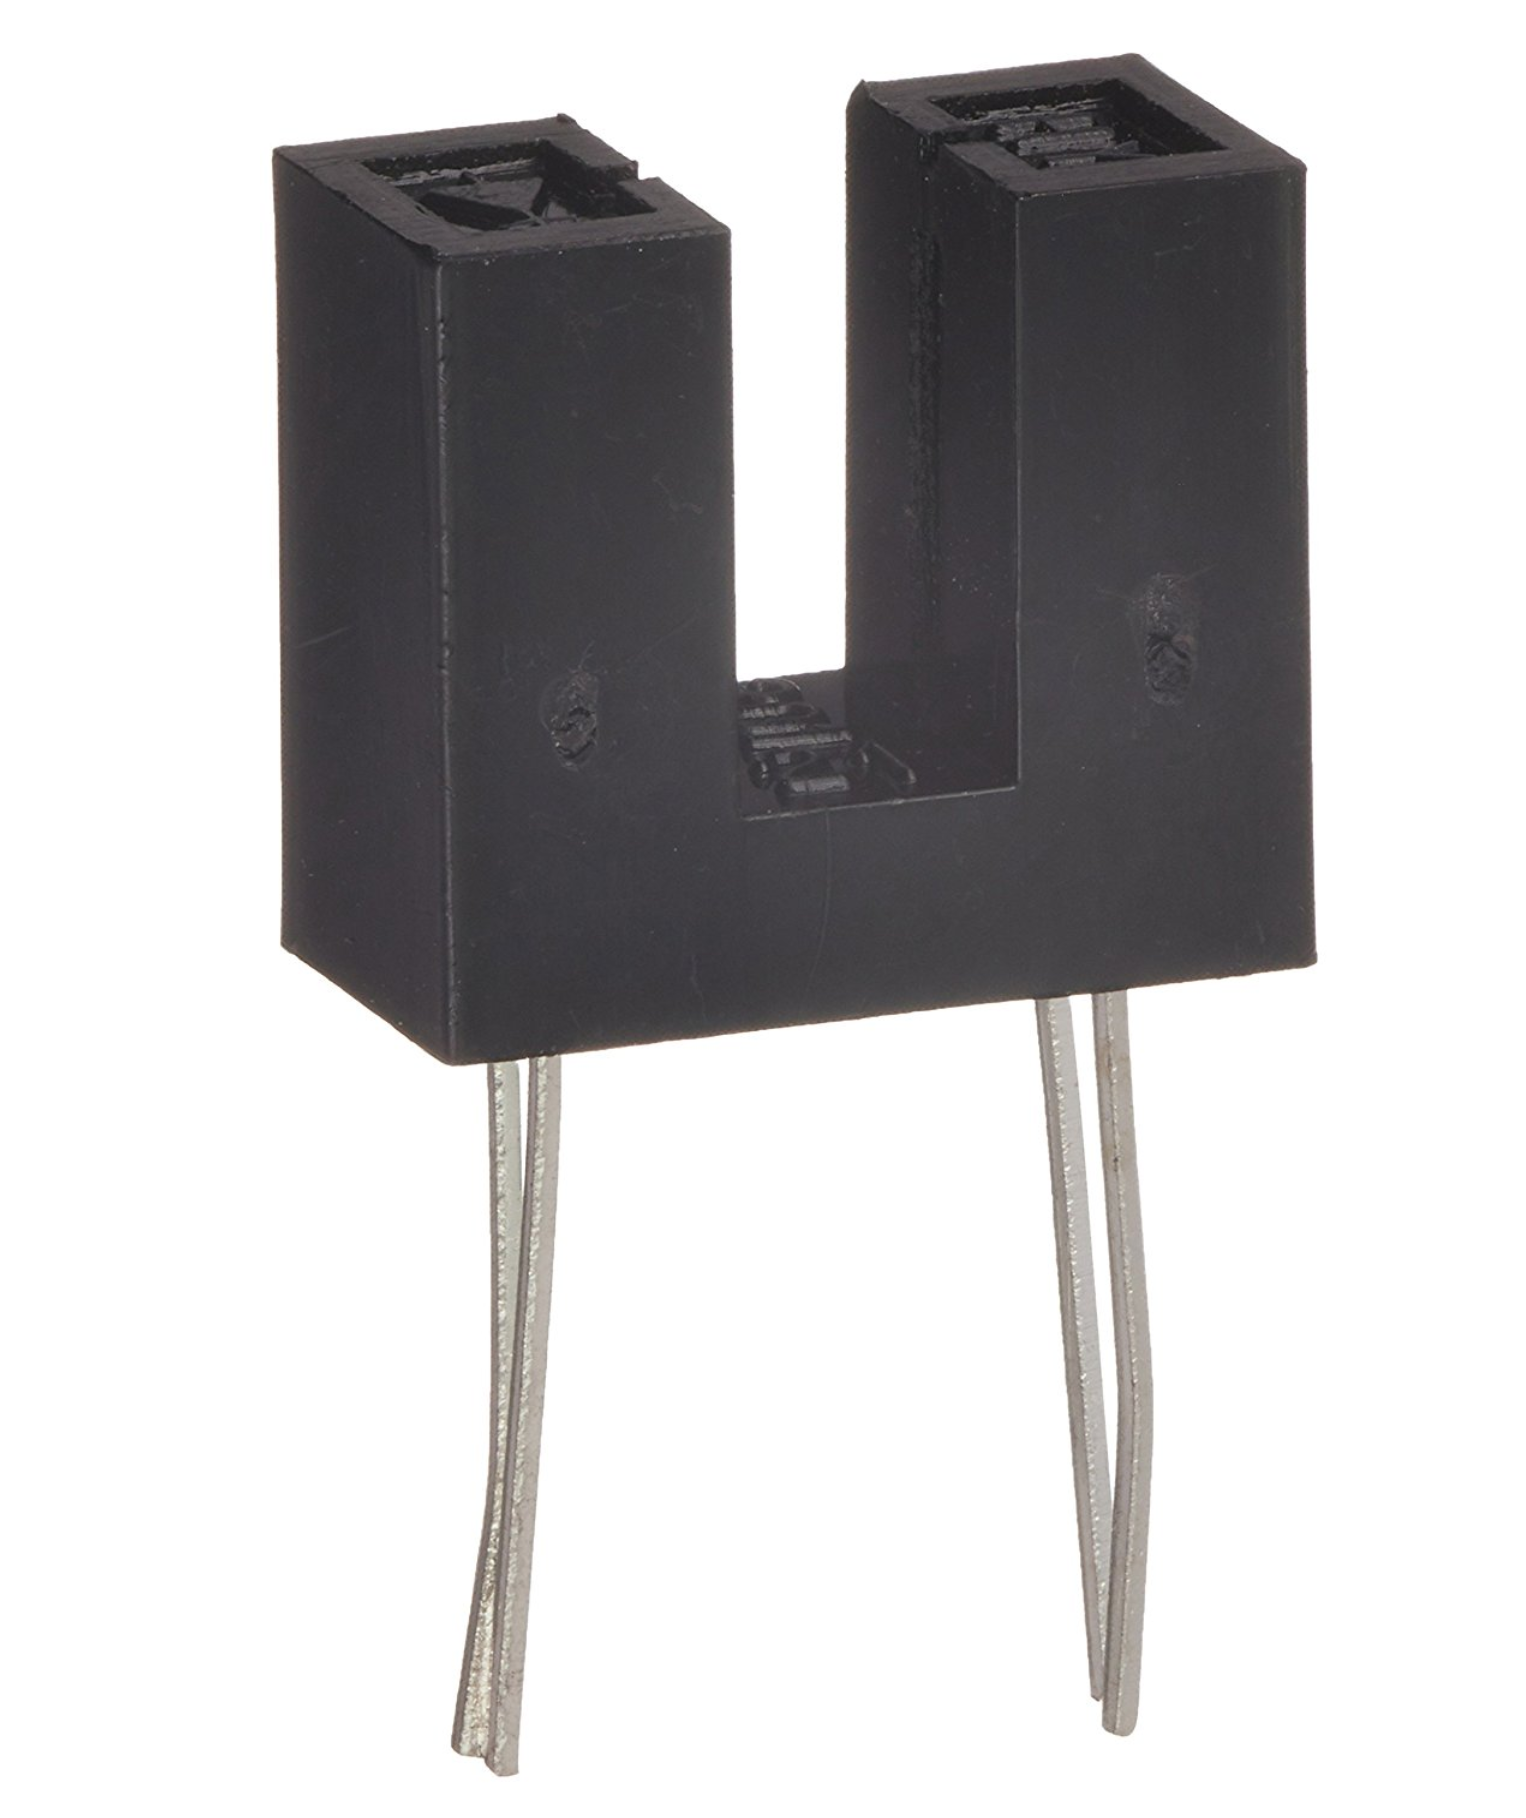
The photo interruptor was from a project a few years ago, where I needed a stop sensor. I bought 10 random photo interruptors from the first place I found them on Amazon; it was a "I need it now" kinda thing, and I wasn't picky about the particulars. I wound up with 10 HY301-21 slotted photo interruptors.
![]()
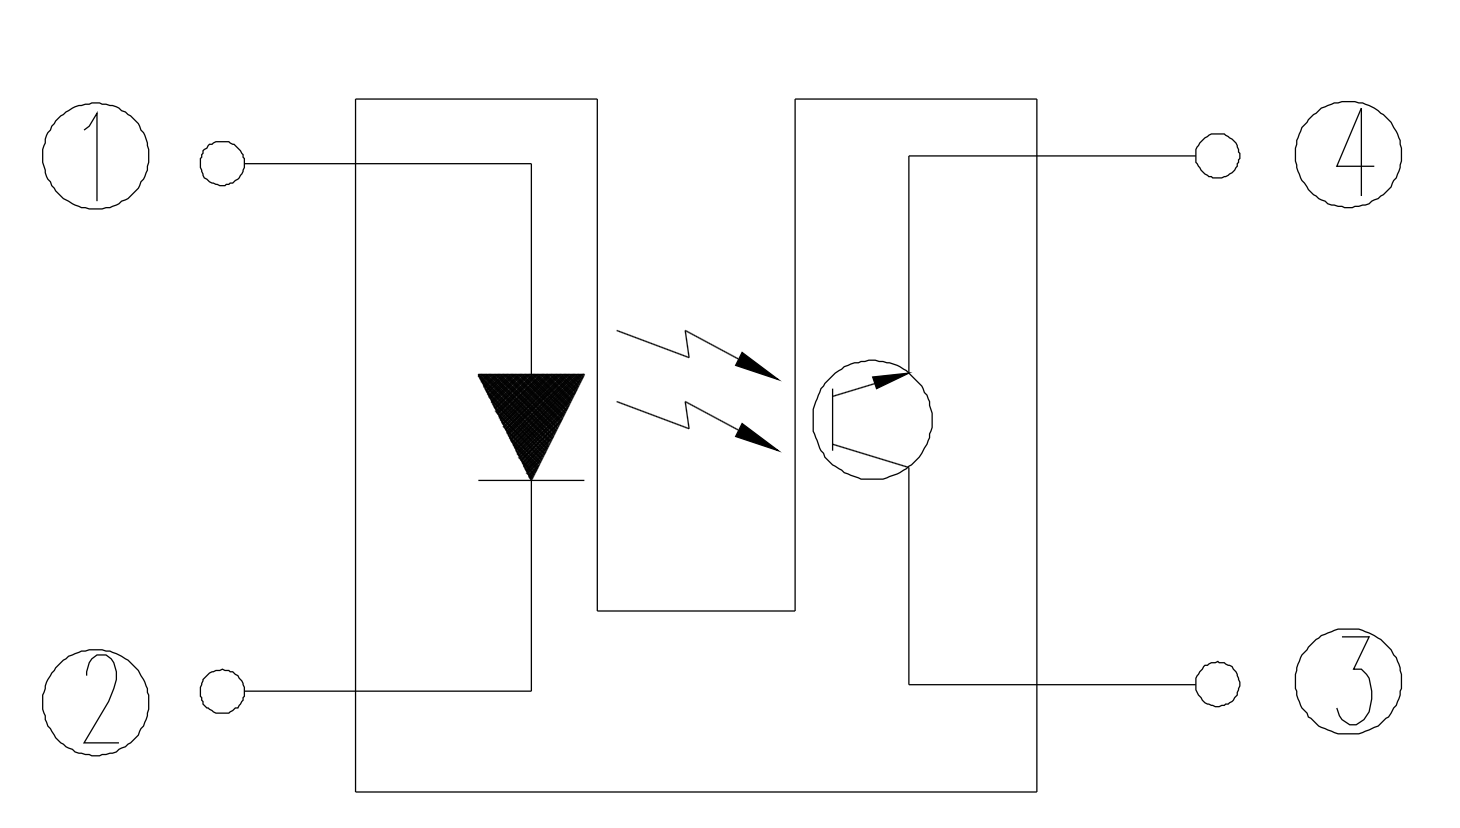
For those that don't know what these are: they're really simple. One side has an infrared LED in it; when you apply voltage, it lights up. But it's encased in black plastic - with a single slot in it, allowing the infrared light to escape toward the center channel. And on the other side of the channel is a similar slot that opens up to a phototransistor. You read the phototransistor to see whether or not you're seeing infrared light; if you're not, then you know something is physically in the channel between the LED and receiver.
![]()
The important thing for this build is that these are two completely distinct components. By cutting the plastic in half, it's possible to use just the sensor piece without the Infrared LED. And the phototransistor isn't only sensitive to infrared light. It senses lots of kinds of light (albeit not necessarily as well as infrared light).
A couple resistors later, presto - you've got a sensor that will tell you whether or not any old LED happens to be emitting light. Add some blue painter's tape to affix it to an LED on the washer's control panel and suddenly you've got a non-invasive hack that can tell you when your washer's power LED is turned off.
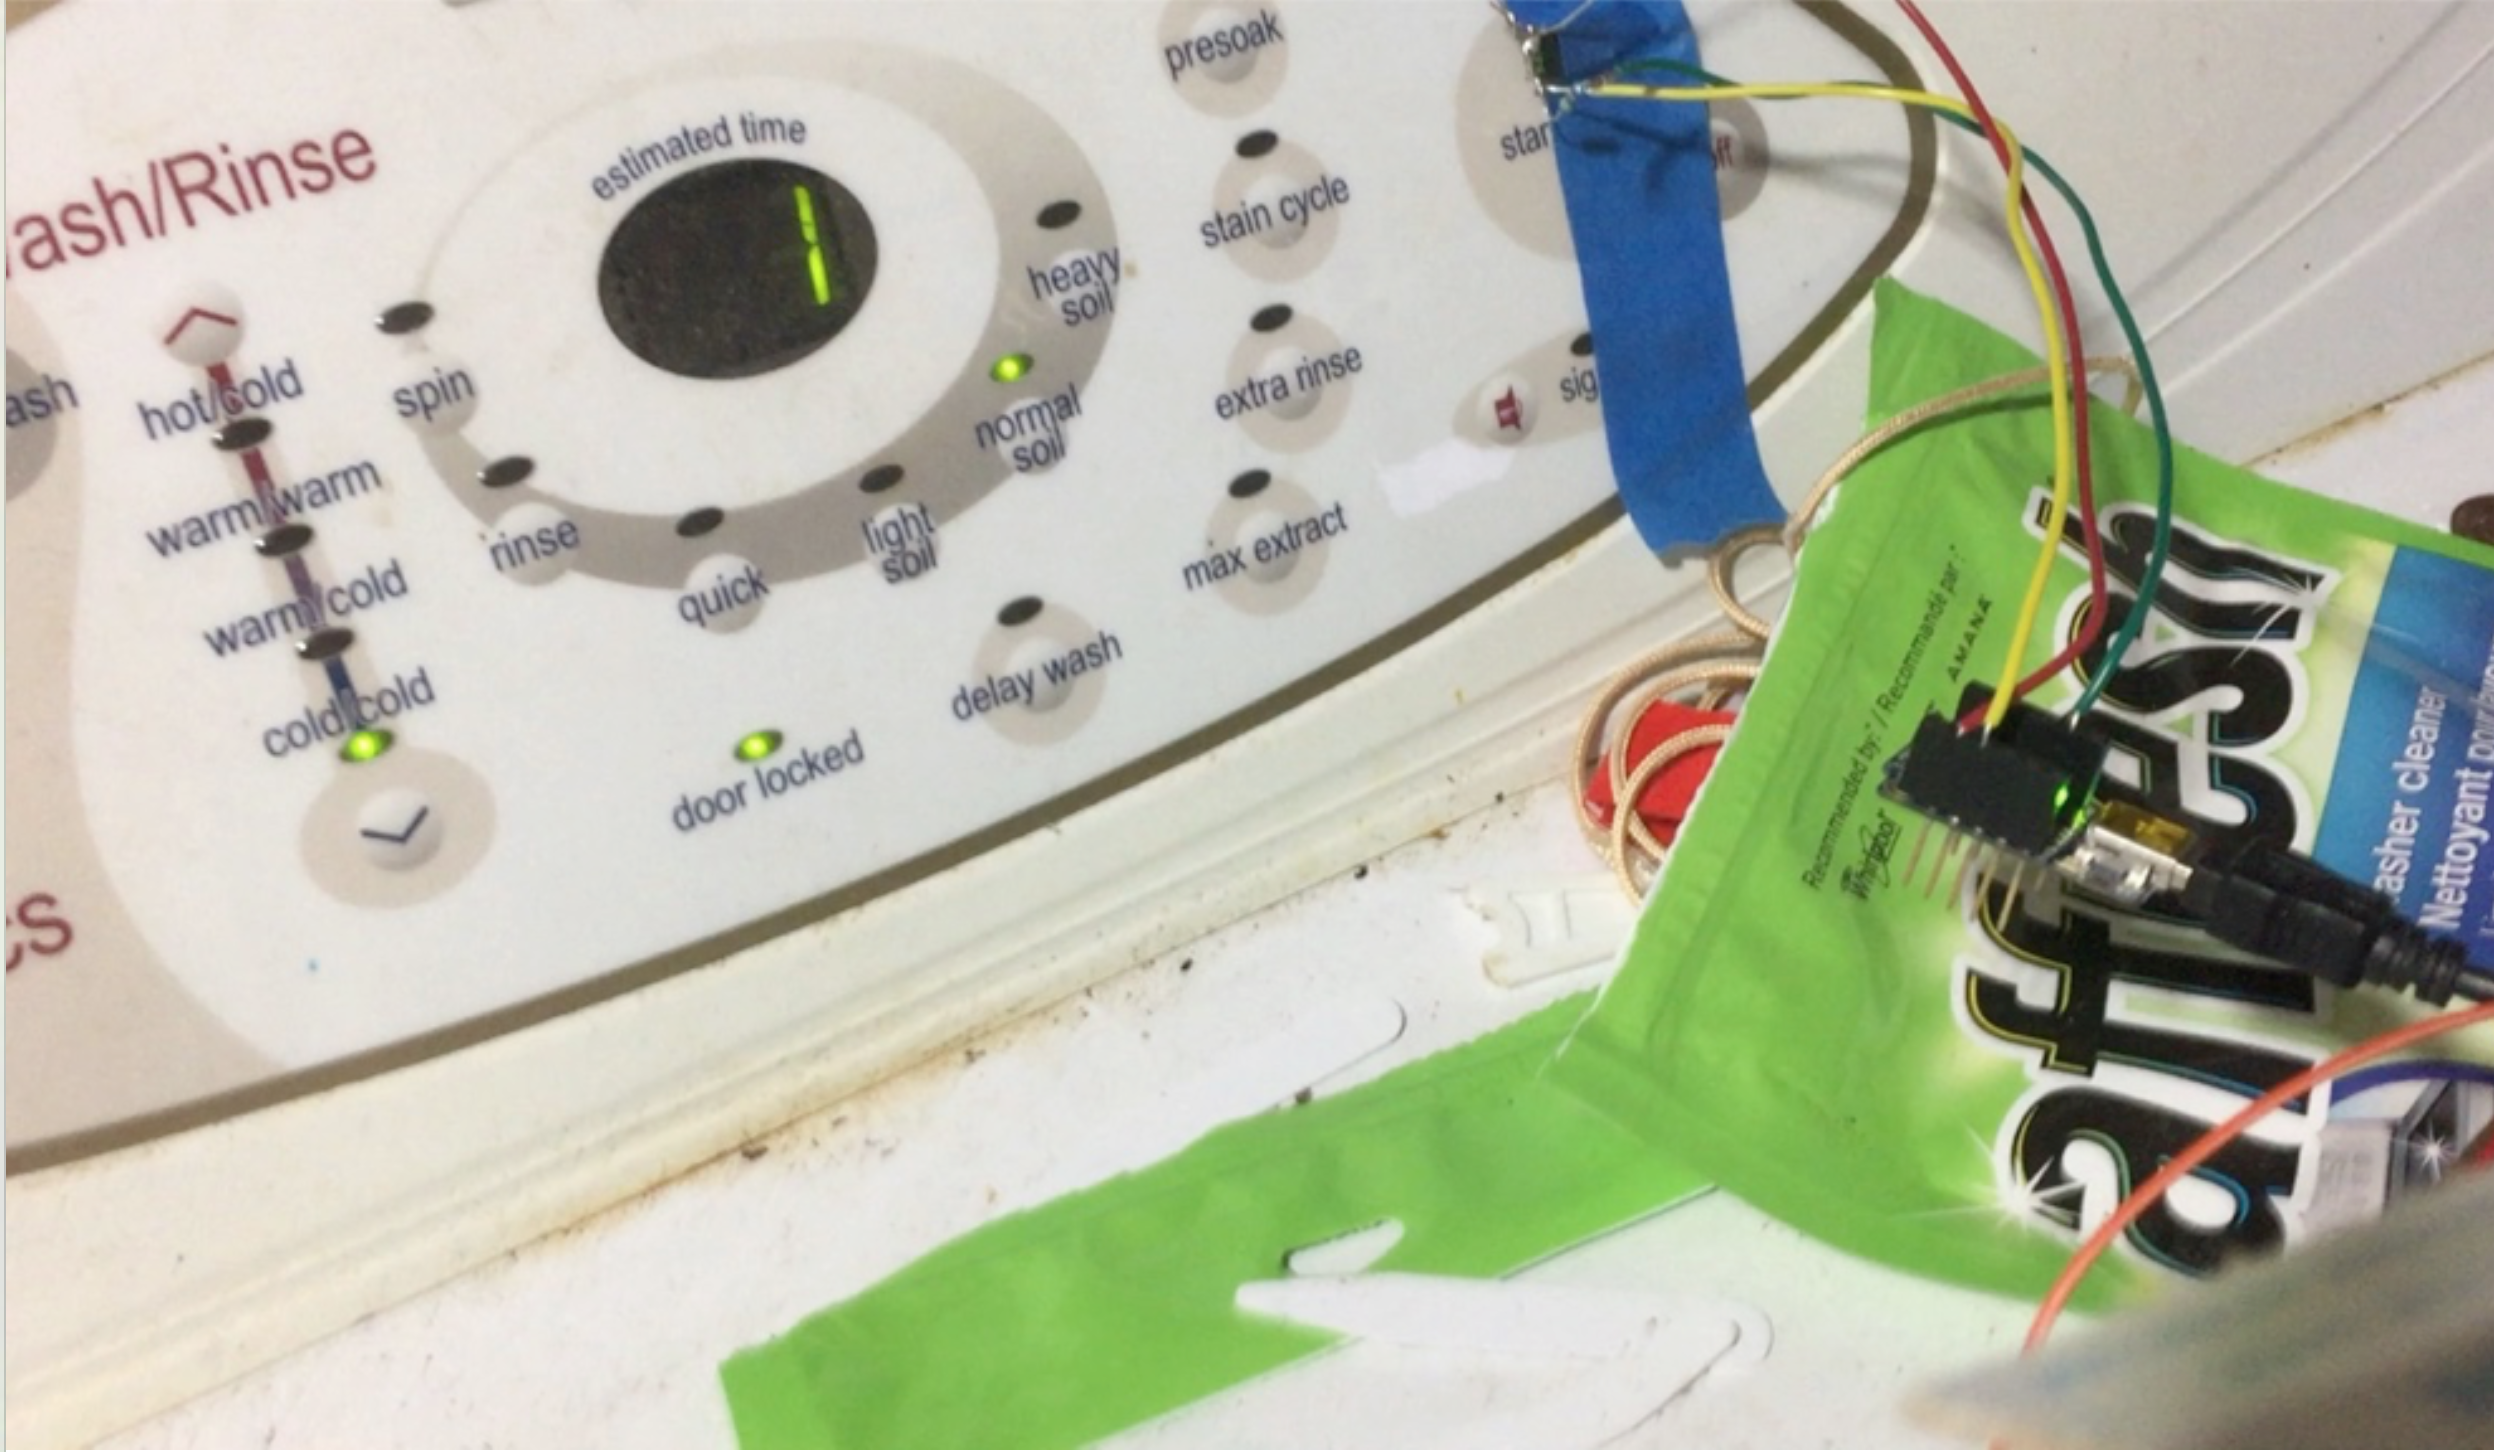
Which is what you see here:
![]()
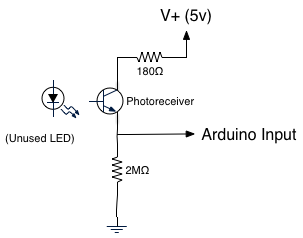
The sensor is taped over the power LED, on top of the start button; that runs down to the Trinket, which is just (at this point) turning its own LED on and off to mirror the state of the power LED. The simple but important piece of circuitry looks like this:
![]()
The code is pretty straightforward - attach this to a digital input, perhaps something like this for an Arduino Uno...
#define LED 13
#define SENSOR 2
void setup()
{
  pinMode(SENSOR, INPUT);
  pinMode(LED, OUTPUT);
}

void loop()
{
  digitalWrite(LED, digitalRead(SENSOR));
}
And from here, it's just a matter of "how fancy does this need to be?"
For a first cut, the answer is "not very fancy." I just rigged it up to make noise whenever the LED was off, as a proof of concept. And then things start to get interesting...
The Wash-Is-Done-inator
I'm tired of wasting time between when the washing machine finishes, and when I notice it's done. Time to build a gadget!
 Jorj Bauer