Close
0%
0%

DIY Low-cost AT Switches

Low-cost, homemade AT switches that, unlike Jelly Bean buttons, work by many forms rather than by contact or pressure

Public Chat
Similar projects worth following
This project presents two open-source, low-cost, homemade AT switches that don't work by physical contact or pressure like Jelly Bean buttons or other conventional AT switches. Instead, they work by proximity- and puff-based methods. An Infrared-based proximity switch detects the approximation of an object, while a piezoelectric sensor is responsible for sensing the air flow caused by a mouth puffing. These kind of devices could be useful for those who have upper limb weakness or paralysis, and therefore can't press buttons.

Despite the improvements achieved by the research community in the area of human-computer interaction, conventional interactions are still the most used ones for device control. However, these  methods usually force the use of hands, which becomes a barrier for those who have some problem in performing upper-limb motor movements — including people with problems in fine motor skills, weakness of the fingers, etc., whose limitations are mainly concentrated at handling physical objects. Thus, non-conventional interactions should be explored in order to avoid people with motor disabilities to be digitally excluded. In other words, non-conventional interactions could be used as Assistive Technologies since they might be the only way for those people to autonomously interact with electronic devices.

Adaptive switches, one of the most used devices in the context of Assistive Technology, allow the physically challenged users to activate devices that are usually triggered by conventional buttons or keys, which can be a fundamental aspect at not leaving those people apart from the use of electronic devices. However, these kind of switches usually have a high commercial value and can cost more than U$ 300 USD,  such as the Pneumatic Switch, which is a price relatively high to be paid.

According to World Health Organization (WHO) on its book [WHO Global Disability Action Plan 2014-2021], approximately 1 billion people around the world have some kind of disability, and 80% of these people live in sub-developed countries, where their purchasing power is highly influenced by the fragile economies of these countries. A person living in the Brazil, for example, where the minimum wage is R$ 954 BRL (about U$ 244 USD), could hardly buy a Jelly Bean Twist that costs U$ 65 USD, since approximately 26% of that person's income would be compromised. 

Hence, this work aims to present a solution to reduce the digital exclusion experienced by people with disabilities who are often unable to use electronic devices, due to the limitation of resources that adapt them to their needs. The overall goal of the project is to build two switches with two different forms of interaction: mouth-puffing and proximity. The output of puff-based switch is the P2 Jack audio interface, while the proximity-based, wireless one is designed to be used with microcontrollers or single-board embedded computers that provide several input pins. A schematic of the operation of the proposed devices is shown below.
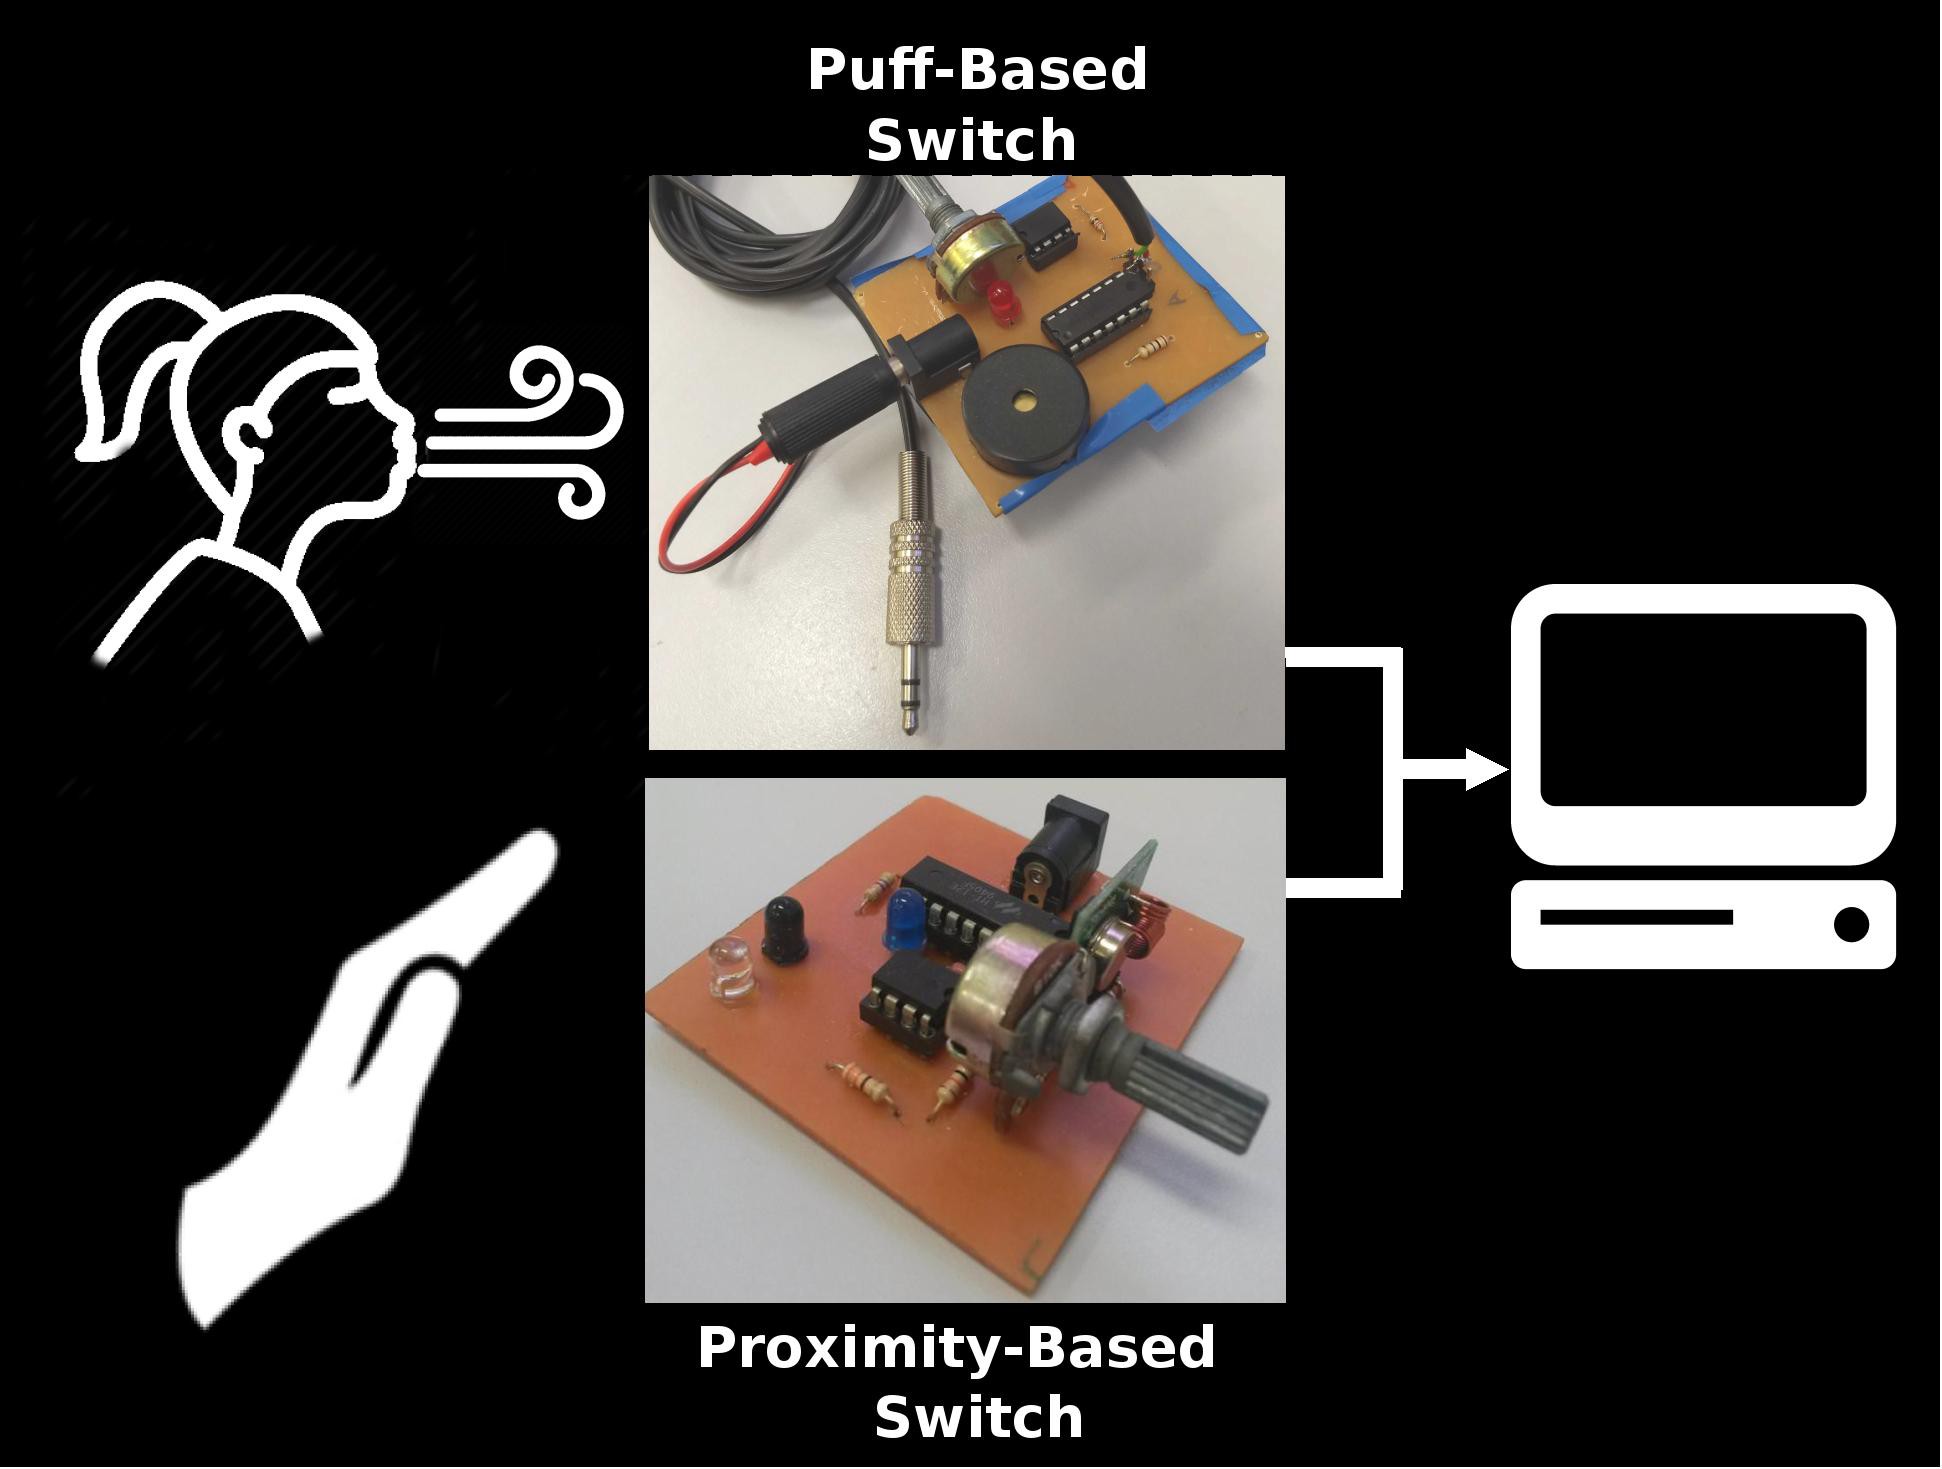
The proximity-based switch has already been successfully used on a system that controls a TV set via head gestures. The puff-based device, on the other hand, has been developed to act as the left click of the mouse. In order to the P2 Jack-based interface to be directly recognized by a computer operating system (without the need for a customized mouse with a jack input on its side), a software drive had to be developed to record audio data from the Jack input, analyse that data and convert it to click events. As far as we know, none of the switches whose output is the audio interface can control the click events of the mouse when connected directly to the computer. A demonstration of puff-based switch is shown bellow.

All tools used in this project are under license GNU General Public License v3.0.

at-prox.zip

Proximity Switch Kicad

Zip Archive - 811.33 kB - 08/22/2018 at 17:28

Download

at-puff.zip

Puff Switch Kicad

Zip Archive - 39.07 kB - 08/22/2018 at 17:28

Download

LibsKicad.zip

Required for HT12E and HT12D ICs

Zip Archive - 6.04 kB - 02/03/2018 at 05:55

Download

  • 2 × OPAMP LM358 Puff and proxomity (Transmitter module) switch
  • 2 × Potentiometer 10K Puff and proxomity (Trasmitter module) switch
  • 1 × Resistor 10K Proximity Switch (Transmitter module)
  • 1 × Resistor 750K Proximity Switch (Transmitter module)
  • 1 × HT12E 12-bit encoder Proximity Switch (Transmitter module)

View all 19 components

  • Project components and files

    Erick campos08/25/2018 at 13:10 0 comments

    The electronic components used for the development of the two AT switches were added in the components section of this project and each item is properly indicated in which switch to use. Also were added in the files section the .zip files containing the complete design of each AT switch designed in the KiCad software. All these files can also be found in Erick's Github.

  • Description of proximity switch development

    Erick campos08/22/2018 at 17:42 0 comments

    Certainly the section describing the development of the proximity switch is complete. The circuit of the transmitter module is similar to the puff swicth circuit, but in the proximity switch two infrared LEDs are used to detect an obstacle (it can be the hand, arm and even the user's foot).

  • Pics repository

    Cassio Batista08/22/2018 at 17:33 0 comments

    Swtiches' images repository moved from Imgur to Postimg.cc

    -- CB.

  • Description of puff switch development

    Erick campos08/20/2018 at 00:57 0 comments

    I forgot to mention in the last log about the development of puff switch support. The objective was to show the initial ideas of the development of this support that ended up influencing the tool developed as a final result. As it can be seen the development of this support was very artenal ( to fix the wires even hot glue was used hahaha). I had so much fun doing this support hahaha. I hope I have been able to show the reason for the construction of this tool.

  • Puff switch text finished

    Erick campos08/19/2018 at 22:32 0 comments

    All the text written here was taken from my undergraduate thesis. I tried to show the prototype circuit and how each component works. The next step is to write about the development of proximity switch and also the method used for the development of the printed circuit boards of these swithces.

  • Starting to write the details

    Erick campos08/18/2018 at 22:54 0 comments

    It took me a little while to start writing this project because I was busy with college -- I'm about to graduate in computer engineering :). The detail section is almost finished. The overview image took me a long time, since I do not have many skills to do these schemes hahaha sorry. /p>

View all 6 project logs

  • 1
    Proximity-based Switch

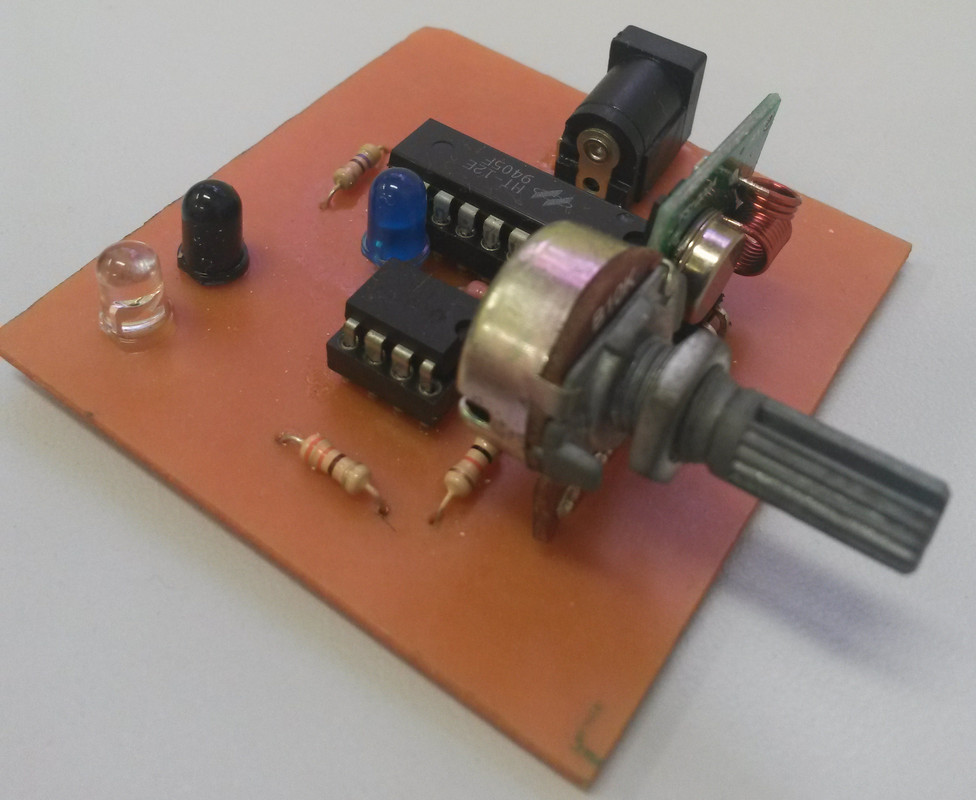
    In order to turn the remote control system on, an external switch was used. You can think of it as a button, except you don't need to press it, just hover something above it. It also works apart from the circuit triggered, which means it works as a wireless trigger. To do so, an infrared-based, proximity switch was combined to radio-frequency modules (encoders, decoders and antennas). You can think about this switch as a low-cost button that you can "press" while you're at the kitchen to turn something on at the living room. The details on construction and implementation are given below.

    Transmitter side of the switch

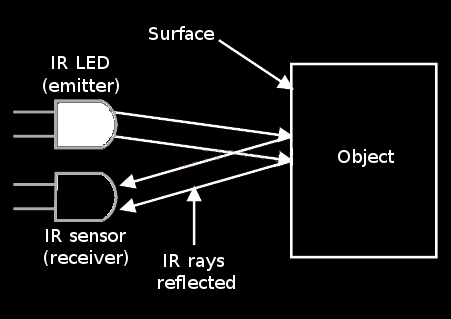
    The proximity switch is based on the principle of a simple line follower circuit. An infrared LED (IR LED) is placed beside an infrared sensor (IR sensor), as depicted on the image below, with both pointing to the same direction (up). This circuit is kept close to the user to be used as his/her "hover button". Once an object is placed over the IR components, the infrared light emitted by the LED is expected to be reflected by the object onto the IR sensor, which will "detect" the approximation of the object through the change on the voltage of its anode.

    https://s25.postimg.cc/vu1qsf39r/2_-_39_Zqh1v.png

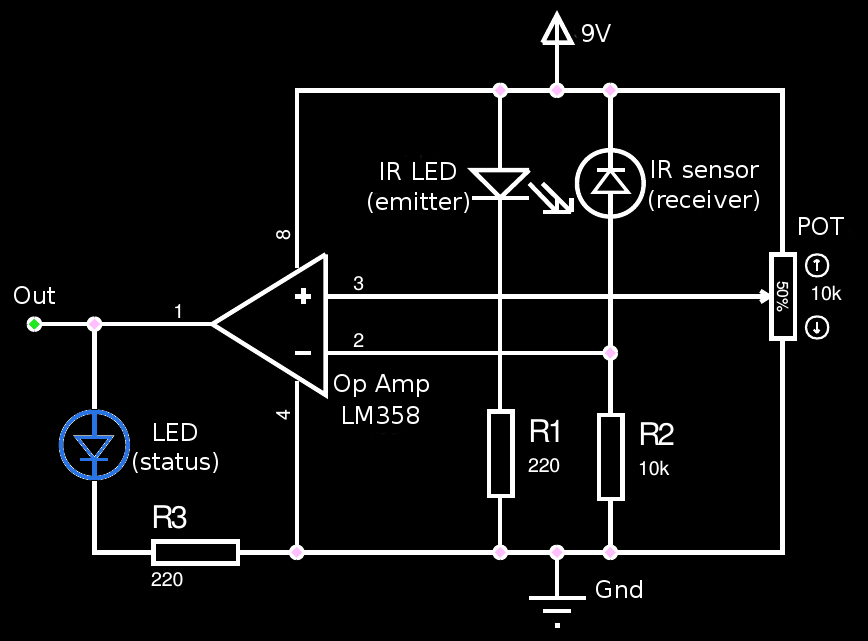
    Since that voltage change is really small, an operational amplifier is used to (guess what) amplify this signal. The Op Amp (IC LM358) is also combined to a 10 k Ohm potentiometer to be used as a voltage comparator: when the voltage on the IR sensor's anode is greater than the voltage on the potentiometer, the 5V from the battery goes to a red LED, which provides a visual feedback for the user about the approximation of the object. Plus, a resistor was placed in series with the status LED in order to divide the voltage that goes to the pin of the radio-frequency encoder module (HT12E), as can be seen on the image below.

    https://s25.postimg.cc/4jgfkifsf/3_-_i_Zwl_YDg.png

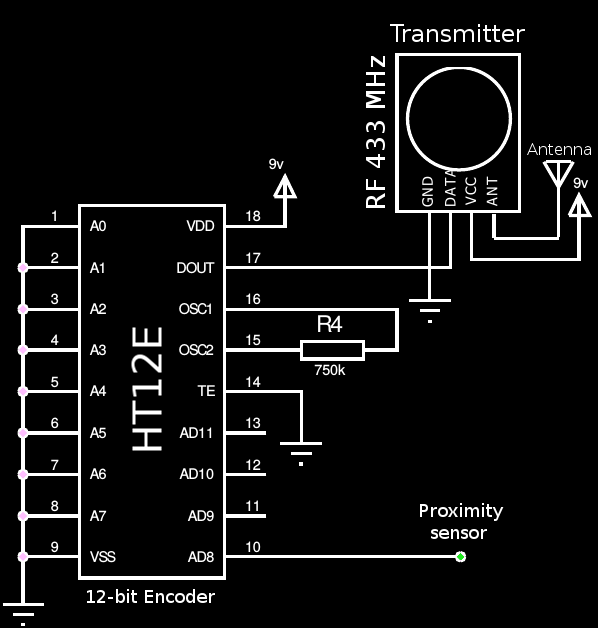
    The HT12E integrated circuit is used to transmit an encoded 12-bit parallel data via RF transmitter module at 433 MHz frequency. The same voltage used to turn the red status LED on is put on the encoder's pin number 10 (AD8, input data pin. There's also other 3 AD pins, since the IC has 4 channels). The data pin of the RF-module (transmitter antenna, Tx), on the other hand, is connected to pin 17 of HT12E (DOUT, data output pin). The DOUT pin serializes the data to the antenna if, and only if there's a high voltage on the AD8 input pin. Otherwise, no RF wireless signal is generate by the transmitter circuit.

    https://s25.postimg.cc/rxoewfpzz/4_-_vjf8_Rm_X.png

    Receiver side of the switch

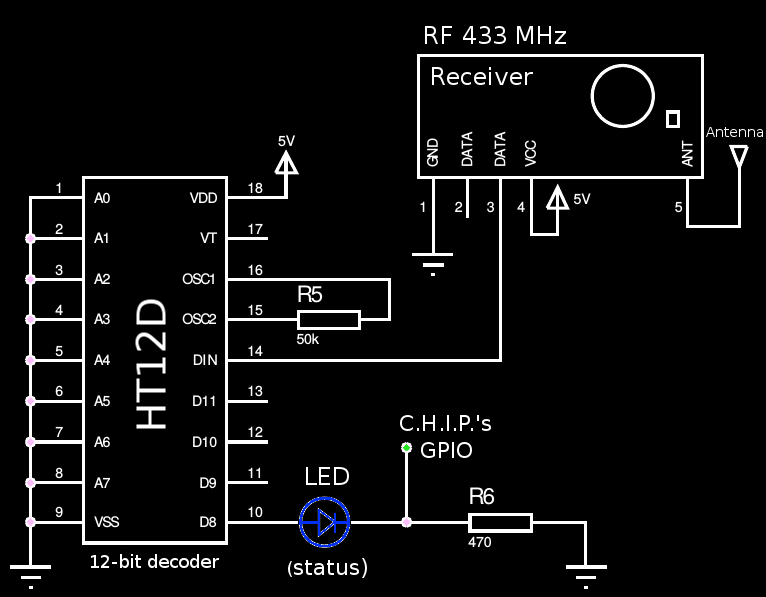
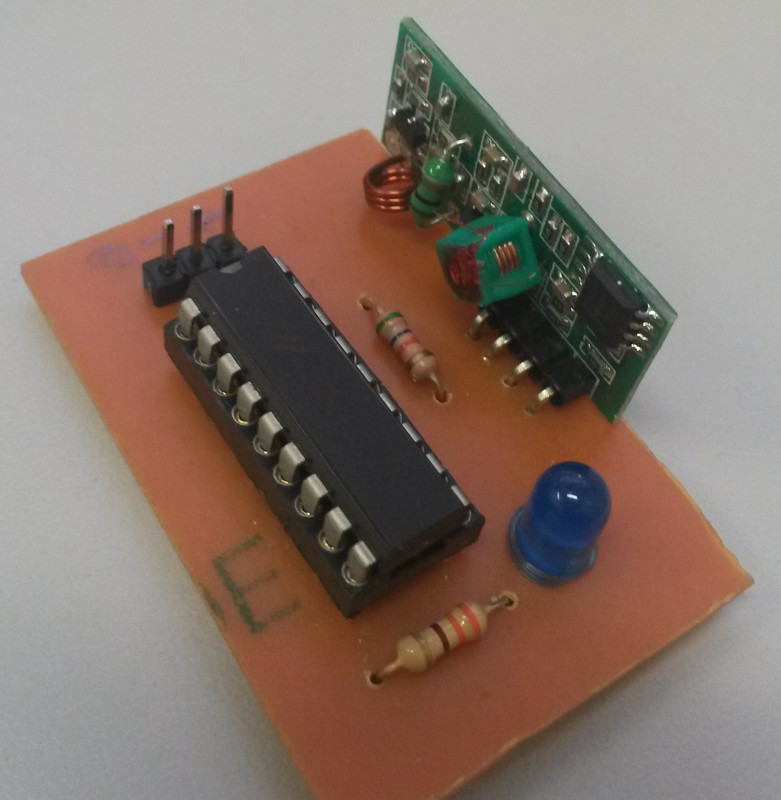
    The receiver part of the wireless switch stays close to the microcomputer in order to (guess again) receive the encoded signal from the RF-Tx modules, decode the information and turn the remote control system on. The RF-module (receiver antenna, Rx) output pin is connected to decoder's pin 14 (DIN, input pin). The HT12D integrated circuit reads the serial data captured by the RF-Rx module on its pin 14, and decodes the 12 bits trying to find a match the address. If the data is successfully decoded, the output is generated in one of its data pins. Pin 10 (D8) was used here. The schematic is shown below.

    https://s25.postimg.cc/58z7wvo1r/1_-_AHbd_SOd.png

    The HT12D's D8 output pin is connected to an input pin (GPI) of the microcomputer. Since the C.H.I.P. supports 3.3V of input voltage, a voltage divider circuit was formulated with an LED and a resistor to limit the voltage at the output of the decoder, which avoids burning the microcomputer pin.

    You can see a demonstration of the wireless, proximity AT switch on the video below:

    Designing and Building PCB

    The board was designed on Kicad. You can find all files at Github

    and also on files section.

    Trasmitter module

    Receiver module

  • 2
    Puff-Based Switch

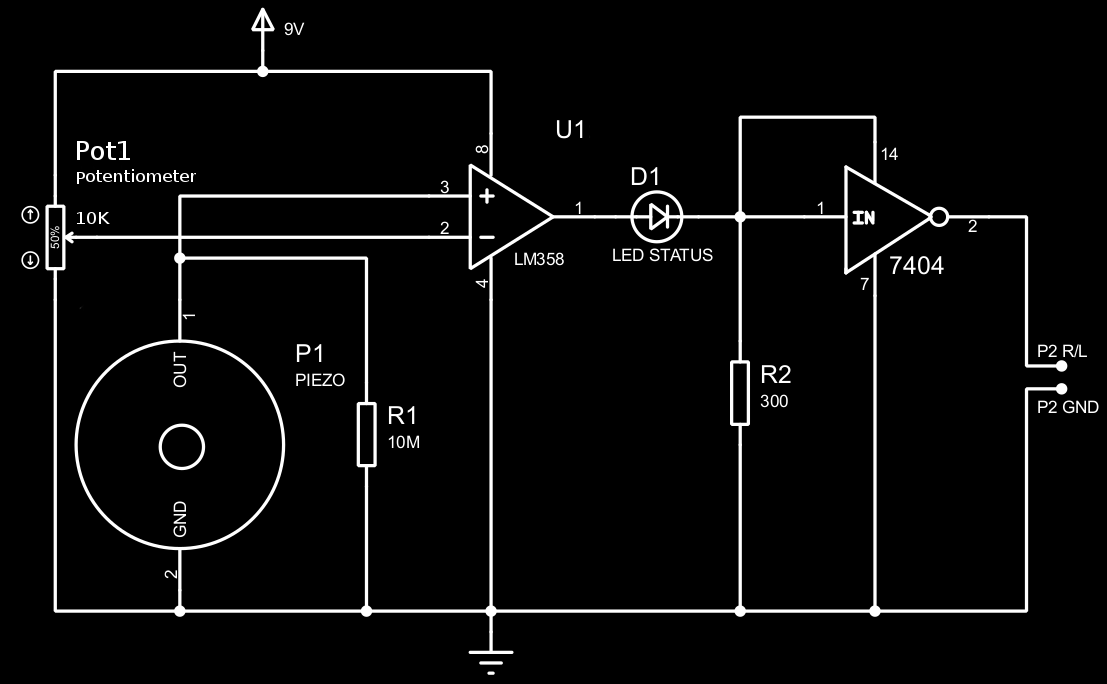
    The proposed adaptive switch (AT switch) based on mouth puffing was developed with the intention of being open-source and low cost, so that more people could eventually have access to this tool that can be used as an alternative method for the click of the mouse. The prototype circuit developed in this project is shown below.

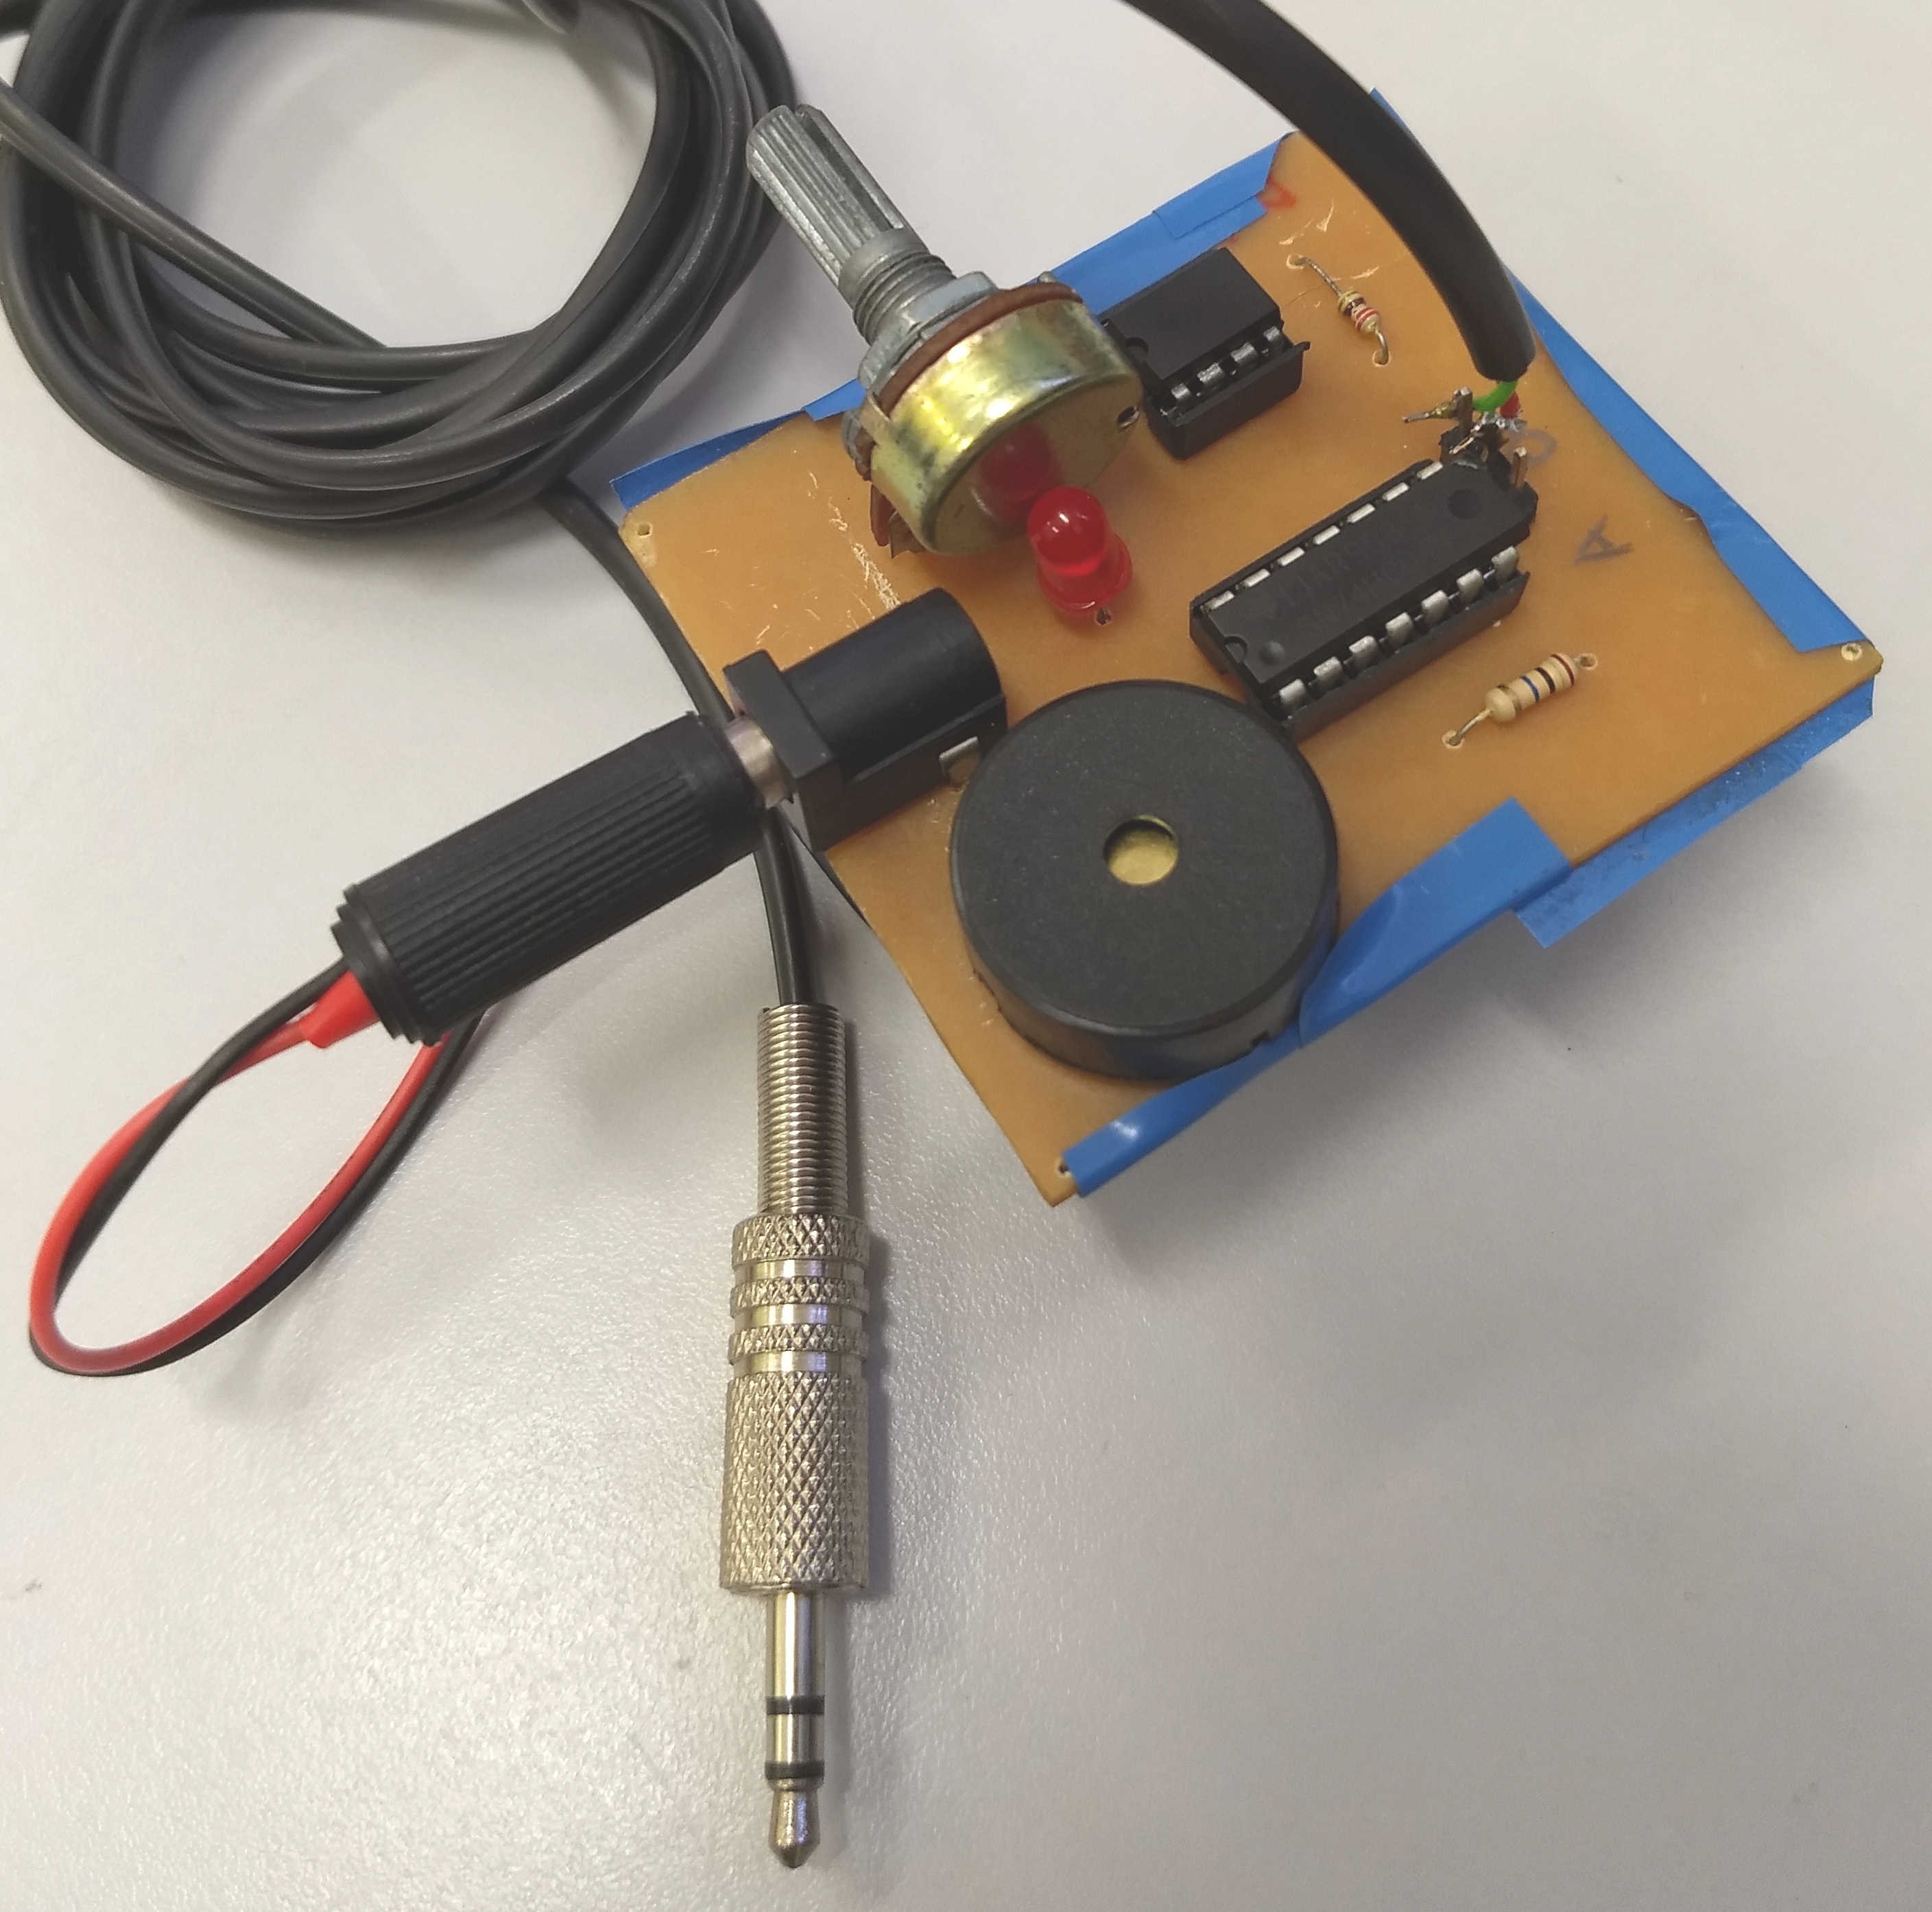
    The operating principle of the puff-based AT switch is relatively simple. The perception of the puff occurs thanks to the piezoelectric sensor encapsulated inside a round disc that is placed the top of the device, as shown in the picture below. When the user blows directly into the piezo, there is a mechanical stress that produces a difference in electrical potential at the extremities of the piezoelectric material. Using the voltage produced in the piezo, it is possible to generate a mouse click event on the computer.


    The resistor R1 placed in parallel with the piezo is is responsible for determining the sensitivity that the transducer generates electrical voltage after being subjected to some type of mechanical stress. Therefore, the higher the resistance value, the greater the sensitivity of the piezo. In the developed prototype, a 10 MΩ resistor was used, which resulted in a reasonably good sensitivity. Resistors with resistance values greater than 10 MΩ were also tested, however the sensitivity with resistances greater than 15 MΩ made the transducer very susceptible to detecting mechanical stresses with undesired intensities.

    The voltage signal generated at the ends of the piezoelectric material is analog. However, since the mouse click has a binary nature, (click enabled and click not enabled), it would not be possible to directly use this voltage produced as a form of click activation due to the large amount of noise that this signal has. Therefore, the switch output signal had to be digitized.

    The solution found to perform the task of "converting" the analog signal from the switch output to a digital signal was to use an LM358 operational amplifier. This electronic component compares two voltages that determine the output of the switch. There is a reference voltage, which can be adjusted thanks to a potentiometer of 10 kΩ, and the voltage produced by the piezo transducer. When the reference voltage is higher than the piezo voltage, the output of the amplifier is close to 0 Volts (low).

    However, when the reference voltage is lower than the piezo voltage, the output of the amplifier is close to 9 Volts (high). There is no possibility of the output of the amplifier being different from these two cases. In this way, the reading of the voltage signal produced by the mouth puffing is binary, which facilitates to implement emulation of mouse click events.

    Communication Interface with the Computer

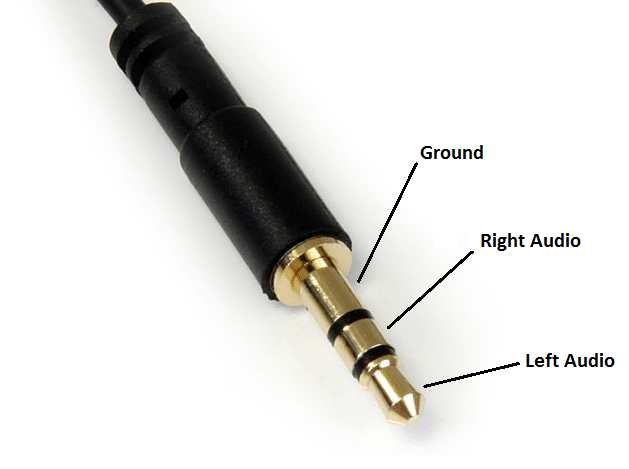
    As one of the objectives of the project is to develop an adaptive low-cost switch, communication between the developed switch and the computer is performed with the P2 Jack audio interface shown in the figure below.

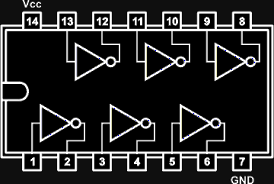
    To generate a pulse on the computer's audio Jack input interface, simply connect the GND pin with the Right and Left of the P2 Jack of the switch (short-circuit). For this reason, the use of an inverting logic gate of the SN7404 component, illustrated below this paragraph, was necessary. This logic gate captures the output signal of the LM358 only when it is high, because this very same output is also used to power the SN7404. This voltage is used as the input of SN7404 as well, which in turn inverts the input signal to a low logic level. The inverter output is connected to both P2 Jack's right and left pins, generating a pulse at the input of the computer's audio interface, which is later translated to a mouse click event.

    It is important to note that the output voltage of the OpAmp, when high, is very close to 9 Volts. This voltage is higher than the max voltage recommended (5.5 Volts) by the component manufacturer [Texas Instruments]. To reduce this voltage, a red LED in series with a 300 Ω resistor was used. When the amplifier output is high, there is a voltage drop on the cathode of the LED that is sufficient to power the inverter circuit. Therefore, in addition to being used as a voltage divider, the LED also works as a visual feedback, indicating whether the switch was activated by the user's puff.

    A video of the puff-based switch working can be seen below.

  • 3
    Puff switch support

    One of the biggest challenges found in the development of this work was to find a way that the user could perform the puffing directly at the piezo. The puff-based adaptive switches available, such as Sip and Puff Switch with Gooseneck, use solutions with PVC pipes, where the person blows through one end of tube to be able to use the switch connected to the other end. However, this kind of solution would require a direct contact of the mouth with the tube, which is not recommended due to hygienic issues.

    Some other solutions, such as Orin Instruments Sip and Puff Switch, on the other hand, use a kind of headset to hold the tubes of PVC near the user's mouth. This served as the basic idea for the construction of support developed in this work. Here, annealed wires were used to hold the puff-switch close to the user's mouth. The wires were then coupled on the sides of a headset and were curved in such a way that the ends of the wires were in front of the user's mouth. Two crocodile clip were placed at the ends of the wires in order to couple the device to the holder skeleton. The result of the developed support is shown below.

    With this structure, the switch will always stay in front of the user's mouth, regardless of the position of the person's head. In addition, the status LED is always in the user's field of vision. Therefore, the support does not compromise the visualization of the LED that informs whether the switch was activated or not by a mouth puffing. It is also important to point out that since the headset used has a size adjustment structure, the support can be used by several people, simply adjusting the desired size for each head size.

    The proposed puff-based tool was developed to work in conjunction with a software that allows the mouse cursor control through an unconventional method. Head movements captured by a camera are translated to the mouse cursor thanks to the Enable Viacam (eViacam) head tracking software. Apart from being a free, open-source software, the main reason for selecting eViacam is its configurations, which can be adapted to each user.

View all 4 instructions

Enjoy this project?

Share

Discussions

Similar Projects

Does this project spark your interest?

Become a member to follow this project and never miss any updates