Close
0%
0%

ESPLux - Smarts for your downlights

A circuit you can place inline with your existing low voltage lights to allow for wireless control

Similar projects worth following
Have you ever wished you could give some smarts to your existing low voltage lighting? I have, and I have yet to find a decent solution I can put in line with my existing light fixtures. This is where ESPLux comes in. Simply disconnect your existing low voltage light, plug the transformer into the ESPLux box, and plug the light into the ESPLux. The ESPLux will come up as a wifi access point where you can configure and control the light.

Welcome to my little project. This is the first real electronics project that I have undertaken. My main goal is to learn more about electronics and product design. Hopefully the information I have written up in my project logs is helpful to you!

The Problem

There are plenty of ‘smart’ light fixtures on the market these days, but very few options for controlling an existing light. Those that do exist are either insanely expensive, or require integration with a much larger system, such as Clipsal C-Bus, or require an electrician to install (at least in a country like mine, Australia).

I have a number of low voltage lights on the outside of my house that I am constantly forgetting to turn off, and a few other lights that only have light switches inside, which isn’t very helpful when you need to see the lock to get in the door!

In Australia, there are laws around working with mains voltage. You aren’t allowed to play around with anything behind a GPO or mains light fitting unless you are an electrician. You are, however, allowed to work with low voltages. This brings us to my solution!

The Solution

Every man and his dog is playing around with these ESP8266 boards. I thought that I would get my hands on a couple to try as well. I figured that they would be the perfect platform to build my solution on.

Most low voltage lights work between 12v and 24v from what I have seen, with the exception of a few high end LED lights I have found. I didn’t want to have to put another power supply in the roof, and there is a perfectly good power supply sitting up there, why not use it! This would mean that I need a regulator to drop this voltage down to a logic friendly 3.3v.

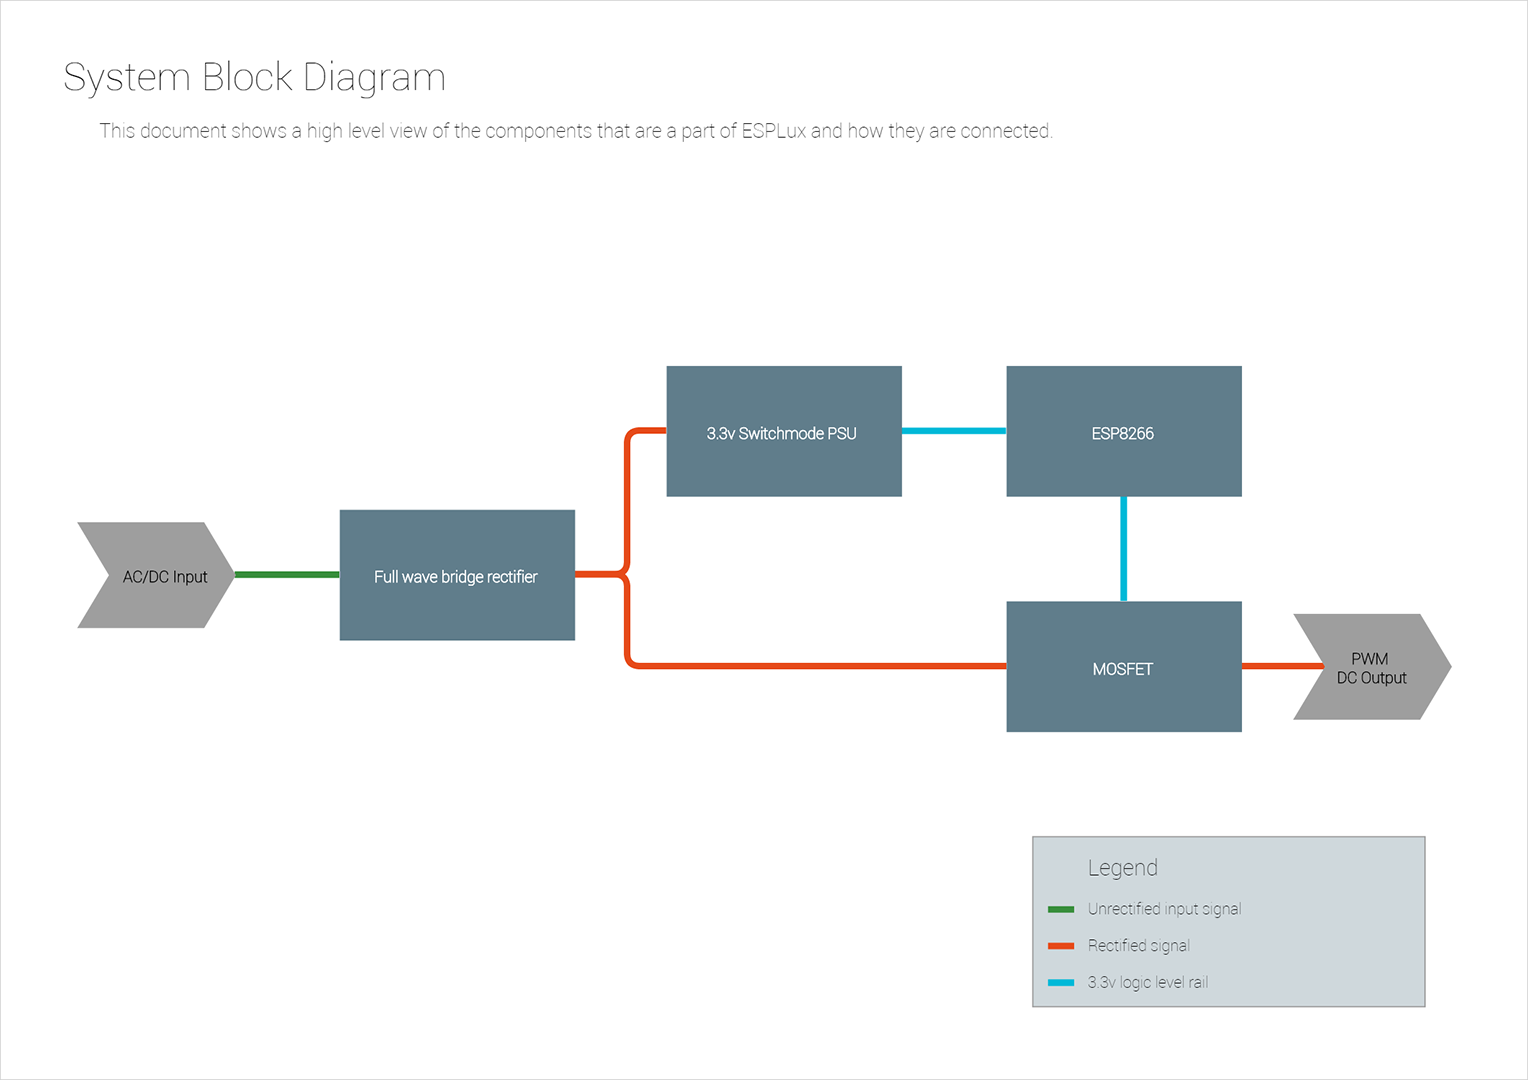
We also need a way of switching the light on and off. Initially I was looking at using a triac for switching, considering most downlight transformers are 12VAC. I then figured LEDs like DC much better than AC, so ideally I should rectify the AC input into a PWM’d DC out. This also means you can throw a DC input on with no issues. Also, I believe that using PWM to dim an LED is a better idea than chopping an AC signal with a triac. I don’t really know, let me know if I am wrong! This means I need two additional components; a full wave bridge rectifier and a MOSFET.

Alone, one of these units is pretty useless. It really needs to be integrated within a larger system. At this point in time, I am looking at using OpenHAB. It looks neat, and integrates with a bunch of other stuff I have floating around the house. This will allow me to set up geofencing, or turning the lights on and off based on other triggers.

The Requirements and Features

In the first instance, my plan is to limit the unit to about 30 watts. This copes with most LED’s that I have found, but rules out using most incandescent globes. I’m sure I can increase this in a future version, but as a first pass, I think this is quite reasonable.

I want the ability to be able to switch the light on from the light switch. This will help increase the acceptance factor for visitors and other family members, not to mention having easy access to light in case of an emergency or loss of wireless.

The unit should be powered off the transformer that already exists in the system. You don’t want to have to have an additional power supply just to have an ESPLux connected to your light. That’d just be silly.

There should be locator lights on the unit itself. I’m not sure about you, but I’m not a huge fan of crawling through roof cavities. Anything that helps get me out of there quicker is a good thing as far as I’m concerned. Using these lights to find the unit in a dark crawl space will be a beneficial thing hopefully!

Licensing

This project stands on the shoulders of giants. Without the amazing work of some of the greats in the industry, this project wouldn't exist. I have detailed all the license information for each component of ESPLux in a directory on GitHub.

The Use Cases

I’m sure I am only scraping the surface, but a few things that...

Read more »

  • 4 × 100R 0603 Resistor R2, R3, R6, R9
  • 1 × 510R 0603 Resistor R4
  • 1 × 1K 0603 Resistor R8
  • 3 × 10K 0603 Resistor R1, R5, R7
  • 1 × 220uf 25v 8mmx10mm electrolytic capacitor C2

View all 21 components

  • OpenHAB Configuration

    Matt09/21/2015 at 10:52 0 comments

    Howdy!

    I've finally gotten my little ESPLux working in OpenHAB. I have posted the files here: https://github.com/pretenda/ESPLux/tree/master/OpenHAB

    There are two different options in there, there is a simple switch that flips the light on and off, and then also a slider for dimming, take your pick as to which one you want to use.

    Hackaday are sending back two of my prototypes from the Best Product prize, so I'll hopefully have them to work with again soon.

  • Busy times

    Matt09/03/2015 at 05:44 0 comments

    Well, there goes three weeks of my life! Sorry for the lack of updates, work has consumed all of my time this past few weeks.

    First up, a big thanks to HAD for choosing me to be in the top 100 projects. I am honoured! I also sent in 3 units for the best product prize, unfortunately I didn't make the top 10. I'm a little bummed, but looking at the products that did make the cut, holy cow, they are all amazing, every one of them deserves to be there. Congratulations to you all, and best of luck for the remainder of the prize!

    I wish I had something to show you all, but I don't. I've been looking into various things, like OpenHAB and different ways of powering the logic level stuff, but yeah, nothing has really come to fruition. Hopefully this next week I have more information for you.

  • Brief Update

    Matt08/17/2015 at 13:36 0 comments

    Hi everyone,

    I'm down in Adelaide for the week for work, so time is fairly limited for me. This is just a brief update on where I am at, and what my next steps are.

    I'm currently playing around with OpenHab, checking out the best way to integrate ESPLux into it. I have a document describing the API for ESPLux on my GitHub here: https://raw.githubusercontent.com/pretenda/ESPLux/master/Documentation/API Commands.pdf. I've got my home theatre set up in OpenHa, so I'll probably set up an ESPLux box behind the TV and set up a bit of accent lighting for my home theatre as a small demo.

    I've also been playing around with how to reduce the amount of heat generated by the rectification process. There are a few things I am looking into. First up is active rectification. It uses a bunch of mosfets and a handful of jellybean parts. I really like the idea of this, but it does introduce complexity that isn't there in the current design. I like the current designs simplicity, but I need to weigh up my options here, see what route I'd like to take.

    As an addition to altering the rectification circuit, I'd like the ability to have a DC only version, which will negate the need for any rectification at all. Hopefully I can implement this on the same layout. When you are dealing with just DC, this will save a fair bit on the overall BOM, so I believe this is a worthwhile cause.

    Again, sorry for the lack of updates. Once this week is up, hopefully I can post some meaningful progress on both OpenHab and the rectification stuff.

  • 5 Minute Video

    Matt08/12/2015 at 07:52 2 comments

    Howdy!

    It is finally here! I have finished my 5 minute video. It is a bit of an overview of where I am at and what the project is all about.

  • System Design Diagram

    Matt08/12/2015 at 01:17 0 comments

    Hi everyone, sorry for the lack of updates this past week and a bit. I've been recording and editing my 5 minute video. Hopefully I should have this posted this evening. I have drawn up a quick system design diagram for ESPLux. It shows a very high level of each of the components and how they are connected to each other. It is a pretty simple little circuit, so there isn't a great deal to show here. It does however do the job quite nicely! Click on the image to see it full size.

    I drew this on draw.io. Pretty neat little site!

  • Best Product Entry

    Matt07/31/2015 at 00:19 0 comments

    Howdy,

    As I've mentioned before, I hoped to get my ESPLux into the Best Product category. I'm cutting it very fine, especially for shipping from Australia, but hopefully I have made it. I know my little ESPLux isn't much, but I've given it my all, and thrown my hat in the ring.

    I've programmed, tested and packaged all three ESPLux boards, packaged a bunch of ancillary stuff together (PSUs, cables, etc), and written documentation on how to use it all. I just dropped it off at the post office to take the journey to the other side of the world.

    For everyone else who has gone into the Best Product category, best of luck! There are some amazing projects out there,. If last year is anything to go by, there will be an amazing set of winners this year. Good luck little ESPLux.

  • HAD Article, Improvements

    Matt07/27/2015 at 07:56 7 comments

    Wow thanks everyone! I wasn't expecting an article posted about my little project.

    Thanks to @arcol and @bogdan for their input, I'm keen to include your suggestions into my project.

    @arcol suggested that I should use different colours for the input and output terminals, which is a great idea, I didn't realise there were different colours in the same type. He also suggested using spring terminals and having two different locations to be able to wire the DC out into, both which I'll be looking into in the near future.

    @bogdan noted, rightly, that the rectifier will get warm pretty quickly, which is correct. He suggested using active rectification to reduce the amount of heat produced in the process of getting a DC signal out. I hadn't heard about this before, so I was intrigued. It looks like you can use a couple of MOSFETs to perform the same role. Two downsides that I can see for this are, first, added complexity. This shouldn't be a problem, just something I need to wrap my head around! The second is the Vgss value on whatever MOSFET I choose, I need to make sure that it is capable of handling the voltages that I would like the ESPLux to handle. Alternatively I should be able to throw a zener diode in to drop the voltage to an acceptable level. I am super keen to have a shot at getting this working, it'll increase the number of lights that you can run on one unit.

    Thanks again for everyone who has followed me in the past 24 hours, I'm chuffed at the amount of people who are interested in it!

  • Cases!

    Matt07/24/2015 at 07:24 2 comments

    Howdy!

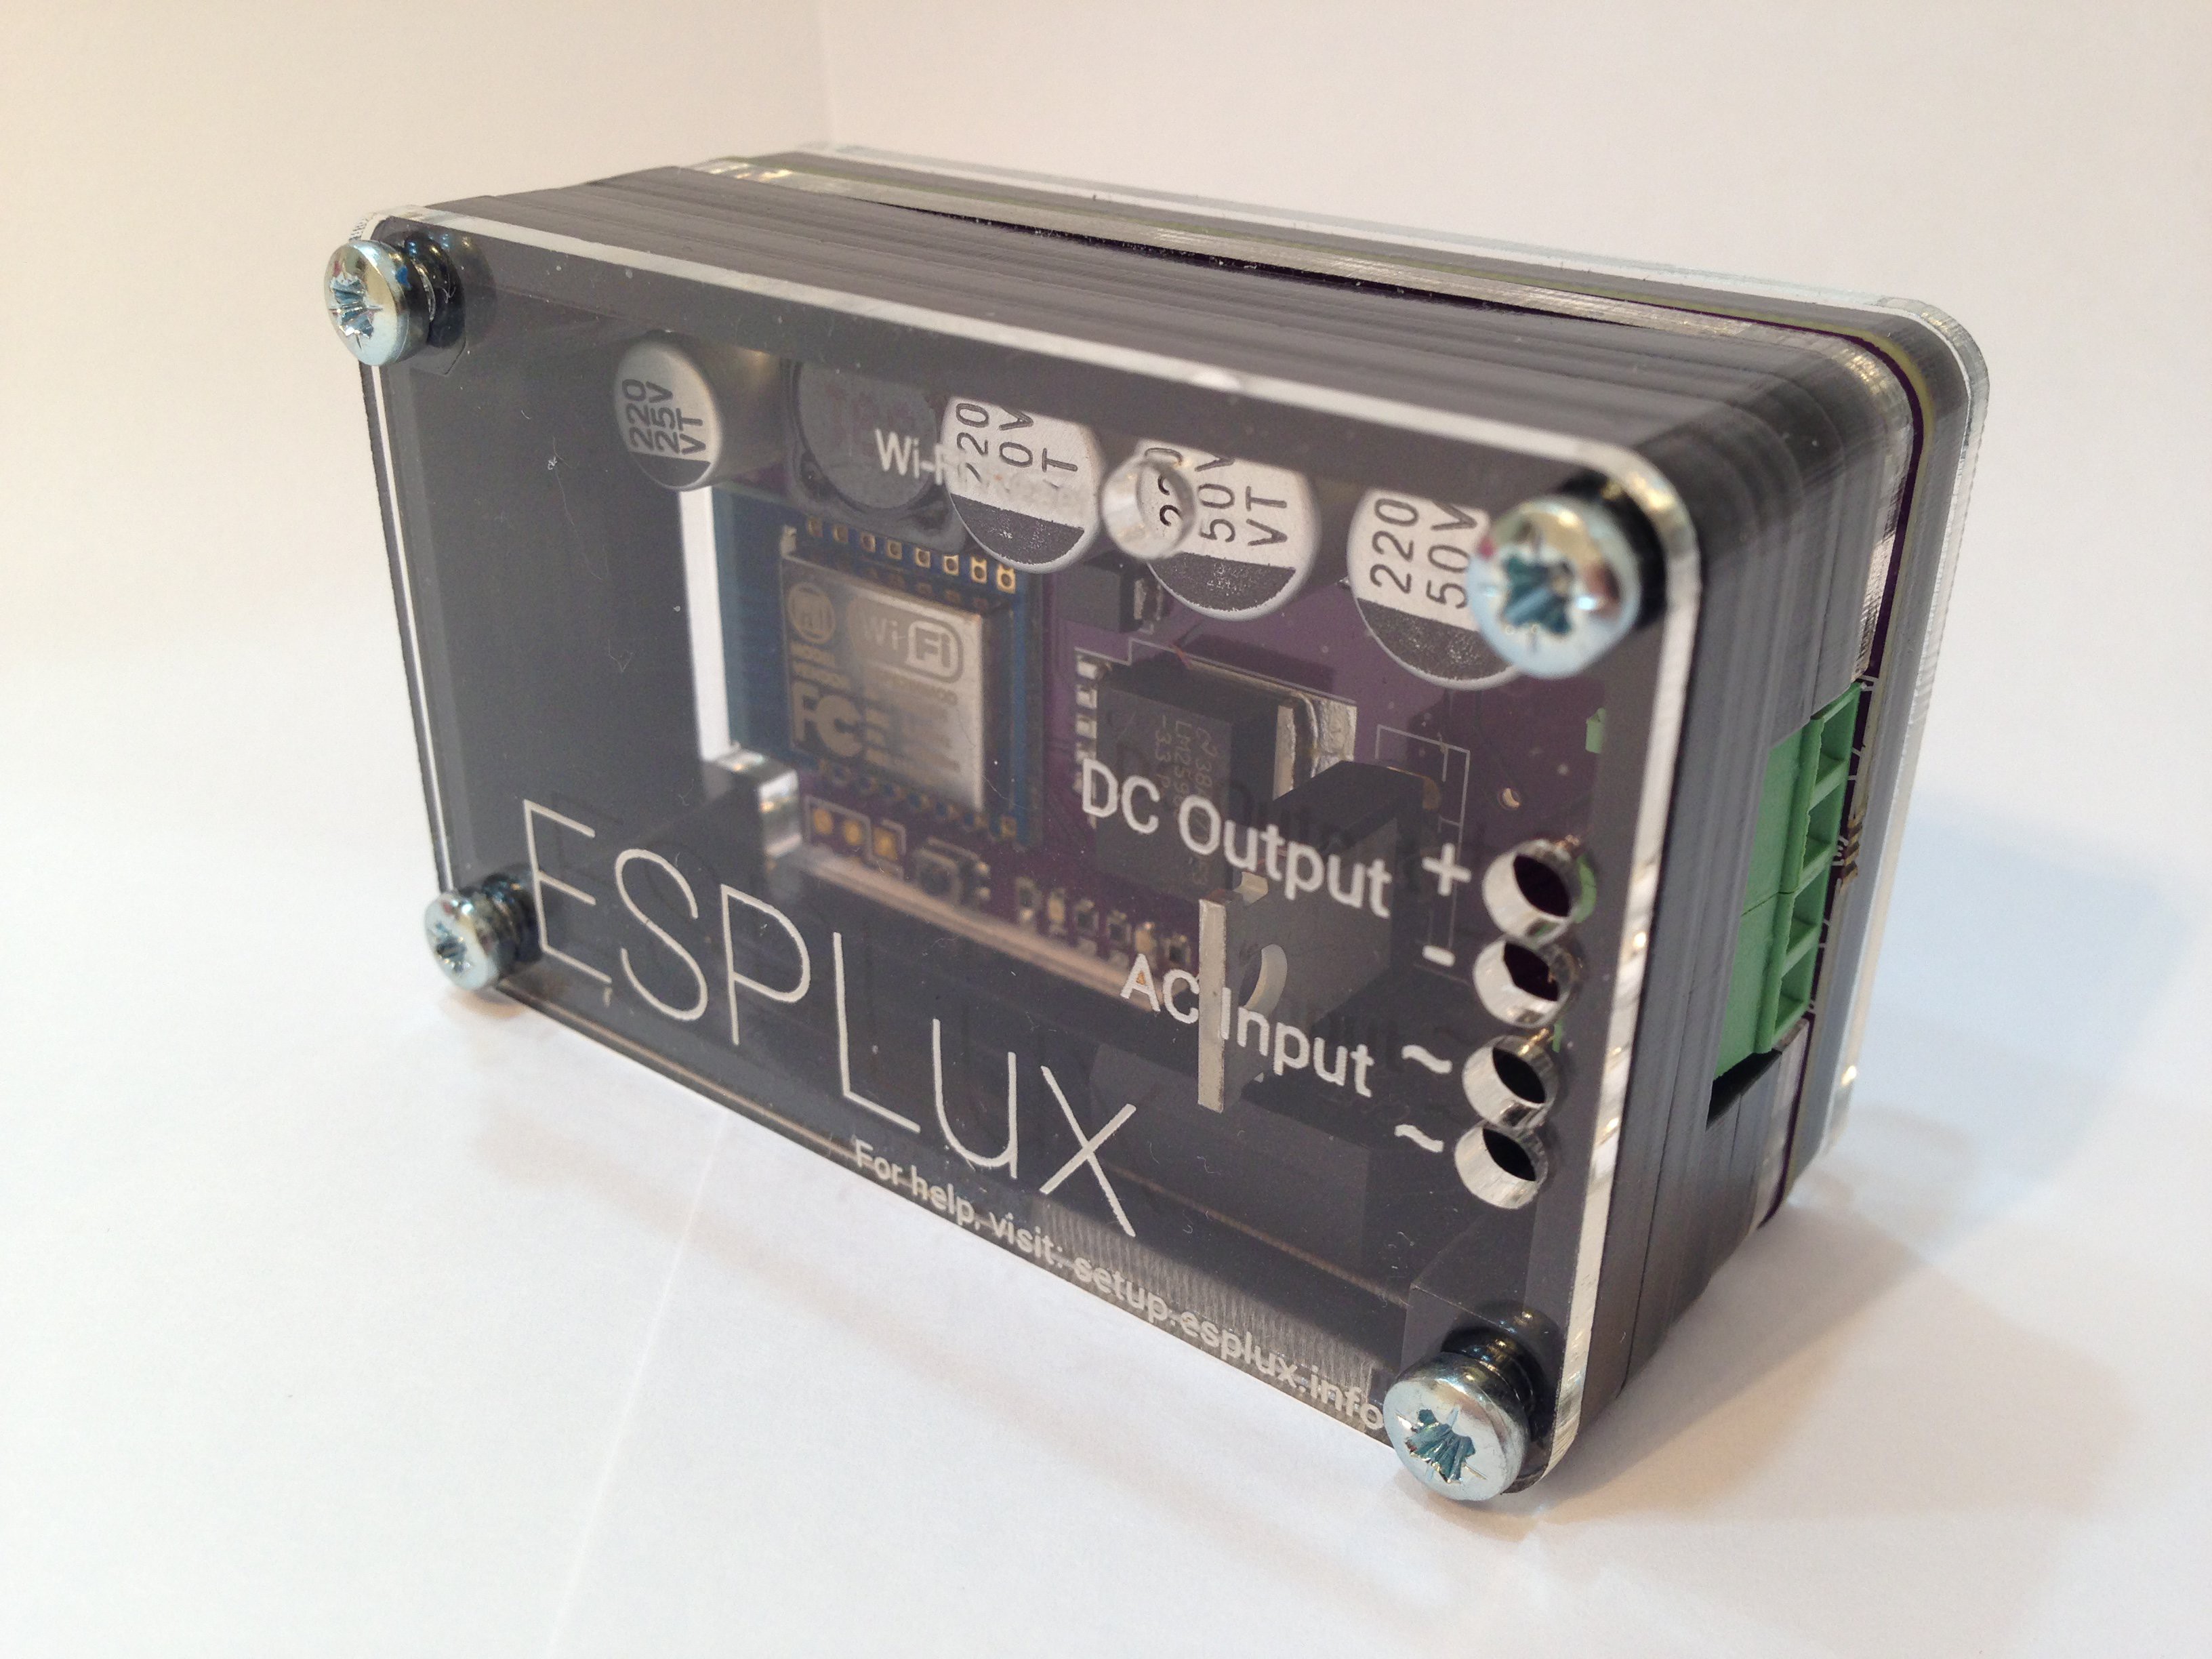
    I have been sick, so sorry for the lack of updates. Good news though! My cases arrived! Thanks goes to HAD for providing me with a $100 gift voucher for ponoko.com, where I got my cases laser cut. Make sure you go in the hotlists in the future if there are more, they are well worth it!

    There are a few things that could be improved from this design, but overall I am very happy with it! First some photos, then I'll explain what could be improved.

    There are a few more pictures after the break.

    Read more »

  • Boxes!

    Matt07/17/2015 at 12:08 0 comments

    Gday!

    I've been working away at my ESPLux a lot recently as you can see. My plan is to send off three ESPLux units to compete in the 'Best Product' category. Who knows how I'll go, but one thing is for sure, I plan on giving it a good crack. Sending stuff from Australia over to the US can be sketchy at best, so I want my ESPLux boxes to have the best chance possible at making it over in one piece.

    Read more »

  • Cases

    Matt07/17/2015 at 05:38 0 comments

    Howdy again!

    In between working on the new firmware over the past little while, I have been designing the cases. My intention from the beginning, as you can see in my pictures, was to create a stack up of acrylic to build the case. I know this might not be the quickest way for production, but hopefully the design I have made is relatively easy to produce anyway.

    The main reason for this design is the tools that I have. I have a laser cutter sitting here in my garage, one of the cheapie ones you can buy off eBay, but it has degraded over time and I can no longer cut through the thickness of material that I was planning on using. I also have a 3D printer, it makes spaghetti very well.

    Anyway, I still wanted to go with the laser cut version, and then along came the mini contest from HAD for $100 credit with Ponoko, which I scored! Thanks HAD! Click past the break to see some images.

    Read more »

View all 40 project logs

Enjoy this project?

Share

Discussions

tyler wrote 12/09/2021 at 22:12 point

Cool, I like the name. Translating into Latin really never fails to produce an attractive-sounding name.

  Are you sure? yes | no

evandrorech wrote 03/23/2016 at 15:11 point

Hi! Have you had any problem with the PWM dimming on the  12V LED bulbs? I want to make a 12V DC line in my house and control the spots using cheap led dimmers for led strips, but if the 12V LED bulb have some sort of current controller, it cannot work corretly... Thanks!

  Are you sure? yes | no

Matt wrote 04/06/2016 at 01:17 point

Hey, sorry for the delay in replying. It depends on the led bulb. I have quite a wide variety of them. Generally speaking, the cheaper ones are terrible and the more expensive ones do better.after pwming one of my cheap eBay ones, it no longer worked. I have a mirabella one and a Phillips one though that dim superbly. You'd also have to be careful with those cheap dimmers to make sure they can cope with the power requirements of your led bulb.

  Are you sure? yes | no

evandrorech wrote 04/08/2016 at 19:08 point

It is a pity... I had thought the opposite, that with a cheap lamp, it would be easier to dim. In my country (Brazil), it is difficult to find good bulbs to 12Vdc, and they are expensive.

For my application, the power of the dimmer is enough, and my idea is that it was temporary, because in the future I would make a controller using a ESP8266. The intention was to follow some kind of stantard to facilitate future replacements.

Thanks!

  Are you sure? yes | no

[deleted]

[this comment has been deleted]

Matt wrote 07/27/2015 at 21:32 point

Hey Dean, thanks for the message. Powerpeg looks like a pretty neat design! At the moment the two devices that get hot are both PTH parts. When I get to a stage where I am replacing these parts with SMD components I will be sure to keep your project in mind. 

  Are you sure? yes | no

davedarko wrote 06/04/2015 at 09:16 point

Awesome write-up and learning curve! Good luck with your project and happy hacking :) 

  Are you sure? yes | no

Matt wrote 06/04/2015 at 12:26 point

Hi Dave, thanks for your message! It has been an interesting and fun ride so far. I'm looking forward to seeing it through to completion

  Are you sure? yes | no

Robert wrote 05/10/2015 at 10:42 point

Hej! you are controlling the ESP with you mobile phone, what about an integration in euerdesign.de?

We could improve the usability by connecting all the ESP together.

You could use an PIR motion detector or an Buttonswitch to activate your light.

What about that ? 

email me : info@euerdesign.de

Robert from south germany

  Are you sure? yes | no

Matt wrote 05/11/2015 at 11:09 point

Hi Robert,

Thanks for your message! My plan is/was to implement openHAB support at some stage during development. This seems to be the industry standard home automation software at the moment. It meets all my requirements; It is open source, it supports a bunch of different hardware that a lot of people already use, and it has native applications on both iOS and Android. This is not to mean you can't utilise the same hardware to communicate with your software, my project is fully open source, feel free to grab it when I am done and implement your own firmware!

Cheers,

Matt

  Are you sure? yes | no

Similar Projects

Does this project spark your interest?

Become a member to follow this project and never miss any updates