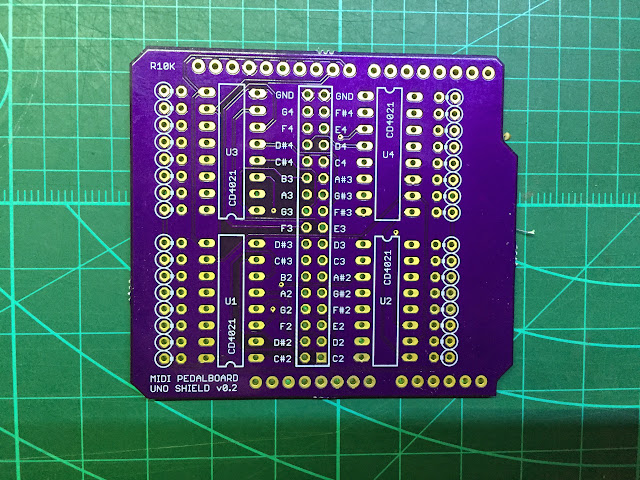
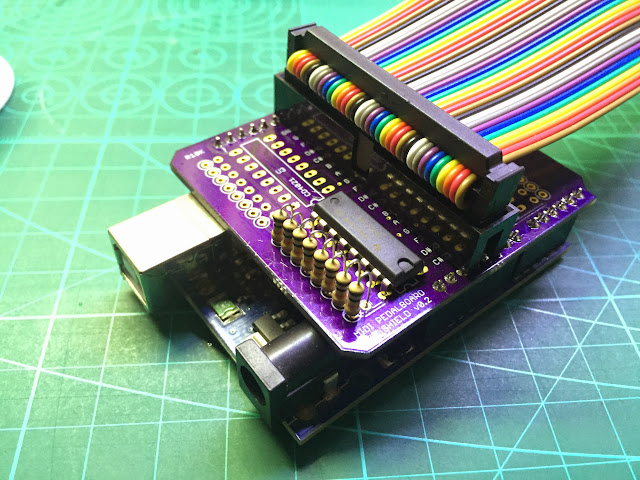
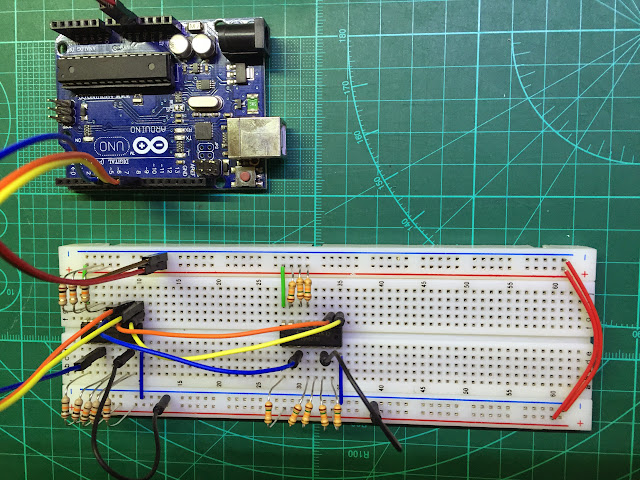
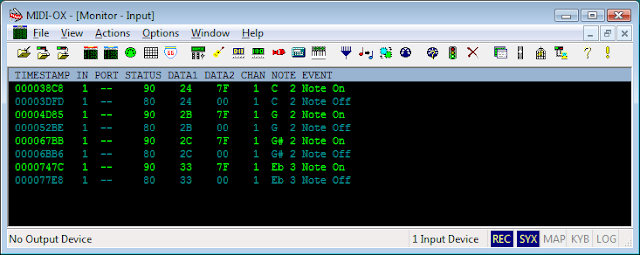
Arduino Uno shield & sketch to convert the input from 32 switches to MIDI notes via Hiduino firmware
To make the experience fit your profile, pick a username and tell us what interests you.
We found and based on your interests.
Based on what I've been able to achieve here, we have taken the project to the next step:
Just a quick update - the project is still alive, just went on a brief hiatus! The pedalboard concept has been completed using reed switches & works perfectly with Hauptwerk. I may upgrade the reed switches I used to a higher quality in the future, as the the junky eBay ones I bought in bulk aren't the most consistent.
In the meantime other parts of the console are in process. We managed to find 2 nice piston rails on eBay which will be used with the 3 M-Audio Keystation MIDI keyboards. I'm considering redesigning the MIDI shield and using a Teensy 3.2 to simplify the MIDI software, as I need several more inputs for the piston rails, stops & pedals.
More detailed updates shortly!
Finally got the circuit boards from OSHPark!
After verifying that there were no shorts, I installed the shield pins. Good tip when assembling a shield: put the header pins into the Arduino first, then solder the pins to the shield PCB. With the shield installed on the Arduino, I verified that 5V was getting everywhere it was supposed to. I then proceeded to assemble the first shift register circuit (U1 + 8x10K resistors).
Testing was a success - using a jumper cable I bridged pin 1-8 to ground and got the expected MIDI notes on the computer. Next step was to install the second shift register (U2) , which is daisy chained to the first register (U1). Again this worked as expected.
After completing the shield assembly, the hardware & software part is complete!
Now comes the mechanical part, figuring out a way to install 32 reed switches & magnets to the pedalboard. I have been testing various magnets to determine at what distance the magnet closes the switch, as I need this to be a good 10-15mm in order to deal with the travel on the pedals. Details to follow!
Set up the breadboard with two CD4021 shift registers daisy chained:
Next flashed the default Arduino firmware to the ATmega16U2, loaded the sketch in debug mode then fired up the serial monitor:
Register #0: 254-11111110
Register #1: 127-1111111
Note ON 1-7: 51
Register #0: 254-11111110
Register #1: 255-11111111
Note OFF 1-7: 51
Success! The daisy chained shift registers work perfectly, I get the MIDI note ON & OFF messages as expected in the correct order.
I loaded the Hiduino firmware and connected the Arduino to a MIDI monitor, again the notes were being sent as expected:
Next step is to send the shield PCB off to OSHPark to be manufactured!
Before I can test the breadboarded circuit, I wanted to figure out how to flash the Arduino's firmware. The Uno actually has 2 Atmel MCUs, the main ATmega328 & then a ATmega16U2 which I believe handles the serial-USB connection.
Using Hiduino firmware to replace the stock Arduino firmware, turns the Uno into a class-compliant USB-MIDI device which any MIDI software will recognize.
This step actually gave me the most headaches as there are more than 1 way to do this.
At first I tried DFU programming which most links I found suggested. This involves switching the Uno into DFU mode then running the dfu-programmer utility. I could not get this to work at all, as my Uno refused to go into DFU mode. Much later I realized my Uno had a really old firmware installed on the ATmega16U2! I confirmed this by flashing the official Uno firmware (included in the /hardware subdirectory in the Arduino IDE software directory).
An alternate way to flash the ATmega16U2 is using avrdude, which I found to be much simpler. I hooked up a 6 pin connector to the ICSP (the one close to the USB connector) & using my USBASP flashed the Uno in a few seconds.
avrdude -p m16u2 -F -P usb -c usbasp -U flash:w:usbserial_uno_16u2.hex \
-U lfuse:w:0xFF:m -U hfuse:w:0xD9:m -U efuse:w:0xF4:m -U lock:w:0x0F:m
IMPORTANT NOTE: Once you have flashed Hiduino to your Uno, you will no longer be able to write sketches to it via the USB cable. This is a PITA to deal with, as you have to flash the stock firmware, write the sketch, then flash Hiduino again. I couldn't find a way to make this process easier - maybe someone can enlighten me?To flash the Hiduino MIDI firmware use the following command (with a USBASP):
avrdude -p at90usb82 -F -P usb -c usbasp -U flash:w:arduino_midi.hex -U lfuse:w:0xFF:m -U hfuse:w:0xD9:m -U efuse:w:0xF4:m -U lock:w:0x0F:m
Note that I used at90usb82 to flash the Hiduino firmware.The USBASP programming cable attaches to the Uno as shown here:
My day job is in software, so this is the fun part for me. The Arduino sketch does 2 things: read the CD4021 shift registers & outputs MIDI notes. I know the pedalboard covers notes C2 - G4, but what does that translate to in MIDI.
After asking the mighty Google, I learnt that C2 is MIDI note 36, up to G4 which is MIDI note 67.
Using the Arduino MIDI library, a simple function takes care of this:
MIDI.sendNoteOn(note, velocity, channel) MIDI.sendNoteOff(note, velocity, channel)The Arduino sketch turned out to be pretty simple: Read the switches, if the value has changed from the last time they were read, send the MIDI command.
The sketch is included in the Github repo.
Next step is to build the circuit on a breadboard to prove if this design can work!
At this point I have a massive 200+ lbs American Guild of Organists specification pedalboard sitting in my lab. I have many questionable talents, but music isn't one of them. In fact I have no idea what the word what octave means, at which point my very musical son gave up trying to explain and said: "You'll figure it out dad, you always do!".
The pedalboard has 32 pedals, corresponding to notes C2 on the left up to a G4 on the right. Push a pedal, arduino reads the switch position then sends a MIDI note. Easy right?
Step 1: Use an Arduino Uno with Hiduino (or Moco) firmware to create a class-compliant USB-MIDI plug-and-play device, or use a Teensyduino which has built in MIDI support. I have an Arduino Uno R3 - so easy decision.
Immediately this presents a problem: the Arduino Uno doesn't have 32 inputs. I considered using a switch matrix, but this still uses a lot of inputs & complicates the shield PCB routing. I decided to use 4 daisy-chained CD4021 Static Shift Register ICs which allows me to read 32 switches with 3 pins on the Arduino. The shift register works by reading 8 inputs parallel then outputting it serially as a 8-bit byte. As an example 255, or 11111111 would mean all inputs are high.
Research indicated it is better for noise reduction to to pull the pins on the CD4021 high, then pull them to GND when a switch is closed. This is done by connecting the 8 CD4021 input pins to +5V via a 10K resistor & connecting directly to GND via the reed switch.
This resulted in a few iterations of a schematic in Eagle CAD. Next step software!
Create an account to leave a comment. Already have an account? Log In.
As the Midi output? For a 5-pin connector (MIDI) or USB? I have not seen in the scheme Midi 5 Pin connector.
This is completely excellent! 1. I'm interested in a PCB if you make more. 2. You should apply to exhibit at San Diego Maker Faire (deadline is tomorrow, sadly). and 3. I'm in Escondido, and I'd love to collaborate or just help out if needed.
Hi James, thanks for the comment! I'm working on version 2 of this interface, which functions identically, but uses a Teensy 3.2 instead of an Arduino Uno. Just got the circuit boards from oshpark.com, so I'll post an update soon. I would suggest you get the PCB made there if you want one. What's your background with this kind of stuff?
I'm an embedded engineer. You can check out some of my open source projects here on Hackaday, or my site is MassMind.org and the store has products I sell, the techref has all sort of other things... and I teach classes (listed in Lessons) and volunteer with San Diego Maker Faire... and I'm one of the lead singers for a (non-professional) rock band called EkG. I play keyboards (poorly) and have wanted to experiment with looping, for which I want a pedal board. Both to play notes and to trigger start / stop etc... for looping.
I live in Brazil. You have the Midi Pedalboard Shield board to sell?
Unfortunately I do not have any more MIDI shields to sell. I'm changing the design, so possibly in the future.
Did you finish the project?
Is the arduino key scanner sketch available?
Do you have any PCBs left over?
I did finish the project and the pedalboard conversion works great. I still have to update project log. I will create a repo on github with the code & post it here. I have 2 PCBs left - $8.25 + shipping.
Just realized I did add the Arduino source code here, look for the link on the left side of the page below the images, click on "Arduino Uno MIDI Shield"
super. Es genial pero no entiendo mucho lo de hiduino. Ademas estoy haciendo lo mismo pero mas barato.
Become a member to follow this project and never miss any updates
Hello, is there any possibility to get a PCB for this? I'm so sad I'm so late to discovering this great DIY Pedalboard converter - I had one, but the company is out of business and the configuration software is no longer available - and I deeply need to get my organ setup again with my computer to practicing during this friggin pandemic! Help! Thank you! Scott in Illinois, USA!