 Brendan Ardagh
-
1Step 1
Collect all the necessary parts, tools and software dependencies:
TOOLS
- Soldering iron
- Hot glue gun
- Drill and appropriate bits
- Saw
- Pencil
PARTS
- Intel Galileo (Any micro will work – you just need serial communications and 4 output pins)
- 2 x Stepper Motors (we used Nema 17s)
- 2 x Stepper motor controllers (we used Easy Driver v4.4)
- Veroboard/Breadboard
- Some headers to mount the motor controllers
- Wires for connecting
- Ball bearings (we used parts from an old printer and harddrive - see pictures)
- Elastic bands
- Solder
- Laser pointer (please be careful with this)
- AA battery pack(or anything that can provide a steady 3V - NOT the arduino)
- Wood
SOFTWARE
- Arduino IDE
- Python 3.3
- PySerial
- PyEphem
- Stellarium
-
2Step 2
Electronics assembly:
We used a combination of commercially available parts for the prototype, but future revisions will use a custom controller and e-waste parts (Old printer parts).
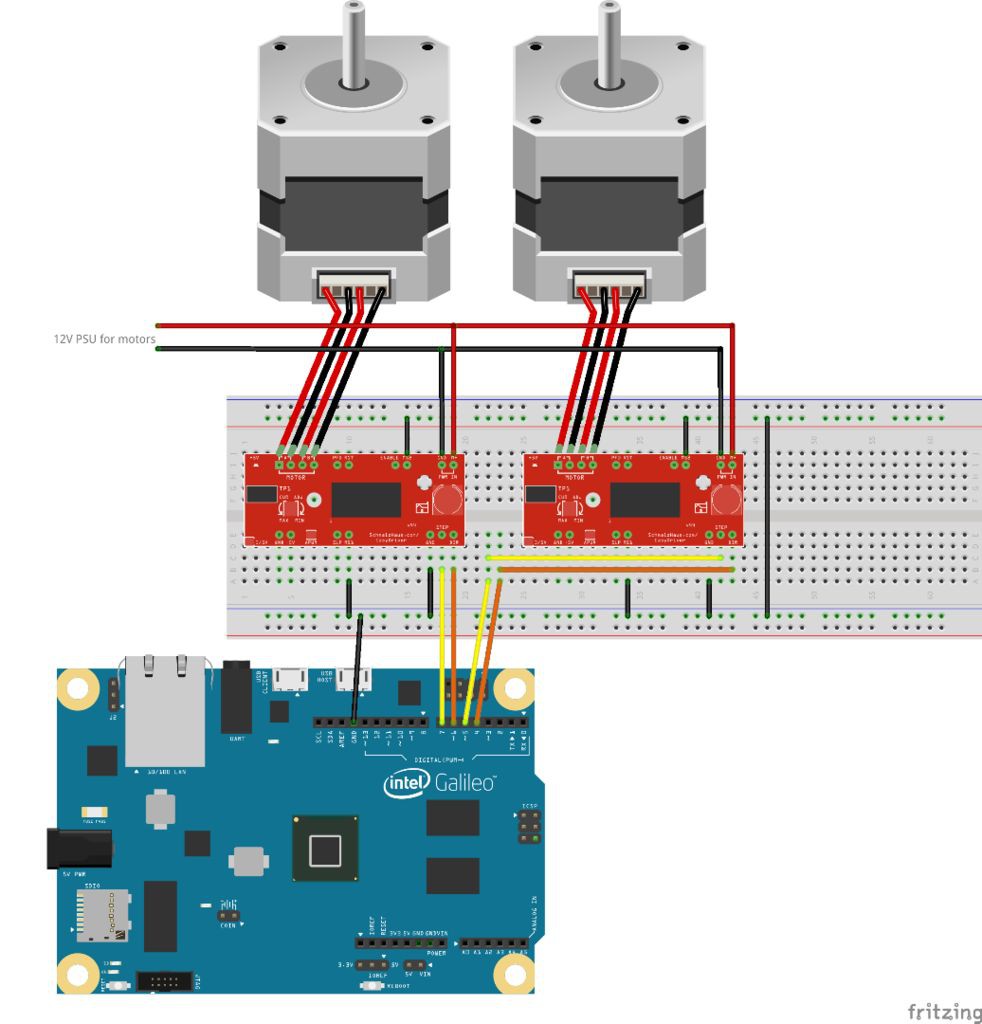
The Galileo's pins (Same layout as an Arduino):
![]()
- Connect MS1, MS2 and the GROUND on both easyDrivers to GROUND on the GALILEO/ARDUINO. (This sets the easyDrivers to 'Full Step')
Connect M+ and GND (on the PWR IN) on both boards to the 12V power supply for the motor. (External power to power the stepper motors.)
Connect DIR on easyDriver 1 to Arduino pin 4. (Used to control the direction of the motor)
Connect STEP on easyDriver 1 to Arduino pin 5. (Used to control when a step is taken)
Connect DIR on easyDriver 2 to Arduino pin 6.
Connect STEP on easyDriver 2 to Arduino pin 7.
Connect each motor to its own easyDriver, paying attention to which coil is which. Each of our steppers has two coils, with 4 wires. Use a continuity tester on any multimeter to figure out which two wires are from the same coil. Connect one coil (two wires) to one set of outputs on the easyDriver (A or B)
- Connect MS1, MS2 and the GROUND on both easyDrivers to GROUND on the GALILEO/ARDUINO. (This sets the easyDrivers to 'Full Step')
-
3Step 3
Software stack:
You will need to download and install the following.
- Arduino
- Python
- Stellarium
TelescopeMotorController (both arduino code and python code) - Github Source
Note: A special thanks to Sven Steinbauer (GitHub) for the python code (pyscope)
A special note here: You will need to make some changes to the python code. Specifically,
- The com port used (this is almost guaranteed)
- The city you are in (or at least your lat/long)
- The degrees on the stepper motor
- The gearing ratio
All of these are commented as to where you might need to change them
-
4Step 4
Physical build:
We used a plank of pine as the basis for our prototype, for no specific reason. Use the pictures in the gallery as a guide for construction if you want to follow our layout. The gearing ratio between our driver and driven wheels are 1:2, i.e. the small wheel is half the size of the large wheel. The gearing ratio for the laser altitude axis is 1:1.
Galileo's Finger
A open source tool that aids in the learning of the sky map in amateur astronomy.
Discussions
Become a Hackaday.io Member
Create an account to leave a comment. Already have an account? Log In.