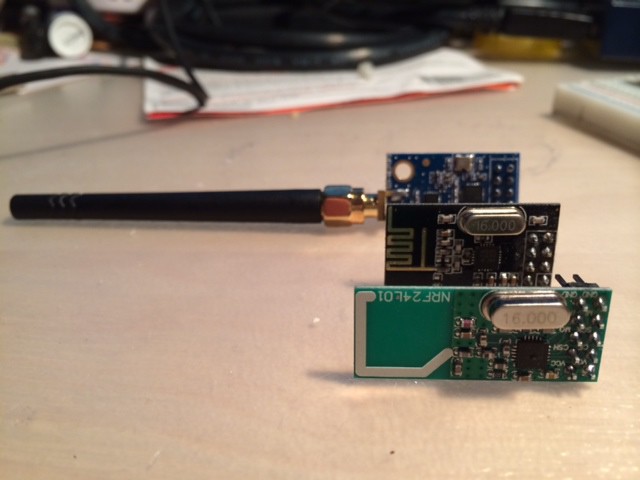
When browsing eBay and looking for the NRF24L01+ one is swamped by a multitude of sellers selling these dongles for really low prices. The current rate is approx. $1.60 to $1.70 and you get a lot for that amount of money, a transceiver capable of:
Sending and Receiving data at a max rate of 2Mbps using 2.4GHz. 5 additional "pipes" to communicate with other NRF24L01+ transceivers (which makes a total of 6). Auto acknowledgment and CRC coding for reliable transmission. Low power modes and maskable interrupts for reception and transmission of data. Lots of information on the web regarding these dongles.
I found my dongles at eBay and have the best experience with the green ones containing a "loop". I also have the PA+LNA version, but that doesn't seem to add much to the range.

Launchpads and wireless
The first part has been getting the wireless link up and running on the launchpad. Although many libraries exist for the Arduino, getting it to work on the launchpads (both MSP430 and Stellaris) requires some tweaking. I finally chose to use RF24 by Maniacbug as it exposes a lot of low level functionality as well. I did the following tweaks (file will be up in my repository soon):
- MSP430 - Add an external C function at the beginning of your sketch for "putchar(x)" for printf to work:
extern "C"{
  int putchar(int c)
  {
    Serial.write((uint8_t)c);
    return c;
  }
}
- MSP430 and Stellaris - Remove references to flash memory from the RF24.cpp file. These are the pgm_read and pgm_write functions and the PROGMEM directives. Note: this is probably not necessary as there are several #if and #endif statements declaring alternatives for these commands and directives.
- MSP430 and Stellaris - Remove the #include "printf.h" directive.
- Stellaris - Comment the _write(x) function in the startup_gcc.cpp function and add this function to your sketch.
- Stellaris - You need to select the SPI module to get a working connection.
SPI.setModule(0) or SPI.setModule(1)
This will yield a working version. I somehow messed up the printf statements. These are only needed to execute the radio.printDetails() function, so if you remove this function you can skip many of the steps.
Beyond pinging hence and forth
When the changes have been made in the code it is possible to try out the examples. I've been trying the "pingpair" examples and finally made it work between two launchpads. These could either be the Stellaris or one of the MSP430 launchpads.
OK, that's nice and it's a nice way to check the potential range. You will get the best results when you use 250Kbps, a small payload size and auto acknowledge enabled. I am able to get a range of 6-15 meters indoor, depending on the medium (we have a concrete house which blocks many signals).
Now, it's time to do some sending and receiving of other data. I've created a sendval(char* x) function that sends a string with a maximum length of the configured payload size. I will be sending strings constructed from sensor data and finally I will write a small parser to parse commands to the greenhouse.
Note: Using strings is very costly for memory. Although small examples work with the MSP430G2553 controller, larger examples will yield strange results as the memory overflows. I am currently using the Fraunchpad which provides just enough storage. The F5529 launchpad is nice but cannot be powered by other means than the USB port (which is annoying the least).
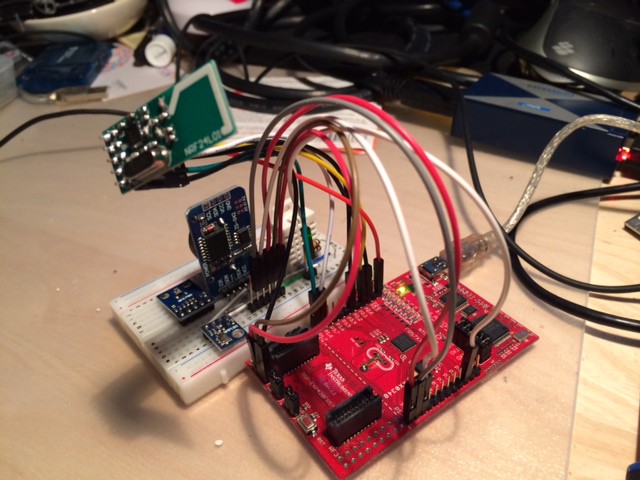
Using simple libraries for my RTC (snippets from a DS1307 program), DHT22 (from the DHT22 lib found on Energia.nu), BMP180 (from the BMP085t lib from Energia.nu), I've been able to construct environmental data.
A Raspberry Pi gateway
The Raspberry Pi can also handle the NRF24L01+. I specifically wanted to program it using Python. I found the Pynrf24 library on the net which maintains the same class members as the RF24 library used for the launchpads. The Pynrf24 library relies on the spidev library for python. It can be installed using the following statement:
sudo easy_install spidev
The Pynrf24 library is hosted in a github repository.
Getting the library to work has proven to be a little challenge, as the pynrf24 library is written for the BeagleBone Black and can be ported easily to the Raspberry PI, by making the following changes to nrf24.py:
- Change the import ... as GPIO by:
import RPi.GPIO as GPIO
- Add a statement to set the pin numbers to Broadcom in __init__(self) :
GPIO.setmode(GPIO.BCM)
- Add a statement to maximize the SPI speed (more on this later) in the begin() method:
self.spidev.max_speed_hz=(4000000) # limit to 4MHz
Due to the kernel implementation of the Raspberry Pi, the SPI clock scales with the CPU clock. Overclocking will yield a higher SPI clock and without the former statement it will not work.
I have made a simple program to receive data from the wireless node and print it out. It is a great way to work with both Energia to program the microcontroller platform and using PuTTY and Xming to edit the python programs on the Raspberry Pi.
Next steps
The next step is introducing bidirectional communication and making a command parser that is small enough to fit into the microcontroller. Commands should include:
Measure now Set time Set Servo angle Turn on/off LED's and pumps Reboot
 eelco.rouw
Discussions
Become a Hackaday.io Member
Create an account to leave a comment. Already have an account? Log In.