Project based off of:
- [spauda01]'s D-Bot Core-XY printer, with various additions
This project uses:
It's a 3D printer that's about 25cm Y axis, 30cm Z axis, and 1.1 meters X axis. It's based on the CoreXY D-Bot. It's the Long D.
To make the experience fit your profile, pick a username and tell us what interests you.
We found and based on your interests.
The Long D.stlThe first printStandard Tesselated Geometry - 821.22 kB - 06/02/2016 at 17:14 |
|
|
BuildPlate.dxfAluminum build plate, cut out of 0.25" 6061. It weights 18 pounds.AutoCAD DXF - 53.95 kB - 06/02/2016 at 14:48 |
|
The Original D-Bot includes something I quite like: an LED strip shining light onto the build surface. Since this sort of thing can be expanded into not only illumination but notification e.g. green for a completed print, red for a failed print, etc, I'm adding it to this build.
These LEDs are bright, and somewhat annoying. They need a diffuser, and I have some ninjaflex sitting around.
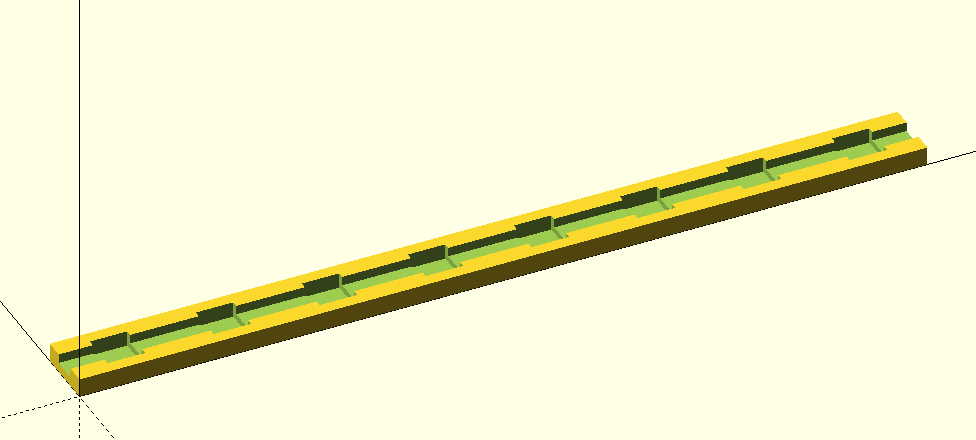
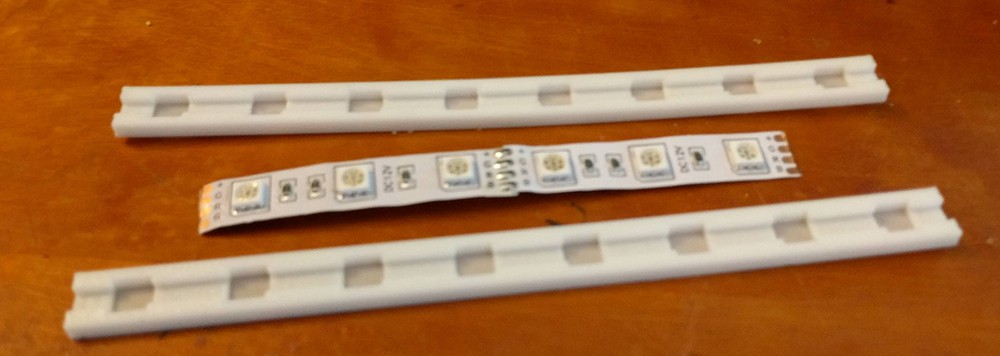
Does it work? Technically, yes. The space between the LED holes is a bit off, but not enough to matter over the entire length of an entire diffuser. These are the LEDs designed for this diffuser, and the OpenSCAD is below:
//The spacing var can be altered for different LED strips
spacing = 17;

difference(){

    cube([136,10,3]);

    translate([0,3,1.5])
        cube([136,4,2.5]);

    for(i = [-11.5: spacing: 170]){
        translate([i,2,0.5])
        cube([6,6,3]);
    }
}
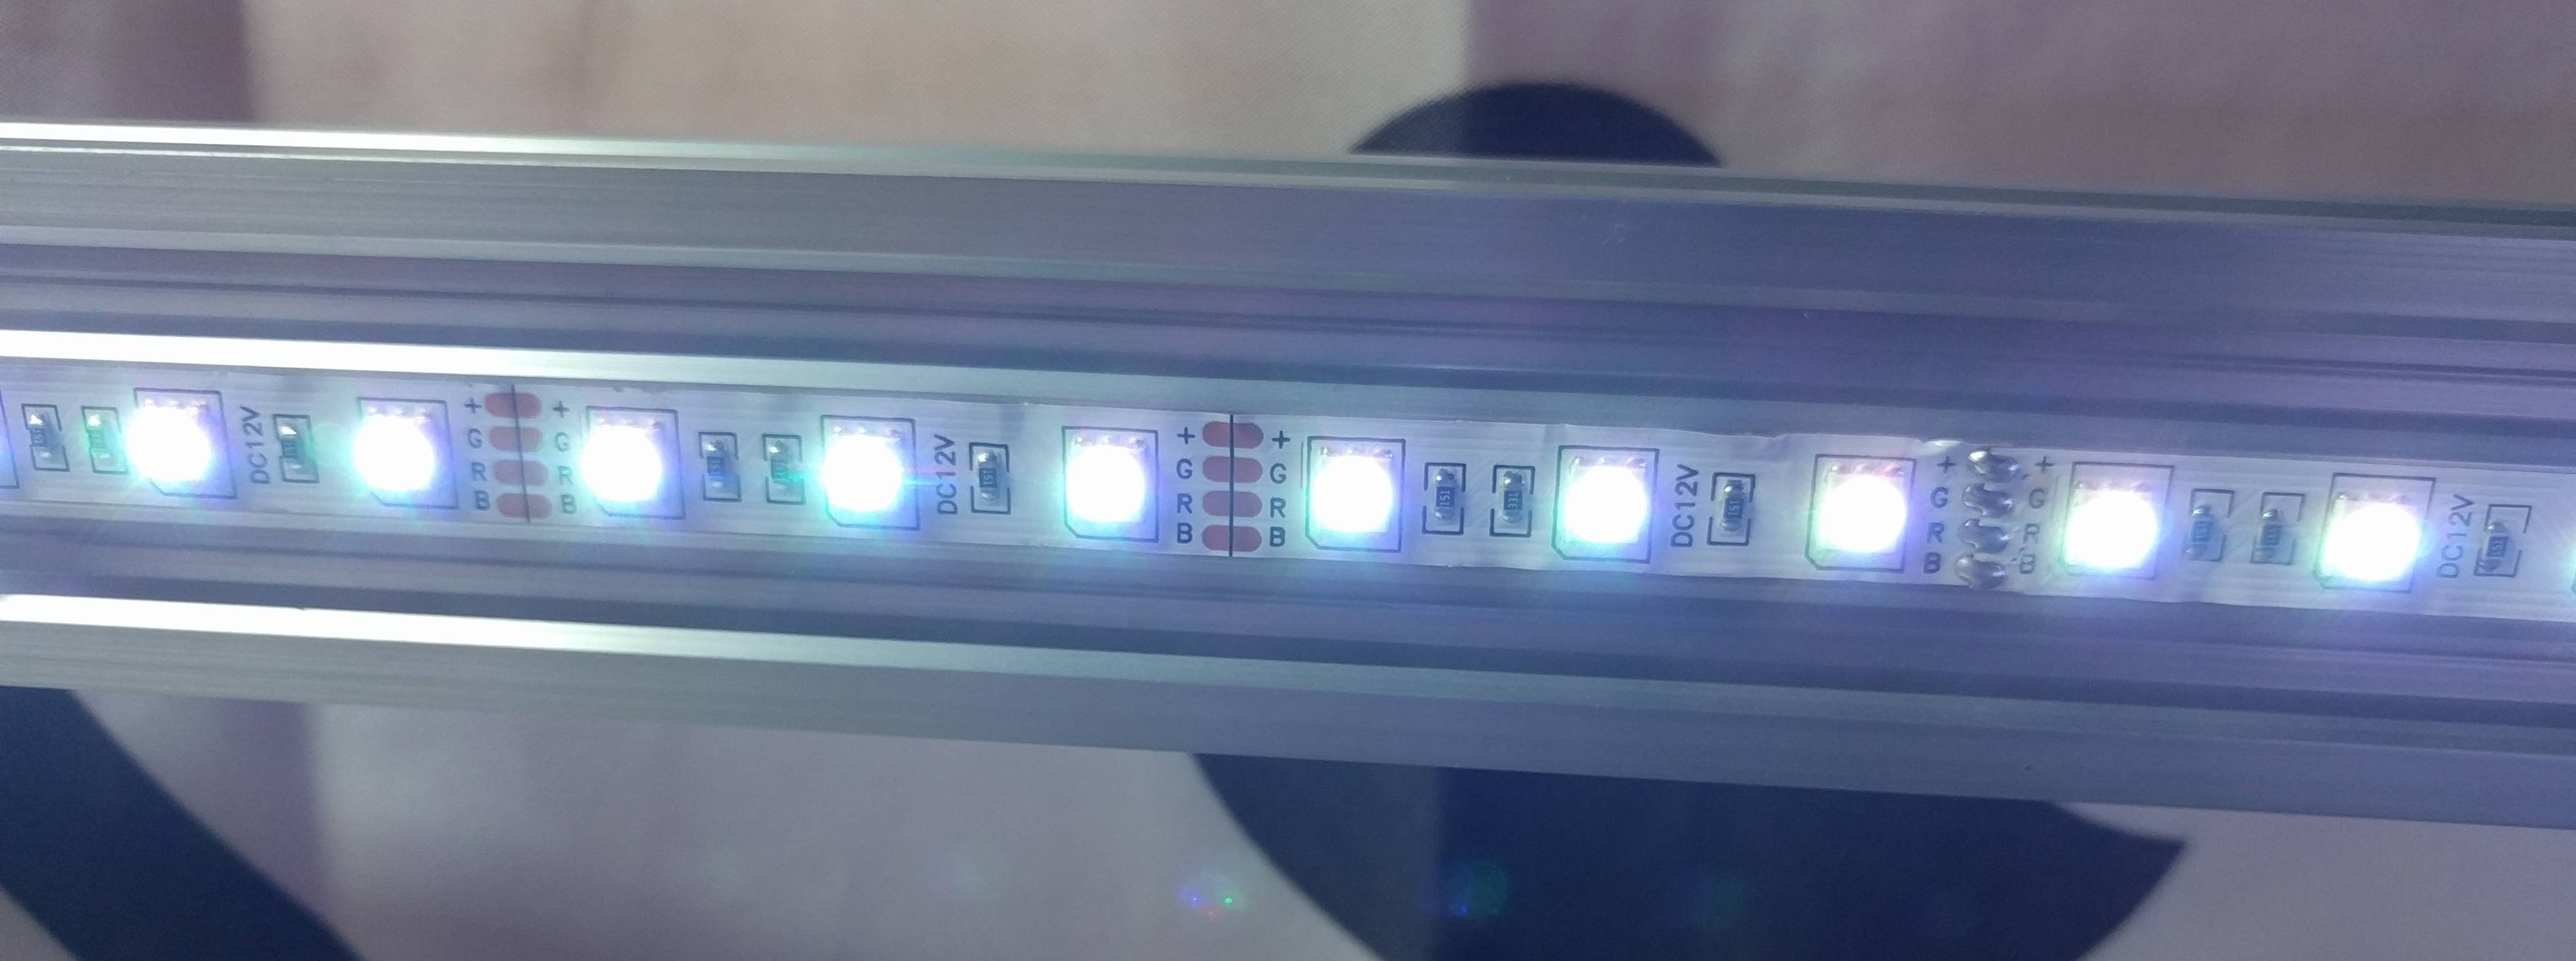
What does it look like when printed in Ninjaflex Semiflex Snow?
Witout
Wit
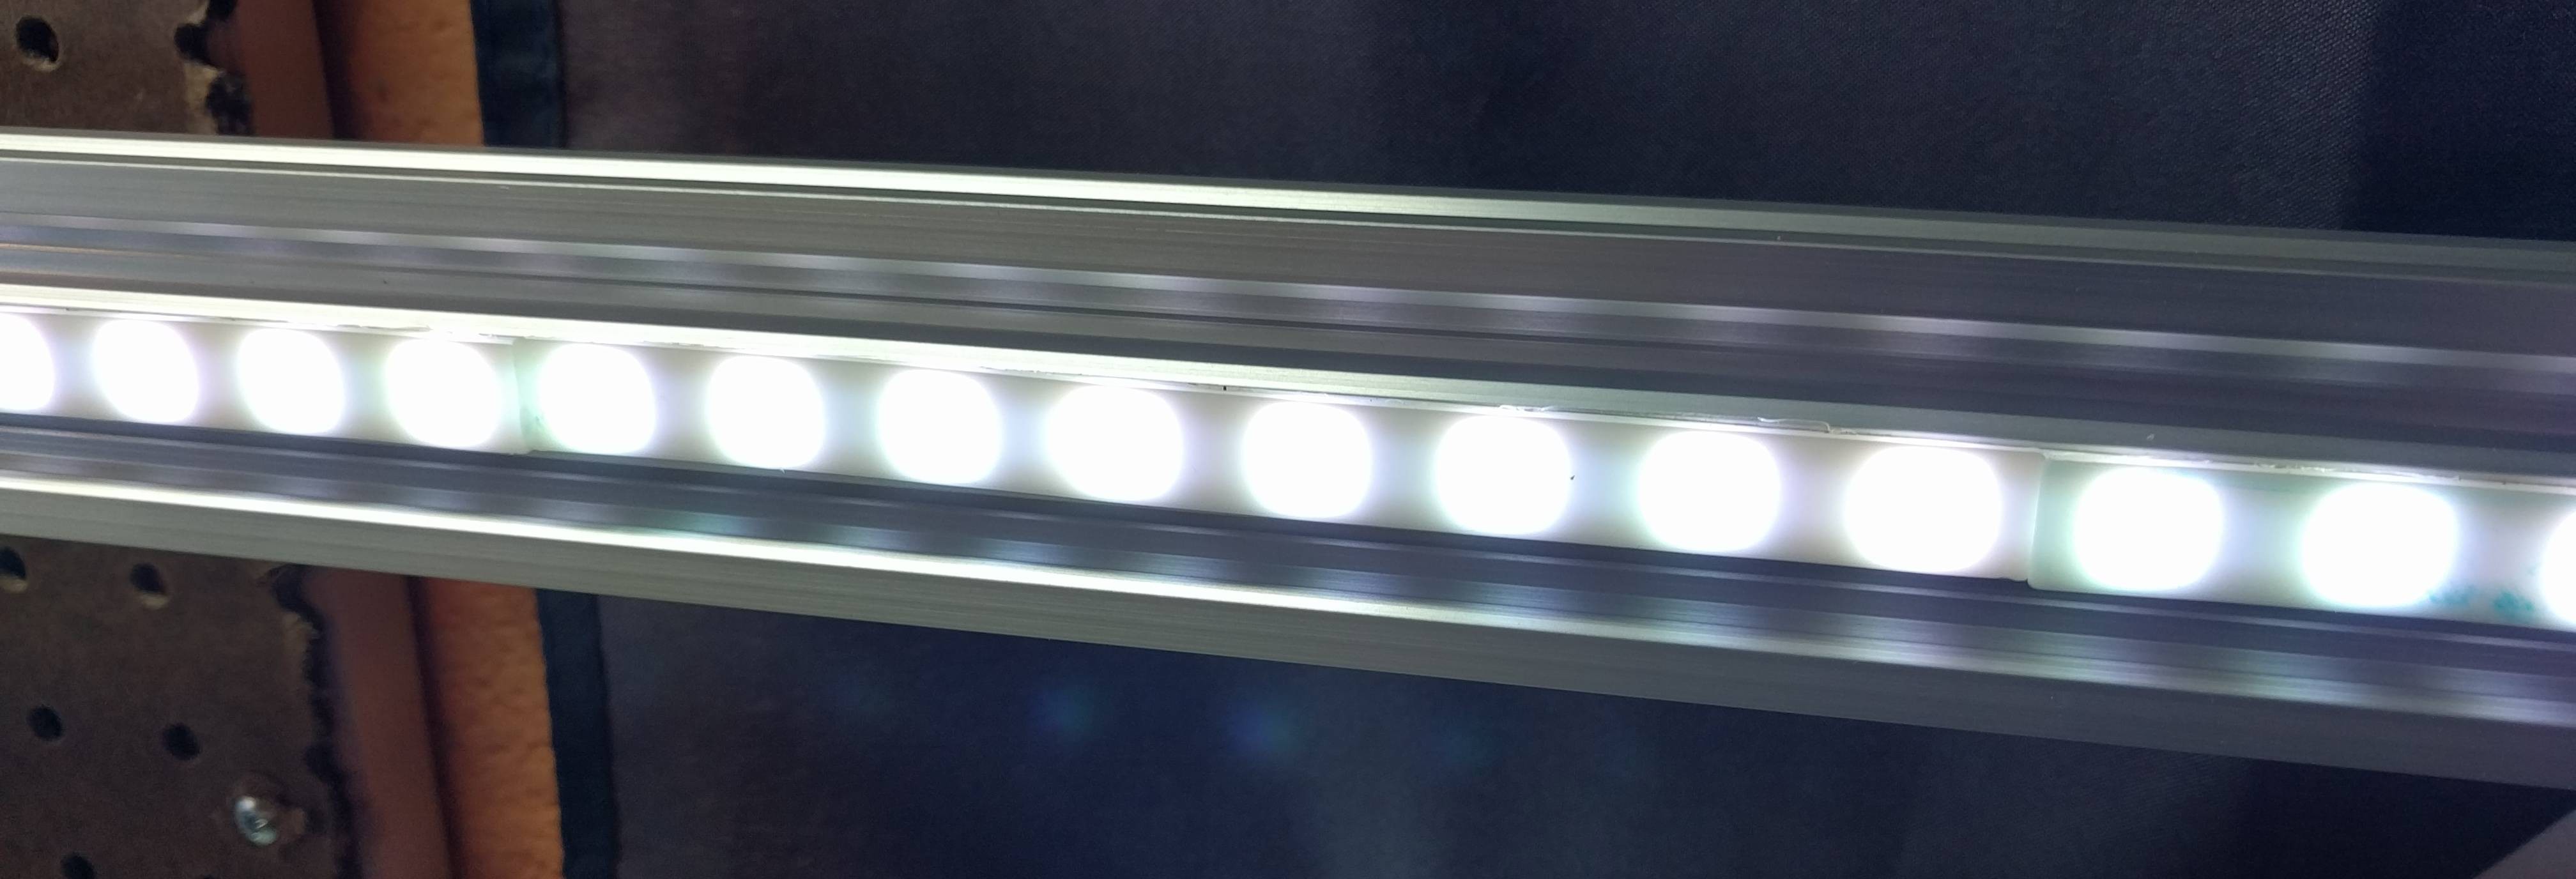
Slightly more even and glowey. These were affixed to the LED strip with 3M 468MP sheet adhesive, which should be more than strong enough to keep these things from falling down.
It's about time to figure out how much aluminum extrusion I should get. Since I'm basing this off the D-Bot, it only makes sense to check out the awesome assembly manual and figure out how much extrusion I should buy:
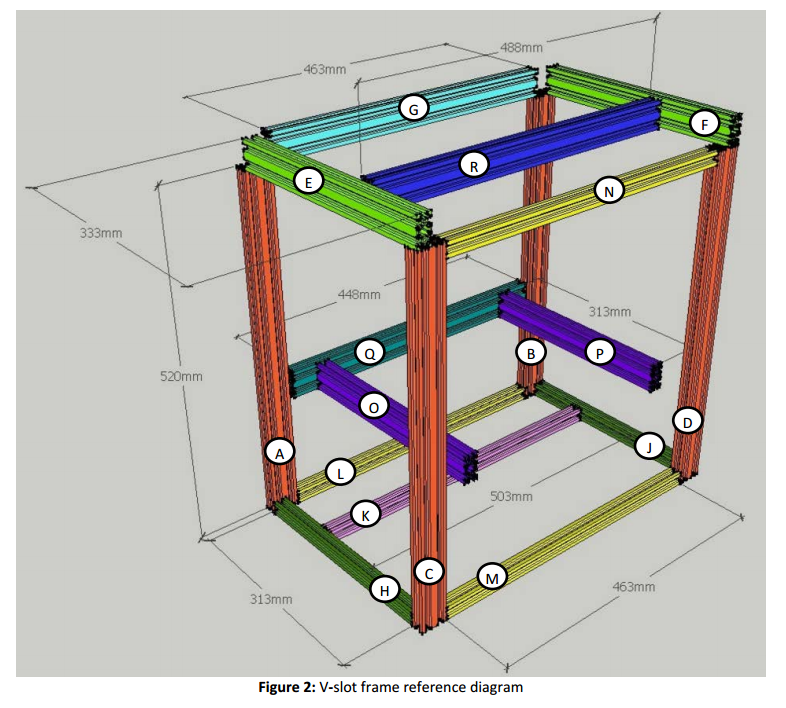
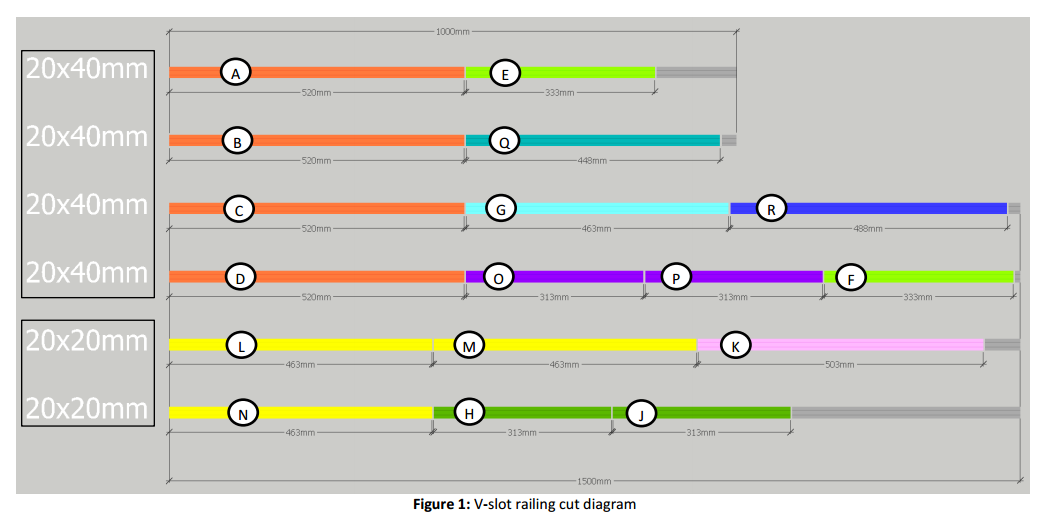
My bot is going to be much longer, and the original C-Bot has an extrusion length calculator to figure how much extrusion to buy and how to cut it. What I'm doing is heavily modified from either the C-Bot or the D-Bot, so I'll have to make this up as I go along.
The cut guide will be based entirely around the bed. already have the dimensions for the bed - 27cm by 112cm from corner hole to corner hole - so I can just build it out from there.
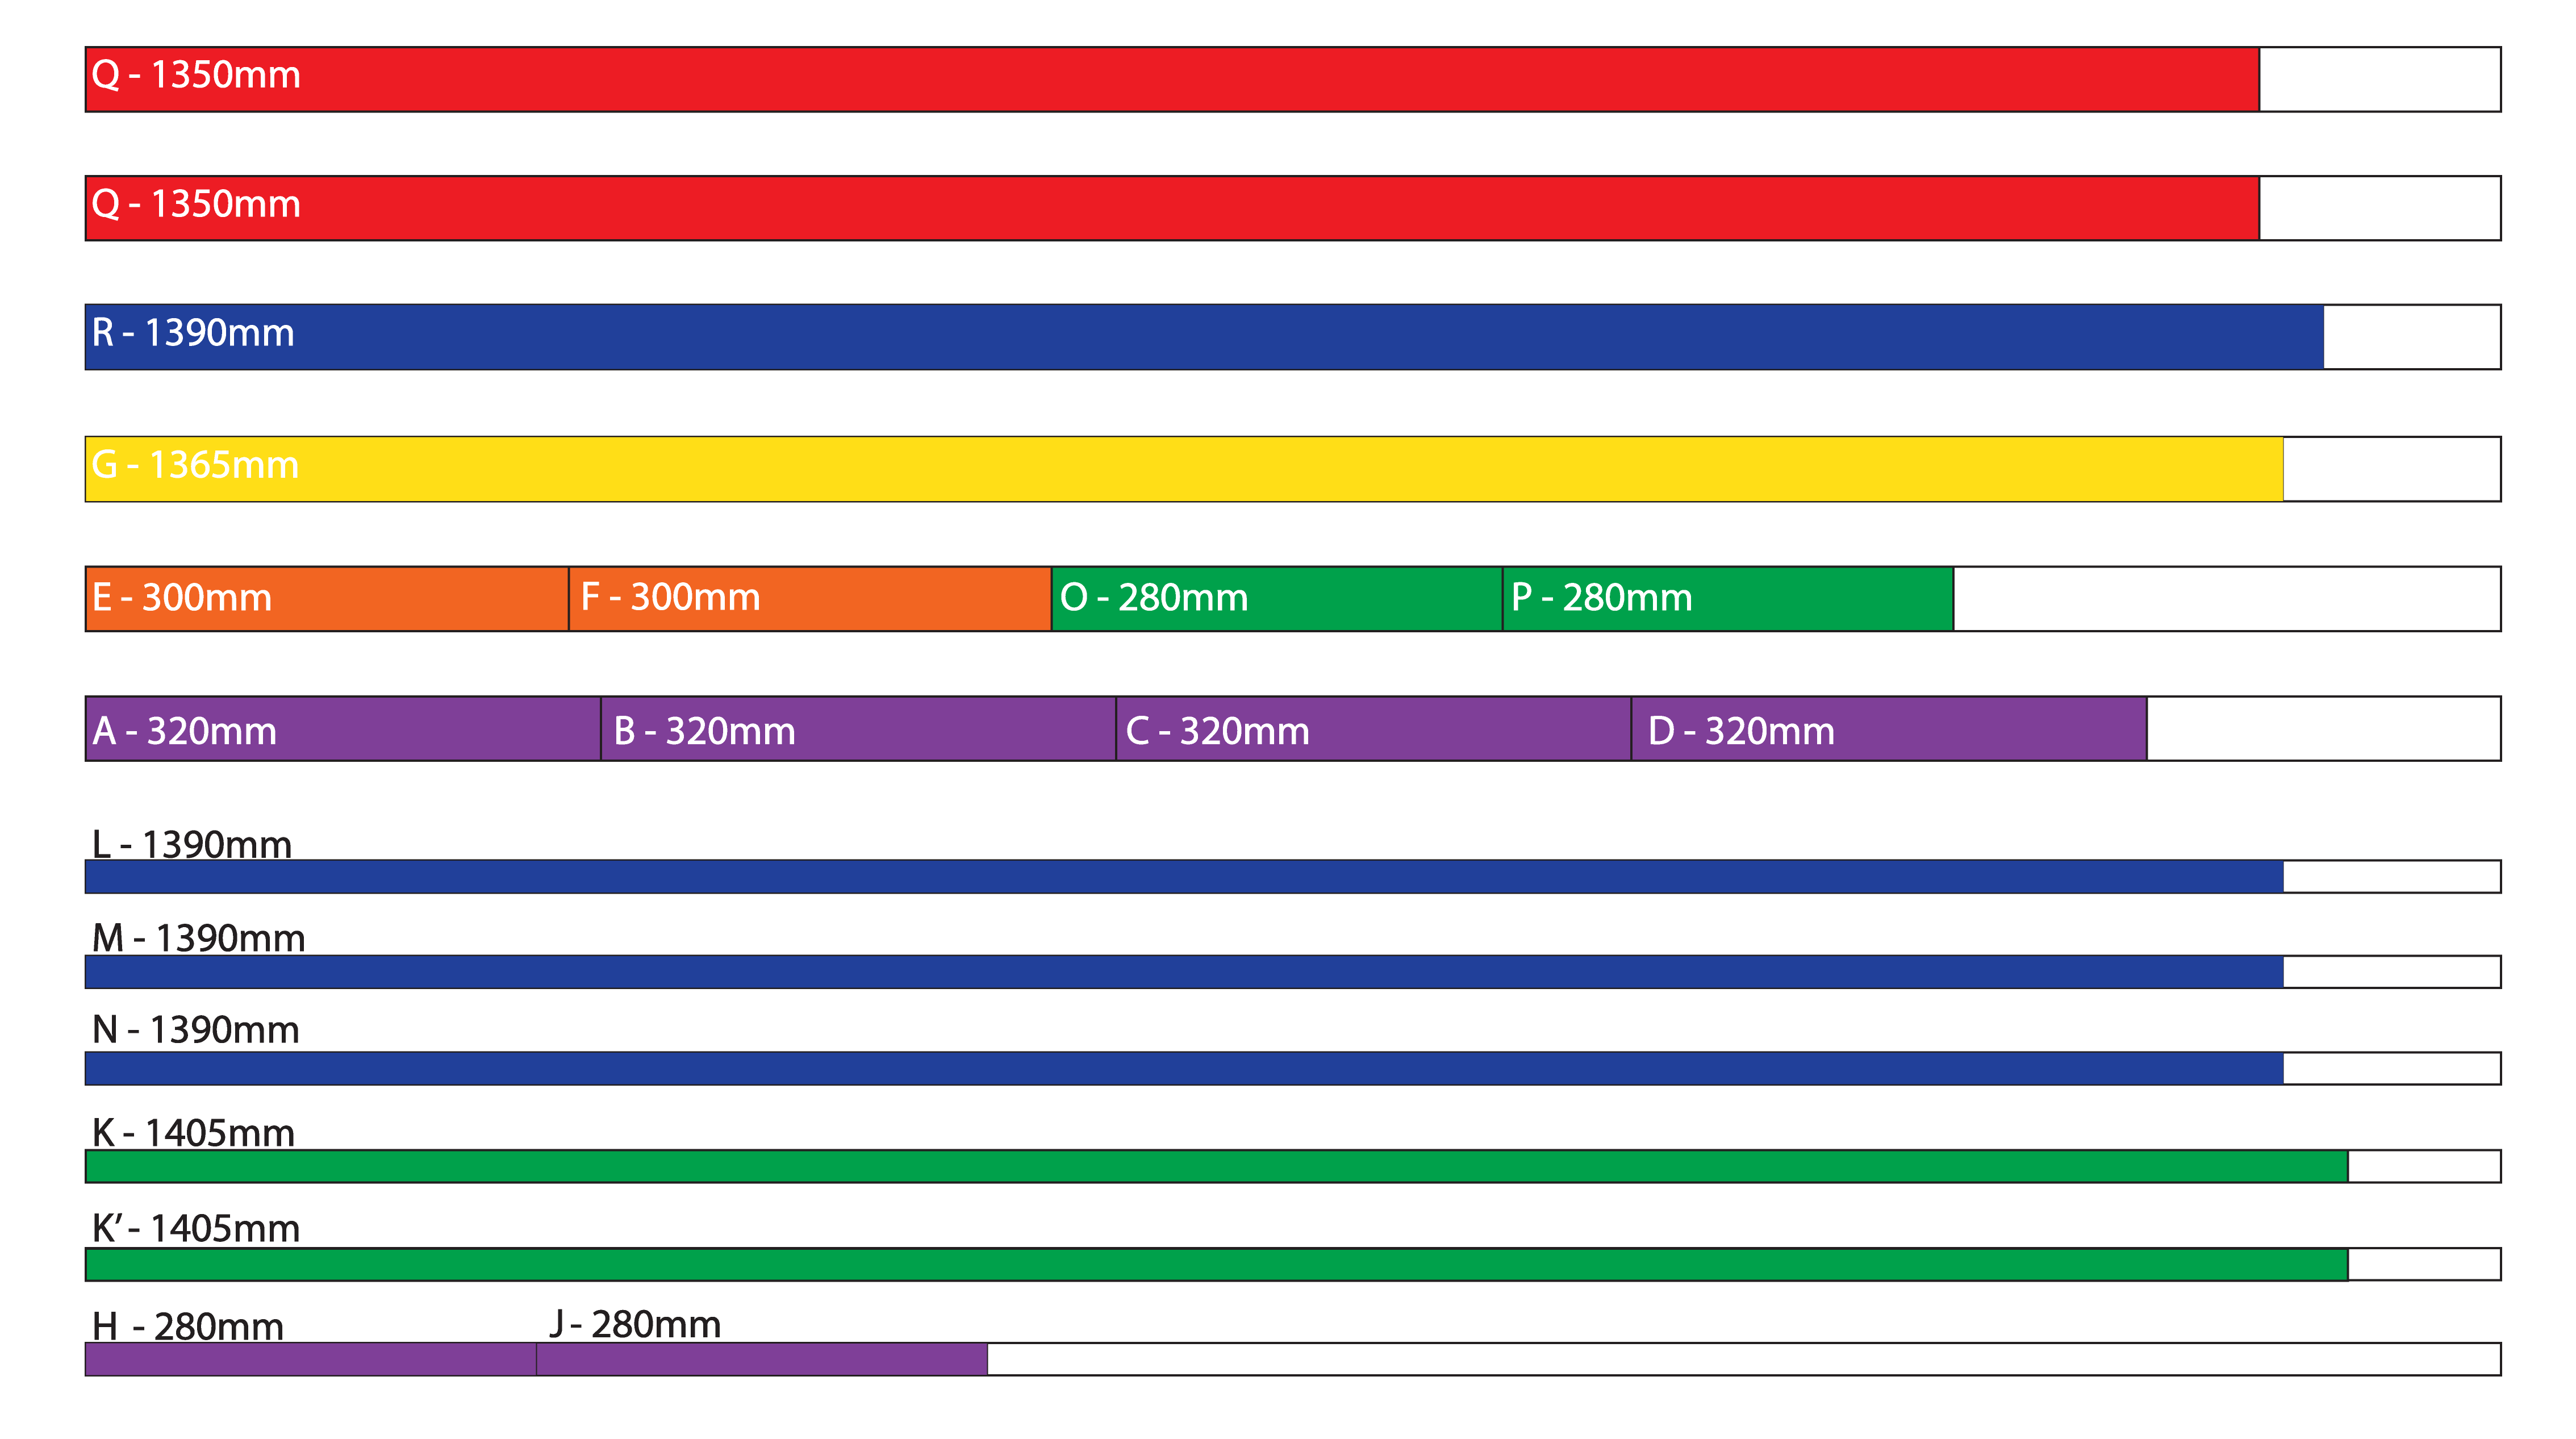
Parts Q, Q', O, and P
Parts Q and Q' (There are two Q pieces) are the main pieces of the Z-carriage. O and P are cross members, joining Q and Q' together. The dimensions for these parts can be derived directly from the size of the bed.
O and P: this cut is simply the distance between two mounting holes in the bed across the Y dimension, plus the offset from two printed bed supports. This offset is 5mm per side, and the distance across the 'short' side of the bed is 27cm. Parts O and P are 280mm long.
For parts Q and Q', we must add the length of the 3x3 corner bracket and half the length of the bed support. The 3x3 corner bracket is 6cm long, and the bed supports 3.5cm long (we can round that up to 4). Therefore, the distance between O and P are 110+(6+2)+(6+2) = 1260mm. Space for the Z-axis leadscrew is given by this graphic, with the z axis mount being 50mm in the relevant dimension:
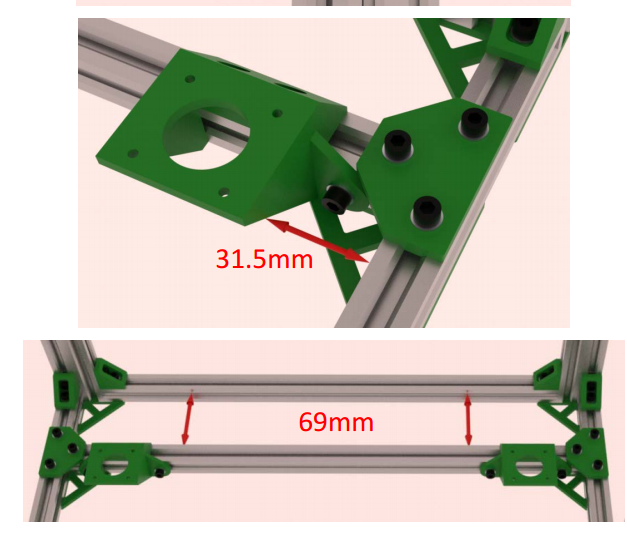
This adds 25mm + 25mm + 20mm +20mm = 90mm to 1260mm, or 1350mm. That's the length of the Z axis carriage.
That's four cuts, netting four pieces.
Part R, the CoreXY carriage
Part R is simply 40mm longer than part Q. That means it's 1390mm long. That's another cut.
Part G, the top back piecs
This part is 15mm longer than part Q. That means it's 1365mm long.
Part E and F, the top short pieces
They're 20mm longer than parts O and P. O and P are 280mm long, meaning Parts E and F are 300mm long.
Parts A, B, C, and D.
These parts determine the Z build height of the machine and are effectively arbitrary. I very much doubt I'll be using a lot of Z height on this printer (and is antithetical to the entire idea of this printer, anyway). Therefore, I'm going to make the sides for this printer square. Why not? If I don't like it, I can just buy another $17 piece of extrusion and make the printer taller.
The front to back depth of this machine is the length of O and P, plus 40mm. These pieces are 280mm long, which means A, B, C, and D are 320mm long. Cut four of them. That's it for the 20x40mm extrusion.
Parts L, M, and N:
These parts are the same length as part G. They're 1365mm long
Parts K and K'
There are two K pieces and are 40mm longer than L, M, and N. They're 1405mm long.
Parts H and J
The same as O and P. They're 280mm long.
Here we go:
The hardest parts of this project were always going to be 1) heating the build plate and 2) acquiring the build plate. Getting one square foot of aluminum, a big heated bed, or even a piece of glass for a normal 3D printer is never a problem. When you make a build plate that's a meter long, things start getting a little harder.
But before you acquire a build plate, you must first design it. Therefore:

Benjamin and banana for scale.
The dimensions of the useful part of the build plate are 25cm by 110 cm. Yes, it's a little bigger than I planned, but I figure why not? The overall dimensions of the build plate 27cm by 112cm. On each long side, there are six holes for M3 screws. You want to support it in the middle, you know...
How to build this build plate
I have access to the Hackaday Design Lab, which gives me access to the 4x8 foot shopbot. A 12x48" sheet of 1/4 inch MIC6 aluminum plate will run me about $150. That's not bad. However, I don't really need MIC6 aluminum - 6061 will do just fine; I'm covering the 'flat' part of this build plate with Kapton and PEI sheet.
If I'm going to build this thing out of 6061, I might as well send the file out to BigBlueSaw. This plate, cut out of 0.25 inch 6061 with basic surface finishing will cost about $200 in quantity one. That's fine.
Here's an interesting fact: this build plate will weigh 18 pounds. This printer is going to easily weigh 70 or 80 pounds.
Build plate file uploaded to hackaday.io
In other news, I've decided on the first print. It's this:

It's designed to fit into the front top aluminum extrusion. I think it's great: it immediately gives the not-at-all sexual name of the machine, while giving a clear demonstration of the capabilities of the machine right up front. Here's the OpenSCAD file for it, with the STL in the project files.
difference(){
    union(){
        cube([500,3,20]);

        translate([7,3.1,0]){
        linear_extrude(height=15){
            text("THE LOOOOOOOOOOOOOOOONG D",
                font = "Liberation Sans:style=Bold", size=20);
        }
    }

        difference(){
            translate([0,-1,5])
                cube([500,1.1,10]);


            translate([0,0,4])
                rotate([45,0,0])
                    cube([500,1.5,10]);

                translate([0,-3,14.2])
            rotate([-45,0,0])
                cube([500,1.5,10]);

        }
    }


    translate([5,5,10])
        rotate([90,0,0])
            cylinder(h=10,d=4, $fs=0.01);

    translate([495,5,10])
        rotate([90,0,0])
            cylinder(h=10,d=4, $fs=0.01);
}20cm X axis, 30 cm Z axis, 100 cm Y axis. or switch the X and Y axis, it doesn't really matter. Need some visualization for that?

That's a Pompeii gladius, full scale, printed on this bot. Yes, it's big.
The design
I've chosen to base this printer off the D-bot Core XY printer. As far as I can tell, it's the best design for printers with one very long axis; the only thing being thrown around the long axis is the print head carriage. This decreases the inertia and will produce better prints. Also, the torque from both the X and Y motors will be used at all times. This will work, and it might work well enough to get rid of the bowden cable.
There will be a few changes to the design. I'm getting rid of the cantilevered bed design and putting four steppers on the Z axis. I'll be using an aluminum (mic6) build plate. That's heavy, and I'll need the extra support and torque from the motors. The Z motors will not be independant. Instead, I'm using this shitty breakout I designed.
A Heated Bed
For large 3D printers, the heated bed is the largest problem. A 200mm x 200mm heated bed draws about 80 Watts, or about 5 W/cm^2. The same power density for this printer looks like this:
Yeah, 43 Amps of 230 mains to get the same power density as the standard RepRap heated bed. This is the problem with large 3D printers.
I can do a heated bed with ~1W/cm^2, which brings the power requirement down to something sensible. For now, though, I'll just print in PLA while making provisions to get a silicone heated bed and a 230V outlet installed.
I've begun printing the parts for the D-bot, and since enlarging it is basically only a matter of ordering more extrusion, there aren't many modifications necessary. Once the parts are printed, I'll spend the $150 on extrusion, $250 on hardware, and get assembling. The print bed is the biggest challenge, but the Hackaday design lab has a shopbot.
I've found that I sometimes need to print very long objects in my 3D printer. The usual way of printing objects that are big in one dimension is to use a delta printer; there's pretty much infinitely extendable in the z direction. This is not the ideal solution for a lot of prints, and I'd rather have a printer that's very long in the X or Y axis.
Therefore, I need to design a printer that is 30 cm in the x axis, 100 cm in the y axis, and about 20 or 30 cm in the z axis. That's 60 liters of volume.
You can just buy a milling or carving machine that's a meter long. There are also 3D printers that have a square meter build footprint. I'm not concerned at all about extending a printer axis to a meter long.
By far the hardest part of this build will be the heated bed. I'm of the opinion that you need a heated bed for a 3D printer, and with a bed this big, it will be a challenge. The rule of thumb for a heated bed is 0.6 W/cm² if you're printing with ABS, and my print bed is 3000 cm². This means I need an 1800 Watt heat bed at the bare minimum. That amount of power means a crappy heat bed, and ideally I would have 1.0 W/cm². That's 3 kilowatts.
I'm trying to build this thing for less than $2500, which means a DC powersupply for the heated bed will take me over budget. I'll need to do an AC heated bed with an SSR. This is well-tread territory in the Reprap world.
That amount of power means a 25A circuit with 120V. This means I won't be using it at home. I'll be using the 220 mains at the hackaspace. There it will only be 13-14 A.
Therefore, I need to find a silicone heated bed, 30cm by 100cm, rated for 220V. Like this, but a lot bigger:
Create an account to leave a comment. Already have an account? Log In.
Thinking about it, I would have opted for a gantry style machine. Long axis gantry routers seem pretty common in these dimensions and it eliminates a massive, moving heated bed in favour of a long-legged mobile gantry. Also as mentioned higher up, at least using multiple heat zones in the bed could cut down on wattage required. That gladius is only 10 cm wide or so, so surely edge heating would be wasted? Anyway interesting project, well done.
This idea is insane. The belts will be so ridiculously long that they will just be sloppy and will be almost impossible to properly tighten to remove slack. The gantry bar will be so long and heavy that Y movements will oscillate badly if it can move at all. A bed that large is the craziest thing; 43A at 230V? Not even a tanning bed draws that much!
Please please if you want to print gigantic things like swords just scale UP, not out. The mechanics barely have to change other than longer lead screws.
Good luck either way.
But such a tall object will wobble itself or lose adhesion due to very high leverage during printing. And tanning beds with 10kW exist :-)
this is very interesting. I've always wondered how CoreXY would perform int he case of elongating one the axes to this extent. I really wanna see how this turns out because most tall printers have long Z axes some really large objects would be better printed flat. So yeah pumped to see this work.
Have you considered tiling a number of smaller heater boards, each with a thermistor? It obviously complicates the controller, but I'd think that you'd want to monitor temp across multiple "zones" of a monster head bed anyway. Something that big isn't going to heat evenly, so different individually controlled chunks of the bed might be a good idea, and simply sourcing.
Would it be possible to only heat up the zones needed? For example, the sword only needs a few zones on the print bed. No sense in heating it up evenly unless you would need to worry about slight expansion and contracting of aluminum. Just an idea.
Hat printer? Is it going to print hats?
Anyway, I'm curious about this project. A few times I ran into issues with my boring classic 20x20x20cm printer (that's about 2 gallons, FYI), needing larger print area.
Become a member to follow this project and never miss any updates
 Sebastian Lenartowicz
 heinz
heinz
 Saabman
 Malte Schrader
Any updates to this project?