 Victor Frost
-
1Step 1
Okay, so rather than give a step by step for MY build, since you all will have radically different budgets and parts, I'm gonna give suuuper general instructions operating on the reasonable assumption that you'll be working with a system that is a collection of separate parts rather than a pre-existing whole you need to take apart and that you have the parts you want to use already.
I'm also going to assume that you have the skills and knowledge for me to skip over stuff like "Hey, don't wire the power backwards!" or "Don't just cut wildly like a jackass!" and that you either have or know how to get wire and other stuff to hook all this business up.
Okay, ready?
Step 1: Parts.
Get all your parts out in front of you. Seriously. I'm not kidding. Your bike included. Pick up everything one at a time and really get a feel for the complexities of their size, shape, and weight. Look at where you're expected to put mounting screws.
If your speaker has a grille you can use, figure out how that mounts to the speaker. Does it just clip onto the speaker? Do the speaker mounting screws go THROUGH the grille first? Do you have to remove part of the grille before you can mount it or access mounting screw holes?
How does your amplifier mount? Screws? Can you get away with using something else, like wire ties, if you have to? Will velcro work? Does your amp have any fans or vents that need to keep unblocked? What about connecting terminals? Where are they located? Read the manual for your amp.
Pick up whatever battery you're going to be using and try holding it in your hands for a minute. An actual minute. Turn it over a few times and really feel where the weight of it lies. Is there any orientation where it feels happier sitting? How heavy is it, really? Where are the terminals? Picture how you would connect to them; what direction will the wires go from the battery?
How thick are the walls of what you're mounting all this stuff to? Does it flex a lot? Is it going to be hanging off of your bike or sitting on top of it? Will it be able to support the weight of all this stuff or will you need to add extra support? Do you live in a place where weather is an issue? Does one side seem more weather resistant than another? Think about how water might flow onto and off of it. Where would you run any cables in and out of it? Take the lid off and look at how the lid interacts with the interior of the container. Any latching mechanisms, rivets, or supports you need to be careful of? How much do you think you could reasonably cut away before the container starts becoming structurally unsound?
Now try physically positioning stuff against other stuff. Pretend you're working with cut out pictures of your parts and look at it to check fits. Put your speaker(s) on your container(s) and get a good look at where they naturally fit together. Now add your battery and see where that could go. Now your amp. Now turn your view around and see how they would fit depth wise into the container. Make sure you know exactly where everything ought to go.
Now take that mental image and think about where it'll go on your bike. How would you secure it? Would it bump into anything that moves? How much does all that stuff weigh and how much weight can your bike actually support? How would it affect the balance of your bike? Can you carry that much more weight and still comfortably bike?
This is all really important stuff we often forget to figure out ahead of time and then have to MacGyver solutions to mid-build. It's better to know NOW than have to learn later and possibly replace parts as a result.
-
2Step 2
Step 2: Measure Twice, Cut Once.
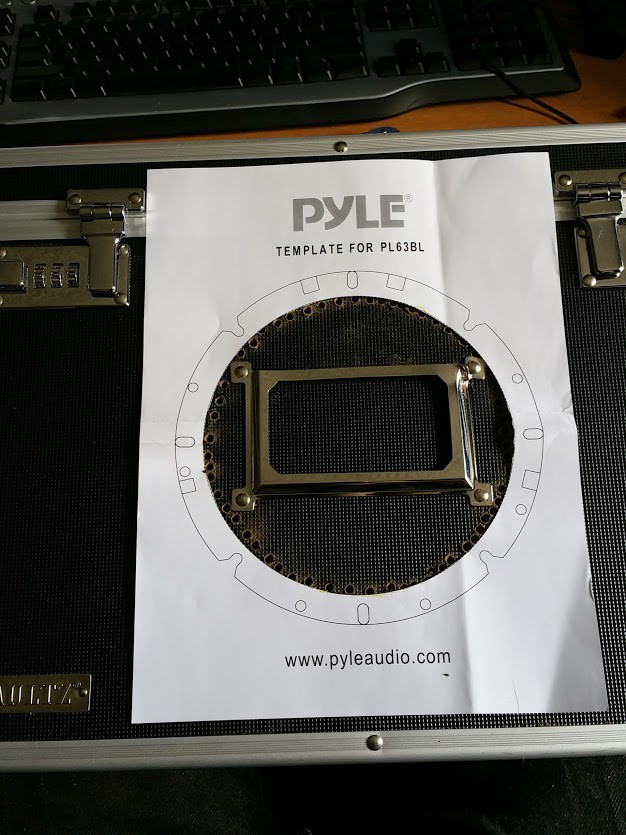
Look at this picture.
![]() That bit of paper has a hole that is cut out to be the size and shape of the part of the speaker that sinks into whatever will be holding it and shows the mounting holes for the speaker. If you bought car speakers like I did something similar will be included. If not, measure the diameter of that part of the speaker and make your own template. Use this to mark out your holes.
That bit of paper has a hole that is cut out to be the size and shape of the part of the speaker that sinks into whatever will be holding it and shows the mounting holes for the speaker. If you bought car speakers like I did something similar will be included. If not, measure the diameter of that part of the speaker and make your own template. Use this to mark out your holes. Now take away the template and look at what you marked out. Does that look like it's right? Measure what you marked out and verify that against the actual speaker.
Check, check, check and check again. You fuck this up in the wrong way and you're gonna have to buy a new enclosure.
If you are sure you've got it right, check again, then go ahead and cut it out.
Now try putting the speaker in. It should sink in but not fall in. You want it sitting pretty, not hanging on for dear life.
Repeat this process for any other surface mounted parts (switches, connectors, buttons, knobs, etc...) and make holes for any cabling you might have coming out of it, measuring the fattest part of the cable (probably the connector) against the middle of whatever other cables you'll have coming out.
-
3Step 3
Step 3: Mount and Stuff
Now, start mounting. Really screw as hard as you can. Give it all you got.
Hang on. Sorry, I was giving instructions for something COMPLETELY different.
Ah, here we are.
Now, start mounting your components. Make sure whatever screws or fasteners you're using are as tight as they can be. If you're using nuts and bolts, put lock or spring washers in and really give it all you got when tightening.
Once you're done mounting, unmount everything and do it again, this time connecting the parts as needed.
Once you're done mounting it again, pick it up and shake it for all you've got. Do jumping jacks while holding it. Make sure everything is totally secure.
Now do it again, but with the power on and music playing. If the music stops or crackles, figure out why and fix it so it doesn't happen again. Keep doing this until it's as solid as a steel pipe.
If all this seems overboard, remember that when you're riding your bike, your legs and butt absorb the bulk of the vibrations. This thing needs to be able to take every bump, crack, jolt, and hit your bike takes when riding on those disgusting craggly roads and sidewalks you forgot are so bad.
-
4Step 4
Step 4: The Fitting and Test.
Finally, load this puppy on your bike and secure it. Make sure any cables coming out of it are routed where they need to go and secured in place.
After you're done tightening things down. Turn on some tunes, pick up your bike, and slam it as hard as you can into the ground without letting go of the bike. Do this a few times. If your new stereo moves, even a little bit, secure it better. Keep doing this until your stereo is just part of the bike, as solid as the cranks or the handles.
And, if you can't lift your bike, you really shouldn't be riding it, much less putting a stereo on it.
Once you are sure it is 100% secure, go for a ride around the block. Get used to the new handling of your bike on a fairly smooth area, then ride it across the grass and dirt in the park. Now off a curb with it at speed. Now hop back onto the curb. Then get up to as fast a speed as you can and see how long it takes for you to stop.
-
5Step 5
Step 5: Have a beer.
If you have done all of this and you have a functioning stereo system on a bike that can handle everything I told you to throw at it, then congratulations, you've earned a beer or other beverage of your choice. Enjoy it while marvelling at your new and wonderful creation and taking instagram selfies with it.
Here are some recommendations in no particular order:
- Samuel Adams Seasonal Craft Beer
- Samuel Adams Boston Lager
- Wyder's Dry Pear or Raspberry Cider
- Redd's Apple Ale
- Literally Anything by Angry Orchard
- Literally Anything by Woodchuck Ciders
- DRY Lavender Soda (Tastes better than it sounds)
- Cucumber Water (if you're feeling oddly classy)
- White Wine Spritzer
-
6Step 6
Step ∞ : Dealing with the aftermath.
On the course of your tunes-filled travels, you will notice something: people. Their heads will turn as you pass. They will approach you as your lock up your bike. They may even try to stop you while you're riding. This is something you will have to get used to. Your new creation is awesome and, I'm sorry, but they just can't help wanting to know more. They will have questions. Here are some common responses you should learn to help speed things up.
- Yes, I made it myself.
- Yes, it is loud enough... for now.
- No, the balance is fine. It was hard to get right, but I'm glad I took the time to think it through.
- Yes, you can get a closer look, but please don't touch the insides.
- It took more time planning than building but it was worth it.
- It wasn't that hard. I had a really good guide to help me.
- Yes, I thought about using a dynamo, but they just don't make enough power.
- Well, I really should get going.
- Yeah, you can find that guide on Hackaday.io, just search for Victor Frost.
- Honestly, I appreciate your enthusiasm, but I'm gonna be late if I don't get going soon...
- Okay, Seriously. Bye.
This is the life you have chosen for yourself. It is the cross we all bear as awesome people who build awesome things.
 That bit of paper has a hole that is cut out to be the size and shape of the part of the speaker that sinks into whatever will be holding it and shows the mounting holes for the speaker. If you bought car speakers like I did something similar will be included. If not, measure the diameter of that part of the speaker and make your own template. Use this to mark out your holes.
Discussions
Become a Hackaday.io Member
Create an account to leave a comment. Already have an account? Log In.