 Daniel Sikar
-
1Step 1
Notes on build instructions
Everything behind (or literally above) the Arduino UNO, as per Fig. 3 System design, is not essential. I am doing it for the sake of trying to develop something of a practical nature. The proof of concept worked with turning a led on, off and varying its brightness. The heater control came along as I see it everywhere; reflow ovens, sous-vides, hacked espresso machines, home brewing and so on.
If you are interested in the part sitting in front of the Arduino UNO, then you may revert to the led example (Github link has details), or perhaps you have other embedded projects ready, and are interested in creating a generic interface to control and integrate them all via a notebook, tablet or smartphone, then why not join the project? Two heads think better than one!
1. Oven
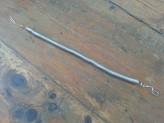
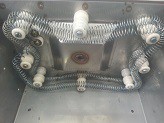
A length of nickel chrome wire preferably, but not necessarily, wound in a spiral, then mounted around isolators e.g. ceramic or other material. Note, the wire can get red hot. Each end of the spiral will be one terminal.
Fig. 1 Nickel chrome coil, oven interior and external terminals
![]()
![]()
![]()
-
2Step 2
2. Chromel-Alumel Thermocouple
https://hackaday.io/project/8213-chromel-alumel-thermocouple
-
3Step 3
3. MDFLY BT0417C Configuration
https://hackaday.io/project/8231-configuring-the-bt0417c-bluetooth-adapter
Jsoknit 2015
Simple embedded software function definition JSON framework.

Discussions
Become a Hackaday.io Member
Create an account to leave a comment. Already have an account? Log In.