Voja Antonic
-
Version B prototype
08/17/2015 at 14:38 • 8 commentsMy PCBs arrived at last, so I can build the final prototype, with much simpler hardware.
The main modification is in True RNG hardware - istead of external white noise generator, which also worked fine, now I use the uninitialized internal RAM state. I described that process at http://hackaday.com/2015/06/29/true-random-number-generator-for-a-true-hacker/, so I won't write about it here.
I have built six units (that much I promissed to my friends), and everything works great. Here is the first photo:
![]()
-
Hacker's True RNG
06/07/2015 at 08:58 • 2 commentsHow to save a lot of components, time and board space? White noise TRNG (True Random Number Generator) works fine - it is the standard solution for low-cost (and yet relatively high quality) random numbers, but it needs a lot of external components and takes two thirds of PCB space. Why can't we use some software PRNG (Pseudo RNG) instead of it?
Most gaming machines use that solution, and it works fine, but in this case it won't be a good idea. Here's why.
PRNG starts from some known seed and it always produces the same sequence when initialized with the same state. That's why gaming machines constantly employ their PRNGs to generate dummy random numbers (and thus new seeds) frequently. When someone starts playing the game, he can't say how many times seed was changed, so it appears as truly random number generator.
This project works in the other way - if you want to create the new password, you plug the unit in USB port and press two buttons (new-A...D). It could be very fast and thus predictable, even if you have a good PRNG with long sequence. But if we could generate the truly random seed for PRNG, we could solve the problem.
PIC MCUs don't have internal hardware for TRNG, but there is one resource which we can use, specifically with this project. When you apply power to the MCU, its internal Data RAM will have the unknown contents. Each flip-flop will be initialized to 0 or 1 state, which could the consequence of imperfection of internal circuits, but in most cases it will depend on thermal noise. That's why the contents of RAM is different each time it's switched on.
This feature is used for seed generation. Some flip-flops will always have the same state, but it doesn't matter, as most of them will be random. Our TRNG routine has to generate only eight bytes of TRNG sequence, so we can use many bits to make only one random bit. It will XOR the first 256 bytes of RAM to generate first byte, and so on - 256 bytes guarantee that there will be enough truly random (or, to be more specific, unpredictable) bytes. As this MCU has 2K of Data RAM, we shall have eight truly random 8-bit numbers. Four of them are used as 32-bit PRNG seed, and the remaining four are used for additional scrambling of PRNG results: if bit 0 in byte 0 (or 1,2,3) is set, then the result byte will be XORed with byte 4 (or 5,6,7), which was generated during initial RAM XORing. There is one more scrambling at the end - randomization sequence is constantly dummy invoked at about 70 KHz rate while MCU is waiting for the key to be pressed.
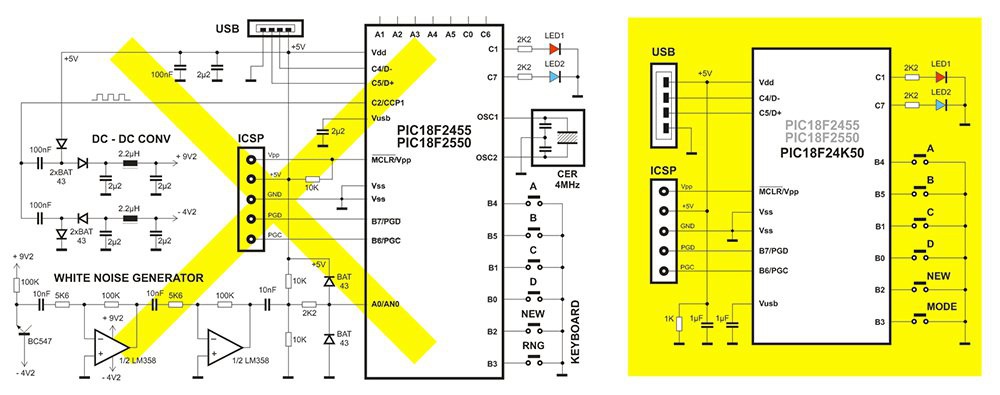
All this guarantees that excluding of TRNG hardware (white noise generator and DC-DC convertor) won't cause any performance degradation. The same procedure of seed creation can be used for other applications, keeping in mind the main thing - RAM contents must be uninitialized and used as-is, immidiatelly after power on. Here we need chaotic (high entropy) RAM contents, so we can't use no battery backup or high capacity decoupling - keep in mind that CMOS RAM retention voltage can be pretty low. That is why there is no RAM initializaton in firmware (except the small "housekeeping" portion), and there is 1K resistor in parallel with MCU supply line (bottom left on the yellow highlighted schematics diagram), it guaranees that RAM will not remember anything from its previous "reincarnations"!
![]()
There is one more suggestion. Instead of 18F2455 (or 2550), it is better to use 18F24K50 (or 25K50). It is significanly cheaper (around half a price), it has internal clock source accurate enough for USB application, and internal MCLR pull-up.
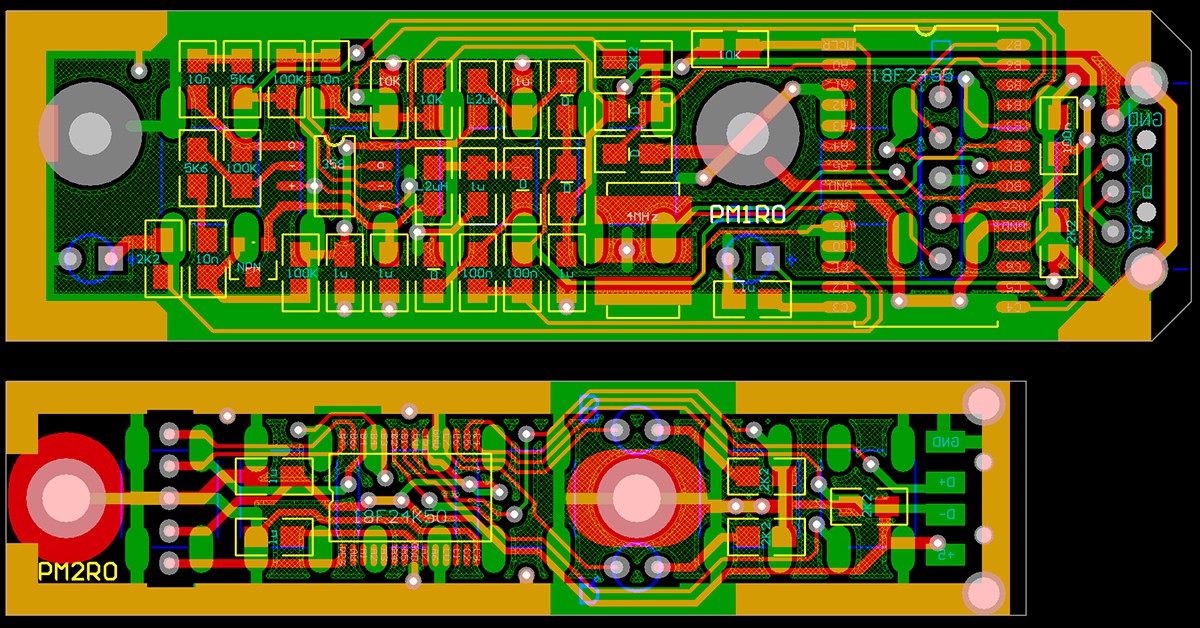
Now there are only a few electronic components. USB and ICSP connectors, slightly smaller keys, LEDs and MCU (now in SSOP package) are still here, but there are only two capacitors and three resistors - that's all. I made the new PCB project, here it is compared to the first version. Dimensions of the final unit (excluding USB connector) will be 65x17x9.5 mm.
![]()
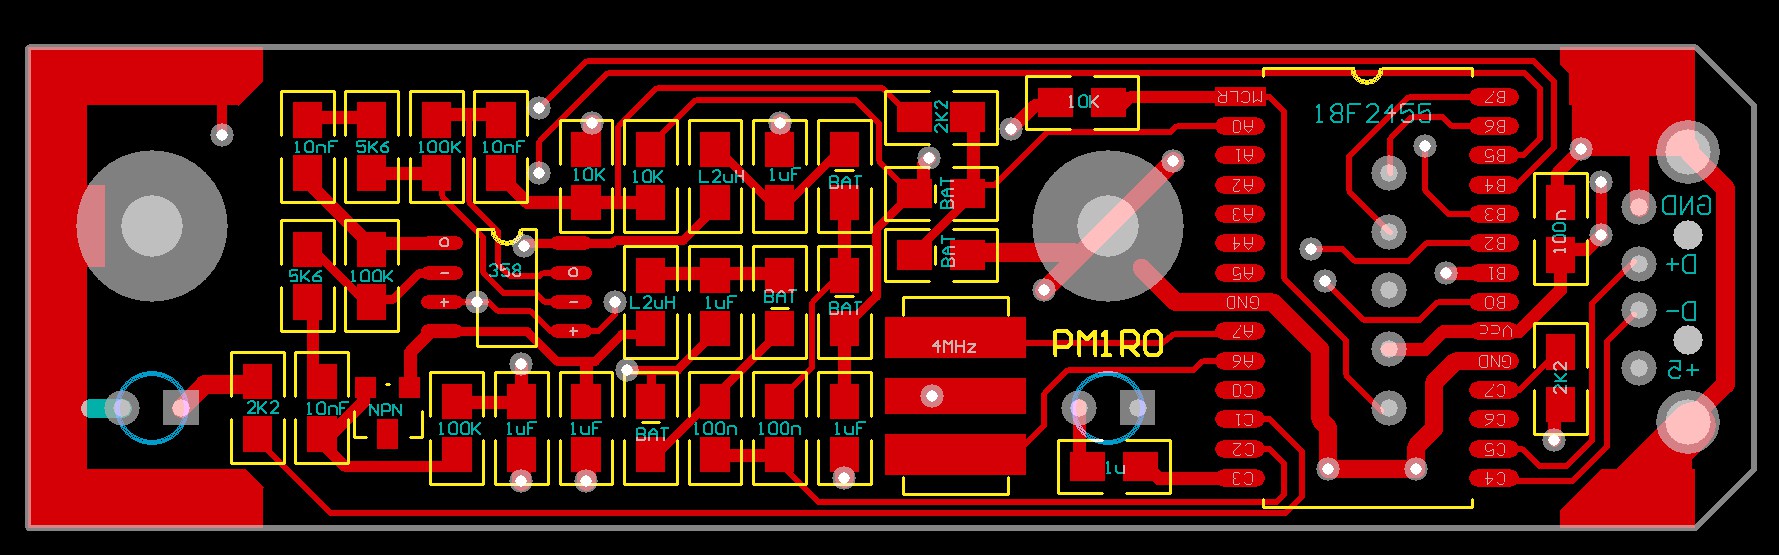
And the component placement:
![]()
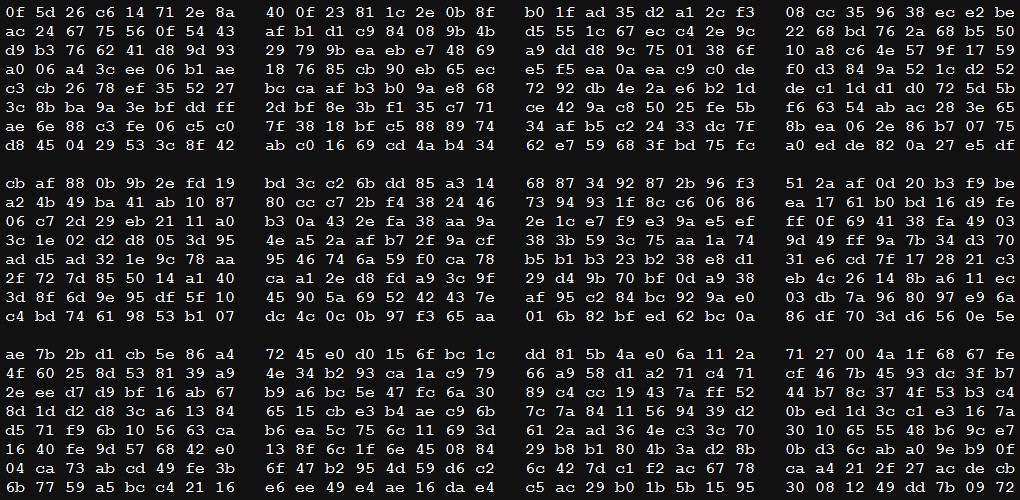
Here are some tests of TRNG unit (password creation is switched off during these tests). The unit was connected to USB port repeatedly for 96 times, and firmware was arranged to send 8 bytes of seed to the text editor. It's a small sample for statistical analysis, but at a quick look there are no recognizable patterns.
![]()
-
Firmware is finished
06/01/2015 at 22:31 • 0 commentsFirmware is complete (assembly language), at least beta version. Works great, but testing is still in progress.
Source filea are available at http://www.voja.rs/PROJECTS/npr.htm
By the way, to keep your passwords safe in this unit, you should...:
- Never click on "Remember password" option when your browser asks you
- Never leave this hardware unattended in the group of people
- All the passwords are in MCU Flash, don't keep them anywhere else, except on the backup paper
- If you use it on some public computer, change the password when you arrive home
- Scan your computer for Trojans frequently, as the only drawback of this approach is possibility that some Key Logger or similar spy program is installed in your computer. -
Final assembly
05/29/2015 at 16:27 • 0 commentsI received PCBs from my supplier and built the final version of the unit. Now I shall show it around to my friends, to hear their opinion.
I have upgraded the firmware a little. I added more password registers, so there are eight instead of four passwords. I also rearanged key functions a little, so the key which was named RNG will act as "Mode switch" key - it toggles between RED and BLUE led. Key NEW acts similarly to Shift or Ctrl key on the computer.
Here is the key function list:
Key ....................Red mode ..........................................Blue mode
A: .......................Type password A ............................Type password E
B: .......................Type password B ............................Type password F
C: .......................Type password C ............................Type password G
D: .......................Type password D ............................Type password H
NEW-A: ............Create and type password A ......Create and type password E
NEW-B: ............Create and type password B ......Create and type password F
NEW-C: ............Create and type password C ......Create and type password G
NEW-D: ............Create and type password D ......Create and type password HSpecial functions:
RNG: Toggle between Red mode and Blue mode (this key will be renamed)
NEW-RNG in RED mode: Type password list
NEW-RNG in BLUE mode: Hex random streamIf the mode is RED, then the last command (NEW-RNG) is for backup password list creating. You open some text editor (Notepad or so), press NEW-RNG and get something like this (this was not typed on keyboard, byt generated directly from my unit - the only thing that I added are dots, as this editor does not like spaces in a row and does not support proportional fonts):
Password list
A: YwymSBLIf3GyzPyTuV0 .......... 34
B: 44XKZRtY9nJ7rouW2l ................ 2
C: BwULbiSIsS9pXyxl7b9 ............ 82
D: x0W2QMXWQuxOOVk ............ 19
E: yGa3poQ8SiuIEBGMZexc .......... 1
F: M5jVWc16Au8OmtYb ............... 36
G: c9bkTP9f8nbVzI6dkT13 ............. 1
H: Jeq6XTqRI1bR4Kg6 .................... 2The last column shows how many times the password was invoked since it was created (this number should be at least 1, as the password is automayically invoked once immediately after its creation). You can use this counter state to check if someone used it without your knowledge.
Now you can print the password list and keep the paper at some safe place (do not keep it as a file on the computer - why did you build this unit then?)
Hardware password manager
Small USB unit which simulates keyboard and generates, keeps and types up to eight passwords