-
1Step 1
Probably the least likely step - acquire an MF Digital Scribe. Although I'm sure this project could be adapted and applied to a different model of CD robot quite easily.
Ensure the mechanism works fully as expected, that the PC inside it boots up and you can log in.
If the PC is busted up, don't fret. You can pretty much substitute the entire PC component for your own bits, as the robot is USB, uses an FTDI serial connection, and uses the internal USB header, 0.1inch pitch to communicate with the driver board.
The bits you do need working though is the complete driver board (lest you build a new one), the rotate mechanism and stepper + sensor, the vertical travel mechanism and stepper + sensor, and the gripper mechanism and solenoid.
If these are busted up, you're gonna have a bad time.
-
2Step 2
Use the 'technician' software on the C: drive, which opens up a HyperTerminal session to the serial port it lives on.
-
3Step 3
The robot firmware responds to ultra simple single character inputs, to complete relatively complex arm movements. Press 'C' to carry out an initial 'calibration'.
Press 'I' to load a disk into the Right tray, press 'K' to load a disk into the left tray (Capitals important). The tray must be open to accept the disk.
NOTE - The robot 'knows' if it succeeded in depositing a disk in a tray, as opposed to just dropping it on the base. It'll light a red LED if it detects an error status, including not being able to pick up a disk or properly deposit it. If the LED lights, you must press 'C' to recalibrate the arm positions before going again.
-
4Step 4
If this works, you have a good functional robot! Continue, or fix up any of the mechanics to get it working.
-
5Step 5
Make a folder on the desktop for convenience, deposit my package files into this folder. You can check out the sources later.
Included is an altered CUETools.ConsoleRipper.exe file, along with all required libraries, and the RobotRip.exe rip automation software.
-
6Step 6
Stack your CDs into any of the input bins, doesn't matter which.
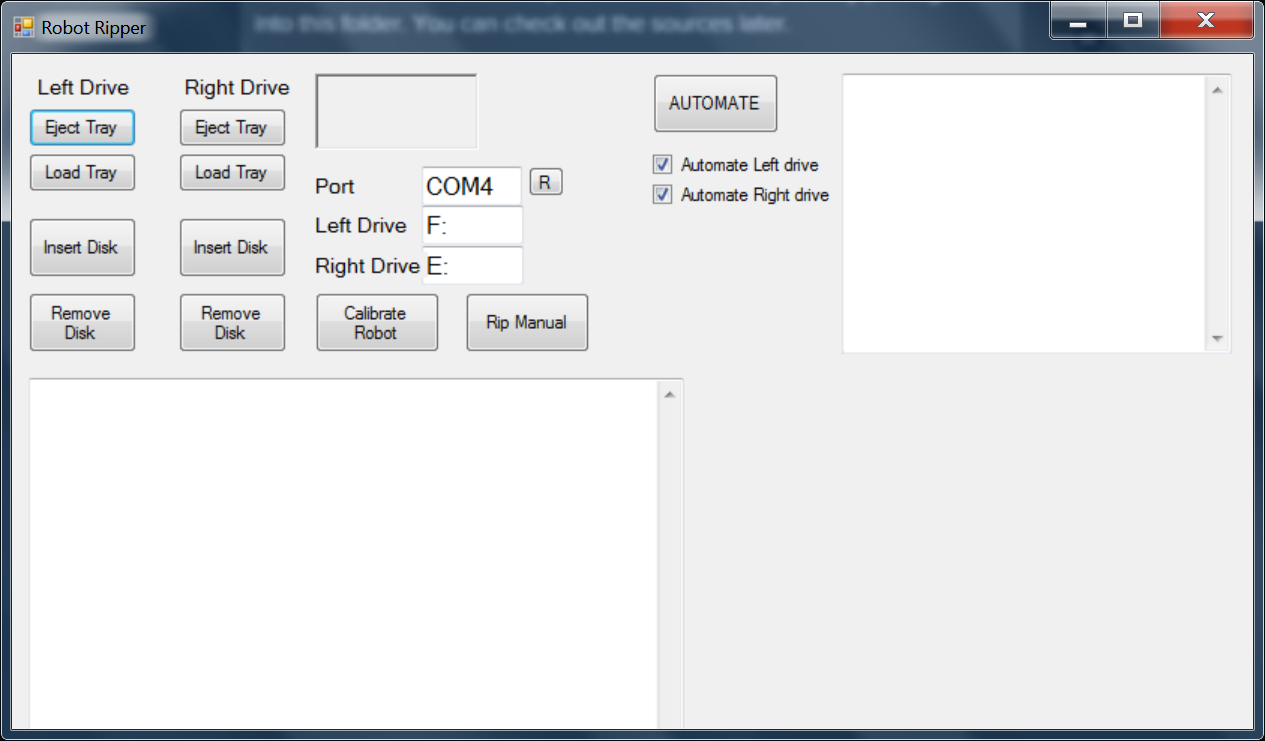
Run the RobotRip.exe program -
![]()
Click 'Automate'.
It will proceed to load disks into the left tray (left drive used only despite the tick boxes!), run the console ripper, and deposit WAV and CUE files into the 'rips' folder, process all disk into the output metal spike, all automatically.
-
7Step 7
Upon finishing a stack of disks, it's not so simple determining whether the stack of CDs is exhausted, the robot doesn't know. So it will fail several times opening the tray, trying to load a disk, closing the tray, etc.
RobotRip detects error states and counts them, i.e. an illumination of the red LED, so it counts three such 'errors' then stops the process entirely.
-
8Step 8
From here, use normal Windows file shares to transfer the files up to your desktop PC / Laptop. Your house is well networked isn't it!? ;-)
The MP3 conversion process is possible on the robot PC, but it's probably not going to be particularly fast.
It's no real chore at all to use the CUETools package to go over the entire folder of WAV and CUE files to convert them to MP3s automatically.
Run the CUETools GUI program, change to 'convert' mode, click 'tracks', choose your output quality on the slider, then select the input folder. Assure the output file naming scheme is good by carrying out some tests in the GUI. It reads the CUE file to determine all the details about the album and does the traditional 1 file per track way of working.
When set, you can also run cuetools.exe /Convert to carry out automatic conversion on complete folders of WAV files.
I'm seriously thinking about leaving the Lossless WAVs available for the greatest audio quality - disk space is cheap - however my ears really aren't up to the task of telling the difference!
-
9Step 9
Profit.
But don't re-distribute the music files! Reward the artists.
Music CD Ripper Robot
A CD Robot and PC combined, plus some custom software to capture my 25+ year CD Audio collection to the digital era.

Discussions
Become a Hackaday.io Member
Create an account to leave a comment. Already have an account? Log In.