sako0938
-
Is anybody out there?!
02/11/2017 at 03:58 • 1 commentI have been working on this project for a couple years now, and I have finally made something that is fairly easy to make and useful for me, but I always wanted this to be useful to others. This project has 790 followers, but only 4 comments!! Who are you people out there who thinks this could be useful? Message me! I am thinking of doing a small (5-20) production run for friends and family, and wanted to put my value proposition out there:
Who is interested in a 4 controllable AC outlets with AC current logging, powered by the Particle environment, and temperature/humidity/light intensity sensing for <$100? And it has a web and iOS app interface?
I think this is could be the home "growers", brewers, makers, distillers new favorite toy.
Please I need any feedback I can get, if anyone messages to express any sentiment to me about the project, I will post a public GitHub repo with PCB design files, Bill of Materials, Software, and Firmware. (its currently private for my ease of login and security, not for lack of transparency)
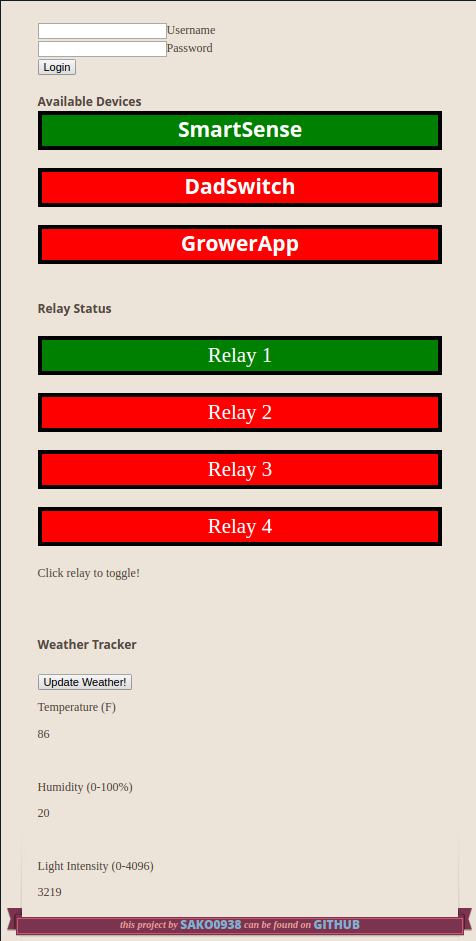
Web Interface
![]()
Latest project: Mint Plant grown with 5 x 100Watt equivalent LED bulbs = ~75W
![]()
-
Hydroponic Pumpkins and Future Plans
06/20/2016 at 04:24 • 0 commentsCheck out this demo application for the PhotonHome, growing hydroponic pumpkins. I first started a number of pumpkins in a coco coir and vermiculite mixture in a starting tray from a garden store, then I moved the two best growers into the clay balls "hydroton" in the planter. Right now I am planning on doing a 5 minute water every hour, but maybe 15 minutes every 3 hours might work better?
-
AC/DC Converter
01/23/2016 at 23:31 • 0 commentsI found some nice AC/DC converters from Jameco Electronics, which are fairly high current switching ones. I got a 5V@3A one for $10. This allows me to put this in the case, and have the entire system be powered from the AC power input. No more external wall-wart!
Also, my Photon sense PCB is at the fab. That will have 2 NeoPixel outputs, 1 thermocouple, 1 controllable USB, and 1 DHT22 Temperature and Humidity sensors. I have gotten the parts already in the mail. I'm glad the AC/DC converter worked well, because for the NeoPixels, I'll need a lot of 5V current.
-
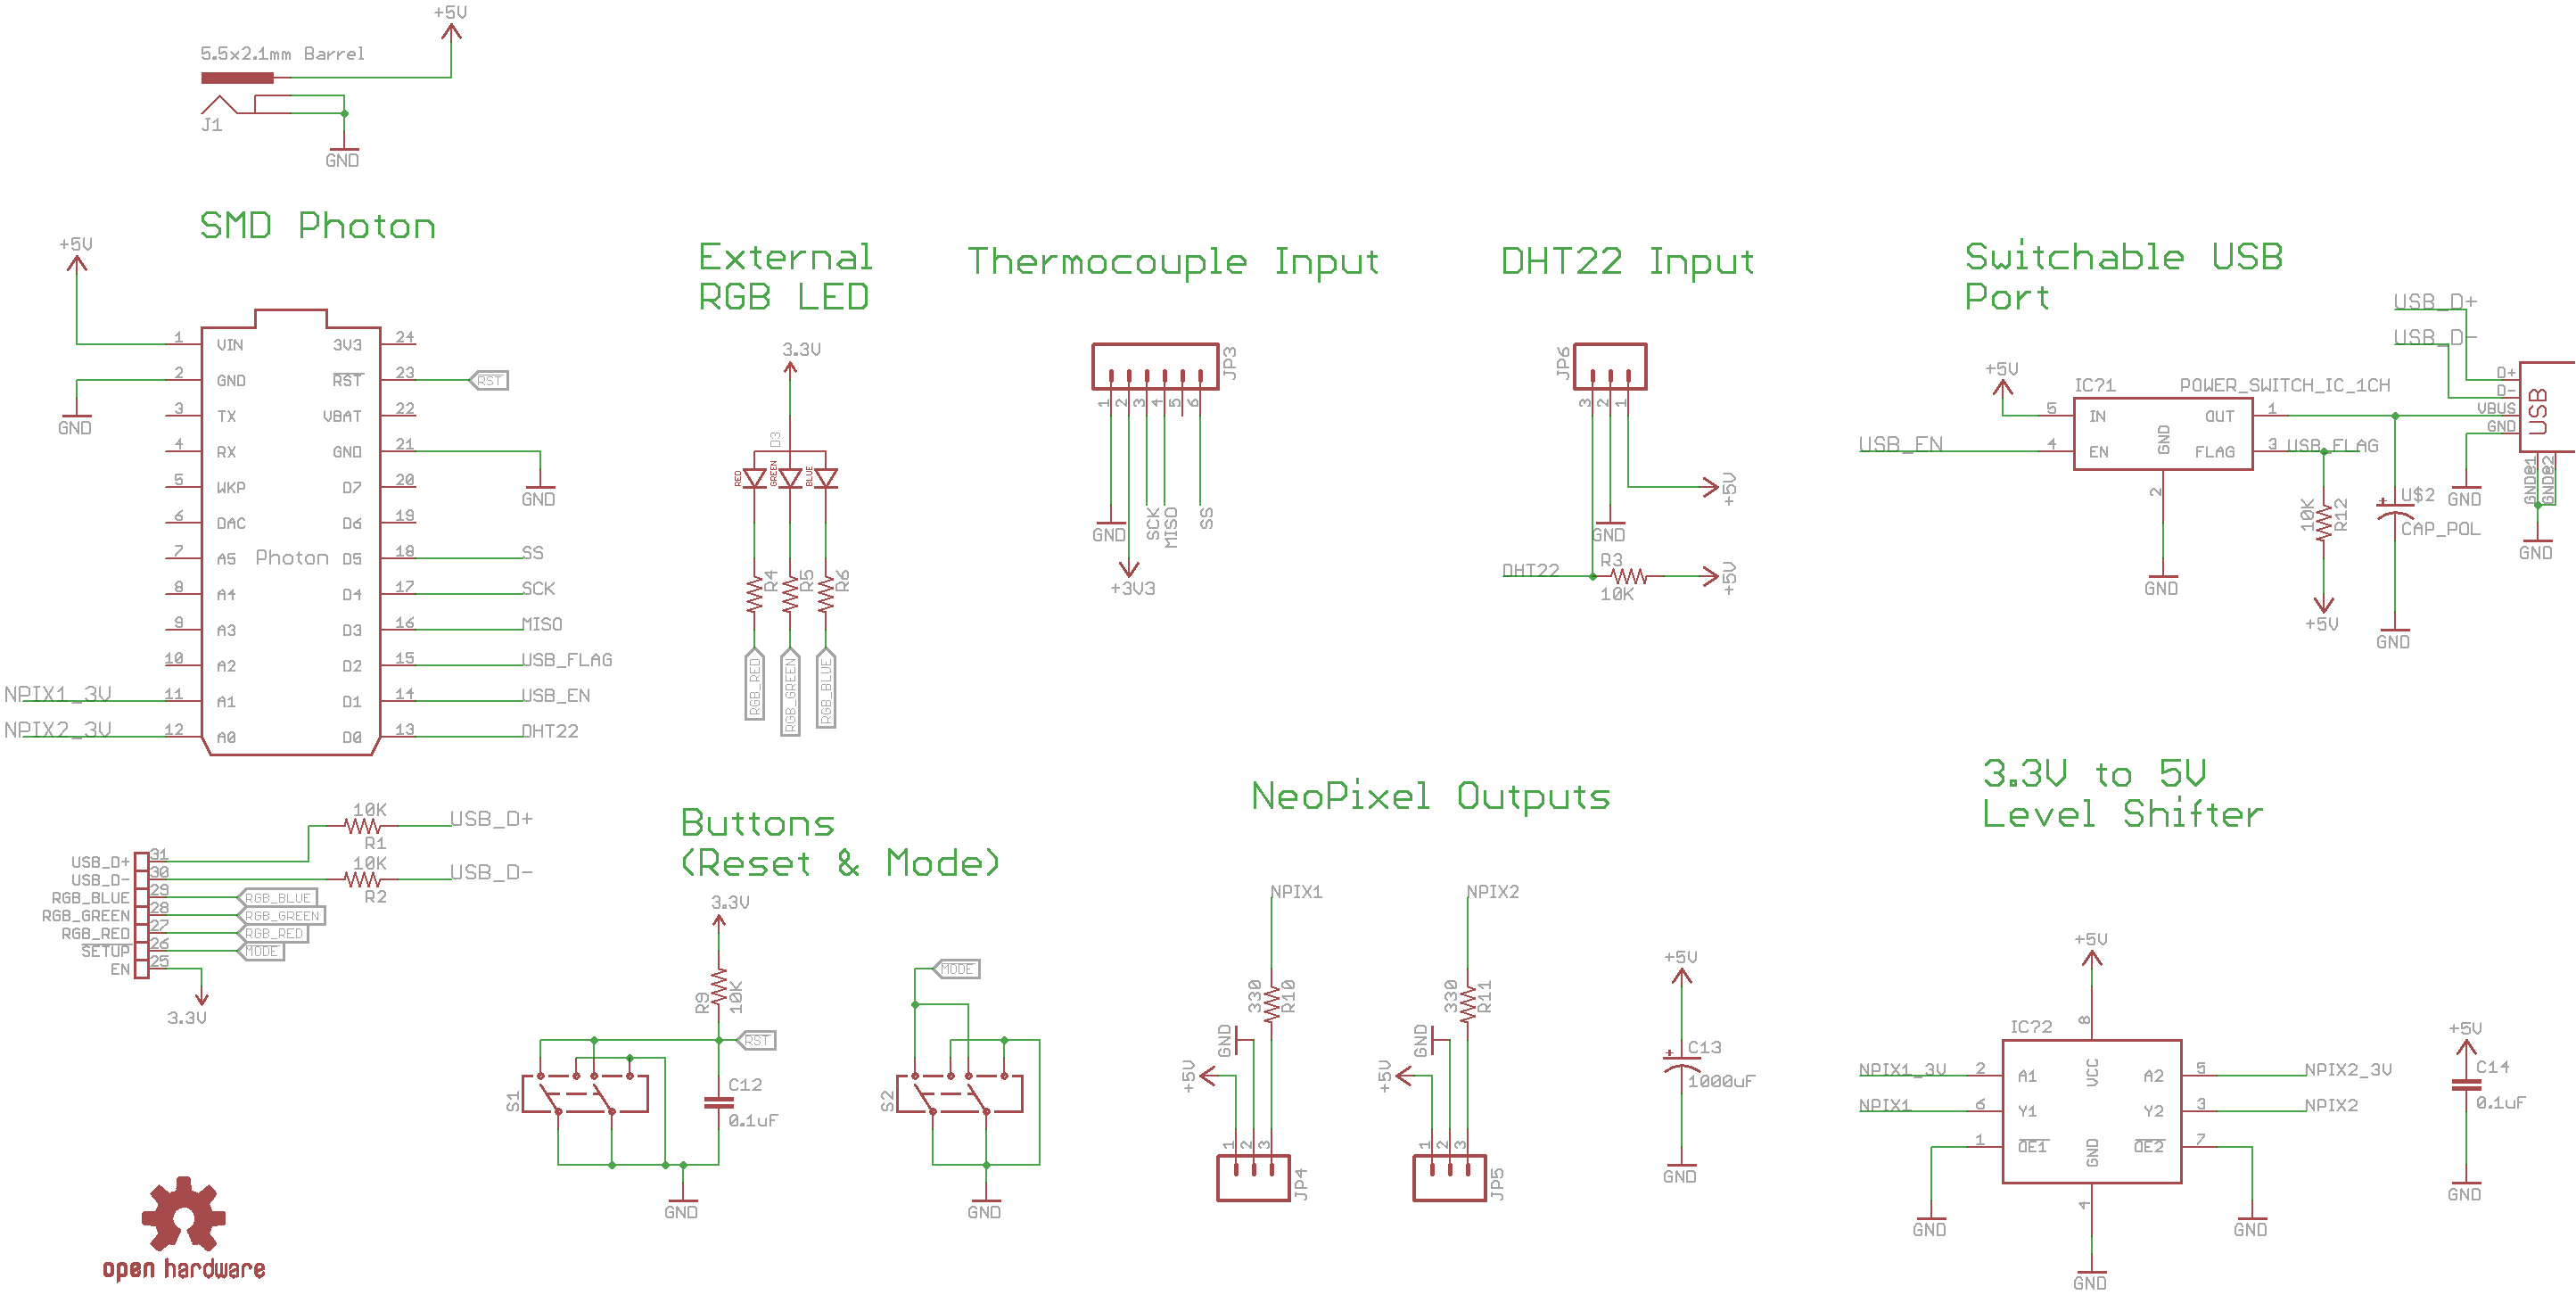
Sense Board Complete!
01/16/2016 at 23:04 • 0 commentsThis is a bit of a side project, but I need more Photon sensors to control the electrical outlet controller. I am creating a PCB with:
2 - NeoPixel WS2812B outputs.
1 - USB port with power switching
(This is to test the switching high-side switch, which will be featured on the next PhotonHome revision)
1 - DHT22 Temperature and Humidity Sensor Input
(I can't keep putting the whole sensor PCB in the freezer, its going to short someday)
1 - Thermocouple input header
(This requires the SparkFun Thermocouple Breakout - MAX31855K)
Here is the schematic:
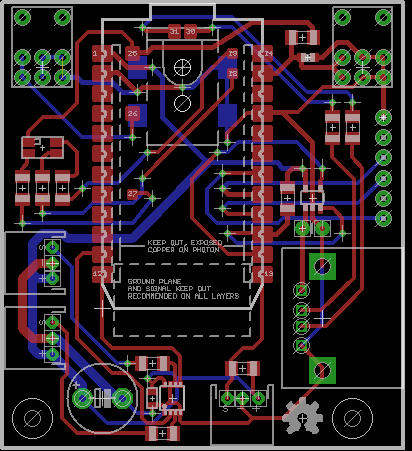
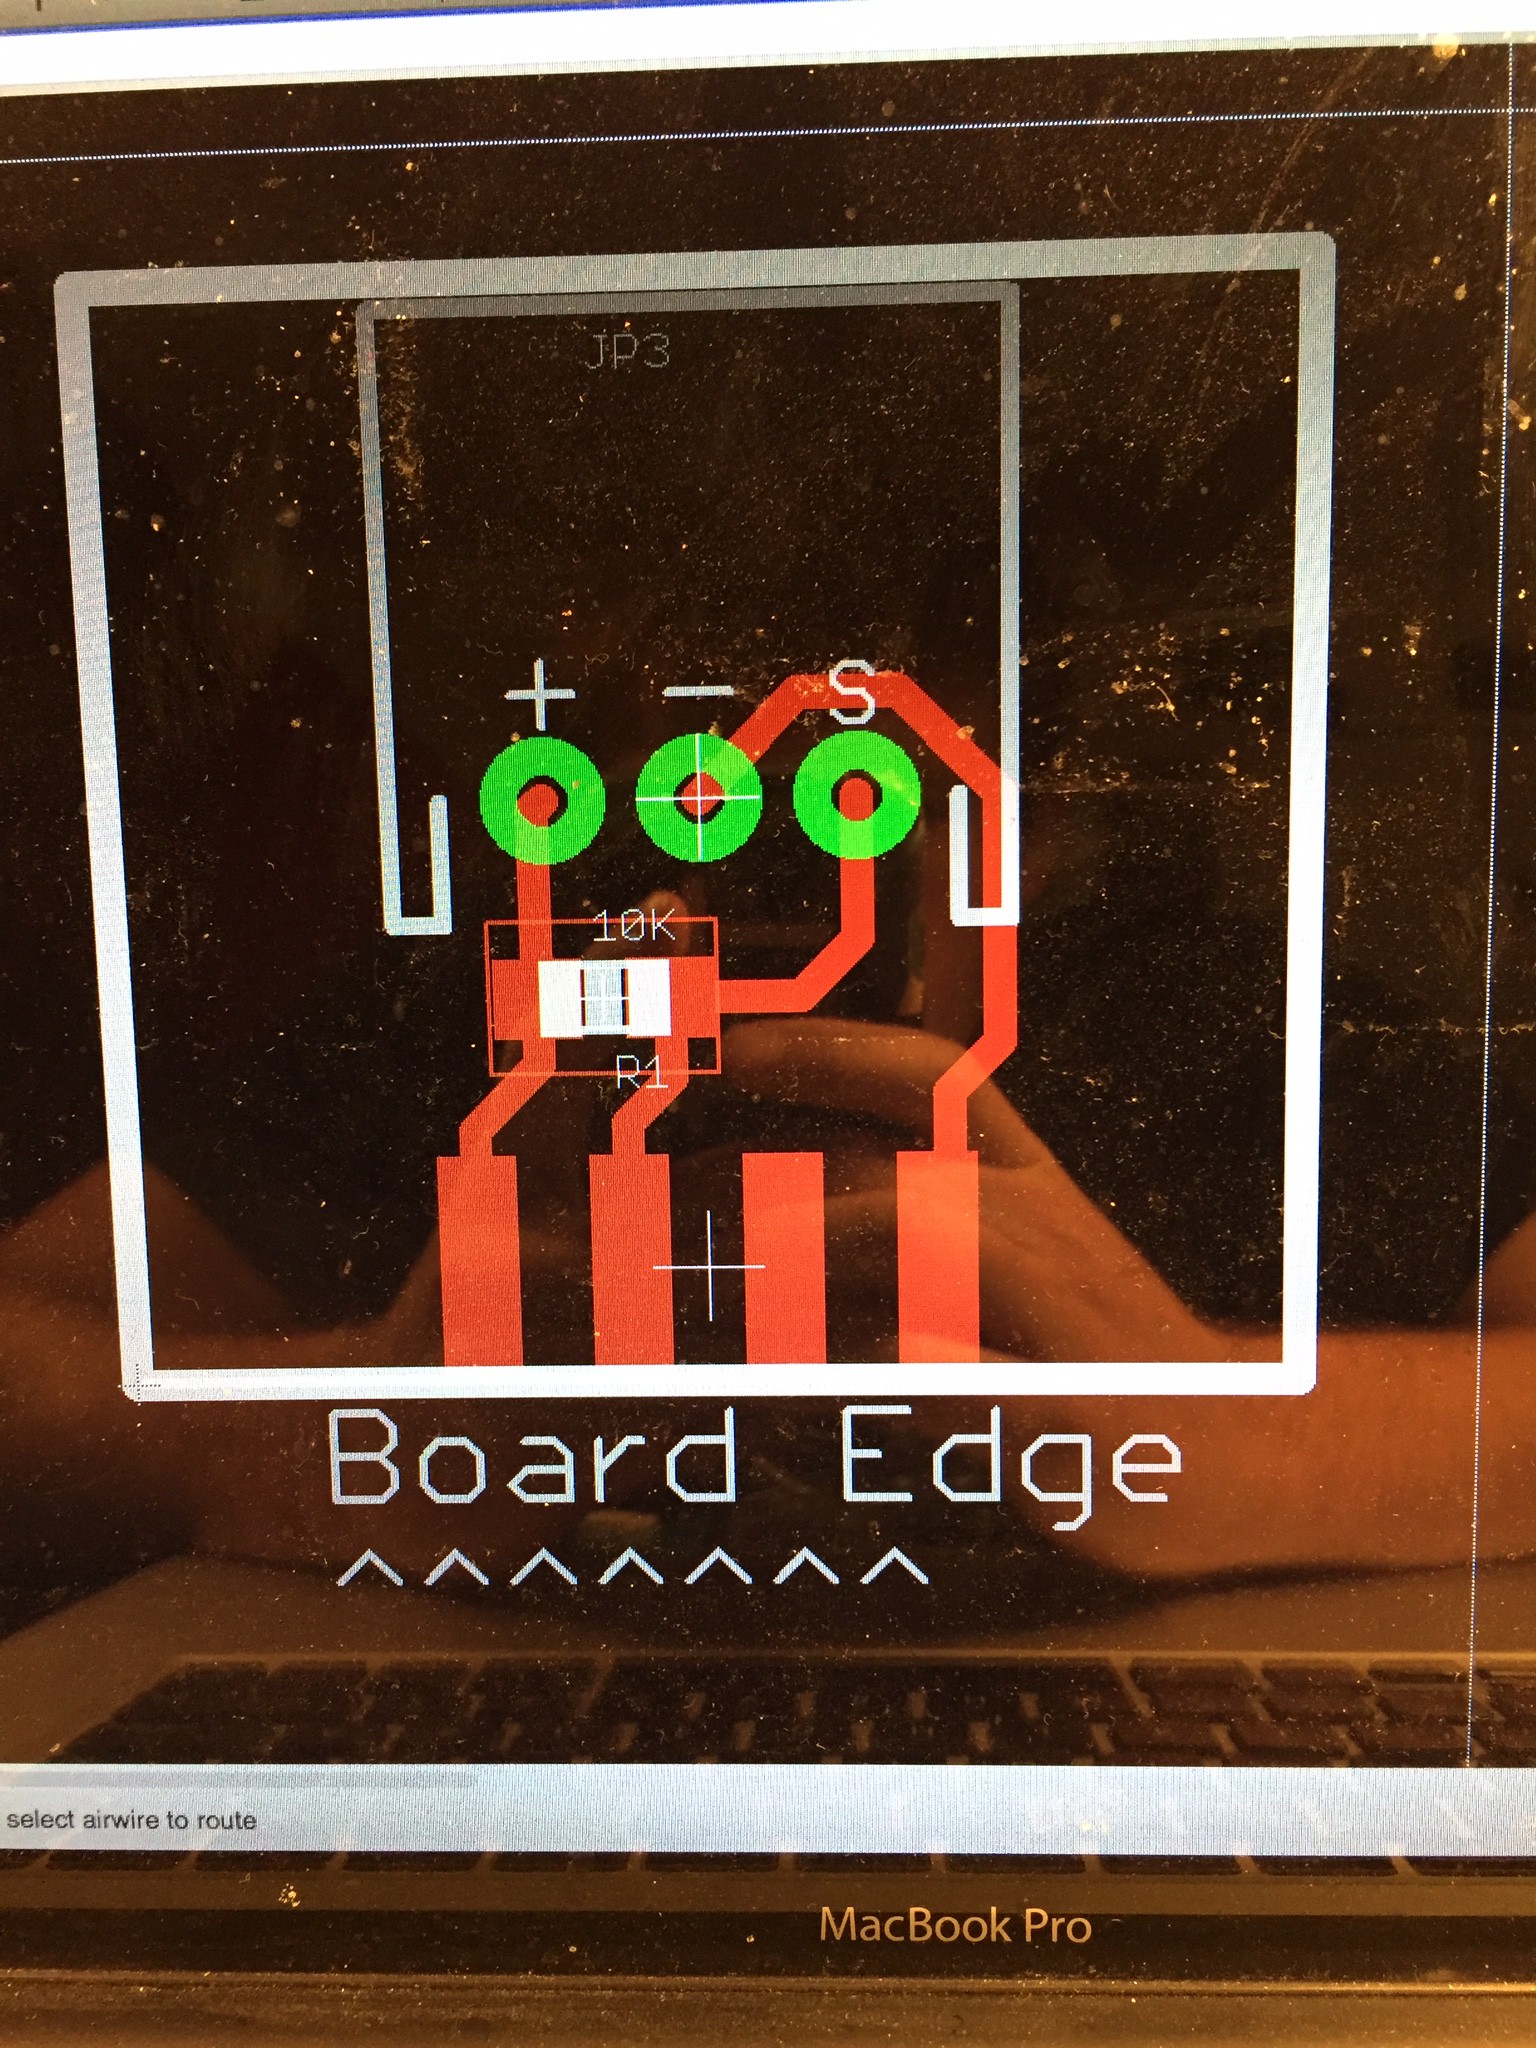
Here is my first pass of PCB routing:![]()
![]() Once I get paid for another electronics job, I am going to order this board and the materials for the next iteration of the PhotonHome. This board will give me the sensor functions that I need, and test out a few circuits which will appear in the next PhotonHome revision.
Once I get paid for another electronics job, I am going to order this board and the materials for the next iteration of the PhotonHome. This board will give me the sensor functions that I need, and test out a few circuits which will appear in the next PhotonHome revision. -
1st Example Application
01/08/2016 at 03:44 • 0 commentsHere is the video: I used the device in order to control a space heater. I used the space heater and the SparkFun Weather Shield in order to defrost my refrigerator, but with a control system so it doesn't get too hot and potentially melt plastic. Check out the video, you'll be able to see the new case and a full working demo!
-
100 Followers!
01/03/2016 at 07:10 • 0 commentsHello everyone! I am super excited to say that today my project reached 100 followers, (I'm at 102 now). I am super grateful for the support. I am also super excited to project is finally in working order.
Now to the tech: Over this next week I plan on devising some software to put on the controller that will let me do a variety of outlet controlling functions, and do it in a consistent way so I don't have to open up the box in order to reprogram the Photon continually.
Lastly I just wanted to say keep following the project (and share!), and expect some big developments over the next couple months. I am currently building a Photon powered PCB reflow oven(its like 70% done), and with that reflow oven I will be redesigning the board to include a Particle P1 module, and a small AC/DC converter that will allow the P1 to be powered by the AC wall input that is already required.
I believe I have all the skills necessary to get this done, and I hope 2016 to be my breakout year!
PS I'd love a comment. It shows people are listening. I'm thinking of migrating over to a solid state relay, and hopefully a powerful one at that. I'm playing around with SparkFun's 40A one, but if anyone knows of any high powered, but fairly cheap one, I am all ears. DigiKey averages like $20+ each for the power I am looking for, while SparkFun's is only $10.
-
Breakthrough Day! It works!
12/30/2015 at 06:15 • 0 commentsAfter finally obtaining the last component of the project, (the 5x20mm 8AMP minifuse!!) the project has finally come to fruition! Luckily I was home for the holidays and I got to show my parents where their venture capital went to. My dad helped film this video and helped me get through the message of the PhotonHome:
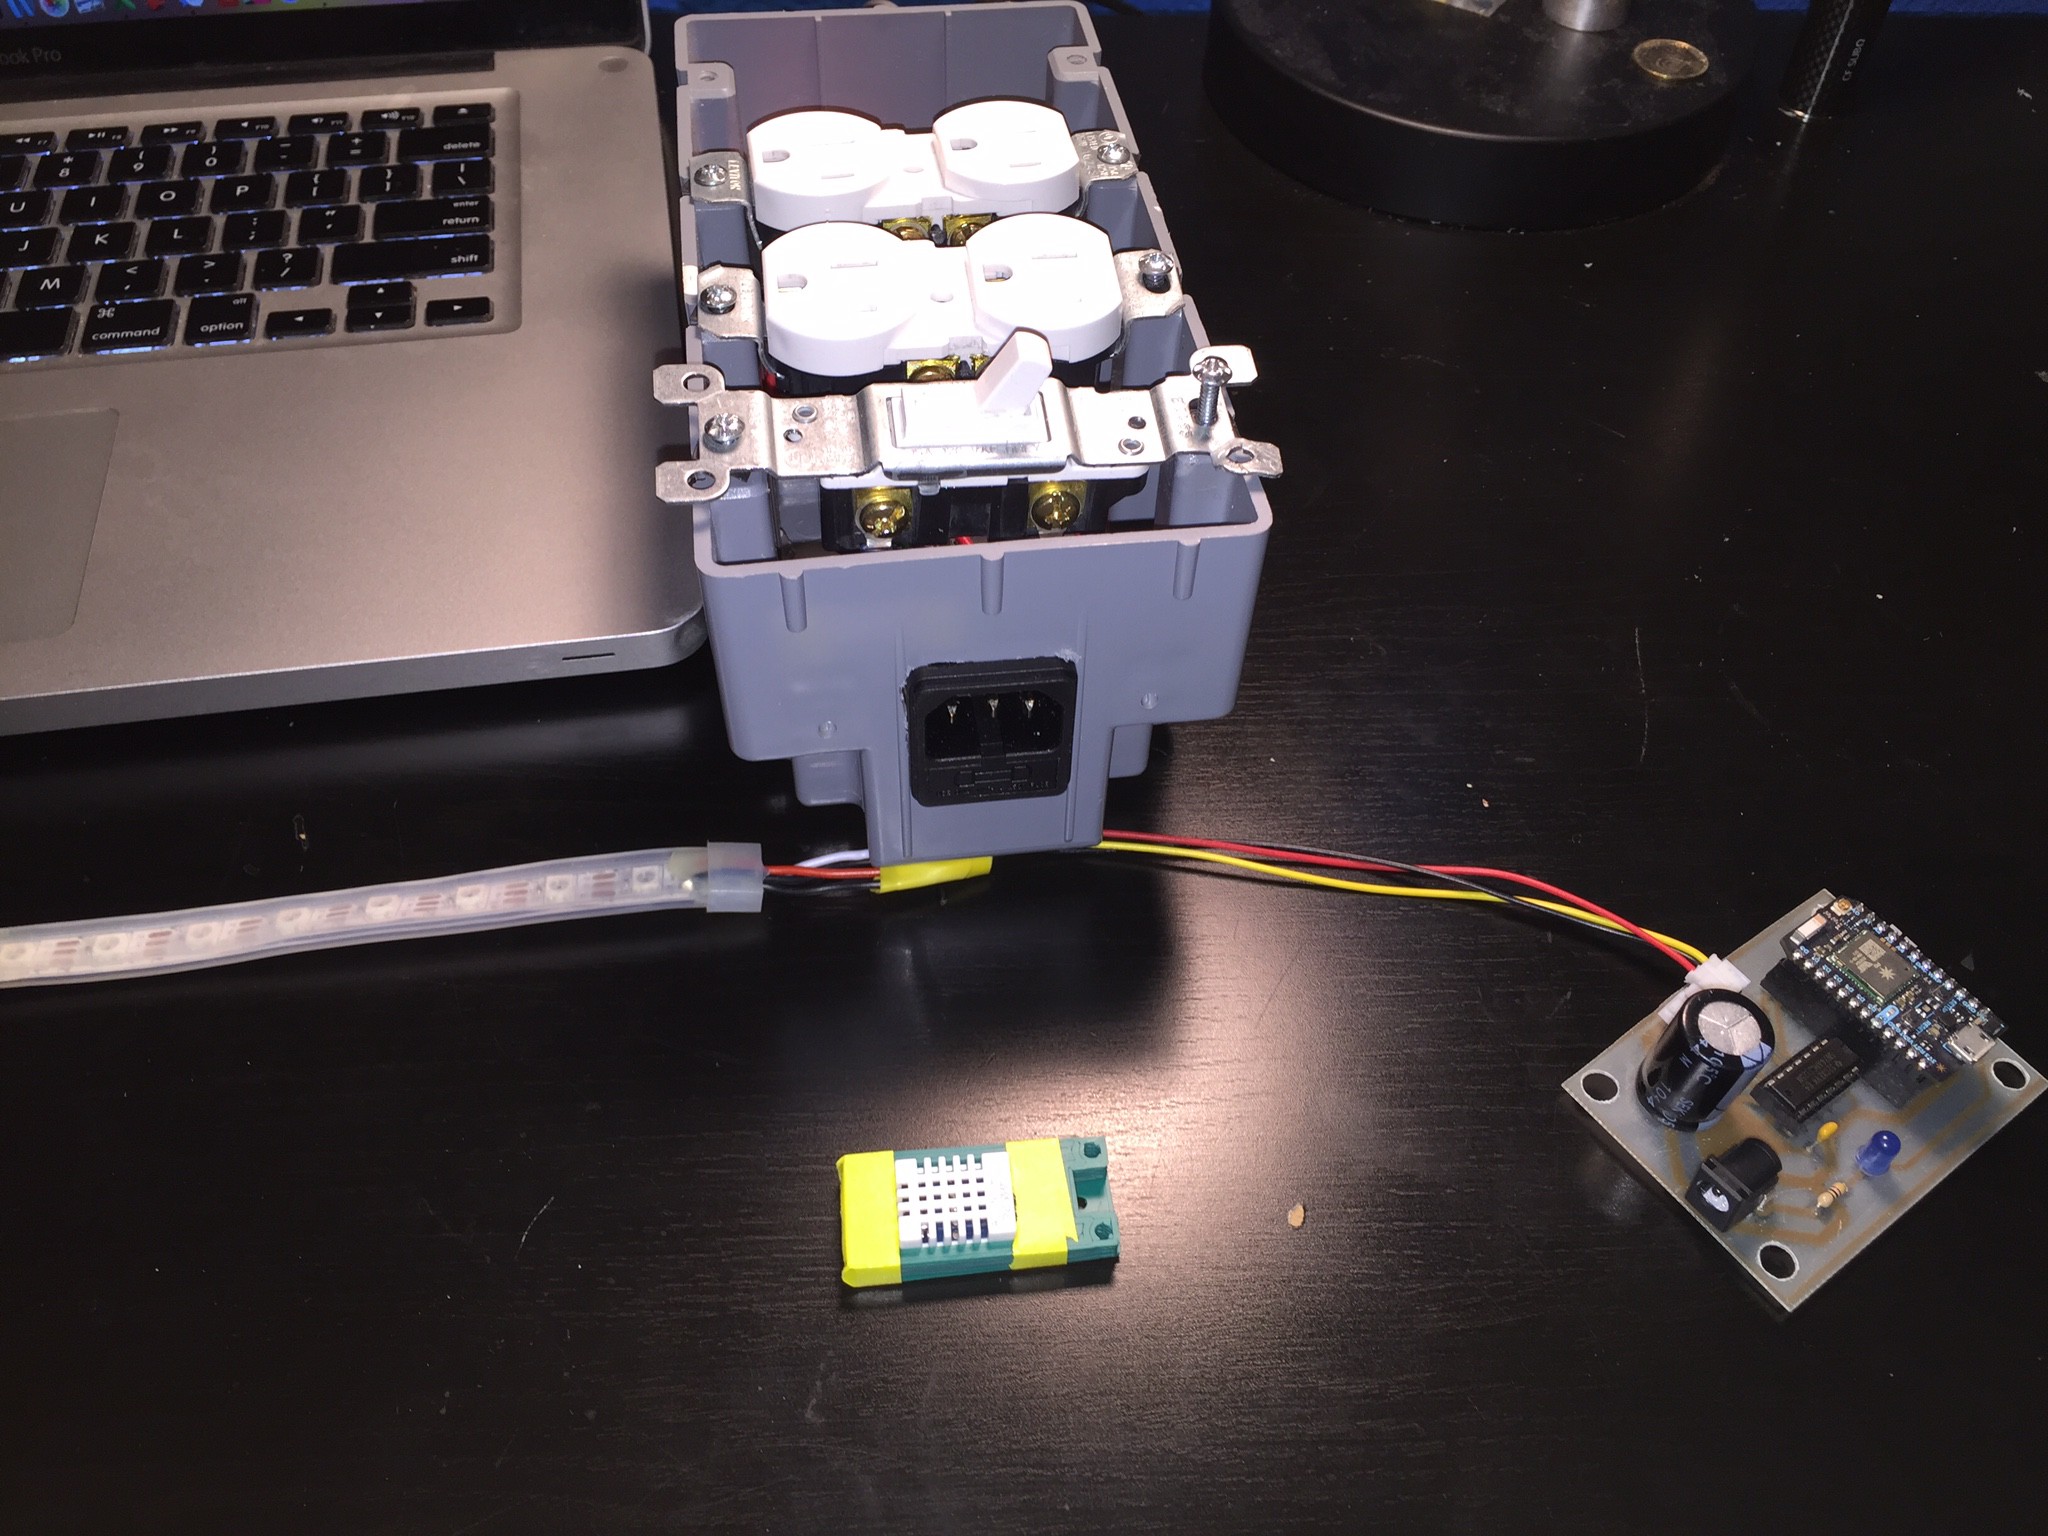
The two boards featured in the video is the Particle Relay Shield, and the SparkFun Weather Shield. Upon finally getting everything wired up and complete, without any software at all, using the Default "Tinker" Photon application which allows toggling IO pins using a smartphone, this in turn toggles the relay which switches mains power to the outlet.
That was an exciting first step! But what is even more useful is using sensors to toggle the outlets. I already had a simple app for recording the temperature and humidity using the Weather Shield, and within two minutes I had the Weather Shield sending humidity threshold events, which can be received by the outlet controller in order to toggle the outlet.
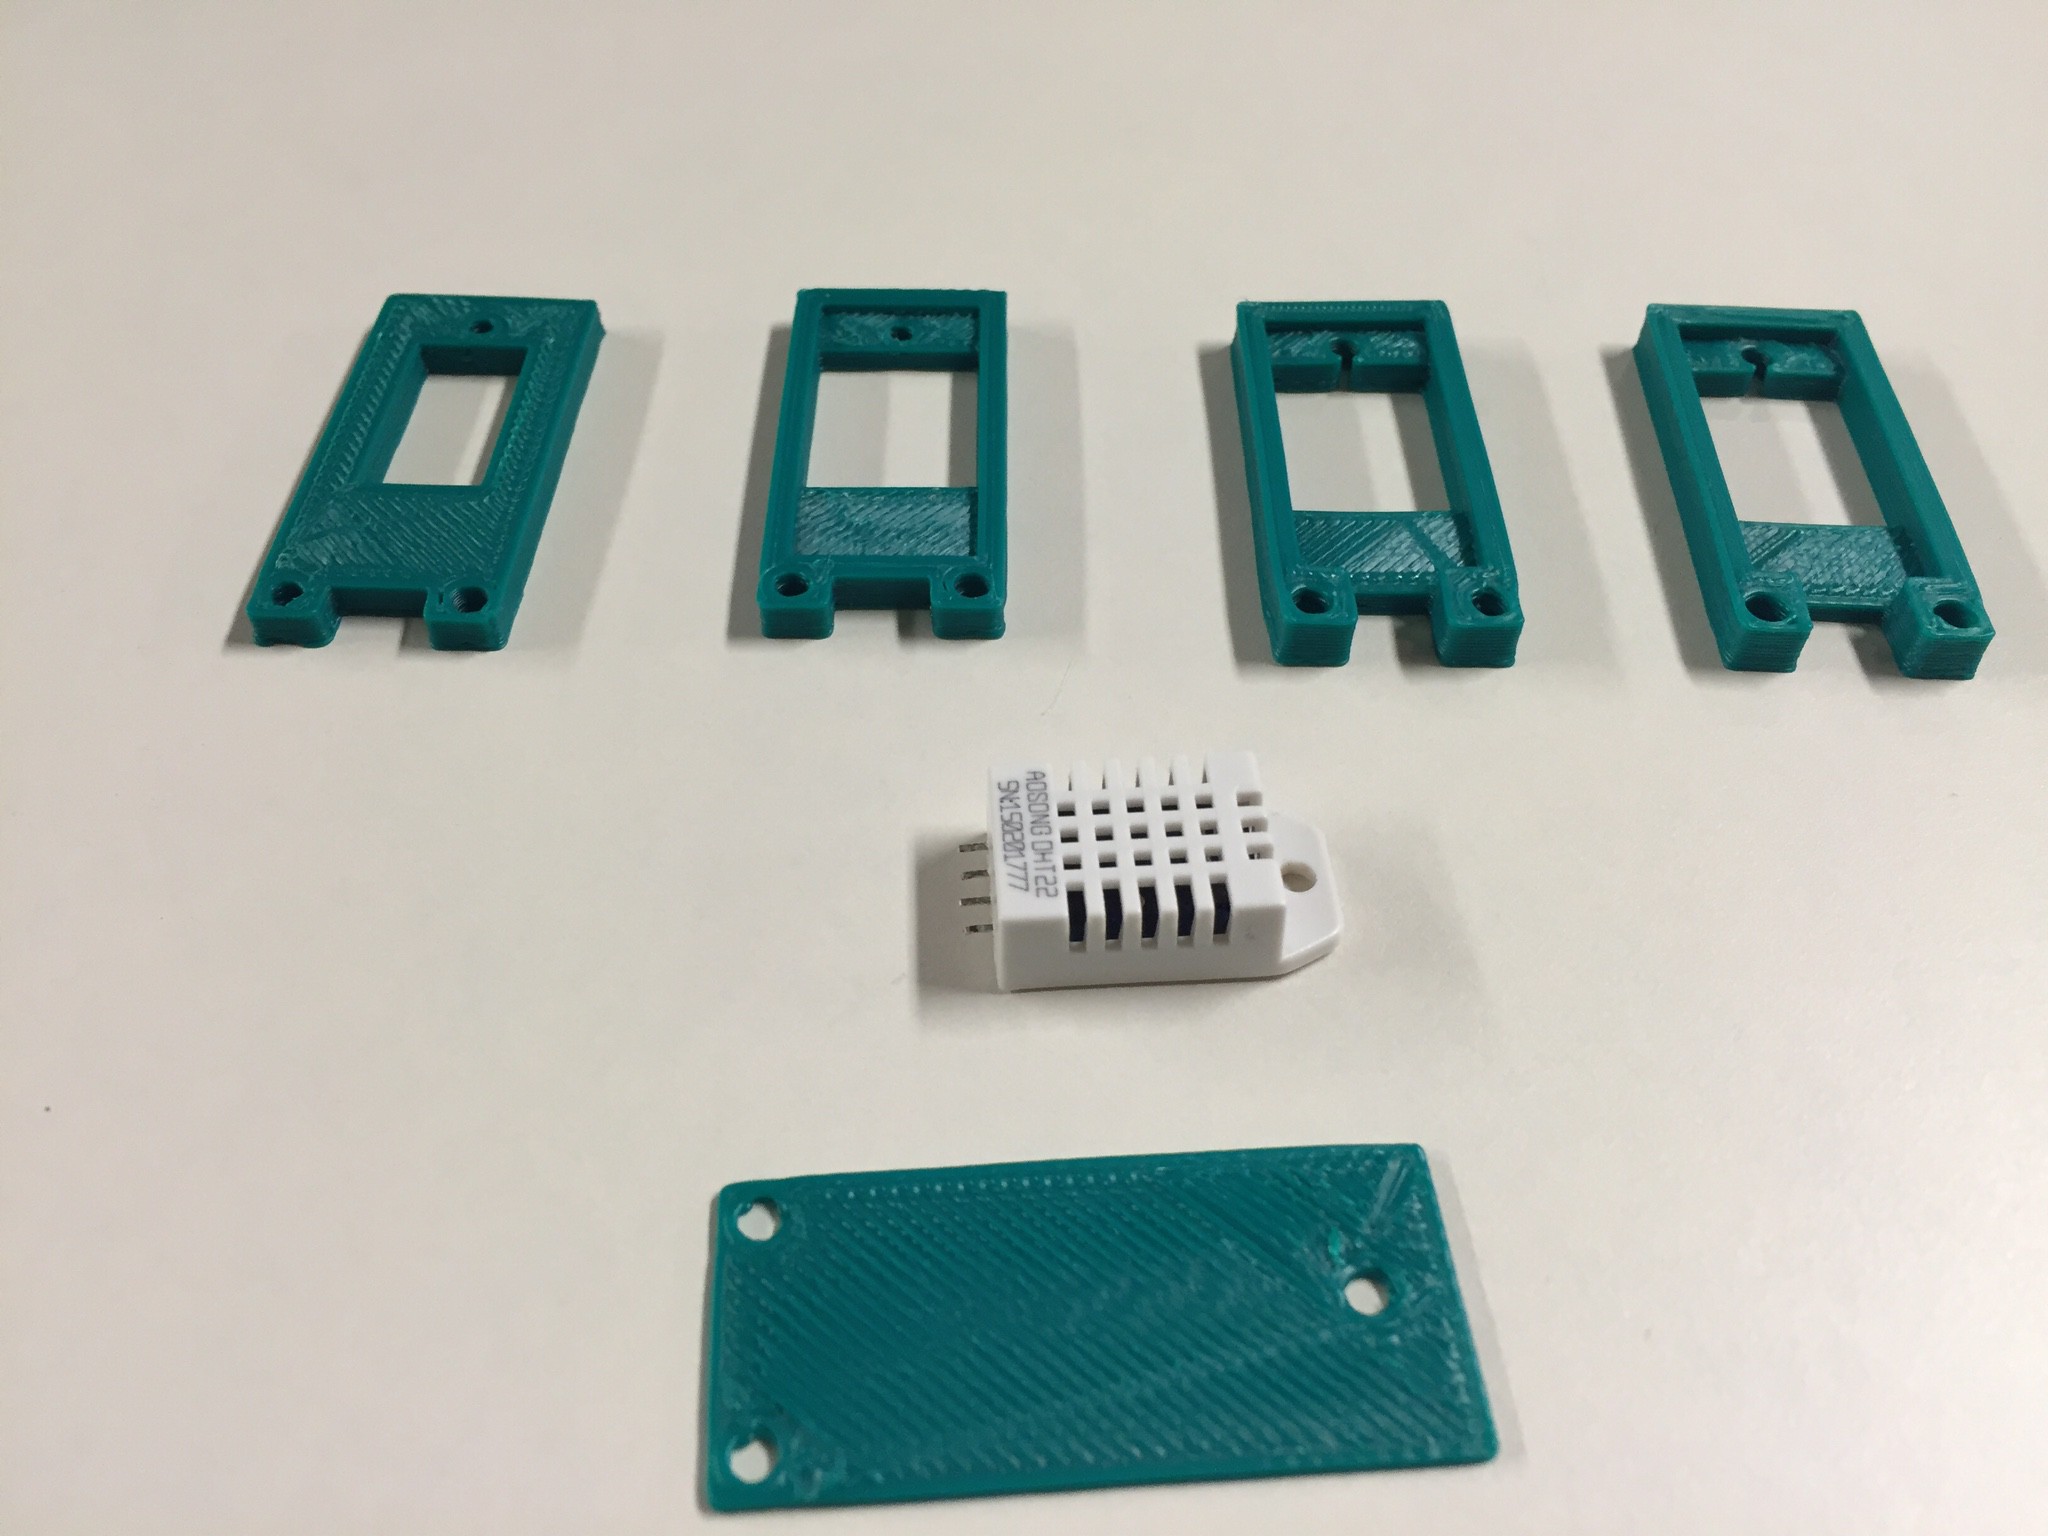
Finally, today I made the DHT22 interface board, which will allow me to use my 3D printed DHT22 holder shown in the last project log. Also, another Photon board was built which has DHT22 input, and NeoPixel output.
For the final project demonstration, which will be happening soon I will have high voltage wires in the case, and interfacing with the DHT22, the NeoPixels. These systems will work together in order to take upmost control of your home, and your projects.
-
Progress Hasn't Stopped!
12/21/2015 at 00:04 • 0 commentsJust wanted to let everyone know that progress has not necessarily halted, though I lost a lot of motivation to post when I didn't advanced in the Hack-A-Day prize.
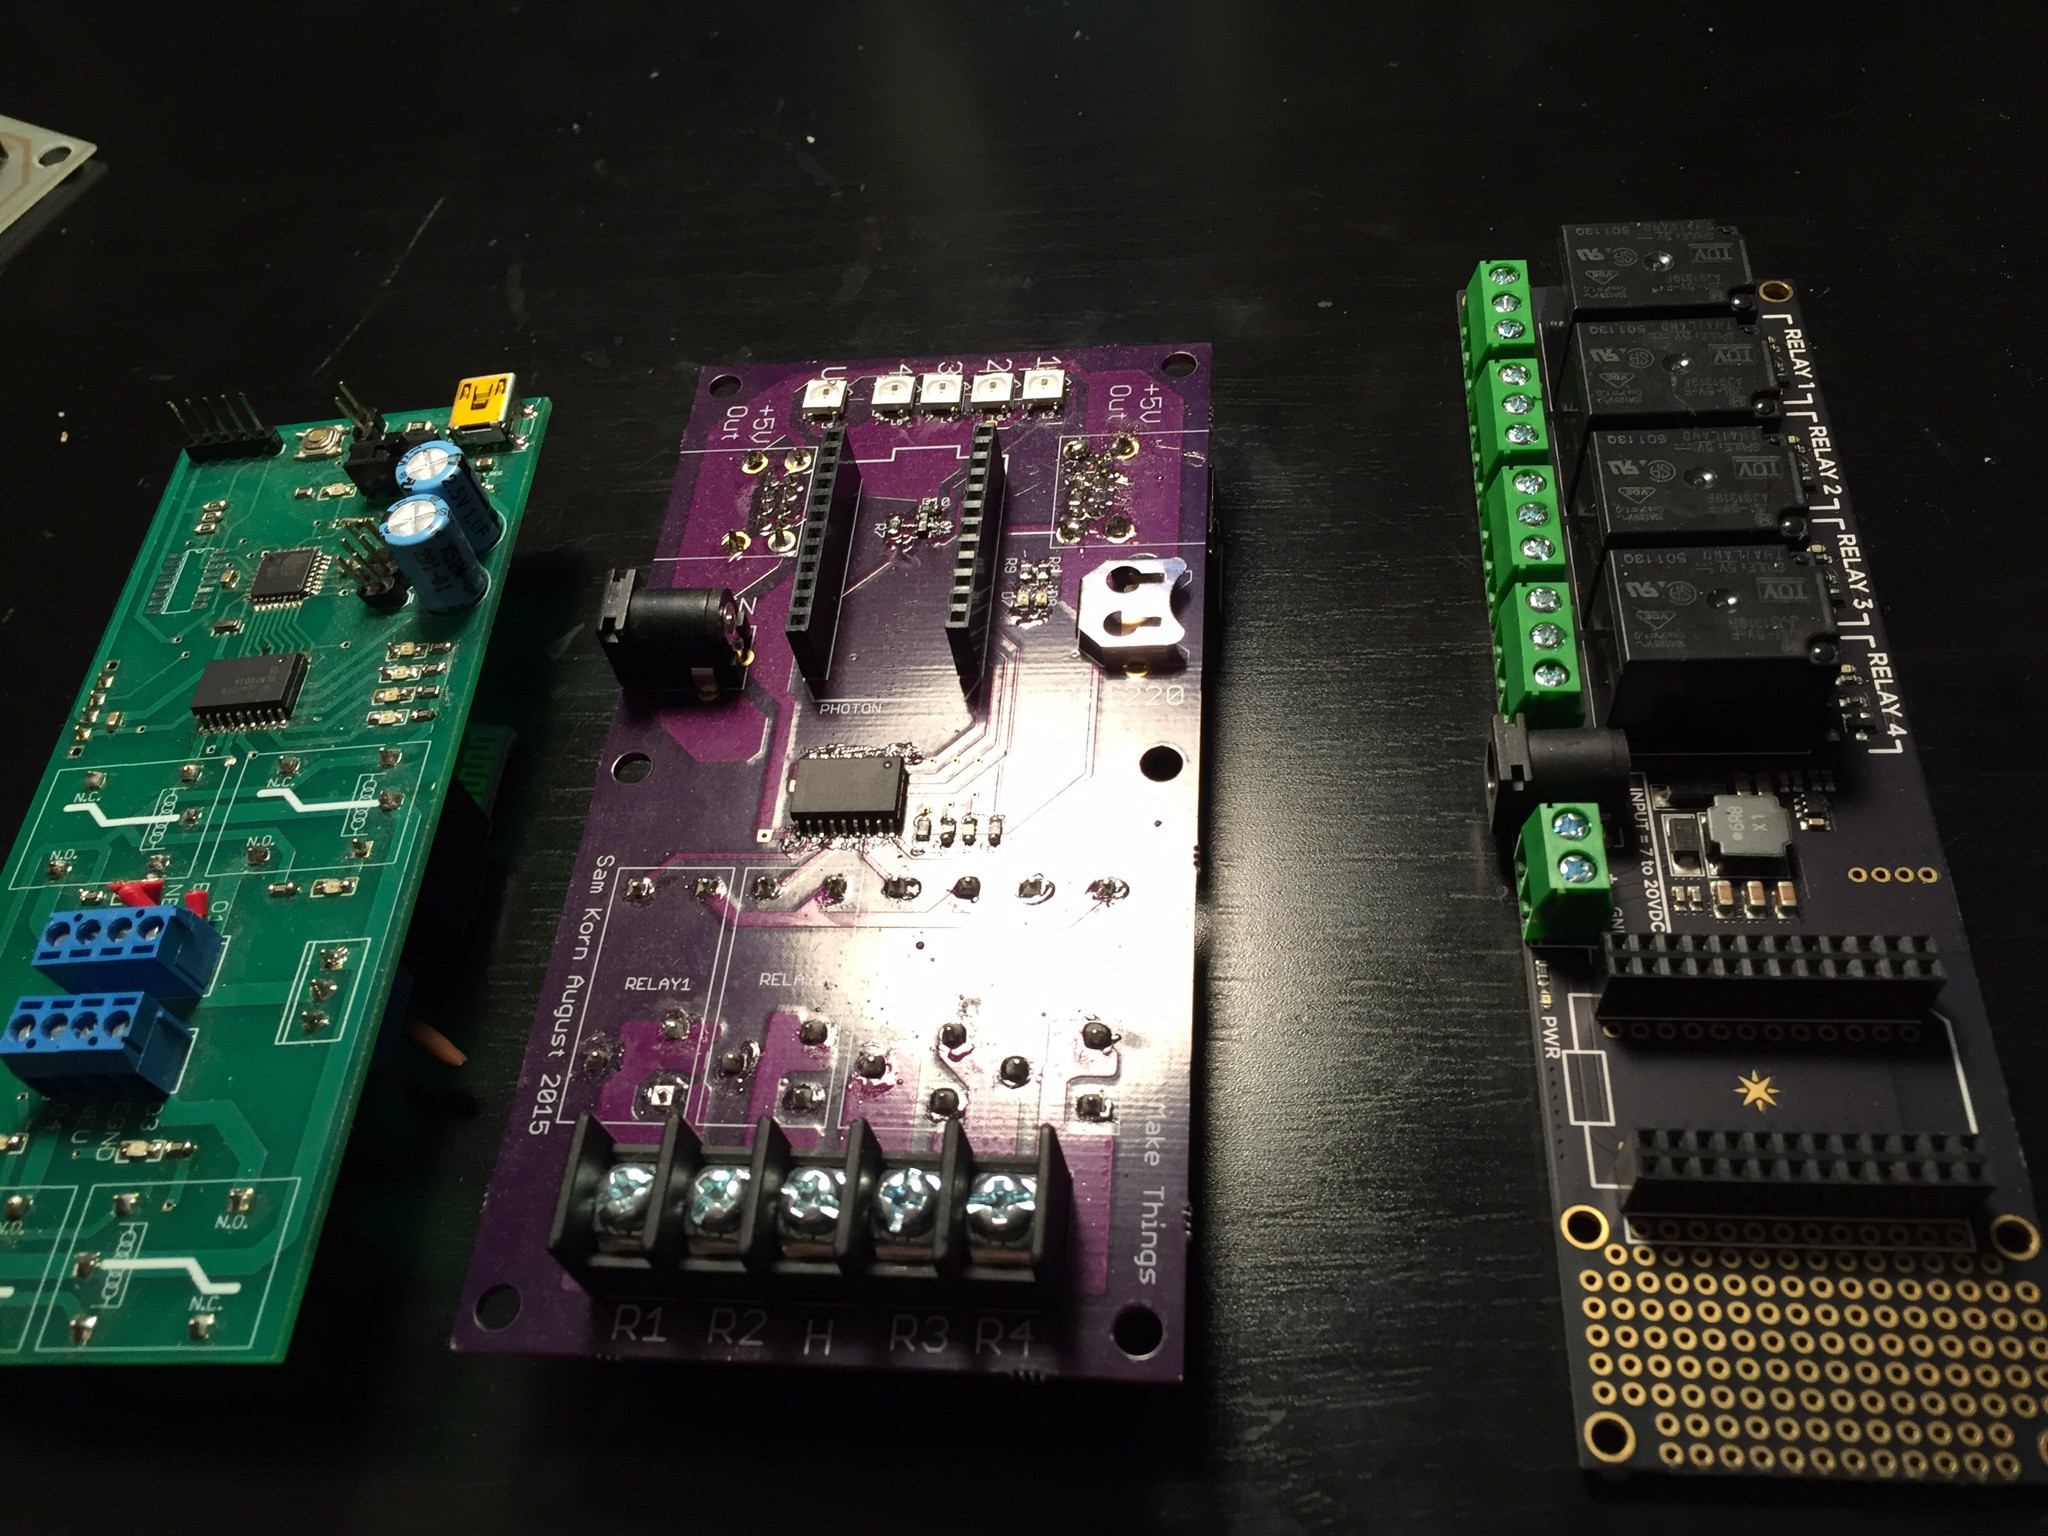
New Developments: I have spent so much time creating PCBs for this project, when I have mostly looked over pre-built solutions and using that in the project. I have finally caved... And I think it was a good learning experience to try going the hard way though. I've decided to use the Particle Photon Relay Shield instead of making my own relay PCB. The annoying part about their board is the connector they use only allows using smaller gauge wire, and the connector doesn't have common entry point, which would make sense, seeing as they are advertising as good to use for AC. But check out the new entry to the family!
![]()
The board on the right is the Photon Relay Shield.
Also, while the SparkFun Photon Weather Station was pretty cool, what I really need is only NeoPixel LED output, and a temperature and humidity sensor. The DHT22 is cheap and easy, so I made a 3D printed body for it, and plan on putting a tiny circuit board inside, which will provide the 10K pullup for the data line and then just a 3-wire JST output.
![]()
![]()
![]()
Finally! Woo, that was a lot of pictures... I had a class this semester at CU Boulder called Democracy in the Digital Era, and we made the "Voting Booth of the Future", look up CU Boulder ATLAS Expo! But I made a dual NeoPixel strip, and single button input PCB, for the Photon. I plan on modifying this PCB and getting it professionally printed, but also add an input for the 3-wire DHT22 sensor. I have 2 more level-shifter outputs remaining, should I add more NeoPixel outputs?
![]()
The board on the right is what I made for that class, and plan on modifying super easily. As for the the gray 4-gang case, I drilled a hole for my AC power input, and that fits nicely. All the wires inside are connected using nice quick-connect or ring-terminals, which is why I'd love a better connector on the Relay Shield!!!
Let me know what you think of the progress! The end goal of this project has changed just slightly, its Winter Break so maybe I'll get around to updating all of that.
:)
-
Quarter-Finals Video!
08/17/2015 at 19:25 • 0 comments -
Everything Ordered and Photon Phun
08/13/2015 at 17:11 • 0 commentsEverything has been ordered, from DIgiKey, Adafruit, and OSHPark! We're in business. Just got an LED to turn on via the internet on the Photon, and got the SparkFun Weather shield mostly working. The Photon is extremely cool!
![]()
PhotonHome - AC Power IoT Homebase
The PhotonHome is the next step in bringing the Photon environment to AC powered applications