pRoFiT
-
Google Home Version /w TTS
03/10/2021 at 04:56 • 0 commentsOkay so i found someones code on how to send tts to google homes. after some major modifications and copy paste from my old code i have it working.
Here is the github location i borrowed it from https://github.com/debsahu/GoogleSay
his was cool and overkill for what i needed. Maybe
//https://github.com/horihiro/esp8266-google-home-notifier
was all i really needed to look at.
Now when the wash completes it will tell me on my google mini
I think i will add a loop where it keeps telling me once a minute until i open the wash door and the light goes off. Otherwise i may miss the notification
#include <ESP8266WiFi.h> #include <WiFiClient.h> #include //https://github.com/horihiro/esp8266-google-home-notifier //https://github.com/horihiro/esp8266-google-tts const char* ssid = "SSID"; const char* password = "PASSWORD"; const char GoogleHomeName[] = "NAME OF GOOGLE HOME DEVICE"; //Must match the name on Google Home APP // analog portion int add1=0; int add2=5; int add3=2; int an=A0; const int triggerLevel = 200; // level to trigger change in ledstate int sendWashComplete = 0; // set 0 at start, 1 when trigger is hit, 2 once sent, back to 0 during if start has started or all leds off like when wash is done and lid is opened. int sendWashStart = 0; // set 0 at start, 1 when trigger is hit, 2 once sent, back to 0 during if complete or all leds off int ledStates = 0; // use bitwise for keeping track. one number to compare against int lastLedState = 0; // set same at start. only check once they change in a loop. GoogleHomeNotifier ghn; void connectToGH(){ Serial.println("connecting to Google Home..."); if (ghn.device(GoogleHomeName, "en") != true) { Serial.println(ghn.getLastError()); return; } Serial.print("found Google Home("); Serial.print(ghn.getIPAddress()); Serial.print(":"); Serial.print(ghn.getPort()); Serial.println(")"); } String ipToString(IPAddress ip){ String s="http:// "; for (int i=0; i<4; i++) s += i ? " dot " + String(ip[i]) : String(ip[i]); return s; } void setup(void) { Serial.begin(115200); Serial.println("trying to connect..."); WiFi.mode(WIFI_STA); WiFi.begin(ssid,password); while (WiFi.status() != WL_CONNECTED) { delay(500); Serial.print("."); } Serial.println(""); Serial.println("WiFi connected"); Serial.println("IP address: "); Serial.println(WiFi.localIP()); connectToGH(); String init_text = "Washing Machine Application has started"; if (ghn.notify(init_text.c_str()) != true) { Serial.println(ghn.getLastError()); return; } Serial.println("Done."); pinMode(add1,OUTPUT); //analog control pinMode(add2,OUTPUT); pinMode(add3,OUTPUT); } void loop(void) { byte i; for( i=0;i<=5;i++) { setAddress(i); // switch analog port before reading delay(50); // give 50ms to let analog switch complete. bitWrite(ledStates, i, 0); // set 0 before loop for(int x=0;x<1500;x++) // comes out to about 1 second scan rate for all 6 leds with given switch delays etc... { if(analogRead(an)>triggerLevel) // read level output and compare { bitWrite(ledStates, i, 1); // if we see it go high after anytime during the 1500 loops, set high or LED ON STATE. This should eliminate 50/60hz led issues on the wshing machine...ugh....pain. } } } Serial.println(ledStates); // simpler i guess if(ledStates!=lastLedState) // if there was a change from last loop do something { switch(ledStates) { case 16 : // wash complete state [0,1,0,0,0,0] = 16 if(sendWashComplete == 0) { sendWashComplete = 1; // 1 means we need to send notification. sendWashStart = 0; // 0 means it can be triggered again } break; case 33 : // 33 is start and locked. sometimes both are on at same time. if(sendWashStart == 0) { sendWashStart = 1; // 1 means we need to send notification. sendWashComplete = 0; // 0 means it can be triggered again } break; case 1 : // 1 is start only if(sendWashStart == 0) { sendWashStart = 1; // 1 means we need to send notification. sendWashComplete = 0; // 0 means it can be triggered again } break; case 0 : // clear notifications if all leds are off machine is off or completed and lid opened. sendWashComplete = 0; // 0 means it can be triggered again sendWashStart = 0; // 0 means it can be triggered again break; default : {} } } if(sendWashComplete == 1) washComplete(); if(sendWashStart == 1) washStart(); lastLedState = ledStates; // at end of loop so we can test next loop } void washComplete() { Serial.println("Wash Complete"); String init_text = "The wash has finished"; if (ghn.notify(init_text.c_str()) != true) { Serial.println(ghn.getLastError()); return; } Serial.println("Done."); } void washStart() { Serial.println("Wash Started"); String init_text = "The wash is starting"; if (ghn.notify(init_text.c_str()) != true) { Serial.println(ghn.getLastError()); return; } Serial.println("Done."); } /****************************************** * * setAddress(byte i) * * Take byte value and output the bits, 3 bit address * *******************************************/ void setAddress(byte i) { if(i & B00000001) digitalWrite(add1,HIGH); else digitalWrite(add1,LOW); if(i & B00000010) digitalWrite(add2,HIGH); else digitalWrite(add2,LOW); if(i & B00000100) digitalWrite(add3,HIGH); else digitalWrite(add3,LOW); } -
Small status update
03/09/2021 at 23:52 • 0 commentsThis ran perfectly fine for about a year. Then stopped sending info. I think either pushbullet needed me to log back in again, api key went away or the fingerprint changed on the cert for the site. Either way its been down for a couple years.
Now i have google minis in the house. thinking i should open back up the code and see if i can get a response sent to the google mini. Too many unfinished projects though.
Just waned to give a long term status update. I think this is fine as is, if i just reset the API for pusbullet should work again. Would be nice if i didn't have to deal with a cloud based service though. with all this home automation stuff there is too much reliance on cloud connections. something changes and you have to reconfigure everything.
Same issue with my sonoff switches. seemed like every couple months if i did not log back in it would stop working. and i would have to reset everything. So i gave up. Have synology server now so maybe home assistant can help localize some things. time to look into direct messages to google home devices.
-
Prepare for some long term use
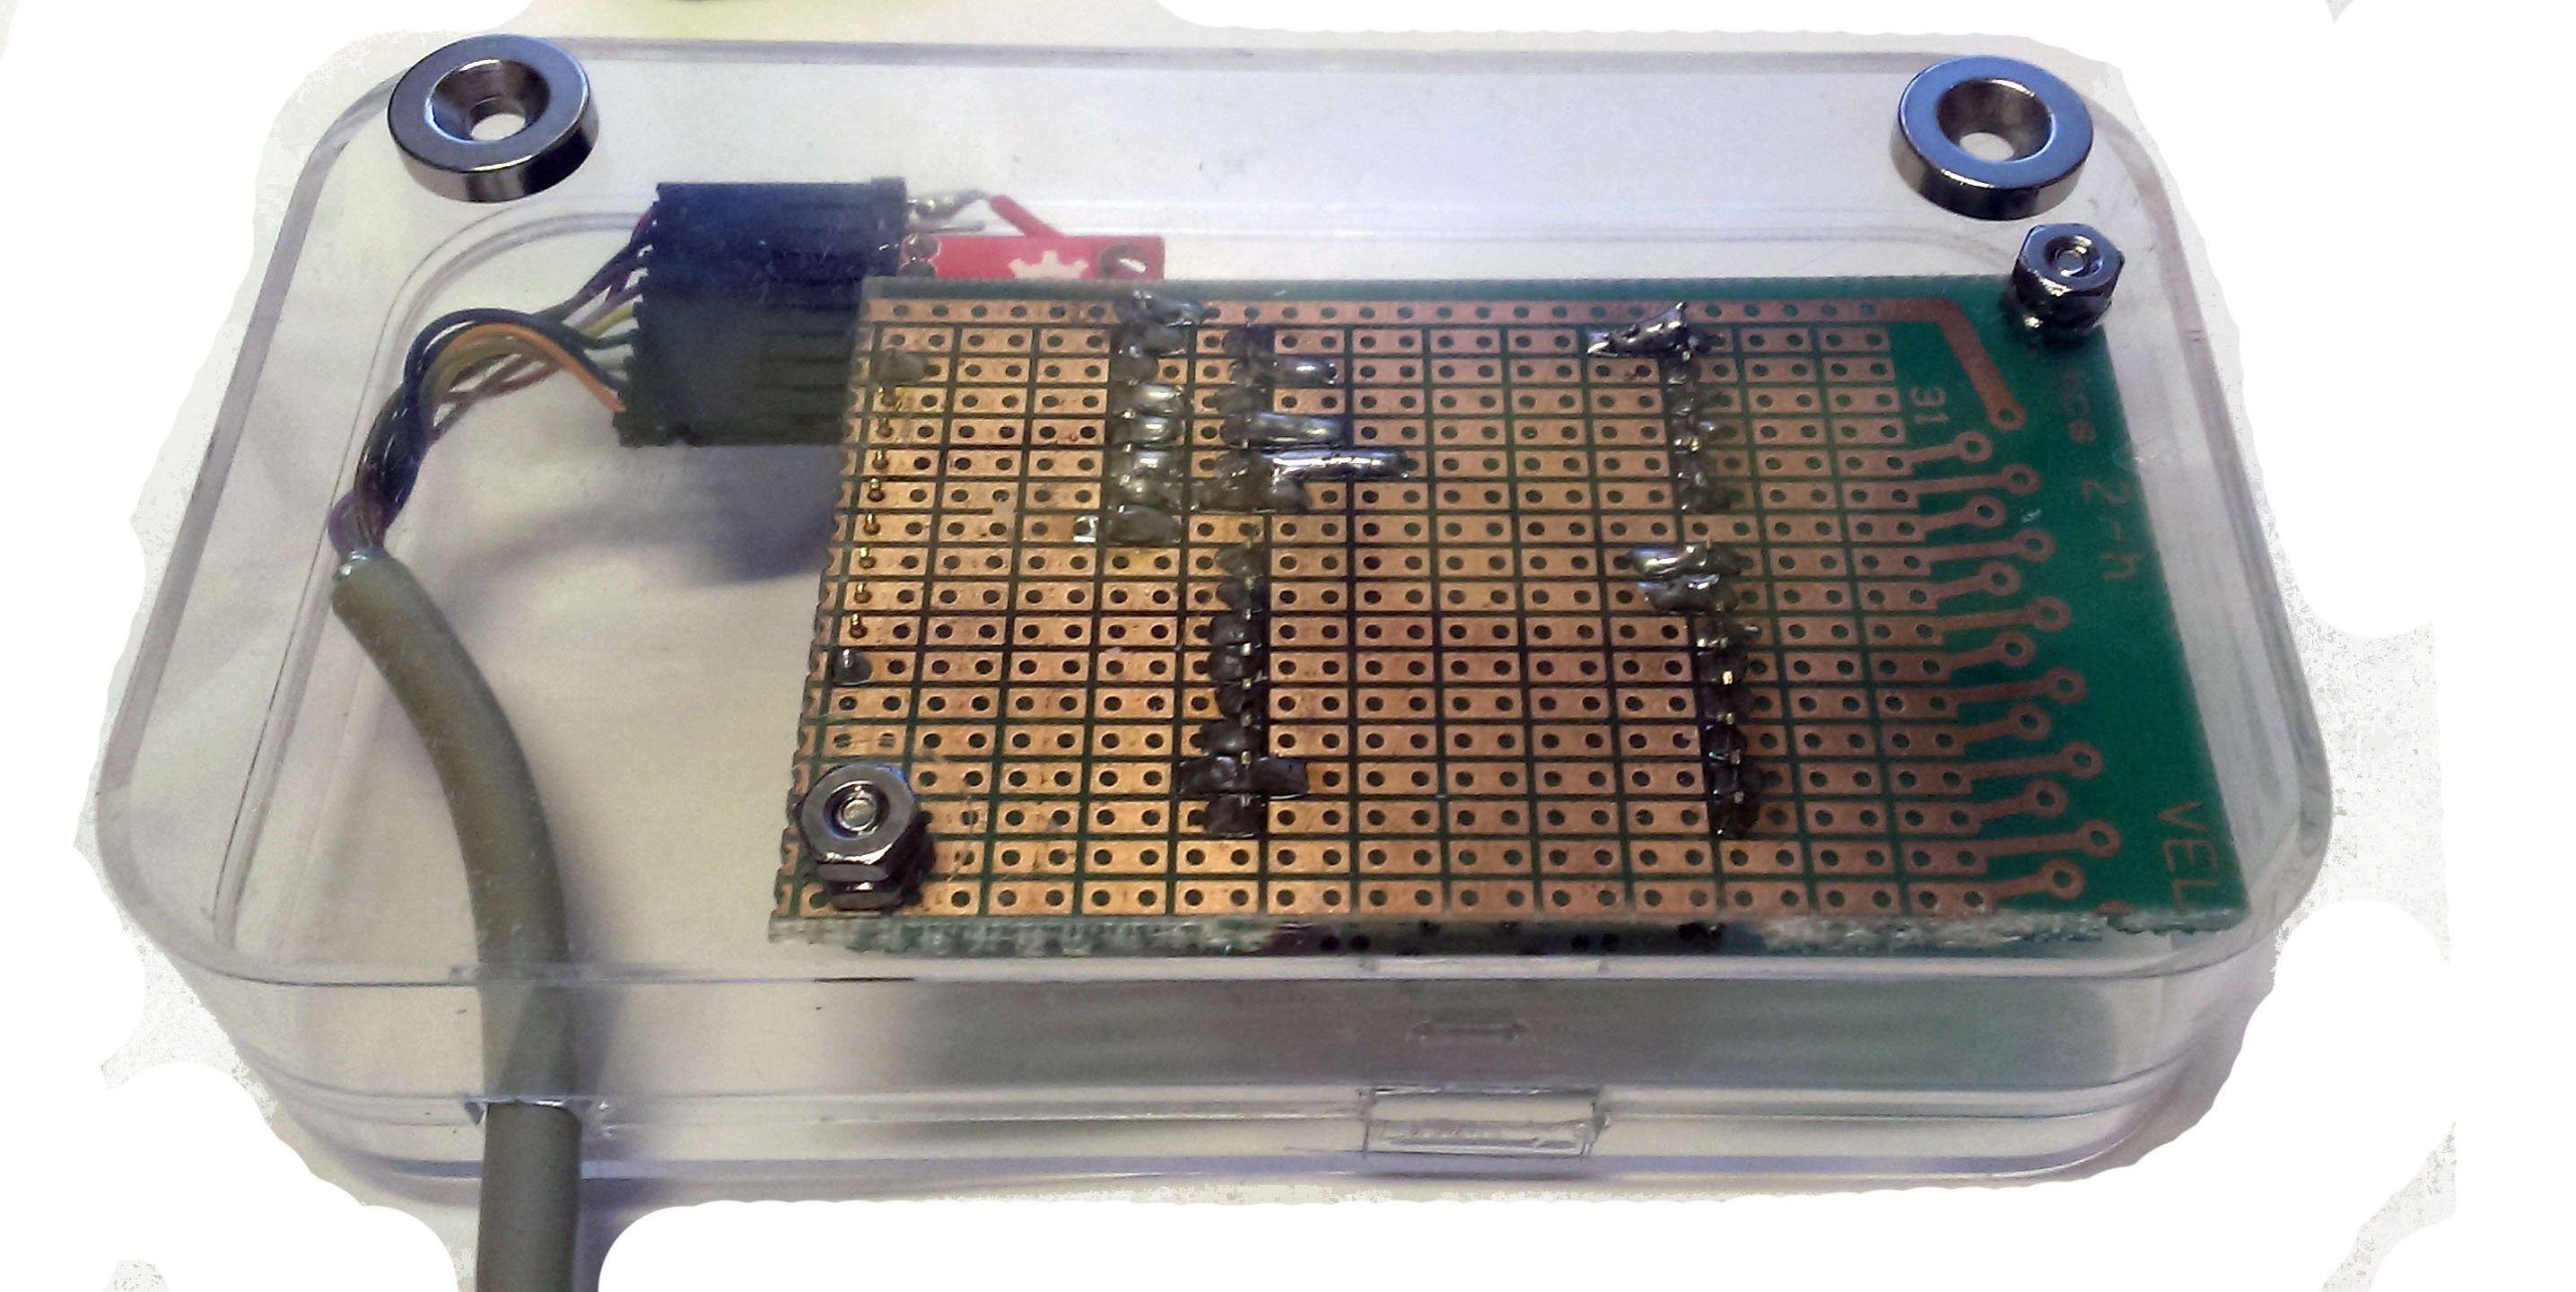
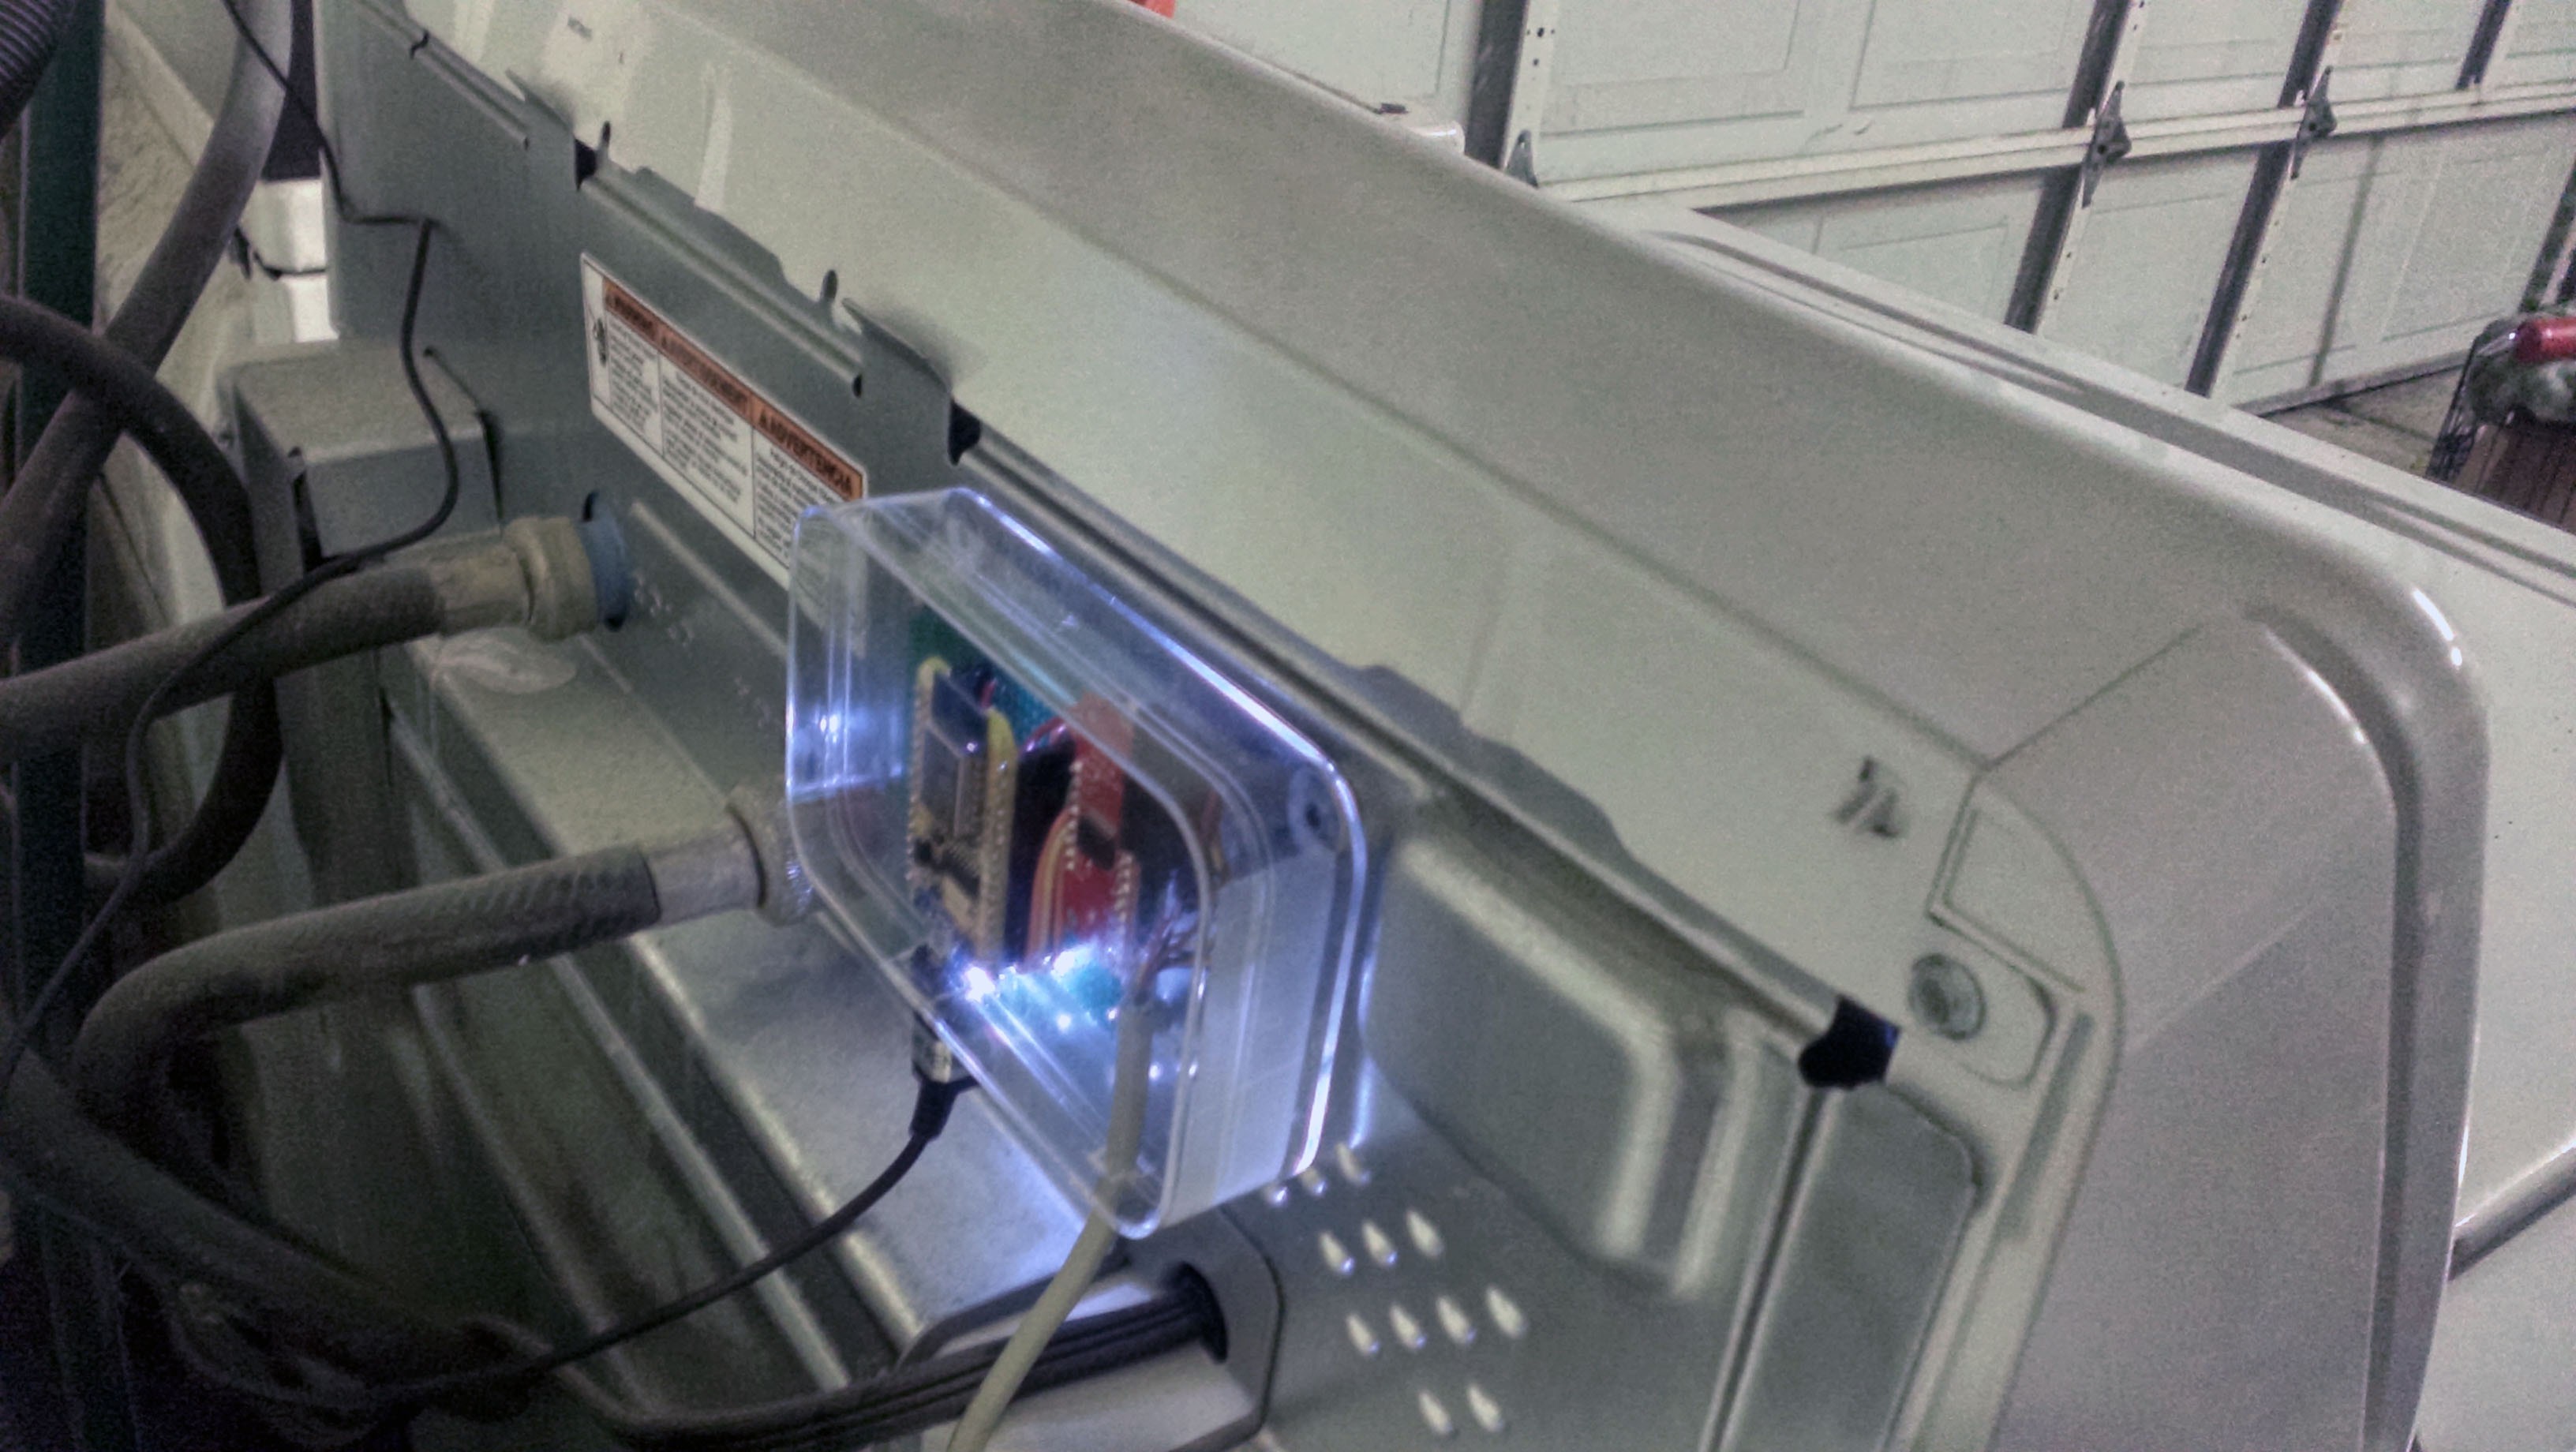
03/16/2016 at 05:41 • 0 commentsOkay after a couple days of testing i think it works good enough to seal up this project and protect it for a little long term use. I found an old iPhone 4 enclosure that has just enough room to put the nodemcu controller board into. And I've super glued two rare earth magnets to the back so i can attach to the washing machine without having to screw into anything.
Front
![]()
Back
![]()
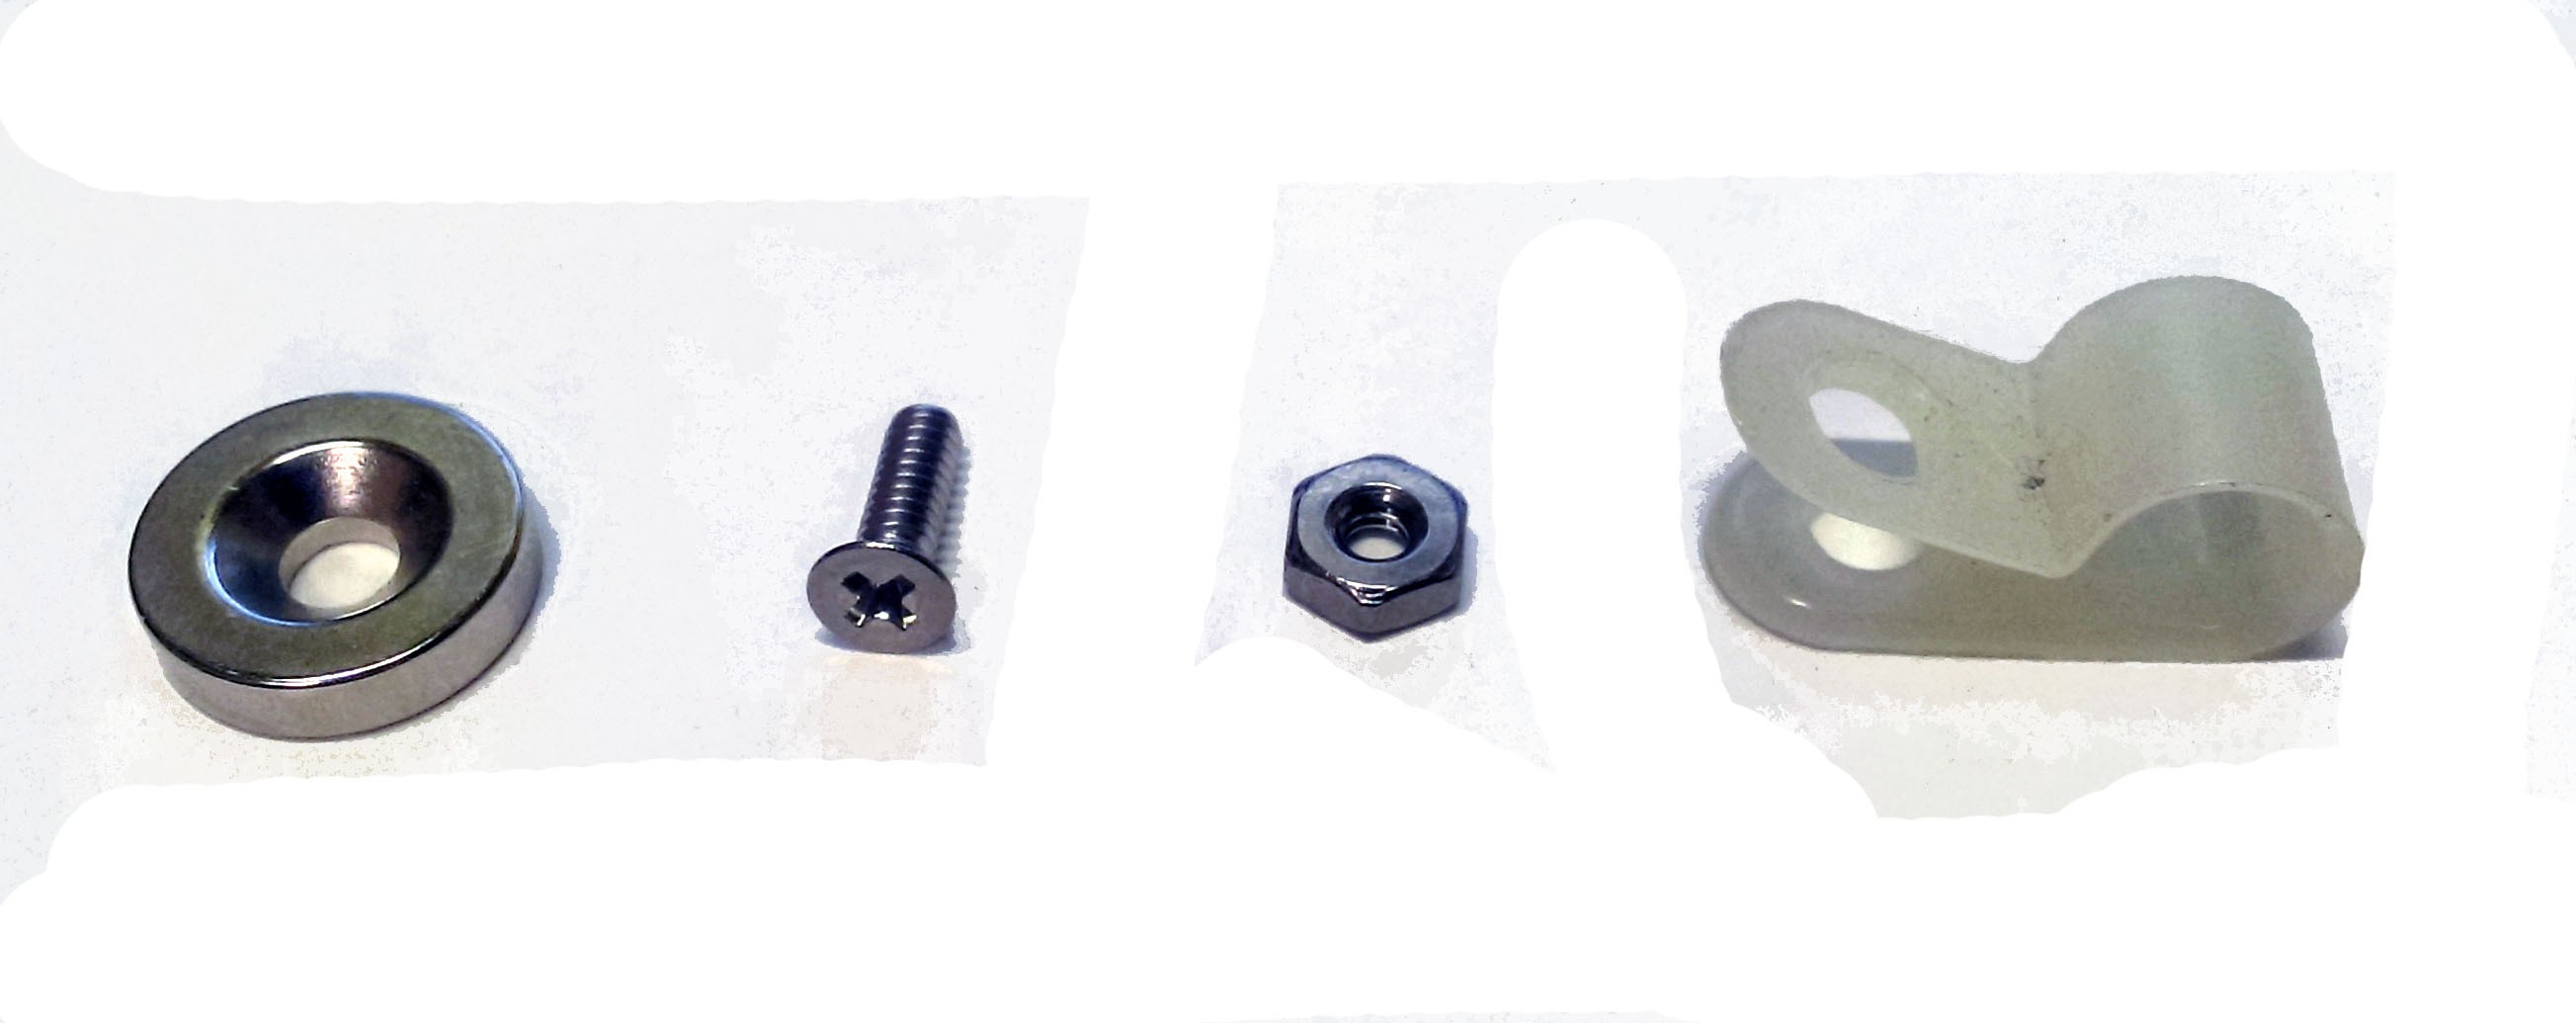
Since i had some extra magnets i came up with a nice way to manage the cable. Using a cable tie and a magnet i can run the cable across the front to keep it out of the way.
Cable tie Parts
![]()
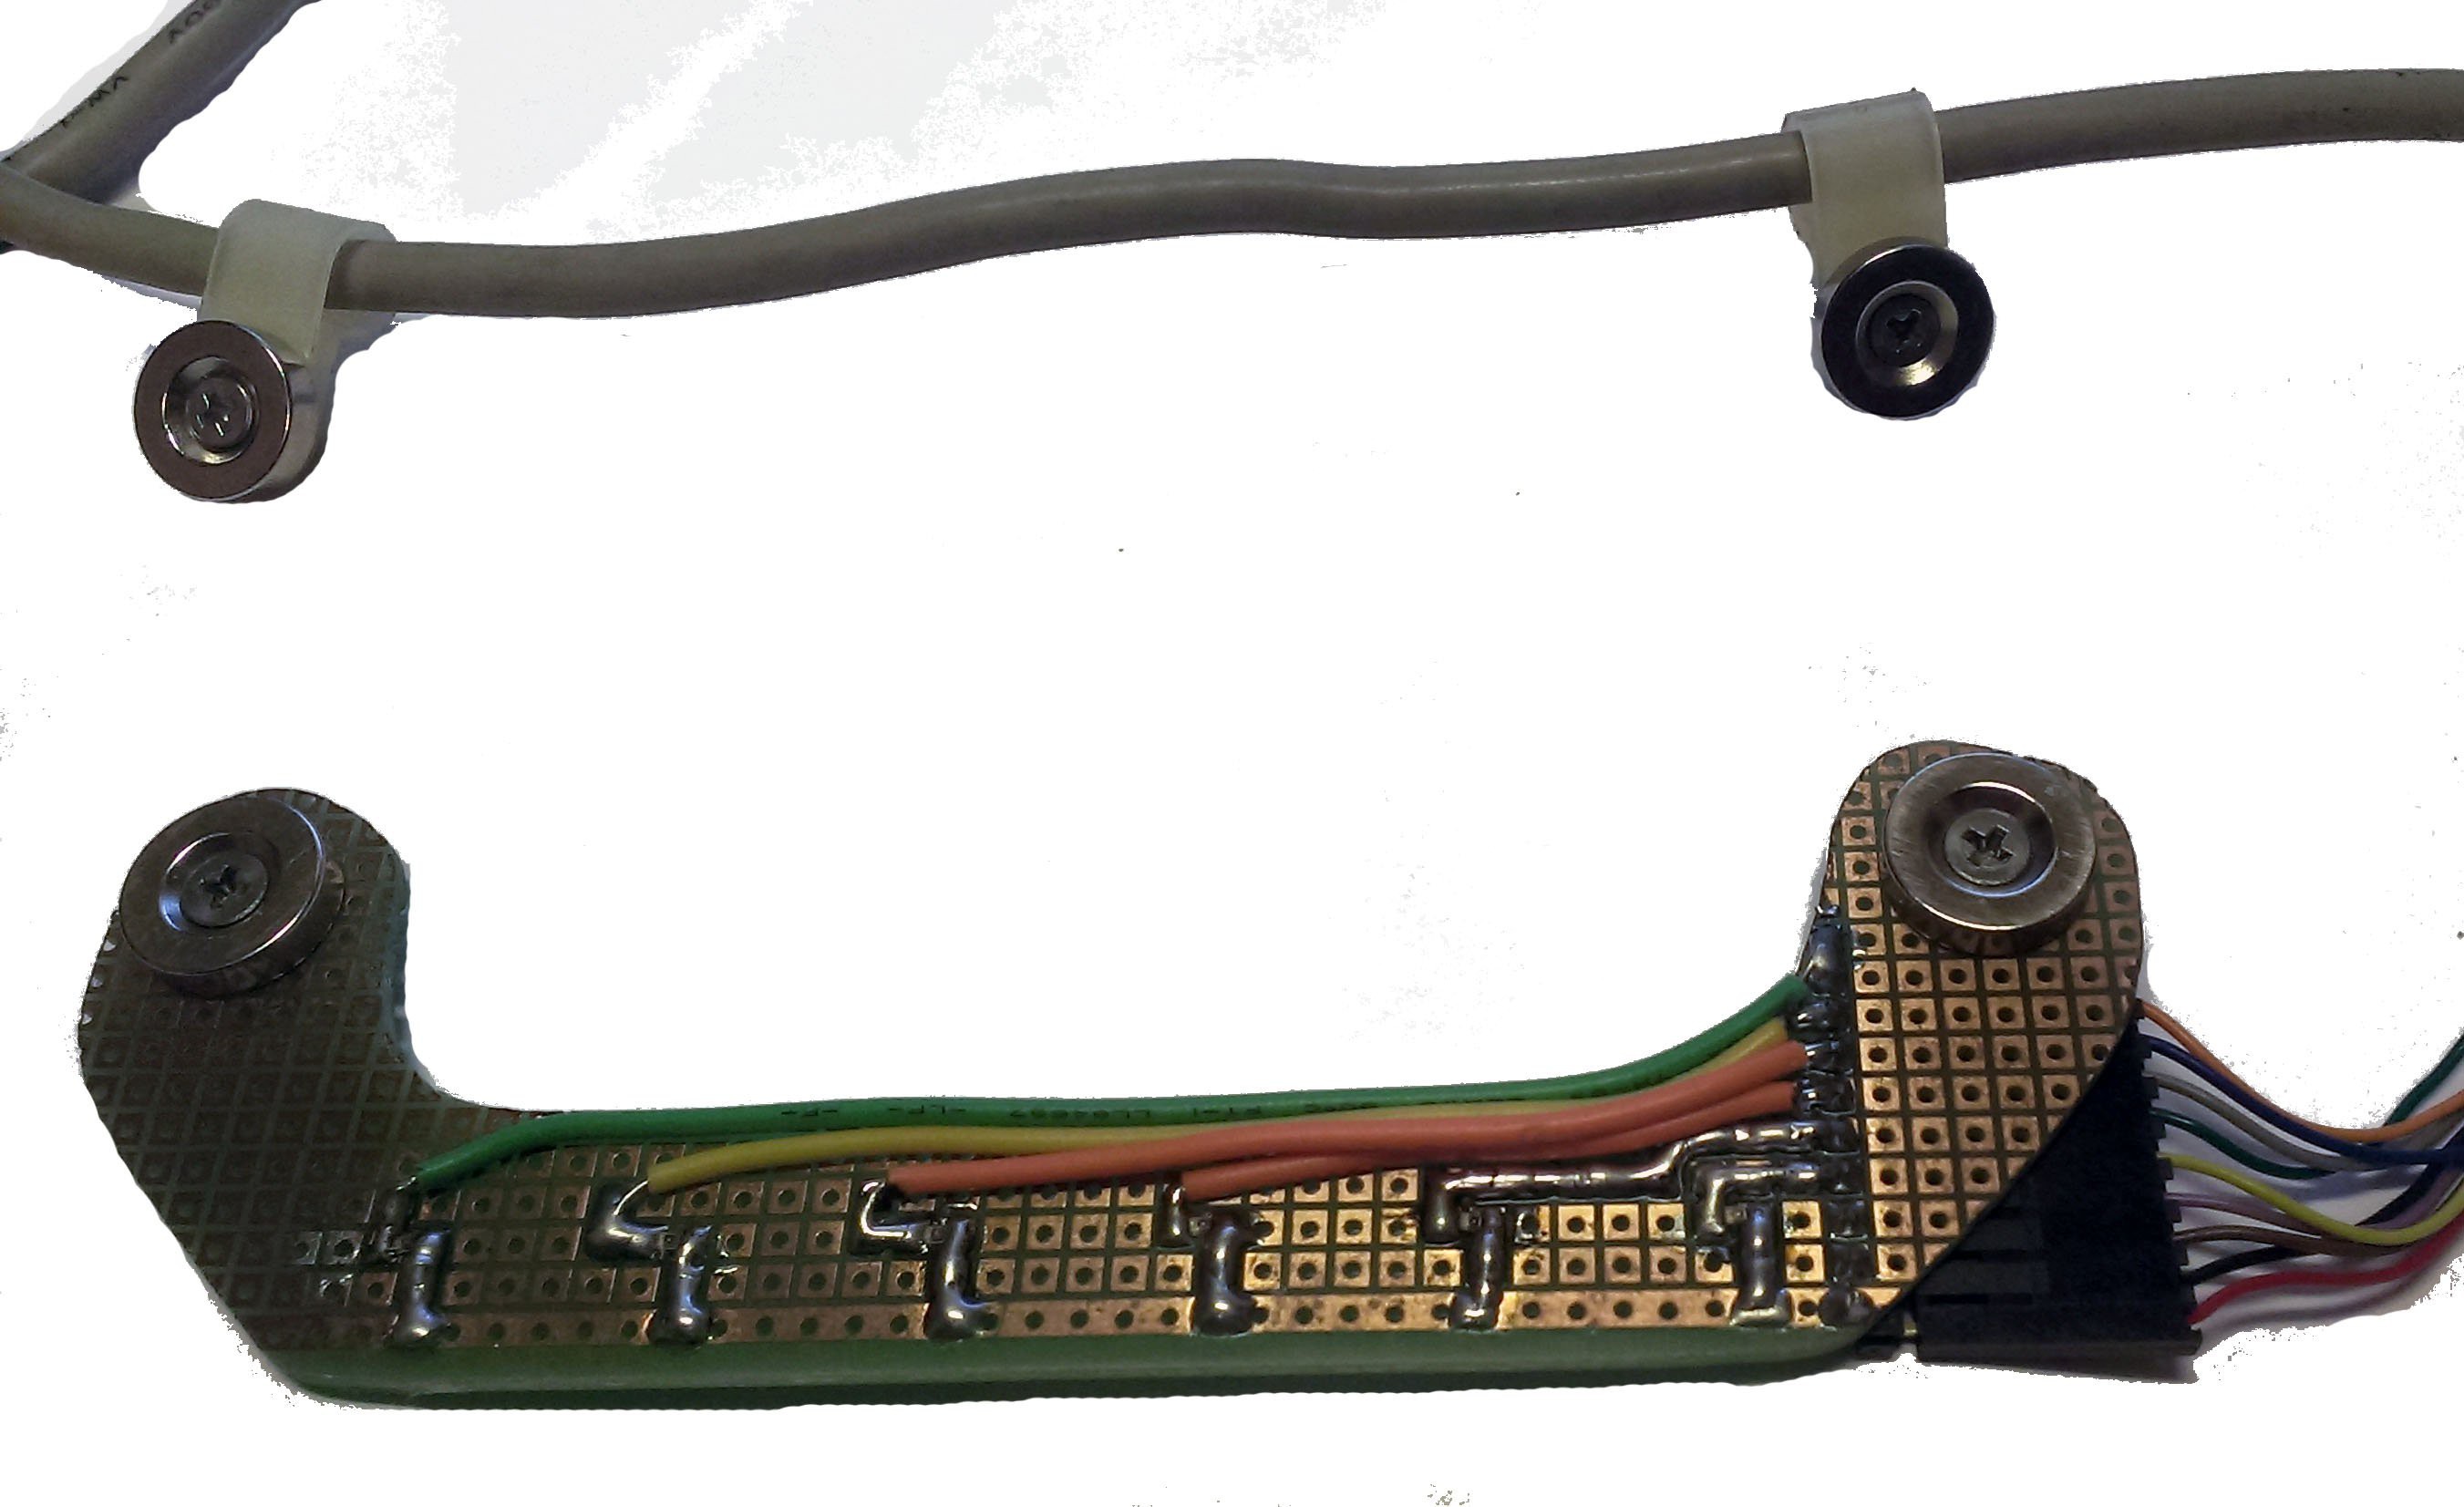
I also found flat screws so i fixed the sensor board mount with flat screws so the magnets are now holding flush to the washing machine. They were pan heads and it would rock a little before.
Cable harness, New flat screws on sensor board
![]()
Okay i had to mount it real quick and take two more photos.
Front
![]()
Magnetically mounted on the back
![]() And that is it for tonight. i will still attempt to sit down and create a video of the process. Possibly next week I will have some video editing time.
And that is it for tonight. i will still attempt to sit down and create a video of the process. Possibly next week I will have some video editing time. -
Testing Has Started
03/13/2016 at 10:02 • 0 commentsOkay after seeing hackaday post someone elses washing machine notifier on the page i had to go back and try to finish my project. Following their use of pushbullet and a post on the esp8266 forums i came up with the following script. I will remove my apikey, get your own ;)
#include <ESP8266WiFi.h>
#include <WiFiClientSecure.h>

const char* ssid = "........";

const char* host = "api.pushbullet.com";
const int httpsPort = 443;
const char* PushBulletAPIKEY = ".........................................."; //get it from your pushbullet account

// Use web browser to view and copy
// SHA1 fingerprint of the certificate
const char* fingerprint = "2C BC 06 10 0A E0 6E B0 9E 60 E5 96 BA 72 C5 63 93 23 54 B3"; //got it using https://www.grc.com/fingerprints.htm


// analog portion

int add1=0;
int add2=5;
int add3=2;
int an=A0;

const int triggerLevel =  200; // level to trigger change in ledstate

int sendWashComplete = 0; // set 0 at start, 1 when trigger is hit, 2 once sent, back to 0 during if start has started or all leds off like when wash is done and lid is opened.
int sendWashStart = 0; // set 0 at start, 1 when trigger is hit, 2 once sent, back to 0 during if complete or all leds off
int ledStates = 0; // use bitwise for keeping track. one number to compare against
int lastLedState = 0; // set same at start. only check once they change in a loop.


void setup() {

  pinMode(add1,OUTPUT); //analog control
  pinMode(add2,OUTPUT);
  pinMode(add3,OUTPUT);

  Serial.begin(115200);
  Serial.println();
  Serial.print("connecting to ");
  Serial.println(ssid);
  WiFi.mode(WIFI_STA);
  WiFi.begin(ssid);
  while (WiFi.status() != WL_CONNECTED) {
    delay(500);
    Serial.print(".");
  }
  Serial.println("");
  Serial.println("WiFi connected");
  Serial.println("IP address: ");
  Serial.println(WiFi.localIP());


}


void loop()
{

  byte i;
  for( i=0;i<=5;i++)
  {
    setAddress(i); // switch analog port before reading
    delay(50); // give 50ms to let analog switch complete.
    bitWrite(ledStates, i, 0); // set 0 before loop
    for(int x=0;x<1500;x++) // comes out to about 1 second scan rate for all 6 leds with given switch delays etc...
    {
      if(analogRead(an)>triggerLevel) // read level output and compare
      {
        bitWrite(ledStates, i, 1); // if we see it go high after anytime during the 1500 loops, set high or LED ON STATE. This should eliminate 50/60hz led issues on the wshing machine...ugh....pain.
      }
    }
  }

  Serial.println(ledStates); // simpler i guess

  if(ledStates!=lastLedState) // if there was a change from last loop do something
  {
    switch(ledStates)
    {
      case 16 : // wash complete state [0,1,0,0,0,0] = 16
        if(sendWashComplete == 0)
        {
          sendWashComplete = 1; // 1 means we need to send notification.
          sendWashStart = 0; // 0 means it can be triggered again
        }
      break;

      case 33 : // 33 is start and locked. sometimes both are on at same time.
        if(sendWashStart == 0)
        {
          sendWashStart = 1; // 1 means we need to send notification.
          sendWashComplete = 0; // 0 means it can be triggered again
        }
      break;

      case 1 : // 1 is start only
        if(sendWashStart == 0)
        {
          sendWashStart = 1; // 1 means we need to send notification.
          sendWashComplete = 0; // 0 means it can be triggered again
        }
      break;

      case 0 : // clear notifications if all leds are off machine is off or completed and lid opened.
        sendWashComplete = 0; // 0 means it can be triggered again
        sendWashStart = 0; // 0 means it can be triggered again
      break;
      default : {}
    }
  }

  if(sendWashComplete == 1) washComplete();
  if(sendWashStart == 1) washStart();

  lastLedState = ledStates; // at end of loop so we can test next loop
}


void washComplete()
{
  Serial.println("Wash Complete");
  SendNotification(1);
  sendWashComplete=2; // set sent
}

void washStart()
{
  Serial.println("Wash Started");
  SendNotification(0);
  sendWashStart=2; // set sent
}


void SendNotification(bool on)
{
  // Use WiFiClientSecure class to create TLS connection
  WiFiClientSecure client;
  Serial.print("connecting to ");
  Serial.println(host);
  if (!client.connect(host, httpsPort)) {
    Serial.println("connection failed");
    return;
  }

  if (client.verify(fingerprint, host)) {
    Serial.println("certificate matches");
  } else {
    Serial.println("certificate doesn't match");
  }
  String url = "/v2/pushes";
  String messagebody;
  if(on) messagebody = "{\"type\": \"note\", \"title\": \"Washing Machine\", \"body\": \"Wash Complete\"}\r\n";
  else messagebody = "{\"type\": \"note\", \"title\": \"Washing Machine\", \"body\": \"Wash Started\"}\r\n";
  Serial.print("requesting URL: ");
  Serial.println(url);

  client.print(String("POST ") + url + " HTTP/1.1\r\n" +
               "Host: " + host + "\r\n" +
               "Authorization: Bearer " + PushBulletAPIKEY + "\r\n" +
               "Content-Type: application/json\r\n" +
               "Content-Length: " +
               String(messagebody.length()) + "\r\n\r\n");
  client.print(messagebody);

  Serial.println("request sent");

  //print the response

  while (client.available() == 0);
  while (client.available())
  {
    String line = client.readStringUntil('\n');
    Serial.println(line);
  }
}


/******************************************
*
* setAddress(byte i)
*
* Take byte value and output the bits, 3 bit address
*
*******************************************/
void setAddress(byte i)
{
  if(i & B00000001) digitalWrite(add1,HIGH);
  else  digitalWrite(add1,LOW);

  if(i & B00000010) digitalWrite(add2,HIGH);
  else  digitalWrite(add2,LOW);

  if(i & B00000100) digitalWrite(add3,HIGH);
  else  digitalWrite(add3,LOW);
}
Most of the pushbullet script i found here http://www.esp8266.com/viewtopic.php?f=29&t=7116 Thanks to DedeHai. Exactly what i needed.This isn't completed yet but i'm running a load of wash now. Wash Started message sent once this time. To my pc and phone using the pushbullet software. Need to install on HTPC so i get notified while watch tv.
first couple runs though i was getting non stop messages. i think the 60hz was messing with my readings at full speed. didn't really notice when outputting serial. Maybe runs faster when serial is not connected? Anyways the 1500 loops per analog read fixes it i think. i set the reading to 0 and then read 1500 times to see if it ever goes above the threashold. if it does set it true and continue....maybe i should break as soon as i read high to make it faster????
I'll try to post a video tomorrow if everything is working.
-
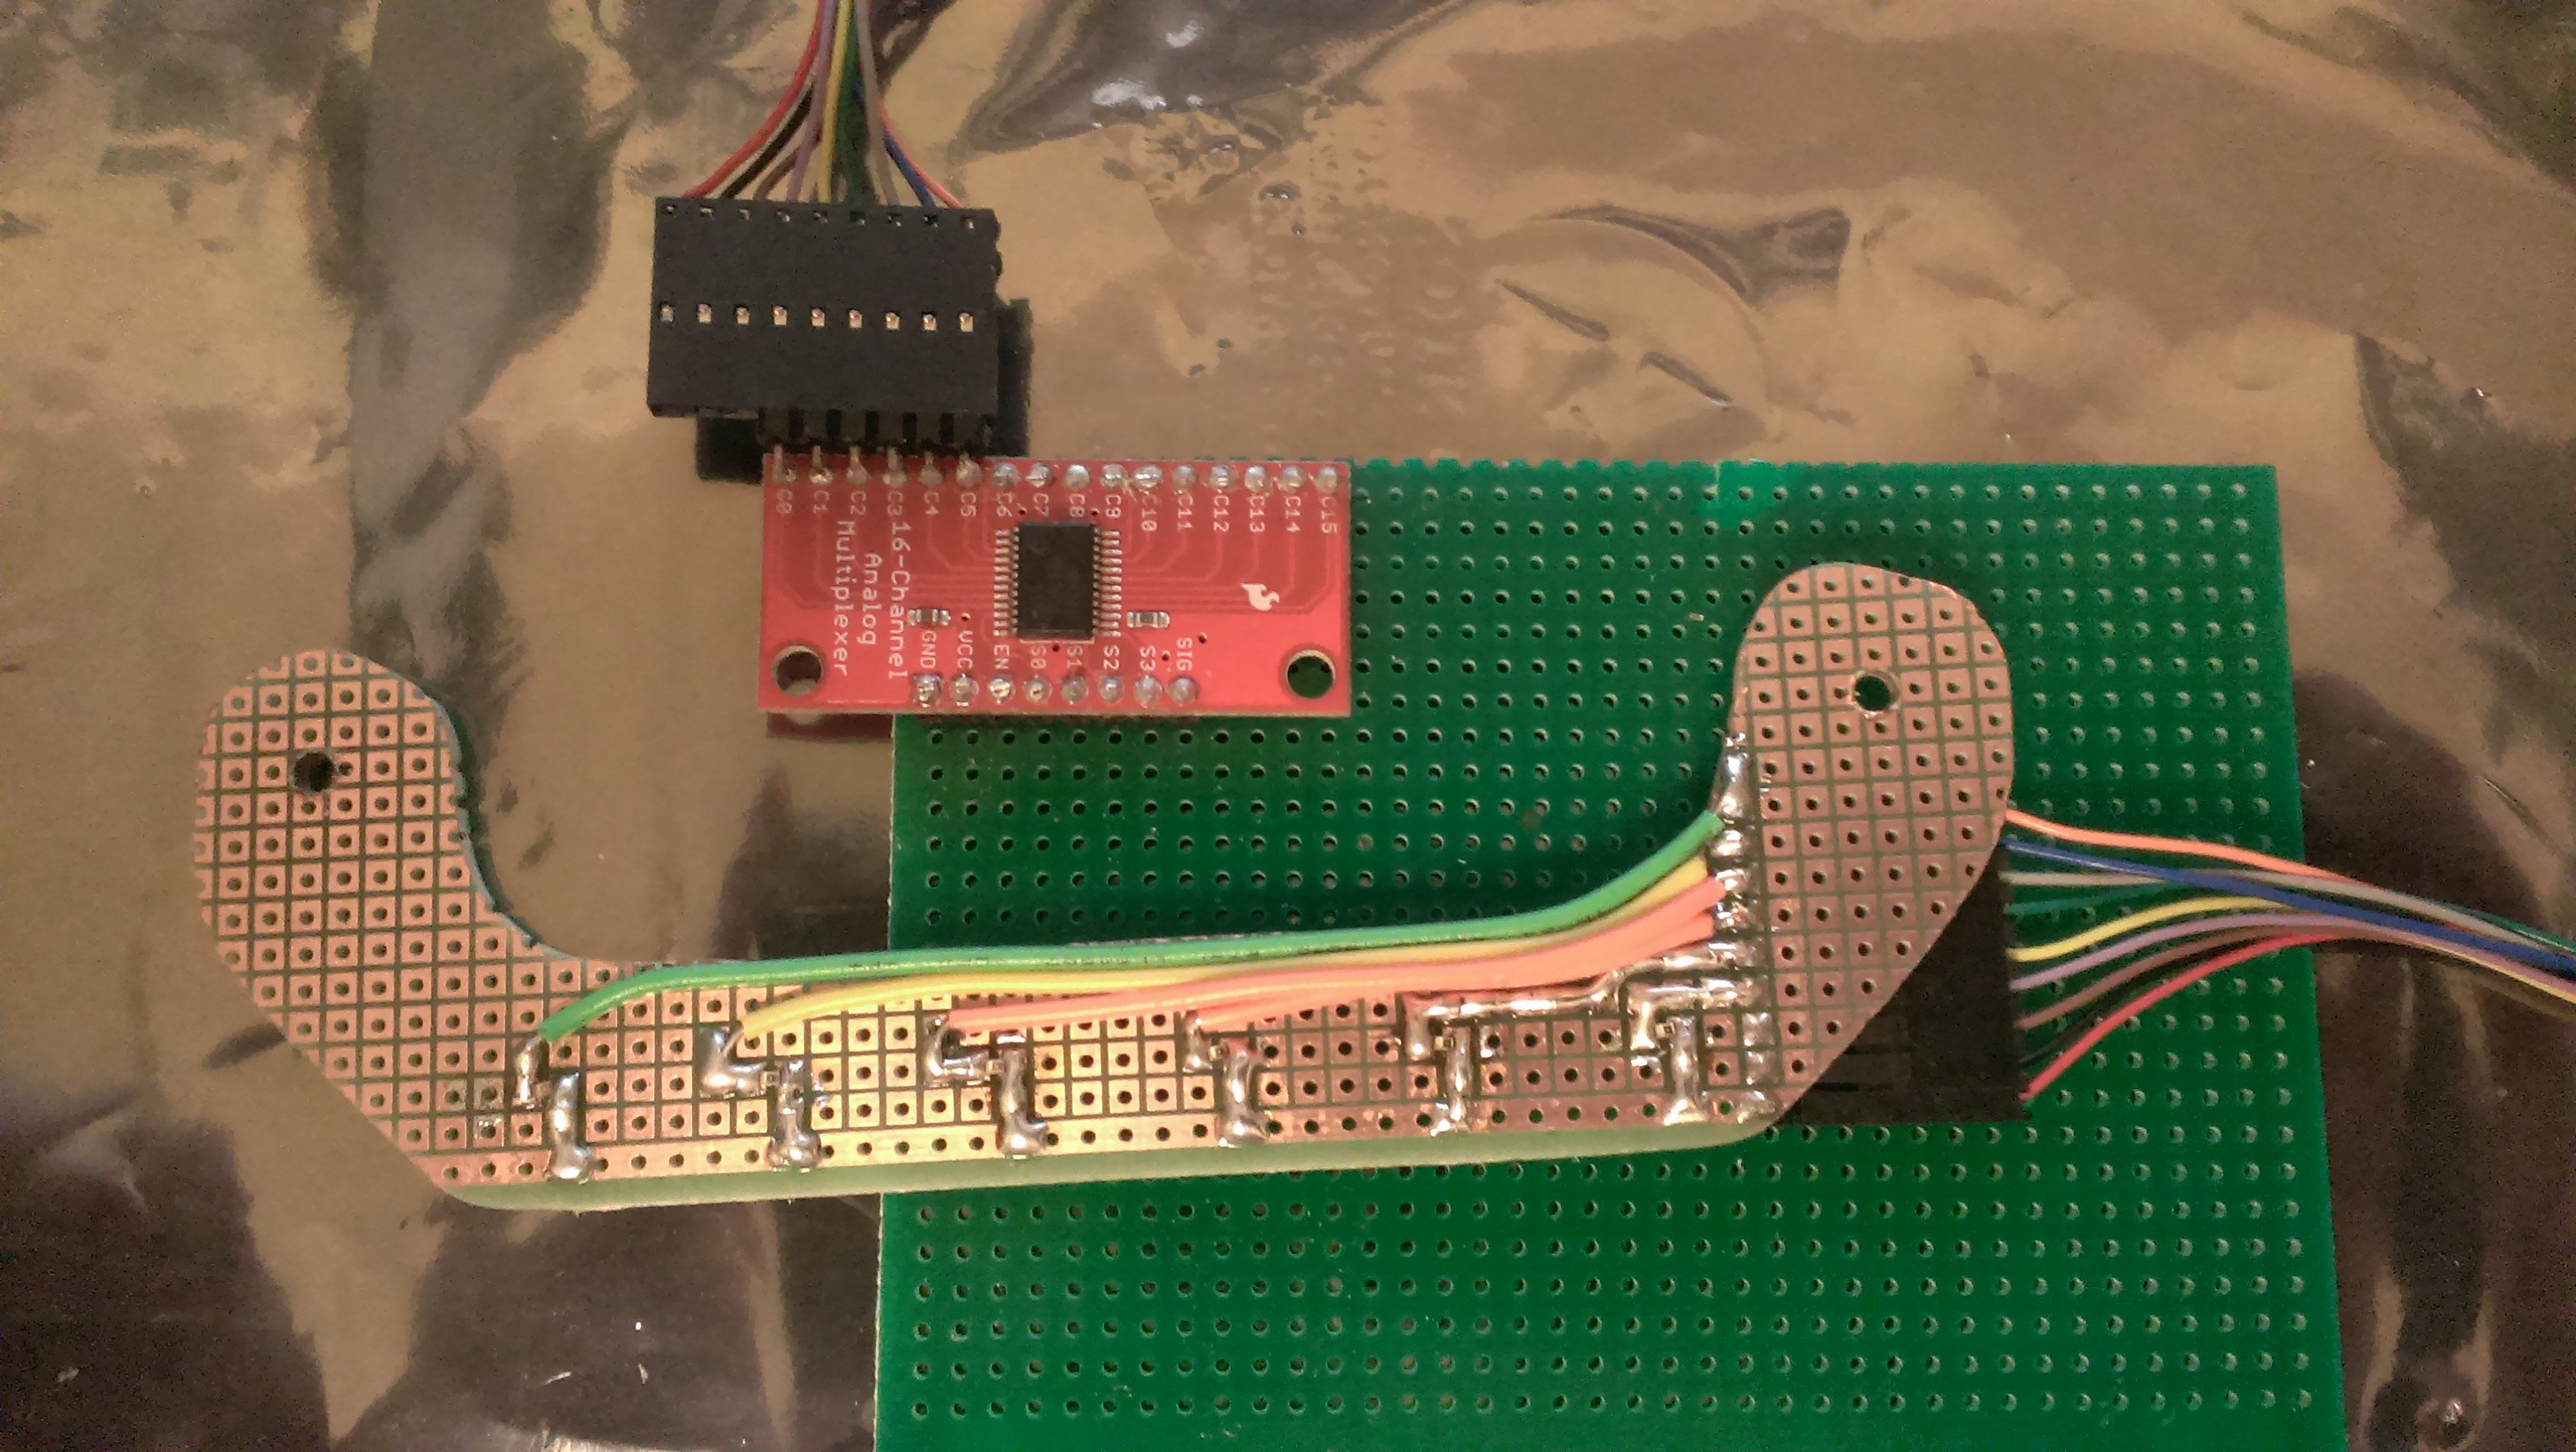
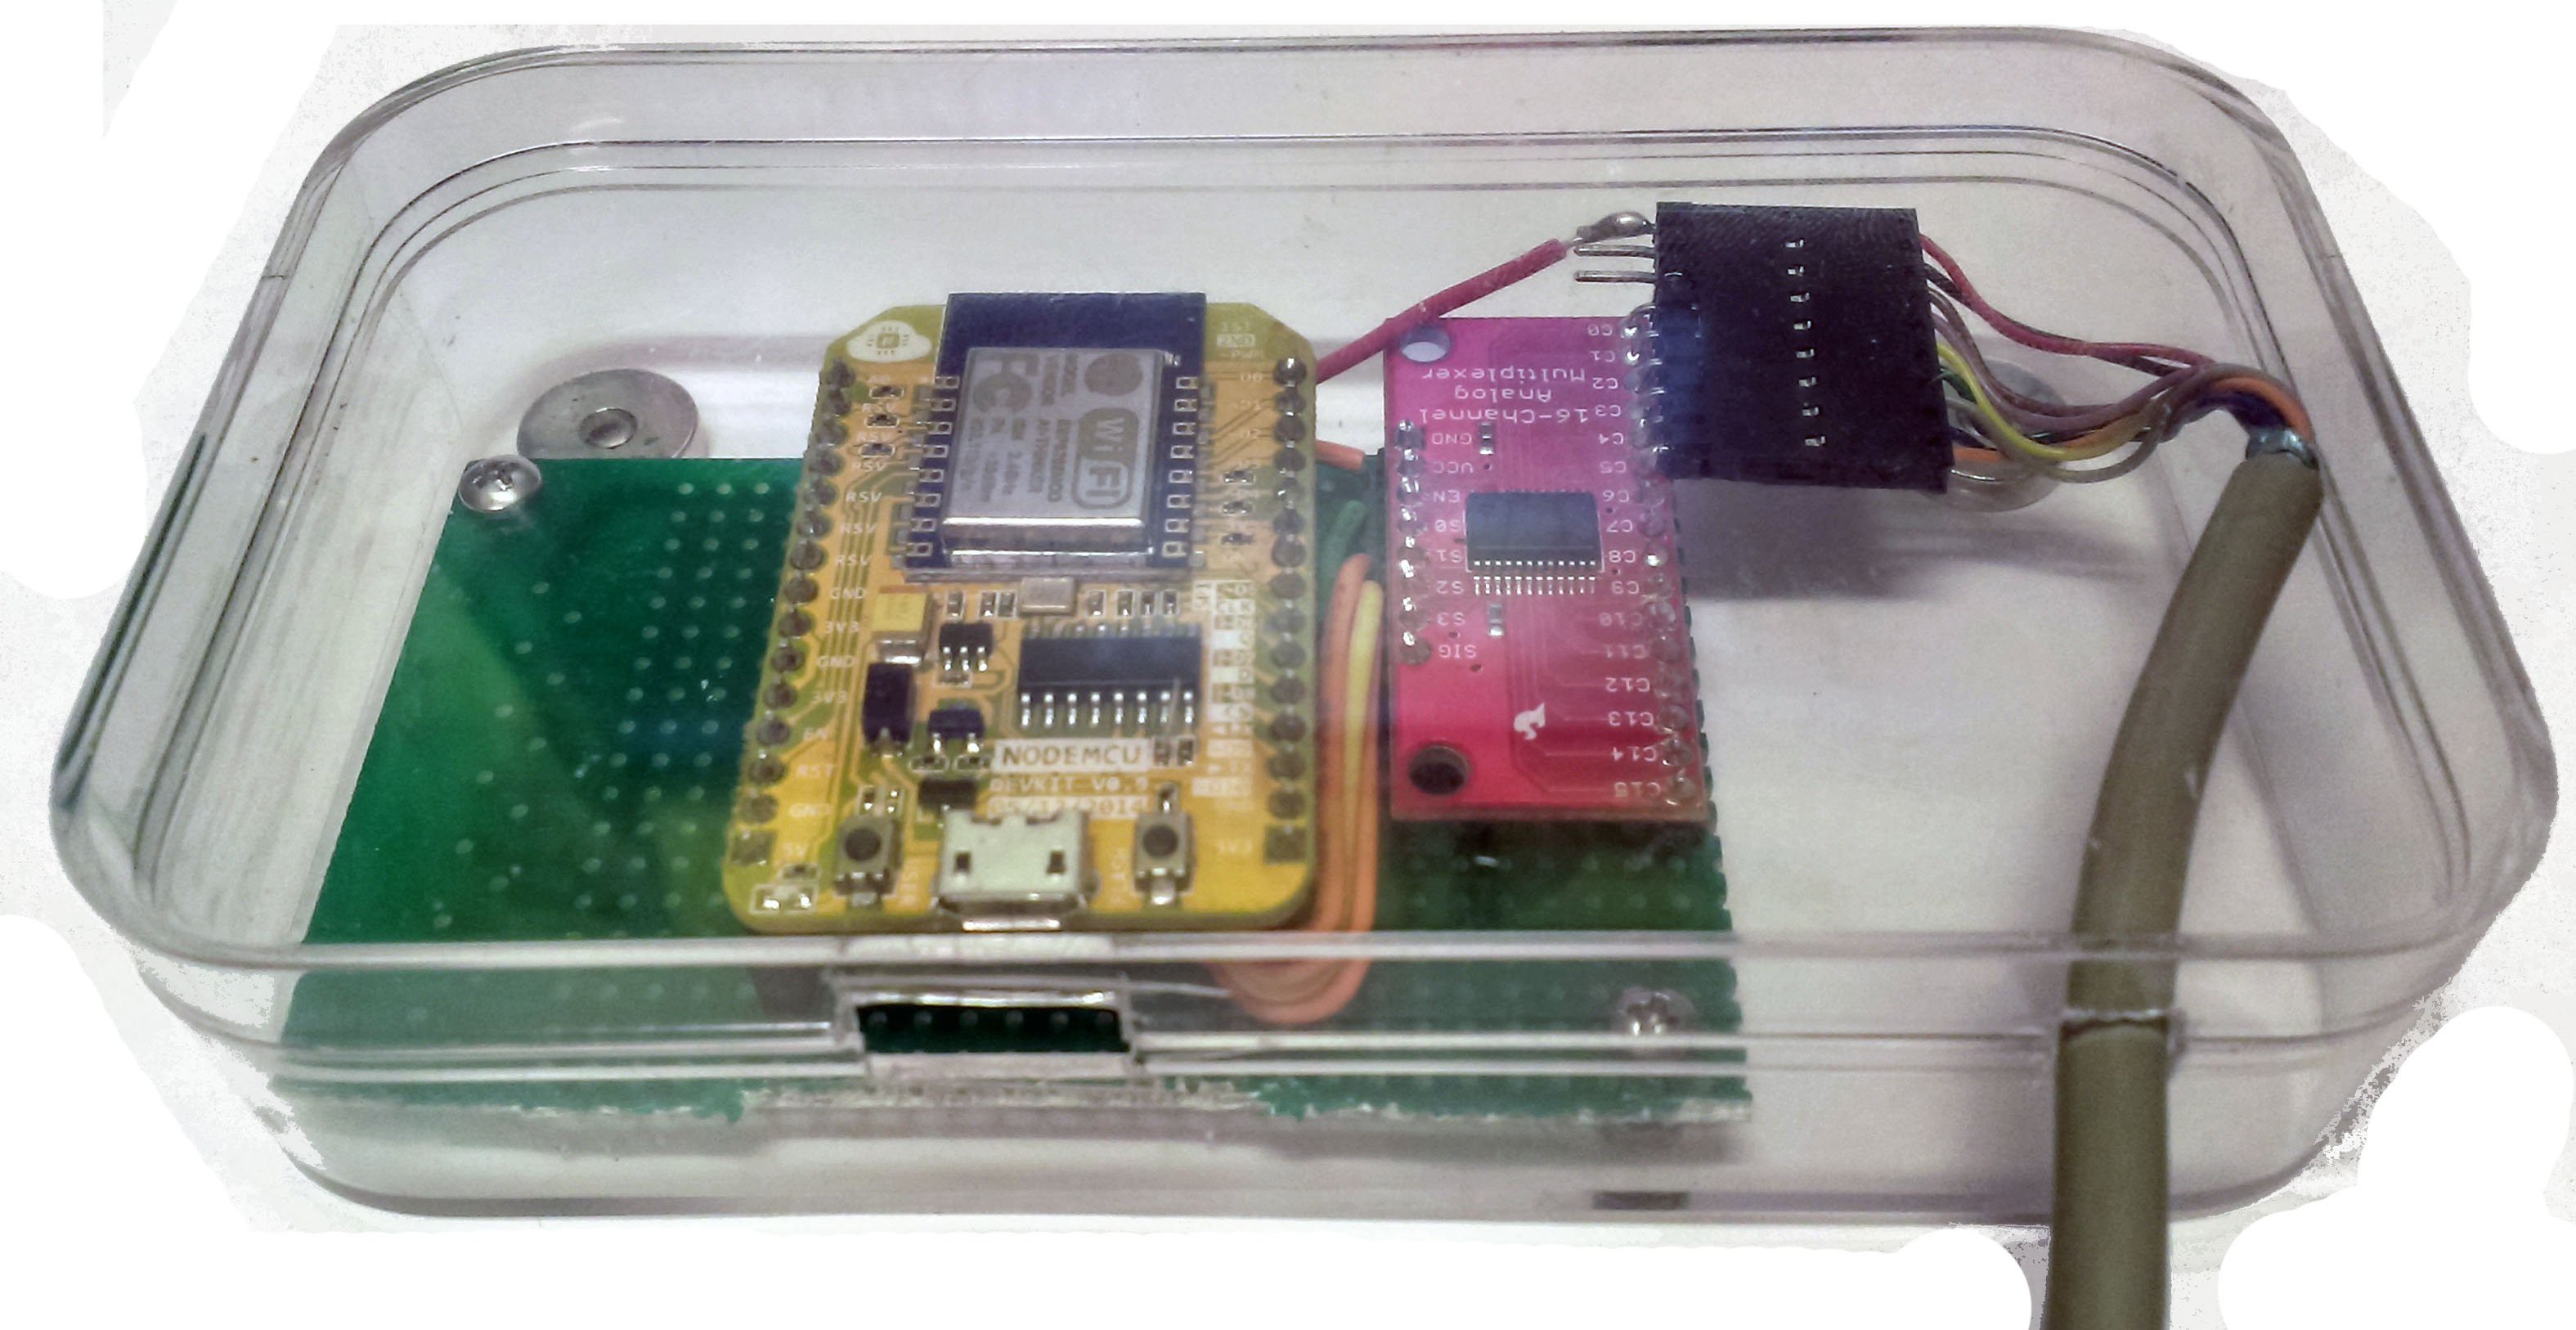
Board Level soldering Complete!!!
07/08/2015 at 07:40 • 0 commentsOkay sometimes life gets busy and projects fall behind. Found some free time to get back to this.
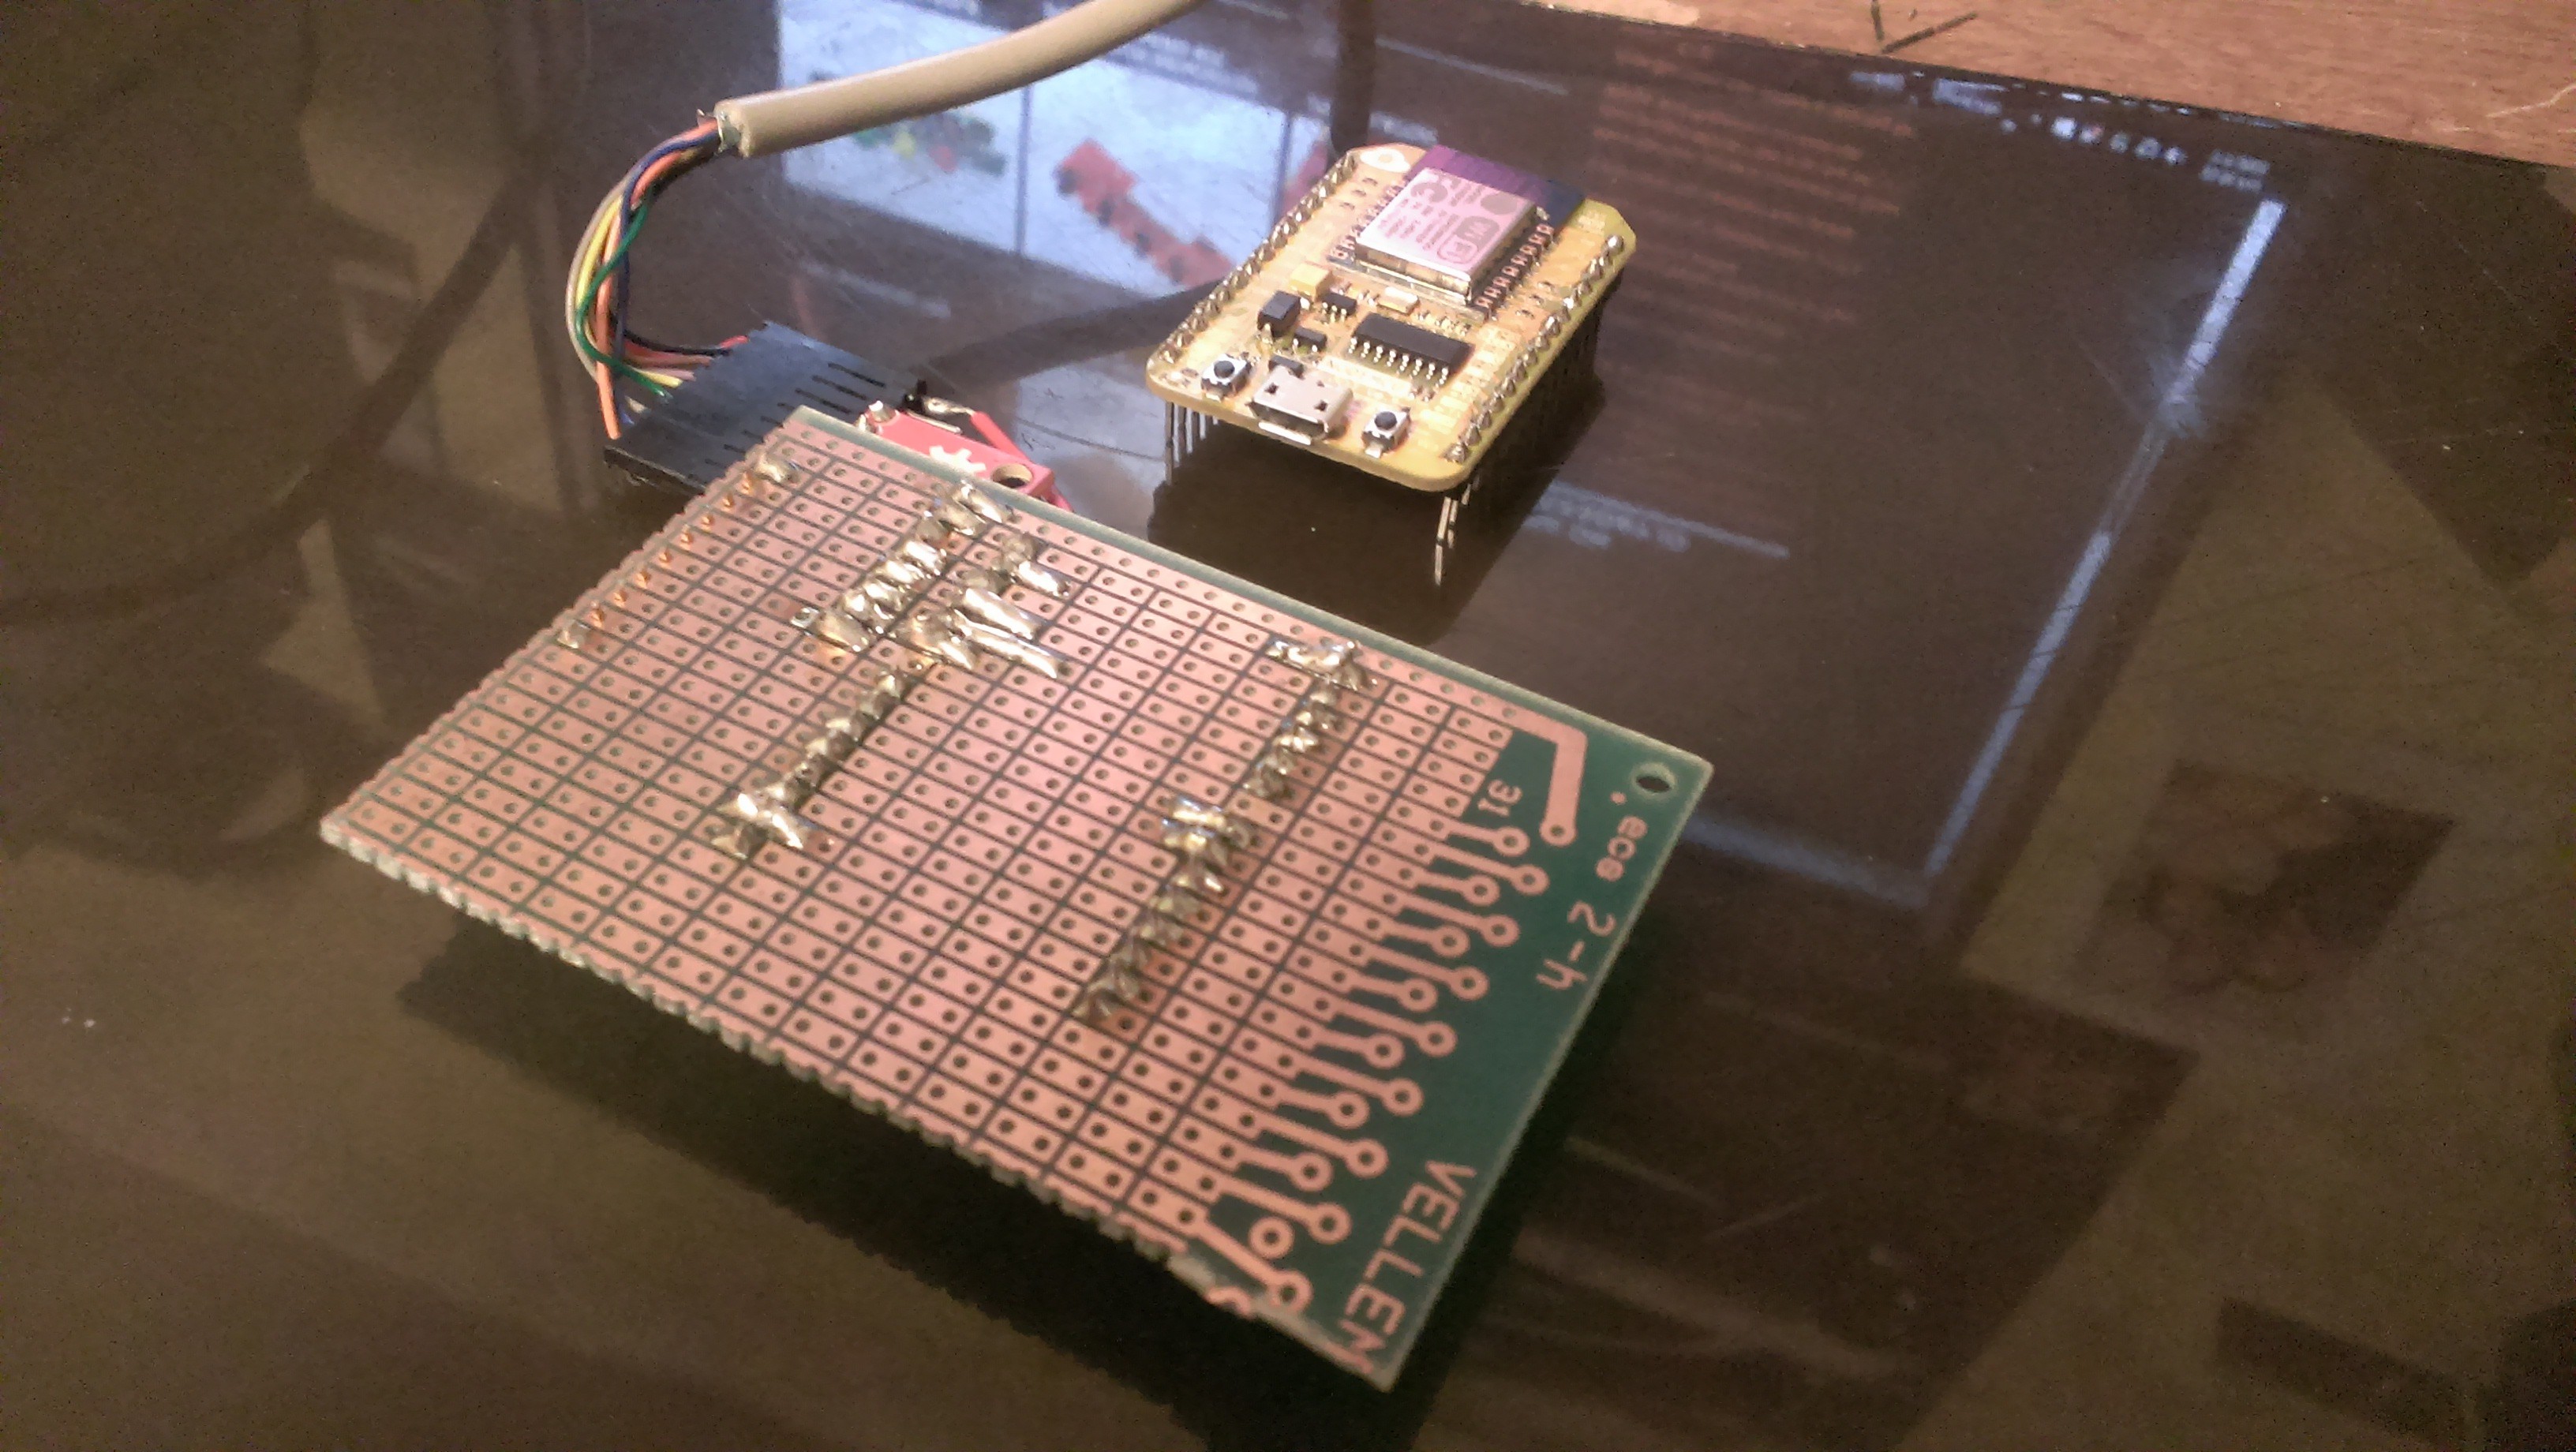
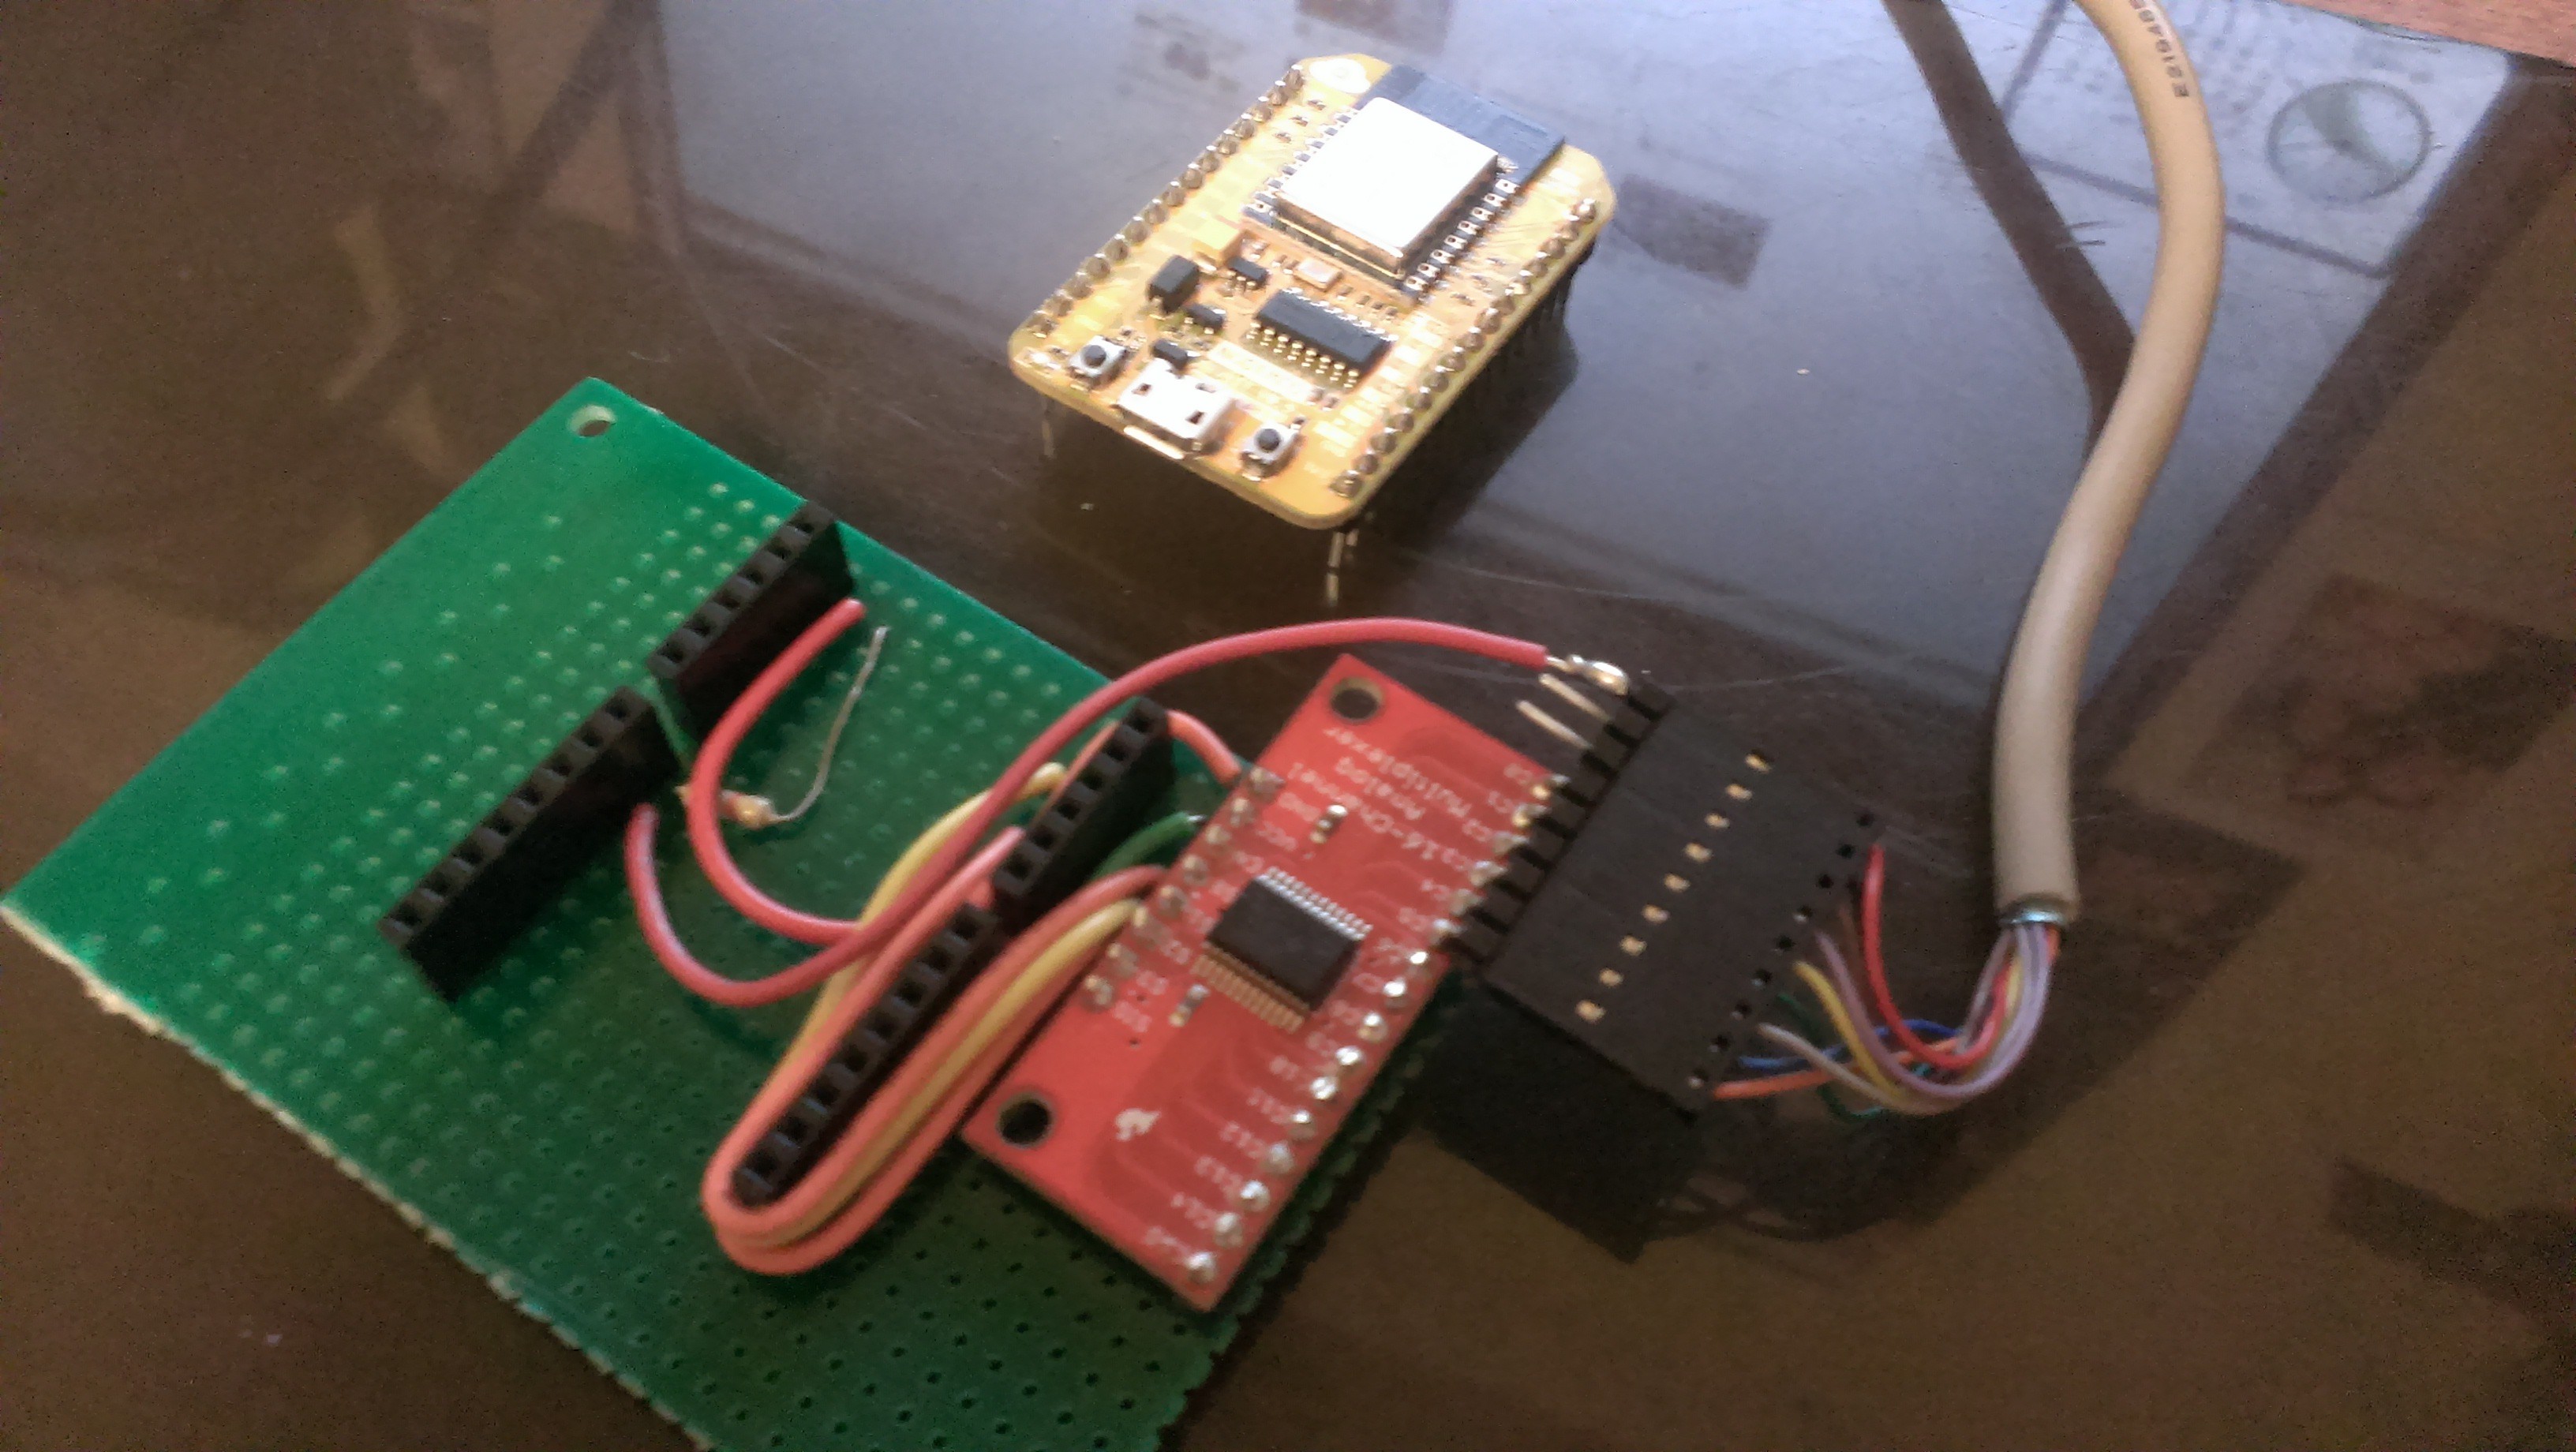
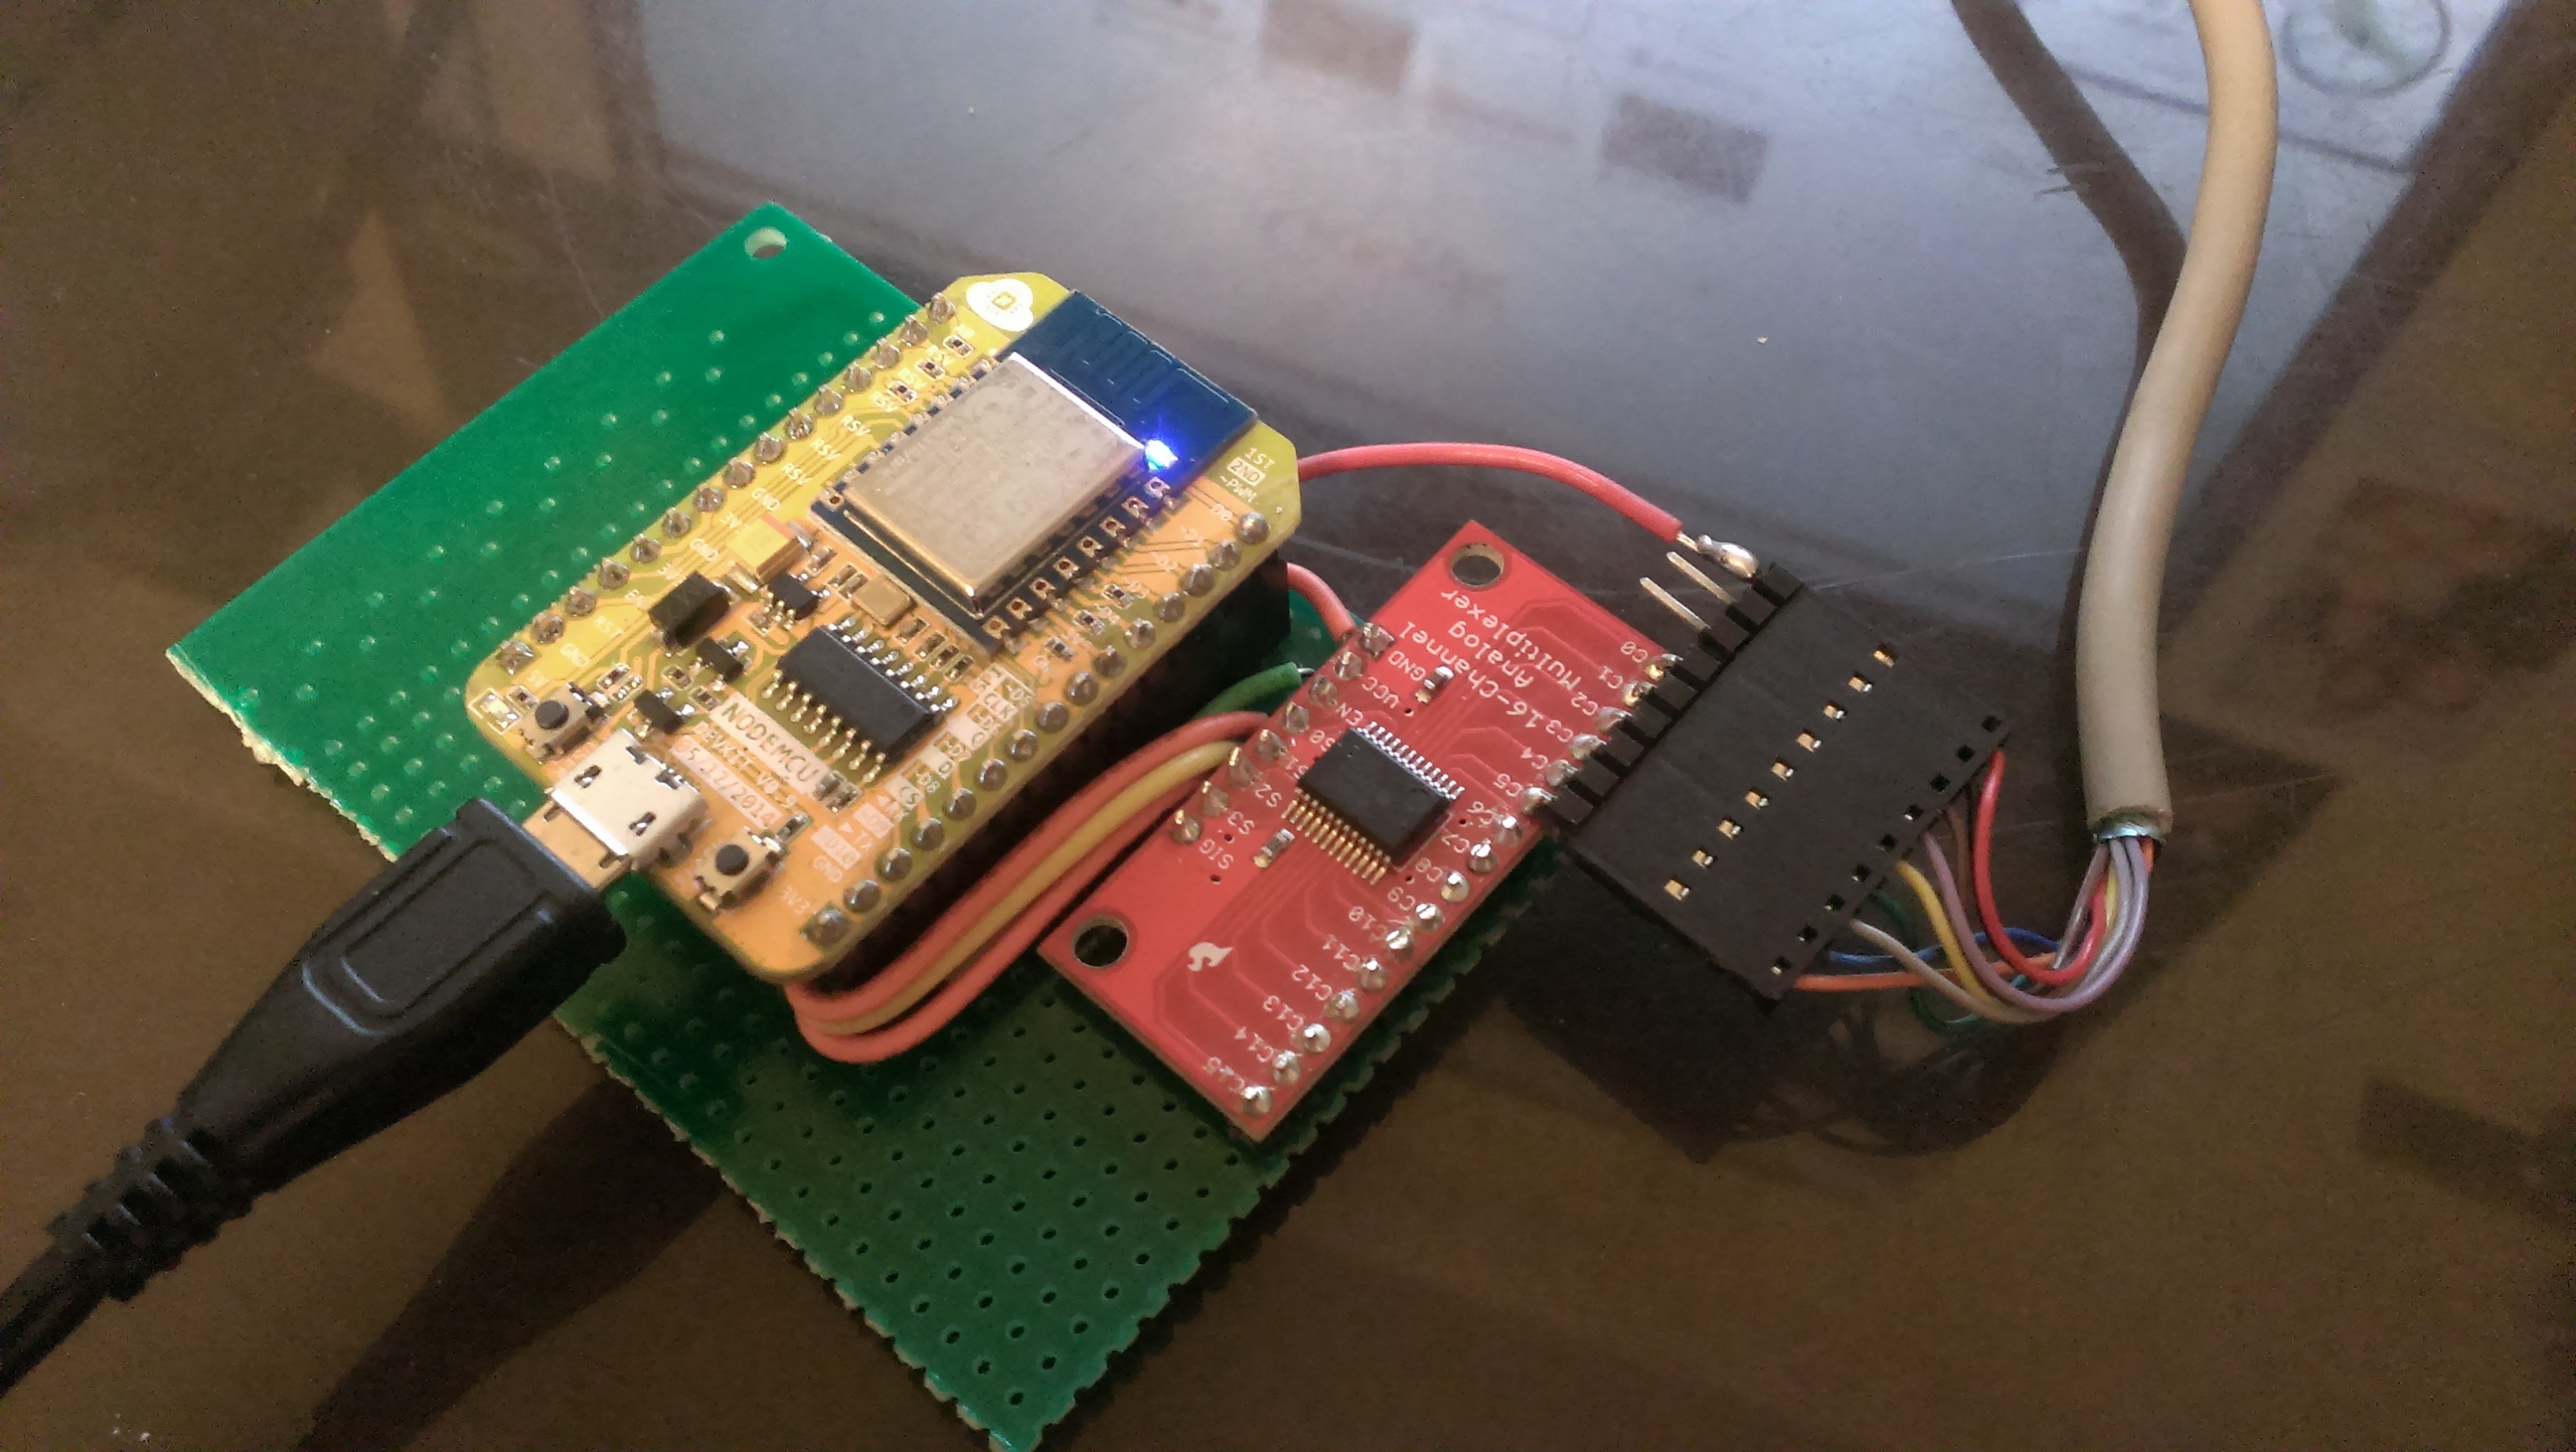
Tonight i finished soldering up the interface to the NodeMCU ESP8266 board. I used a couple Arduino shield connectors so i can remove the NodeMCU in case i have programming issues while its connected up. Or if i want to use it for another project :)
Powered up assembled design and ran a quick arduino sketch to test out the analog read from the 6 LED sensors and bam! somethings not working right. I read 700 from the analog read....WTF! No lights should be 0V reading around 0. so i use an led flashlight to light them up. hmm. 800??? whats going on here. The problem is i should be getting a 0v reading around 0 and a 3.3V reading around 1024 from the analog read. It worked on my other NodeMCU at work when i tested out the circuit on a breadboard and a single LED sensor.........
...so after digging around on the internet i found some people with similar issues with some NodeMCU boards not returning the correct voltage from the ADC.
This problem https://github.com/esp8266/Arduino/issues/338
Well thanks to bluewalk with his code i modified the
__analogReadincore_esp8266_wiring_analog.cextern int __analogRead(uint8_t pin) { if(pin == 17){ return 0xFFFF & system_adc_read(); } return digitalRead(pin) * 1023; }Re ran the sketch and everything seems to be running great. I'm now getting around 2-3 with no lights on the led sensors and ~1000 with a led flash light. So now i need to work on getting the ranges from the actual LED's and possibly a way to determine if there is ambient light based on the ADC level from all 6 sensors. As i don't think the washing machine will have all of them on at once. but will have them all off at the same time.
Here are some photos of the progress. I will need to find a project box to put this in soon.
![]()
Here you can see the Arduino shield connectors on the board. This makes removal of the NodeMCU easier.
![]()
Everything connected up and transmitting LED sensor readings back through the USB Serial port
![]()
Now the hard part of the work starts next. Programming all the code. Still not 100% sure what i will need/want. The bare minimum is to let me know when the wash is done. but now i can read all the LED indicators so maybe a full webpage with Indicators showing a replica of the washing machine front display.
I've also built an SD card adapter that runs in 1bit mode. Kind of slow but i was thinking i could use it to log everything. Keep track of washing cycles etc... but for good data tracking i will need to figure out TIME and DATE??? maybe NTP server? it will be on my home network. should be able to get time from somewhere with a simple HTTP post command.
Stay tunned..... i'll be traveling this month. so probably get back to this in august.
-
LED Sensors soldered on
06/19/2015 at 07:35 • 0 commentsAnother slow but steady day of work on the project.
With a good headband visor magnifier and a flashlight jammed against my head i was ready to start. These LED sensors are tiny. Some good SMT Tweezers would of been nice but i had to do with a really sharp pencil to push these things into place and hold down while hand soldering. They kept sticking to my x-acto knife. See that thing on Washingtons eye!!
![]()
Anyways steady hand and an hour later and i have them all in place. Trust me they are there.
Couple more added wires and the sensor board is 99% complete. Just need to get the flat head 4x40 screws and this can be attached to the washing machine for some testing.![]()
Yah i know wireless device with long wired cable.... If i can distract my wife long enough maybe i can scrap the sensor board and wire directly to the LED's inside the machine!!! :)![]()
-
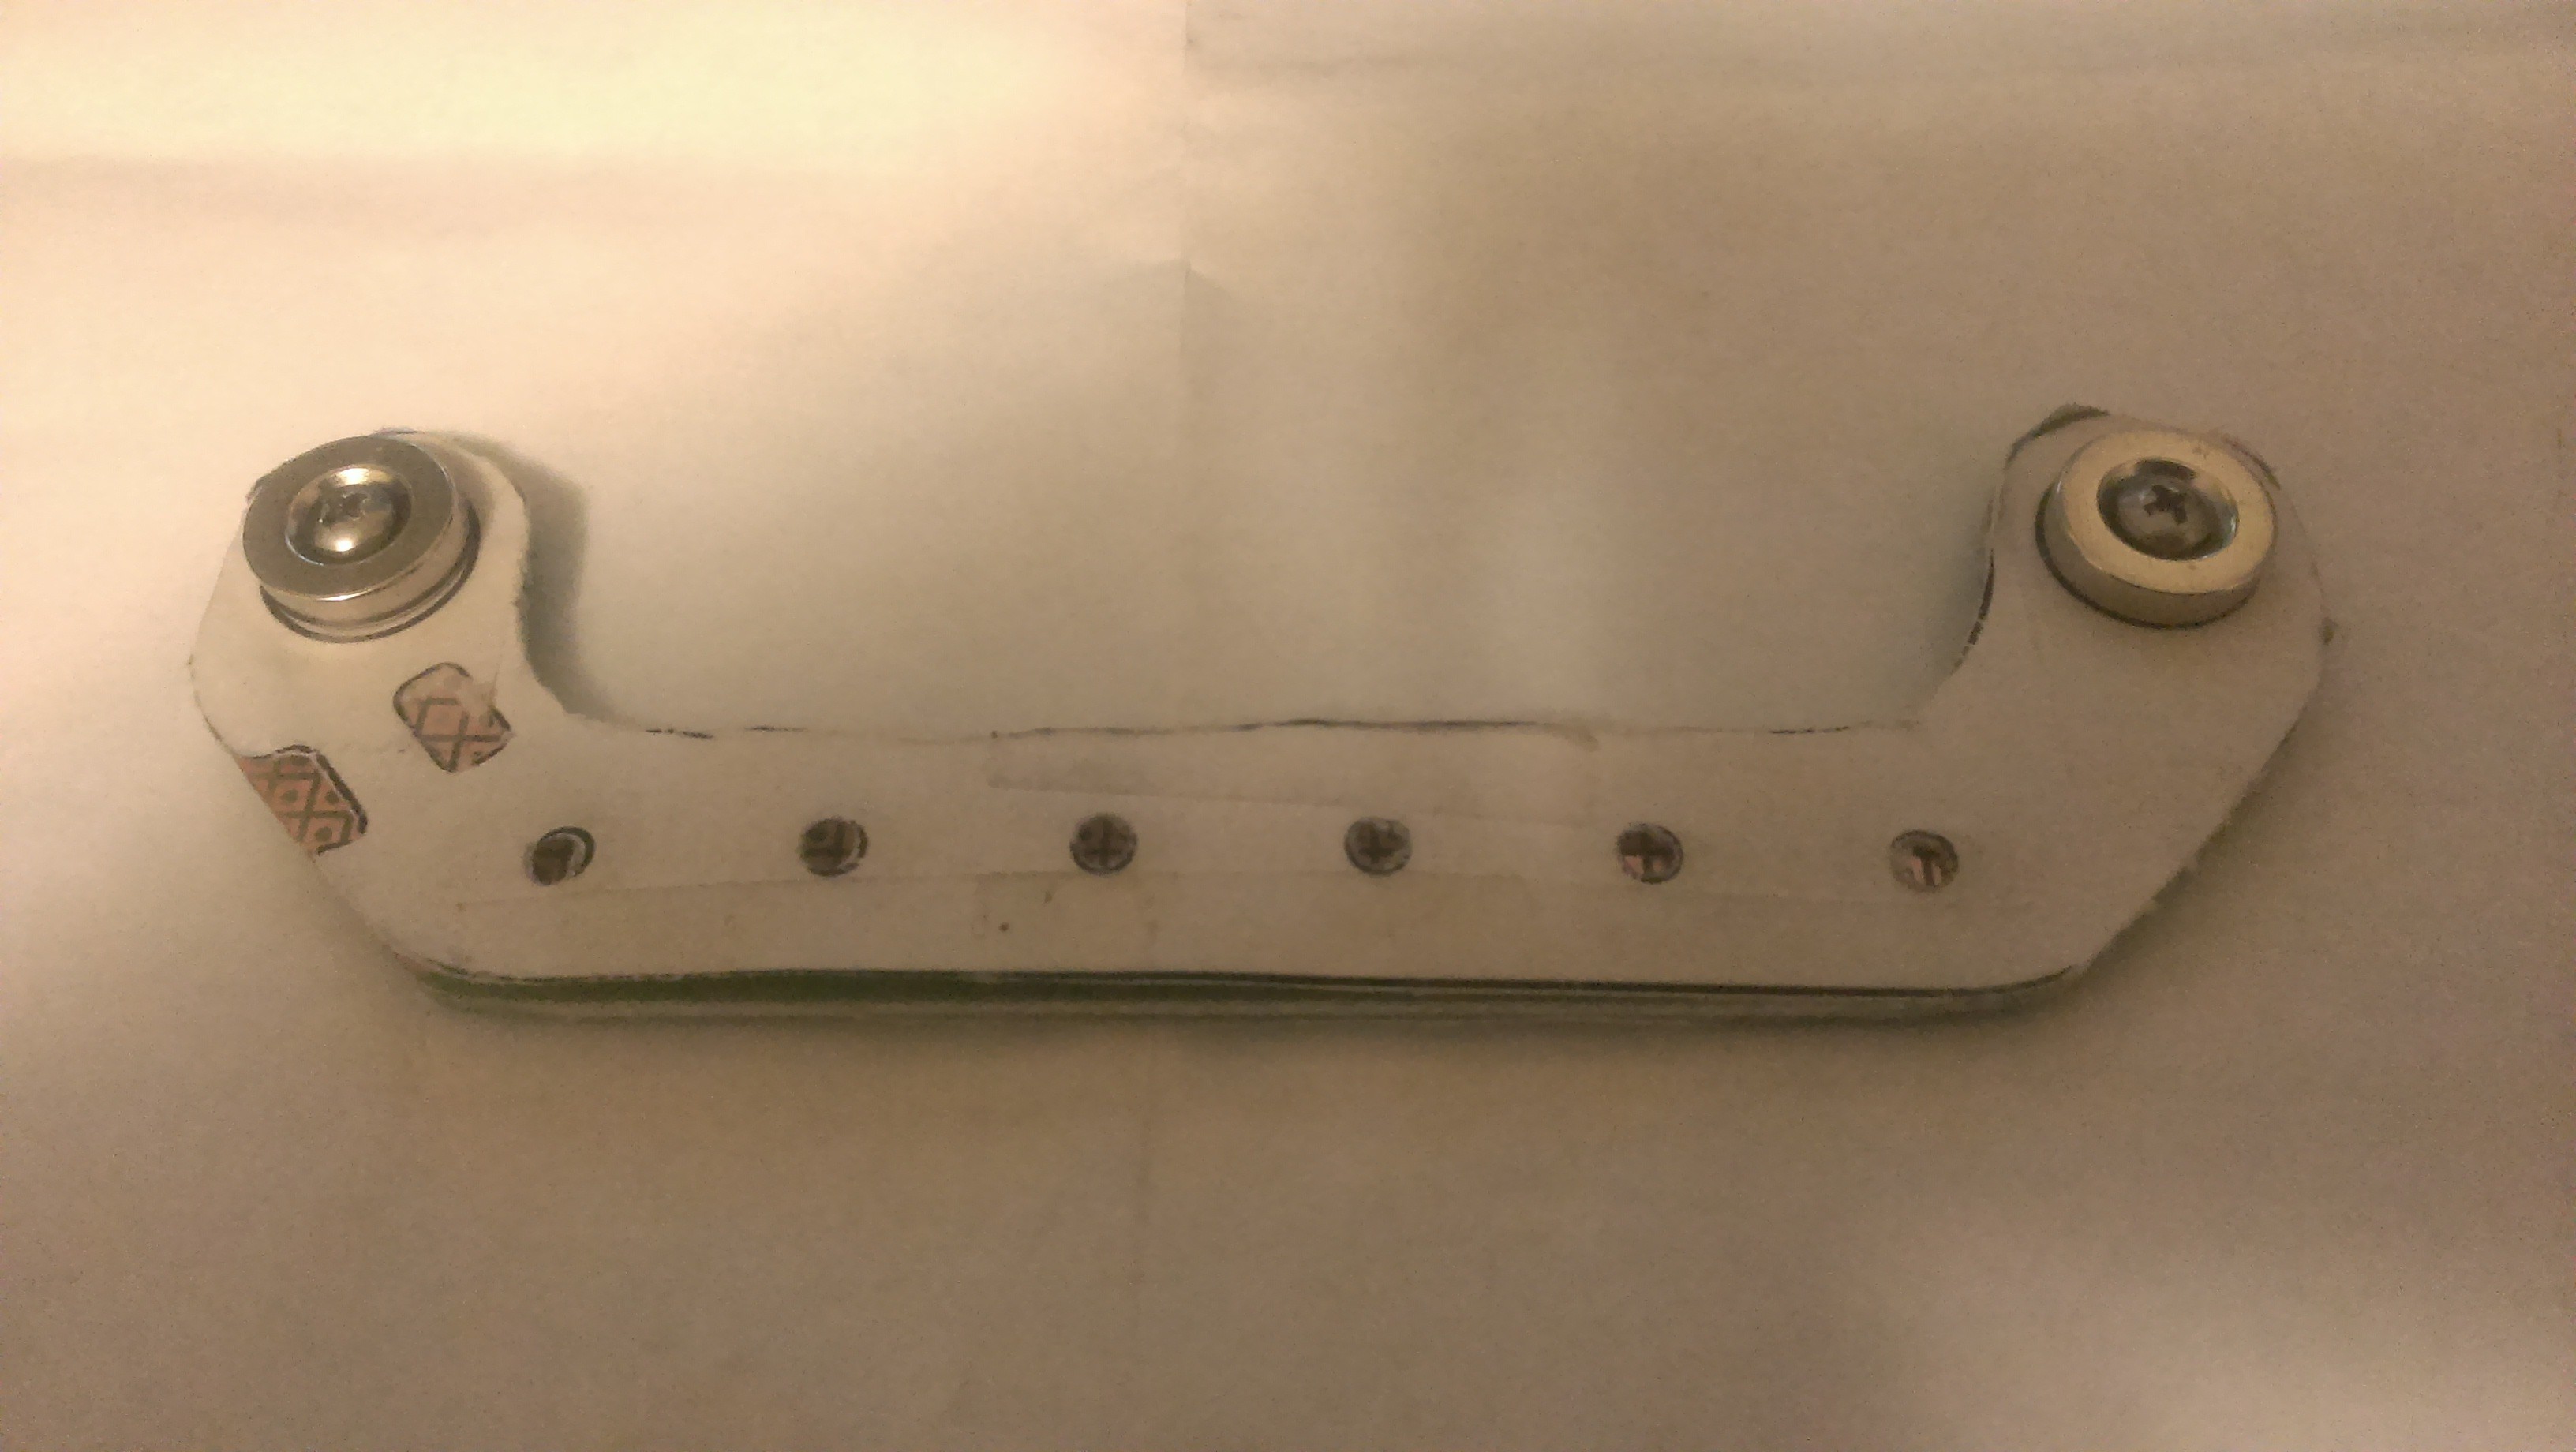
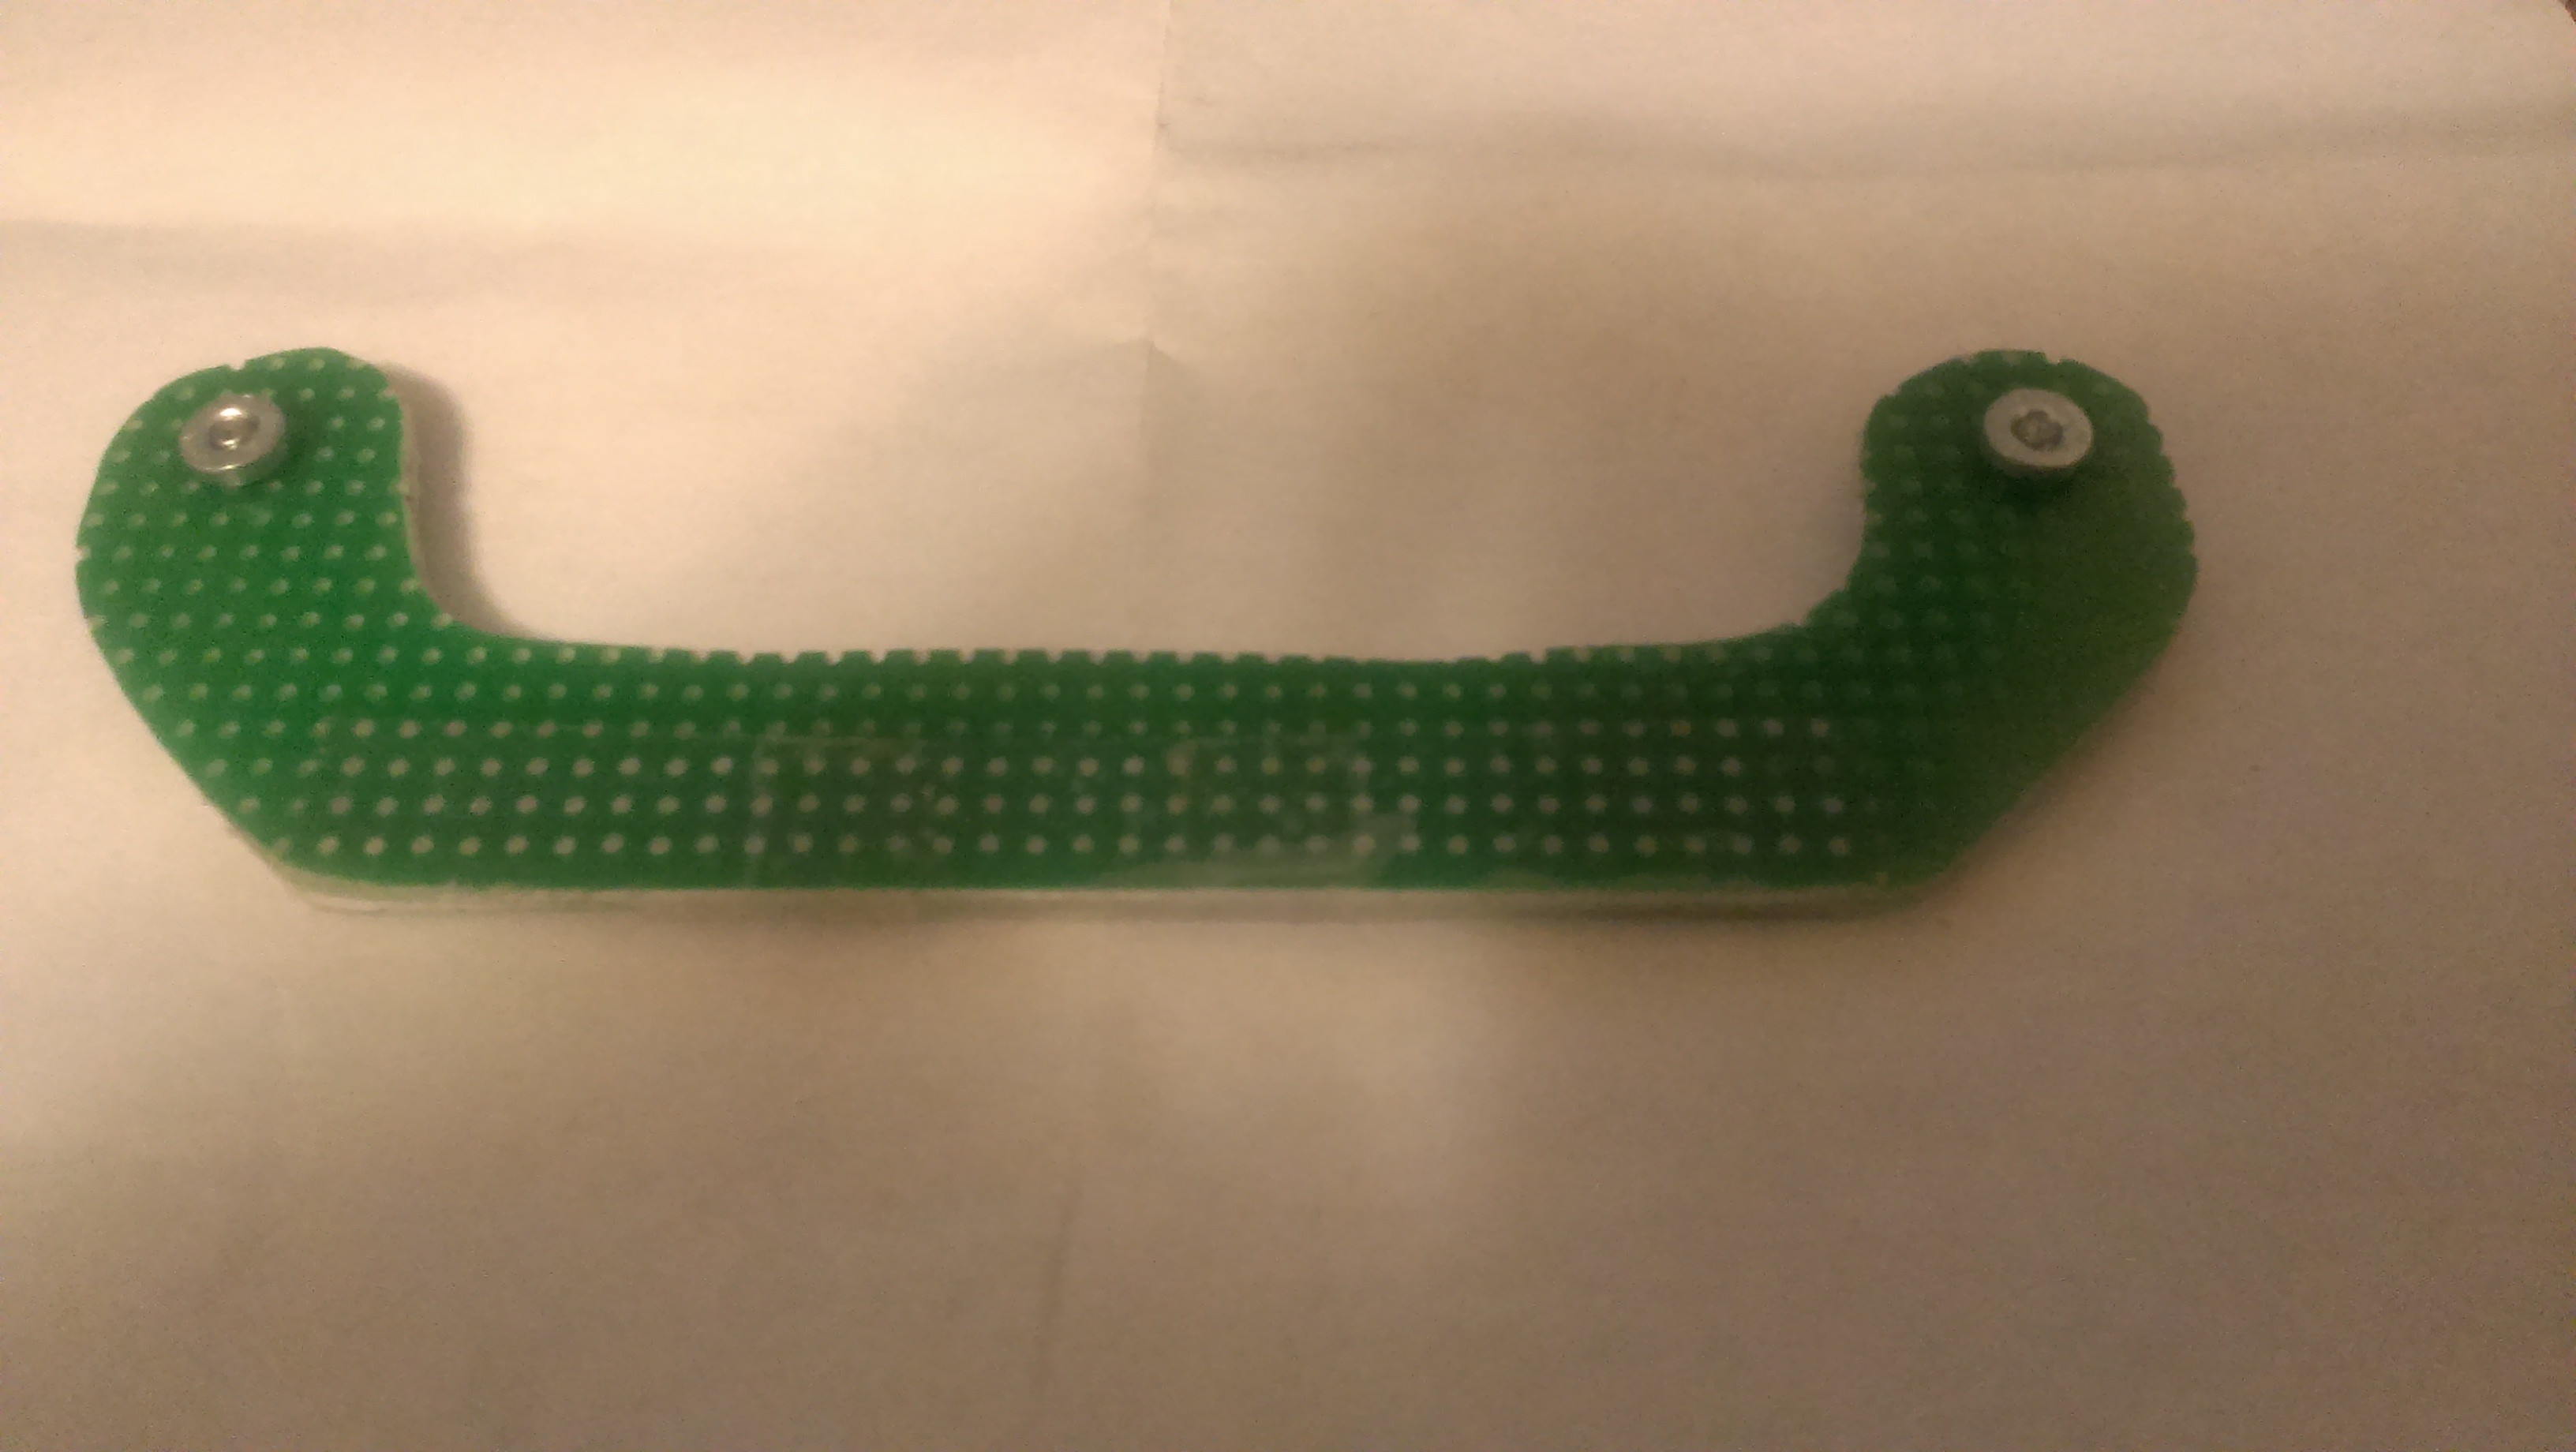
Proto Board cut down to Size
06/18/2015 at 07:38 • 0 commentsI almost forgot to post my work from last night. Received my veroboard from Pixel Print Ltd. Printed out my design on paper and cut it down to the shape. Used that to verify size and fit on the washing machine LED's. Looks like everything is good and i have clearance from the start button and the selector knob.
So i taped it down to the veroboard and started up the Dremel. Started with cutoff wheels and moved to sanding wheel to round the edges off.
Also added a couple mounting holes on the ends for the magnets. At first i was going to cut big holes and glue the magnets in the middle of the veroboard. but i had magnets with holes in them so i decided to use screws to hold in place. Giving the led sensor board about 1/8" clearance from the washing machine LED's.
Currently I don't have flat head 4x40 screws so the pan head is getting in the way of the magnets sitting flush. I thought about grinding them down, but screws are cheap, i'll pick some up tomorrow.
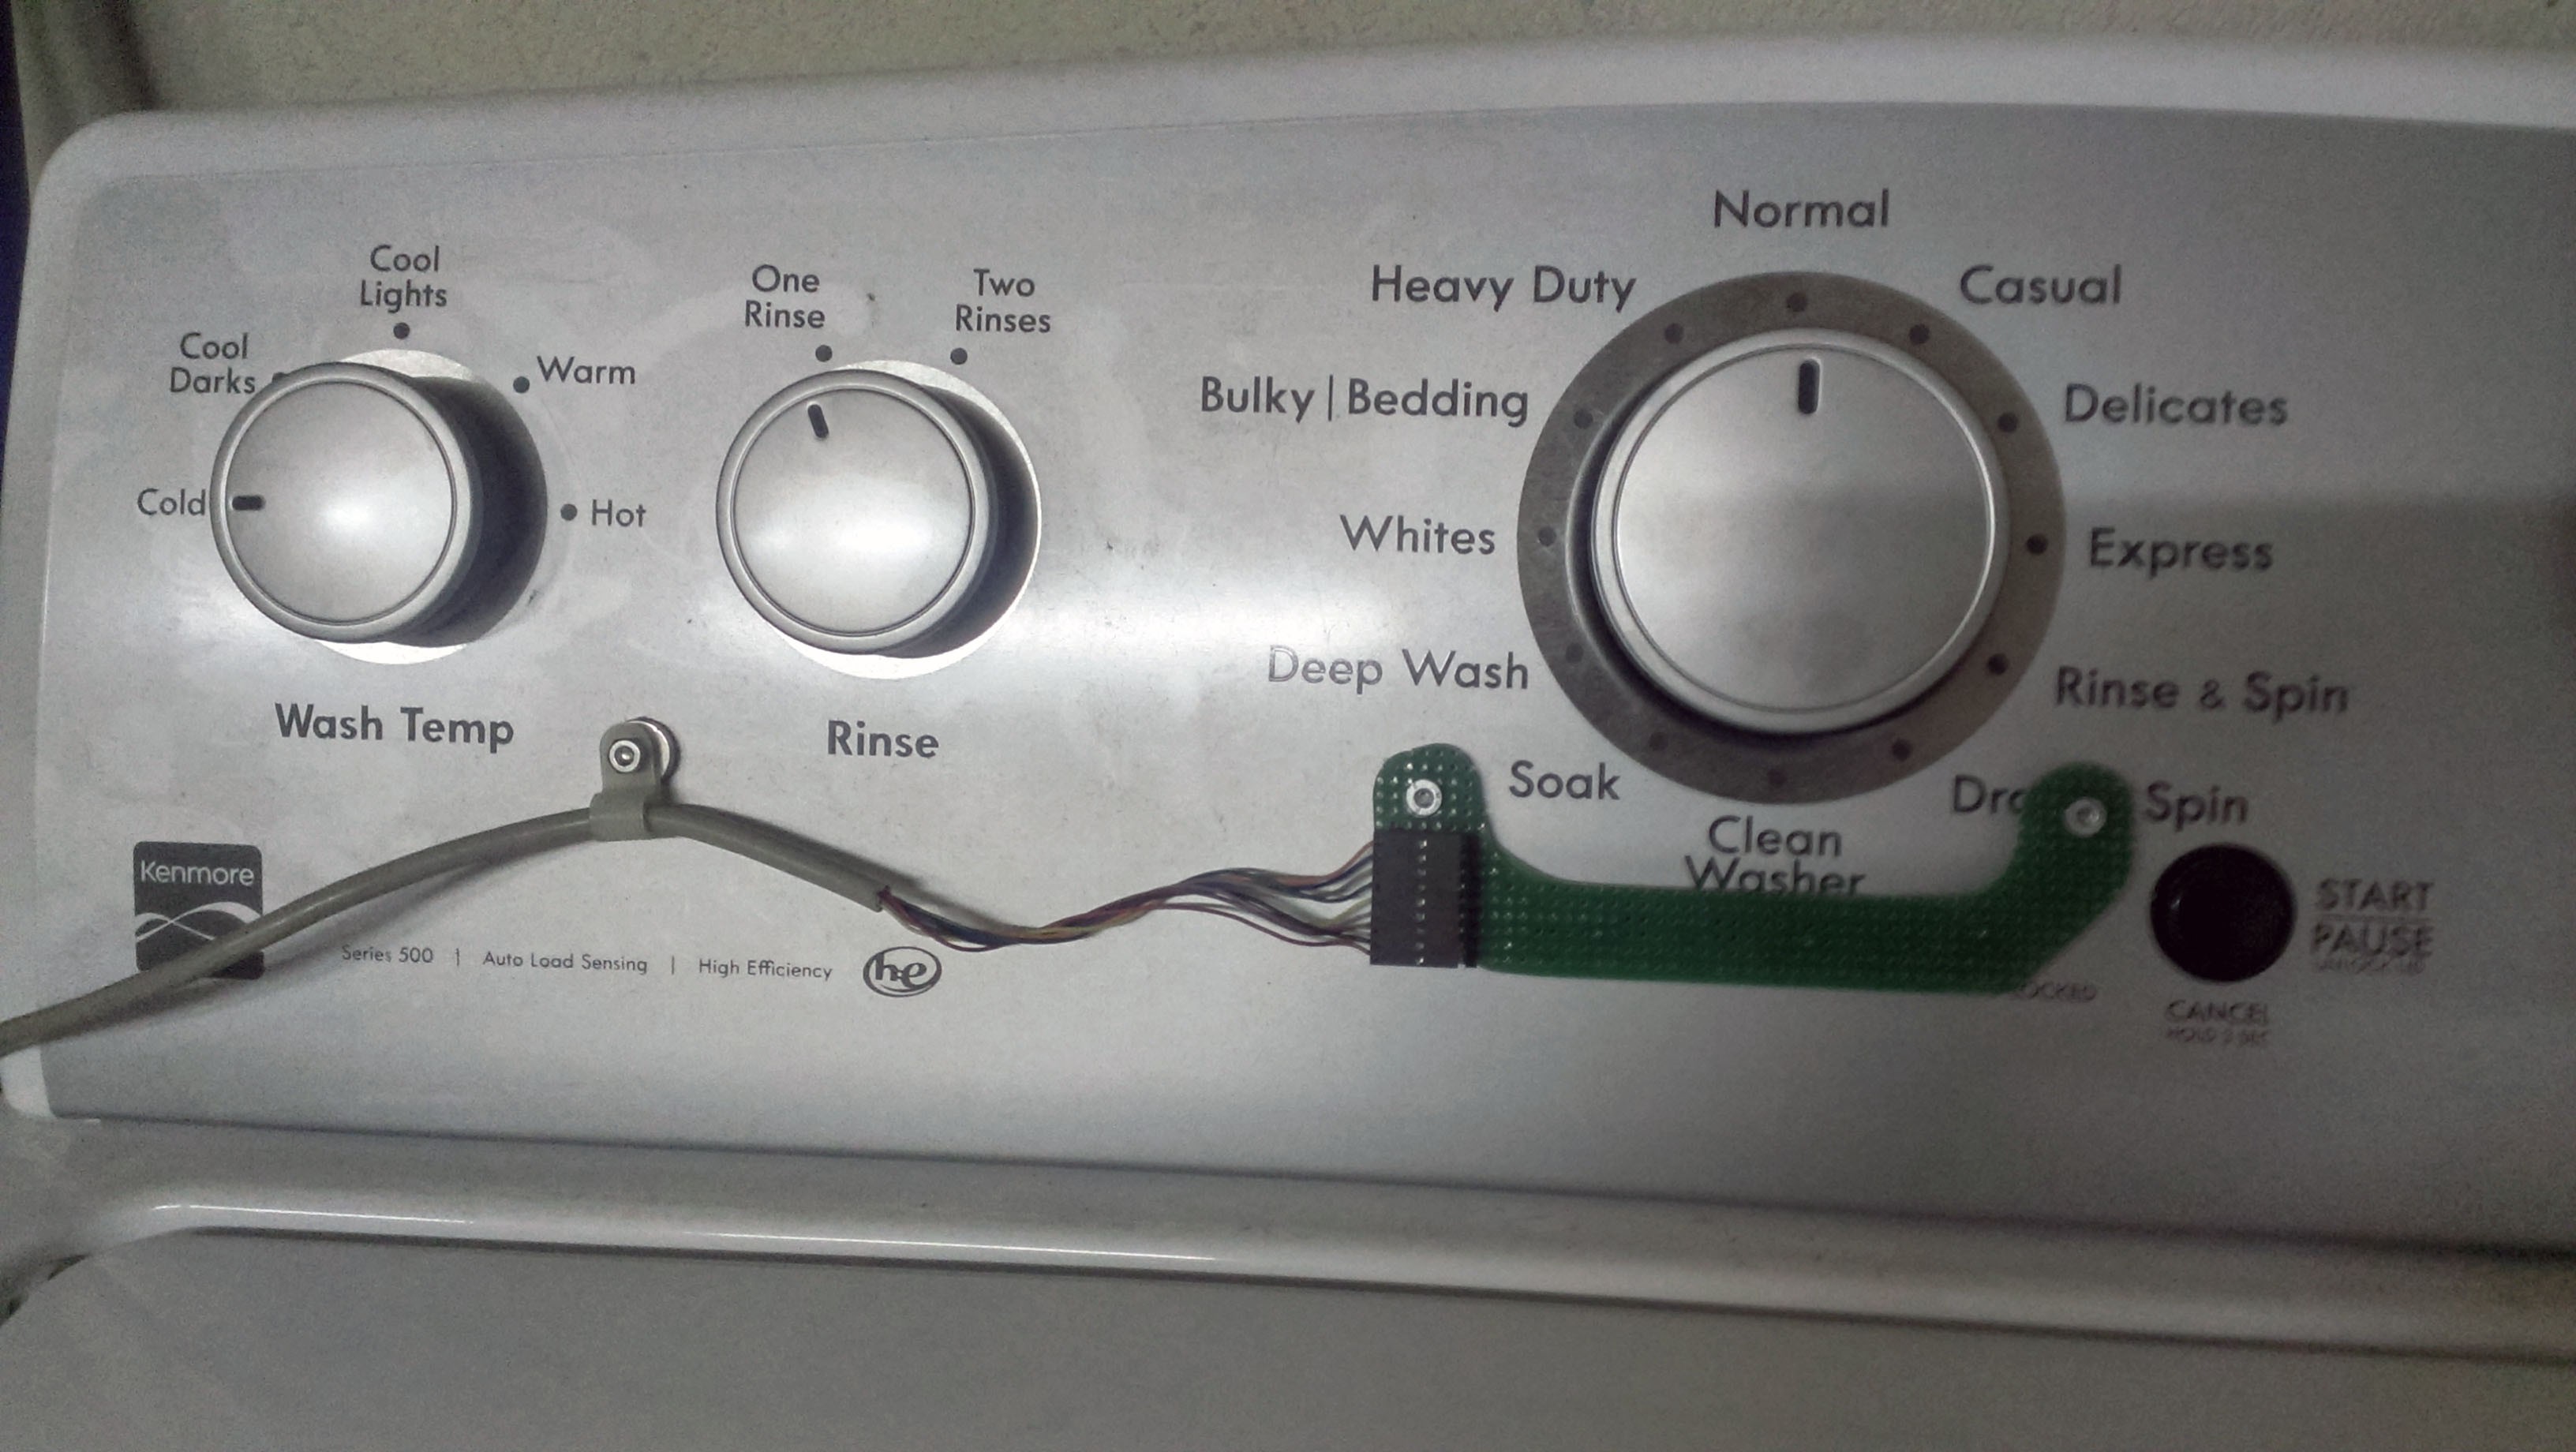
Here s what it looks like so far. LED Side
![]()
Front side. May need PAINT? Not sure yet. Maybe i can get a 3d part printed at work to cover it.
![]()
-
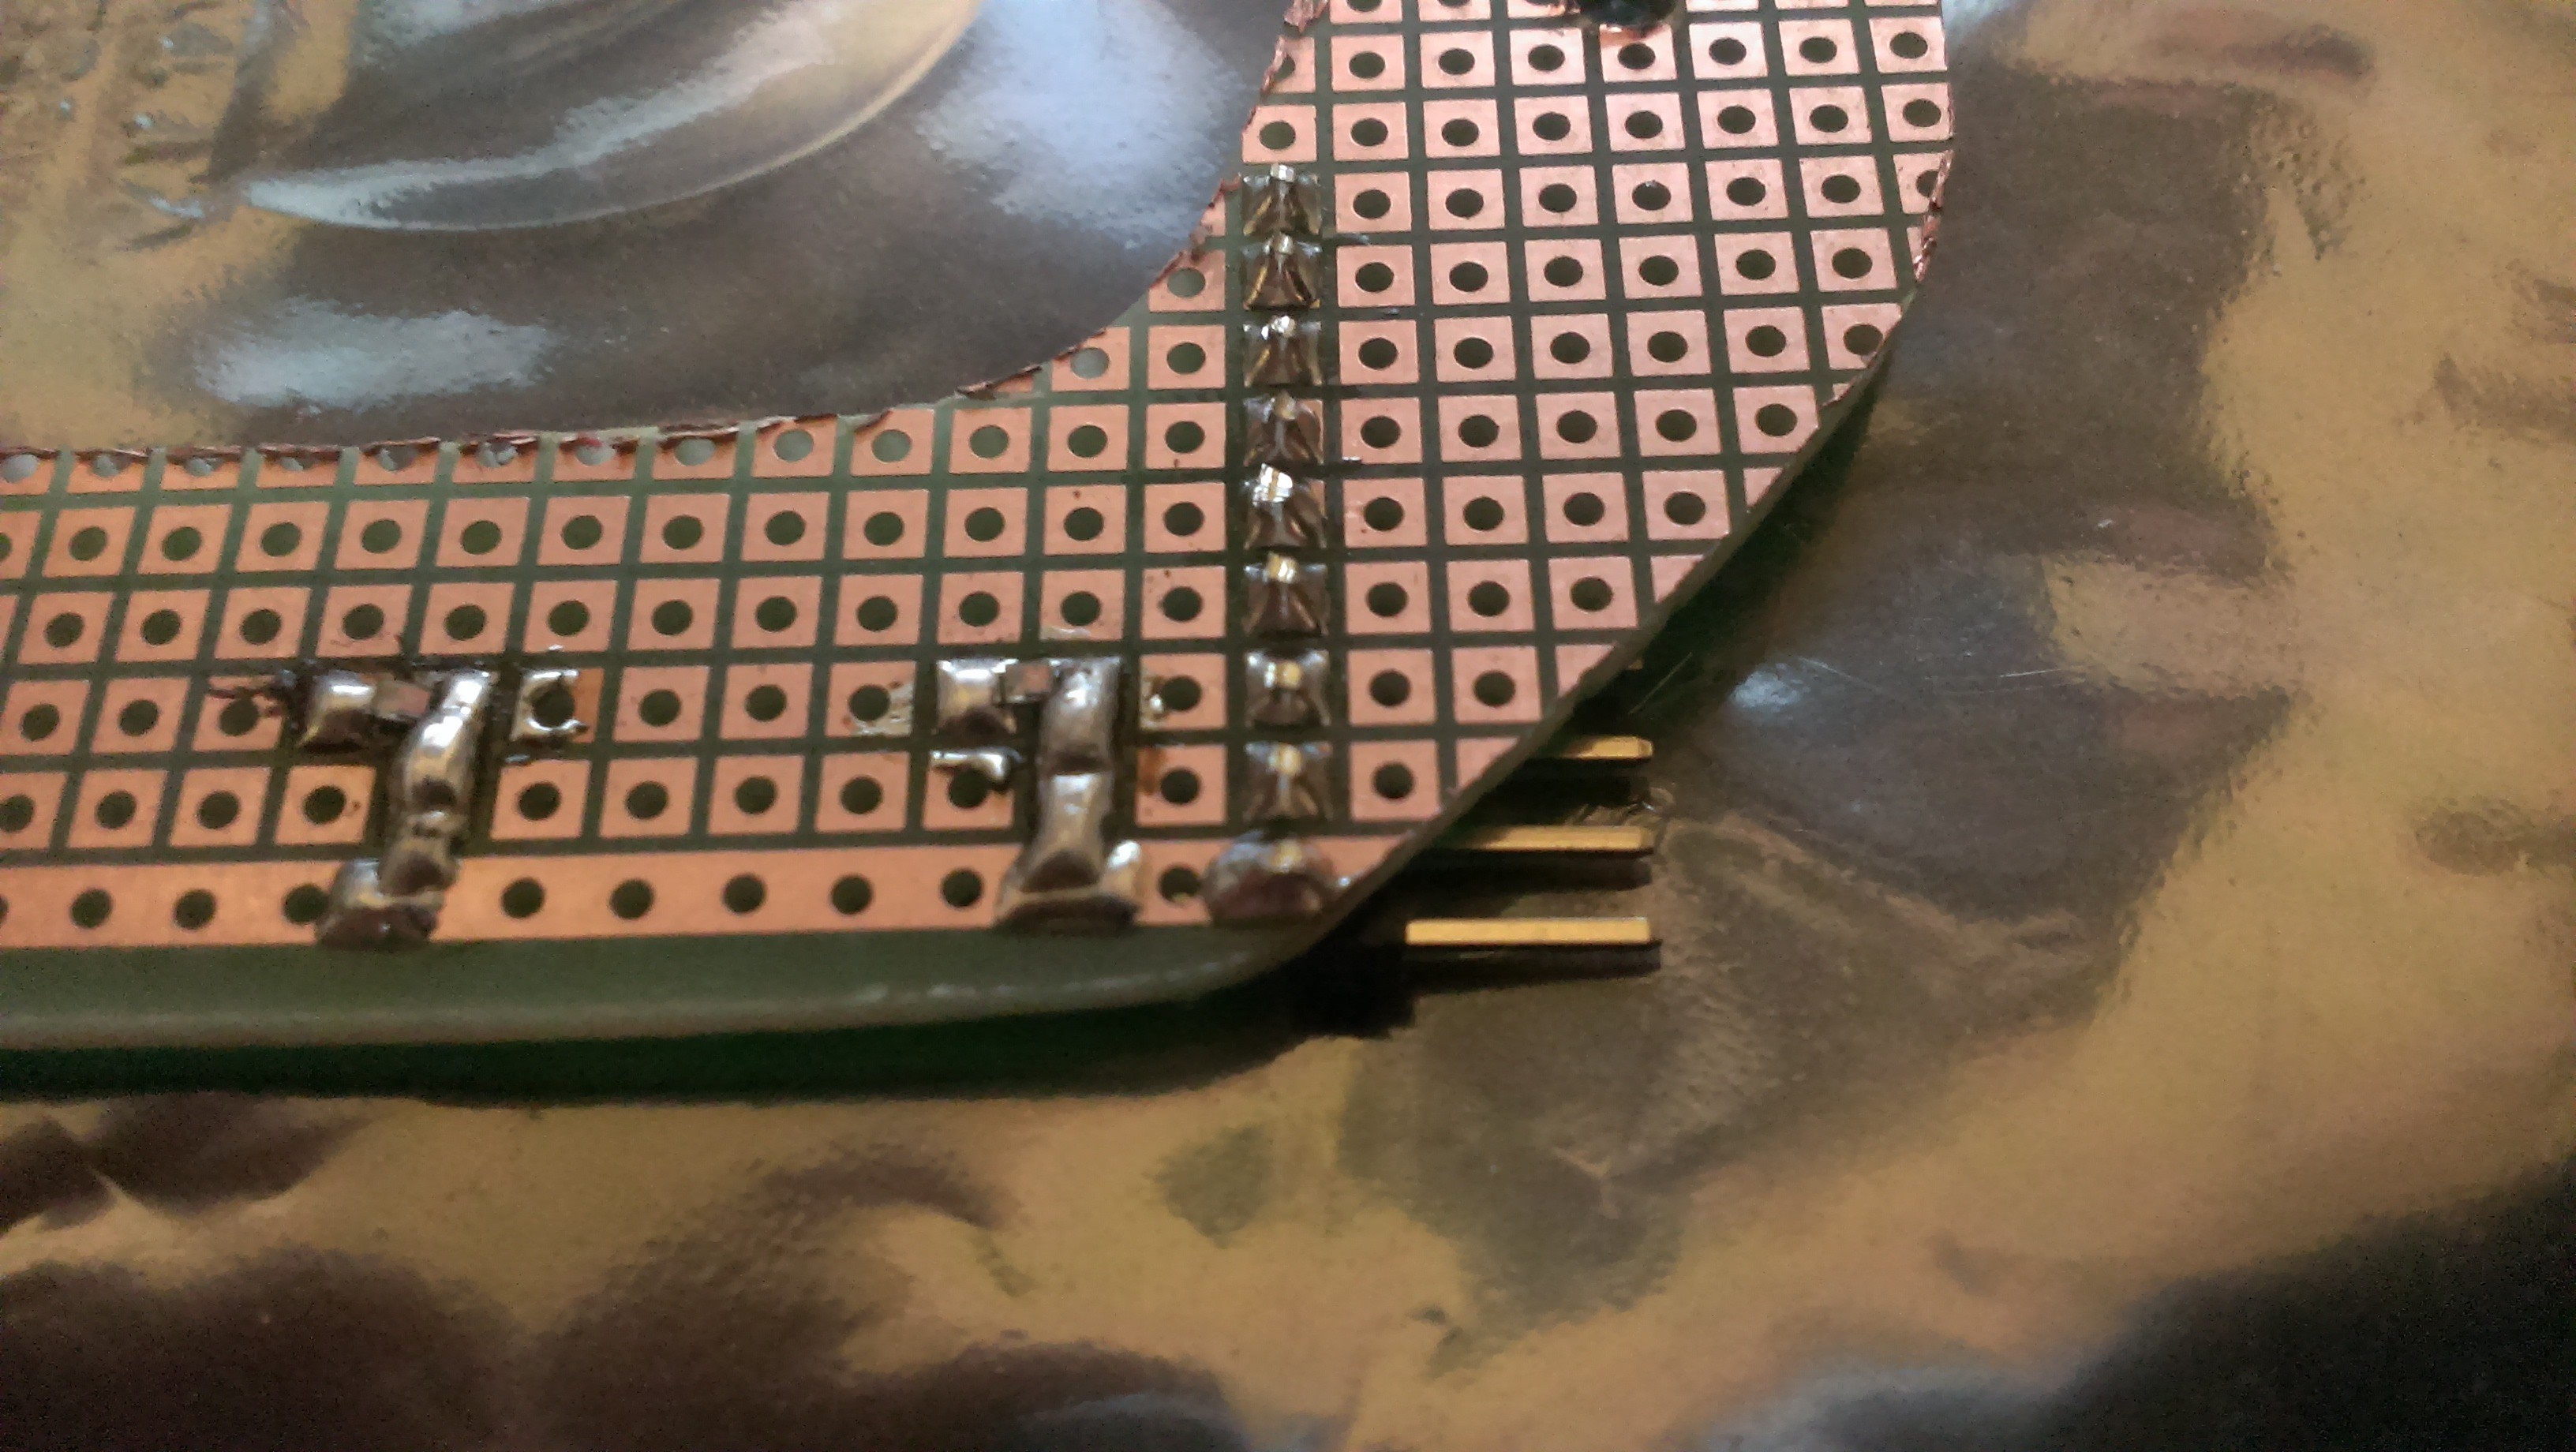
Wire Harness Complete...maybe...
06/18/2015 at 07:24 • 0 commentsI don't want to be to intrusive on the washing machine so i built a cable harness today to keep the ESP and analog mux separate from the LED sensor board. Cut the ends off a DB9 serial cable and crimped on some single row 9 pin headers. Don't think i will need all 9. Only 6 sensor data lines and 1 power line going to sensor board....I may need ground too... will require testing. But for now i only need 7 wires and i have 9 so i should be covered in case the design changes.
![]()
 And that is it for tonight. i will still attempt to sit down and create a video of the process. Possibly next week I will have some video editing time.