SAM D20/D21 Breakout Board
A Breakout board for Atmel's SAMD20/D21 Series Microcontroller
A Breakout board for Atmel's SAMD20/D21 Series Microcontroller
To make the experience fit your profile, pick a username and tell us what interests you.
We found and based on your interests.
V0_1.sch32-pin SAMD20/D21 Schematic [eagle]sch - 104.50 kB - 02/10/2017 at 19:38 |
|
|
V0_1.brd32-pin SAMD20/D21 Layout [eagle]brd - 95.04 kB - 02/10/2017 at 19:38 |
|
As mentioned in Entry 4, the size of the board has been reduced to allow more to fit on a panel that I was already purchasing.
Unfortunately, whilst the silkscreen does have some part numbers (frankly a little too small to read easily without referring back to the layout design), I forgot to add descriptions to the pins on the outer edge. Suffice to say, the pins on the microcontroller are directly mapped to the pins on the board, i.e. pin 1 to pin 1 etc. Pin 32 is next to the programming header.
I've panellised these up with another design for manufacture, however the individual layout is shown below, both without the planes, then with them (in this case, both are ground planes).
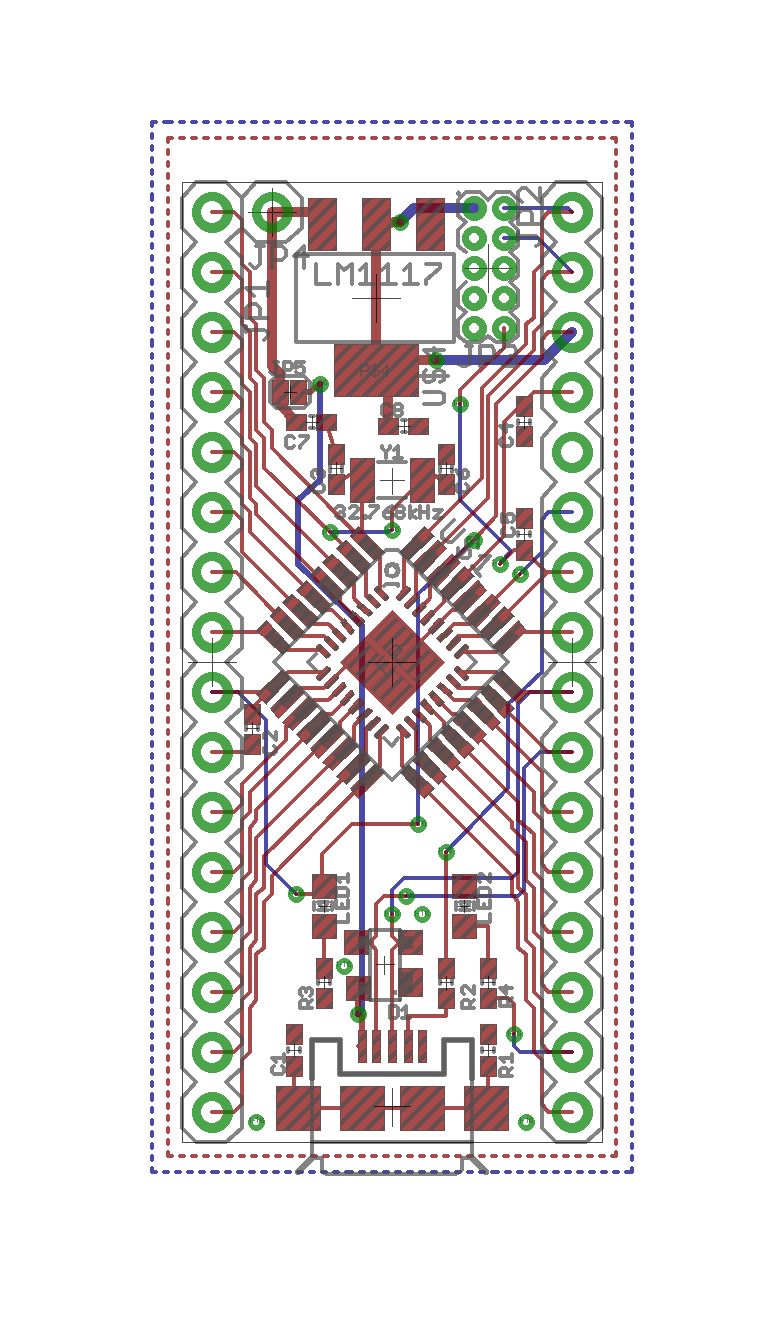
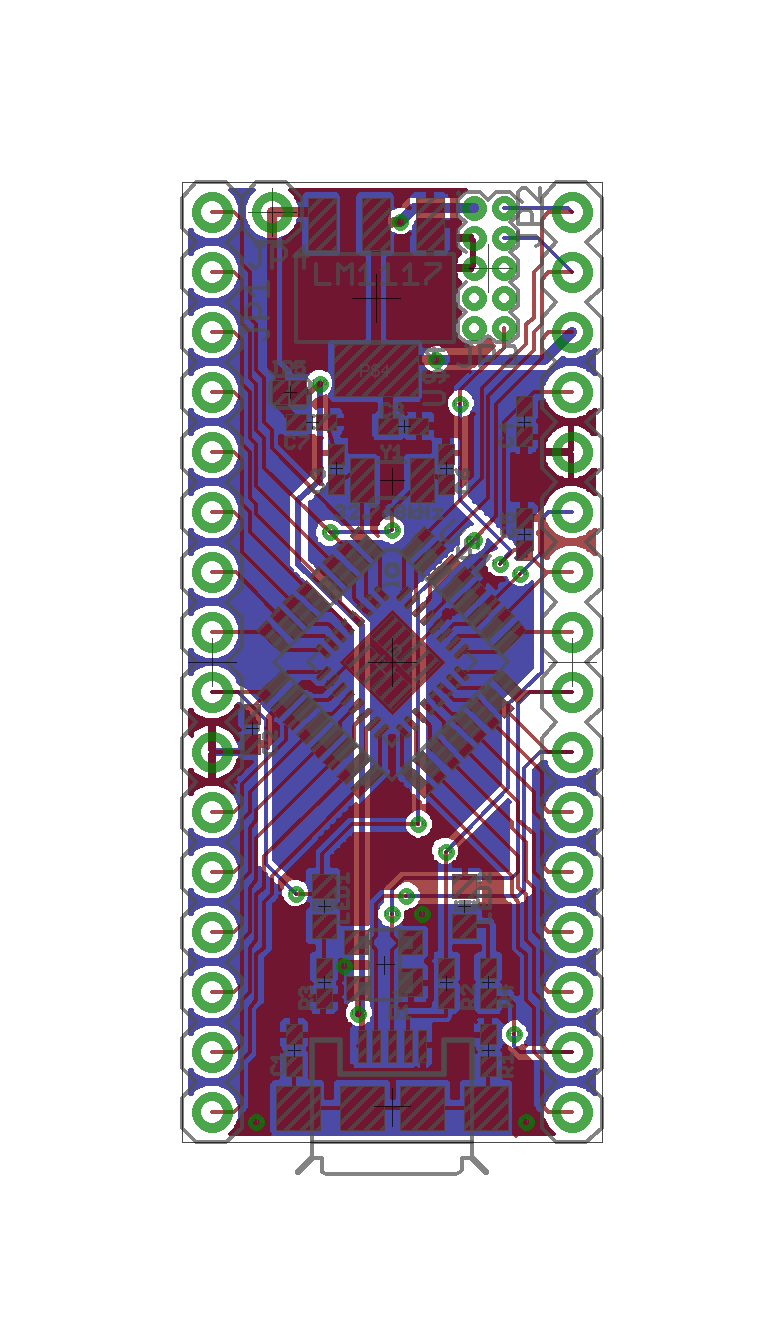
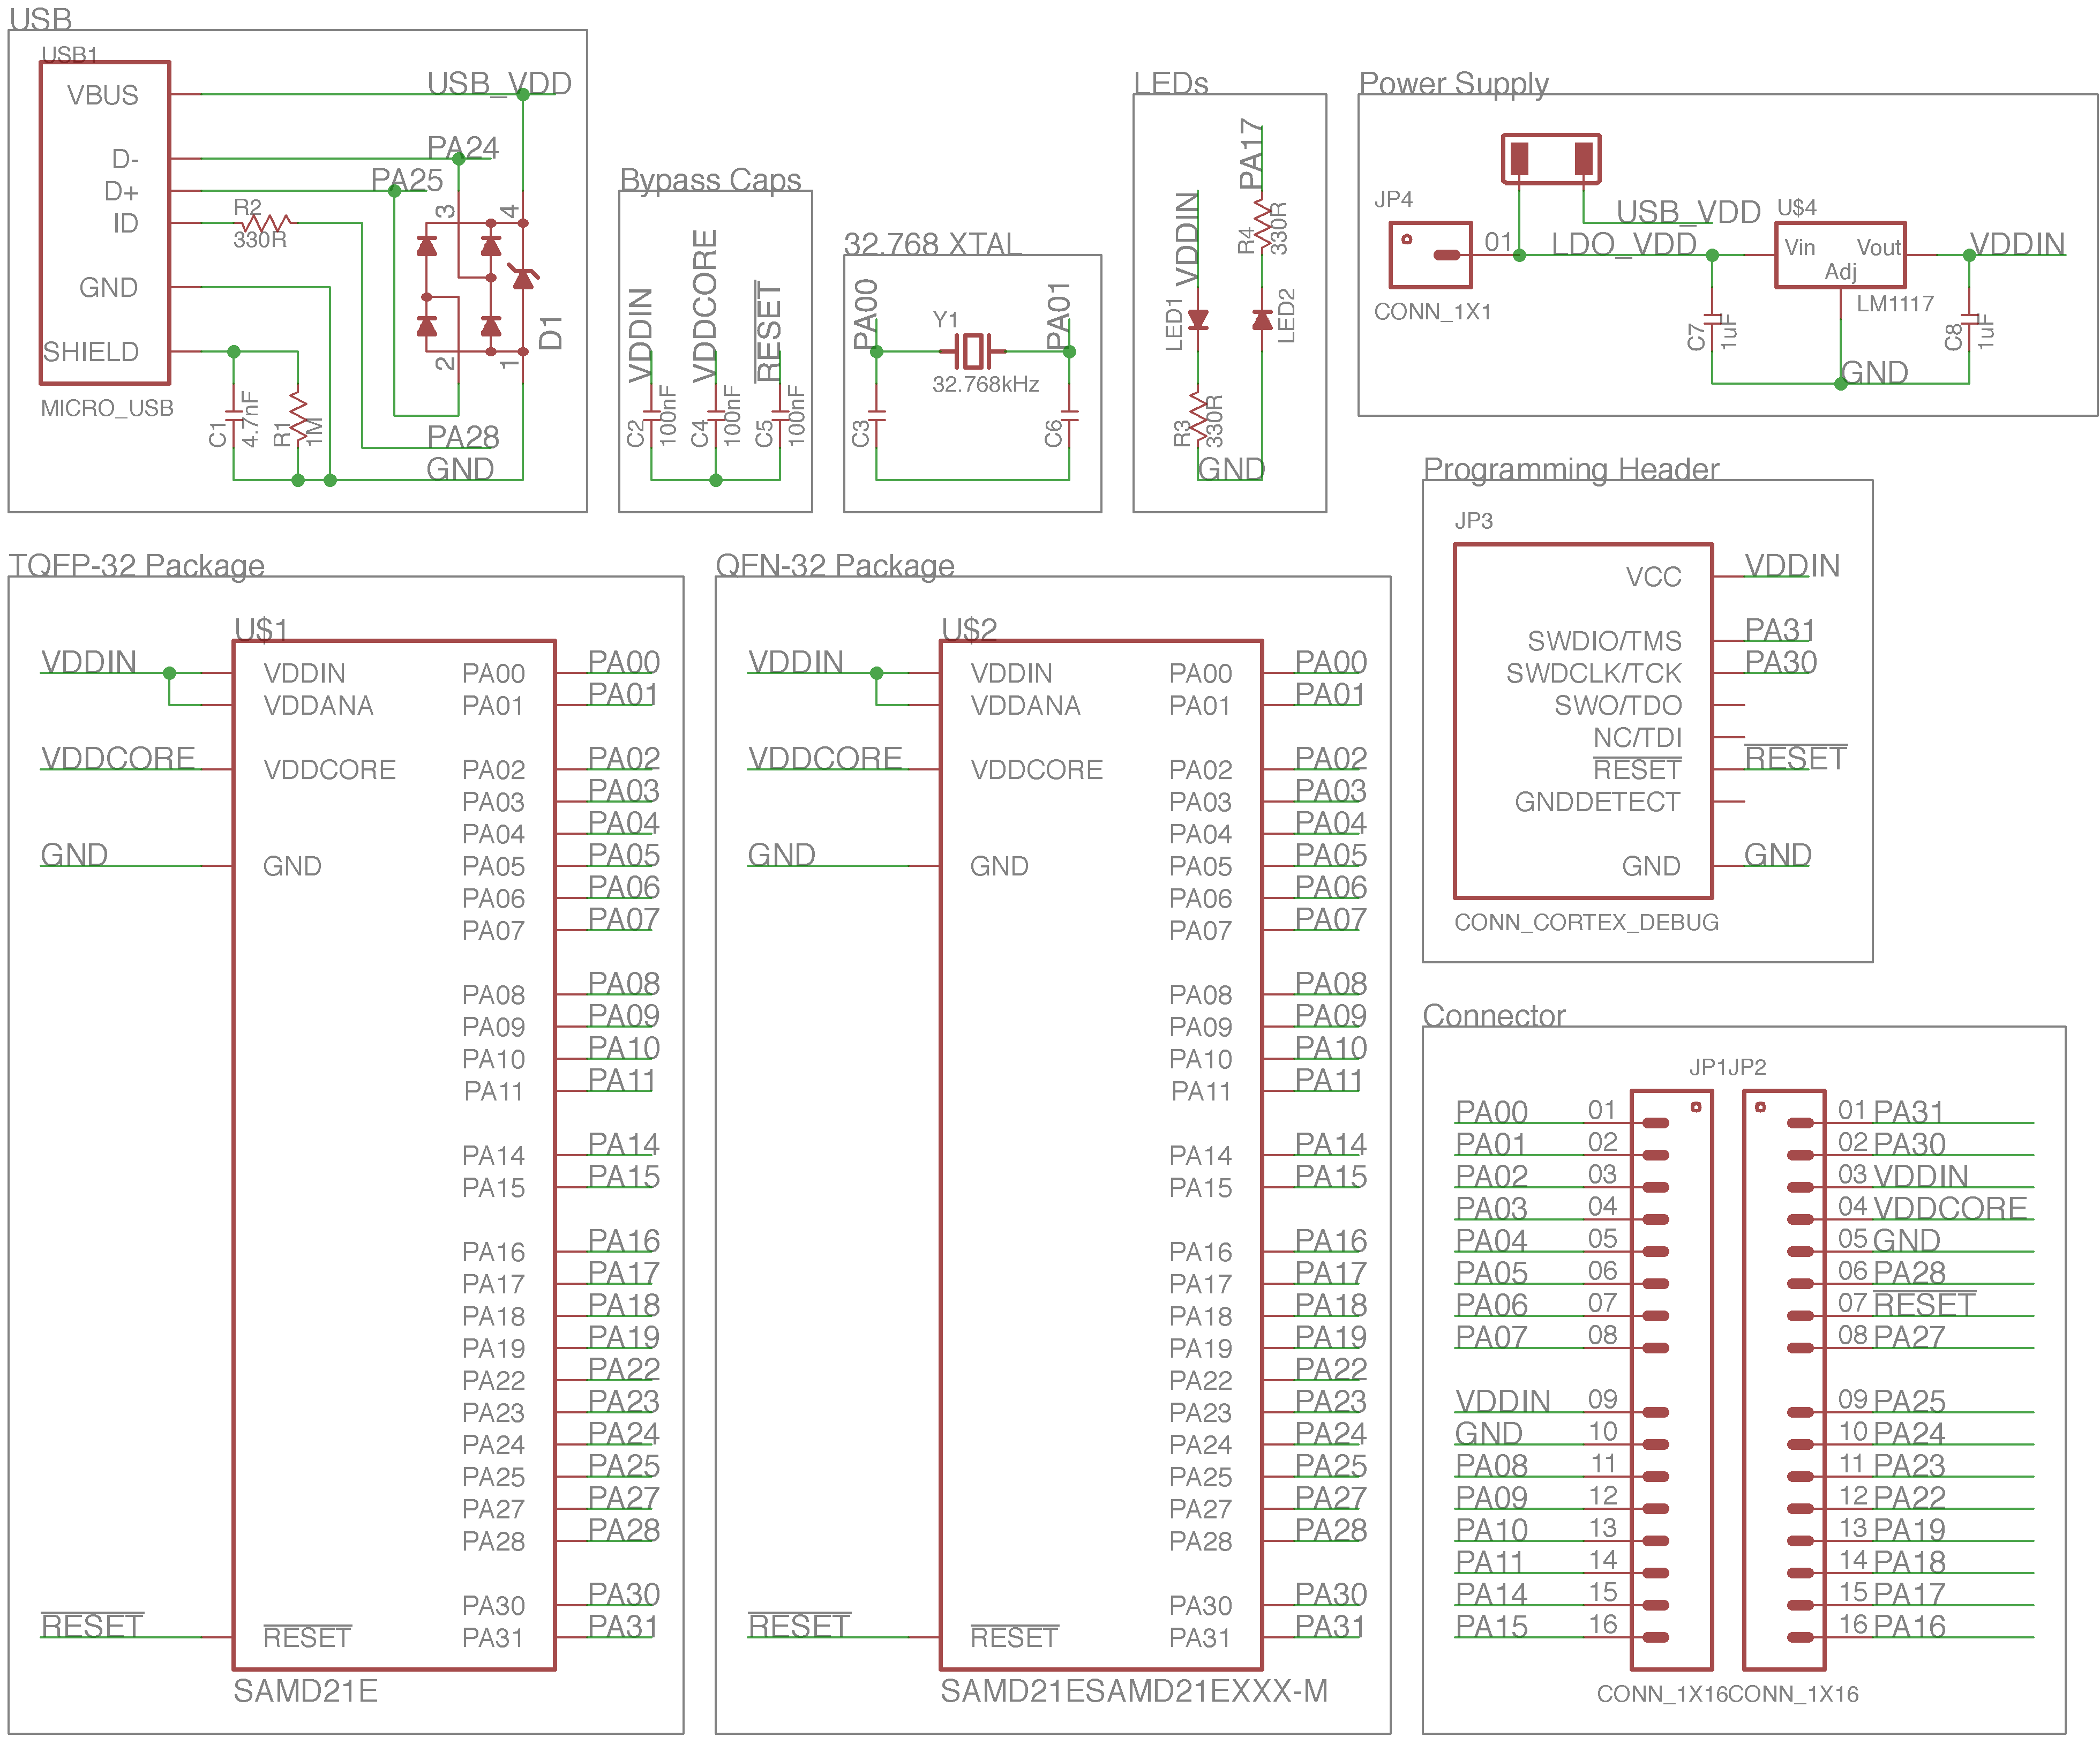
I've updated the schematics slightly prior to ordering the PCBs. This was done to reduce the board size further, which would enable me to fit substantially more on the panel I was ordering (the slight reduction in size meant the number increased from two per panel to five per panel).
The key differences (in order from Entry 1);
Schematic below!
I know it's been a while, but I've received PCBs, and populated a few - some brief tests indicate they work!
I'll try to get some more information up probably around Christmas time, with some photos, tests to see what's working, and I'll upload the source files so anyone else can download them too!
If this interests you - keep an eye out in the coming months.
Arduino LLC have released their latest IDE - version 1.6.5.
The Arduino Zero is based on the SAM D21G18 processor, a 48-pin variant from the D20/D1 series. It should be possible to use the Arduino interface to upload the Arduino Zero bootloader to other SAMD21G18 micro controllers - however, an Arduino Zero may be required to do this. Alternatively, it should be possible to upload the bootloader by using a dedicated programmer (such as an Atmel ICE), though this method may not be supported within the Arduino IDE, and may require other software, such as Atmel Studio.
The Arduino Zero boot loader is based on Atmel's SAM BA Bootloader, though I believe it has been slightly modified by Arduino for use in the Zero. This may mean that the Zero bootloader will only work for the SAMD21G18, however the SAM BA bootloader will work for the full D20/D21 range.
The project here on http://hackaday.io was created after I had finished (ish) the 32-pin variant of the breakout board. It is compatible with both the SAM D20 and D21 lines from Atmel, using the D20E / D21E variants (E corresponds to the 32-pin variants).
The PCB uses the reference designs in the datasheet for the SAM D21, which was checked against the SAM D20 datasheet to make sure there were no major conflicts. The D21 has full speed USB 2.0 Host and Device, so there is also a USB footprint, with some supporting components (Micro USB Socket, ESD protection diodes, and a filter for the cable shield).
I've crammed as much as I could onto the PCB, with the intention of only populating the footprints that are necessary for each application. Below is the schematic broken down into its relevant parts, with a brief explanation.
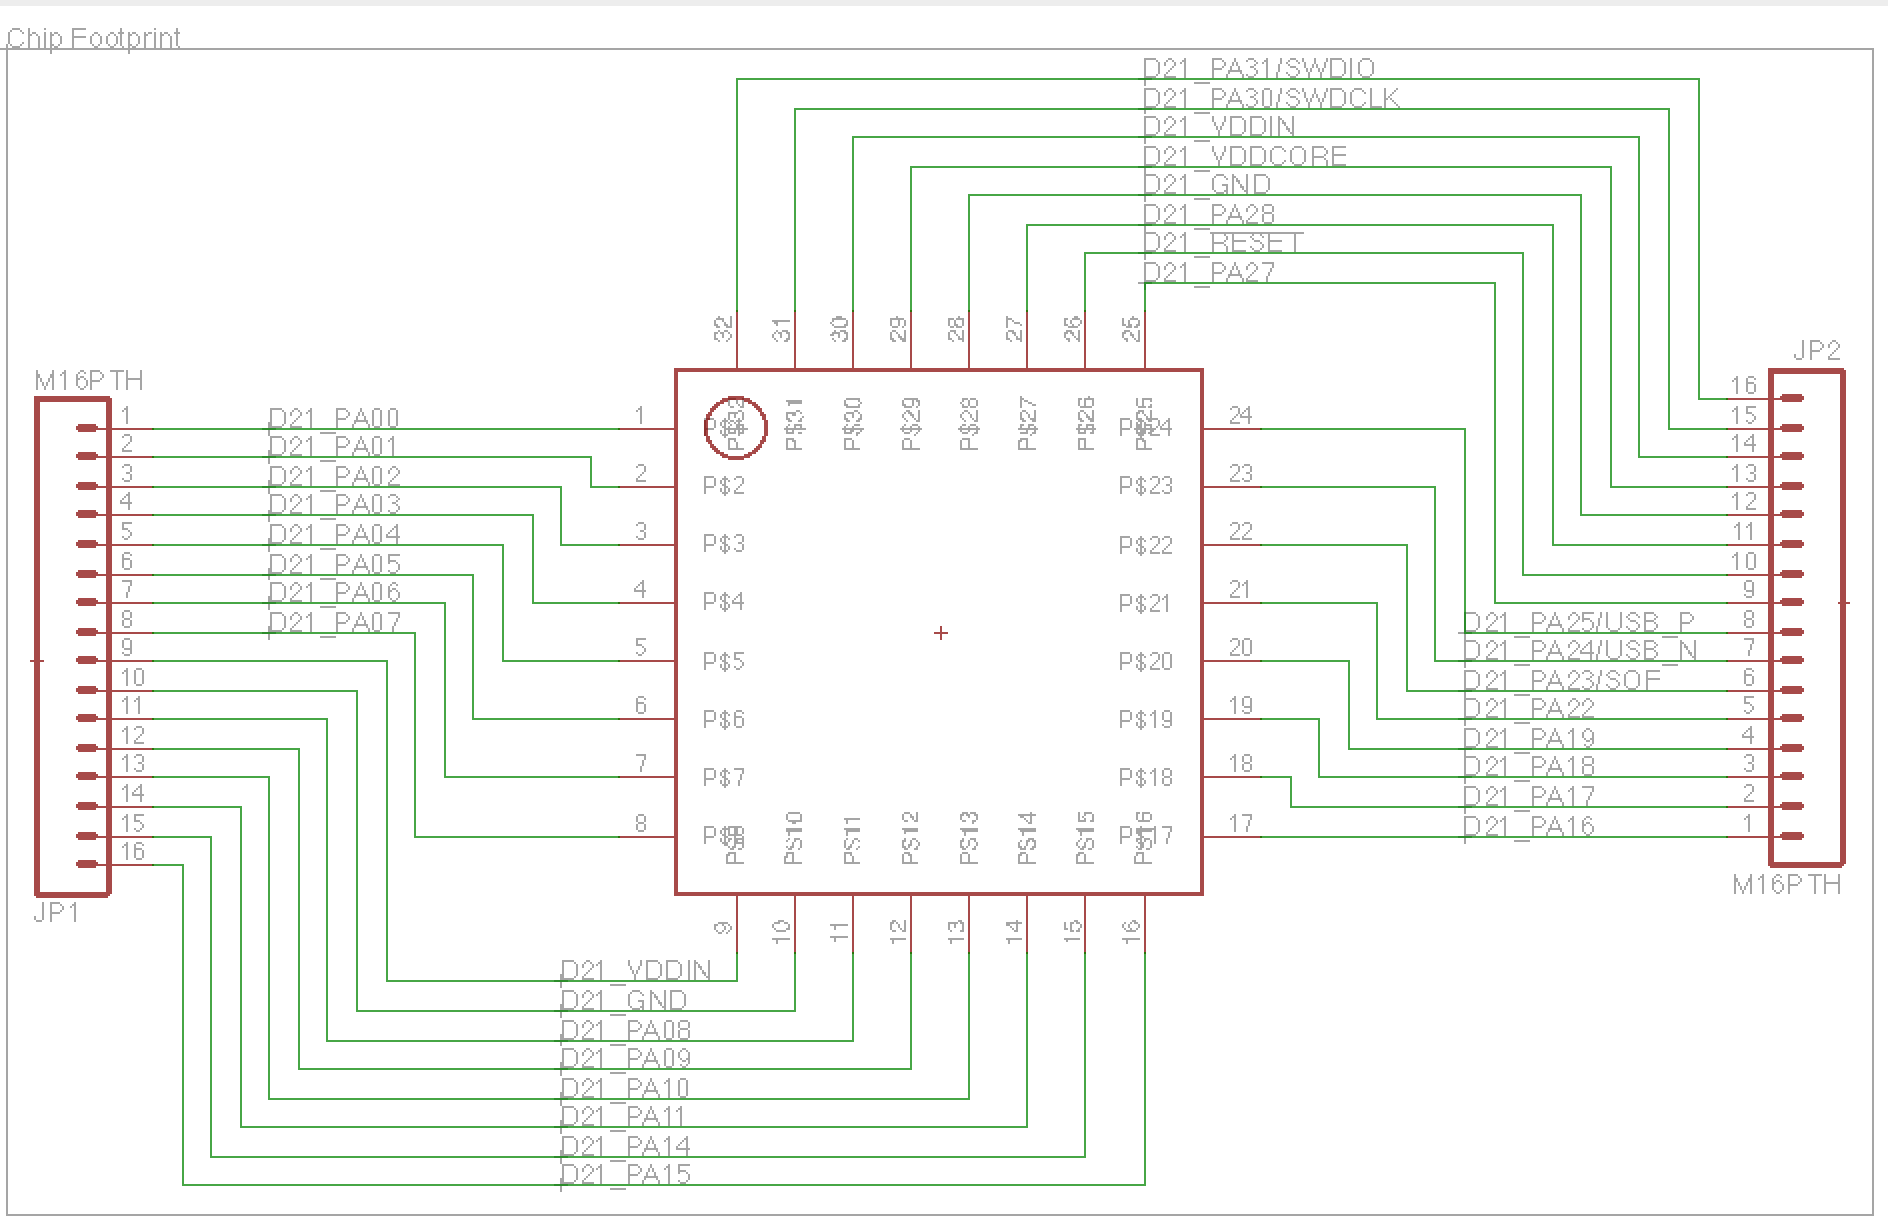
The 32-pin footprint, with all of the pins connected to the two 16-pin breakout headers. These are standard 0.1" pitch headers, with one on each side of the board. All of the nets are named and labelled.
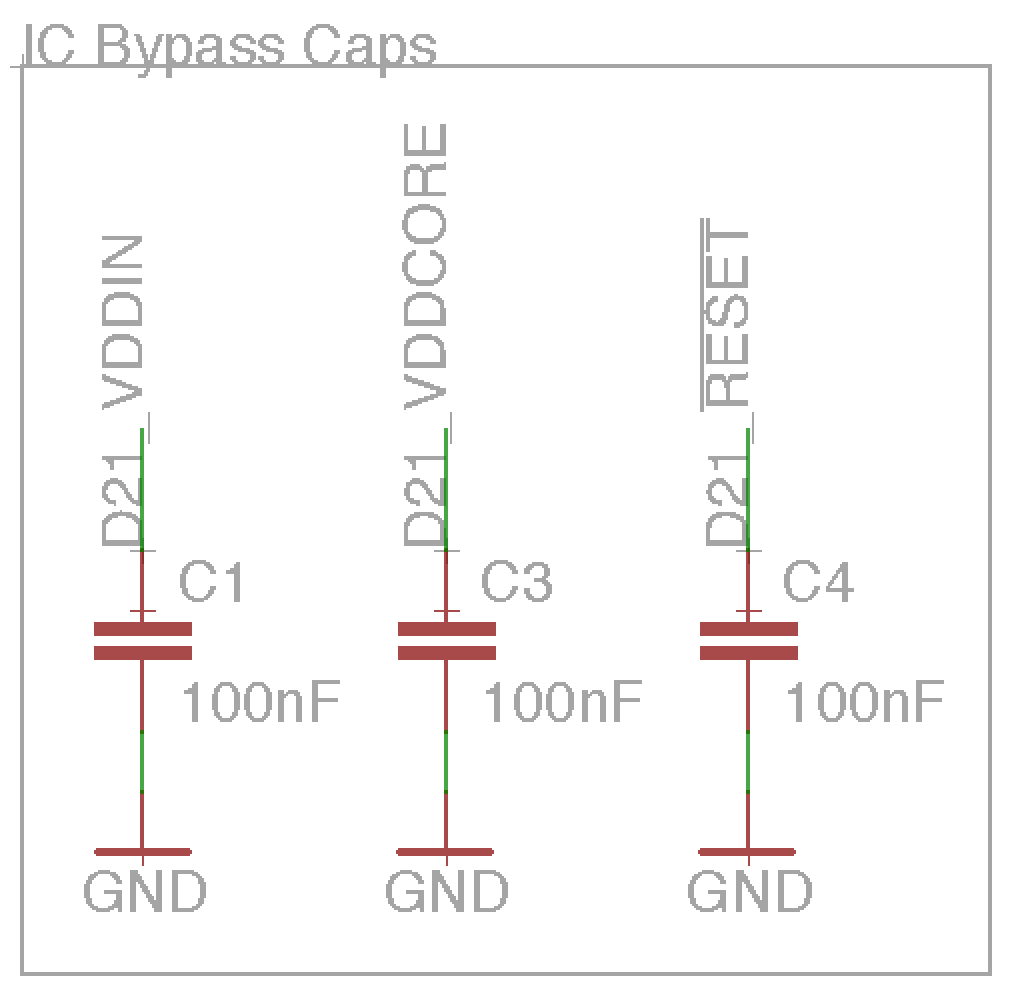
Standard parts for most microcontrollers. These help smooth out the power lines.
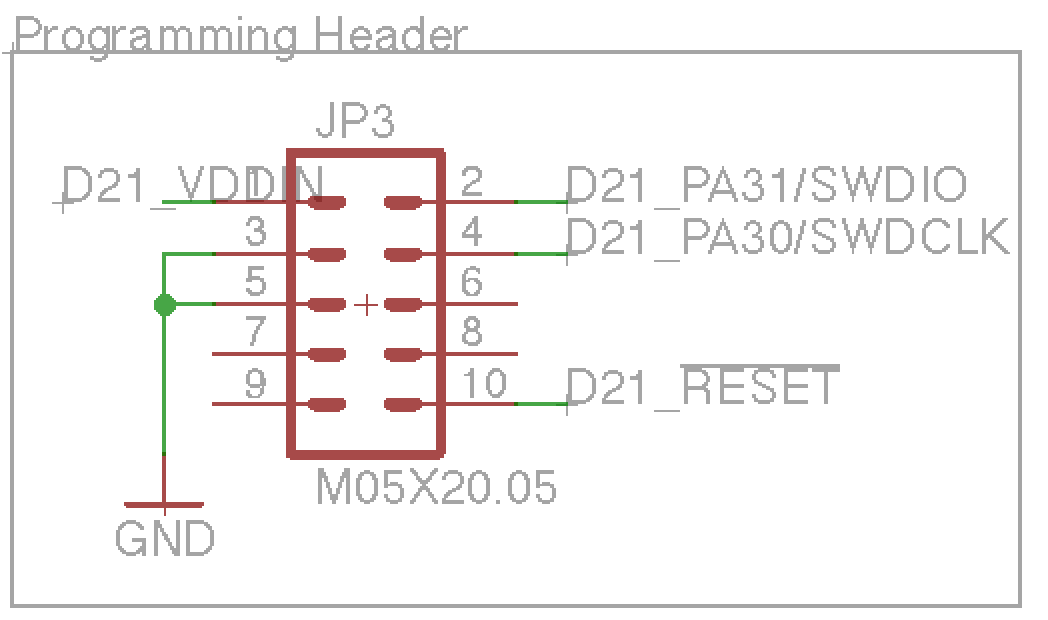
Unlike the ever popular Arduino, these chips do not have a nice bootloader pre-programmed in (The D21 does have an example USB bootloader in Atmel Studio 6, but you'll still need to program it onto the chip!). The pins are 0.05" pitch, as per the standard Cortex Debug Connector. The pin headers for these are a little expensive, so I plan to make a breakout board (gotta love the breakout boards!) so I can connect the programmer to pogo pins, and then just use the pads on the board.
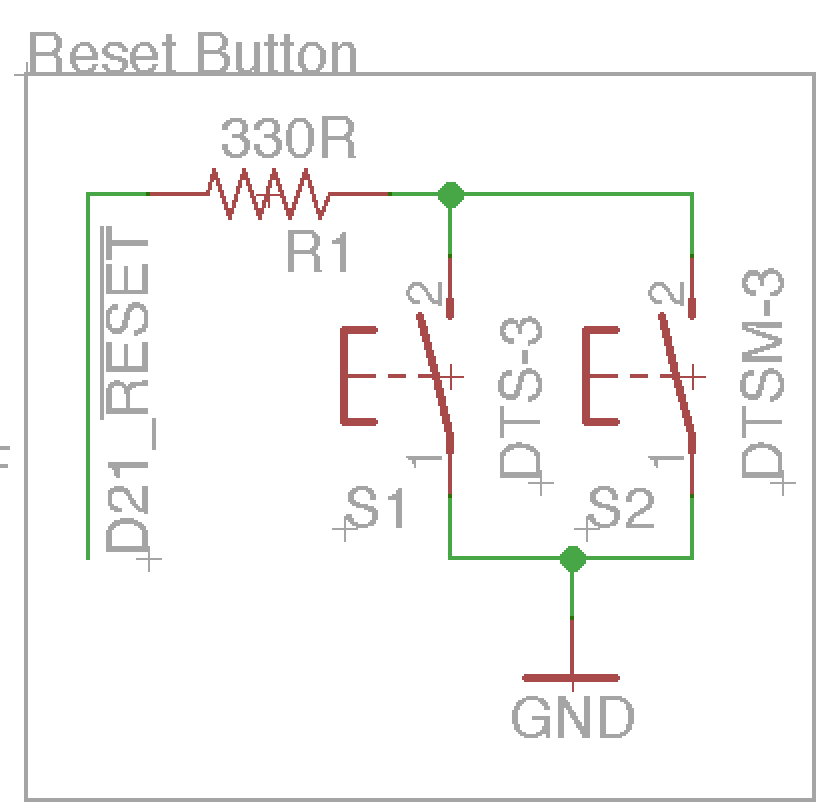
Into the optional parts! Sometimes, power-cycling a board can be a little tough, especially if you're doing a lot of resets during development. For that need, comes the very popular reset button! The usual 6mmx6mm tactile switch was far too large to fit on my PCB, and my usual distributer (Farnell UK) seem to have a sparse range of thinner switches; as a result, there are two footprints, one for a surface mount DTSM-3, and one for a DTS-3 through hole variant. The footprints are on top of each other on the PCB, to minimise the space usage.
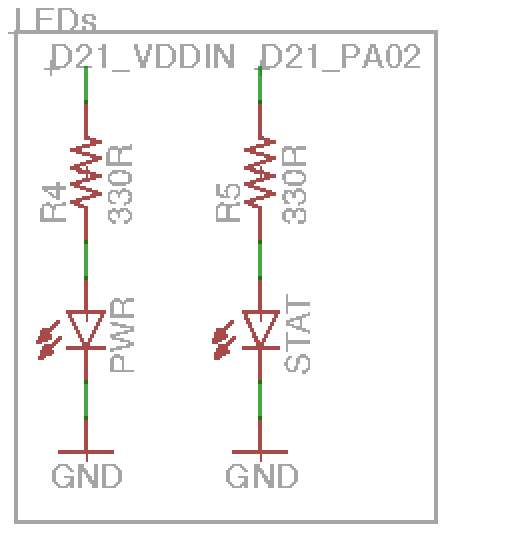
Two LEDs here; one for power, and one connected to an IO line on the microcontroller. The power LED is directly connected to the VDD line on the microcontroller. The resistor values here are just placeholders, they'll need recalculating depending on the specific LEDs that are used, and the voltage the board is powered at (usually 3.3V, though 1.8V would be common too).
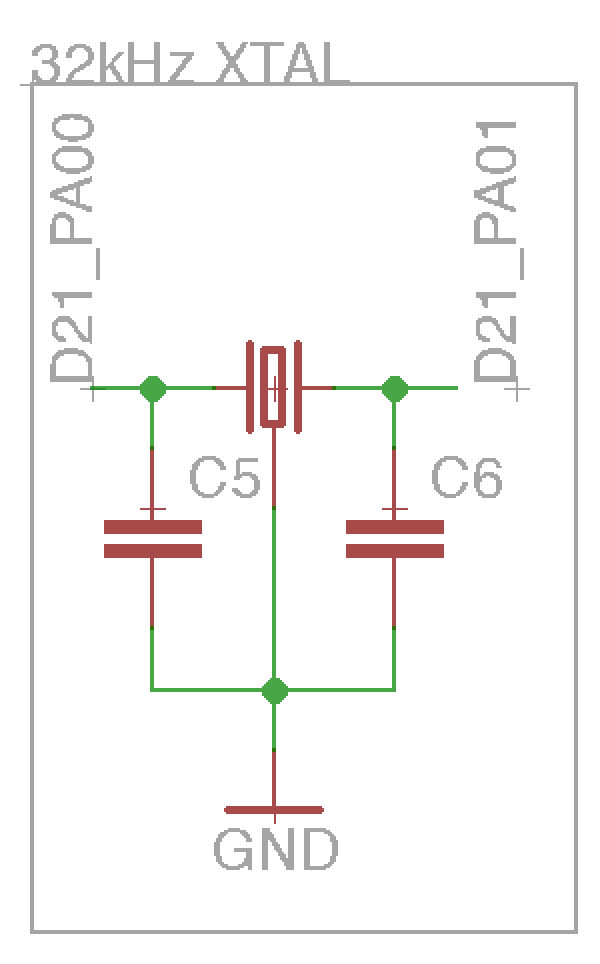
The usual oscillator pins do not have a footprint for the crystal, as the SAM D20/D21 range has a good onboard oscillator that (through clock multiplying magic) can clock the microcontroller at 48MHz. However, there are separate pins for a 32.768kHz oscillator, and I quite like the idea of RTC capability; therefore, there is a lovely footprint for that on the PCB instead. The capacitors don't have a given value, as it will vary dependent on the specific oscillator chosen.

The SAM D21 has full speed USB 2.0, both device and host! To use this capability, the board has a micro USB connector. The D+ and D- (Data lines) have a TVS (transient voltage suppressor) on it for ESD protection. This is an extra measure, and the diodes inside this package are all in parallel with the signal, so this can be left unpopulated and the USB will still work. The shielding on the USB acts as a large antenna, so R2 and C2 act as a filter before it's connected to ground. The values for this come straight from the SAM D21 datasheet, but these components can either be omitted, or bridged with a 0R resistor if you would like the shield grounded. R3 on the USB ID line is used to limit the current through the 5V line to the 3.3V tolerant pins; again the value for this is straight from the SAM D21 datasheet.
Whilst the SAM D20 doesn't have USB, that doesn't mean it wouldn't benefit from a USB connector! USB...
Read more »
Create an account to leave a comment. Already have an account? Log In.
Great project, thank you! I was wondering if you might have a parts list available? I'm not very familiar with the SMD parts... are these 0805 size?
If there were a 5V option for this, I would be, for one, interested.
Have you looked into the SAMC21? It is basically a 5V version of the SAMD. I am unsure on chip availability but they do have a SAMC21-xplained pro demo board.
I think many people would be interested in this options. It might even be pin compatible with the D series but I am not sure.
>The shielding on the USB acts as a large antenna, so R2 and C2 act as a filter before it's connected to ground.
For RF signals, the 4.7nF acts like a short, so that's not the right explanation/conclusion. You have a high pass filter and it lets the high frequency stuff to pass easily. To block the RF signals, you would want a ferrite which has high impedance at high frequency.
The cap is usually used when you don't want to have the USB shield connected directly to a chassis ground. e.g. to prevent 50/60 Hz hums in a ground loop. The 1M is there to discharge the cap when it is disconnected.
That's a very good point about the high frequency RF shorting the cap!
From the SAMD21 Datasheet:
"Tying the shield directly to ground would create a direct path from the ground plane to the shield, turning the USB cable into an antenna. To limit the USB cable antenna effect, it is recommended to connect the shield and ground through an RC filter."
The filter I have on the shield is straight out of the datasheet's schematic checklist, and is what the quote above directly refers to. In my mind I saw a capacitor and resistor, read RC filter, saw it mentioned the shield being an antenna, and (without really thinking about it) that made sense to me.
I guess I just misunderstood the datasheet's comments - thanks for pointing out that it's probably for 50/60Hz hums!
There is a summary of all the contradicting ground shielding connection recommendations by different vendors. Unfortunately all the links are broken as that was back in 2011.
Basically you want to have a low impedance connection on both ends of the shield. If not, you have an antenna. Atmel's explanation however is completely wrong here. You didn't misunderstand it.
The recommendation by Atmel is sound when you have two systems with potentially different AC Earth ground connections or you want some level of isolation.
Hello i have a question can the SamD20 use the same boot loader as the SamD21? sense the arduino zero is a SamD21 and both are a M0 chip??
Honestly I'm not sure. Unfortunately a lot of the designs I've done are theoretical, and I haven't had a deep look into the bootloader code for the Arduino Zero... I can tell you however that the Arduino Zero bootloader is based on Atmel's SAM BA Bootloder, which will definitely work on the D20 and the D21.
In short; it depends on which bootloader you are looking for, and how much effort you are willing to put in
Hi there, I just wanted to let you know that I'm going to copy the protection diodes on the Vin/VDD/VBUS part for my JACK project :D It's quite the same thing as your project, but it is oriented towards the 48 pin version of the D21G18, the one with the most Flash and RAM, and also towards the TQFP package (I can't quite see if yours is using the QFN package) for a more diy/kit friendly approach.
Copy away, I'm glad to have helped!
I am also using TQFP, however the QFN footprint may actually fit inside - though I have a power trace in the way I'd have to move.
The 48-pin is the same physical size as the 32-pin, so just beware that the pin pitch is slightly smaller!
Become a member to follow this project and never miss any updates
Thanks a lot for your great contribution is exactly what I was looking for. Howwever I am trying to open the .sch file with eagle 8.1.1 and I get the following error:
line 127, column 25: Unexpected ' '.