PK
PK-
Productization & A Suitable Logo For VGATonic
08/02/2015 at 21:59 • 2 comments![]()
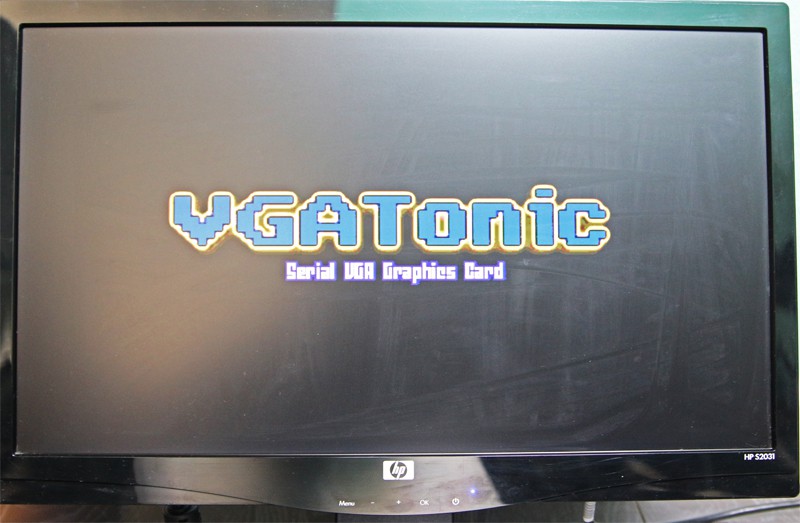
I wanted to add a logo with a tagline to VGATonic for some time now, a la @Blecky 's great logo for his SubPos indoor positioning system.
I wanted to make something which vaguely reminded me of the early 1990s and late 1980s. While stressing over how to create something in time to add to my video entries, I came across an excellent site for developing exactly this type of text logo: Textcraft. I highly suggest using them if you've got a similar project requirement!
Thank you to Textcraft for the logo generator; I feel this logo evokes just enough retro nostalgia to fit my product well. Also, thank you to my wife who turned me away from the bad looking color combinations, haha.
Here's what it looks like while displayed on VGATonic itself (640x480x8bpp, dithering):
![]()
Productization
One of the requirements for the fourth stage of the contest is a rendition of the 'productized' look and feel of the product:
"Post an artist’s rendition of the “productized” design/look and feel of the project"
I have one 3D model (that's artistic, right?) from my initial KiCAD work last year which looks pretty good as, perhaps, a box cover/illustration (for a sufficiently technical audience):
![]() For a move generalized audience, something cleaner and more web 3.0 like would probably play. Overlaying the logo on the design document comes out well:
For a move generalized audience, something cleaner and more web 3.0 like would probably play. Overlaying the logo on the design document comes out well:![]()
As for the prototype video, I'll have it posted soon!
-
Updated Bill of Materials
08/01/2015 at 16:49 • 0 commentsBecause last year I only purchased enough parts to make 4 boards (whoops), I recently had to buy VGATonic components again. We've had a few price increases over the last year (and some minor drops), so this is as good a time as any to update our Bill of Materials. Some of these are last year prices (since I had 10-20x of some).
Assuming you buy enough components to make 10 (like me):
$20.53
I spent around $3.08 a board in shipping total, but you can beat that. There are also 95 cents worth of options (technically some of the resistors are optional too in the RCA output stage - I don't have a firmware using it yet).
If you are lucky/willing on eBay or with non-authorized stock or pulls, I have no doubt you can do ~ $15 - but I, of course, encourage ordering new/authorized for support reasons.
Part Name #/Board Cost/Part Cost/Board Where? Part Number ATTiny 2313a 1 1.11 1.11 Newark 68T3554 Bourns PTC Reset Fuse 1 0.134 0.134 Newark 83K0399 47uF 1206 Tantalum 1 0.4029 0.4029 Newark 60R5862 LTC6903 1 3.14 3.14 Newark 57M0173 10uF 1206 Tantalum 2 0.168 0.336 Newark 01M8216 USB B Connector 1 0.5528 0.5528 Newark 14N8154 VGA Connector 1 1.3 1.3 Newark 54M6031 NCP1117ST33T3G 1 0.387 0.387 Newark 67H7013 XC95144XL 1 7.25 7.25 Digikey 122-1372-ND IS61LV5128AL-10TLI 1 4.45 4.45 Jameco .1uF 0603 Ceramic X7R 11 0.008 0.088 Jameco PCB Service 1 1.19 1.19 Elecrow PCB 1uF 0603 Ceramic 1 0.008 0.008 Male Headers 18 0.001 0.018 10k 0805 1% Resistor 6 0.008 0.048 4.7k 0805 1% Resistor 1 0.008 0.008 510 0805 1% Resistor 4 0.008 0.032 1k 0805 1% Resistor 5 0.008 0.04 2k 0805 1% Resistor 4 0.008 0.032 4k 0805 1% Resistor 1 0.008 0.008 $20.53 Shipping 1 3.079 3.079 Various Optional Part # #/Board Cost/Part Cost/Board Where? Part Number RCA Connector 1 0.732 0.732 Newark 89K7618 3 Bit DIP Switch 1 0.22 0.22 eBay $0.95 -
Proof of Video Life on the Intel Edison!
07/30/2015 at 09:13 • 0 commentsI'm finally ready to announce A Big Conquest: adding graphics to a headless Linux part!
While the BBB, Odroid C1 and Raspberry Pi support was great to add and taught me a lot, getting VGATonic working on headless parts was a higher priority goal for me from the beginning. It just so happens that the Intel Edison was the first headless part I finished - and the results look great.
I got clean DMA 25 MHz SPI from the Edison (complete writeup is in a new project which you can find here. Let me know if you reproduce it!). And, of course, it's tradition to pick an id Software game to run as proof your video project is working... so here's a video showing it running Quake at over 40 frames per second (and other software as well, haha - 2:11 it begins):
I will attempt to do the PogoPlugs as well, but probably after the August 17th deadline.
-
New Drivers Uploaded: BeagleBone Black DMA Fixed! Intel Edison Added!
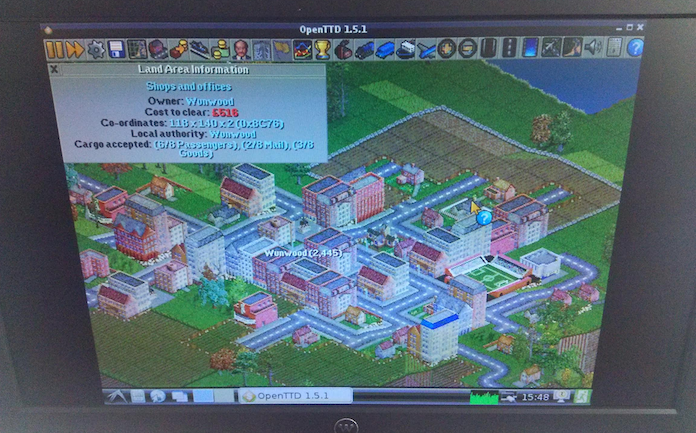
07/29/2015 at 16:03 • 0 commentsI've got to head off to the day job so I'll add details later, but this is a big one - Intel Edison support is added and BeagleBone Black DMA is fixed!!! The Edison can do 25 MHz SPI with DMA, so you're looking at 10.1 FPS at 640x480x8bpp, or 40.4 if you drop to 320x240 (both at 5V SPI, which, I can now verify, works!).
Also, the BBB's SPI DMA is working! We can do 19.5 FPS since we've got 48 MHz SPI. SPI doesn't even show up in top anymore. Here's a shot of OpenTTD on the BBB (between XOrg and OpenTTD - which is rendering in software, remember - it peaks at around 60-70% of the CPU. A fine result!). You can see the CPU meter in the bottom right didn't top out while I was scrolling around.
![]()
Okay, don't take my word on the Edison - it's a big one so I'll write something up and do a video. For now, you can get the new stuff on the Github repo, here.
-
VT52 Compatible Commands on VGATonic, and Custom/Administrator Sequences
07/23/2015 at 16:24 • 0 commentsVGATonic has a terminal emulator built in, and this post will detail how that works. It uses VT52 compatible commands, and also shows special sequences I added to control how VGATonic works.
For all of these, you need to hit 'escape' or send ASCII 27 first for VGATonic to respond.
VT52 Compatible Commands
To use escape codes, first hit the 'escape' key (or ASCII 27 in base 10 in your program), then hit the second key to execute the command.
	  A - Move the cursor to beginning of line above.
	  B - Move the cursor to beginning of line below.
	  C - Move the cursor right by one.
	  D - Move the cursor left by one.
	  E - Clear the screen and place the cursor in the upper left corner.
	  H - Move the cursor to the upper left corner.
	  I - Move the cursor to beginning of line above.
	  J - Erase all lines after our current line
	  K - Clear the current line from the current cursor position.
	  M - Delete the current line.
	  Y - 'Goto' Coordinate mode - first will change line number, then cursor position (both ASCII - 32)
	  b - Byte after 'b' sets new foreground color.
	  c - Byte after 'c' sets new background color.
	  d - Erase all lines above current line.
	  e - Enable the cursor.
	  f - Disable the cursor.
	  l - Erase current line line and place the cursor at the beginning of the row.
	  o - Erase the current line from the beginning to the current cursor.
	  p - Invert background and foreground color.
	  q - Invert background and foreground color.
VGATonic Framebuffer Codes
The main point of the project is, of course, being a video card... not a terminal emulator. I added some codes which are solely meant to control VGATonic, so you can choose to not use the terminal emulator while in serial mode and use it similar to how it works over SPI and write a pixel at a time. I built in 9600 bps and 38400 bps 8-N-1 asynchronous serial modes, so you'd have to be a masochist to use 640x480x8bpp mode (here are some example transfer times - i.e. 38.4k at top resolution/depth in 82.2 seconds for one frame!), but something like 80x60x1bpp or 80x60x2bpp might be bearable as more than a slideshow.
Obviously, these only work on VGATonic - if you have a VT52 somewhere, they won't work there, haha:
	  % - Administrator Mode (see next section)
	  W - 'W'rite framebuffer mode (pass through pixels from UART, 255 at a time)
	  Z - Send control character to VGATonic.  (Position or Resolution or Bit Depth change)
	  m - Become 'm'aster of CPLD (Disable external SPI writes and put Microcontroller in control)
	  r - 'r'elease CPLD (Allow external SPI writes)
	  s - 's'elect CPLD (Warn CPLD a new frame write is coming)
	  u - 'u'nselect CPLD (Inform CPLD current frame write is done)
VGATonic Administrator Mode
If you hit the '%' key after an Escape key, VGATonic puts you into administrator mode. You would come here to fine tune the PLL for your monitor, or to change the speed of asynchronous serial (it starts at 9600 bps 8-N-1, but you can set it to 38400 bps for a tiny, yet relatively large, speed bump.)
Here is a link to the LTC6903 data sheet so you can see what adding/subtracting one does with the PLL. We're only changing the second byte, and not allowing you to change the last 2 bits, so you have 2^6 options.
	  < - 9600  Baud Serial Terminal (Default)
	  > - 38400 Baud Serial Terminal
	  + - Add one to LTC6903 PLL Scaler
	  - - Subtract one from LTC6903 PLL Scaler
	  & - VGATonic default PLL Scaler, 0B01011110
	  | - Burn current PLL Scaler to EEPROM
Some Example Sequences
VGATonic starts up with the ATTiny in control. It quickly calibrates asynchronous serial (and sets it for 9600 bps 8-N-1), sets the PLL to 2x the VGA pixel clock (actually around 50.344 MHz if you don't change it), changes VGATonic's mode to 160x120x8bpp and draws a green screen to prove it is alive. It then gives up the bus. Here are a few sequences you can use to get into different modes:
To Get Into Terminal Emulator Mode:
- Connect to VGATonic at current speed of serial (default: 9600 bps 8-N-1)
- Optional: Change serial speed to 38400 bps:
- Escape % >
- Reconnect at 38400 bps 8-N-1
- Escape m
- (Become master of VGATonic)
- Escape s
- (VGATonic chip select; drives SPI low)
- Escape Z r
- (Set VGATonic to 160x120x8bpp - the only supported terminal mode, just in case it was changed)
- Escape E
- (Clears the screen - in case it was changed to something else)
VGATonic starts calibrated to 50.344 MHz, but this might not work with the PLL on all monitors. There is a way to change the PLL's setup - although, of course, you should try calibrating the monitor first before changing VGATonic's calibration! Consider this your last option, but always available (you get 100,000 EEPROM writes, however, so don't worry too much about changing it).
To Change the PLL Calibration
- Either:
- Escape % -
- Decrease PLL calibration
- Escape % +
- Increase PLL Calibration
- Escape % -
- Then, when happy:
- Escape % |
- Burn PLL Calibration to EEPROM
- Escape % |
Of course, it's possible you set VGATonic to a PLL calibration where you can't get any picture on your VGA monitor. Check all other connections, but if you feel the PLL setting is preventing the monitor from syncing, you can reset to factory:
To Reset PLL to Factory
- Escape % &
- Reset the PLL calibration to roughly 50.344 MHz
- Escape % |
- Burn this calibration to EEPROM
Compromises and One Improvement
I did my best with the VT52 commands - but there are a few limitations that I had to compromise on due to only having 128 bytes of RAM. Some RAM is taken up by global variables - FG/BG colors, row/column location, a buffer for ASCII characters sent over serial, etc. A bit is also reserved for local variables, such as counters and offsets (and putting functions return addresses on the stack).
The 'main' buffer is 40 (or, actually, 41 for the null character) bytes long and comprises one column in VGATonic. That means any commands that require multiple line memory we had to skip, and any time we move the cursor up or down we need to go to the 'beginning' of the line. Here is a listing of VT52 escape sequences so you can see the sorts of commands that use those constructs. We also are stuck with the 40 byte limit, so we are always overflowing to the next line instead of wrapping while typing.
Finally, we aren't supporting a few control characters - vertical tabs and bells (I mean, we don't have sound...) for example. Return/new line and delete are fully supported, though, of course!
Our main improvement is color: the VT52 supported 'high brightness' and 'low brightness' 3 bit color, which is better known now as 4 bit RGBI, where the I is an intensity bit. We support the full gamut of 256 colors, so if you use escape characters to change the BG or FG colors, whatever ASCII character you send next will use the full RRRGGGBB color set.
As for improvements?
Prior Art
VGATonic isn't the first AVR terminal emulator, of course - Martin K. Schröder released a mostly VT100 compatible emulator (with better 40x40 row x column support!) for 4k RAM and some smaller parts some time back. If you're considering a similar project, I hope you'll take a look at his code.
-
Asynchronous Serial and Terminal Emulator Support
07/23/2015 at 02:13 • 0 commentsToday, the ATTiny 2313a comes alive!
Serial support (or, as I discussed today in the Hacker Channel, other names you might know it as - "Asynchronous Serial", "RS-232 TTL", "TTL Serial", etc.) was always on the roadmap for VGATonic, but my Terminal Emulator Support comment was a joke.
Of course, once I put it out there in the universe, I had to try to make it reality - despite only having 128 bytes of RAM to work with on the 2313a!
The Serial Framebuffer
The serial framebuffer works mostly as I telegraphed a few articles back, but as I was running low on a different resource (flash memory), I modified it a bit so all framebuffer transmits are 255 bytes long. If you are doing one of these pixel transmissions and you are transmitting less than 255 bytes over UART, you'll have to transmit in a 255 byte block (or if it is at the end of the transmission, you can transmit random characters or all 0s or something).
This means you can use VGATonic over asynchronous serial almost exactly as you'd use it over SPI - that is, drawing pixel by pixel.
The Terminal Emulator
The main feature, though, is the terminal emulator. I decided to attempt to reproduce the vt52 character codes as best as I could, and got most of them. I got the 3x5 (4x6 with white space) font I discussed the other day to fit in EEPROM and Flash on the 2313, and I use it in 160x120 mode for an effective 40x15 character terminal. For background and foreground color changes, we go beyond spec (16 colors) of the vt52, and allow you to set any of 256 colors supported by RRRGGGBB in one byte, our selected 8 bit color mode.
I used the vt52 escape code listing I found here. The ones that involve memory of multiple lines or writing more than 40 characters I compromised, either going to a newline (line wrap) or zooming to the beginning of the line when I change line numbers. I will make another article listing the escape codes VGATonic supports.
How Did You Do It?
Since this is Hackaday, I figured I better explain how I got 600 bytes of screen... plus foreground colors, background colors, and line changes... into 128 bytes of memory.
The short answer? I used the hardware acceleration capabilities I built into VGATonic to avoid overwriting lines that had already been written. If I'm on line 7, for example, I don't need to send commands to update lines 1 through 6 - I just tell VGATonic to skip to line 7 (Internally, since it is in 160x120 mode it's more like "skip to line 56"). I then only maintain a buffer of the current line.
It's a nifty trick, and I will put it in my next video demo so you can see it in action without procuring a VGATonic (just yet!). It's a feature I couldn't have done terminal emulation without, but it's also a great demonstration of my hardware acceleration scheme working - that specification will be fully published with the final product so you can do something similar without delving into the source code, if you so choose!
-
Announcing BeagleBone Black Support!
07/18/2015 at 01:36 • 0 commentsHey everyone, I'm very happy to announce support for the BeagleBone Black today!
As per custom, here is the BBB rev 3 displaying itself with VGATonic!
![]()
Difficulties
Unfortunately, we had a few difficulties in getting VGATonic to run on the BBB (an initially frustrating yet ultimately successful experience!).
First, SPI DMA seems to be broken, which is a major issue with the BBB since the SPI driver in the kernel automatically does DMA when over 160 bytes are sent (we send 307,200 for 640x480x8bpp mode...). I'm using a 3.8.xx kernel and had some issues upgrading due to missing scripts, however it does appear this bug cropped up again even in recent kernels. I'll revisit it when there is a fix, though, since I would like to squeeze out maximum performance on the popular BBB, and I think it was working at some point in the 3.14.* kernels. (Please ping me if you see an update or know more!)
It was an easy enough workaround, though: write 159 bytes at a time, maximum. VGATonic's main driver needed an update to support this, but it does seem a useful feature (it looks like the Edison will need something similar). Here are the gory details of how that function works now. It should be relatively self-explanatory, but let me know if you would like more explanation:
static int vgatonic_write_data_buf(struct vgatonicfb_par *par, u8 *txbuf, int size)
{
	/* Chip Select low to warn VGATonic something is coming */
	gpio_set_value(par->cs, 0);

	int bytesLeft = size;
	int retval = 0;
	while (bytesLeft > 0) {

	  if (bytesLeft > par->maxSPIBytes) {

	    /* Full Speed SPI */
	    struct spi_message	m;
	    struct spi_transfer	t = {
	      .tx_buf		= txbuf+(size-bytesLeft),
	      .len		= par->maxSPIBytes,
	      .speed_hz         = par->spiSpeed,
	    };
	    spi_message_init(&m);
	    spi_message_add_tail(&t, &m);
	    int retval = spi_sync(par->spi, &m);
	    bytesLeft -= par->maxSPIBytes;
	  } else {
	    	    /* Full Speed SPI */
	    struct spi_message	m;
	    struct spi_transfer	t = {
	      .tx_buf		= txbuf+(size-bytesLeft),
	      .len		= bytesLeft,
	      .speed_hz         = par->spiSpeed,
	    };
	    spi_message_init(&m);
	    spi_message_add_tail(&t, &m);
	    int retval = spi_sync(par->spi, &m);
	    bytesLeft = 0;
	  }


	}

	/* Chip Select high to warn VGATonic something is done */
	gpio_set_value(par->cs, 1);


	return retval;
}
So, we keep doing 159 byte chunks until we have sent 307,200. And, yes, this does hurt performance.
Performance
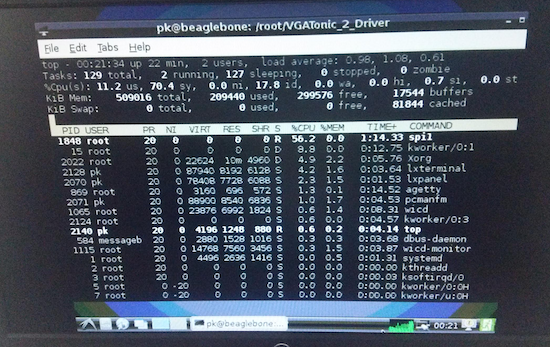
In theory, the BBB is an excellent candidate for VGATonic since it can support 48 MHz SPI. That's a nice 19.5 Frames Per Second worst case for 640x480x8bpp (and over 60 for most other modes!). Unfortunately, due to SPI overhead due to the small transfers and not using DMA, most functions are closer to 7-10 FPS (Dropping to 320x240 on the BBB looks excellent though, and often maxes out the 60Hz refresh!). Here's an example of what I mean, where mouse movements can drive SPI to take up 50% of the CPU:
![]()
I will say this, though - it's very usable even with the 159 Byte sends - a credit to a nice platform! I'm happy to update the driver when the SPI issue is fixed - or if I can find a kernel where it is patched already. But, for now, this is a great start - let me know if you get it working!
-
Announcing Odroid C1 Support(!), Plus Hardware Acceleration
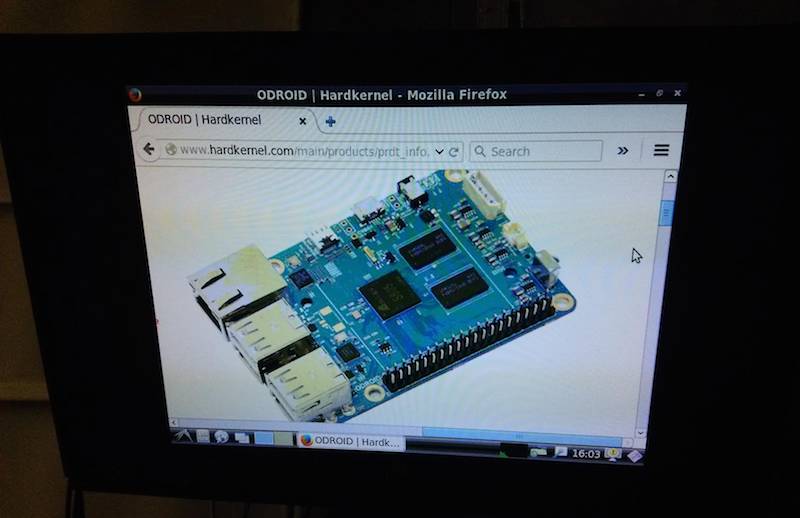
07/13/2015 at 07:05 • 0 commentsI know you expected an update on the microcontroller with all the serial work I've been doing, but today I've got something even more interesting. Here's VGATonic announcing Odroid C1 support (link to drivers on Github) by surfing to the Odroid C1 product page on an Odroid C1:
![]()
For those who haven't used one of these boards, it's my go-to for this project, and I haven't had any problem with it corrupting disk images.That said, this driver supports the Raspberry Pi 2 Model B as well.
Okay, let's discuss the exciting features! Today we've got hardware acceleration through color depth and resolution changes, as well as some interesting color depth macros you can borrow.
Release Notes
To change the resolution with these drivers, do this once VGATonic is loaded:
fbset -fb /dev/fb# -xres XXX -yres YYY -depth ZZ
Resolutions: 640x480, 320x240, 160x120, 80x60
Color Depth: 8 bpp, 4 bpp, 2 bpp, 1 bpp, 16bpp (virtual - you may need this to launch X)
Other:
VGATonic will multiply your framerate automatically, up to 60, depending on how you scale down your mode:
Say you have a board that does 15 frame per second at 640*480*8bpp, and you scale it down to 320*240*8bpp. VGATonic's driver will automatically adjust your refresh rate to 60Hz - maxing out the refresh rate for the 640x480 mode we chose.
VGATonic automatically does color conversions. They could use some adjustment, but here are bit shifting macros to convert from 5-6-5 RGB to our 4 color modes:
#define RGB565toRGB332(c) ( ((c&0xE000)>>8) | ((c&0x0700)>>6) | ((c&0x0018)>>3) )

#define   RGB565toRGBI(c) ( ((c&0x8000)>>12) | ((c&0x4000)>>14) | ((c&0x0400)>>8) | ((c&0x0200)>>9) | ((c&0x0018)>>3) )

#define     RGB565to4G(c) ( ((c&0xC000)>>14) | ((c&0x0600)>>9) | ((c&0x0018)>>3) )

#define     RGB565toBW(c) ( ((c&0x8000)>>15) | ((c&0x0400)>>10) | ((c&0x0010)>>4) )
InstallationRaspberry Pi:
Install all of the normal build tools and a recent gcc/g++. You may need an updated kernel - I'm using some 3.18 flavor (no device tree); you can match me like so:
sudo rpi-update 07179c0ab486d8362af38c6fc99643ded953b99d
rpi-source
cd into Driver directory
sudo make clean ; sudo make
sudo modprobe sysfillrect; sudo modprobe syscopyarea; sudo modprobe sysimgblt; sudo modprobe fb_sys_fops; sudo insmod vgatonic.ko; sudo insmod rpi_vgatonic_spi.ko
(You should see activity. Or just do a 'cat /dev/urandom > /dev/fbX' to see writes!)
Odroid C1:
I'm on this kernel: Linux odroid 3.10.80-94
sudo -i
Install all of the normal build tools. cd into VGATonic directory.
make clean ; make
sudo modprobe spicc; sudo modprobe spidev; sudo modprobe sysfillrect; sudo modprobe syscopyarea; sudo modprobe sysimgblt; sudo modprobe fb_sys_fops; sudo insmod vgatonic.ko; sudo insmod odroid_vgatonic_spi.ko
(You should see activity. Or just do a 'cat /dev/urandom > /dev/fbX' to see writes, just ike our Raspberry Pi bretheren!)
-
What's Old is New Again - XMODEM and Serial Transfers meet VGATonic!
07/11/2015 at 21:02 • 0 commentsI'm playing with the USART on the ATTiny 2313a currently. Since I have all of the SPI writes working excellently, the first thing I wanted to do was have a simple method of blasting writes over the (new, since we didn't have it before!) serial connection to VGATonic!
Instead of writing a new protocol from scratch, I looked into some of the early methods of file transfer over (slow, at least relative to today) early modems.
In 1977, Ward Christensen released a protocol called 'XMODEM' for a terminal program he was making. XMODEM's algorithm is relatively simple (Christiansen referred to it as a "hack" - was it ever featured on Hackaday?):
1) SOH - Start of Header Packet
2) Sequence - Counter to 255 (the packet order)
3) 1s Complement of Sequence: (255 and seq) xor 255
4) 128 Bytes of Data
5) Checksum - add all data bytes together and disregard the carries
6) Receiver sends back 'ACK' or 'NAK', ACK being a match and
    NAK meaning 'resend, there is a mismatch'
As Christiansen put it, his resulting XMODEM protocol may very well be the most modified code (and supported file transfer protocol!) of all time. It's quite efficient: 4 bytes of overhead for 128 Bytes of data. (With 8-N-1 Serial you also lose 2 bytes every 10 due to start and stop bits)
Instead of reinventing the wheel, I'm basing my protocol on XMODEM. Here's what I've got working:
1) Escape character
    a) Receiver sends back '>'
2) Start Packet (I'm using a 'W')
    b) Receiver sends back '#'
3) x = message length (One byte, so 0 - 255)
    c) Receiver echos size
4) Send x single bytes
5) Receiver sends back ACK
Note that I don't care about checksums, and VGATonic will never ask for a resend - a slight pixel difference is fine for our application.So, We've got 7 bytes of overhead for (up to) 255 bytes of data, or roughly 97.3% channel efficiency. Now, multiply the 262 bytes by (10/8) (the inverse of the efficiency of our asynchronous serial connection) to find how many 'raw' bytes from the serial connection are needed:
Bytes Needed:            (10/8) * 262 = 327.5
Bits Needed:               327.5*8 = 2,620
Data Bits Transferred: 255*8 = 2,040

Overall Efficiency: 255/327.5 = 77.86%
Now that you've got an idea of overhead - almost a quarter(!) - you can calculate how some of the VGATonic screen writes would work:
640*480*8 bit depth needs 2,457,600 bits, which would take
3,156,330 bit transfers after overhead.

... (etc)

320*240*4 bit depth needs 307,200 bits, which would take
394,541 bit transfers after overhead.

... (etc)

80*60*1 bit depth needs 4,800 bits, which would take
6,165 bit transfers after overhead.
I've tested it at 9,600 baud and 38,400 baud - common enough speeds. For those 3 (Remember, we have all 16 combinations if we want them):
640*480@8bpp (256 color)
9,600 Baud: 328.8 seconds per frame ( 5.5 minutes(!) )
38,400 Baud: 82.2 seconds per frame ( 1.4 minutes )

320*240@4bpp (16 color)
9,600 Baud: 41.1 seconds per frame
38,400 Baud: 10.3 seconds per frame

80*60@1bpp (B&W)
9,600 Baud: .64 seconds per frame
38,400 Baud: .16 seconds per frame
Okay, that's a slideshow at best (other than, arguably, the 6.25 frames per second we can get out of our most modest resolution/color depth at 38,400 baud).
Worse, I'm also leaving out latency, so it will be even slower than the above waiting for responses before continuing.
Anyway, it's in the code now - and hopefully this post also illuminates why terminal emulators were so popular - getting a lot of useful-to-humans-data across 'slow' asynchronous connections. Demos of VGATonic connected to Raspberry Pis running Doom at 25 frames per second over SPI (a synchronous serial connection, remember!) are fun, but it's making these slow connections useful which is really driving the work on VGATonic.
All of this is thanks to, of course, protocols like XMODEM which paved the way - before yours truly was even born!
-
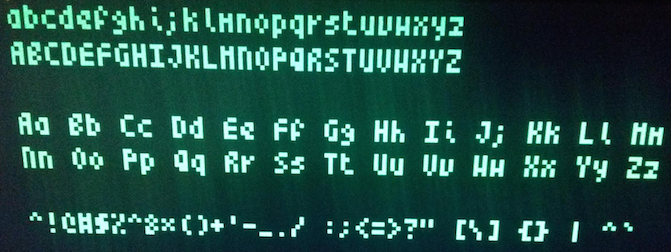
A Tiny 4x6 Pixel Font That Will Fit On Almost Any Microcontroller (License: MIT)
07/10/2015 at 05:12 • 11 comments![]()
I won't ruin the surprise about what feature I'm working on right now for VGATonic (it's a crazy one), but I needed to add a font. Let me rephrase - a tiny font. Let me be more specific - the most space efficient font possible.
My searching first led me to the 4x6 font here: http://robey.lag.net/2010/01/23/tiny-monospace-font.html made with an assist by 'Robey' by Brian Swetland of Palm Pilot fame (I've got a working Palm Pilot with a minor crack in the screen in the office). Further clicking led me here, where "Dr_Acula" had already encoded it into 96x3 bytes: http://forums.parallax.com/discussion/comment/1073601#Comment_1073601We can do better, though - you see, it's really a "3x5" font, with whitespaces.
3x5 = 15, which is less than 16 (one word, or 2 8 bit bytes). You guessed it - I wrote up some python to make it even smaller, and jammed each character into 2 bytes. It's so small, I'm going to post it in its entirety here (in C, for AVR - easy enough to convert for your favorite language):
// Font Definition
const uint8_t font4x6 [96][2] PROGMEM = {
 {  0x00  ,  0x00  },   /*SPACE*/
 {  0x49  ,  0x08  },   /*'!'*/
 {  0xb4  ,  0x00  },   /*'"'*/
 {  0xbe  ,  0xf6  },   /*'#'*/
 {  0x7b  ,  0x7a  },   /*'$'*/
 {  0xa5  ,  0x94  },   /*'%'*/
 {  0x55  ,  0xb8  },   /*'&'*/
 {  0x48  ,  0x00  },   /*'''*/
 {  0x29  ,  0x44  },   /*'('*/
 {  0x44  ,  0x2a  },   /*')'*/
 {  0x15  ,  0xa0  },   /*'*'*/
 {  0x0b  ,  0x42  },   /*'+'*/
 {  0x00  ,  0x50  },   /*','*/
 {  0x03  ,  0x02  },   /*'-'*/
 {  0x00  ,  0x08  },   /*'.'*/
 {  0x25  ,  0x90  },   /*'/'*/
 {  0x76  ,  0xba  },   /*'0'*/
 {  0x59  ,  0x5c  },   /*'1'*/
 {  0xc5  ,  0x9e  },   /*'2'*/
 {  0xc5  ,  0x38  },   /*'3'*/
 {  0x92  ,  0xe6  },   /*'4'*/
 {  0xf3  ,  0x3a  },   /*'5'*/
 {  0x73  ,  0xba  },   /*'6'*/
 {  0xe5  ,  0x90  },   /*'7'*/
 {  0x77  ,  0xba  },   /*'8'*/
 {  0x77  ,  0x3a  },   /*'9'*/
 {  0x08  ,  0x40  },   /*':'*/
 {  0x08  ,  0x50  },   /*';'*/
 {  0x2a  ,  0x44  },   /*'<'*/
 {  0x1c  ,  0xe0  },   /*'='*/
 {  0x88  ,  0x52  },   /*'>'*/
 {  0xe5  ,  0x08  },   /*'?'*/
 {  0x56  ,  0x8e  },   /*'@'*/
 {  0x77  ,  0xb6  },   /*'A'*/
 {  0x77  ,  0xb8  },   /*'B'*/
 {  0x72  ,  0x8c  },   /*'C'*/
 {  0xd6  ,  0xba  },   /*'D'*/
 {  0x73  ,  0x9e  },   /*'E'*/
 {  0x73  ,  0x92  },   /*'F'*/
 {  0x72  ,  0xae  },   /*'G'*/
 {  0xb7  ,  0xb6  },   /*'H'*/
 {  0xe9  ,  0x5c  },   /*'I'*/
 {  0x64  ,  0xaa  },   /*'J'*/
 {  0xb7  ,  0xb4  },   /*'K'*/
 {  0x92  ,  0x9c  },   /*'L'*/
 {  0xbe  ,  0xb6  },   /*'M'*/
 {  0xd6  ,  0xb6  },   /*'N'*/
 {  0x56  ,  0xaa  },   /*'O'*/
 {  0xd7  ,  0x92  },   /*'P'*/
 {  0x76  ,  0xee  },   /*'Q'*/
 {  0x77  ,  0xb4  },   /*'R'*/
 {  0x71  ,  0x38  },   /*'S'*/
 {  0xe9  ,  0x48  },   /*'T'*/
 {  0xb6  ,  0xae  },   /*'U'*/
 {  0xb6  ,  0xaa  },   /*'V'*/
 {  0xb6  ,  0xf6  },   /*'W'*/
 {  0xb5  ,  0xb4  },   /*'X'*/
 {  0xb5  ,  0x48  },   /*'Y'*/
 {  0xe5  ,  0x9c  },   /*'Z'*/
 {  0x69  ,  0x4c  },   /*'['*/
 {  0x91  ,  0x24  },   /*'\'*/
 {  0x64  ,  0x2e  },   /*']'*/
 {  0x54  ,  0x00  },   /*'^'*/
 {  0x00  ,  0x1c  },   /*'_'*/
 {  0x44  ,  0x00  },   /*'`'*/
 {  0x0e  ,  0xae  },   /*'a'*/
 {  0x9a  ,  0xba  },   /*'b'*/
 {  0x0e  ,  0x8c  },   /*'c'*/
 {  0x2e  ,  0xae  },   /*'d'*/
 {  0x0e  ,  0xce  },   /*'e'*/
 {  0x56  ,  0xd0  },   /*'f'*/
 {  0x55  ,  0x3B  },   /*'g'*/
 {  0x93  ,  0xb4  },   /*'h'*/
 {  0x41  ,  0x44  },   /*'i'*/
 {  0x41  ,  0x51  },   /*'j'*/
 {  0x97  ,  0xb4  },   /*'k'*/
 {  0x49  ,  0x44  },   /*'l'*/
 {  0x17  ,  0xb6  },   /*'m'*/
 {  0x1a  ,  0xb6  },   /*'n'*/
 {  0x0a  ,  0xaa  },   /*'o'*/
 {  0xd6  ,  0xd3  },   /*'p'*/
 {  0x76  ,  0x67  },   /*'q'*/
 {  0x17  ,  0x90  },   /*'r'*/
 {  0x0f  ,  0x38  },   /*'s'*/
 {  0x9a  ,  0x8c  },   /*'t'*/
 {  0x16  ,  0xae  },   /*'u'*/
 {  0x16  ,  0xba  },   /*'v'*/
 {  0x16  ,  0xf6  },   /*'w'*/
 {  0x15  ,  0xb4  },   /*'x'*/
 {  0xb5  ,  0x2b  },   /*'y'*/
 {  0x1c  ,  0x5e  },   /*'z'*/
 {  0x6b  ,  0x4c  },   /*'{'*/
 {  0x49  ,  0x48  },   /*'|'*/
 {  0xc9  ,  0x5a  },   /*'}'*/
 {  0x54  ,  0x00  },   /*'~'*/
 {  0x56  ,  0xe2  }    /*''*/
};

// Font retreival function - ugly, but needed.
unsigned char getFontLine(unsigned char data, int line_num) {
  const uint8_t index = (data-32);
  unsigned char pixel = 0;
  if (pgm_read_byte(&font4x6[index][1]) & 1 == 1) line_num -= 1;
  if (line_num == 0) {
      pixel = (pgm_read_byte(&font4x6[index][0])) >> 4;
  } else if (line_num == 1) {
      pixel = (pgm_read_byte(&font4x6[index][0])) >> 1;
  } else if (line_num == 2) {
      // Split over 2 bytes
      return (((pgm_read_byte(&font4x6[index][0])) & 0x03) << 2) | (((pgm_read_byte(&font4x6[index][1])) & 0x02));
  } else if (line_num == 3) {
      pixel = (pgm_read_byte(&font4x6[index][1])) >> 4;
  } else if (line_num == 4) {
      pixel = (pgm_read_byte(&font4x6[index][1])) >> 1;
  }
  return pixel & 0xE;
}
To decode, you pass in the character you want (ASCII, so say 'c' or 0x63) and a line number. Line 0 through 4 will be the magic lines, so set up your loop accordingly.
And the Descenders? ('g', 'j', 'p', 'q', 'y')
I manually changed the descenders to have a '1' in the LSB of the second byte. That's the second line of the decoder program - if there is a one in that spot, I shift the whole thing down a line. (Why waste a bit, right? I think the CPLD work in those tight conditions is in my head still).
I manually edited the 'j' and the 'z', but before you ask - it can stay as the MIT license. Enjoy, and please let me know it you use it!
VGA Graphics Over SPI and Serial - VGATonic
640x480 (and 848x480!) Color VGA Video Card for Microcontrollers and Single Board Computers

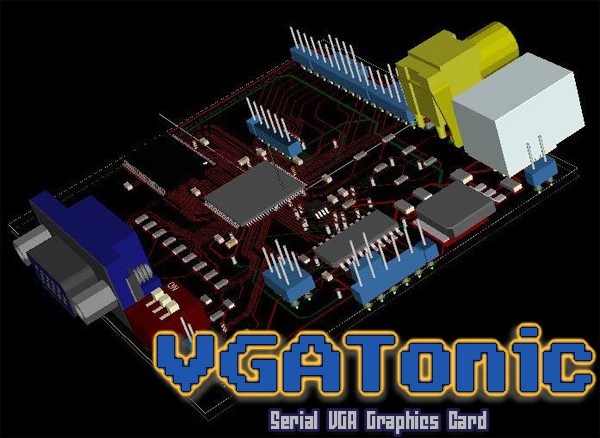 For a move generalized audience, something cleaner and more web 3.0 like would probably play. Overlaying the logo on the design document comes out well: