Close
0%
0%

Raspberry Pi Wet Incubator/Sous Vide/Slow Cooker

A web and locally controlled sous vide and slow cooker, now turned in to a laboratory water bath/DNA PCR cycler.

Similar projects worth following
Slow cookers are cheap (A nice one is $80). Sous vide's are hideously expensive (A nice one starts at $500), and all it does is keep a water bath at a very specific temperature (accurate to around 1 degree Centigrade). I'm going to use a Raspberry Pi to control a slow cooker, both to be used as a sous vide and as a web-enabled slow cooker.

An even bigger deal: Lab grade water baths cost thousands of dollars (much of this is the cost of certification). The vast majority of the planet doesn't need certifications, they just need equipment that works. It's even better if it is locally serviceable.

A good friend's lab's lab incubator went down. They're in an austere environment, lucky to have a lab, lucky to have some trained personnel to use the equipment in the lab. A ton of the stuff that they got was through corporate donations. The only problem is that no one is around to maintain the ultra-high-tech. All they need is a carefully controlled thermal environment.

Using a Raspberry Pi and a low-tech slow cooker, I'm going to build an open source sous vide. To be honest, I'm going to build a Raspberry Pi controlled digital mains power controller. You can plug whatever you want into the side of this thing and control it from the Pi.

OK, the project changed yesterday. Maybe it forked. The first iteration of this project is now being used to incubate test tube cultures in an austere medical laboratory. The next feature request is for a PCR machine. Having this capability in an austere lab is an amazing prospect, but should be easily achievable.

http://www.uvm.edu/~cgep/Education/PCR.html

  • 1 × Raspberry Pi, ~$35
  • 1 × 5v Opto-isolated Controlled Mains Relay, Under $10 from eBay
  • 1 × Heavy duty electrical box from Home Depot, $11 (I think)
  • 1 × Single electrical wall plug, Home Depot, $5
  • 1 × 1A 5V USB power supply, Lying around the house

View all 7 components

  • DS18B20 Library

    staticdet507/16/2015 at 23:21 0 comments

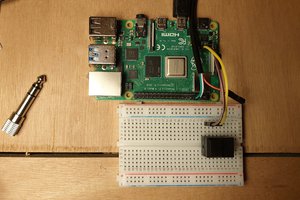
    Last night's documentation made me realize that I'd been going about this wrong (bummer, the unit in the field doesn't have this). I had some pretty low level hardware-centric code in the program, instead of breaking it out into a module of its own. A quick re-write today, and the DS18B20 library exists (albeit in a primitive form, for now).

    The new system is two parts, really: DS18B20.py and temptest.py. The meat is in DS18B20, which contains everything to initialize, discover the thermometers connected to the board, and give out a temperature (in Centigrade. Fahrenheit is on the to-do list). The temptest.py program simply verifies that the thermometers can be initialized, discovered, and all temps can be displayed.

    This is going to speed up deployment, as the project itself is forking. We're basically going to be making two devices at this point. First, we're going to polish the wet incubator (test tube hot water bath), before we add on a cooling system to enable the PCR machine. Second (probably at the same time) we're going to finish making the Sous Vide. I like a gourmet steak.

  • Let's talk some code: Glob Module

    staticdet507/16/2015 at 01:56 0 comments

    Anyone that really knows me, knows that I'm a bit of a spaz. I like to get in to things, see how things work, how they could fit together, try new things, find trouble, get in to it, run, and learn something new. HOWEVER, at the core, I'm lazy. I hate repetitive efforts, duplicate work.

    One of my goals, when I started this project, was to make a system that took care of the "crap" for the user. I knew I wanted to be able to incorporate multiple thermal sensing elements in the design. With the selection of the DS18B20 thermometers, I knew I could potentially have an unknowable number of sensors available. I wanted to set the program up to scan for sensors within the linux file structure (one of the cool aspects of this particular sensor, and the Raspberry Pi).

    os.system('modprobe w1-gpio')
    os.system('modprobe w1-therm')
    
    base_dir = '/sys/bus/w1/devices/'
    thermometers = (glob.glob(base_dir + '28*'))
    print(thermometers) 
    

    The code snippet above is how I get the list of DS18B20 thermometers that are attached to the Pi.
    The first two lines use the python OS module to initialize the thermometers.

    The "base_dir" variable contains the directory where the thermometers "live". Checking the "contents" of the thermometers is how we read the temperature. The cool thing about this is that the thermometers and the Pi update the "contents" with temperature data. We just need to check the files occasionally.

    The next line uses the Glob module to find all of the items in the "base_dir" location that start with "28", what our thermometers identifiers start with. We don't really care what the identifiers are, or how many of them there are. All Glob does (in this instance) is return everything that meets the criteria (Criteria being: In the directory, "base_dir"; and starting with "28"). In the past, I would have written some PITA code that would have iterated over things within the directory, with manual checks written to make sure the code didn't get confused halfway through a string.

    Python's great, but sometimes it's a bit tough knowing about all the great modules out there.... (hint: awesome site: Python Module of the Week: Glob)

    The "print(thermometers)" line is simply a program check, to make sure things are working.

    Four to Five lines of code to check what DS18B20's are hooked up. The next thing I need to do is also play back what temperatures the thermometers are currently reading. This could help distinguish thermometers, making assignments easier. This will keep the user from having to dig into the Pi's file structure, write down detected devices, and then manually alter a configuration file. This should automate that process completely.

  • GitHub code posted

    staticdet507/13/2015 at 14:18 0 comments

    Finally!

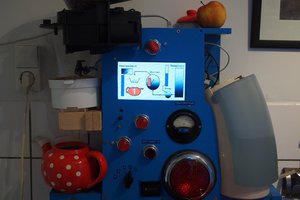
    Packed away in the garage, tucked behind someone else's stuff, was my early office prototype (And I may go back to this one for a couple of reasons). The code is early, but it worked for cooking.

  • Why PCR?

    staticdet507/10/2015 at 14:26 0 comments

    So one of the end results of this project is to build what is essentially a water heater and cooler. What the hell are they going to do with it?

    Amplify DNA, yeah. Fun. If you've ever seen DNA, it's not that thrilling. (I'll give you a hint, you can get the same effect by sneezing after sanding drywall)

    The really cool ingredient here is having the trained microbiologist in the lab, and the lack of insane standards to follow. Don't get me wrong, those standards make sense in many cases, but when your back is against the wall, you're going to find a way to make what you have on hand, work for you.

    My earlier discussion of PCR is the quick and easy method. Take your DNA sample, mix in some things, and also mix in your primers, the A,T,C,G's that DNA is made of. Then go through the heating and cooling processes of PCR. Bingo, DNA amplification.

    So, let's look at the advanced technique. There exist "DNA Tools" that cut DNA in specific locations. Dozens, hundreds of different enzymes that only cut specific locations of DNA. This is the technique that allows gel electrophoresis to work:


    Cut two samples (or more) up with the exact same set of cutting tools. Then use a gel electrophoresis rig to "pull" the samples using an electric tension from a sample site, across the gel. The different sizes/weights of DNA will settle across the gel in distinct bands. Compare the bands to each other (take a look at the second picture). If one matches, that's your original sample's identity.

    This takes awhile, and takes some more "stuff". Instead, lets see what else we can do.

    Take a known sample. We'll say a known sample of The Dreaded Gombu, lethal creeping crud of NoWhereistan. Do your special procedure to extract DNA (Bacteria, viruses, etc, all of slightly different methods for extraction), get it in your test tube, and start PCR'ing it. We want to amplify it. A lot.
    Next, we're going to take our special cutting tools, and cut this DNA up. And then we're just going to leave it. For a minute.
    Now we go to our patient sample. This guy is sick, but we're worried he has The Dreaded Gombu. If we give him the treatment and he doesn't have it, it'll kill him (a little drama). We need to be sure.
    We take our patient sample, extract the DNA from it. Keep in mind, that we're going to get ALL of the DNA out of it. The sick guy, all the little critters in him (we have more foreign DNA in our body than you want to think), and our mysterious disease causing agent. We put that mishmash of DNA into a test tube, along with some of our known, sliced up, Dreaded Gombu. NOW, we PCR the hell out of it. The PCR reaction is only going to efficiently work with the Dreaded Gombu slices. If we cycle this thing a bunch of times (each time doubles the reacting DNA, right?), we should see the amount of DNA increasing in the test tube, if there is Dreaded Gombu present. If not, we're not going to see much changing.

    If you get this technique down, you can achieve more than a qualitative analysis. You can actually do a quantitative analysis of the DNA (How similar is this to a known sample?).

    The technique itself is amazingly simple, but it takes a skillful hand (and in some cases, is a bit of an art, to really make the technique sing). The skill of the technician is very important, more important than the tool itself. For this reason, not having the tool is a stupid stumbling block, when the lab has the skills to use it.

  • Commits- DS18B20

    staticdet507/07/2015 at 19:32 0 comments

    My girlfriend just informed me that she thinks the test board (I had two boards, one in the kitchen, one in my office) is in the garage... somewhere. We moved, and our garage got filled with other people's crap. Fortunately we have a work day this weekend to get it organized and labeled for a yard sale. There should be an old version on there.

    In the meantime, I'm going to talk about some of my design decisions. First, I'm going to talk about the temperature sensor.

    I'm using the waterproof DS18B20 (from Adafruit http://www.adafruit.com/products/381?gclid=COPRmeLVycYCFYsWHwodEKYAGA) for this project (and probably a bunch of others). It's a three wire sensor (Vin, Ground, Data) with 9 or 12 bit resolution. You feed it between 3.0 and 5.0v, and you get back a temperature reading. The beautiful part is that each sensor has a unique 64-bit ID. You can run multiple sensors off of the same pin.

    I wrote a quick Python program to watch the Raspberry Pi system, and autodetect all of the DS18B20's connected to the Pi. The program then asked you how you wanted to treat the thermal probe (Ignore it, treat it is an external probe, or an active probe). Initially the system was going to have a great PID loop (I'll talk about these later). I had a fair amount of trouble implementing a true PID system that drove a digital pin (as opposed to a PWM system).
    Now, I may switch over to a PWM system, if I replace the relays with a FET or SCR or something (You gotta pardon my terminology. I'm not an electrical engineer).

    I'm using multiple $10 parts for a reason. The biggest is because I could spend the money, and support Adafruit. Without them and Sparkfun, I wouldn't have much of a chance of accomplishing this. Second, I know the parts can be had pretty inexpensively (You can get 5 on Amazon for $7.50. No idea how water proof they are....). Third, the initial design didn't have a water circulator. It was a simple Pi controlled system that turned the power on and off to the slow cooker. I wanted to have a thermal probe on one side of the vacuum sealed bag, another probe on the other side, and one floating free.

    I also had plans to make this extensible. There are a huge number of applications for "intelligently" controlled thermal systems. Being able to measure multiple temps from one board, and log it, would be pretty useful (I'm looking to build a home monitoring project using distributed Pi's). If I get my act together, I'll write a software library for the sensor, including the autodetect function, so it can spit out temperatures in a variety of formats on demand.

  • FORK THIS!

    staticdet507/07/2015 at 15:13 0 comments

    This project has been on a slow burn for awhile. Life intrudes.

    Two weeks ago a friend contacted me from overseas, and asked for the whole set-up. Slow cooker, beat up case, everything. Their multi-thousand dollar incubator couldn't handle the heat and environmental conditions. Their lab is fortunate to have a trained microbiologist, someone who is actually able to make real use of this type of equipment. Frequently it's not a matter of having the equipment, you need the skills to use it. It's even better when you have people that can innovate to the equipment that is there.

    I put a final polish on the code, and shipped it. My friend gave up his cellphone charger, and wired the crockpot for the local power (I'm worried about this, as I didn't check anything about this. I know the relay will take it).

    I didn't put the code into a repository. We're trying to figure out how to remedy this now. I'm freakin' furious with myself for doing that. I'm checking my chips, and scouring moving boxes looking for old code.

    OK, a water bath incubator is easy. Honestly, you set the temp, and keep it there. The code updates that I did kept a minute by minute log of the average temperature, and archived them for a month. The users are setting the temp through a command line interface, but I'm betting that the temp is being maintained at 98.6F/37C. The lab is air conditioned, and supposedly on an emergency generator. From the sounds of things, the emergency generator is what killed the incubator. The dirty power fried the control system or something.

    The next step is to incorporate a cooling system into the mechanism, in case the air conditioner fails. Once the cooling loop is incorporated, this project evolves into a DNA PCR machine (A feature request). http://www.uvm.edu/~cgep/Education/PCR.html

    PCR stands for Polymerase Chain Reaction. In layman's terms it is DNA amplification. In theory, give me a single cell, and I can replicate that DNA. There is nothing stopping you from taking the 3.6 picograms from a human cell, and replicating it in a machine until it is something you can see with the naked eye.
    To do this, you have to mix the sample with DNA primers, put it in a machine to heat it and cool it in a controlled fashion. The goal is to get the DNA to uncoil, meet up with the DNA primers completely, coax it in to reassembling, and then repeat the process. Quickly. Every time you repeat the cycle, you double the DNA.

    Now, there are some other cool tricks you can do with this, beyond simple replication, but that's for the guy in the lab to do. I haven't done this for close to ten years.

View all 6 project logs

Enjoy this project?

Share

Discussions

staticdet5 wrote 07/07/2015 at 18:33 point

OK, I think one of you that's following the project is familiar with the hospital where this is in use.  Please keep in mind the operational sensitivities, and keep this thread clear of any specifics.  I know.  I almost certainly didn't have to say it, but we need to be safe out there.

  Are you sure? yes | no

staticdet5 wrote 03/30/2015 at 14:09 point

OK, I've been really lax as of late, and I'm going to get better.  A big thanks to the folks that started following me.  You collective "push" is the boot I need in the rear to get my butt in gear.

The big obstacle in front of me is programming the PID controller for the heating system.  I currently have a kludge system that works, REALLY well.  But it works really well for this specific system in this specific environment (in the house, no real cooling impacts on the cooker).  I'm trying to decide if that's good enough, or to clean up the programming and put in a real PID software controller with an auto-tuner.

The next hurdle will be the web control system.  I haven't really done anything like this before.  I've pushed data out and made it web viewable every minute or so, but it wasn't elegant.

I'll work on getting code up as soon as I find the box that the sous vide controller is packed in.  I'll get some UGLY pictures up, and eventually get the current code online as well.

  Are you sure? yes | no

Similar Projects

Does this project spark your interest?

Become a member to follow this project and never miss any updates