Close
0%
0%

Drum Master

Electric drum set based on Teensy 3.1 and Audio Board

Similar projects worth following
In a previous life, I used to play the drums. Unfortunately, I grew up and Things got in the way, so I was unable to keep my acoustic set.

My solution (which started me out on my journey of embedded programming and electronic design) was the original Drum Master. Started in 2008 with an Arduino (for ADC readings) talking to a computer (for sound synthesis / playback), I got a result which worked reasonably well. However, it still had some problems: the two most critical issues being a difficulty in accurate velocity sensing and the fact that you needed a separate computer to actually play the sounds.

This Rev 2.0 version attempts to fix both issues, by applying techniques which I have learned in the past 7 years of electronics design.

The ADC part of the circuit now uses peak detection hardware to ensure a stable signal, and the sample playback is done via a Teensy 3.1 with Audio Board.

This project is mostly completed, with only minor tweaks still pending.

This project encompasses the analog electronics, microcontroller / software, and physical design / build of the actual drum set. The end result is accurate, customizable, portable, and ergonomic.

The pads are designed around mesh heads, for a quiet and realistic feel. The pads' piezo sensors are read into a max voltage hold circuit, and buffered / amplified by an op amp. The amplified signal goes through an analog multiplexer, which is then read by the Teensy ADC.

Once the value is read into the microcontroller, logic is applied based on the current state (hihat pedal, previous strikes, etc) and, if applicable, an audio sample is started. There can be 15 concurrent samples playing (when the teensy is overclocked to 120MHz). When all samples are already being played back and a new one is requested, we stop a currently playing sample to allow the new one to start. The sample to be stopped is chosen in such a way to minimize interruptions.

There is a simple menu system built around an encoder + button and a 20x4 character HD44780 display. This lets you pick a kit mapping, adjust volumes, calibrate pads, load new samples, etc.

drummaster_rev2.pdf

Schematic

Adobe Portable Document Format - 158.30 kB - 11/30/2016 at 15:42

Preview

View all 7 components

  • Troubleshooting (or, the problem is always where you last look)

    The Big One04/28/2016 at 14:38 0 comments

    A couple weeks back I started experiencing intermittent issues where my ride cymbal would play samples without me hitting it. It was first noticed in a small jam session in a church attic where I didn't have access to my scope and such, and was limited in the troubleshooting I could perform. I did the basic stuff, like unplugging the pad (to see if it was a problem with the piezo, the cable, etc). It appeared to be independent of the pad + cable, so when I got home I turned my attention to the main hardware.

    Hooking up my oscilloscope, I could clearly see that there was no signal occurring when the ghost hits were being triggered. I followed the signal path all the way down to the ADC, with no luck.

    Having thus confirmed that the problem was in the software, I started adding debug statements to the beginning of a play event. Bafflingly, I was not even seeing *those* print when the spurious sounds were triggered!

    I finally thought to look at the sample itself. Sure enough, the problem was there - of the 16 samples (all at different velocities) for my ride cymbal, a handful were somehow duplicated - they played the same thing twice, after a 12 second delay. Doh!

    Re-converting the samples after fixing my sox conversion script, and the ghost notes are gone. Yay!

  • µ-law working, but not recommended

    The Big One04/25/2016 at 15:19 0 comments

    So it turns out that, even though the ulaw encoding / decoding is working fine, it is not great for the drums - the encoding causes the noise floor to raise enough that you hear a 'hiss' or static-like sound when a sample is playing at very soft levels. Unfortunately, this happens a lot, especially for longer cymbal sounds like the ride cymbals.

    At this point I have removed all the ulaw encoded sounds, in favour of raw 16 bit PCM. With the new 128MB flash chip I have enough room for all the samples that I need (plus a bit of headroom), so it's working just fine.

  • Added u-law encoding support

    The Big One01/27/2016 at 18:03 0 comments

    In an effort to give myself even more room, I implemented u-law encoding support in the play_serialflash_raw audio objects. For those who had not heard of this encoding method before, u-law (or µ-law or mu-law, a.k.a. a version of G.711 standard) is an 8 bit telephony encoding scheme which relies on the fact that human hearing is logarithmic to reproduce better sounding audio with less space needed. The implementation is just a lookup table, so very little processor requirements. Theoretically it gives you about 14 bits of data in 8 bit space, which sounds wonderful. Wikipedia knows all if you are interested in more details.

    I found that in practice, this works very well for some sounds, and not well at all for others. In general, higher pitched sounds with low resonance tend to work well; I found that all of my cymbal samples could be encoded in u-law and I would be unable to differentiate between that and 16-bit PCM. However, drums (especially the lower drums, like the toms and bass) sound very bad.

    Given that my cymbals constitute the majority of the samples by size, though, this works out very well for me. After picking and choosing samples that work with the new encoding scheme, I was able to reduce my sample set from 120MB to 77MB. This will give me lots more room for other samples and more kits to choose from at run time!

  • Doubled the sample space

    The Big One01/07/2016 at 02:48 0 comments

    I just upgraded from my old Spansion S25FL512SAGMFI011 (64MB) flash chip to the Micron N25Q00AA13GSF40G (128MB) flash chip. This lets me hold twice as much sample data. 64MB is pretty close, but I found that when you have multiple kits defined, and when wanting to have access to different sounding cymbals (all at different velocities), that having more space gives you more options.

    Performance wise, the new chip is much slower to erase / upload samples (erasing alone takes almost 10 minutes), but when you are reading from it, things are just as fast as with the Spansion (which is what matters - erasing will happen only once in a while).

    If you are following along, please note that the pinout is slightly different than the Spansion. In particular, the Spansion has internal pullups on W# and HOLD#, whereas the Micron does not. You need to pull these pins high for it to work. Also, the Spansion had a second voltage supply (VIO) on pin 14, whereas the Micron's pin 14 is DNU (Do Not Use). On my board, I just used some jumpers to connect VCC and W# / Hold#, and bent pin 14 up so that it was not connected. Yeah, it's a hack, but it works.

    Now that I have the extra space, I need to go through my samples again and pick out ones to fill it up! ;-)

    Cheers

  • Total Cost and Relative Performance

    The Big One12/31/2015 at 15:46 0 comments

    Someone had asked me about the total cost, and how it compares with commercial units. Since the question requires an in-depth reply, and since I tend to write novels for responses, I figured I would share with HaD community.

    Total investment is hard to say... the electronics cost is quite small ($35 for the Teensy 3.1 microcontroller + Audio board, $25 for my custom designed PCB, maybe another $60 for the rest of the components and RCA connectors / cables (the connectors / cables are from eBay, the components from Digikey).

    The frame is where things get fuzzy - I bought the frame years ago from a local classified ad for $50, but trying to find all the same stuff new would cost much more. Likewise, I already had the two bass pedals (one for bass beater, one for hihat pedal) from my previous sets. There are some alternatives to the frame, of course; I found that electrical conduit can work very well for it, although it is heavier than the aluminum that I am using now. Still not sure what I would use for joints / connectors for the drum pads in that case... and the commercial drum clamps are expensive (around $30 each these days). I had some from years ago, and connected some of the pads directly to the frame (the two top cymbals and the bass pad are done like this) so I didn't need to buy any more.

    The pads are quite straightforward - I used cedar fence slats, planed down and butt-jointed together, as the material for the rims. Plywood probably would have been better. A single 4x8' piece should be sufficient if I remember correctly; budget about $40 - $50 for this (you would want to use higher quality plywood, I assume).

    The drum heads were cheap - $5 each for Pearl Muffle Heads, obtained pretty much anywhere. I bought mine locally (and already had a bunch from before, so only needed to get a couple more this time), but you can find them online for the same price.

    Then there are the misc. screws and fasteners, which I had in my inventory already from previous projects, but which would have cost around $20 - $30 if purchased separately. Then of course there is the cost of tools if you don't already have those (both for the electronics and the woodworking side of things).

    So in summary, for me, my total investment in this project (i.e. the Drum Master 2.0 revision) was around $100 - $150... but there was a lot of other sunk costs from my previous projects that I leveraged, which is not counted here. I really can't say how much it would cost for someone starting from scratch, but I doubt that it would be much cheaper than an entry level kit. I build things because I love to create; for the most part my creations cost more than they would have if I just bought an equivalent, but then I would not have the experience and knowledge.

    As for how it compares... I would say that it compares quite favourably with sub-$1000 kits. My kit is easily extensible (it has connectors for up to 11 pads, plus one hihat pedal and three cymbal mute switches). You can pick your own samples (this can be a pro or a con depending on your point of view, but most cheaper sets that I have seen don't let you do this). The sensitivity and consistency is quite good, with a dynamic range from soft ghost snare hits all the way up to really banging on it. The pad sensitivity calibration is done via software (I use software-controlled potentiometer chips to adjust the amplification levels, so it is easy to calibrate different pads). I do not have positional sensing; i.e. I don't play different samples for center vs. edge on drums, or bow vs. bell on cymbals. My hihat pedal senses position, and I can play different samples for different positions plus the 'chic' sound when closing. I had support for foot splashes, but got rid of it because I didn't like how it was working (and I don't really use it in songs). I am not really familiar enough with current sets to say much more than that... my previous commercial set was an old Yamaha from about 10 years ago, and this one is...

    Read more »

  • Change to Sample Uploads

    The Big One12/28/2015 at 06:00 8 comments

    Since I started, I had based my sample uploads on @Paul Stoffregen's sample code, where he copies files to the SPI Flash memory from an SD card. This works fine, but it was annoying that I needed to keep removing the card from the Teensy board, putting it in the computer (via an adaptor), copy files onto it, unount + remove it, and then put it back in the Teensy. I was worried that I would damage either the SD card or the socket. Furthermore, it meant that I needed to keep the cover off, since I needed access to the guts.

    I finally got sick of it, and spent most of yesterday writing a serial based sample uploader.

    I have a simple Python command line client that lets you select the files to upload (bash globs work). There is a menu option on Drum Master which puts it into serial listening mode, either with or without first formatting the flash. Formatting is slow, but works best when uploading many samples, since deleting from flash doesn't actually recover the space; however, if you are only upload MAPPINGS.TXT (the file which defines kits and maps samples onto them), you can quickly do so without formatting.

    As an extra bonus, I copy the files directly onto flash from the serial port, so I don't need to use an SD card at all.

    The protocol is very simple, with a start byte, a field end byte, and an escape byte. There are three fields which need to be sent: the filename (A-Z,0-9, period, underscore), the size (32 bit integer, MSB first), and the actual binary data (with any start bytes escaped).

    The Teensy serial port runs at full USB speed of 12 Mb/s, which with overhead and processing time gives me a real world 250KB/s throughput. This means that uploading the entire 64MB takes about 4 minutes. There is another 2 minutes spent in formatting the card, for 6 minutes in total. While this is a bit longer than it took to copy files to the SD card, this process requires no user intervention once started, so I don't need to babysit it. Also, uploading only the MAPPINGS.TXT file can be done in seconds, whereas it would take almost as long as uploading an entire set of samples in the previous method.

    (Also, as an update to my previous log entry: I ended up discarding the 5v linear regulator hack, and just got a real 5V wall wart - now there are no brownouts, and the regulators on board are staying nice and cool.)

    Cheers

  • Some new videos

    The Big One12/25/2015 at 05:32 0 comments

    Below are two new videos I shot today. One shows the entire kit, the other shows the new hihat samples. The new hihat samples have more variation between closed and open states (9 levels vs 5), and the open samples are not artificially cut short.

    At this point I am pretty much finished... There are some bugs in the menu system that I need to work on, but the playback seems to be working fairly well. As I actually play there will doubtless be some tweaks, but so far so good.

    Cheers

  • Fixed Power Supply Issues

    The Big One12/24/2015 at 08:06 4 comments

    So I was noticing that the board would brown out and reset occasionally; usually when writing to the SPI flash chip. I could bypass the problem by plugging into USB, so I didn't bother looking into it too much until now.

    I was confused because the regulator I was using was rated for 250mA, but I was pulling much less than that. I seem to average 100mA when playing the drums, and 140mA when copying files from SD card to SPI Flash. Obviously the extra current used when copying was the problem, but how to best fix it?

    It turns out that simple physics is the answer. My wall wart is 12v; I was stepping this down to 3.3v. This is 9v, times 150mA worst case scenario, which is about 1.3W dissipated in a SOT-23 package. Yeah, that's not going to happen for long. (Honestly, what I am surprised about is that the 100mA constant current draw allowed things to run at all; that is still just under 1 watt, which is more than I should be able to get from the SOT-23. I guess having a nice large ground plane as a heat sink without using the thermal relief pattern on the pins helps keep things cool.

    The correct solution would be to get a 5v wall wart, but I am lazy and cheap, so instead I just threw another larger regulator with a heat sink onto the power lines before they go into the board. This steps the 12v down to 5v, which is further stepped down to 3.3v with the SOT-23. I can now load samples all day long without any issues.

  • HiHat Demo

    The Big One12/19/2015 at 05:09 2 comments

    I have the preliminary software working for the hihat. Things are reasonably good, although there are still a few bugs / annoyances. I realize that it will never be as expressive as an acoustic hihat, but I can still try :-)

    The pedal uses 6 IR photo transistors to sense the position of the hihat pedal. In practice this hardware can differentiate between about 4 or 5 different states (Tightly closed, closed, loose, half open, open). If you were to add more transistors and change the orientation of where they are located you could get more positional accuracy; 5 is plenty for my needs currently (finding hihat samples with that many different variations would be difficult at best, and even if I could find them would probably take up most of the space on the memory chip).

    On that note... does anyone know of a good free source of HiHat samples? I need samples recorded at different velocities and at different pedal positions. I have found a couple of very nice sets on freesound.org (both by quartertone; one of these is the one playing in this video); however the longer sounds are cut off / looped for use with a sequencer. Unfortunately looped cymbals just don't sound right to me. I would prefer to have a set that lets the open cymbals taper off over time naturally; or at least for longer than about 4 seconds, which is what these samples do.

    Anyway, without further ado, here is the demo video of the hihat, after one day's worth of software.

    If you have any thoughts, suggestions, or (best of all) sources of high quality hi hat samples, I would love to hear it!

    Cheers

  • HiHat Pedal Hardware Working

    The Big One12/18/2015 at 06:25 0 comments

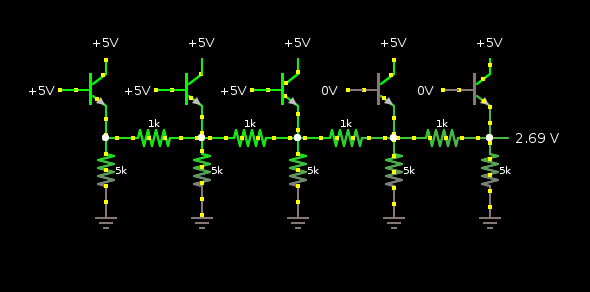
    Tonight I finished the hardware for the HiHat pedal. The enclosure is a narrow wooden box with one side missing, which is attached to a base that a bass drum pedal can mount to. Instead of a beater there is a baffle attached to the drum pedal, which moves down. As it moves it blocks the light from reaching a series of IR phototransistors.

    The transistors are arranged something like this (instead of the voltage on the base of the transistors, it is the light from the IR diodes across from each one). So, in this diagram, the baffle is partway down and blocking the first two lights. The output is attached where the 2.69V measurement is read in the simulation.

    There is a separate photo transistor which senses when the pedal is completely closed. This will be used as the 'tightly closed' switch. (Technically I could have done it all with a single input... I used separate ones for the analog and digital portions because I was following the implementation of my Drum Master 1.0 set, and I figured I would just use the same design here since it was verified to work. After the board was made and I started work on the hihat pedal I realized that having two channels was somewhat redundant. Oh well, no harm done, I still have two unused inputs that I have not even bothered to make pads for... the 9 pads I have already are more than enough for now.)

    Pictures of the actual enclosure will be forthcoming in a later log entry.

    Next step is to write the software which interprets the input from the pedal.

    Cheers

    Edit: It seems there is only one problem with this pedal: The 6 IR LEDs (each with a 200 ohm resistor in series with them) seem to bump my total power consumption just a bit higher than my 3.3v 250mA regulator can reliably source, and I am getting intermittent brownouts. No big deal, I just changed the LEDs to run off of the 5v supply (which is only running the display and thus has plenty of current to spare). Oh well... live and learn. Next time I will use a beefier regulator if I am unsure of the current consumption.

View all 31 project logs

Enjoy this project?

Share

Discussions

Mat13 wrote 10/28/2018 at 15:23 point

Excellent work! and nice report log :-) I have shivered along with you while reading your degguging and troubleshooting experiences...

Could you please update the component list with what SPI flash chip you used, please?

/(From testing, playing from the SD card allows for about 2 sample polyphony, whereas the SPI chip is around 12+)/

Your experiments on polyphony are very useful, thanks!

  Are you sure? yes | no

[deleted]

[this comment has been deleted]

The Big One wrote 12/12/2015 at 04:00 point

Thanks!

  Are you sure? yes | no

Craig Hissett wrote 11/24/2015 at 11:37 point

I'm loving watching this project come together!

I really want an electric kit and have always contemplated making some pads in the past, but the lack of standalone controller has always put me off. Cracking work mate!

  Are you sure? yes | no

The Big One wrote 11/24/2015 at 16:01 point

Thank you!

  Are you sure? yes | no

Craig Hissett wrote 11/24/2015 at 17:35 point

no, thank YOU!! :)

  Are you sure? yes | no

Bharbour wrote 11/08/2015 at 21:50 point

Cool Project! I think that the answer to your question about the Schottky Diodes is that Schotky Diodes have very high reverse leakage. I was looking at some a couple of weeks ago to protect a board against reversing the power supply, and the ones I looked at were showing 10milliAmps or more of reverse leakage. Similarly sized conventional diodes were showing microAmps of reverse leakage.

  Are you sure? yes | no

The Big One wrote 11/08/2015 at 22:31 point

Thanks for the tip!  That does appear to be another major difference between the good and bad diodes, which I had not thought to compare.  The good diodes have reverse current in the neighborhood of 2uA, whereas the bad diodes have reverse current around 50x higher, around 100uA (at the approximate temperature and reverse voltage levels).  That would definitely have an impact on the circuit.

I am planning on buying (at least) 2 types of diodes for the new board; one will be BAT48, so still schottkey diodes, but with the leakage of about 2uA.  The other will be a generic non-schottkey diode, which has an even lower leakage in the nA range (25nA at 20V).

Cheers

  Are you sure? yes | no

Michael Vowles wrote 09/16/2015 at 04:02 point

This is awesome! fellow drummer here. Currently using a yamaha dtx kit. Those custom hoops look great!

  Are you sure? yes | no

The Big One wrote 09/16/2015 at 16:27 point

Thanks!  Now to just get the PCBs here so I can finish the thing!  ;-P

  Are you sure? yes | no

AVR wrote 08/21/2015 at 05:57 point

Just found this project, keep up the great work, I may want to borrow some of your ideas in the future !

  Are you sure? yes | no

The Big One wrote 08/21/2015 at 14:46 point

Thanks!  It's coming along nicely so far :-)

  Are you sure? yes | no

Steve Shaffer wrote 07/28/2015 at 12:38 point

What sensors are you using to detect the drum strikes?

  Are you sure? yes | no

The Big One wrote 07/28/2015 at 16:00 point

Just normal piezo elements.  You can see my web site for a discussion on how the old system worked; I will (sometime) be putting up details on the new system (from a high level: the old system relied solely on RC filters, whereas the new one has peak detection circuitry which will hold the highest value stable until the MCU can sample it and reset the peak).

  Are you sure? yes | no

Does this project spark your interest?

Become a member to follow this project and never miss any updates