-
1Step 1
Build Preamble:
Apologies but, don't sue me. Seriously, Don't Sue Me. Any hazard you create is on you. I in no way take responsibility for what you do.
That said I have filed for patents for this. I don't care if you use this idea non commercially. Weld/machine one up. If you are making these to sell for profit to other people you are not being awesome. I probably won't catch you or sue you but not right. Please credit me if you do build one. If you want to work on this or collaborate on this please contact me.
This is a basic build. The instructions here are general since hackaday doesn't really have a good way to put up all of the solidworks/prints/specifications. There should be enough here that if you are a competent builder/diyer/fabricator you can get this made. Your build will likely be specific to your bike.
Lets Get Started :)
-
2Step 2
Tools and Materials
I used a mig welder to make basic prototypes
Abrasion cut off metal power saw (a cold saw would have been less messy)
Angle grinders galore which is also a good substitute for the cut off saw
Multiple attachments for previous
If you have the ability to machine parts you pretty much don't need any of the parts (other than tubing) as you can just make them instead of buying
I used sections of steel tubing from crashed bicycles that a local non profit bicycle collective I am friendly with had.
I bought clevises from mcmaster http://www.mcmaster.com/#rod-ends/=ygiz8v
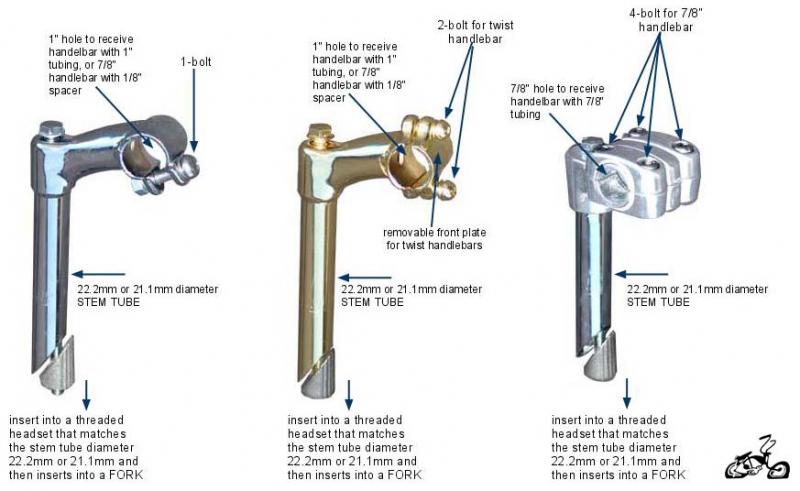
I used bicycle stem
![]()
and a piece of solid stock for seat tube connection and cross beamI used 2 sections of 1/8 inch flat 1" stock for my crank extension. Length will be dependent on your bottom bracket height and how much extension you want.
I used bmx bar extensions. These may be referred to alternatively as bar ends. They go by alot of names. I just made sure mine were steel so I could weld up.
-
3Step 3
Special Note:
Use resources like Sutherlands and UCI http://www.uci.ch/
Or good old Sheldon Brown
Bikes have lots of weird specifications. There are alot of bicycles and not so many good resources for standards
-
4Step 4
Tubing and Connections
I cut my tubes based on the four bar ratio I wanted (will edit to put numbers here later)
I welded the clevises (see tools and materials) male and female ends on and ran appropriate sized bolt and nut. Washers optional.
For the tube running parallel to the ground I welded a solid stock rod to extend towards the bike where tension spring will sit centered in middle of underside of foot platform.
-
5Step 5
Crank Extension
Probably the trickiest element of this build.
Crank face geometry is silly variable for aesthetic reasons. You may have to go for much thicker flat stock depending on your 3 piece crank (will not discuss 1 piece cranks here, if you want thoughts on that message me).
You can drill two holes if you you have a flat crank arm face. Bolt through pedal threaded hole (9/16 is the bicycle threading spec 20 tpi). Or you can use slightly undersized bolts. For second hole drill for amount of crank extension you want. Long is your friend here for the bolts. A bushing and tube to allow this front linkage to spin are needed. Run your bolt through the tube Washer at end of tube to create surface to tension bolt is needed. if your flat stock is spinning on face of crank you can use a U bolt and weld a piece of flat stock perpendicular to your parallel to crank flat stock and drill to holes then securing. This will reduce degree of freedom.
-
6Step 6
Foot Platforms
I happened to be able to salvage and cut down some platforms I had
you really just need a stiff surface that you can mount to the bottom
a front lip as a safety feature is very standard in industry but not required
You could cut down a rectangle of plate or just grind off corners then weld to tension spring.
I used skateboard grip tape (looks like black sandpaper you can buy at skate shops) to make the surface have adequate trackion
-
7Step 7
Handlebar Extension
As I mentioned in tools and materials I used handlebar extensions from bmx bikes that were steel and welded square tube stock to them then attached. I got some ergonomic bicycle handgrips sprayed inside with hairspray then slid on tops of tubes.
-
8Step 8
Mounting
Really look at my build. I can also post a labelled view. Maybe an exploded view. My current builds run fancy as I am slowly moving towards part optimization and part number reduction for mass production.
Hope you enjoyed. Ask if you have questions :D
 Joseph Prosnitz
Discussions
Become a Hackaday.io Member
Create an account to leave a comment. Already have an account? Log In.