Mar Bartolome
-
Honey, I shrunk the Watchduino
10/20/2015 at 21:41 • 4 commentsLast weekend we attended a hardware hackathon organised by PCH in London. The theme of the hackathon was “Take your prototype to the next stage in 54 hours”, so in our case we brought our Watchduino prototype and focused on trying to make it closer to how it would look if it were a commercial product.
The best part is that at the hackathon there was a set of mentors, people who are experts in different areas of IoT, which were giving us useful advice about our product direction, design optimizations or the ins and outs of manufacturing.
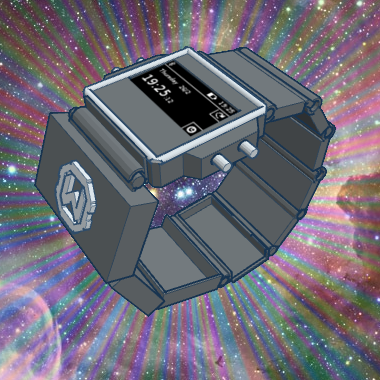
By the end of the hackathon, we had a functional (at least theorethically) design for Watchduino that looks this awesome:
![]()
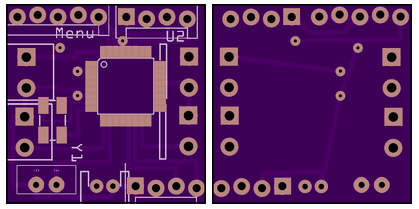
The first step to getting a hardware product into manufacturing is integrating all the electronics into a PCB. This not only makes the system easier to put together, it’s also smaller, and likely to be more energetically efficient.
So we designed a PCB that would mainly replace the Arduino Mini, breaking out the pins of the ATMega processor and leaving space to surface mount the rest of the components. To completely replace the Arduino board, a 8Mhz crystal oscillator needs to be added on top of our current components, as well as breaking out the RX and TX pins for reprogrammation. It’s pretty similar to the process we were following in our first Watchduino.
The board was designed with Fritzing, which we were already using for our schematic. We were recommended Eagle, which appears to be the industry standard software, and has a bigger component library and tons of support online. But Fritzing is simpler and open source, so it suited our purposes for the time being. You can find the file on the Github repo. In the future we would like to try out Eagle though.
By sacrificing the buzzer (which is not really very useful having the vibrator motor) and the USB charching module (to be replaced by a custom connector, as commercial smartwatches usually have) we were able to make our PCB exactly 1 square inch in area. Pretty sweet!
![]()
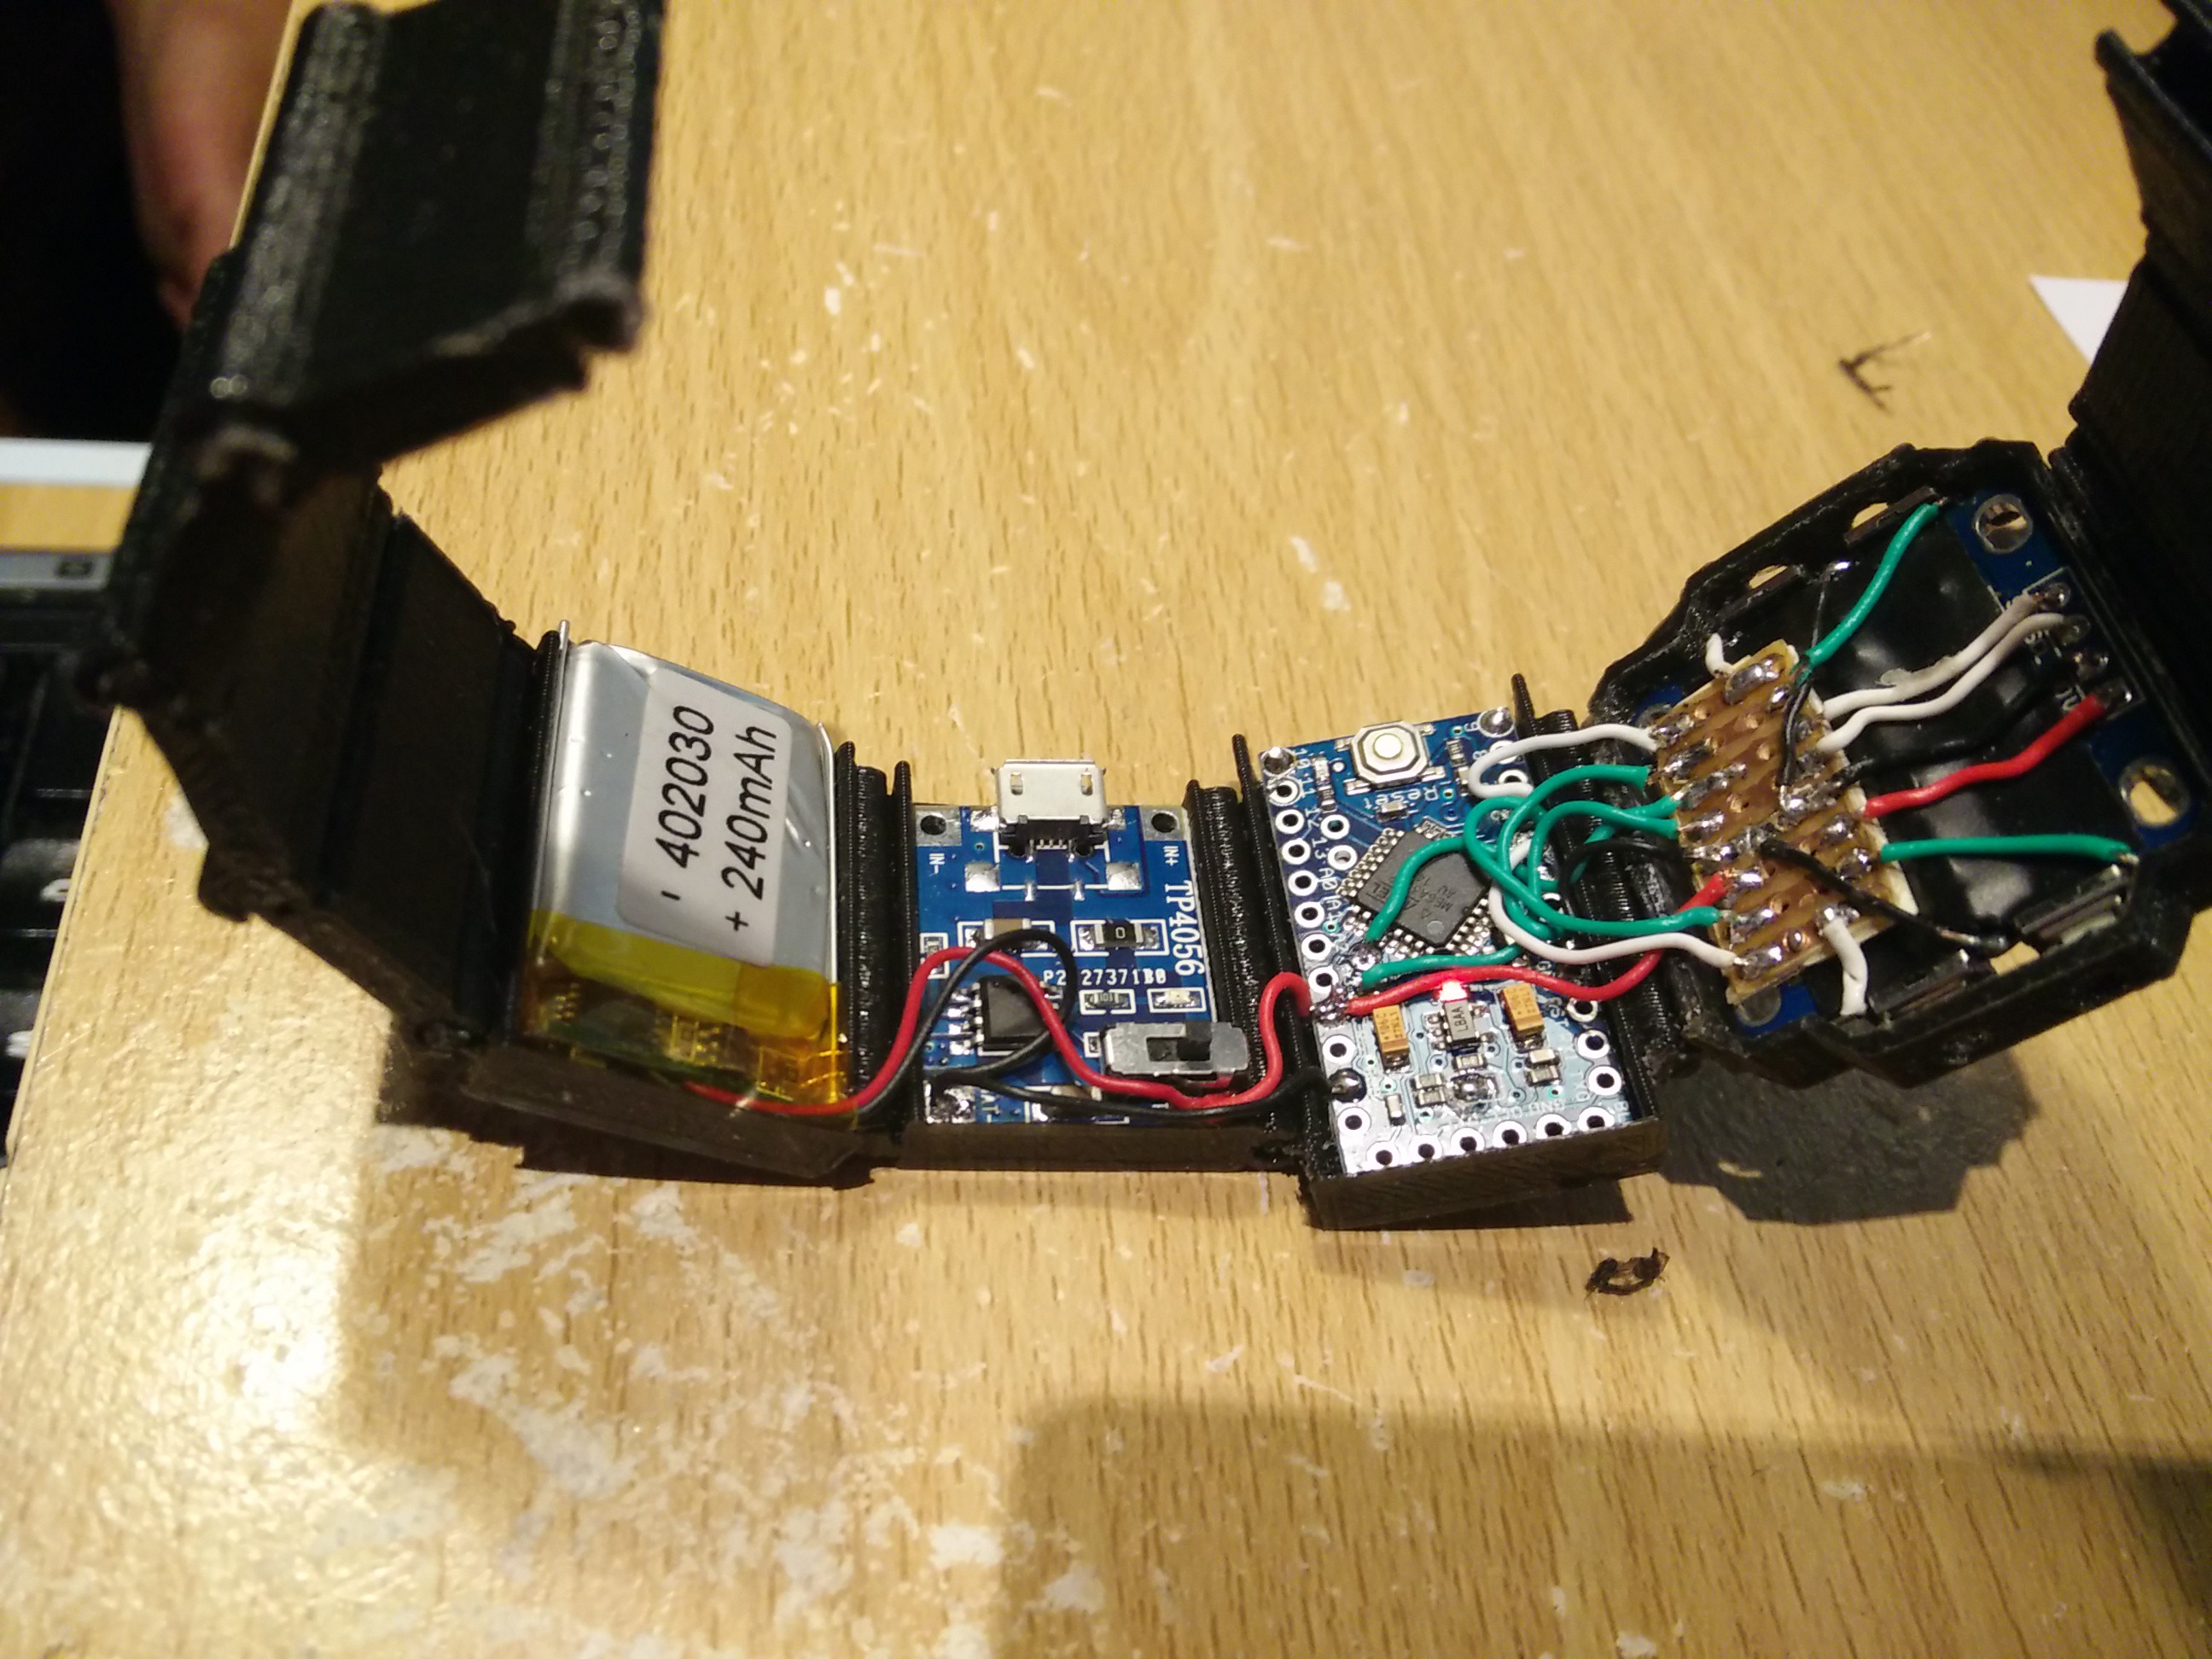
Being able to mount all the electronics in this small area mean there’s no longer the need to spread them across the strap as they were before. The whole design is completely compact, and small enough to fit in it’s entirety into a watch head; battery and everything.
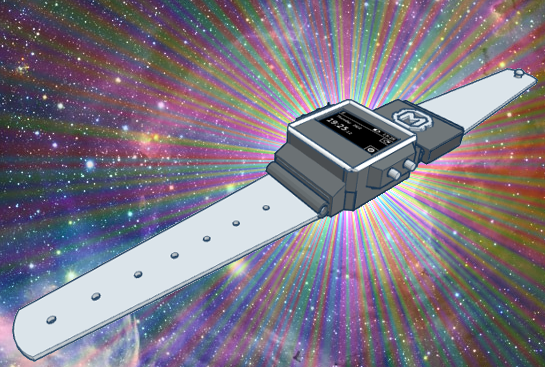
In consequence, we redesigned our 3D case into a simpler shape, looking now very much like a conventional watch!
![]()
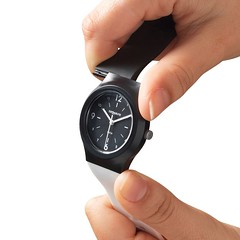
We are cheating a little bit, because we are reusing an existing strap from a Geonaute watch. These watches are sold at Decathlon stores, and just happen to have a so handy sliding mechanism for interchangeable straps.
![]()
So we designed our new 3D case with the same shape, and made it compatible with the Geonatue straps. Once we figure out how to print with flexible filament we’ll replicate the strap with the same connector.
There’s just one thing missing: our sexy new prototype can’t be functional until the PCB is printed (the image on the top I’m afraid is a dramatization with a screenshot pasted on it). Printing PCBs can be done manually, but it’s handier, better, and often cheaper to just get a manufacturer to do the job.
When you design a PCB, either with Fritzing, Eagle, or other software, you can export the result as Gerber files, which contain all the different layers of your design. You can provide any PCB manufacturer with this format, and they’ll be able to fabricate a production-quality version of your board.
So we’ve done just that: we ordered a 3-board batch of PCBs to OSH Park, for the outrageous price of just £1 each. We can’t wait for them to arrive and see if we can get our first mini production-run of Watchduinos!
-
Adventures in Bluetooth development
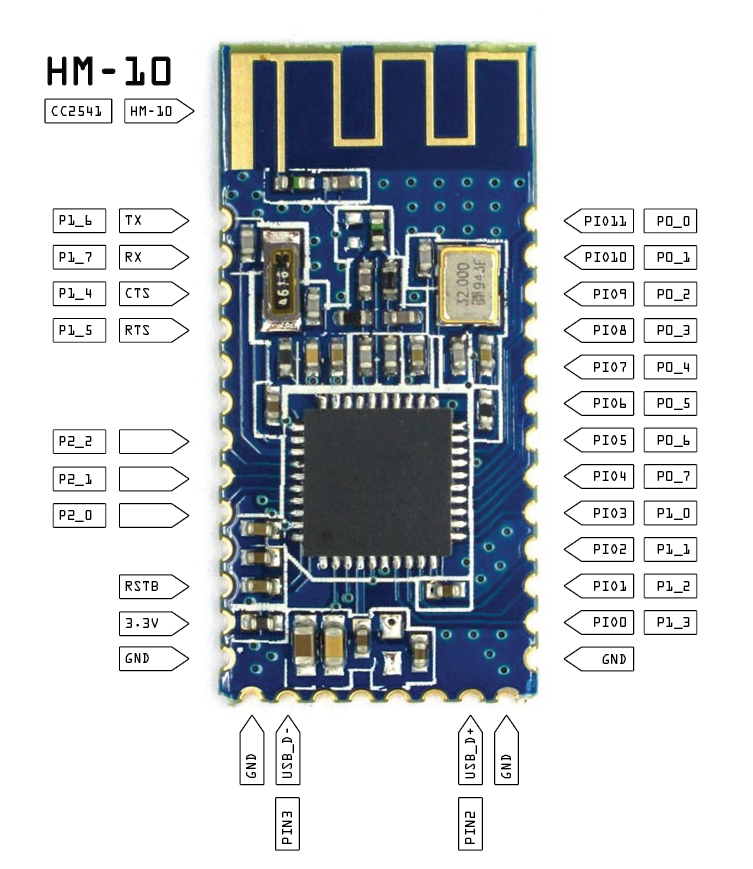
10/02/2015 at 22:07 • 0 commentsDuring the last week, we've done some researching around different Bluetooth options for Watchduino 2, with aims giving an extra kick to the battery life. As you know, the current build of Watchduino 2 has a battery life of around 48 hours; the path to improve that even further goes through optimizing our Bluetooth usage.The Bluetooth modules that are commonly used in hobby electronics projects (the HM-10, CC2540 or nRF8001) are essentially a radio plus a little controller microprocessor, exposing even some GPIO pins on a breakout board. The microprocessor usually allows you to finely tune certain parameters, such as the strength of the signal, intervals for data exchange, or activating and deactivating certain capabilities of the circuit. This would be a smart way to achieve some extra power efficiency.![]() Not all is rainbows and sunshines for Watchduino though. As you aware, we are using the HM-10 module for Watchduino 2. This module is manufactured by Jinan Huamao, a not-too-fancy chinese company. We picked it originally because of how cheap it is (you can easily find them for less than 5 USD on Aliexpress), and our priority at the time was optimizing on cost...
Not all is rainbows and sunshines for Watchduino though. As you aware, we are using the HM-10 module for Watchduino 2. This module is manufactured by Jinan Huamao, a not-too-fancy chinese company. We picked it originally because of how cheap it is (you can easily find them for less than 5 USD on Aliexpress), and our priority at the time was optimizing on cost...
... But cheap comes at a prize. Now that we find ourselves wanting to fine tune the module, we find a stumbling block in the module's sloppy interface, and obscure documentation. All that we have to work with is a PDF document (that has obviously been the product of an automated translation) describing AT commands to interface with the module's processor. Just look at a particularly... brilliant? extract from the document, and judge yourself:7.1 Send "I am iron man, I am iron man, I am iron man, I am iron....." string. Yes, that is a joke, in sleep mode, you can send a long string (Length > 80 or more), that string can made module wake up, and you will receive "OK+WAKE" string through UART.
There are some alternative open source firmware projects for HM-10 that might be more helpful, but don't seem to be mature enough. So we are considering trying with a different Bluetooth module as an alternative, one that is less obscure and better documented.
This alternative is also not hassle free. The problem with Bluetooth modules is that each of them comes with it's own firmware, and it's own particular set of options and AT commands to interface with it. So if you write any code targeted at interacting with the Bluetooth module, it needs to be customized for the particular module that you are using. You cannot simply swap hardware keeping your code intact, which is not great for testing the different options.
It's also not great when you go and try to find guidance in the source code of other projects using Bluetooth with Arduino: each of them deals with Bluetooth differently depending on the module used; and often to understand it you need to study the specific module's documentation first.
We are quite frustrated about this, because it's a problem that the Arduino community has definitely solved with screens. Screens are a similar case: each of them is particular, has different characteristics, and has it's own way of interacting with it. But as with Bluetooth, they talk to Arduino via a serial interface, and "sort of" they function in the same way, despite their differences (it's all about switching pixels on an off, no matter the size of your screen). It would be a nightmare to program them if it were not for the amazing u8glib library, that abstracts away the nitty gritty details of each particular screen, and lets you interact with a broad set of them using a common high level interface.
Surely it must be possible to construct something similar for Bluetooth modules: their differences are smaller than their similarities, and can ceirtanly be abstracted into a higher level interface. Anyone looking for a challenge to work into? -
HaD prize semifinals showcase video
09/20/2015 at 13:03 • 0 commentsJust in time for the HaD prize semifinals deadline, we've put together a neat video showcasing all of the current features and future plans of Watchduino 2. Sit back, and enjoy!
Want to build your own Watchduino 2 after watching this? You can find the complete build instructions here.
-
Improving battery life
09/19/2015 at 19:20 • 0 commentsAs you probably know, one of the reasons that drove us to build Watchduino in the first place was the prospect of creating a smartwatch that you wouldn’t need to think about recharging. We achieved this with the first Watchduino, using techniques like sleeping the processor, and getting rid of any component that we didn't need from the Arduino (such as LEDs). We upped the battery life from days to months, and we expect we can achieve the same with Watchduino 2.
This is what we've tried so far to achieve our goal.
Sleeping the Arduino
In the original Watchduino we were using a library called Jeelib. This library features a handy module called Sleepy, which you can use to *completely* sleep the ATMega processor in the Arduino, driving it's power consumption to almost zero. The only thing that it'll wake it up is a magical kiss... well, ok, not really. It's a hardware interruption. You can trigger one by setting a timer with the library, or activating pins number 2 o 3 in the Arduino.
In our case we are waking up the Watchduino when pressing the menu button (hooked up to pin 2), when we receive a Bluetooth notification from the phone, or when a timer triggers every 60 seconds.
But why wake every 60 seconds? Well, if we wake just for a fragment of a second it's not going to be such a loss in power consumption: we are still asleep 99% of the time. But by waking up every 60 seconds we can update the time on the screen every minute, and it'll appear that the Arduino has never gone to sleep. We can show the accurate time on the screen 100% of the time, so you won't need to actually wake the processor for a few seconds with the button interruption simply to look at the time.
OLED Screen
So does this mean the screen is on all the time? Correct. You may think that this is not the smartest move energetically, but let me surprise you.
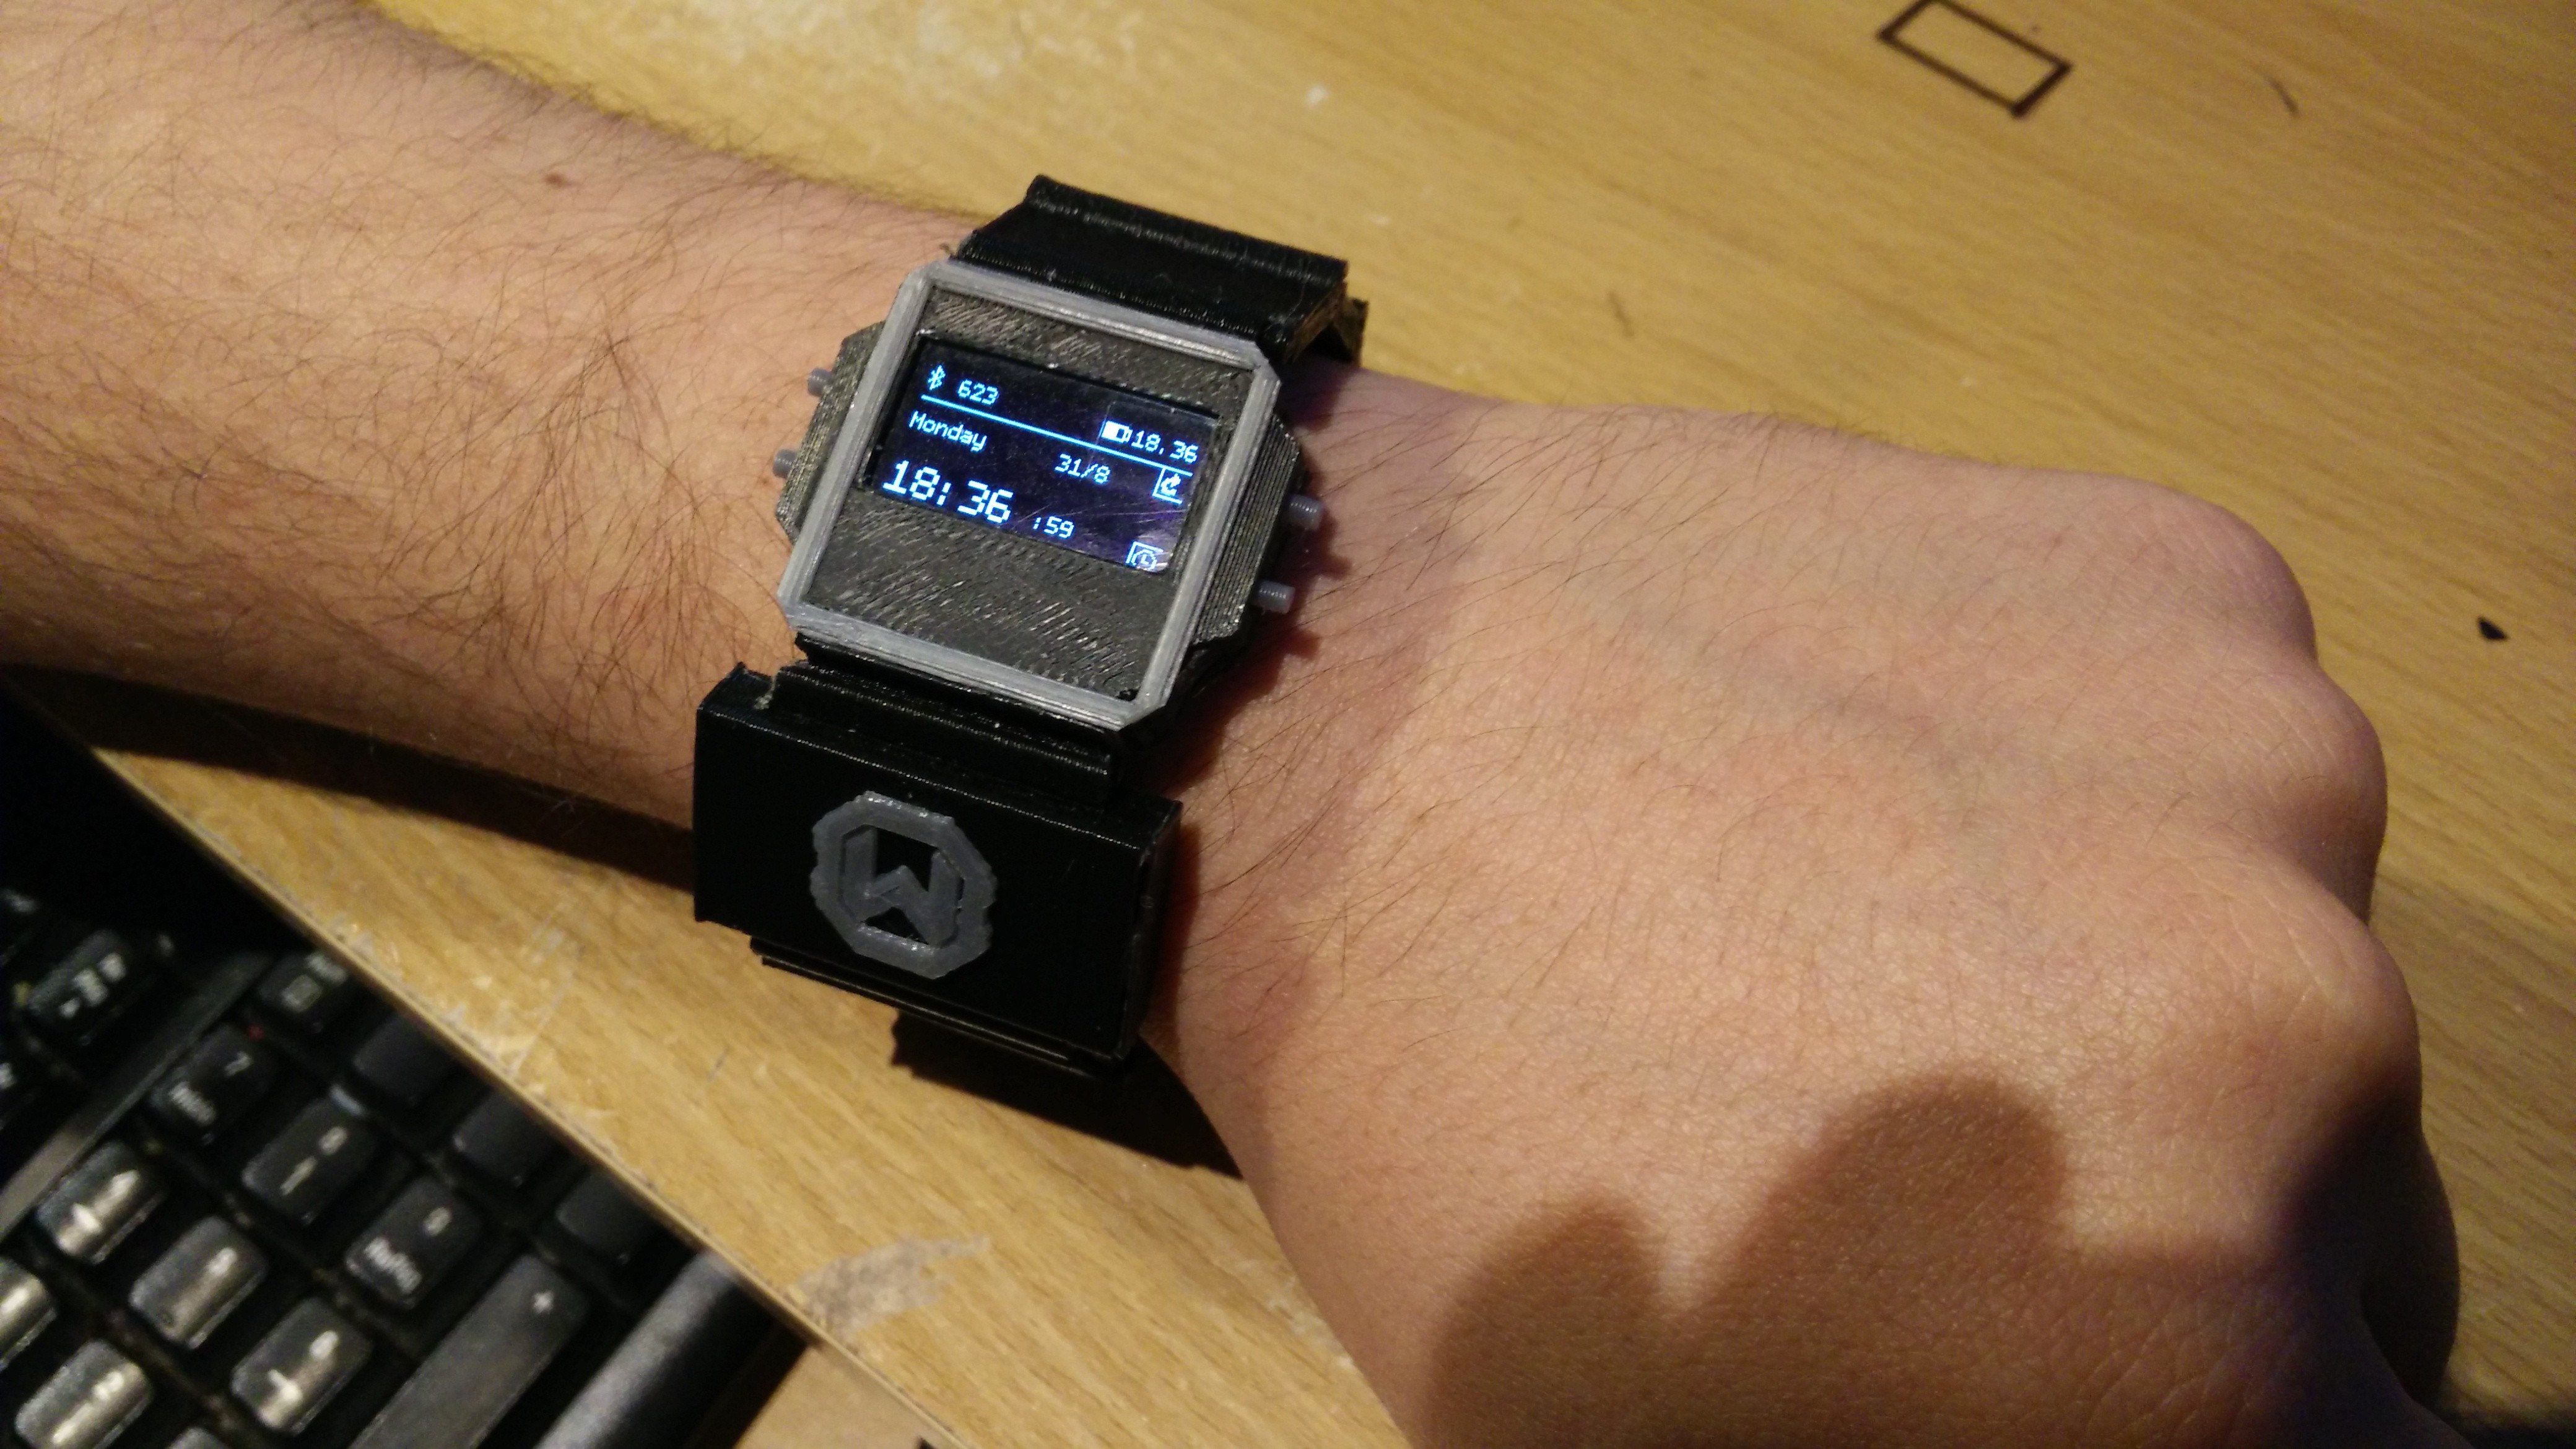
OLED screens are made out of LEDs. LEDs will only drain power when they are on. This is why when your screen is black, it will waste no energy at all. But what about if we make it almost black?
![]()
Everytime we send the Arduino to sleep, just before it closes it's metaphorical little eyes, we instruct it to turn off all of the LEDs in the screen, save for a little area in the middle of the screen, where we shall show the current time, hours and minutes, with no seconds. The Arduino will turn on those LEDs before going to sleep, so they will stay activated after it does. After a minute, the Arduino will wake up, update the time, and go to sleep again.
The consumption of the screen while on this sleeping cycle is minimal, and the benefit of having an "always-on" device is huge.
Sleeping the Bluetooth moduleThe two optimizations above we are already applying. However, our biggest woe at the moment is the Bluetooth module. Despite being "low energy", it's certainly our most energy-hungry component, consuming up to 10mA when it's operating.
However, according to the specs, the HM-10 module that we are using can be optimized to consume between 0.4 to 1.5mA. If we managed to do this, the battery in Watchduino could last for weeks on a single charge.
Our purpose is to be able to integrate the Bluetooth module into the watch sleep cycle, reducing it's consumption when it's not being used. One of our initial experiments involved physically switching off the Bluetooth module with a transistor during the sleep cycle. This had a bunch of problems though. The phone could no longer detect it when it needed to send notifications, so these could not be made in real time.
We have now discovered that the HM-10 specification allows you to activate a sleep mode using the AT+SLEEP UART command, where the Bluetooth device will reduce it's activity somehow, but still remain visible for the phone. So any notifications will reach the Bluetooth module as normal, and wake up the watch. While on this sleep mode, the consumption of the Bluetooth module is close to 1.5mA, as promised by the spec.
A problem that we still need to solve is that after the Bluetooth goes to sleep, the communications from the watch to the phone will need a re-pairing of the two. We are confident that we'll find a workaround for this.
Overall consumption, and battery lifeDuring the sleep cycle, the overall consumption for Watchduino 2 is 2mA. If no manual interruptions are triggered, the timer interruptions will wake up just the Arduino (not the other components) during less that a second. This means about 98% of the time being sleep time.
Considering that we are using a 240mAh battery, this gives us a theoretical battery life of 5 days (240mAh/2mA = 120h). This would of course be reduced if we manually wake up the Watchduino, but we are considering the maximum possible value physically.
Unfortunately, in our prototype the maximum battery life we have achieved has been roughly 48 hours under these ideal circumstances. Which is not terrible, but a bit disappointing given our calculations. We believe that the quality of the batteries we are using (the cheapest ones you can buy off China) might have a lot to say here, so for next experiments we will stock ourselves with different batteries of different prices, and check if they make any difference.
One tool that comes very handy for monitoring the battery life of our prototypes is the battery graphing that we've implemented in the companion app. When active, Arduino will, every 5 minutes, get the voltage that the battery is providing, and send it to the phone via Bluetooth. The phone will then use that data to make graphs like this one:
![]()
Another option to extend the battery life to double what we have now would simply be add a second battery as an additional smart link on the strap. Even if this is an option, we would still like to optimize the last drop of power from those 240mAh that we have from a single battery. Those 5 days of battery life (or at least something closer to them) are definitely within our reach, and beyond that, we are still hoping we will find further ways to optimize to extend it even more!
-
Artist renditions
09/18/2015 at 22:15 • 0 commentsToday we bring you some awesome renditions of our current designs for the WatcDuino casing.
This one should look familiar:
![]()
It's the same design that we've already 3D printed and assembled, featuring a Smart Strap with detachable links. You can see a bunch of photos of the Real Life version in the gallery. You can also find a 3D printer-friendly version of the design on Tinkercad.
This is another prototype that we want to 3D print and experiment with:
![]()
This version has the Arduino inside the main watch head, leaving only the battery as a Smart Strap link. The rest of the strap is meant to be flexible. We hope to be printing this design out in the following weeks, once we adapt our 3D printer for flexible filament. You can download the 3D design on Tinkercad and beat us to it though!
-
Complete build instructions for WatchDuino 2
09/13/2015 at 17:18 • 0 commentsYou may have noticed that we've added a build instructions section to the Hackaday project page just some moments ago. During the past days we've been posting bits and pieces like the schematics for the electronics, the 3D design for the case, a shopping list for the components, and just today, the release of the code for the Android companion app. With this, he puzzle is now complete with all the pieces that you need to replicate WatchDuino 2.
To make it as easy and smooth as possible, we've put together a lovely tutorial detailing the steps that will get you to a working WatchDuino on your wrist. You can find it on the Github repo, and we've also linked it from the build instructions here in Hackaday for future reference.
We still have a lot of improvements planned for WatchDuino, but since it's already in a usable state we think it will be good to get feedback and contributions for other people building and using it. The sooner the better!
-
Open sourced phone companion app
09/13/2015 at 16:57 • 2 commentsGreat news everyone! We've spent the last few days cleaning some bits and pieces of the companion app, which today has been publicly released on Github! Not only that, but we've also put together some documentation detailing how to build it from source, and get it up and running on your phone. We hope to publish it into the Android Play Store in a not-so-distant future, so that installing can be even easier.
We have released as well, as a separate component, a Cordova plugin that we built ad-hoc for the WatchDuino companion app, but that we think it has a purpose general enough to be useful to others. It's a plugin that makes the phone notifications available to Cordova apps as events. We use it to listen to all of the phone notifications and pass them on to the watch. The source code is on Github as well.
'Cause sharing is caring :)
-
How Bluetooth messagging works on WatchDuino
09/12/2015 at 16:21 • 0 commentsToday we are going to explain what's the magic behind the Bluetooth communication between WatchDuino and the phone companion app.
Communications take place every time the WatchDuino needs some piece for info that it can't calculate by itself. Usually this involves querying data from the internet, such as tweets, bus statuses, or the weather. But also... time!
WatchDuino 2, as opposed to it's predecessor, can't actually know what's the current time, as it lacks an RTC module. Instead, when it's started, it asks the phone app for the time, and after that it'll keep track of it by itself. From time to time it also asks the phone again for the time, to make sure it doesn't get too desynchronized.
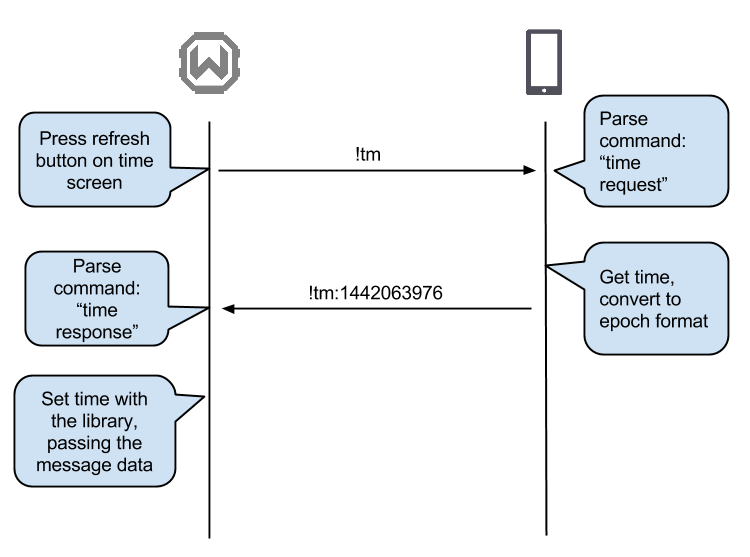
The communication via Bluetooth between WatchDuino and the phone is actually lightning fast!
![]()
When you press the synchronize button on WatchDuino, the following message is sent to the phone app:!tm
This is the "command message format" that WatchDuino and the companion app can understand. A bang means the start of a command, and the next two characters identify the command type. In this case, it's a request for the time. Other commands include "!tw" for twitter, "!tf" for TFL, "!wt" for the weather, or "!nt" for a notification.
Upon receiving this message, the companion app will grab the current time, and send it the watch like so:
!tm:1442063976This is a command message with some data attached to it. In this case, the data is the current time in epoch format. We are using a library for Arduino which will accept this format, and translate it to something more readable for humans "September 12th 2015, 14:19:36". All the watch does upon receiving the message, is parsing the data out of it and passing it to the library, which will set the new time.
As you see, the message format is both simple and flexible, and allows for future apps to pick their own command codes, and transfer any data as long as you can serialize it into a string.![]()
-
WatchDuino 2 components shopping list
09/08/2015 at 22:02 • 0 commentsOne of our requirements when designing WatchDuino was for it to be cheap as chips. Why bother having separate Arduino and BLE modules when there are integrated boards out there? Why not use a nicer screen? The answers is, of course, to optimize on price. More standard components are cheaper than those that are more specific, and this is why we've chosen them for WatchDuino.
Today we want to demonstrate just exactly how cheap it is to build a WatchDuino, by putting together a shopping list to buy the components in Aliexpress. And also, to make it as straightforward as possible for you to go buy them and build yourself a WatchDuino!
Arduino Pro Mini 3.3V 8Mhz $1.74 link LiPo battery 240mah $1.67 link 0.96" I2C 128X64 OLED $4.27 link (4uds) 3x6x2.5mm push button 2 Pin $0.2 link 5x10mm flat micro vibrator motor 0.06A $0.55 link TP4056 Micro USB LiPo charger (5V, 1A) $0.22 link HM-10 Bluetooth 4.0 uart transceiver $3.35 link 12mm piezo buzzer speaker $0.18 link * = For development you are probably interested in a boarded one instead.
It renders a total price of roughly $12 per watch! All of these components ship internationally for free from China. You can find equivalent components shipping locally from your country in stores such as Amazon, Ebay, Sparkfun or Adafruit. They will likely be slightly more expensive, although more convenient to buy for some people.
-
New wearable prototype: introducing the Smart Strap!
08/31/2015 at 21:18 • 0 commentsIn the last week we've been experimenting with a new design for final form of the WatchDuino. One of our problems for building a wearable version was how cramped all of the components had to be. The final result was difficult to solder together, and somewhat bulky.
So we though, since we want to design our own 3D printed strap, why not move some of the components into it? Such as the battery or the Arduino Mini. In essence, the components are spread along the watch strap, making it a "smart strap" indeed!
![]()
We've build a prototype based on this idea. The 3D printed case is made out of links that snap together. Some of the links are "smart", and house some of the WatchDuino components (the battery, Arduino Mini, USB LiPo charger, and the buzzer+vibrator). The only thing left on the main case is the screen and buttons, acting as the interface.
At present the connections between the "smart links" had to be manually soldered together, but we want to further experiment on this idea in the future. We would like to have a way to plug and unplug them easily, so that you could configure a WatchDuino with whatever modules you want: you may like to have an extra battery module, or an accelerometer. A world of possibilities unfolds!![]()
The 3D design has been done on Tinkercad, you can have a look here.
Watchduino2
Inexpensive Open Source BLE smartwach compatible with Arduino tooling


 Not all is rainbows and sunshines for Watchduino though. As you aware, we are using the HM-10 module for Watchduino 2. This module is manufactured by Jinan Huamao, a not-too-fancy chinese company. We picked it originally because of how cheap it is (you can easily find them for less than 5 USD on Aliexpress), and