igorfonseca83
The following tools and materials were used in this project:
Tools and materials:
- Solder iron and wire. I had to solder some terminals to Nunchuk's wires in order to connect it to the Arduino;
- Shrinking tube. Some pieces of shrinking tube were used for a better isolation of the conductors;
- Screwdriver. The structure is mounted using some bolts and nuts;
- 6-axis mechanical desktop robotic arm (link). This awesome kit already comes with several components as described bellow. It's reliable and easy to assemble;
- 12V power supply (2A or more);
- Nunchuk controller (link). It interfaces to the Arduino board, and it's used to control the robotic arm;
- Male jumper wires (4 wires);
- Arduino Mega (link / link / link). Notice that the robotic arm kit I've used also has a board and controller bundle that already comes with this Arduino board. If you you're not using on of those kits, you might use other Arduino boards as well;
I was informed later that there's a Nunchuk adapter that makes the connection to a breadboad easier (link / link). It's a good option if you want to same some time on soldering and doesn't want to destroy the original connector as described on Step 9.
Sain Smart 6-axis mechanical desktop arm already comes with the following components:
- Arduino Mega 2560 R3 (link)
- Control board shield (link)
- NRF24L01+ Wireless Transceiver Module (link)
- MPU6050 3-axis gyroscope and a 3-axis accelerometer (link)
- 71 x M3X8 screw
- 47 x M3 nut
- 2 x U bracket
- 5 x servo bracket
- 4 x 9kg servo (link)
- 2 x 20kg servo (link)
- 6 x metal servo tray
- 3 x U bracket
- 21 x right-angled bracket
- 3 x flange bearing
- 1 x gripper
You might find other robotic arm kits online, or even design your own. There are some awesome projects you can 3D print, for instance.


 Alvaro Ferrán Cifuentes
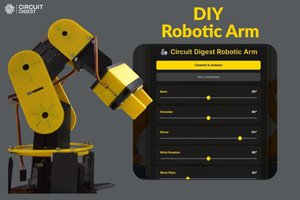
 ElectroScope Archive