 Lex Kravitz
-
11Flash the code!
If you're experienced with Arduino and flashing code, flash the RTC code onto the device to set the clock, and then flash the FED code and confirm that everything works. Both of these are in the files area.
If you're not experienced or are having trouble follow the next five steps. You will do five things to flash the device:
- Download and install the Arduino IDE.
- Install relevant Arduino boards to run the Adalogger M0
- Install relevant libraries
- Download Operant FED sketch zip file and extract
- Flash the FED sketch to the device
- Download and install the Arduino IDE.
-
12Download Arduino IDE
Before starting with building anything you should make sure your computer can communicate with the Adalogger M0 board and that you can flash the operant FED sketch. Start by installing the Arduino IDE.
-
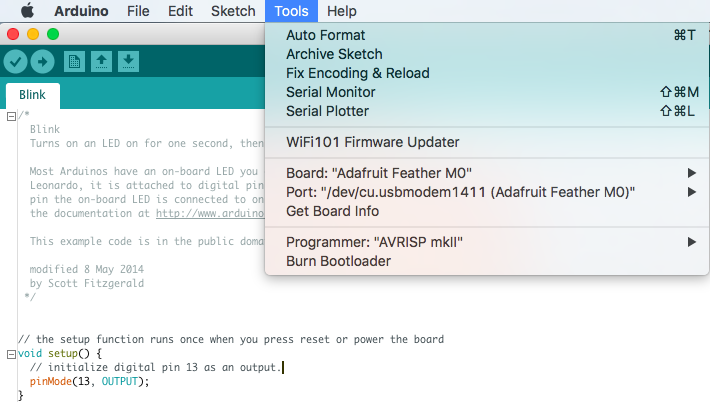
13Install relevant Arduino boards to run the Adalogger M0
The Adafruit M0 Adalogger board is not natively supported by the Arduino IDE. To enable the Arduino IDE to flash sketches to this board, follow instructions here. After completing these steps make sure you can flash the example sketch "Blink" to the Adalogger board before continuing. Open Blink in File>Examples>Basic>Blink. "Double-click" the button on the Adalogger to put it in bootloader mode and make sure Board is set to "Adafruit Feather M0" and port is set to the same before clicking upload (the right arrow at the top of the Arduino IDE).
You should see "Upload complete" in the bottom feedback window and the red LED on the board should blink once per second.
Congratulations, you have configured your Arduino IDE and uploaded a sketch to the Adalogger M0!
-
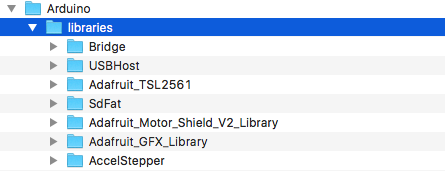
14Install relevant libraries for FED2
FED2 requires the following libraries to function:
#include <Wire.h>
#include <Stepper.h>
#include <RTCZero.h>
#include <SPI.h>
#include <SdFat.h>
SdFat SD;             //Quick way to make SdFat work with standard SD.h sketches
#include <Adafruit_GFX.h>
#include <Adafruit_SharpMem.h>
#include <Fonts/FreeSans9pt7b.h>
#include <TimeLib.h> //include the Arduino Time library
#include <stdio.h>  // include the C++ standard IO library
#include <Adafruit_NeoPixel.h>
#ifdef __AVR__  #include <avr/power.h>
#endif
You can install them in multiple ways, but the simplest will be to download the prepared zip file (FED2 libraries.zip also in the files area) including these libraries and extracting its contents to your Arduino libraries directory (for most of us it is: /Documents/Arduino/libraries)
When you're done they should all be in your libraries directory, see example:
If this doesn't work, or you'd prefer a different way go through instructions here for how to manually add libraries.
-
15Set the RTC
The Adalogger M0 has a RTC built in, which allows it to keep accurate time. First we must set the clock though. Download the code FED2-SetClock.ino from the files area and flash this code to the FED. If you don't know how to flash code onto the Adalogger, familiarize yourself here.
The screen should show the correct date and time. This RTC will stay current as long as the battery remains connected to FED. If the battery is disconnected or if FED loses power you will need to reset the date and time (it's like an old VCR).
**NOTE: We are working on a newer Operant FED that will have a battery backup RTC so it will never need to be reset.***
-
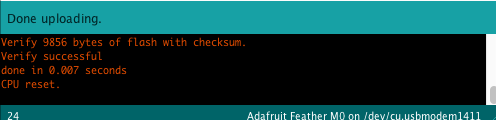
16Flash the FED code
Download and extract the FED2 Arduino sketch (in the files area) to where ever you like to keep Arduino sketches (for me it's: /Documents/Arduino). Double click the FED081218.ino file to open it in the Arduino IDE and flash this code to the M0.
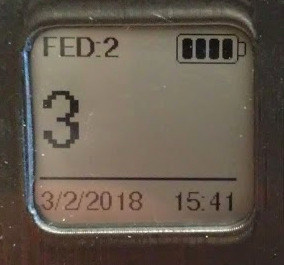
The screen should display "FED STARTING UP" once the code flashes, and the stepper should turn if the photo-interrupter is clear. If you block the pellet well with your finger the screen should show the number of pellets taken and the correct date/time.
Success! You have finished building the FED!
Feeding Experimentation Device (FED) 2.0
FED measures food intake in mice. It is battery powered and designed to be used in rodent colony caging.
Discussions
Become a Hackaday.io Member
Create an account to leave a comment. Already have an account? Log In.