E-Ink Display Adapter
Using a replacement Kindle screen with an Arduino/whatever
Using a replacement Kindle screen with an Arduino/whatever
To make the experience fit your profile, pick a username and tell us what interests you.
We found and based on your interests.
eink-schematic.pdfE-Ink adapter schematicAdobe Portable Document Format - 81.30 kB - 12/06/2016 at 00:18 |
|
|
A long time has passed since my last update. My plan is to build a homebrew tablet or e-book reader using a NanoPi board and an E-Ink screen. I got as far as driving the screen with the NanoPi, using most of the available GPIO and also
the CPU's PWM functionality for speed, but then realized that I don't know how to set about designing a case. Also, my old 3D printer broke down around then. So the project stagnated for a (long) while.
Now I'm trying again. This time around, I want to try to make things more modular. Instead of driving the display directly, I'm using a dedicated microcontroller to handle the display. The NanoPi communicates with it using SPI. This means that I'm not driving the display directly, but this way has several advantages:
First, the display has quite a lot of I/O lines that need to be hooked up. With the new setup, any complicated wiring is only between the microcontroller and the display, and with the MCU integrated into some future PCB, even that wiring would be done away with. Also, now that I'm using the microcontroller's GPIO pins, the parent board's I/O is free to be used for other things. And if I want to control the screen with a board that doesn't have so much I/O, like an ESP8266 board, I should still be able to do so, without having to use a shift register that might really slow things down.
Also, driving the display has some realtime timing considerations, and it's difficult to handle them in a Linux environment, while it's much easier to handle them in a dedicated microcontroller.
Finally, if I want to control the screen with an ESP8266 or some other board, I don't have to rewrite my driver code, I can just reuse the same controller.
So far I've hooked up an STM32 "Blue Pill" board, rewritten my driver code again to run on it, and got some basic functionality working: Blanking the screen and drawing rectangles.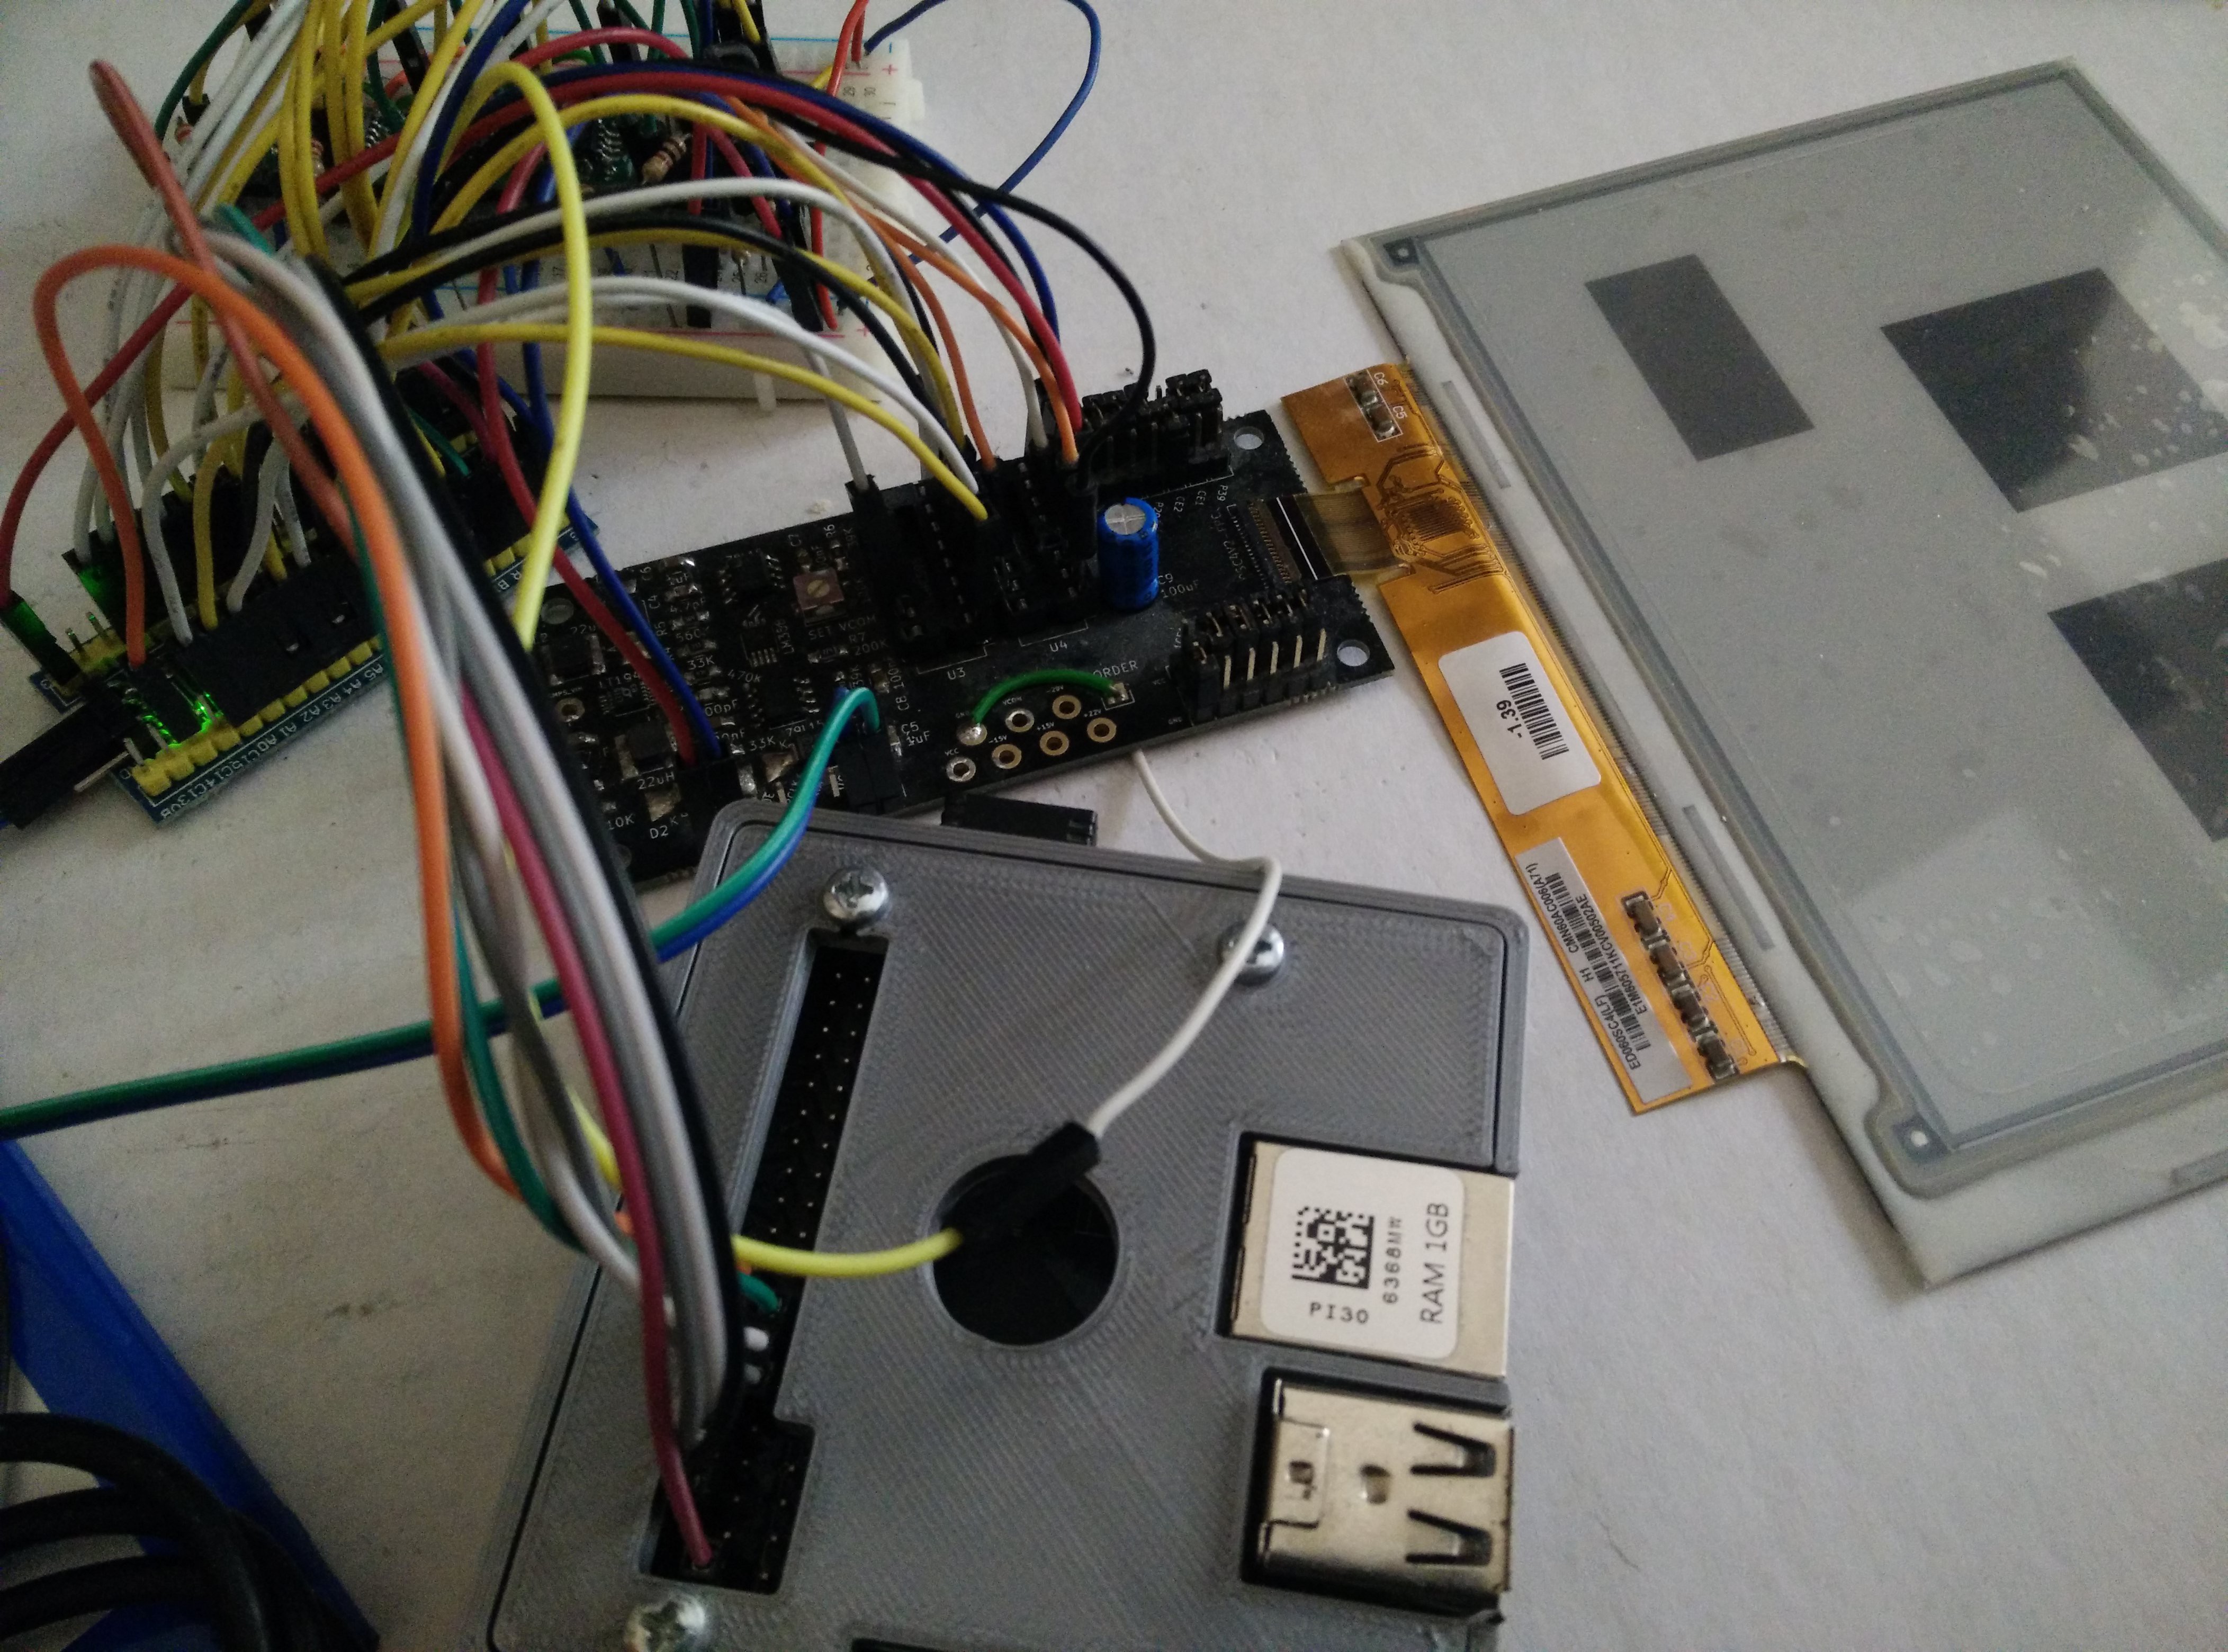
The breadboard in the back has a few SPI RAM chips, as the STM32F103C8 on the "Blue Pill" doesn't have enough RAM for the 4-bit double-buffered 800x600 framebuffer I'm planning.
A friend of mine suggested using an ESP32 instead, as those are cheap, seem to have enough GPIO pins, and have lots of RAM, without the need for any extra chips. It may even be powerful enough as to not require a parent board. So maybe I'll be rewriting my controller code again soon.
After connecting my microcontroller and display to my board, I tried displaying test patterns with code based on sprite_tm's. I did get a reaction from the display, but I kept getting vertical streaks while trying to write a single row to the display. So I switched to my backup screen, and it worked! So I think my first screen got fried while I was attempting to use it with my v1 PCB and its improperly soldered FPC connector.
The next step is driving it properly. Each of the driver sources (essentialscrap/Sprite's mods/NekoCal) is a bit different as to when it sets the various pins high or low, especially the OE (output enable) and CKV (vertical clock) pins. I'm doing it like NekoCal now and it seems right and I get nice black and white output. But to get grayscale like NekoCal does, I need to control the timing better. This is a problem due to my use of shift registers.
I'm using the ESP8266's hardware SPI to drive my SN74HC595 shift registers, and at first I just tried using the max speed of 80 MHz. As it turns out, they can't run at that speed. If I understand it correctly, TI's datasheet says 5MHz at 2V, 25MHz at 4.5V. My board runs at 3.3V, so I set the SPI to 10MHz and it seems to be working fine. The two 8-bit shift registers are chained to get 16 bits, 8 bits of data and 8 control bits. (If I did this again, I'd split them so that data can be written faster without having to also write the control bits). Writing 16 bits at 10MHz takes 1.6us, so that's the fastest I can toggle any pin included in the shift register. Unfortunately, the CKV pin is one of those pins, and I need to time it in hundreds or maybe tens of nanoseconds - 1.6us is too much. I intend to try to work around this by removing the shift register from its socket so I can wire the CKV pin separately.
Another issue I ran into is that a full 800x600 black-and-white bitmap takes 60KB of memory. 4-bit grayscale would be 240KB. I'd thought the ESP8266 has 128KB of RAM, but it only has 96KB, of which around 40KB (maybe a bit more) is available for general use, so no storing a full bitmap for me! For now I'm streaming the bitmap over wifi in 200x200 pixel chunks, but I've ordered some 23LC1024 SPI SRAM chips so hopefully in the future I can store the full image on the ESP itself. Other options I've considered are to store the picture in flash memory instead (My ESPs should have 4MB, which would be plenty) or to try this: hackaday.com/2016/11/30/the-esp-a-new-1kb-contender-appears , as maybe with wifi off I'll have more memory.
The v2 PCBs arrived. This time the order was from pcbs.io as it was cheaper. The trickiest bit would be the FPC connector so I started with that.
At first I tried to tape one side of the connector to the board with kapton while soldering the other side, so it would stay put while I soldered it, but the connector just went up at an angle, so the taped side was touching the board and the untaped pins were touching air. I ruined 2 boards while trying this method by accidentally pulling traces off them.
Then I tried taping the middle of the connector instead (over the middle of both rows of pins) and soldering the corners, then removing the tape and soldering the pins normally. This actually worked! with only minor heat damage to the connector, where I may have accidentally touched the plastic with my soldering iron or with hot solder. Also, I think I missed some of the pins the first time around, but that's no different from the other components.
Anyway, once I got the connector soldered, I went ahead and soldered the rest of the board. A lot more carefully now as if I ruined any more traces, I'd have to do it all over with a dwindling supply of boards.
Powering it up, it all worked, except on VPOS I was getting +13V instead of +15V. It took me a while to realize that I'd gotten the sign wrong and it was actually -13V, and another while to find that the regulator was really outputting +15V, only the output pin wasn't soldered properly. So of course, I fixed that, and now the board works hardware-wise.
Next log will be about software (which I'm still working on anyway).
P.S. If you make this, make sure to set VCOM with the trimpot with the screen disconnected, as the board's max voltage is way higher than the screen's max.
P.P.S. I almost forgot! When the SMPS is on but VPOS and VNEG are off, I'm still getting ~3V for VPOS. Maybe VNEG had some voltage too, I don't remember. Searching about that, I found that that's normal with such SMPS circuits, and if I really want to turn it off I need to add more MOSFETs to switch VPOS and VNEG off. Is there some way to force them to 0V without changing the board?
I just ordered a new batch of PCBs!
The most important change is probably making the FPC connector footprint bigger (mostly longer - obviously the pin spacing stayed the same) so hopefully it'll be easier to hand-solder.
The new revision has the 2 shift registers I keep using anyway built in, and all the extra pins that you might not really need to control are set up so they can be easily connected to VCC or GND with jumpers. So now there are only 8 external pins, instead of like 30.
Finally, this time I put all the resistor and cap values right on the board so I won't have to keep looking them up while soldering.
A long time's passed since my last update...
The board is basically working (if you solder the diodes "backwards") as far as generating voltages goes, but soldering the connector is still really hard. The one connector I may have managed to stick to the board, is at least partially ruined - the lid won't stay shut anymore - and even if I keep it shut I don't know if it's really soldered properly. Anyway, after hooking everything up to the screen etc., it didn't work.
I've ordered some spare parts for basically everything including the screen itself, as I don't know if I fried the old screen. It seems this time I got a screen with all 39 pins wired, while the old one doesn't actually use all of them. (this is something Sprite_tm ran into in his project.) So the old screen should be easier to handle.
I've also ordered some FPC cables so I can attach them between my board and a spare connector, and test the pins with a continuity tester, but they haven't arrived yet.
Finally, I've fried my Teensy, so now I've switched to ESP-12Es. I've got MicroPython running and it's nice to know that if I manage to fry them, at least they were cheap.
I got my pcb some time ago and tried soldering it. I seemed to manage most of it except for the connector. It's hard to even try to solder the connector without touching and melting the plastic, or maybe I need a smaller soldering iron tip. If I order more boards, I'll be making the pads longer.
So while ruining four of my five connectors, I decided to solder everything else, if only for practice. Finally I powered it up with 2 AA batteries - not 3.3V but hopefully close enough. And got a thin column of smoke from somewhere. Turning it off and on gave the same result again, and the smoke seemed to come from somewhere around the LT1945.
After giving it a rest for a few weeks and looking at the board visually, I noticed that some of the LT1945's pins were shorted (VPOS_CTRL and GND, but I didn't check at that point), so I fixed that and tried again. Still smoke. One of the inductors wasn't soldered properly, so I fixed that, and cleaned or melted some brown stuff (flux?) next to a nearby component. No more smoke after that. Somewhere along the way, I noticed the batteries weren't giving 3V anymore, so I replaced them and finally got out the DC/DC power converter I bought from Seeedstudio a while back and got a much nicer 3.28V.
But the output voltages are all off - I'm getting +0.66V or +0.2V instead of +22/-20V. So maybe the LT1945 really is broken.
I don't really know how to continue debugging from here.
Anyway I ordered more spare parts so I can try doing it all over on a new board.
edit: I forgot but some of the LT1945's pins on the other side also looked shorted at one point, so of course I fixed that. Could maybe better explain what went wrong.
After printing out the front copper layer and checking it visually against the physical components, I uploaded the board to OSH Park and ordered it. Link is in the project links.
The components all arrived some time ago, and somehow they're smaller than I imagined. Hopefully I'll manage to solder them somehow. Maybe I'll make the PCB larger so it'll be easier, maybe not.
So I've still got to order the PCB. I accidentally upgraded to KiCad 4, which is nice, but my KiCad 3 files were suddenly out-of-date. KiCad 4 offers to "rescue" all the old components etc. but I still wanted to fix them up properly to use new KiCad 4 components and footprints before continuing with the PCB. (Well, at least for the built-in ones, the caps etc., I'm not planning on editing the footprints I made myself again if I don't have to.) While doing so I also discovered the footprint I had put for the through-hole cap was too small, so it should be fixed now.
Once I'm finished updating and rerouting the PCB and moving things around for the bigger cap footprint, I still plan on printing the PCB out and checking it against the real components, at least for the ICs and the FPC connector, and probably the inductors - I'm more confident about the size of the 0805 resistors and caps matching the 0805-size footprints :)
Just placed an order for the project components from lion.co.il (Farnell distributors in Israel), except for the FPC connector itself which isn't in stock, so I ordered it from AliExpress. And except for the PCB itself, which I still have to finish fixing and verifying.
Some of the project's component choices were influenced by stuff not being in stock when I was planning the PCB. Sometimes the components had different footprints, so it influenced the PCB, too.
I uploaded the schematic etc. to github. Of course, it's heavily based on the previous schematics (see project links). There are a few differences: My board doesn't include a microcontroller. Instead, it's basically a breakout board + specialized voltage regulators. I tried to breakout as many of the FPC pins as possible, even the ones that supposedly aren't connected, and almost none of them are hardwired to each other, to try to minimize the chance I'll need a new PCB if I discover that my display has a slightly different pinout. Also, there were slight differences between the two previous schematics, so mine is sort of a mix. Some resistor/cap values I wasn't sure about are annotated in the schematic file.
PCB layout was difficult. I really wanted to keep to a 2-layer board with the bottom layer as a ground plane, so everything except ground has to be on a single layer and none of the signals can cross each other. (I assume this is obvious for anyone who, unlike me, has ever done any PCB work.) This was difficult enough for some of the logic signals but then I had all the special voltage outputs to deal with, each coming from a different part of the board. I ended up using jumper wires for all the power outputs and another zero-ohm resistor to allow some of the logic signals to cross each other.
The exported gerber files are on OSH Park now, though I'll try to recheck some more stuff like the FPC connector pinout before I actually order. - I'm still not 100% sure about the FPC connector pinout (which side is 1 and which is 39?), even after staring at the datasheet.
btw, I got through the sparkfun "Simon Says" SMD soldering tutorial kit. Very nice! The thought put into it shows. My only complaint was that the troubleshooting section was a bit short, so I got to learn a bit of troubleshooting the hard way :) so maybe a good thing. One of the LEDs wasn't working - the manual suggests reversed polarity and the kit even has a way to reverse them by soldering some jumpers. But the polarity was correct (multimeter continuity tester lit them up). It turned out that I hadn't properly soldered all of the microcontroller pins, so it couldn't turn the LED on. Also one of the buttons wasn't working for the same reason.
My adapter board will probably be a lot harder to solder as it's a lot denser.
Create an account to leave a comment. Already have an account? Log In.
Hey, great project! Forgive me if I missed this, but are you aware of a selection of eink/epaper displays in various sizes (6" to 32") that provide grayscale (not just b/w)? I need some of varying sizes for a project.
FYI, we have used the ESP8266 in the past, but now use the ESP32 and Raspberry Pi for these types of things. In this case, I think the ESP32 with software written with the esp-idf would be the best bet. That's what we were starting to work on but ran into problems with finding the displays themselves.
Hi Ronald! I want to try your project for display ED0970C1. Maybe you already did? If possible, please share.
Anyone in the EU who also likes to buy one of these boards? I'd like one, but minimum is four which is a little much :) Perhaps we can share?
Hi Ronald,
I would be interested in taking two or three boards.
(Germany)
I discovered that my display has a different connector... So I "started" a "project" (still more an idea than a project) => https://hackaday.io/project/160326-ed060sc7-kindle-keyboard-epaper-breakout-board
Since I cannot use this board for my display, I first want to try converting the board to one I may use. I did find some price comparison site for PCBs somewhere in some comments though, but I lost it. I remember price was acceptable even for ordering ~2 boards.
realy interesting project but how do you stream the images(and convert them) to the esp8266?
I made a quick small and shortsighted post about this, if you are interested:
https://fasani.de/2018/08/02/reading-an-image-bitmap-file-from-the-web-using-esp8266-and-c/
There are better examples in the GxEPD e-paper display library (Specially in the GxEPD_32)
Consider switching from the 74HC to the 74AHCT version of the 595. They are supposedly faster.
I'm working on the exact same thing right now and I tried looking at your schematics on github but they showed up completely out of ordered in kicad. Could you post a PDF as well?
oops, sorry, I only just now noticed your comment... I'll upload a PDF.
Awesome, I'm building a 100% breadboardable copy.of.this for the 9.7" display. I'm.going to drive it from a raspberry pi. :)
Actually its the ED097OC1, but I think they are basically the same.
Thanks! Your source is very helpful in understanding how to drive the display :)
Actually I'm working on Rev3 of my project. I have to admit that epd driver program is a little bit messy. If you have any trouble understading it, just ask me.
A similar project: https://hackaday.io/project/10161-6-inch-pi-e-ink-display
My knowledge is not deep enough for making this board. But I would be really really happy to have one. So I am with you, go for it!
That's my project! I just stumbled across your work here, and I must say, excellent job! I'm also not very good with PCB software, learning as I go. I have the schematic done, but the routing is taking forever. I already made one, and it was completely unusable due to my inexperience. Anyway, good luck, I will be following this anxiously!!!
uh-oh. unusable how? should I be worried about my own board? though it's a bit late for that now I've ordered it :)
There were a plethora of problems, wrong footprints for a few of the components, a couple of the traces went nowhere, but the one that made it unusable was the negative and positive voltages were connected... Idk how it happened, but hopefully the next one will work fine. I think you won't have the same problem tho
Another similar project which already works: https://hackaday.io/project/11537-e-ink-calender
(Please, please do a KIT for us)
Thanks! That source code is very helpful :)
I can't really do a kit but I hope someone else does.
Become a member to follow this project and never miss any updates
By using our website and services, you expressly agree to the placement of our performance, functionality, and advertising cookies. Learn More
 Jacob Still
 Michael Cullen
 Dylan Brophy
Have you considered adopting the Raspberry Pi Pico? While it doesn't have wifi, seems like a number of features of that board could go a long way towards making the rest of the task easier.
Either way, great project and I'm watching it closely!