Matt
Matt-
Gaining Ground!
07/28/2016 at 08:38 • 1 commentSo there have been some nice advances so far, and we have made up some good groundwork.
Currently as it stands Joel's car has been outfitted with the O-Droid, Display, DAC&DSP Stack, and all required amplification, and currently playing audio tracks without issues (and they sound good for not calibrating anything yet!).
The steps that were done (and I'll keep this as chronological as possible) are as follows:
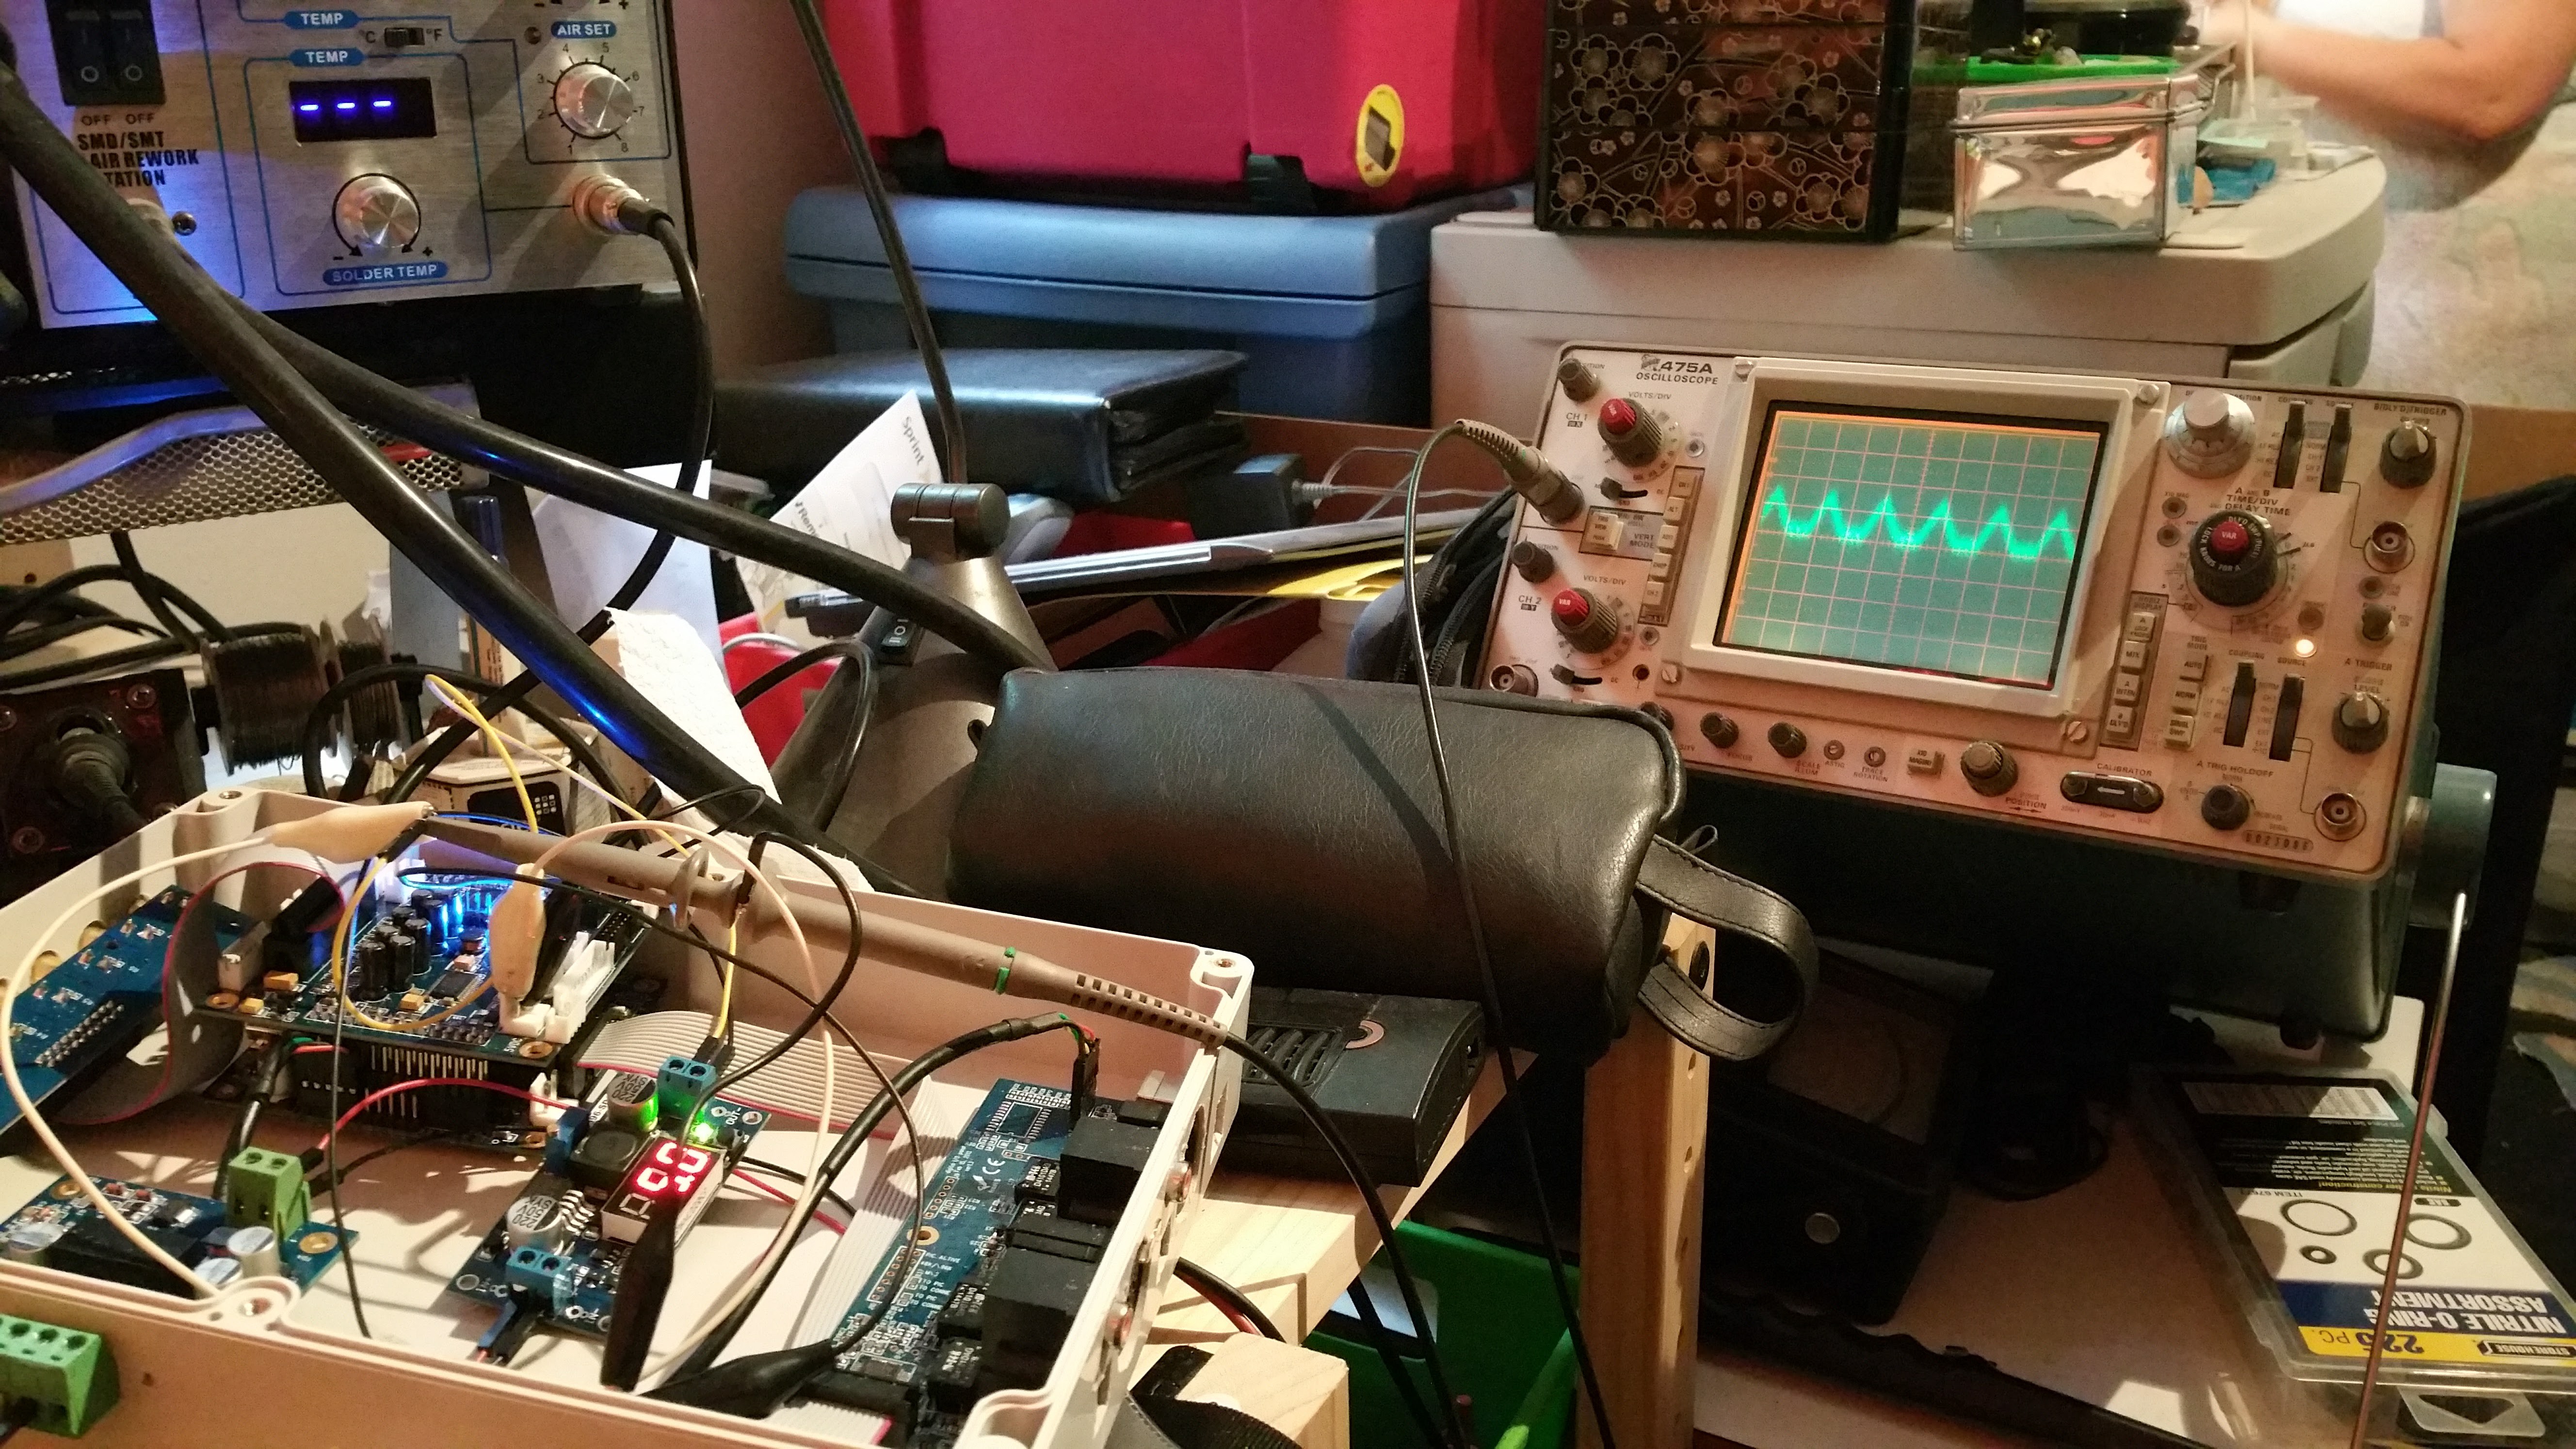
- Complete all DAC/DSP mounting and testing into suitable project box, and complete a "break in test" (the break in test was more for my verification purposes)
![]()
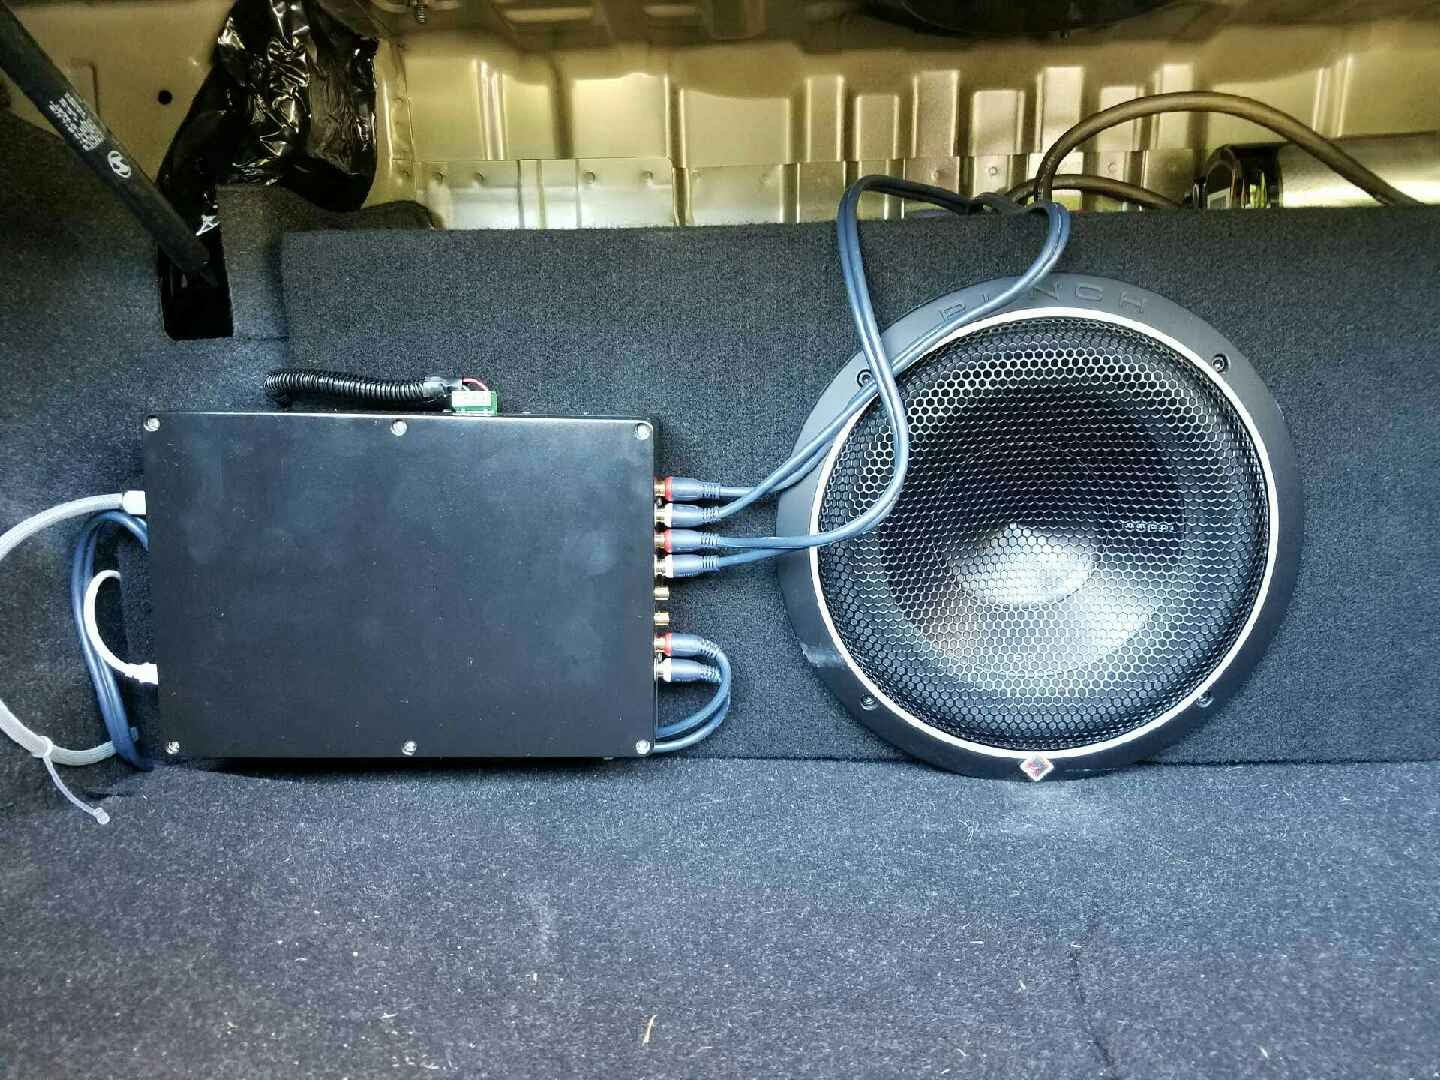
- Wire the car so all speaker cables go to the rear (as thats where all the amps are).
- Wire the optical cable and USB cable from the DAC/DSP to the front for audio and control/programming purposes.
- Get all power wiring ready to go for DAC/DSP from existing wiring in the rear
![]()
- Install the things that require external trim work/modification.
- In this case, the existing shark fin antenna was modified to do GPS instead of SAT Radio, we swapped the modules with a little persuasion from a Dremel, and ran the wires under the headliner (or above, depending on how you want to look at it).
- We also were installing a rearview cam to a rearview mirror with an LCD in it, and we elected to do that at the same time (as we would have all kinds of stuff already ripped out of the interior anyway).
- Fabricate the facia/mount for the LCD Panel and O-Droid.
- Mount O-Droid and all associated parts, and panel together in dash. Close the dash up all nice and tidy.
- Enable all channels on DSP.
At this point, this is where we stand. Everything is baseline functional and sounds pretty good. Next steps, are integrating a front panel button and knob control, a micro-controller (Arduino), and a few small odds and ends. Once all the hardware has been completed, the software should be almost done.
My personal challenge in all of this, is learning KiCAD to make the circuit board(s) for the front panel control. It's starting to come together, and thankfully it probably wont be too expensive in case I screw up horribly... but I'm trying to avoid a lot of silly mistakes I see and read about all the time. So for the time being that is slowly marching on, but at least we have something to really test on and perfect before we bring more hardware/software into it. Once the KiCAD drawings are complete I may post those. See the gallery for some more updated pics of the projects.
- Complete all DAC/DSP mounting and testing into suitable project box, and complete a "break in test" (the break in test was more for my verification purposes)
-
Off to an ALMOST run...
02/26/2016 at 09:31 • 0 commentsOkay, so if you haven't read the previous log, do so now and come back.
So now that we have had a great amount of initial success with the ODRIOD-XU4, we're going to be moving forward with that as the main "head unit" computer. Now there are some things that we ran into, which I'll go over here.
1. SATA connection for SSD drive for music storage is not built in.
- This is simply overcome due to the presents of USB3.0 on board, so we will be using an adapter that is available on the ameriDroid site.
2. No optical output or microphone input built in.
- The optical output can be solved by a USB adapter (also provided on the site), however a microphone input will be needed for phone and other voice controlled applications, for this we will probably be using a bluetooth microphone that is powered by the car. (work in progress)
3. 1 less USB port on board (we had 4 or more with other machines, we're now down to 3)
- A while back we bought a USB hub that is designed to be installed in a car, 12V powered, directly wired, and ignition switch controlled.
4. Built in EMMC is no longer present.
- No big deal here, there are EMMC snap-on modules that are nice and small available on their site (noticing a trend yet?)
5. Display is powered from the USB port.
- Nothing a little hacking can't fix, USB power will be removed from the board and added to the hub (mentioned above) while keeping the data pins present... or something of the like, also, work in progress, its possible that the hub may come in here again.
So far, those are the only "issues" we've run into and they are all stuff we can work through with minimal effort. Currently, I am working on the following:
1. Putting together a AC powered test rig for Joel so we can make sure that "Tasker" and other programs respond properly when we kill the power, and turn it back on. doing things such as putting the device into airplane mode after a certain period of time.
2. The enclosure for the DSP that is going to be sitting in the trunk in each of our cars. I've thrown together a concept in Fusion 360, and I have some ideas from off the shelf kind of stuff.
3. Obtaining the buttons we want for the physical push buttons (that will be somehow tied to the GPIOs/Arduino), and the rotary encoder. The buttons are a bit on the pricey side, but I am going to try to get some samples because I do need to figure out which size will work best for both of us.
All in all, things are now back on track, granted, a bit longer than we both wanted to take, but life happens, and honestly I'm sort of happy that we found a lot of bugs before we started installing all this stuff into our cars.
-
A long time coming...
02/26/2016 at 09:02 • 0 commentsDue to some major setbacks and other life events (on both of our parts) we have been unable to really work on the project again until more recently. The largest setback by far, is that a second Rock2Square failed, the video output on it decided one day to start artifacting HORRIBLY. So we have decided, that despite its excellent specs, its really not up to the task for several reasons:
1. Powering the device, though not really an issue, is apparently an area that is weak. (First failure)
2. The second failure (video issue) just kills any remaining confidence that we have in it. And trying to get the touchscreen working was apparently IMPOSSIBLE with android (not really, just we don't have the kind of time and insane amount of background knowledge to continue to attempt)
3. We still didn't "stress" test it, in the environment that it will be in (a car), and if the previous failures are any indication of what we would be possibly dealing with.... well, NO. We are in a pretty harsh environment anyway, and keeping this thing in a car just makes it even worse. We live in Central NY, temp range in a car is anywhere between -15F to 125F, if not more.
So, on to the news:
There were 2 additional purchases for this project, the first was the CubieBoard2 and a 7inch touchscreen and accessory kit. This worked well for some stuff, but the touchscreen working with Android, once again was seemingly impossible, and with better support than the Rock2, we were honestly hoping for better. The Cubieboard2 did have a lot of nice accessories with the pack we got, and honestly if we were using linux, it would probably have been okay. The other big setback was the GPIO pins working in a way that would suit our needs.
The second purchase was the ODROID XU4, its companion 7inch touchscreen, and some accessories. This touchscreen setup worked ALMOST out of the box, Very impressive. Joel was able to get it working on the inside of a few hours to what we needed. So far the accessories we picked up worked perfectly, and the Android version is more up to date than ANY of the products we've tried so far. The only thing that has not really been tackled yet is the GPIO, and I'll be doing more of that when I order mine. One of the accessories we picked up was a little button board with some LEDs on it. This works pretty well, but there is some lag that concerns us a bit, but hopefully tapping off the additional GPIO we can get better response times. Really all we need on the GPIO is either connect an Arduino and have it do the buttons and rotary encoder, or to run the 6 buttons and rotary encoder directly.
-
Touchy, no Touchy... and other small setbacks
11/19/2015 at 12:17 • 0 commentsSo for the past few weeks, my counterpart (Joel) has been attempting to compile the android kernel with the correct support to get the touchscreen working. So far there have been no successful compiles.
That being said, the screen does work under Linux (all flavors I tried initially did work) some flavors needed the drivers to be installed but most at least had a clue what to do with the screen. So basically he's been battling with that, and I've been roughing out ideas and tackling other small issues.
1 - Low power support is something that can be done, which is good as we will be attempting to keep the Rock2 on while the car is off. The power drain should be pretty minimal. I'm going to be experimenting with that sometime very soon.
2 - We will still need an Arduino or something of the like for CAN-BUS for Joel's car, mine, not so much. So what I am going to be attempting to do is get something working for him with that. Then use the Rock2's GPIO pins for all of the buttons/rotary action. If need be we can bit-bang that out for the time being.
3 - We can't really use anything but mock locations for the USB-GPS... as its how android really layers things. So that's out. Maybe we can make or find an app that works a little better.
4 - "Tasker" should be able to take care of most things... and with the use of the GPIOs on the Rock2, we should be able to interact a bit faster.
I am going to be seeing if I can request some samples of the buttons I like, and purchase the rotary encoders, but I will be probably playing around with making a quick rig sometime over the next few weekends to start hashing it all out. I do have some spare stuff I can play around with. I may still need to use an Arduino to do some stuff in my car.
Getting the CAN-BUS stuff working shouldn't be too hard, Joel's car is fairly well documented, but there will still have to be some digging to be done, as the exact model year isn't documented that we can find in all that great of detail.
This time of the year gets a little weird... busy, then not, then busy then not... all with varying degrees of time.
-
No more days... just code, wood, and plastic
10/30/2015 at 10:11 • 0 commentsSo all of the hardware is pretty much in hand, with the exception of 6 buttons and a rotary encoder (we have them picked out, just not purchased yet). At this point we are now working on building the Android kernel we've always dreamed about... everything we need, nothing we don't, sleek, streamlined and sexy.
We need to build in the following items to really get things working the way we have envisioned:
- Hibernation/low power standby support
- Communication via UART to Arduino (there are some nice pin headers that I'd like to use) for the physical buttons/rotary encoder
- Find a way to have Android look for NEMA data from the GPS dongle we have and not have to turn on Mock Locations (hints anyone?)
- All of these things then need to be able to talk to "Tasker" application (or "Tasker" needs to look for them)
After we get the kernel built and get the "Tasker" application working with everything, the software and hardware testing will begin.
Currently there is another test fixture/jig being built for my partner on this project... as well as an enclosure for the MiniDSP/DAC stack that will go in the trunks of the cars.
-
Day 4 - Well... not exactly, but kinda.
10/16/2015 at 11:31 • 0 commentsUPDATE:
I know its been a bit since the log update, so I'll summarize:
- Turns out the board for the Rock2 did die, sadly, beyond repair. So we got it RMA'd and purchased another one. The delay in the project is mostly due to this.
- We've put together a small test fixture to hold the LCD panel, touchscreen digitizer, and the associated control boards for the LCD panel. (pictures to be posted soon). Thanks to my Dad for the precision cutting :-). This also delayed the project slighty as both of us wanted something a little more stable than the cardboard box that I cut apart.
- We've also purchased and received the DSP, DAC and associated hardware for the audio processing part of the project (once again, pictures to be posted soon). Tested basic functionality and we were both very pleased with the results.
So, at this point we will be working out some of the finer details of the actual workings of the software, right now we are sticking with Android, as opposed to a true Linux distro, for a few main reasons:
1. Easily integrated applications and the ability to play nicely with our smartphones (and their applications).
2. Driver support for the board is fairly robust, and in its current state things work pretty nicely with the Android OS. Though for the touchscreen and a few small things we may have to compile some drivers/support into the kernel, but that shouldn't be too bad.
3. Android seemed a bit faster on that board vs. Linux. Now, that being said I'm sure the kernel was not as optimized as it could have been, and there were some things running that I'm sure could be turned off, but either way integrating things that we wanted to work properly seemed like a bit kludge and they did not operate as smoothly as hoped.
-
Day 3 - Operating System tweaking
09/04/2015 at 09:04 • 0 commentsMission:
- To get the current debian based OS (Rabian) working with a better resolution for viewing on the small screen.
- To investigate a kernel re-compile to add some drivers for the USB Touchscreen.
Part 1:
Decided to attempt to use the SATA Header and attach the SSD that will be storing the music, just to verify it will work.
- Board does not power up with the SATA header and SSD installed with a 2A power supply (its actually about 2.3). Please note, my partner in this project was able to do this with his, and it did not see the drive, but was able to use the base OS without issue.
- Unplug all cables, and only plug in base cables (power and HDMI). Board does NOT power up.
- Attempt several different times to get into "loader mode" to attempt recovery. FAILED.
- I notice that the power LED (red) on the square base board is blinking... not staying on steady and I can hear a small almost beep coming from the board whenever it blinks. (Failed component?)
- I attempt different power supplies even ones that are underrated, and I get pretty much the same issue.
- I removed the SoM from the board, and put power just to the board. The red LED stays solidly lit without issue.
- Posted issue to http://talk.radxa.com/ in hopes that someone can help diagnose the issue, or provide some ideas.
Hoping someone can assist as I honestly have no idea where to start. Its literally only be 3 days since it was working last, and I really don't think I fried it...
-
Day 2 - The Bench
09/02/2015 at 06:57 • 0 commentsMission:
- To make a temporary testing platform for further experimentation with the computers to determine which will be the "winner" and gets to be the main computer in the car.
Part 1:
Created a cardboard stand for the monitor and necessary driver boards to sit on while still providing adequate room to move things around.
*** THIS IS TEMPORARY! ***
This setup will be used to create a more "permanent" platform for things to mount to until all of the software and drivers are working to our liking. The more "permanent" structure will also have to be transportable, as we will need to be able to move the components around the work area(s), as well as need to be able to transport the unit in its entirety to different locations.
Part 2:
Experimented with different distributions and versions of Android and Debian on the Rock2. So far there are 2 issues:
- Touch Screen is not recognized by default on any OS
- HDMI output does not appear to be adjustable EXCEPT in Android Kitkat.
NEITHER of these are deal-breakers, it just means that driver installation for both the LCD Panel and Touch interface will be necessary as well as the configuration and calibration to preference.
-
Day 1 - The Test
09/02/2015 at 06:49 • 0 commentsMission:
- Open all packages and test for DOA components, parts and accessories.
- Get both computers up, running and base distributions installed to verify functionality.
Part 1:
Test power supplies obtained from amazon to verify there is little to no ripple on the power line.
- This was successful, with less than .2v of ripple under load (tested with LEDs first to verify functionality, then with series of resistors and LEDs to make a quick dummy load) for each supply.
Part 2:
Powered up the Raspberry Pi and got distribution(s) installed. Everything appears to be working correctly. Wi-fi and Bluetooth were working within a matter of moments of plugging the adapters in.
Powered up the Radxa Rock2Square (minus the CR1220 clock battery!), it has a factory image of Android KitKat installed. That booted up successfully. Once again Wi-fi and Bluetooth were working within a matter of moments of turning them on in software (both onboard!).
Part 3:
Figure out how to correctly wire up the LCD and Touch screen interfaces, as there are several versions of this LCD out there, and they all do NOT come with instructions.
- Successfully traced out connections and figured out how to correctly wire this particular unit, thankfully there was a + and - marking on the actual touchscreen.
- Powered up the touch screen and interfaced it successfully with both computers. The Raspberry Pi seems to have more options as far as HDMI output goes in the default state (this can be corrected in software as the screen is capable of quite a few).
Audiophile grade car stereo/computer
Not your average stereo... or even your high end stereo... but MORE!