-
1Step 1
![]()
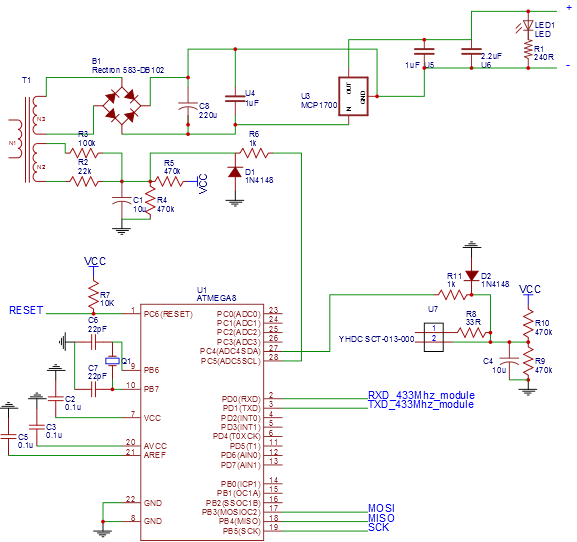
Power source
As mentioned in the discretion, I used a transformer with two secondary coils, so I could use one for the power supply and the other to measure the voltage. As the power source is used as the reverence for the ADC converter (Aref), it had to be very stable and precise.
The emonV3 has a build in MCP1702 linear voltage regulator with 0.5% tolerance. Unfortunately I could not get my hands on one of these, so I had to use an equally adequate LP2950 (50 Eur. Ct) with 5 V output voltage. After the usual capacitors to sooth the voltage I fed the µC with 4.99 V. According to the datasheet of the LP2950 the voltage is stable up to a couple 100 mA drawn.
-
2Step 2
Voltage measurement
The circuit for the voltage measurement is basically the same as for the emontx, except for the voltage divider right at the transformer exit (see This page for a very good explanation). The emontx uses a 100 and 10K resistor and a 9 V transformer, I use a 6 V one. So with these resistors and my smaller transformer I would end up with about 0.77 V coming from the transformer as a oscillating voltage on top of 2.5 V from the voltage divider. In sum only 3.27 V of the 5 V my ADC could measure.
So I would waste about 1.7 volts and with that resolution. So I exchanged the 10K resistor with a 22K one and end up with:
Add these 1.52 V to the 2.5 V from the voltage divider and you end up at 4.02 V, a much better voltage range for the ADC to work with.
-
3Step 3
µC power supply and reference voltage
I learned it the hard way how important decoupling capacitors are...
My ADC measurements were always a bit unstable until I read more about the ADC on a micro controller (RTFM!) and fixed this issue with some capacitors near to the IC.
Thats what I did to get stable ADC measurements
- 100 nF capacitor between Vcc and Gnd
- 100 nF capacitor between AVcc and Gnd
- 100 nF capacitor between Aref and Gnd
- Supply 5V to AVcc / Gnd through a separate, which is not extended from Vcc and Gnd.
-
4Step 4
C-Code
The C code is, as everything before, basically the same as for the emontx respectively the earlier versions. What I did was translate the c++ code to C and make it a bit simpler. For example this
    sqV= filteredV * filteredV;                 //1) square voltage values
    sumV += sqV;                                //2) sum
is simplified tosumV += effV*effV; //sqV; filteredV == effVThe original code is perfect for learning to program and keep track of the process, but it an be simplified and variables saved.The
Since reading the ADC values is much faster outside the Arduino IDE, I could optimize the code for the zero-crossing of the sine wave. In EmonLib.cpp the code is:
  while(st==false)                                   //the while loop...
  {
     startV = analogRead(inPinV);                    //using the voltage waveform
     if ((startV < (ADC_COUNTS*0.55)) && (startV > (ADC_COUNTS*0.45))) st=true;  //check its within range
     if ((millis()-start)>timeout) st = true;
  }
With ADC_counts = 1024 the loop checks for a ADC reading from 563 to 461 to find the zero-crossing. This is a very wide range to find the starting point of a measurement. With the faster reading in C I could get reliable zero-points with this code:while (is_zero != 1) //wait for the sine wave to cross //zero, then start measuring { adc_v = ADCsingleREAD(PC5); if (adc_v < 519 && adc_v > 507) is_zero = 1; }While the EmonLib code finds the "zero" within a 10 % window over the total ADC range, it is possible to do the same within a 1.1 % window without the IDE.Furthermore with faster ADC reading you get a much fast sample rate and therefore in principle more accurate measurements.
Without the Arduino IDE (on which the EmonLip.cpp is based on) my code compiles to about 2.4 kb and the original needs about 7 kb space on the micro controller.
Possible further improvement ?
To reduce the computing power of the µC and possibly use lower clock frequencies with the expense of space one could try to use lookup-tables for the following calculations:
raw_v = ADCsingleREAD(PC5);
raw_i = ADCsingleREAD(PC4);
offsetV = offsetV + ((raw_v-offsetV)/1024);
offsetI = offsetI +  ((raw_i-offsetI)/1024);
effV = raw_v - offsetV;
effI = raw_i - offsetI;
sumV += effV*effV; //sqV
sumI += effI*effI; //sqI
So with a lookup-table with all 1024 possible ADC readings the code would be reduced to:effV = lookup_table[raw_v]; effI = lookup_table[raw_i]; -
5Step 5
Python script on the receiving side (PI)
The Python script is pretty straight forward. The incoming data is read by the py.serial library from /dev/ttyAMA0 (the 433 MHz module / serial port) and stores the data in a sqllite database via py.sqlite3.
Add the datalogger script to "autostart" on you PI. Create a new file "emon_starter.sh"
#! /bin/sh
# /etc/init.d/emon_logger
### BEGIN INIT INFO
# Provides:          emon-logger
# Required-Start:    $local_fs
# Required-Stop:     $local_fs
# Default-Start:     2 3 4 5
# Default-Stop:      0 1 6
# Short-Description: Emon-Logger
### END INIT INFO

case "$1" in
  start)
    echo "Starting Emon-Logger"
    # run application you want to start
    sudo python /home/osmc/emon/log.py -log &
    ;;
  stop)
    echo "Stopping Emon-Logger"
    # kill application you want to stop
    killall python
    ;;
  *)
    echo "Usage: /etc/init.d/example{start|stop}"
    exit 1
    ;;
esac


exit 0
Copy the code above to /etc/init.d/emon_starter.sh, then run:
sudo chmod 755 /etc/init.d/emon_starter.sh sudo update-rc.d emon_starter.sh defaults -
6Step 6
Java-Script-Graphs
Among the many many free / open Java Script graph libraries I found those from C3js.org particularly easy to include and to customize.
The data every graph shows depends on the SQL-query one fetches the data with: e.g. hourly statistics of the current day
$get = $dbhandle->query("select strftime('%H',timestamp), round(sum(real_power*".$time_interval_h_min."),2) from ".$tbl_name." where date(timestamp) = date('now') group by strftime('%H', timestamp)");The returned rows from the SQL-query were processed into variables and printed as java script code.while($data = $get->fetchArray()) { $x_tick_label[] = $data[0]; $real_power[] = $data[1]; $num_entries++; } [...] //lines of code <script> var chart = c3.generate({ size: {width: 75}, bindto: '#chart1', data: {x: 'x', columns: [['x', <?php $i = 0; for ($i; $i < $num_entries; $i++){ if ($i == $num_entries-1) echo "'".$x_tick_label[$i]."'"; else echo "'".$x_tick_label[$i]."'".','; } ?>], ['Wh', <?php $i = 0; for ($i; $i < $num_entries; $i++){ if ($i == $num_entries-1) echo $real_power[$i]; else echo $real_power[$i].','; } ?>] ],[...]//lines of code </script>
Yet another energy monitor
A low cost Energy-Monitor system which is deeply influenced by the openenergymonitor.org projekt
Discussions
Become a Hackaday.io Member
Create an account to leave a comment. Already have an account? Log In.