Close
0%
0%

Stubby the (Teaching) Hexapod

100% open source robot platform with accessability and affordability in mind: teaching children of all ages about robots & programming

Similar projects worth following
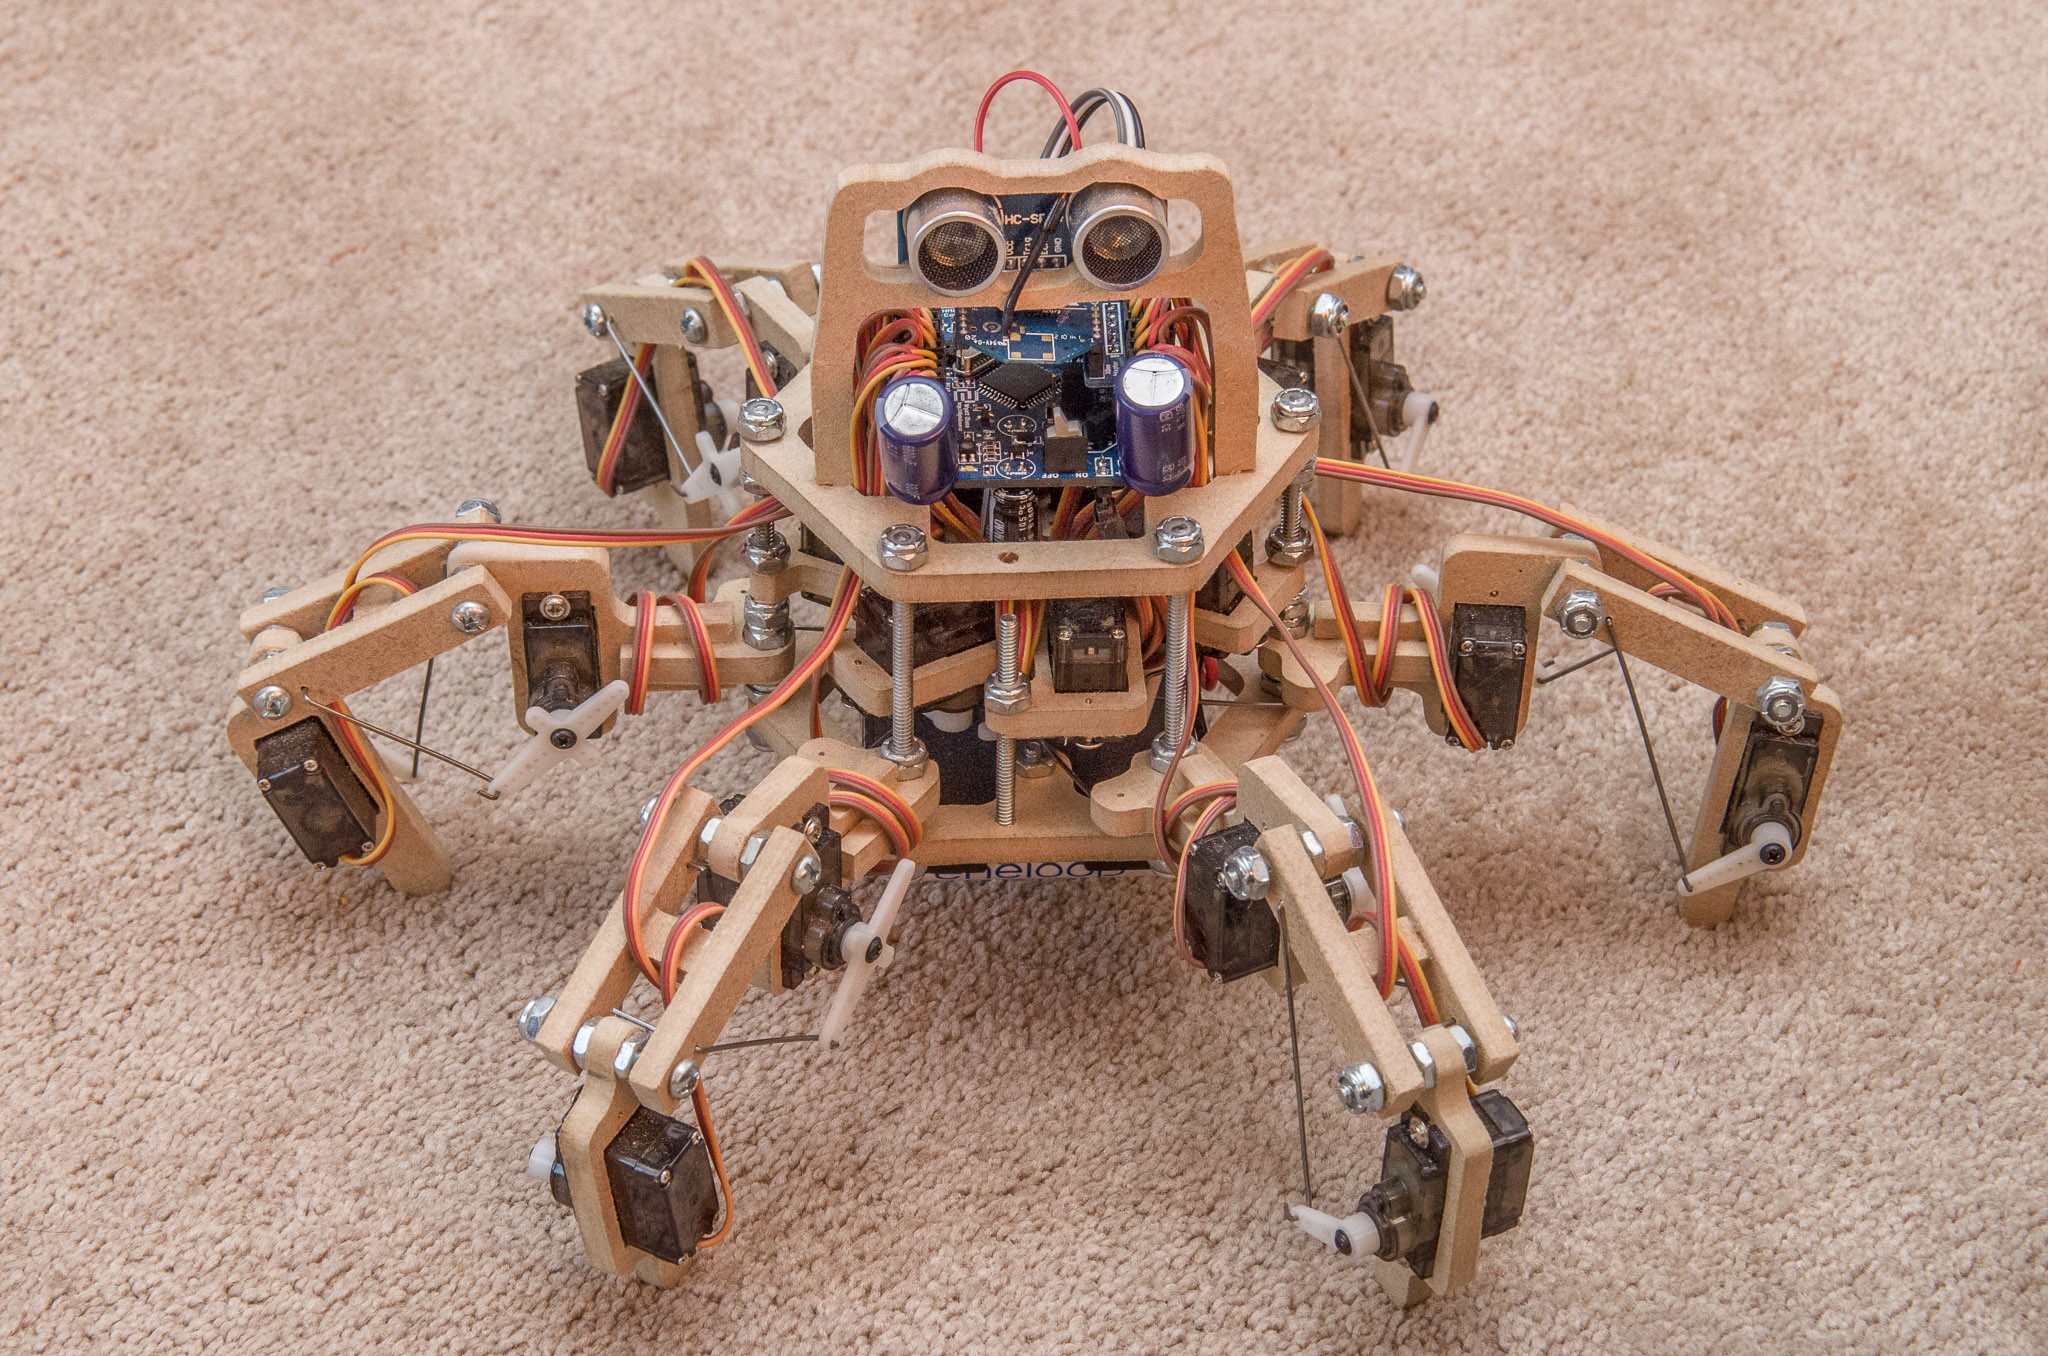
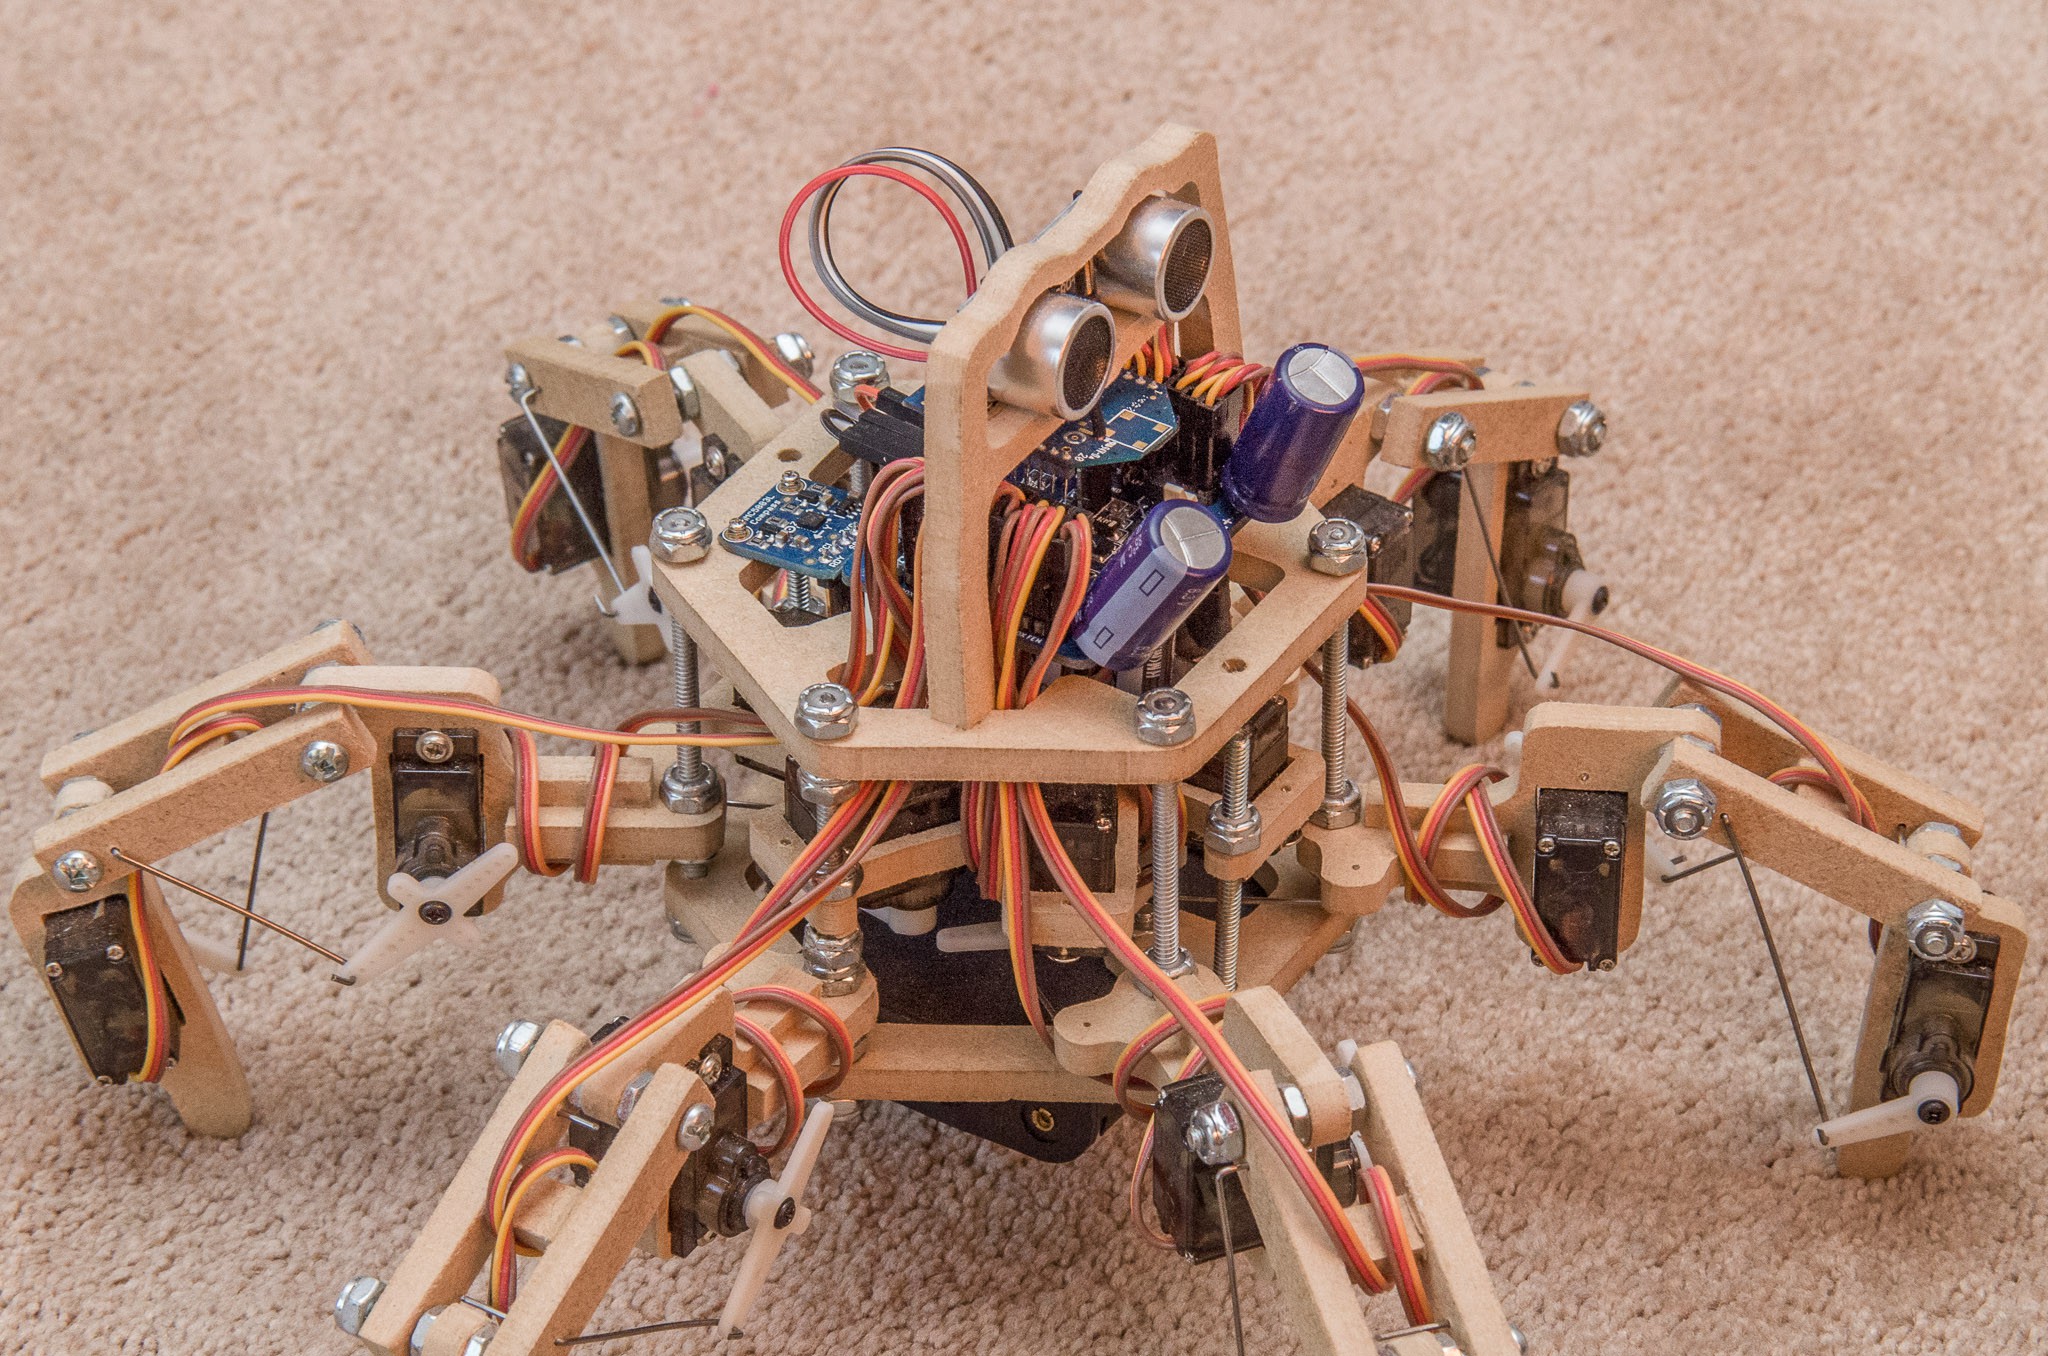
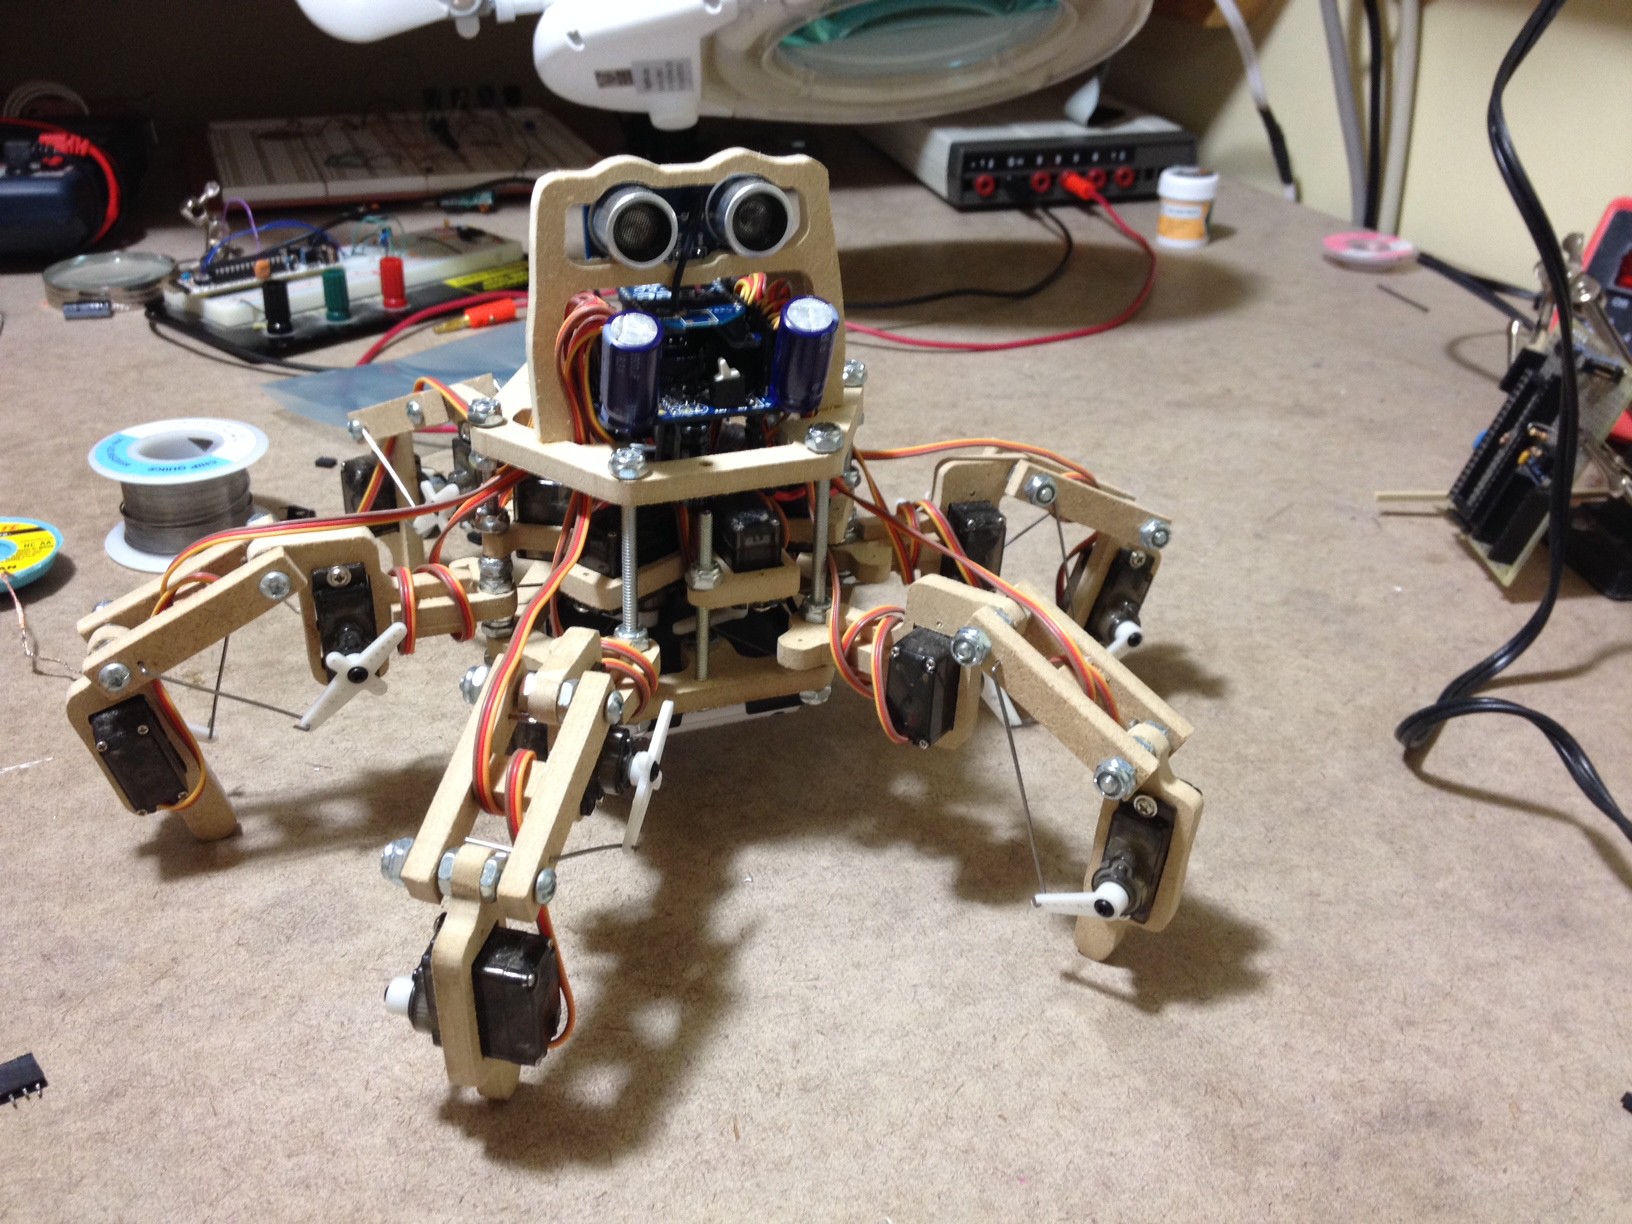
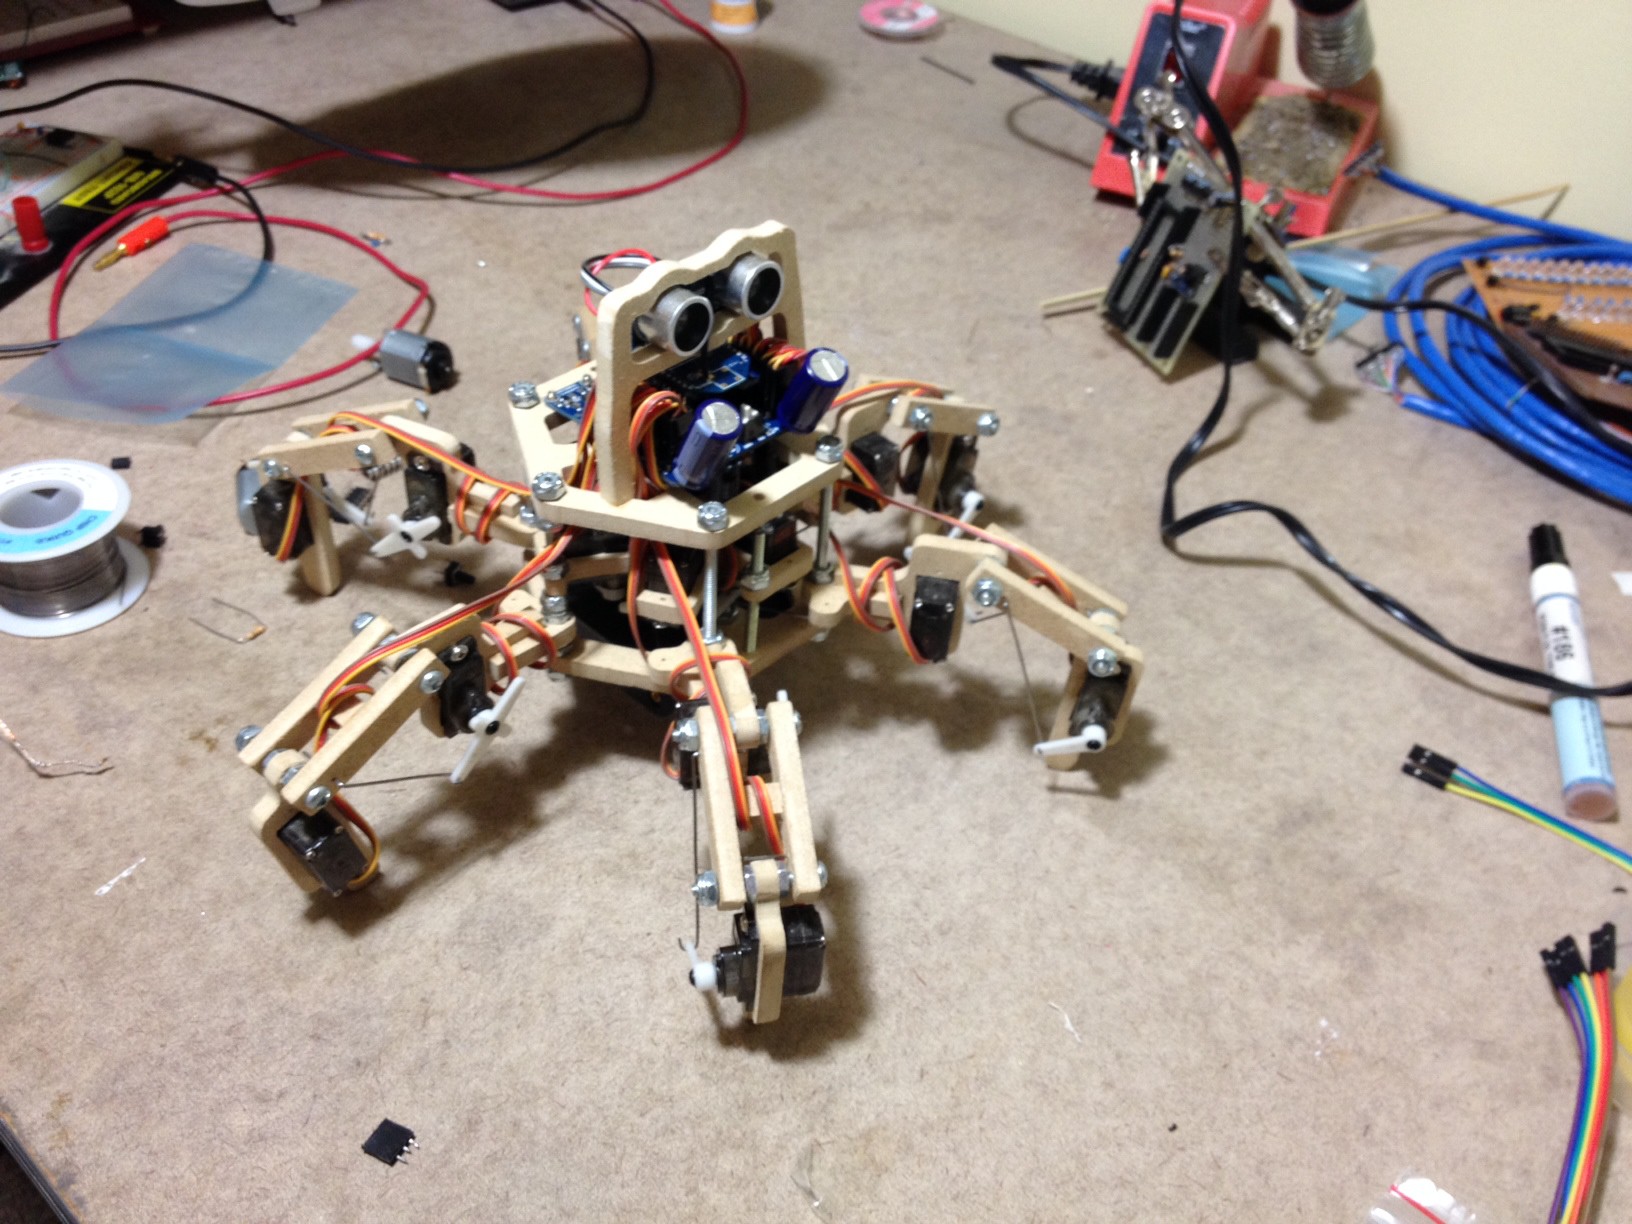
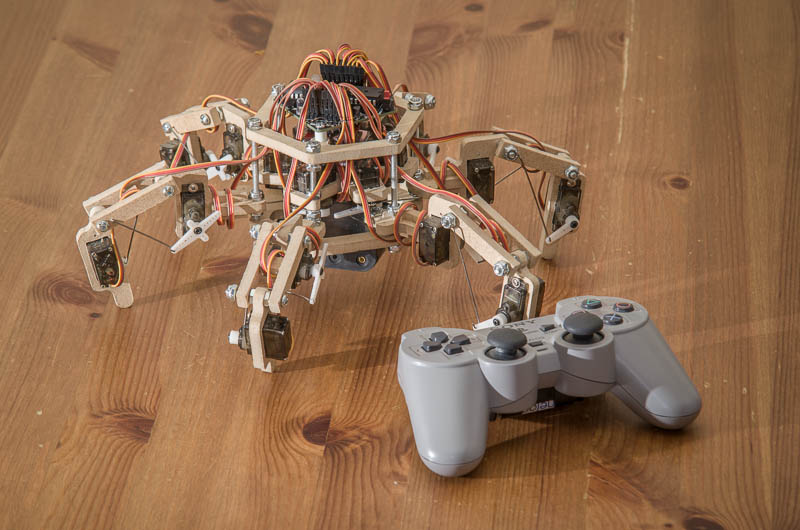
Stubby is a 100% open source, extensible robotics platform. It features ultra low cost design (MDF frame, which you can cut with a scroll saw; $2 low torque servos; a single microcontroller; easily-obtainable electronic and mechanical components), can be controlled by a Universal Controller (over XBee) or a computer (over Bluetooth), and has a Processing API which can help children learn basic programming concepts.

My daughter, Princess Sparkle, and I have been working on it since February 2014, along with the help of some of my friends. Other hackers worldwide are working on their own versions, some of which are 3D printed, others are laser cut plexiglass, and at least one is hand cut from Baltic Beech wood for what will doubtless turn out with a beautiful, natural look.

The Universal Controller interface is completed and working, and the Processing / Bluetooth API is well underway.

See http://stubby.digitalcave.ca/ for more information.

Since we started, Stubby has grown from a simple, direct-driven 2 DOF (degree of freedom) per leg frame to a mechanically-assisted 3 DOF per leg design with a full inverse kinematics engine (which allows the processor to calculate custom foot positions for each step, rather than relying on a static loop).
This video shows off the latest version, including various features of the Inverse Kinematics engine:


Originally, the concept of Stubby came from the SG-1 universe's replicators (which, let it be known, are completely awesome!). The name 'Stubby' was coined by Princess Sparkle, after seeing the first version (with 2cm long, oblong legs), barely able to limp along the carpet.

After the interesting parts (most notably the frame design and inverse kinematics engine) were completed, I wanted to expand Stubby's abilities. The Hackaday Prize made me think about 'connected' projects... at the same time, Princess Sparkle was expressing interest in computers and programming. In talking with her, we came up with the idea of making an API which would allow her to issue simple commands to control the robot.

This is not the first time she has done this sort of thing... in her Grade 1 class, there was a unit on Lego Mindstorms robots, which taught the children to visualize arithmetic expressions by programming the robot to, for instance, move 10 units forward and 3 units back, and seeing where on a number line they were (10 - 3 = 7). With Stubby, the plan is to expose more of the programming structure to her, teaching such things as procedural control, calling methods, assigning variables (by reading sensors), etc.

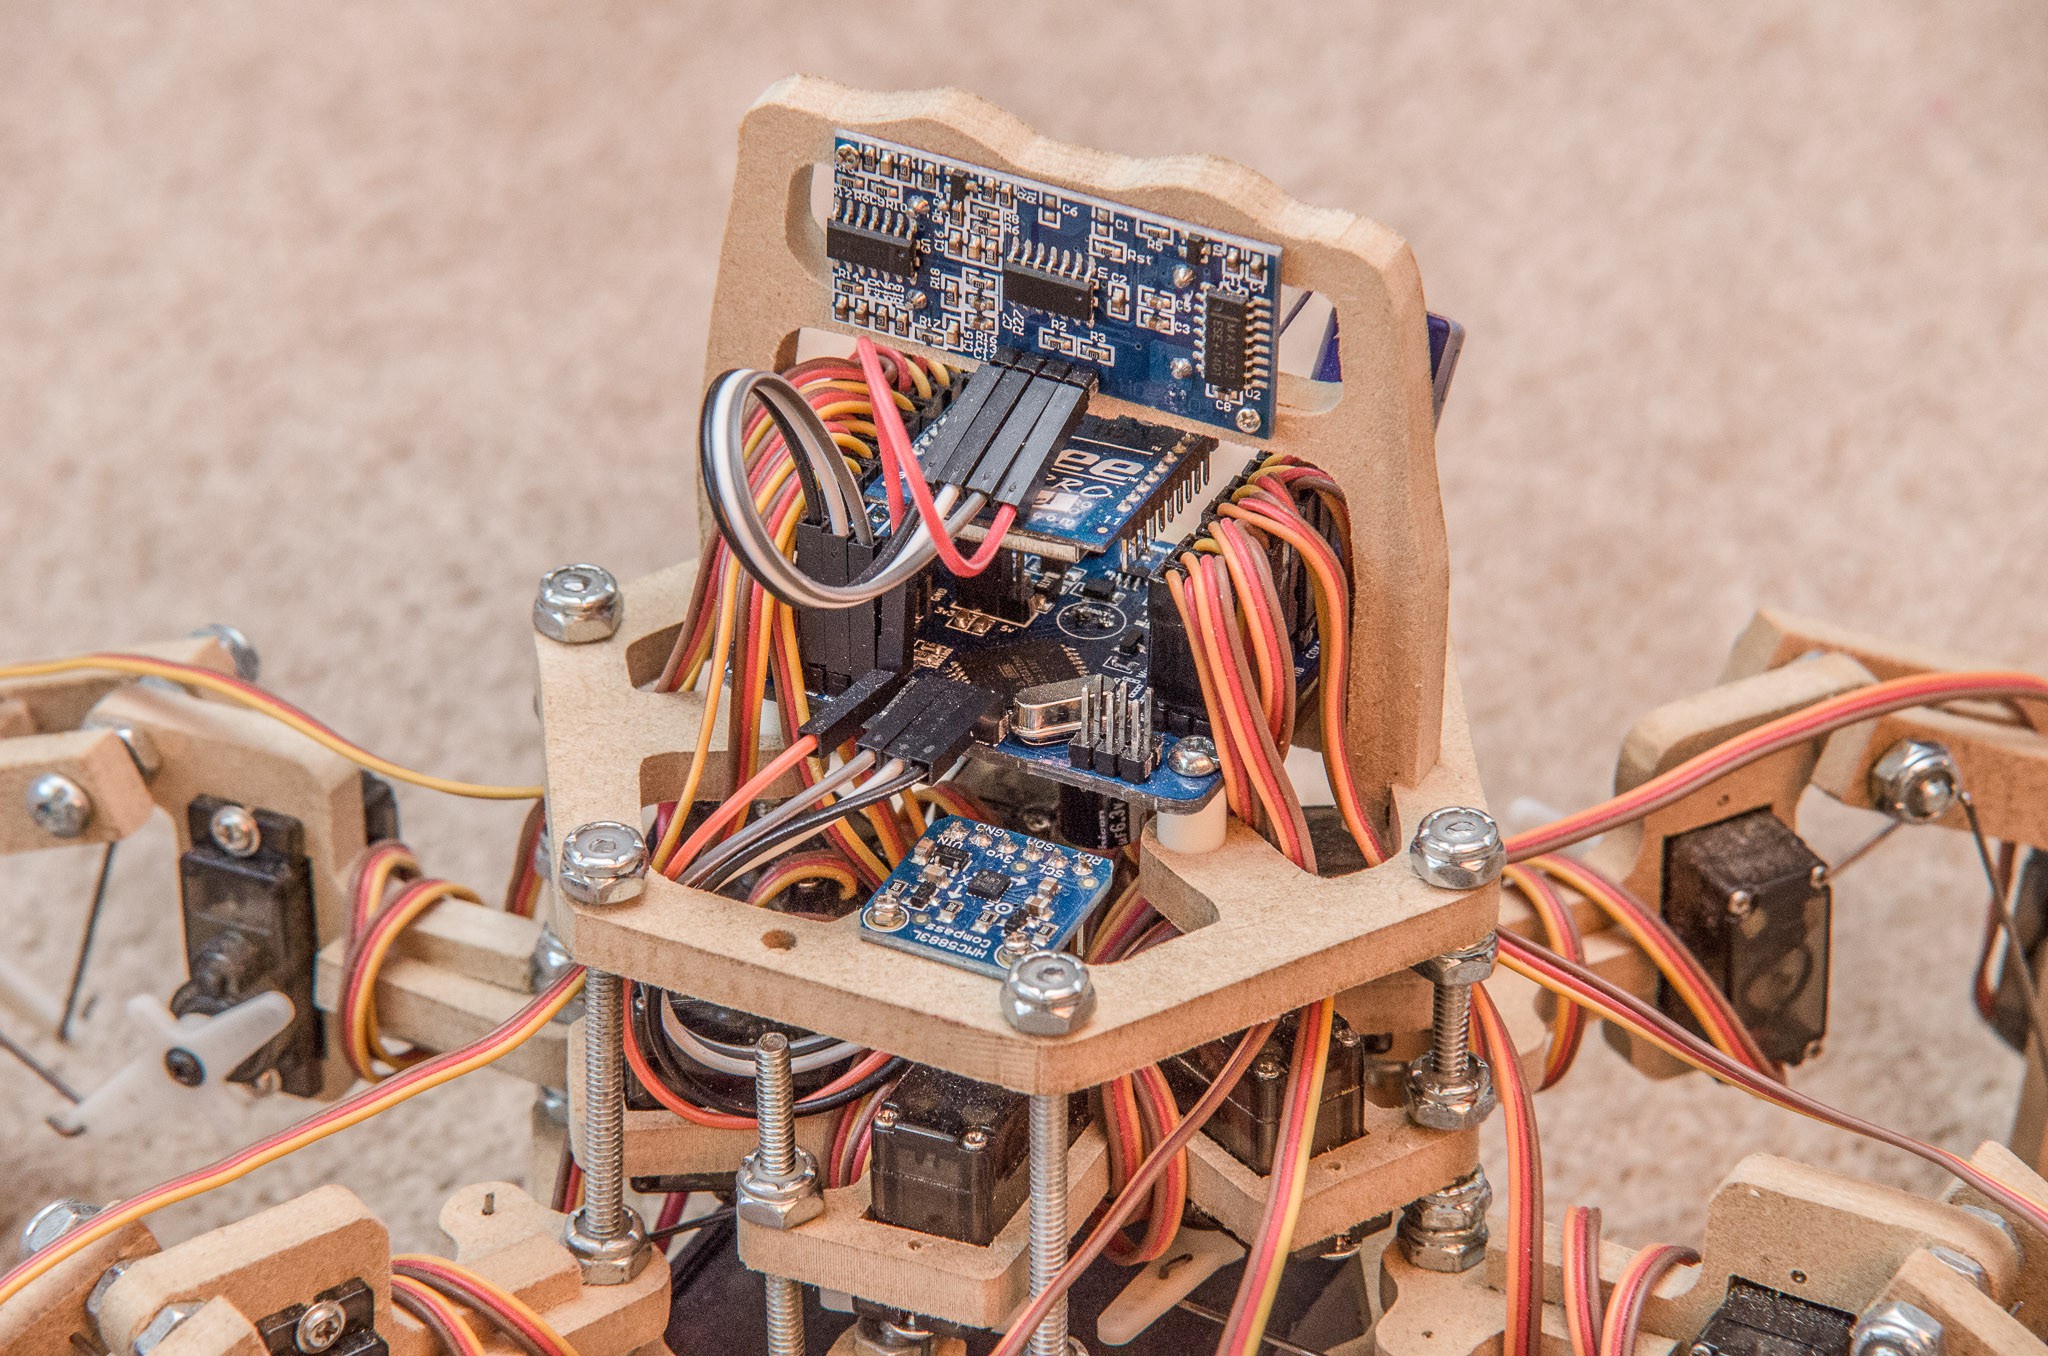
When finished, I plan on having an Ultrasonic Distance sensor and a magnetometer, together allowing users to write code for autonomous operation. An array of UV LEDs + photodiodes on the bottom will allow for writing line following algorithms. An i2c header is broken out, so that hackers can add completely new components as well.

Please refer to Youtube for THP Submission video and THP Semifinals video. Judges: see the Semifinals Requirements log for details on how Stubby achieves THP requirements.


For those who are interested in building their own version of Stubby, I have all the designs, plans, and theory available for all to use and modify freely. There are two documents which encapsulate the majority of my work.

First are the frame plans. The frame is one of the biggest advantages which Stubby holds over other, more expensive hexapods. The first difference is the materials: Stubby is designed to be cut from 1/4" MDF using a scroll saw. (However, the design is adaptable enough to be able to use other materials as well, and the community has modified these plans for use with a 3D printer, laser cutter, etc.) The frame is quite easy to make; simply print the plans, tape it to an 8.5x11" sheet of MDF, and cut along the lines. The second difference is how the servos are attached to the legs: Stubby uses push rods to convert distance to torque, allowing Stubby to work with cheap, low-torque servos (at the expense of being a bit more limited in leg movement). This is the biggest factor in being able to keep below $150 in components (this assumes you have no parts in your parts bin, but does assume that you have all the required tools already).

The second important diagram is the circuit board schematic. This shows how to wire the control board so that the microcontroller can perform the needed calculations and tell the servos how to move.

The hardware is useless without software to control it. You can download or browse my git repository, which includes all software, electronics, and frame design.

Everything needed to make Stubby, both hardware and software, is licensed under a Creative Commons Attribution-Share Alike License).

  • 1 × Visit http://stubby.digitalcave.ca/stubby/components.jsp for components list

  • Laser Cut Frame Assembled

    The Big One01/30/2016 at 17:39 11 comments

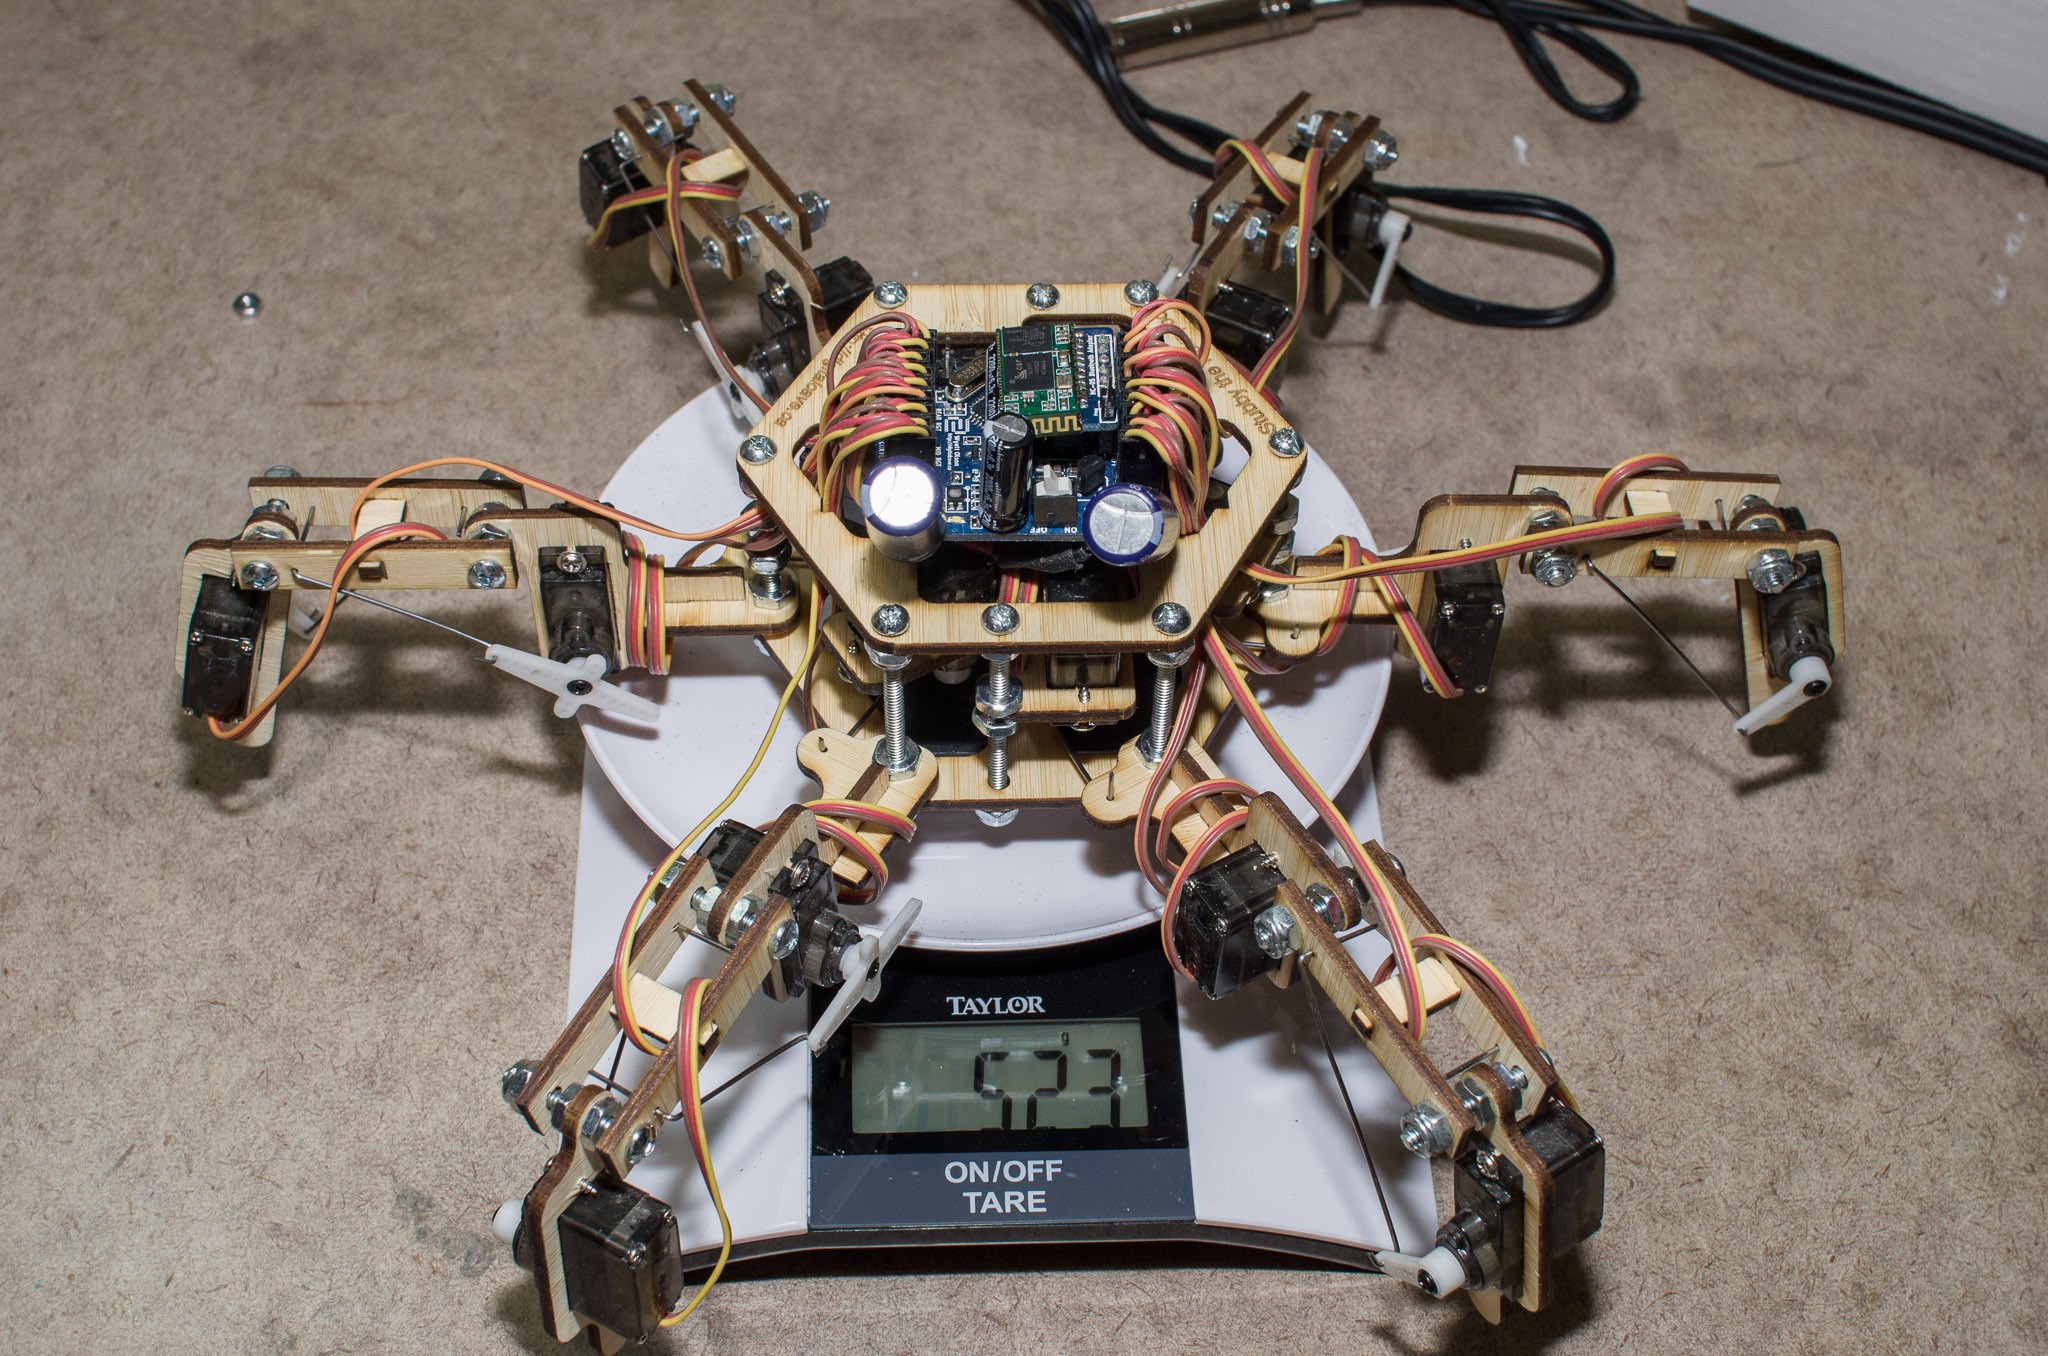
    I finally got around to assembling the laser cut frame parts, and everything is looking good. The servos were just barely too large for the holes (and by 'barely', I mean a couple thousandths of an inch); 20 seconds with a file on each servo hole made it fit perfectly. I am not sure whether I should enlarge the holes or not, though... I cut the holes according to spec, so I suspect that my servos are just a bit out of spec. I don't want the holes to be too large, so that the servos are not flopping around. (They are only secured with two tiny screws). If anyone has a thought on this let me know...

    Another nice thing with the thinner wood is that the entire body stack is now short enough that I can use 2" #6 screws, instead of custom cut threaded rod. Screws are much easier to work with, especially in conjunction with lock nuts.

    I also decided not to assemble the distance sensor mount this time; it was nice to play with it when I was working on the API for the HaD Prize, but since then I have not use that much. The kids like to just use the remote control.

    The laser cut frame is definitely lighter than the MDF one, although at the end of the day the total difference is less than I thought - batteries and servos contribute the most to the weight. The laser cut parts do look pretty sweet, though!

    The 'after' shot is included below, with the 'before' shot and some assembly shots included after the break.

    Cheers

    Read more »

  • Laser Cut Parts Arrived

    The Big One11/24/2015 at 00:51 1 comment

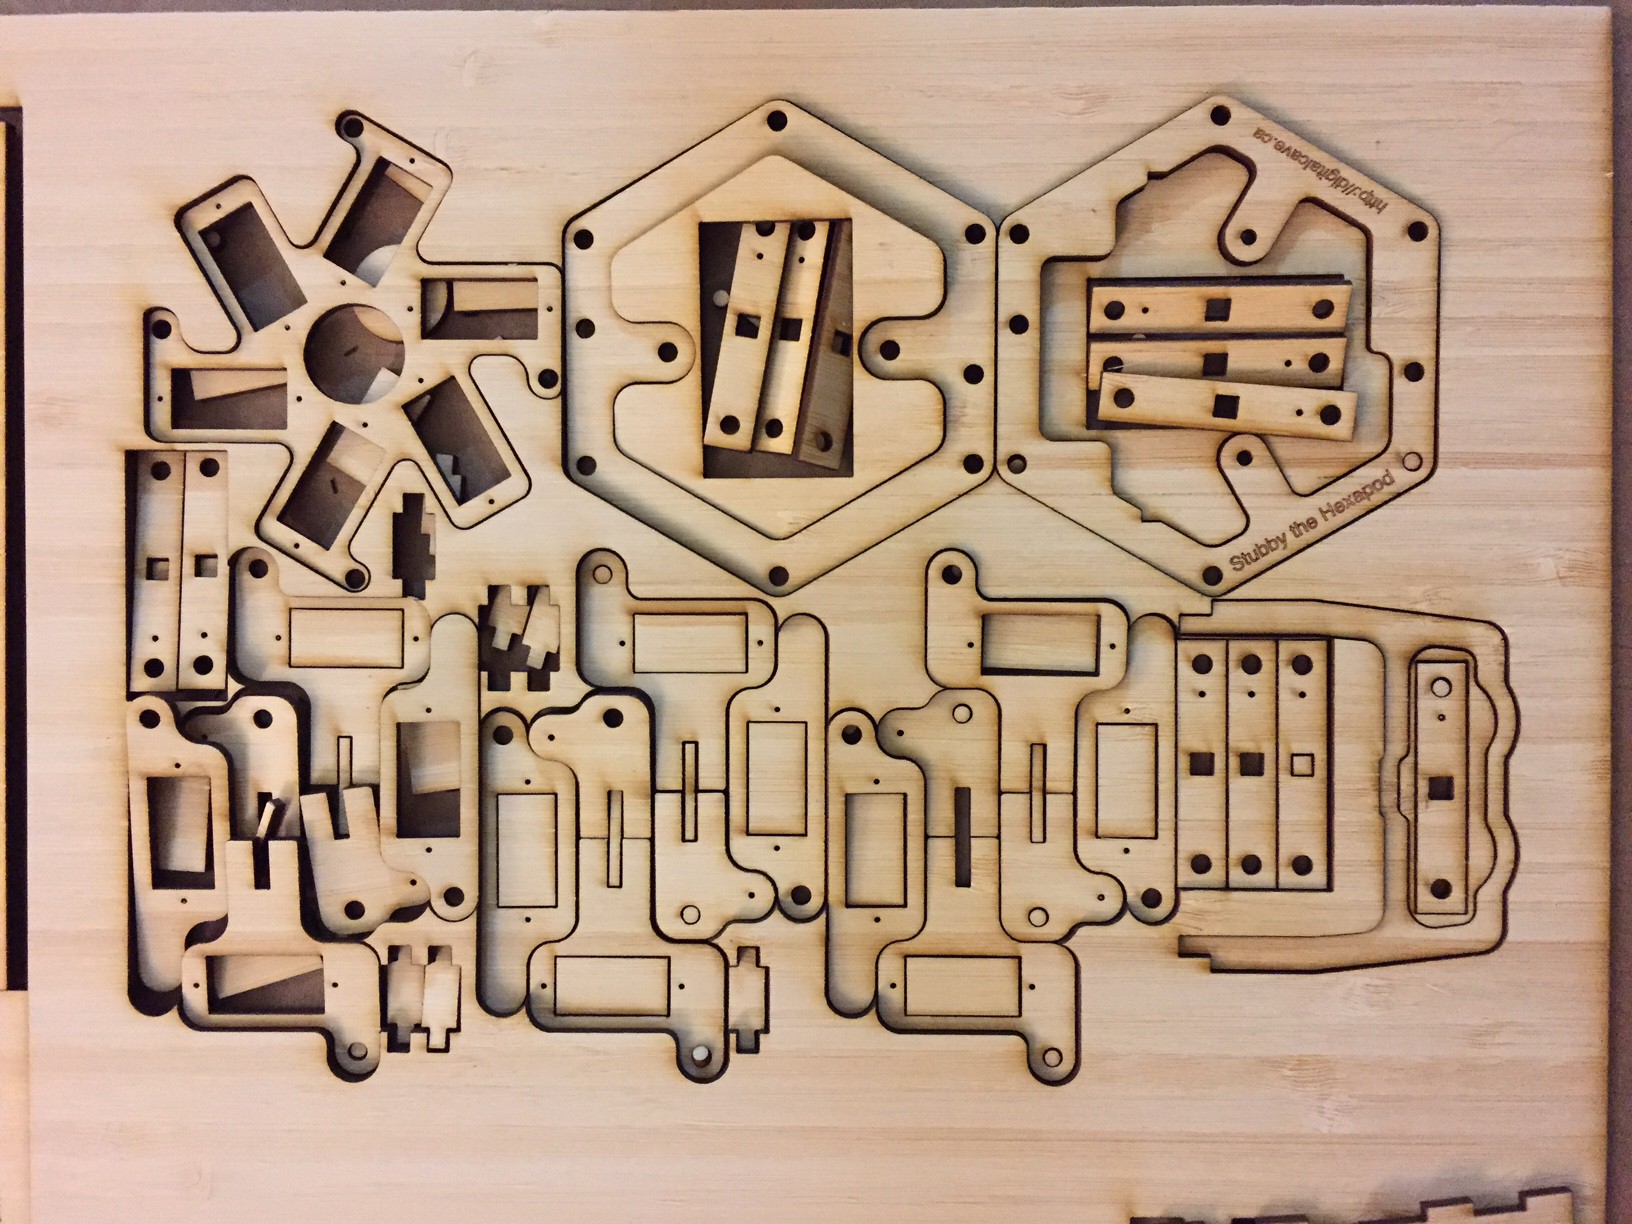
    The laser cut frame for Stubby has arrived today, and things look good overall. I made a couple of mistakes, which have since been resolved in the .dxf file: most notably, the braces between each of the femur parts (which, when glued together, will form an 'H') have slightly too large holes, so that the cross braces do not fit tightly. A second, not as bad, issue is where the distance sensor attaches to the top part of the frame; there is about 1mm too much space. Both of these will be fine with a bit of glue, but I have fixed the .dxf file so that if others try it, it should work fine.

    I am not sure how long it will take for me to put this together... I don't have any spare servos, so I would have to disassemble my existing Stubby to assemble this one, and I am reluctant to do that (both for sentimental and time reasons). Furthermore, the servos in the original Stubby are getting a bit worn, which is causing them to jitter a bit; it is probably time for a new batch of servos, but I don't have a spare $50 right now. I'll make the order some time...

    Here is the incoming laser cut plywood, right after pulling the top sticker off (which unfortunately caused some of the smaller parts to move around):

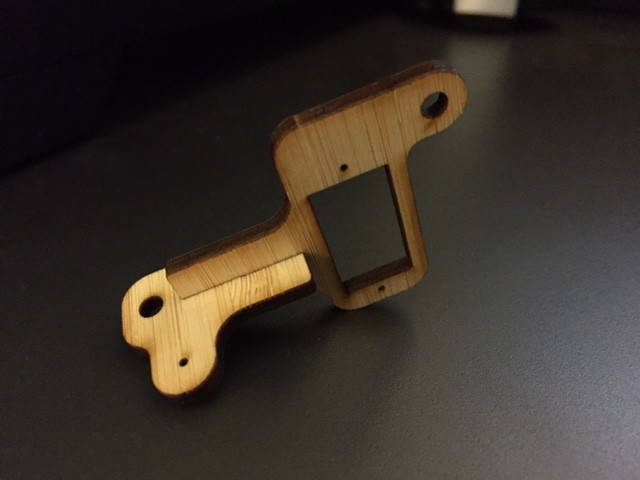
    Here is a (poor quality) shot of the coxa joint's two parts, fitting tightly together without any glue. (You will of course want to use glue when assembling the robot, but the fact that it fits this nicely means that the glued joint will be that much better in the end):

  • Official Laser Cutting Template

    The Big One11/14/2015 at 19:43 2 comments

    It's been a while since I have posted an update... I've been working on lots of other projects.

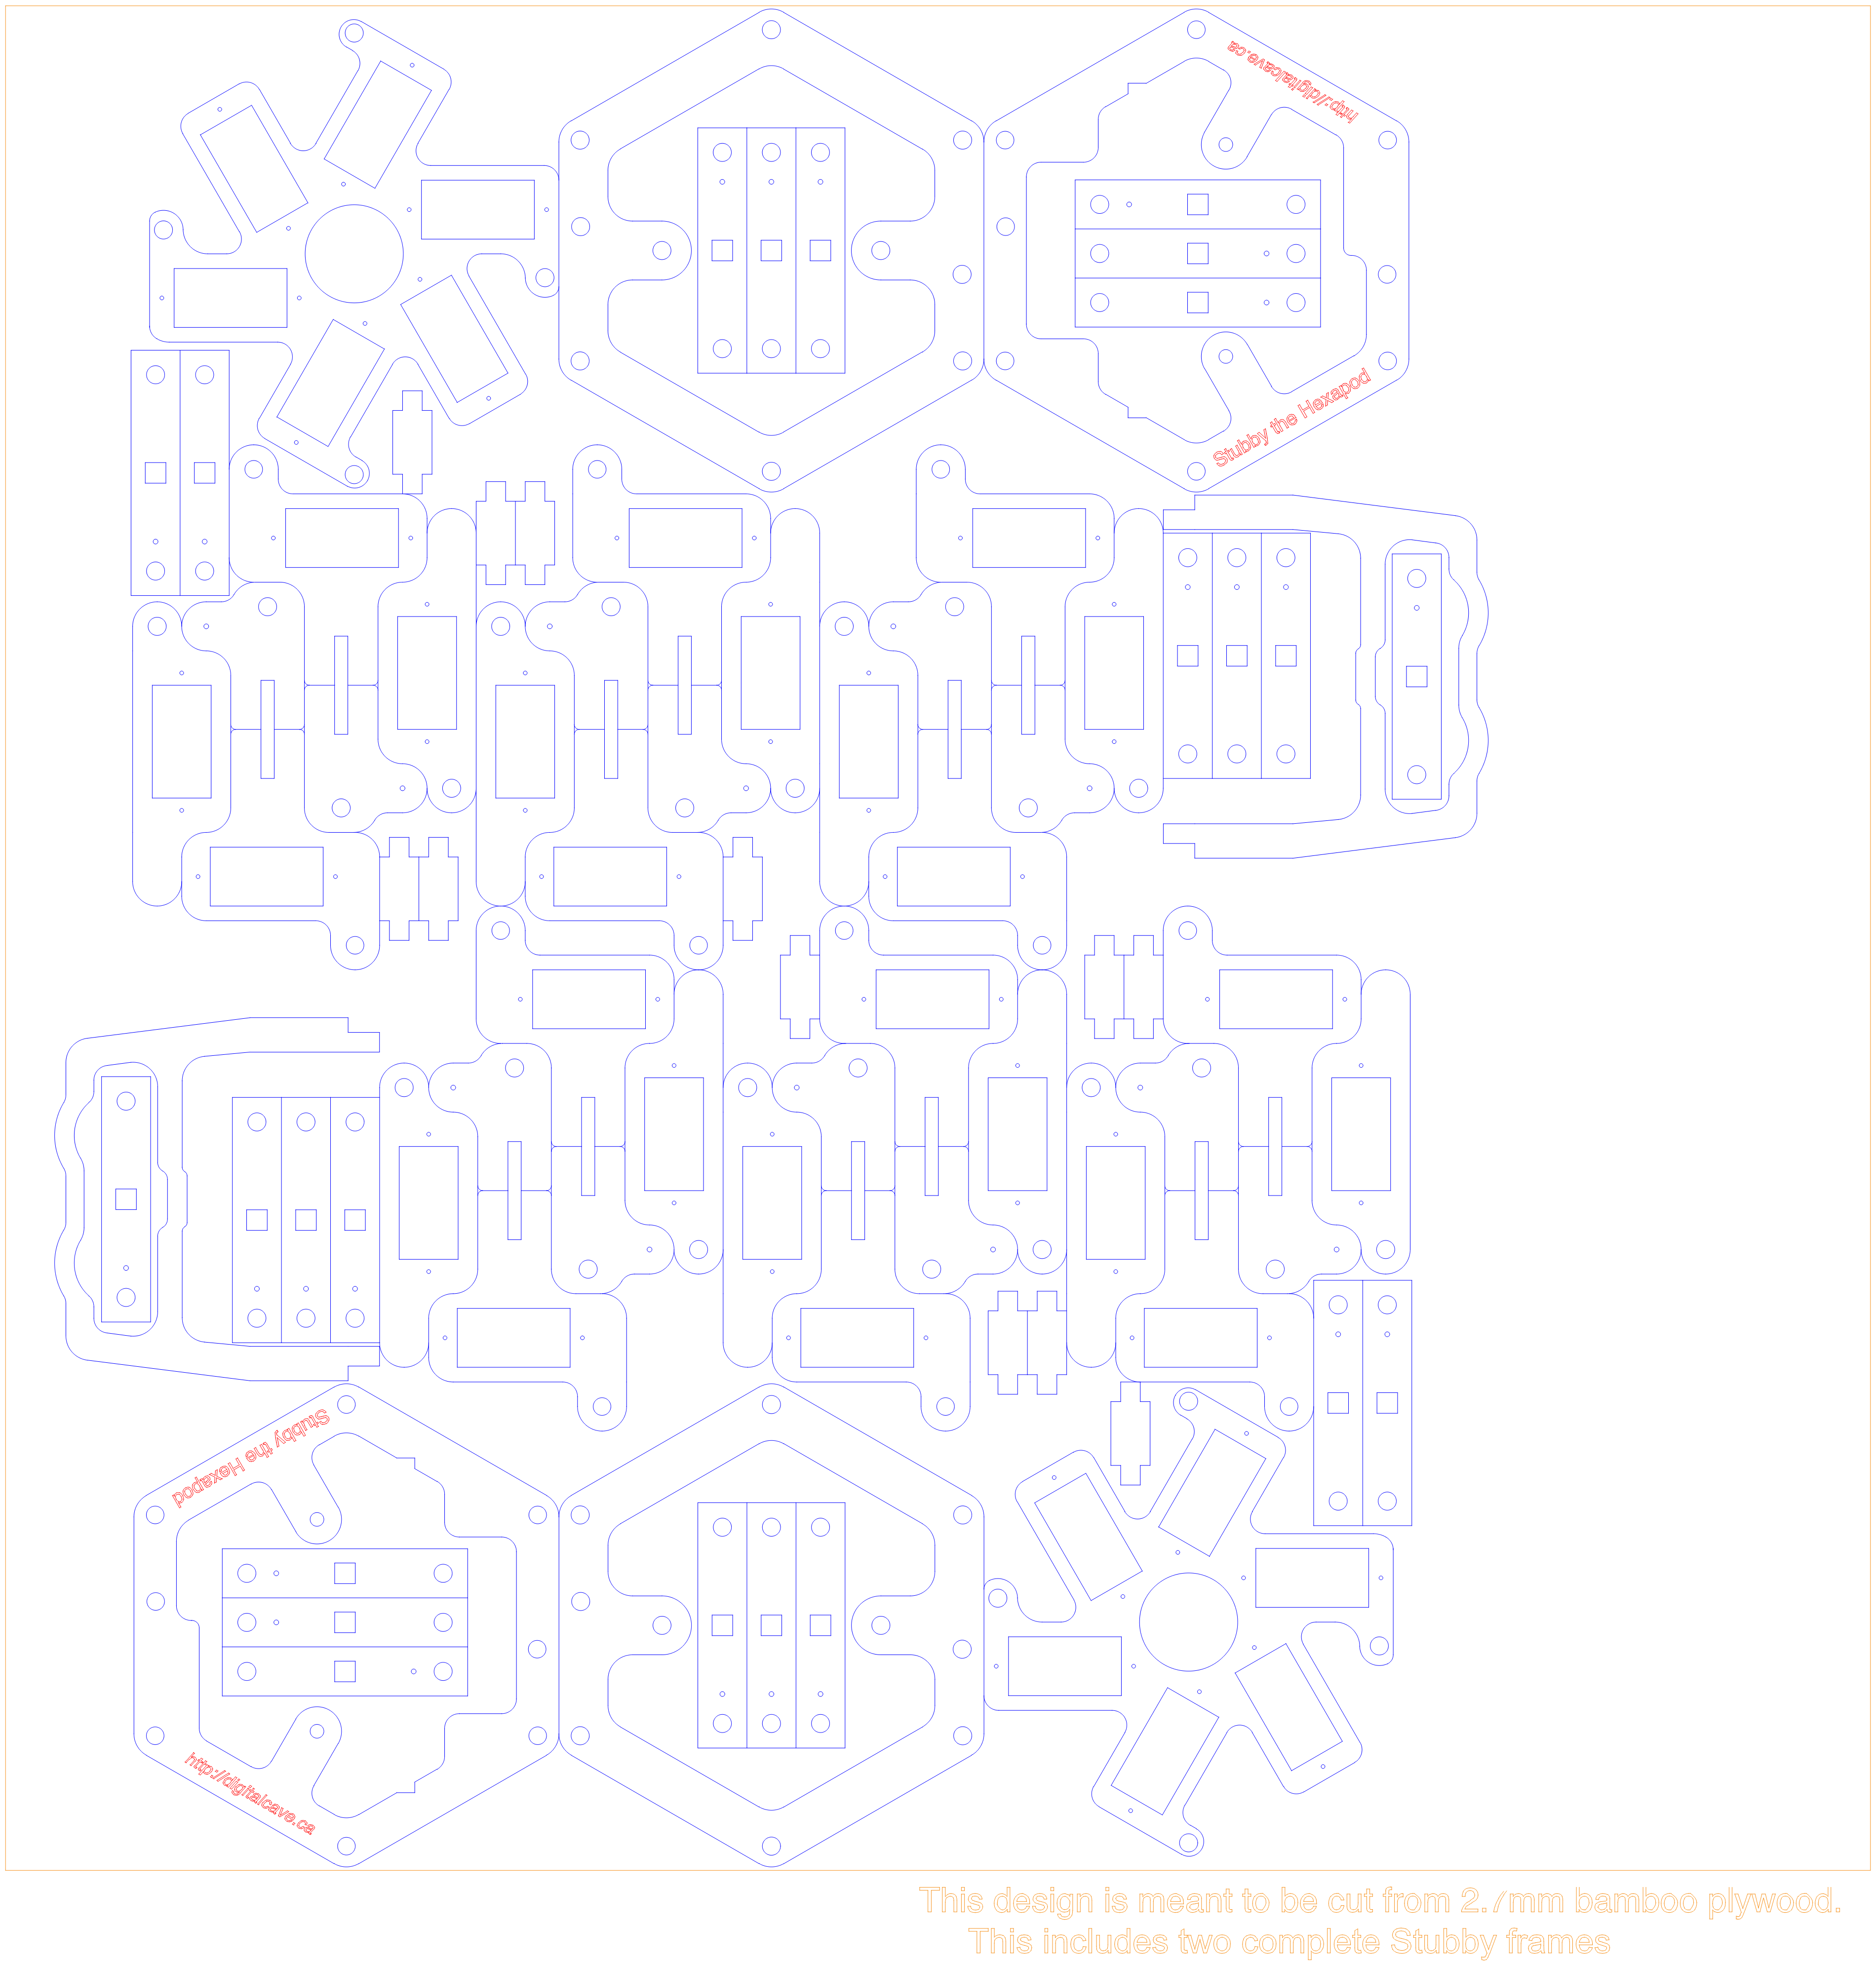
    One of my recent projects includes a laser cut faceplate from Ponoko, so I figured I may as well save on shipping and batch something else. Stubby is the obvious candidate for this. I have made some modifications to the original frame to be better suited for laser cutting (removed doubled-up lines, added some engraving text, etc). Two frames fit nicely on a Ponoko P2 template size.

    I have just made the order today, so have not yet confirmed that it works properly, but I think that it should as long as I have not messed up the measurements somewhere. If you are interested in trying it out yourself, you can grab the .dxf file from the git repo (right click and select 'save link as' - it is a .dxf, which the browser tries to open as text).

    Enjoy!

  • Another Stubby Moves!

    The Big One01/12/2015 at 21:38 0 comments

    David S has just sent me a video of his Stubby implementation (a very nice pink and blue 3D printed model) walking. Enjoy!


  • PC-based Universal Controller Emulator working

    The Big One12/31/2014 at 21:26 0 comments

    I have finished a preliminary version of a 'Universal Controller Emulator', written in Python. This should help those who want to play with Stubby, but cannot find a PS2 controller to re-purpose.

    The program is very simple (currently about 150 lines), and is written in Python (I tested it on python 2.7 in Debian Jessie). It requires the pyserial and pygame libraries (both of which are available across all major platforms).

    The controls are simple: use the keyboard to emulate the Universal Controller.

    • Hit 'T' to press the Start button on the UC.
    • Hit 'Right Control' and 'Left Control' to press the R2 and L2 buttons on the UC
    • Use WASD keys to emulate the left joystick
    • Use the arrow keys to emulate the right joystick
    That's all that is implemented so far (and that is all that is currently used by Stubby). If you want to extend this program to support other keys, it would be very easy to do so.

    Note that in order to get key press / release events working in a cross platform manner, I need to use pygame (and I need to open a SDL window, which in turn requires focus). It is just an empty, black window at 320x200 pixels in size. I'm not a fan of it, but it works.

    You can download this program from the GitHub repository, under the 'python' folder.

    Cheers

  • Building on Windows

    The Big One12/30/2014 at 20:13 0 comments

    I don't use Windows at all, so my workflow has always been very Linux-centric. A couple days ago, Chris emailed me with some questions about building on Windows... it turns out that there were a few problems. There were symlinks in my git repo, some filenames didn't work properly on Windows, and compilation failed with a few different problems when using the (older - released in 2010) avr-gcc for Windows.

    To get things working better, I split Stubby source into its own github repository (previously, it was lumped in with all my other projects), and removed all symlinks. I fixed the code in a couple places where Windows didn't like it. However there was still the problem when compiling using avr-gcc versions older than 4.8; when you tried to do this, you would get a bunch of errors from the math libraries:

    c:/winavr-20100110/bin/../lib/gcc/avr/4.3.3/../../../../avr/lib/avr51\libm.a(atan2.o): In function `atan2':(.text.avr-libc.fplib+0x70): relocation truncated to fit: R_AVR_13_PCREL againstsymbol `__addsf3' defined in .text section in
    
    c:/winavr-20100110/bin/../lib/gcc/avr/4.3.3/avr51\libgcc.a(_addsub_sf.o)
    
    c:/winavr-20100110/bin/../lib/gcc/avr/4.3.3/../../../../avr/lib/avr51\libm.a(inverse.o): In function `inverse':(.text.avr-libc.fplib+0xc): relocation truncated to fit: R_AVR_13_PCREL againstsymbol `__divsf3' defined in .text section in
    
    c:/winavr-20100110/bin/../lib/gcc/avr/4.3.3/avr51\libgcc.a(_div_sf.o)
    
    c:/winavr-20100110/bin/../lib/gcc/avr/4.3.3/../../../../avr/lib/avr51\libm.a(pow.o): In function `pow':(.text.avr-libc.fplib+0x94): relocation truncated to fit: R_AVR_13_PCREL againstsymbol `__mulsf3' defined in .text section in
    
    c:/winavr-20100110/bin/../lib/gcc/avr/4.3.3/avr51\libgcc.a(_mul_sf.o)
    
    c:/winavr-20100110/bin/../lib/gcc/avr/4.3.3/../../../../avr/lib/avr51\libm.a(square.o): In function `square':(.text.avr-libc.fplib+0x4): relocation truncated to fit: R_AVR_13_PCREL againstsymbol `__mulsf3' defined in .text section in
    
    c:/winavr-20100110/bin/../lib/gcc/avr/4.3.3/avr51\libgcc.a(_mul_sf.o)
    
    c:/winavr-20100110/bin/../lib/gcc/avr/4.3.3/../../../../avr/lib/avr51\libm.a(log.o): In function `log':(.text.avr-libc.fplib+0x46): relocation truncated to fit: R_AVR_13_PCREL againstsymbol `__addsf3' defined in .text section in
    
    c:/winavr-20100110/bin/../lib/gcc/avr/4.3.3/avr51\libgcc.a(_addsub_sf.o)
    
    c:/winavr-20100110/bin/../lib/gcc/avr/4.3.3/../../../../avr/lib/avr51\libm.a(log.o): In function `log':(.text.avr-libc.fplib+0x4e): relocation truncated to fit: R_AVR_13_PCREL againstsymbol `__addsf3' defined in .text section in
    
    c:/winavr-20100110/bin/../lib/gcc/avr/4.3.3/avr51\libgcc.a(_addsub_sf.o)
    
    c:/winavr-20100110/bin/../lib/gcc/avr/4.3.3/../../../../avr/lib/avr51\libm.a(log.o): In function `log':(.text.avr-libc.fplib+0x6a): relocation truncated to fit: R_AVR_13_PCREL againstsymbol `__floatsisf' defined in .text section in
    
    c:/winavr-20100110/bin/../lib/gcc/avr/4.3.3/avr51\libgcc.a(_si_to_sf.o)
    
    c:/winavr-20100110/bin/../lib/gcc/avr/4.3.3/../../../../avr/lib/avr51\libm.a(modf.o): In function `modff':(.text.avr-libc.fplib+0x3e): relocation truncated to fit: R_AVR_13_PCREL againstsymbol `__subsf3' defined in .text section in
    
    c:/winavr-20100110/bin/../lib/gcc/avr/4.3.3/avr51\libgcc.a(_addsub_sf.o)make: *** [stubby.out] Error 1

    This problem is apparently quite common, and there are tons of references on how to fix it (specifically, don't use -mshort-calls option). However I was not using it. Finally I found a post on a forum which indicated that the problem is that the linker was trying to get the math functions from libgcc rather than avr-libc. The solution was to put -lc and -lm near the beginning of the compiler command, and -lc again at the end. Sure enough, it works! I have now fixed the Makefile, and things should be working on winavr as well as other older versions of avr-gcc.

    To recap: to compile in Windows, you need to download the code (see the links section at the side for the Github Stubby repository), and then compile...

    Read more »

  • Another Third Party Build Completed.

    The Big One11/20/2014 at 01:40 0 comments

    I just received an email today from A.C., who informed me that his Stubby build is now completed. He sent the following video to share:

    This build features laser cut parts (MDF, I think, although I am not positive), and a Rev 2.0 PCB.

    Congrats on a great build!

    Cheers

  • High Resolution Photos

    The Big One11/16/2014 at 22:46 0 comments

    As promised, below are some high(er) resolution photos of the newest frame + distance sensors.

    As for the status, I have not done a lot of work on Stubby recently. There is an oustanding bug with the Processor API turn command: when turning to a specified heading, Stubby will overshoot and then bounce back and forth. I may end up converting to an actual PID routine for this... currently I am using a PID-like approximation, but it doesn't give me much control in tuning. I just don't know when I will do the final bits... I am still a bit overdosed from all the time spent in the beginning of October, before the finalists list was announced.

    Cheers

  • Project Update

    The Big One10/15/2014 at 17:54 0 comments

    So it has been a little while since my last log. I assure you that I am still alive and kicking. Things have been a bit slow, due to the culmination of many parts of the project, but at this point everything seems to be working, and I have just merged my changes from the development branch to master.

    A summary of what we have accomplished in the past week:

    1. Re-cut the top layer of the frame to accommodate the rev2 PCB and Adafruit magnetometer (see photos below)
    2. Mounted the distance sensor to the frame (unfortunately the distance sensor mounting piece pushes us over the arbitrary limit of fitting everything on a 8.5x11" sheet of MDF)
    3. Moved all of the most commonly customized values (what revision of the board are we using? is there a magnetometer? is there a distance sensor? what is the mounting angle of the magnetometer? is there a customized CPU clock speed?) to a file hardware.mk which is included from the main Makefile. This allows for easy customizations without having to modify a large number of header files; future git updates of the source code can then easily proceed without conflicts.
    4. Added functionality to Processing API to support reading heading and distance
    5. Updated the rev2.1 board design to address issues found in the rev2.0 board

    Some pictures of the latest Stubby instance... higher quality photos will be forthcoming, but this should suffice for now.

    Cheers

  • Revision 2.0 Board Errata

    The Big One10/10/2014 at 03:29 0 comments

    So I have wasted far too many hours these last few days trying to get the Rev 2.0 board to work properly. In the process, I have discovered the following errors. If anyone is using this version of the board, please be aware of these required changes.

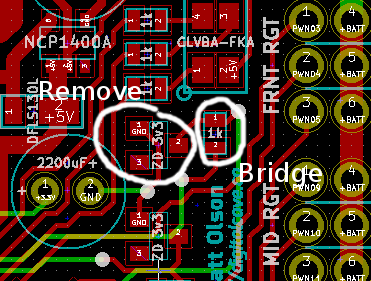
    • Remove the 3v3 zener diode and resistor between Serial TX and AVR RX, and bridge where the resistor used to be. This is the zener and resistor which are closest to the RGB LED (see screenshot below). I am not sure why this is causing problems; from my understanding of this sort of thing, it should have been perfectly fine (and it works perfectly fine the other way, going from AVR TX to Serial RX). It is possible that I had a bad solder connection. If someone has tried this and got it to work, please let me know.

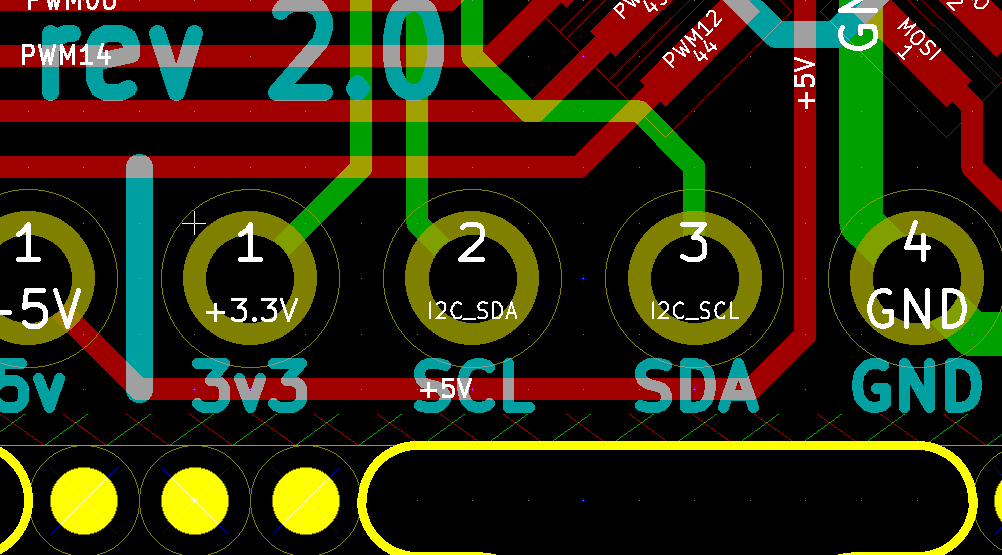
    • The SCL and SDA labels on the board are reversed. As you can see in this screenshot, the net names are correct but the labels are not:

    • Pullup resistors on SDA and SCL are required (I used 1k for Rev 1 and had good success there). I had left them off this board since the magnetometer board I selected had 10k resistors built in, but apparently 10k resistors are not enough for high speed i2c communication. If you do not want to put on additional resistors, feel free to reduce i2c speed by using the TWI_FREQ define (from what I have seen, setting it to something like 100000L works). For reference, the default value is 400000L.

    All of these bugs have been (or are in the process of being) fixed in Rev 2.1.

    Cheers

View all 72 project logs

View all 3 instructions

Enjoy this project?

Share

Discussions

axf33480 wrote 09/08/2014 at 14:11 point
magnifique réalisation du superbe travaille il et possible de le fair avec arduino

  Are you sure? yes | no

The Big One wrote 09/08/2014 at 19:54 point
No it is not done with an Arduino; but it does use the same CPU family as Arduino does (the Atmel ATMega family of chips). A normal Arduino does not have enough pins to do what is required (drive 22 PWM signals), and the Arduino IDE is far too inefficient to do everything which needs to be done in real time.

  Are you sure? yes | no

Dan Royer wrote 08/18/2014 at 20:12 point
I have open source java code to teach a crab robot to walk. https://github.com/MarginallyClever/hexapod If it helps your cause, please tell your friends about my work!

  Are you sure? yes | no

Jasmine Brackett wrote 08/15/2014 at 19:48 point
Hello Wyatt and the Stubby team,
it looks like you've not updated the project in a couple of weeks. Now is the time to check and edit your project documentation on Hackaday Projects to give Stubby the best chance of going through to the next round of The Hackaday Prize.

I think you've got most of it covered, but this is the checklist of what must be on Hackaday Projects by August 20th:
- A video (check)
- At least 4 Project Logs (definitely check)
- A system design document. You have a lot of design docs. It would be great if you could highlight the main ones in the project Details.
- Links to code repositories, and remember to mention any licenses or permissions needed for your project. For example, if you are using software libraries you need to document that information in the project details.

Thanks for entering and good luck!

  Are you sure? yes | no

The Big One wrote 08/18/2014 at 01:50 point
Thanks for the tips, Jasmine! I have updated the project details with the two most important diagrams (frame design and control board schematics), and duplicated the links from the links section describing the repository and what is included, and clarified the licensing.

Cheers

  Are you sure? yes | no

Souljacker wrote 08/03/2014 at 16:23 point
Is this build in Arduino?

Would a programmer with no experience in robotics or electronics be able to build this by following the instructions?

  Are you sure? yes | no

The Big One wrote 08/03/2014 at 17:27 point
Hard to say when I started I had electronics experience but no robotics experience. 6 months later I had stubby. I would say that if you are patient and willing to make mistakes it would be very doable. Email me and I will help how I can. Everyone has to start somewhere and here is as good a place as any.

Cheers

  Are you sure? yes | no

The Big One wrote 08/03/2014 at 17:30 point
As for the arduino question, no it is not done with an arsuino, but it does use the same CPU family as arduino does (the amega family)

  Are you sure? yes | no

Karl wrote 08/03/2014 at 02:21 point
I'd love to build one - a little beefier, can be controlled via a cellphone app or PC, has a camera mounted on it. I have no idea how to do these things so that would be a nice learning experience. Do you think you'd sell them as kits? I have almost no access to the required parts - especially the PCB and the frame :/

  Are you sure? yes | no

The Big One wrote 08/03/2014 at 02:44 point
I have some pcbs left and have been sending them to a few people. Send me an email with your address and I can let you know the cost.

The frame would be a bit harder as I cut it by hand and it takes a very long time. Someone has posted plans for a 3d printed frame which you could try out. Anyway email me and we can chat. My aemail is on my digitalcave website.

Cheers

  Are you sure? yes | no

GoatZero wrote 07/15/2014 at 19:32 point
Hello Wyatt thanks for all the help, and for keeping updated your log and project page,

I already got most of the components already, i just have to find the xbee modules you used since i have never used radio communication modules before reason of why im a bit confused, i will get 2 for both the PS2 controller and stubby, wherever i look (mostly ebay) i find way to many versions of the xbee, and the breakout board, some are way to expensive others are not, im a bit confused about which one is it, could you point me out in the right one please?

  Are you sure? yes | no

The Big One wrote 07/16/2014 at 18:13 point
I had some XBee Pro version 1 modules from a previous project. There are a few things to note when choosing this:

1) Make sure you get Series 1, not Series 2. They are different, and not compatible. (Series 2 may be fine, but I have no experience with it and cannot say for certain)
2) XBee Pro have a much longer range than normal XBee. Long range is probably not required for this project, so you can go with the cheaper modules unless you think you may be re-using them for other stuff.
3) I think that these ones should work fine: http://www.digikey.ca/product-detail/en/XB24-AWI-001/XB24-AWI-001-ND/935965 . However, the ones I used are: http://www.digikey.ca/product-detail/en/XBP24-AWI-001/XBP24-AWI-001-ND/935968
4) Since you don't already have any RF stuff (i.e. no legacy requirements), you could really use anything that gives you a transparent serial port and runs at 3.3v. Basically, the interface Stubby is expecting is to be able to send data over the serial port. whatever radio you pick, it only needs to transparently send data which it receives over the serial port. For instance, I am working on using Bluetooth SPP modules for this (will be controlled by the computer).

Hope this helps! Let me know...

Cheers

  Are you sure? yes | no

David S wrote 07/11/2014 at 23:50 point
Hey - if you still have extra PCBs, I'd like to buy one from you. I'm going to try your build with 3D printed parts :)

  Are you sure? yes | no

The Big One wrote 07/12/2014 at 23:04 point
Yep, I still have a few. Send me an email with your address and I can verify cost and provide details. My email address is in the contact section of http://stubby.digitalcave.ca.

Cheers

  Are you sure? yes | no

GoatZero wrote 07/08/2014 at 00:54 point
Wyatt, I have several questions regarding your project which im already in the process to replicate and if possible to improve in order to learn something more, Here come a bunch of newbie questions, please brace yourself for my ignorance

1.- What exactly which servos did you use?, I found this “$2” 9g servos in hobby king,

http://www.hobbyking.com/hobbyking/store/__32095__Turnigy_TG9_9g_1_7kg_0_12sec_Eco_Micro_Servo.html

Assuming I replace the top of the frame with some modified MDF roof in order to make it able to carry stuff around while it moves (Increasing the weight) would higher weight servos accomplish this?

3.- This one is just to make sure I understand how to use a Xbee, if the PS2 controller has been modified like yours , I will need another module of the Xbee placed into stubby, , module, Stubby will need another one right however since I don't have a model at hand ?

4.- I have programed PICs 18F… using a pickit2, however I wanted to ask you exactly which programmer and what software did you use in order to program the AVR pic

5.- At the component list for stubby “1x Control PCB” can be found however I find this confusing

6.- Any chance you post some pictures of the assembled and soldered PCB and the connection with the Xbee?

7.- What software did you use to make the MDF designs? i tried using Corel, Ilustrator and Autocad to open them and review them with no luck until now, they do open but all messed up

8.- I just noticed you just updated the Assembly Instructions in your project page, they are very detailed, great job Any chance we can get some high resolution pictures?

  Are you sure? yes | no

The Big One wrote 07/08/2014 at 01:43 point
Hi there.

No worries about questions... 3 months ago I was in exactly the same place! :-)

1) Those are the servos which I used. (The price has gone up a bit... when I bought them, they actually were $2, not $2.25. The blue version, http://www.hobbyking.com/hobbyking/store/__9549__Turnigy_TG9e_9g_1_5kg_0_10sec_Eco_Micro_Servo_.html , is a bit cheaper and I would assume that it works too, but I can't say for sure.)

2) If you wanted it to carry anything substantial (anything more than 25g or so - it is already borderline as far as weight is concerned), I would definitely want to use larger servos. The problem with that is that larger servos will not fit in the frame I designed, so you would have to modify it. Now, this is not very hard, but would involve using a CAD program (I used QCad and can highly recommend it), and that may have a bit of a learning curve if you have not used a CAD program in the past. More specifically, the coxa servos should be fine as they are, with the smaller servos (there is not a lot of load placed on these ones), The servos driving the femur and tibia should be larger, though.

3) Correct, you need two XBees to communicate with each other. The design really only calls for some sort of serial communication, though, so you could use any module that provides serial communication at 3.3v. I am planning on putting one of those cheap serial Bluetooth modules on Stubby sometime (in which case you would control it with the computer). Other options could include various eBay serial modules, or even just a cable for testing. You would probably have to tweak the software a bit, as right now it is relying on the protocol from my Universal Controller, but that is not a big deal.

4) I am using LadyAda's USBTinyISP programmer (http://www.adafruit.com/products/46). The software is AVR-GCC (compiler) and AVRDude (to upload programs). I have no idea how to get this installed in Windows, but on Debian it is easy (install avr-libc and avrdude) and on Mac I just use Crosspack (http://www.obdev.at/products/crosspack/index.html). I know you can do it on Windows, I just don't know how. To compile everything, clone the git repo, go to projects/stubby/source and type 'make'. To install, 'make install'. To set the fuses on the AVR, 'make fuse'. You can verify that you have everything installed properly before buying a single item, by trying 'make program'. It will fail to upload, of course, but the error should be from avrdude saying the programmer is not found, rather than from the OS saying avrdude is not found.

5) The control board is a PCB which I have designed and ordered from DirtyPCBs.com (the design looks like http://static.projects.hackaday.com/images/4964341397760277202.png). I have a few extra which I can send via letter mail for $5 if you are in the USA ($4 for Canada, a bit more for international depending on the country in question). This board uses a lot of surface mount resistors and capacitors, but is solderable using a normal soldering iron as long as you have steady hands. Look for Youtube videos on how to solder 0603 SMD components by hand. Alternatively, you can wire up everything by hand using a protoboard and through hole components according to the schematics (this is what I used at first, while still designing the circuit). The schematic is at http://stubby.digitalcave.ca/stubby/schematics.jsp.

6) Pictures are at http://stubby.digitalcave.ca/stubby/assembly.jsp

7) I used QCad for the frame design. I don't have access to any of those other programs, so have no idea how compatible they are.

8) Which pictures do you want higher resolution versions of? I kept them small to conserve bandwidth on my site (and since most of those pictures don't really need great detail, as they are just showing how things attach together), but I could link to some higher resolution ones if needed. Just let me know...

Hope this helps; please feel free to ask if you have other questions.

Cheers

  Are you sure? yes | no

APBurner wrote 07/03/2014 at 03:32 point
I am new at ordering boards. Which file do I send to the board service.

  Are you sure? yes | no

The Big One wrote 07/03/2014 at 14:09 point
Look at http://git.digitalcave.ca/gitweb/?p=projects.git;a=history;f=projects/stubby/kicad/gerber/stubby.zip;h=85ca159d7bad2bafbfc147f382d2850806c3176f;hb=HEAD . The file itself is stubby/kicad/gerber/stubby.zip. The one which I ordered is the older one (last updated 2014-05-21). I have since updated the design to include some fat capacitors on the bottom to help filter the large voltage drain that running 18 servos at the same time will do.

(Strictly speaking, you only need one of the three capacitors: the one which filters between GND and 3v3. If you don't have this one, the AVR will brown out when all the servos are moving at the same time. However, you could use the original design and just solder a cap on the expansion port, where I have already broken out GND, 3v3, VBAT, and A0-A2: this is what I have done.) I have the caps marked as 2200uF for the two capacitors on VBAT, and 470uF for the one on 3v3, although I am probably going to use a 2200uF one for all three. Currently I have a 470uF on 3v3 and that works, but larger wouldn't really hurt for something like this.

As to which one you should choose, that is really up to you. The original one is guaranteed to be correct, since it is the one which I had ordered. The new one should be fine, and has the advantage of some more capacitor holes, but I have not tried it myself.

Regardless of which one you choose, I would recommend uploading to a gerber viewing site (I use http://www.gerber-viewer.com/) and verify that things look right. (Look for things like holes not matching the solder mask, etc).

Finally, depending on where you are located, it may be easier / cheaper / faster for me to send you one of my boards. (You get 10 per order, and I only needed a couple). This would probably cost about $4 or $5 for one board, depending on exactly where you are located. Email me if you are interested. (Offer open to anyone pending interest and availability... first come, first served).

Cheers

  Are you sure? yes | no

APBurner wrote 07/02/2014 at 15:11 point
So I have started cutting out the pieces for Stubby and find the cutting very easy. The plan is well thought out. I have found something that will make it easier on those that try this. Before you cut the leg pieces off the board cut the holes for the servos. Then you have something to hold onto and can control the cutting better, Don't ask me how I know LOL. I am cutting it out of 1/4 inch Baltic Birch plywood, Only because I am a scroller two and have a bunch already on hand.

  Are you sure? yes | no

The Big One wrote 07/02/2014 at 16:01 point
That's a great idea... I cut them out after, and my hand was very close to the blade... it was a bit scary for some parts ;-)

Cheers

  Are you sure? yes | no

brian kame wrote 07/01/2014 at 17:17 point
I love it!

  Are you sure? yes | no

GoatZero wrote 07/01/2014 at 10:05 point
This is really amazing, just to see how much has this evolved from V1 to the current V3, i cant wait to see V3 with 2.0 legs

I noticed you wrote in your digital cave that you sent your PCB design to china and got it made there, I was wondering if there was a way for you to share where did you sent it, I would love to attempt to send my future PCB designs the same way and get them delivered if possible

Also, this is the 1st time I hear about using painters tape on MDF in order to cut it, I tried googling to find a technique that describes what you tried to explain with “cover your MDF with painters tape and glue the design to the tape” however I didnt really understood that step, i found lots of painters using it to make messy art tho

also, just curious, around how much time do the 4 AA batteries last in stubby??

  Are you sure? yes | no

The Big One wrote 07/02/2014 at 16:13 point
Thanks!

I used http://dirtypcbs.com/ to print this board (it was featured on HackaDay a few months back). In the past, I have also used seeedstudio's Fusion PCB (very similar). I can highly recommend both services. About 7 years ago I also got a larger PCB printed by working directly with a fab house (this was before hobby boards were really a thing); I would not recommend doing that, as it cost *way* more (IIRC it was around $100 for tooling costs alone).

Covering the wood with painters tape (or similar) is a fairly common approach when using a scroll saw. The idea is that you cover the wood with tape, and then glue the plans to the tape. You can then easily cut along the lines exactly as they appeared on the computer. When you are done, the tape removes easily without any residue. I have seen some people recommend covering the plans with a layer of packing tape as well, but I have not tried that. (I am quite new at using a scroll saw, so am not the best to ask about this... I am sure that if you ask in a scroll sawing forum, or possibly even ask APBurner (commented above), they could give you great info.

4x fully charged AA batteries lasted abour 30 - 45 minutes of continuous use in Stubby v2. I have not run Stubby v3 straight for that long, but given the fact that a) there are more servos and b) those servos are doing more work (version 2 was supported mostly by the joints; version 3 puts more load on the servos), I would guess that the batteries will last about half as long... I would be surprised if they last more than 30 minutes.

I have a battery monitor on this version, consisting of a voltage divider feeding an ADC channel. It is very interesting to see how much the voltage drops whenever Stubby moves. It may have actually been a good idea to use 5 batteries, but I didn't have the space or the battery holder to do this.

Cheers

  Are you sure? yes | no

x3n0x wrote 06/30/2014 at 16:20 point
Sweet! excellent work! I want to scale it up about 2-3x. You wouldn't happen to have an SVG or DXF of the parts would you? That would make it easy to scale up! Coupled with a different building material and some nice beefy servos, it would be a fearsome beast at the local RC gatherings...

  Are you sure? yes | no

The Big One wrote 06/30/2014 at 16:56 point
Yep, I do have a .dxf - look in my git repo (now with 42% more Web Interface!) at http://git.digitalcave.ca/gitweb/?p=projects.git;a=tree, and browse to projects/stubby/frame/frame_3dof_radial.dxf. I used QCad to design it, and have not used any other design programs so I can't say how compatible it is with Autocad, etc, but I would imagine it Just Works...

If you do end up building a larger version, please drop me an email... I would love to see an all-grown-up version of Stubby! ;-)

Cheers

  Are you sure? yes | no

Joshua wrote 06/30/2014 at 12:06 point
Good work, looks very well thought out. I like the name too, fits the cheerful whirring, buzzing and clacking along. I like the idea of unloading the servos as much as possible, simply design something well and use some proper mechanics rather than just going the easy way and bolting to the servo arms.
One thing I noticed was that sometimes the servo arms in the lower leg look like they get pretty close to the ground, just thought with some roll and translate positions they might catch stuff. Also have you tried rubber feet or does the slight degree of play in footing help to keep things unloaded?
I want to make a hexapod too. At the very least I will be repurposing some of my old PS1 and 2 controllers as you have. Thanks!

  Are you sure? yes | no

The Big One wrote 06/30/2014 at 17:07 point
Thanks!

The servo arms have not caught on anything yet, although they may if you walk in deep shag carpet or something.

Somewhat on that note, in general, I *am* pretty limited in what I can do with the Z axis. I cap the Z offsets at +/- 15mm in software; the hardware can do a little bit more, but not much (maybe 17mm if I am lucky). The limitation here is the servos: they are so small and weak that I needed to use push rods and trade mobility for torque in order to even get the thing to stand. If you have stronger servos, you could move the push rod connection point closer to the joint, which would allow for more movement distance for a given servo rotation; that would in turn allow for more height. The same torque limitation is what constrains the length of the legs: make the leg too long, and the servo is fighting against a lot more leverage.

I have considered rubber feet, and I may end up adding them, but this works pretty well already. It is much quieter in real life than it seems in the video (the problem is that the camera's microphone faces forward, and I was behind the camera when talking, so my voice is quiet and the footsteps are loud). The slight slippage does tend to help prevent overloading the servos (although that being said, Stubby works fine on carpet as well, and there is no slipping there).

I do notice that the roll math seems a bit off... for instance there is one point in the video where a leg is lifted right off the ground when demonstrating the roll. I should probably re-work that section (I am currently cheating and just doing two rotations on the XZ and YZ axis, rather than doing a single rotation on an arbitrary axis. My linear algebra is a bit too rusty to figure that out... I guess it has been too long since I was in University!)

Cheers

  Are you sure? yes | no

frankstripod wrote 05/07/2014 at 22:24 point
Thank you for the push rod soldering video and pictures :)

  Are you sure? yes | no

The Big One wrote 05/07/2014 at 23:37 point
No problem, hope they are helpful!

Cheers

  Are you sure? yes | no

Mike Szczys wrote 05/07/2014 at 21:26 point
Remarkable fabrication!

  Are you sure? yes | no

The Big One wrote 05/07/2014 at 22:00 point
Thank you! Version 3 is coming along nicely, and is even more intricate than version 2 was... I am really wishing I had a CNC at this point! ;-)

  Are you sure? yes | no

Mike Szczys wrote 05/07/2014 at 22:03 point
I can understand how a CNC would help out a lot. But to tell you the truth, as your first CNC project i might take just as long as doing it by hand.

All my robot projects have been wheel-based. Seeing this I'm super tempted to try my hand at a hex build.

  Are you sure? yes | no

jfw wrote 04/25/2014 at 05:02 point
This looks great, I'd love to use this for inspiration.

The bolts-as-bearings look pretty chunky -- how come it wasn't them bearing the weight in V1, instead of the weight being transmitted to the servos?

  Are you sure? yes | no

The Big One wrote 04/25/2014 at 13:55 point
Version 1 didn't have the bolts / axels at all... the legs were directly connected to the servos. (This seems to be standard for most simple hexapod designs, just because it is stupid easy to assemble and program - see for instance the Sparkfun kit at http://letsmakerobots.com/node/34852).

You can see a picture of the old version at http://static.projects.hackaday.com/images/4646641397746524433.jpg

The new version is more than twice as heavy as the old one (almost 1kg, vs 400g previously), but essentially none of the weight is being borne by the servos, so it actually works out much better. The only downside is when walking on thick carpet: since it is heavier, it tends to sink in more, which means that the tips of the legs can sometime get caught when trying to lift up. Walking slowly can mitigate this, but even then I am more comfortable walking on smooth surfaces.

I currently have some el-cheapo ball bearing units on order from eBay; I am mulling over the possibility of changing the leg design yet again, to get rid of the bolts and use a real bearing assembly, plus add another joint for the third degree of freedom. Even if I choose to do this, these changes won't be for another month or so, though.

Cheers

  Are you sure? yes | no

Eric Evenchick wrote 04/14/2014 at 16:40 point
Neat to see a homemade hexapod build with the goal of being affordable, as opposed to the many that use off the shelf kits.

  Are you sure? yes | no

The Big One wrote 04/14/2014 at 16:49 point
Thanks! It has been very fun so far... I find the designing / making of a given project to be the fun part; to me, buying an off-the-shelf robot kit would only serve to rob me of the hours of pleasure I would otherwise get.

Once I finalize all of the build details I will be writing up instructions + BOM. I anticipate a total build cost of somewhere in the neighbourhood of $150 - $200, assuming you need to buy everything. I have been lucky to have much of what I need already (most of the electronics, wood for the chassis, etc); all I really needed to buy so far was servos (less than $50 inc. shipping), the aluminum for the v2.0 legs, and some hardware for the v2.0 joints. Assuming the design does not need to change much from where it stands now, I don't foresee the need for much else.

Stay tuned for more details!

Cheers

  Are you sure? yes | no

Similar Projects

Does this project spark your interest?

Become a member to follow this project and never miss any updates