https://www.tindie.com/products/microwavemont/super-tinybasic-computer-assembled/
Some small computer project
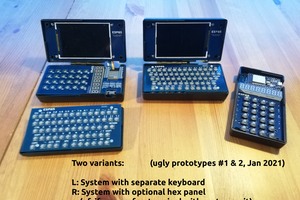
Simply making small computer as a hobby, combined my previous two (ATMega, SAMD21 ARM) projects in one.
Simply making small computer as a hobby, combined my previous two (ATMega, SAMD21 ARM) projects in one.
To make the experience fit your profile, pick a username and tell us what interests you.
We found and based on your interests.
I may have overlooked very fundamental problem of my tiny computer. that is....
Availability of good keyboard which can transmit serial ASCII data in 4800bps. This is not totally general and never find in Best Buy. Actually I have one but 99.99 % of people of the world would not have such a weird keyboard. SO, this time I would present the solution for that.
NOW my tiny computer will automatically execute the program file named "AUTOEXEC.BAS" in SD card and if the file does not exist, nothing will happen. "AUTOEXEC.BAS" is a simple text file and we can edit it by PC and MAC, meaning....
NO MORE EXTRA SPECIAL KEYBOARD TO ENJOY
All you need is battery can provide 3.3V.
Actual operation is explained in the following movie...
HAVE FUN!
Indeed I did lots of extension and even me some of them are forgotten ;-). Now I made a summary movie for sale promotion!! Have fun! and please visit my tindie store if you have interest!
And now my small computer is on sale at Tindie.com
I would say this is the first time and last time of this assembled computer for sale. (I may sell parts sale..) Now it's just $31.5 and don't you have one?
Eventually I would like to sell full kit of "super tinyBASIC computer" contains
(1) PCB
(2) Arduino bootloader written ATMega1284P
(3) RTC (PCF2129AT)
(4) two-byte character (Kanji) SPI ROM
(5) Piezo buzzer
(6) All of connectors and capacitors/resistors
All you will need to complete is this kit and (USB-TTL interface (FTDI): not included) . Stay tune!
As we know, we can buy lots of single board computer with gigant memory by less than $10. In such a situation, my trial is driven by purely my personal interest. This time I made a tiny computer Arduino based TinyBasicPlus, with external SRAM to ATMega2560 through XMEM function.
You may see lots of thin jumper wires on board,,, yes :-( I could not make it in smart (non jumper) manner...Original ATMega2560 has just 8kB but this board support 64x8=512kB (4M bits) by XMEM function of AVR. Indeed my TinyBasic source supports only one bank (64kB) of memory and still in progress but currently, as you will see, supporting around 32kB. (I need more careful arrangement in memory space) Currently this BASIC is plain one (without camera, beep RTC... etc support) but larger main memory gives more "extension" possibility. As a main memory of TinyBasicPlus, bank switching will be a bit hard one but, for example, camera application, another bank can be freely access through XMEM function. For this implementation, XMEM library developed by Andy's workshop is utilised. As same, all the information (Arduino source, Eagle files) are uploaded to github. Actual operation can be found in the following movie... have fun!
It is still work in progress but I've made "big memory board" utilising XMEM function of ATMega128.
This board has additional 32kB SRAM and with internal 4kB SRAM, it will work as 36kB SRAM board. XMEM is not new technology and can find several information to activate it. Currently...
Board itself is working but not yet activate additional SRAM. When I fully activate and utilise additional SRAM, I will add 4Mbit SRAM (will lead to 512kB memory to tinyBASIC plus!!!!) Stay tune!
My tiny computer surely consists of essential element, human interfaces (keyboard, display), storage (SD card), and processing unit. But the current keyboard (firmware re-loaded Xbox360 chatpad) is not for touch-type long-writing one, as you see.
Yesterday I got a keyboard for Palm pilot just by 300JPY at junk shop. Palm is completely obsolete system and not attractive for most people except me! Indeed, the keyboard in 1990 has quite good typing touch compared to crappy current China made. (I have to say this keyboard is also made in China, but ten years ago, lots of China-made with conscious to export was better quality, especially the case of keyboard.) This one is almost brand-new and original user seems not using it so much. (it seems, never used..) I imagined how it will be nice if this keyboard is connected to my tiny computer system!
My good habit before making something is searching hackaday.io, and I found one relevant project converting Palm keyboard into USB and with smartphone. This author uses original keyboard controller circuit and adding USB interface by ATMega32u4, my favorite one, and the author found its communication protocol as "inverted TTL logic at 9600 baud with no parity and one stop bit". My computer character input is TTL serial and I thought it should be piece of cake..... but not in this case.
Surely this keyboard sending "some very long data" for just one key touch. It has some rule between character and produced code, but for me it seems more easier to make keyboard controller from scratch...?
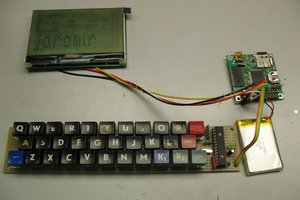
I quickly design (or just connecting components) by ATMega328P and PCA9555PW 16 ports GPIO extender. In theory, keyboard matrix of 16 x 8 needs 128 diodes but I don't want to make diode-paradise board and I copied simplified keyboard matrix circuit of ancient "ZX Spectrum", which reduces just 8 diodes. PCA9555 produces key-scanning signal by I2C command, and result is obtained by GPIO of ATMega328.This is the top view of PCB, where we can see ATMega328 and 8 diodes, and on bottom side...Just one chip PCAL9555. This is my first time to use this type of chip (port extender), but it is quite handy and useful. You can see two thin wires around connector,,, this is due to my careless handling of flat cable of keyboard. (Two signal lines are disconnected, and I fixed it).As same as my previous tiny computer base station, I put Lipo and charging circuit inside.And this is what I made. Actually making keyboard controller is full of "good to know" since actually I did not know what is keyboard matrix and how diodes is working well in it. I found simple key-scanning sometimes produces "too much character" and this type of problem is avoided by software (combination of milis() and ...) Moreover, in addition to full keyboard function (shift key and ...), top six rubber function is also activated. Each of key generates "print ", "load ", "list+CR", "run+CR", "mem+CR", and "cls+CR". Full source including circuit board information and Arduino sketch is released at github, and actual operation can be found in the following movie.... have fun!
Now almost completed.
I had encountered one mysterious situation. I made two similar tiny computer both are based on ATMega1284, but one with microSD and the other is full size SD card. The previous demonstration was taken by microSD card version (without RTC nor Kanji ROM), because it did not work well with color OLED...!
This is the microSD version. Surely working but it is not uncomfortable not knowing why the other one with color OLED does not work!
Indeed, the other one is perfectly working with SSD1306 Monochrome OLED. This was a hint and new good to know. Actually reset signal (RST) of SSD1306 and SSD1331&1351 have different behaviour. RST of SSD1306 can be simply pull-up during operation and SSD1331&1351 should have RST signal generated by MCU. My SDcard version has pulled-up RST signal and this was the reason.
So I change wiring of RST from pull-up to MCU pin, and now it is surely working well. Actual operation can be found in the following movie... have fun!
I also made LCD version of tinyBasic computer very long time ago in dog year. I remember the main reason why I have not used it well was "slowness" compared to OLED. This time I found improved graphic library PDQ in hackaday.com and I switched from Adafruit_GFX to PDQ.
PDQ_GFX version source is available here.
Actually really significant speed up is confirmed. You will see in the following movie..
Create an account to leave a comment. Already have an account? Log In.
How about powering this computer?
If it runs for at least a week on a single charge and you can run fuzix on it (on anything you can) then a lot of people will want it
Become a member to follow this project and never miss any updates


 jaromir.sukuba
 Matthew Begg
 Stefan Köhler
It's a fascinating project!! hats of to you. I am creating a similarly golf game which will help play profoundly and I've already made a store for it. 1: https://golfvela.com/ ... You need to power it on soon.