Jeroen van der Velden
-
ACC / EDC Cruise Control Part 1
11/30/2015 at 20:40 • 0 commentsToday I spend time "sniffing" the Scania Multi Database for answers to some of the harder questions on this project. One particularly hard one is; how does the Scania ACC (cruise control) work and how can I use it in my Simulator? The good news is that I found out how ACC works! The ACC buttons are just a simple two-wire connection and every button carries a specific amount of resistance (this is measured with a multi-meter).
ACC / EDC Cruise Control Part 2 will cover how to connect the ACC to Arduino + Code.
Click this LINK for all the details!
![]()
-
Arduino Pro Micro (Fritzing+Code)
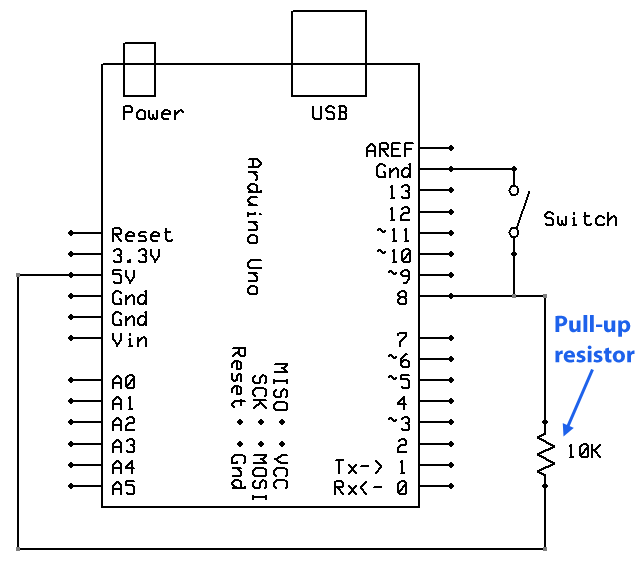
11/23/2015 at 10:26 • 0 commentsFinally I found the required code to use Toggle Switches as a HID (Human Interface Device) so I can connect them to ETS2 (or any other Sim).
I used 10K ohm "PULL-UP" Resistors to get clean code for Arduino. Press a button ON sends one letter of choice, pressing it again sends one letter of choice (could be anything you like).
I also put an example in there where a button presses "left-shift+a". I figured out its easier to assign new keys/functions in some Simulators when you use "left-shift+letter" . Remember most letter are already occupied in most Sims so that's why I put in an example of "left-shift+a".
![]()
I recommend to use a "Pro Micro" just like I did. Please note my code is or might NOT be compatible with an UNO / MEGA or DUE and might need modification for the Arduino LEONARDO!
![]()
Downloads:
.INO File for Arduino IDE (Sparkfun Pro Micro)
.FZZ File for Fritzing (Wiring Diagram Sparkfun Pro Micro as HID+Debounce)
Useful link I found:
-
Parking brake Valve MOD
11/21/2015 at 13:53 • 0 commentsDone modding the Parking brake Valve!
The original Scania Handbrake uses "AIR" instead of CAN-BUS or electricity. I needed it to modify to an electric part (push button) so I can connect it to an Atmel Enabled Arduino like "Pro Micro" or "Leonardo".
So right now the Valve has become a simple Push-Button which I can connect to an Arduino Pro Micro or Leonardo. The Atmel enabled boards will act like an extra keyboard to your PC so most parts in my simulator will act like a button of a keyboard keeping it nice and simple.
The Arduino IDE code Keyboard.print("b") will make your board send a letter "b" to your PC just like a press on the letter "b" of your keyboard. Boards like the "Pro Micro" can have as mush as 9 push-buttons connected. A "Pro Micro" clone (works fine) can be bought online for as little as $5.
The letter "b" corresponds to the ETS2 in-game parking brake toggle but can also be set different if you like.
Please have a look at my other LOGS for Arduino Code, Wiring Diagrams and other useful instructions.
How to:
1# Buy a Parking brake here or here
2# Buy an Arduino Pro Micro here
3# Buy a push-button here
4# Open the lit of the Parking Brake and remove all the lose parts like the spring
5# Place the push-button into the lit (where the plastic air-hose was connected)
6# Replace the 15mm copper bolt for a 30mm M5 bolt with rather large head
7# Temporary put back the lit with pus-button installed and adjust the new M5 bolt (trial and error) till it touches the push button (use multimeter)
8# Download my code and upload it to your board with the Arduino IDE software
9# Have fun and leave a comment and/or SKULL if you like my project
![]()
-
Dashboard Part 3
11/18/2015 at 10:23 • 0 comments![]()
-
Dashboard Part 2
11/16/2015 at 14:51 • 0 comments![]()
-
The Dashboard Part 1
11/16/2015 at 10:30 • 0 commentsToday I fixed the steering part. This is one of the harder parts since I need to find a way to put all this stuff together, remember; I’m not a truck mechanic.
I`m still facing a big challenge ahead; how do I connect the original heavy weight steering wheel to a simple gaming USB racing wheel, and how to I add enough drag to the steering column so it won’t destroy my cheap USB racing wheel?? I can shorten the original heavy weight Scania axle and put a U-joint on it and build an adapter to fit the axle to the wheel underneath the dashboard. I`m hoping this way I don’t need to modify the USB racing wheel and it will be easy to replace the USB wheel later, I might even feel little force feedback in the Scania wheel…?
Ok guys, If you have any ideals for my challenges, please let me know and keep those Skulls coming if you like what I`m doing!
![]()
-
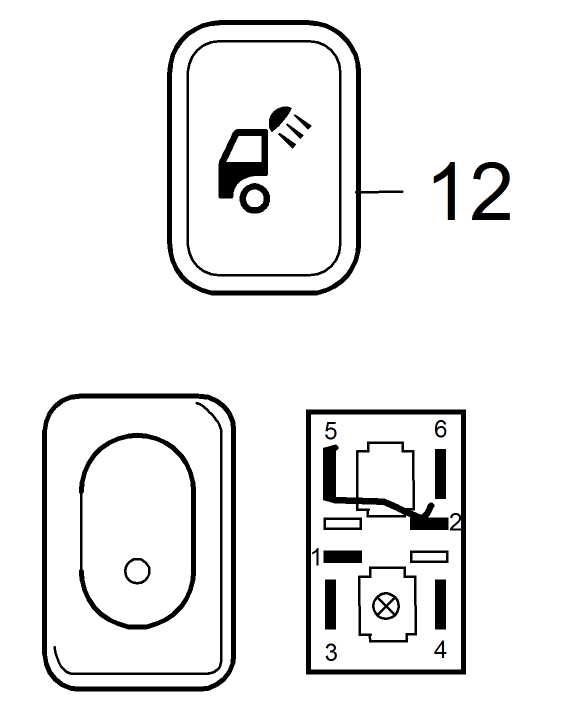
Testing Scania Hardware on Arduino
11/15/2015 at 13:21 • 1 comment![]()
Currently I`m working on sorting out how the original Scania Dashboard equipment works. The best way to get switches act in ETS2 is by an "Atmel" (HID Support) Arduino like the "LEONARDO" or "Pro Micro" (Picture shows UNO Rev3). These have I/O`s to connect the switches and because they carry an "Atmel" chip they will act like an extra keyboard (HID) to your PC. When you "flip a switch"; Arduino will OUTPUT a keyboard character of choice. Follow my LOGS for the download links and instructions.Picture: Scania Work Light Toggle Switch Part No. 1488067
![]()
-
The Seeed CAN-BUS shield is up and running!
11/15/2015 at 13:20 • 0 comments![]()
The Seeed CAN-BUS shield is up and running!
Please don`t use the code below please, its for site tracking only:
<script>
  (function(i,s,o,g,r,a,m){i['GoogleAnalyticsObject']=r;i[r]=i[r]||function(){
  (i[r].q=i[r].q||[]).push(arguments)},i[r].l=1*new Date();a=s.createElement(o),
  m=s.getElementsByTagName(o)[0];a.async=1;a.src=g;m.parentNode.insertBefore(a,m)
  })(window,document,'script','//www.google-analytics.com/analytics.js','ga');

  ga('create', 'UA-71077291-1', 'auto');
  ga('send', 'pageview');

</script>
Picture below:
The blue connector is an Instrument Cluster Plug Adapter 1J0972977 1J0 972 977 For VW Passat CC Audi. It comes with just 16 short leads so I had to swap some of them to match our needs. The little print I made myself for easy connection and extending the cables with a 34p Flat Cable. I only soldered the 17 wires used on Leon Bataille`s Polo Shield out of the 34 wires available on the Polo Instrument Cluster. They go to little screw terminals for easy connection.
![]()
![]()
Real Scania Truck Home Simulator
The Scrapyard and Arduino make a great combination!