Orlando Hoilett
-
Demo-ing Call Feature for Arduino Walkie-Talkie
06/02/2016 at 01:03 • 0 comments -
Slight Modification to RF24Audio Library
06/02/2016 at 00:52 • 0 commentsI made a slight modification to the RF24Audio library to get the "call" button feature to work.
TMRh20 originally uses digital pin 6 on the Arduino as a way to visualize the audio output. Instead, I modified the output of pin 6 to output HIGH when audio was being transmitted and LOW when audio is not being transmitted. Pretty simple.
Please look for these lines (pictured below) in the RF24Audio library and make the modification as shown. It's easy enough to use CTRL+F "ledPin." Otherwise, download the RF24Audio.cpp file from the Wristwatch Walkie Talkie GitHub repository. https://github.com/hoilett/Arduino-Walkie-Talkie-Instructable/tree/master/Slightly_Modified_RF24Audio_File
![]()
![]()
![]()
-
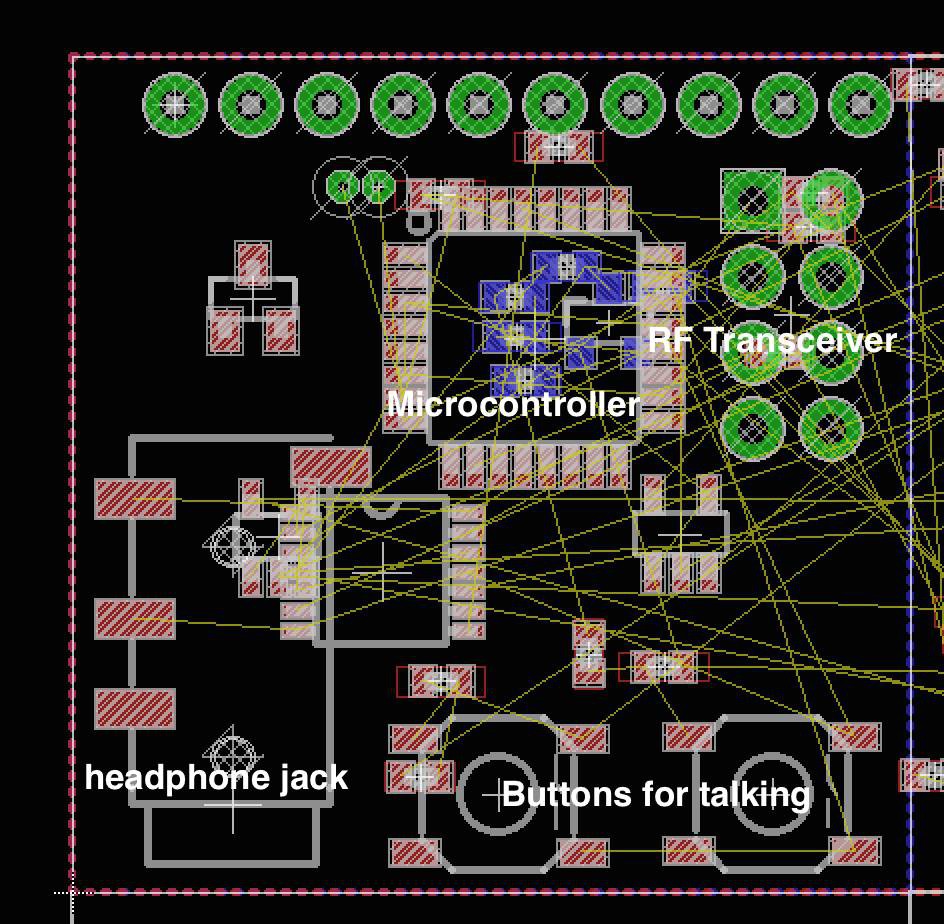
Sent PCB to Fab
06/02/2016 at 00:38 • 0 commentsI sent the PCB design that I was working on to fab a couple days ago. I should get it back by the end of next week.
Features:- Supports talking between two devices
- Call and Talk button
- Microphone for voice in
- Has a "call" button which notifies the other talkie of a requested call by playing the Mighty Morphin Power Rangers Communicator notification through a tiny piezo
- Headphone jack for connecting headphones
- An audio filtering circuit to to make the sound a little cleaner
- Board cutouts for adding a wrist strap to wear the device on the wrist
- Connection for LiPo battery
- Voltage regulator: 3.3 V
![]()
![]()
-
Printed Circuit Board Design
05/15/2016 at 12:44 • 0 commentsI have been working on a printed circuit board for this project for it to fit on the wrist. It's going to be about 1.3 x 1.5 inches or so. I'm also making a slit for a wrist strap . I will just use the bare-bones PCB that I'll get from @oshpark just to see what it would feel like. Later down the line, I'm going to think about an appropriate packaging.
![]()
-
Finished breadboard prototype
11/28/2015 at 05:37 • 0 commentsMonday, November 23, 2015 - Finished breadboard prototype
I have done this part in before, but this prototype was especially for the Wearables Contest on Instructables.com. It was quite fine. It works pretty seamlessly with the code I have put together. Should be an easy build for anyone who wants to get started on the build themselves.