The Johnson counters in the clock are made by stringing together individual flip-flops. This design uses D-type flip-flops. As I wrote before, the design of these flip-flops is copied from Simon Winder's design. He does an excellent job at explaining how they work in the following video.
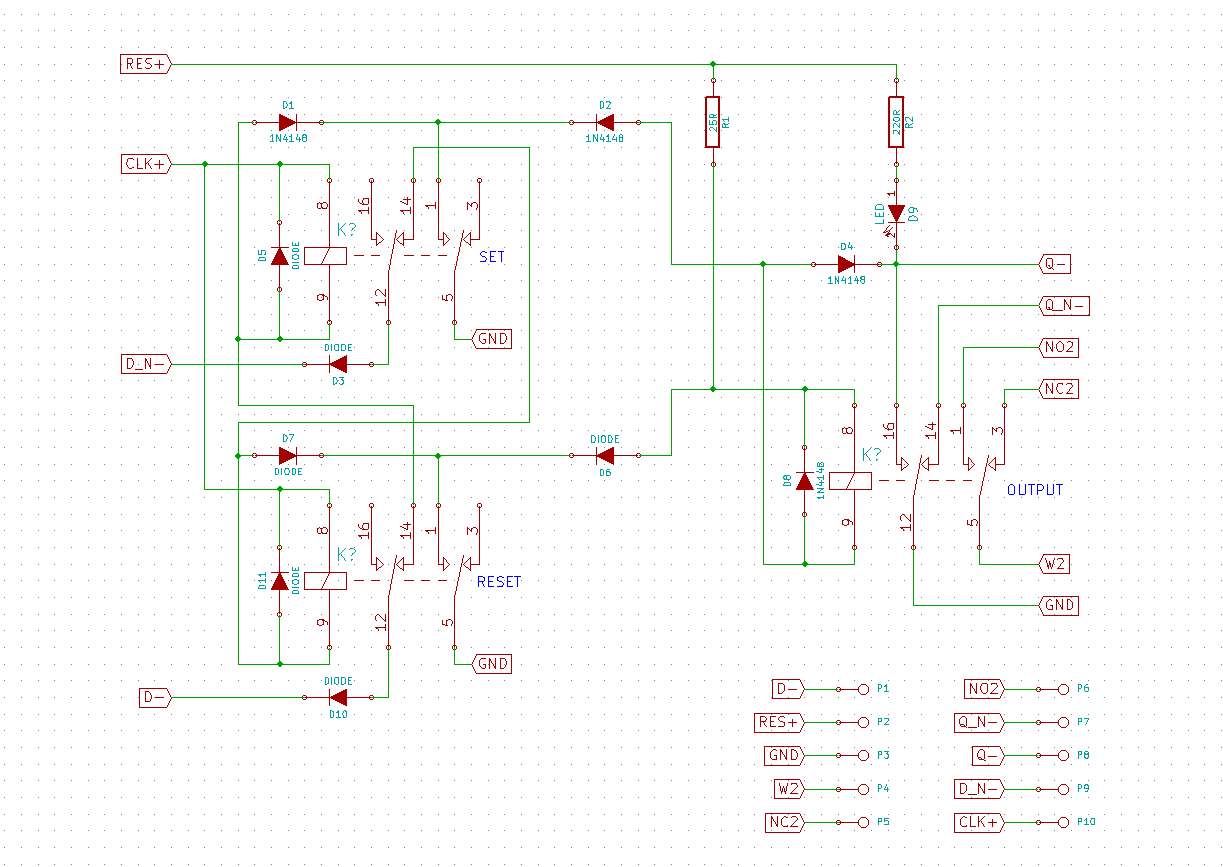
I took Simon's schematic, modified it slightly to suit my needs and then made a circuit board layout in KiCad. All the 15 flip flops in the clock are exactly the same. Here is the schematic:

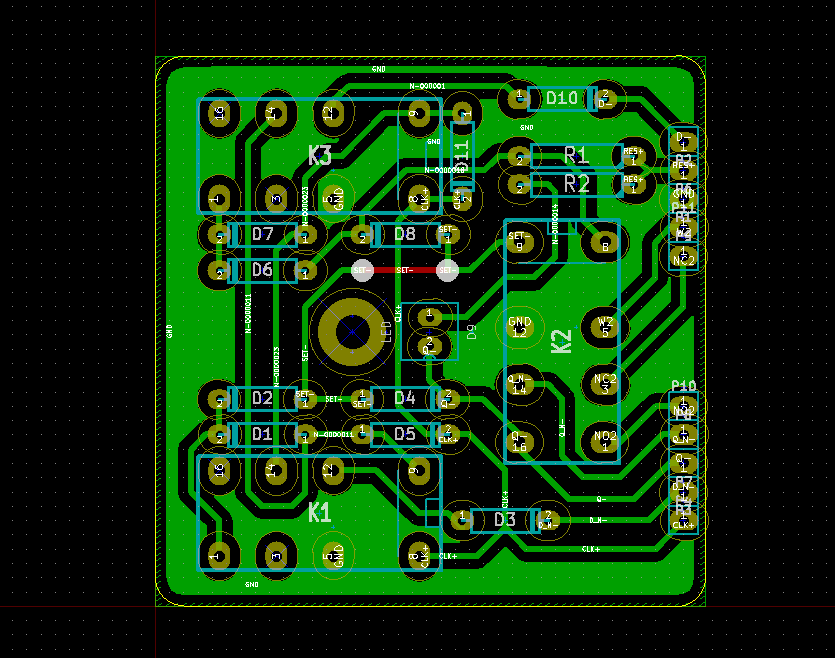
I ordered the cheapest 5 volts relays I could find off of Ebay. Their size is the main determining factor in the circuit layout of the flip-flops. After many revisions, this is the final board I settled on:

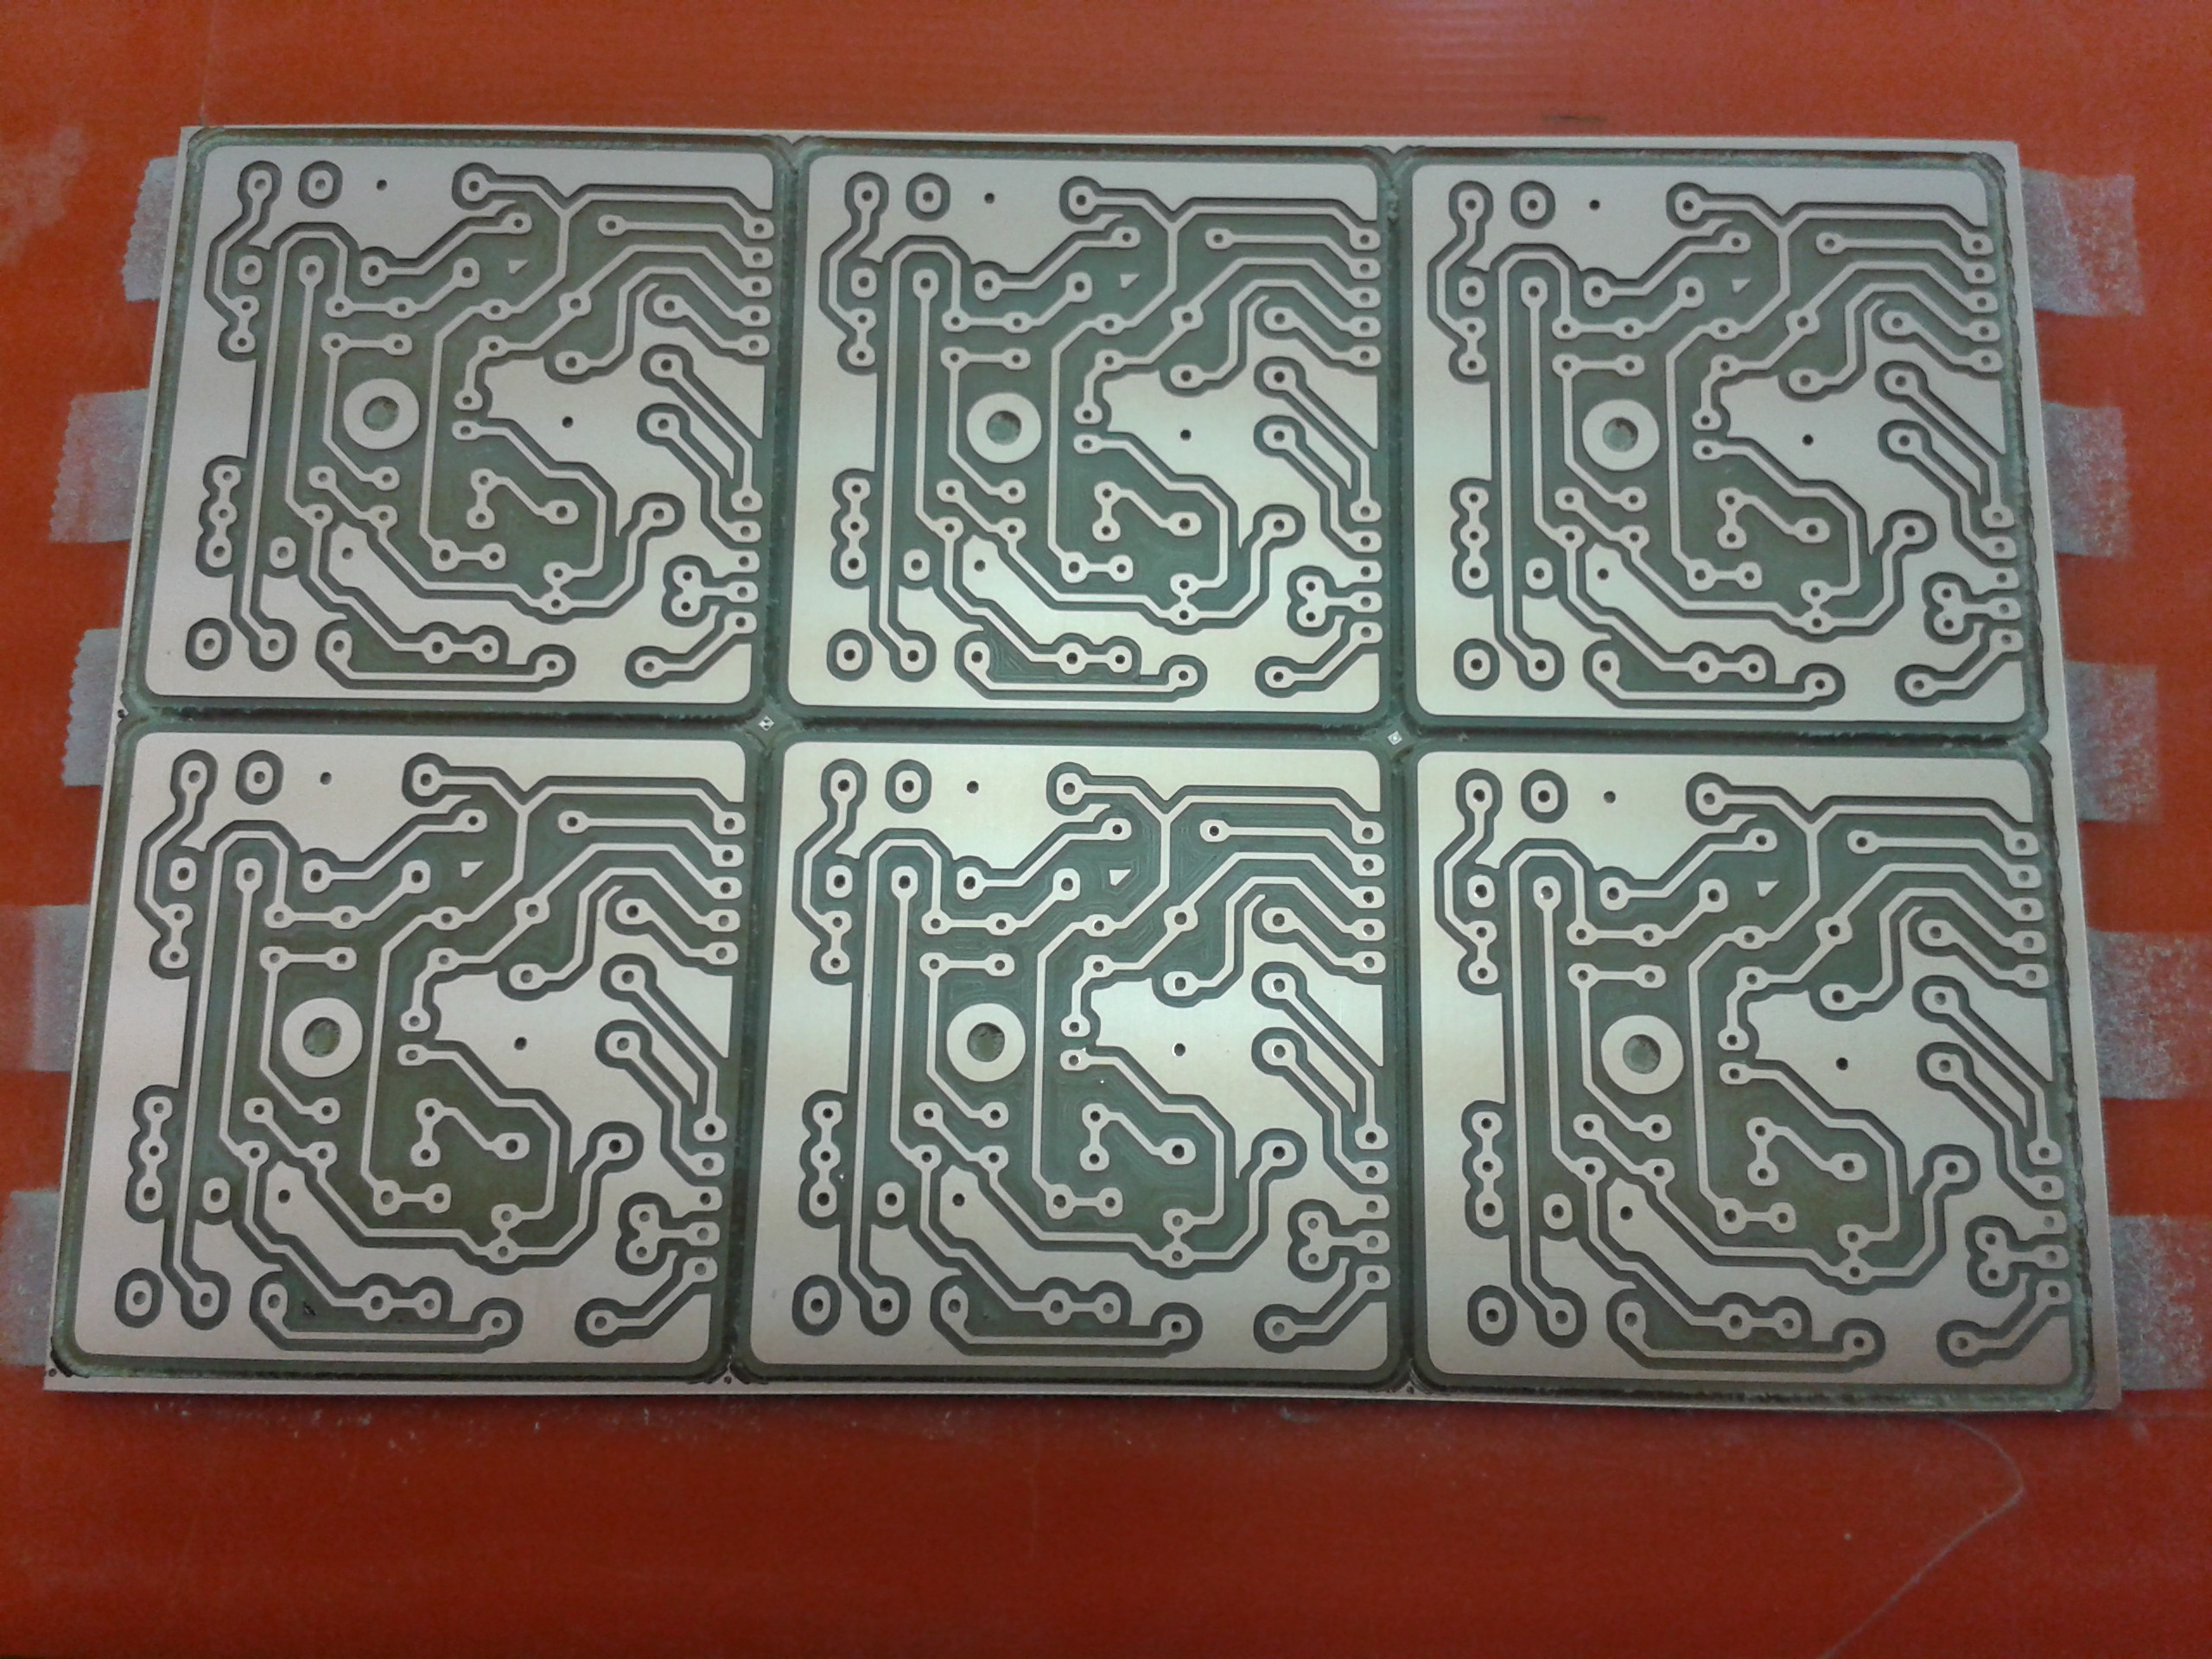
After lay out the circuit board, I milled the pcbs out of single sided FR-1 stock using a Roland Modela mdx-20. I want to thank Fablab Amsterdam for the many hours of machine time. I only have 160x100 circuit board blanks, so when laying out this board (and all the others in this project), I had to keep the size down and fit as many on a board as I could. Here's the result after milling six of them in one go:

 Dave Gönner
Discussions
Become a Hackaday.io Member
Create an account to leave a comment. Already have an account? Log In.
Hi Dave, love the project, I saw Simon's design a while ago and started collecting relays but have recently seen your design which looks great! I saw on the flip flop schematic there are a number of flags. I see you have the Q and /Q outputs but you also have a second pair of contacts on that relay that you are using. What are those contacts for? I also noticed you have separate data inputs for the set and reset relays, how do these connect to the next relay as a standard flip flop counter only has the one data input?
Are you sure? yes | no
Hi Dan, Thanks, nice to hear that you like the project. The logic on these flip flops is slightly different from for example TTL logic chips. The output state is not just 0 or 1 on one pin, but instead it is Q: open, /Q: ground and Q: ground, /Q: open. Those are directly connected to the set and reset inputs. So either Set is low and reset is open or set is open and reset is low. Those are the two states. The flip flops are chained together that way. on the connection between the last and first flip flop, the Q and /Q lines are crossed/swapped.
The second pair of contacts on the output of the flip flops are not directly used. I actually need two free double throw contacts on each output to do the decoding of the digits and drive the LED display. I could not find cheap 5volt triple pole double throw relays, So I am using the extra contacts to drive a second double pole double throw relay, that drives the LED's. I had not figured out all the wiring when I designed the flip flop boards, so I broke out the extra contacts just to be safe. I use some of them to connect to the carry-circuits that detect the rollover to zero and clock the next digit.
Hope this makes sense to you. Please message me if you want to know more.
Are you sure? yes | no
I count 11 diodes, 2 resistors and 3 DPDT relays...
http://relaysbc.sourceforge.net/circuits.html explains a much simpler way
Did you try this ?
Are you sure? yes | no
I'm sorry for the late reply, I didn't see your comment.
I'm not sure if I fully understand the circuit above, but I agree that it is fewer parts. I took the flop-flop design from Simon Winder without thinking too much about it. It just seemed right. It looks to me like the the circuit above is not suited to build synchronous counters, but that you have to cascade them instead. I could be wrong though. Thank you anyway for the link, I will have to study it more closely.
Are you sure? yes | no
I have tried it. Basically the 1.8k resistor holds the slave current in between latch and release, and the capacitor triggers (pulses) an on or an off.
My coil was 5V, 187R and 2 to 3 ms switch time. I found a 270R worked okay (as expected from the datasheet specifications), but I had to use a 100uF capacitor (rather than 33uF, higher than expected).
I hooked it up as a counter, the first stage worked okay but I could not get the second stage to toggle correctly. It may have been contact bounce?
I would rate the design pretty poor because it takes so much time set it up and I never got it working properly as a counter.
AlanX
Are you sure? yes | no
Besides, there are latched relays which keep either state indefinitely, a kind of RS trigger on it's own. This potentially means one relay per trigger and no energy consumption in static. They can have from 1 to 12 poles, and minimum 2 coils (or more). Can be expensive and short range to choose on ebay, though in case of surplus stores, price and stock is always a sort of luck.
just an examples that i know and can comment on:
http://www.ebay.com/itm/Militar-Relay-RPS-32B-RS4-520-224-sealed-polarized-bistable-USSR-NEW-Lot-2pcs-/152706606140?hash=item238e05e43c
http://www.ebay.com/itm/RPS34B-bistable-4PDT-latching-relay-Coil-27V-Terminal-3A-industrial-/152735413221?hash=item238fbd73e5:g:HwoAAOSwr~lYpZ4K
http://www.ebay.com/itm/DP12-Relay-bistable-polarized-12PDT-latching-USSR-Soviet-Coil-27V-Terminal-10A/192321760136?_trkparms=aid%3D222007%26algo%3DSIM.MBE%26ao%3D2%26asc%3D41375%26meid%3D769db32ab8e84002b7df14805b2fa20b%26pid%3D100005%26rk%3D1%26rkt%3D2%2...
Are you sure? yes | no
Please do, it's a great place!
Are you sure? yes | no
I spotted it when random walking but it was closed. Maybe next time it will display your clock :-)
BTW have you thought about means to adjust the hours and minutes ? maybe with a rotary phone dial ?
Are you sure? yes | no
Unfortunately they have only one open day a week, but usually you can get in if you just want to look or ask a question.
Are you sure? yes | no
There will be two small pushbuttons on the back to increase minutes and hours. These buttons will be on the "clock generator" board at the bottom.
Are you sure? yes | no
I'll have to finally visit that fablab next time I come in your city :-)
Are you sure? yes | no