After a lot of trial and error I finally have a working prototype of the Python code that will power the whole experience. It runs really well on OSX.
The basic pseudo-code:
Twitter Authentication (REST API)
Get all tweets with "#selfie"
For every tweet:
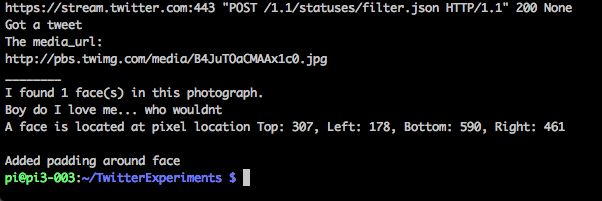
Parse JSON for IMG file.
IF image is present
Find faces in image
Crop random face
Display face in OLED display
ELSE
break It works! 🔥🔥🔥🔥
All of this will be executed on a Raspberry Pi. Initially I was using a Pi Zero W, but the face recognition part was taking too long and since space isn't really an issue I could benefit from a little extra computing power; so upgraded to a Pi 3 B+. Now I need to optimize and cut down time to process the image and find the face. Multi-threading might be the answer.
The trickiest part so far has been the initial setup of all the required libraries, took me about 9 tries (about 15h each) on the Pi Zero only to realize it was too slow. The Pi 3 B+ was easier to set up, and I'll be writing a quick summary of everything I learned in the hopes others will find it useful. A Raspberry Pi quick setup guide for noobs like me.
I will be traveling over the next week, planning to use plane time to write and down time to code. Stay tuned for new updates.
Hardware:
- Raspberry Pi 3 B+
- 1.5" OLED SSD1351
The libraries I'm using thus far:
- Twython (Docs)
- Face Recognition (Git)
- Luma OLED (Docs)
- urllib (Python)
- Pillow (Python)
- Threading (Python)
Next steps
- Optimize code to be multi-threaded
- Separate Twitter, File handling, OLED, and Facial recognition into individual threads.
- Begin 3D scanning experiments to get the right 3D model.
- 3D printing tests, material explorations, and sizing.
Discussions
Become a Hackaday.io Member
Create an account to leave a comment. Already have an account? Log In.