-
1Step 1
Wiring:
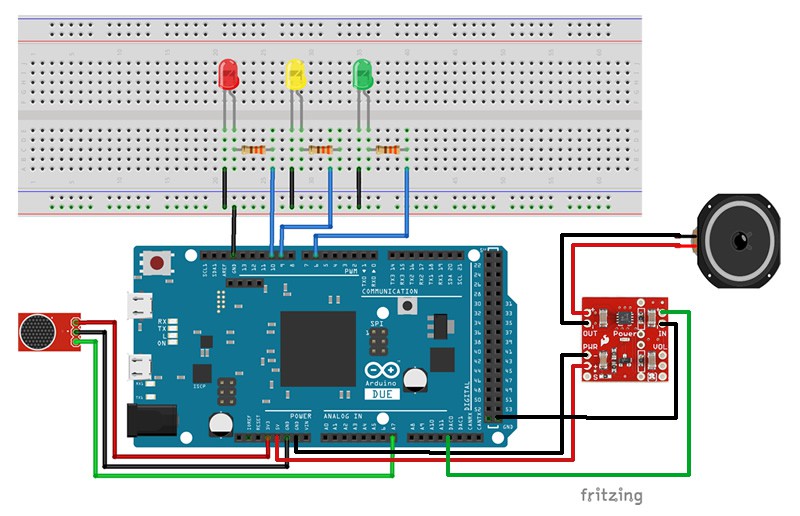
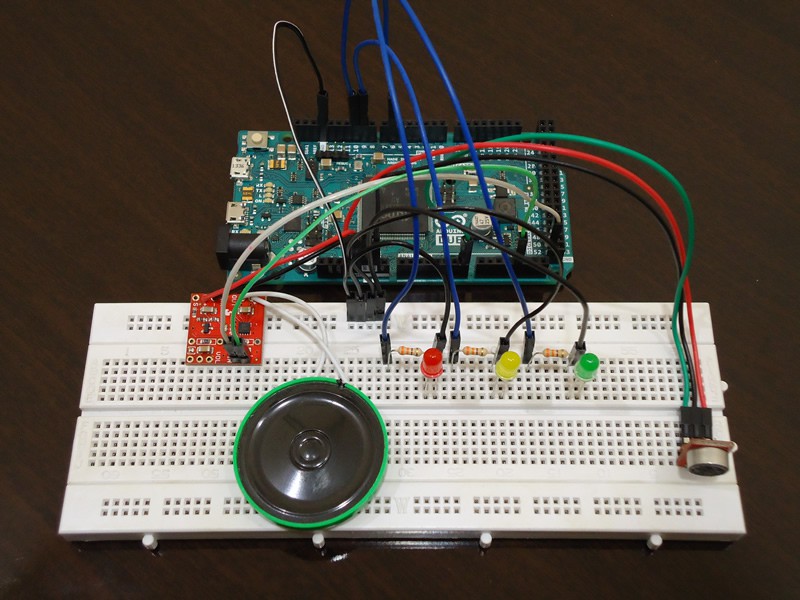
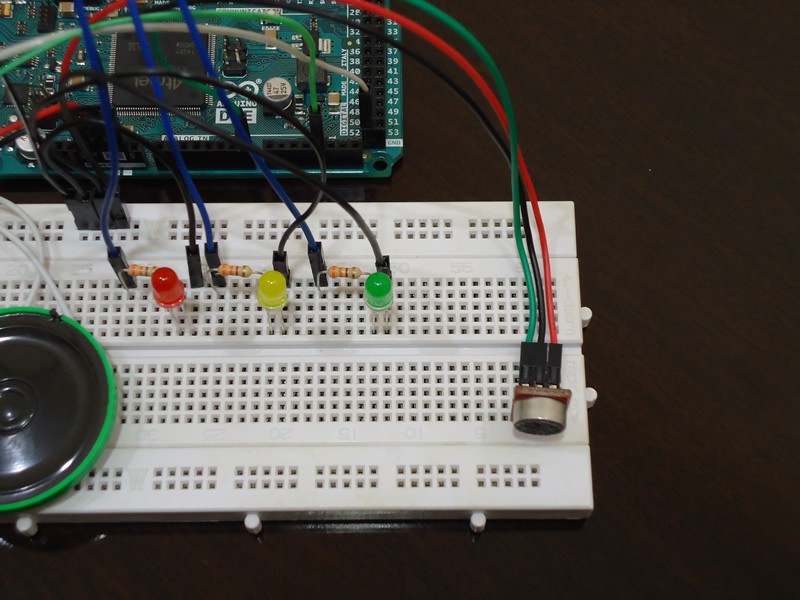
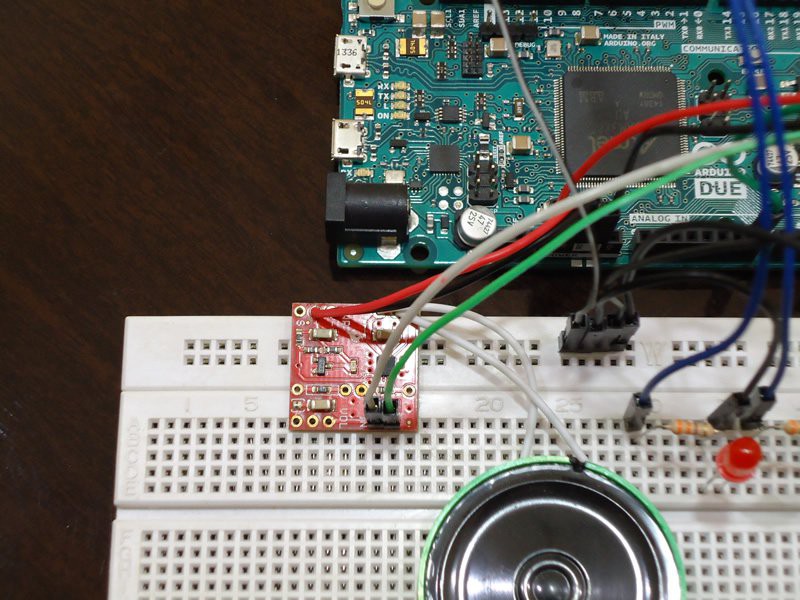
The first step is to wire the Arduino and the breadboard with the components as shown in the pictures below. I had to place a small rubber underneath the speaker because it vibrates a lot and without the rubber the quality of the audio is considerably affected.
![]()
![]()
![]()
![]() Here we have a small but important difference from my previous project. Most Arduino boards run at 5V, but the DUE runs at 3.3V. Because I got better results running the Sparkfun Electret Breakout at 3.3V, I recommend you add a jumper between the 3.3V pin and the AREF pin IF you are using 5V Arduino boards. The DUE already uses a 3.3V analog reference so you do not need a jumper to the AREF pin. In fact, the AREF pin on the DUE is connected to the microcontroller through a resistor bridge. To use the AREF pin, resistor BR1 must be desoldered from the PCB.
Here we have a small but important difference from my previous project. Most Arduino boards run at 5V, but the DUE runs at 3.3V. Because I got better results running the Sparkfun Electret Breakout at 3.3V, I recommend you add a jumper between the 3.3V pin and the AREF pin IF you are using 5V Arduino boards. The DUE already uses a 3.3V analog reference so you do not need a jumper to the AREF pin. In fact, the AREF pin on the DUE is connected to the microcontroller through a resistor bridge. To use the AREF pin, resistor BR1 must be desoldered from the PCB. -
2Step 2
Uploading the code to the Arduino
Now you have to upload the code below to your Arduino. You can also download the Arduino sketch from the link below the code. Before you upload the code, you must properly install the BitVoicer Server libraries into the Arduino IDE (Importing a .zip Library).
#include <BVSP.h>
#include <BVSMic.h>
#include <BVSSpeaker.h>
#include <DAC.h>

// Defines the Arduino pin that will be used to capture
// audio
#define BVSM_AUDIO_INPUT 7

// Defines the LED pins
#define RED_LED_PIN 6
#define YELLOW_LED_PIN 9
#define GREEN_LED_PIN 10

// Defines the constants that will be passed as parameters
// to the BVSP.begin function
const unsigned long STATUS_REQUEST_TIMEOUT = 3000;
const unsigned long STATUS_REQUEST_INTERVAL = 4000;

// Defines the size of the mic audio buffer
const int MIC_BUFFER_SIZE = 64;

// Defines the size of the speaker audio buffer
const int SPEAKER_BUFFER_SIZE = 128;

// Defines the size of the receive buffer
const int RECEIVE_BUFFER_SIZE = 2;

// Initializes a new global instance of the BVSP class
BVSP bvsp = BVSP();

// Initializes a new global instance of the BVSMic class
BVSMic bvsm = BVSMic();

// Initializes a new global instance of the BVSSpeaker class
BVSSpeaker bvss = BVSSpeaker();

// Creates a buffer that will be used to read recorded
// samples from the BVSMic class
byte micBuffer[MIC_BUFFER_SIZE];

// Creates a buffer that will be used to write audio samples
// into the BVSSpeaker class
byte speakerBuffer[SPEAKER_BUFFER_SIZE];

// Creates a buffer that will be used to read the commands
// sent from BitVoicer Server.
// Byte 0 = pin number
// Byte 1 = pin value
byte receiveBuffer[RECEIVE_BUFFER_SIZE];

// These variables are used to control when to play
// "LED Notes". These notes will be played along with
// the song streamed from BitVoicer Server.
bool playLEDNotes = false;
unsigned int playStartTime = 0;

void setup()
{
  // Sets up the pin modes
  pinMode(RED_LED_PIN, OUTPUT);
  pinMode(YELLOW_LED_PIN, OUTPUT);
  pinMode(GREEN_LED_PIN, OUTPUT);

  // Sets the initial state of all LEDs
  digitalWrite(RED_LED_PIN, LOW);
  digitalWrite(YELLOW_LED_PIN, LOW);
  digitalWrite(GREEN_LED_PIN, LOW);

  // Starts serial communication at 115200 bps
  Serial.begin(115200);

  // Sets the Arduino serial port that will be used for
  // communication, how long it will take before a status
  // request times out and how often status requests should
  // be sent to BitVoicer Server.
  bvsp.begin(Serial, STATUS_REQUEST_TIMEOUT, STATUS_REQUEST_INTERVAL);

  // Defines the function that will handle the frameReceived
  // event
  bvsp.frameReceived = BVSP_frameReceived;

  // Sets the function that will handle the modeChanged
  // event
  bvsp.modeChanged = BVSP_modeChanged;

  // Sets the function that will handle the streamReceived
  // event
  bvsp.streamReceived = BVSP_streamReceived;

  // Prepares the BVSMic class timer
  bvsm.begin();

  // Sets the DAC that will be used by the BVSSpeaker class
  bvss.begin(DAC);
}

void loop()
{
  // Checks if the status request interval has elapsed and
  // if it has, sends a status request to BitVoicer Server
  bvsp.keepAlive();

  // Checks if there is data available at the serial port
  // buffer and processes its content according to the
  // specifications of the BitVoicer Server Protocol
  bvsp.receive();

  // Checks if there is one SRE available. If there is one,
  // starts recording.
  if (bvsp.isSREAvailable())
  {
    // If the BVSMic class is not recording, sets up the
    // audio input and starts recording
    if (!bvsm.isRecording)
    {
      bvsm.setAudioInput(BVSM_AUDIO_INPUT, DEFAULT);
      bvsm.startRecording();
    }

    // Checks if the BVSMic class has available samples
    if (bvsm.available)
    {
      // Makes sure the inbound mode is STREAM_MODE before
      // transmitting the stream
      if (bvsp.inboundMode == FRAMED_MODE)
        bvsp.setInboundMode(STREAM_MODE);

      // Reads the audio samples from the BVSMic class
      int bytesRead = bvsm.read(micBuffer, MIC_BUFFER_SIZE);

      // Sends the audio stream to BitVoicer Server
      bvsp.sendStream(micBuffer, bytesRead);
    }
  }
  else
  {
    // No SRE is available. If the BVSMic class is
    // recording, stops it.
    if (bvsm.isRecording)
      bvsm.stopRecording();
  }

  // Plays all audio samples available in the BVSSpeaker
  // class internal buffer. These samples are written in
  // the BVSP_streamReceived event handler. If no samples
  // are available in the internal buffer, nothing is
  // played.
  bvss.play();

  // If playLEDNotes has been set to true,
  // plays the "LED notes" along with the music.
  if (playLEDNotes)
    playNextLEDNote();
}

// Handles the frameReceived event
void BVSP_frameReceived(byte dataType, int payloadSize)
{
  // Checks if the received frame contains binary data
  // 0x07 = Binary data (byte array)
  if (dataType == DATA_TYPE_BINARY)
  {
    // If 2 bytes were received, process the command.
    if (bvsp.getReceivedBytes(receiveBuffer, RECEIVE_BUFFER_SIZE) ==
      RECEIVE_BUFFER_SIZE)
    {
      analogWrite(receiveBuffer[0], receiveBuffer[1]);
    }
  }
  // Checks if the received frame contains byte data type
  // 0x01 = Byte data type
  else if (dataType == DATA_TYPE_BYTE)
  {
    // If the received byte value is 255, sets playLEDNotes
    // and marks the current time.
    if (bvsp.getReceivedByte() == 255)
    {
      playLEDNotes = true;
      playStartTime = millis();
    }
  }
}

// Handles the modeChanged event
void BVSP_modeChanged()
{
  // If the outboundMode (Server --> Device) has turned to
  // FRAMED_MODE, no audio stream is supposed to be
  // received. Tells the BVSSpeaker class to finish
  // playing when its internal buffer become empty.
  if (bvsp.outboundMode == FRAMED_MODE)
    bvss.finishPlaying();
}

// Handles the streamReceived event
void BVSP_streamReceived(int size)
{
  // Gets the received stream from the BVSP class
  int bytesRead = bvsp.getReceivedStream(speakerBuffer,
    SPEAKER_BUFFER_SIZE);

  // Enqueues the received stream to play
  bvss.enqueue(speakerBuffer, bytesRead);
}

// Lights up the appropriate LED based on the time
// the command to start playing LED notes was received.
// The timings used here are syncronized with the music.
void playNextLEDNote()
{
  // Gets the elapsed time between playStartTime and the
  // current time.
  unsigned long elapsed = millis() - playStartTime;

  // Turns off all LEDs
  allLEDsOff();

  // The last note has been played.
  // Turns off the last LED and stops playing LED notes.
  if (elapsed >= 11500)
  {
    analogWrite(RED_LED_PIN, 0);
    playLEDNotes = false;
  }
  else if (elapsed >= 9900)
    analogWrite(RED_LED_PIN, 255); // C note
  else if (elapsed >= 9370)
    analogWrite(RED_LED_PIN, 255); // C note
  else if (elapsed >= 8900)
    analogWrite(YELLOW_LED_PIN, 255); // D note
  else if (elapsed >= 8610)
    analogWrite(RED_LED_PIN, 255); // C note
  else if (elapsed >= 8230)
    analogWrite(YELLOW_LED_PIN, 255); // D note
  else if (elapsed >= 7970)
    analogWrite(YELLOW_LED_PIN, 255); // D note
  else if (elapsed >= 7470)
    analogWrite(RED_LED_PIN, 255); // C note
  else if (elapsed >= 6760)
    analogWrite(GREEN_LED_PIN, 255); // E note
  else if (elapsed >= 6350)
    analogWrite(RED_LED_PIN, 255); // C note
  else if (elapsed >= 5880)
    analogWrite(YELLOW_LED_PIN, 255); // D note
  else if (elapsed >= 5560)
    analogWrite(RED_LED_PIN, 255); // C note
  else if (elapsed >= 5180)
    analogWrite(YELLOW_LED_PIN, 255); // D note
  else if (elapsed >= 4890)
    analogWrite(YELLOW_LED_PIN, 255); // D note
  else if (elapsed >= 4420)
    analogWrite(RED_LED_PIN, 255); // C note
  else if (elapsed >= 3810)
    analogWrite(GREEN_LED_PIN, 255); // E note
  else if (elapsed >= 3420)
    analogWrite(RED_LED_PIN, 255); // C note
  else if (elapsed >= 2930)
    analogWrite(YELLOW_LED_PIN, 255); // D note
  else if (elapsed >= 2560)
    analogWrite(RED_LED_PIN, 255); // C note
  else if (elapsed >= 2200)
    analogWrite(YELLOW_LED_PIN, 255); // D note
  else if (elapsed >= 1930)
    analogWrite(YELLOW_LED_PIN, 255); // D note
  else if (elapsed >= 1470)
    analogWrite(RED_LED_PIN, 255); // C note
  else if (elapsed >= 1000)
    analogWrite(GREEN_LED_PIN, 255); // E note
}

// Turns off all LEDs.
void allLEDsOff()
{
  analogWrite(RED_LED_PIN, 0);
  analogWrite(YELLOW_LED_PIN, 0);
  analogWrite(GREEN_LED_PIN, 0);
}
Arduino Sketch: BVS_Demo2.ino
This sketch has seven major parts:
- Library references and variable declaration: The first four lines include references to the BVSP, BVSMic, BVSSpeaker and DAC libraries. These libraries are provided by BitSophia and can be found in the BitVoicer Server installation folder. The DAC library is included automatically when you add a reference to the BVSSpeaker library. The other lines declare constants and variables used throughout the sketch. The BVSP class is used to communicate with BitVoicer Server, the BVSMic class is used to capture and store audio samples and the BVSSpeaker class is used to reproduce audio using the DUE DAC.
- Setup function: This function performs the following actions: sets up the pin modes and their initial state; initializes serial communication; and initializes the BVSP, BVSMic and BVSSpeaker classes. It also sets “event handlers” (they are actually function pointers) for the frameReceived, modeChanged and streamReceived events of the BVSP class.
- Loop function: This function performs five important actions: requests status info to the server (keepAlive() function); checks if the server has sent any data and processes the received data (receive() function); controls the recording and sending of audio streams (isSREAvailable(), startRecording(), stopRecording() and sendStream() functions); plays the audio samples queued into the BVSSpeaker class (play() function); and calls the playNextLEDNote() function that controls how the LEDs should blink after the playLEDNotes command is received.
- BVSP_frameReceived function: This function is called every time the receive() function identifies that one complete frame has been received. Here I run the commands sent from BitVoicer Server. Commands that controls the LEDs contains 2 bytes. The first byte indicates the pin and the second byte indicates the pin value. I use the analogWrite() function to set the appropriate value to the pin. I also check if the playLEDNotes command, which is of Byte type, has been received. If it has been received, I set playLEDNotes to true and mark the current time. This time will be used by the playNextLEDNote function to synchronize the LEDs with the song.
- BVSP_modeChanged function: This function is called every time the receive() function identifies a mode change in the outbound direction (Server --> Arduino). WOW!!! What is that?! BitVoicer Server can send framed data or audio streams to the Arduino. Before the communication goes from one mode to another, BitVoicer Server sends a signal. The BVSP class identifies this signal and raises the modeChanged event. In the BVSP_modeChanged function, if I detect the communication is going from stream mode to framed mode, I know the audio has ended so I can tell the BVSSpeaker class to stop playing audio samples.
- BVSP_streamReceived function: This function is called every time the receive() function identifies that audio samples have been received. I simply retrieve the samples and queue them into the BVSSpeaker class so the play() function can reproduce them.
- playNextLEDNote function: This function only runs if the BVSP_frameReceived function identifies the playLEDNotes command. It controls and synchronizes the LEDs with the audio sent from BitVoicer Server. To synchronize the LEDs with the audio and know the correct timing, I used Sonic Visualizer. This free software allowed me to see the audio waves so I could easily tell when a piano key was pressed. It also shows a time line and that is how I got the milliseconds used in this function. Sounds like a silly trick and it is. I think it would be possible to analyze the audio stream and turn on the corresponding LED, but that is out of my reach.
-
3Step 3
Importing BitVoicer Server Solution Objects
Now you have to set up BitVoicer Server to work with the Arduino. BitVoicer Server has four major solution objects: Locations, Devices, BinaryData and Voice Schemas.
Locations represent the physical location where a device is installed. In my case, I created a location called Home.
Devices are the BitVoicer Server clients. I created a Mixed device, named it ArduinoDUE and entered the communication settings. IMPORTANT: even the Arduino DUE has a small amount of memory to store all the audio samples BitVoicer Server will stream. If you do not limit the bandwidth, you would need a much bigger buffer to store the audio. I got some buffer overflows for this reason so I had to limit the Data Rate in the communication settings to 8000 samples per second.
BinaryData is a type of command BitVoicer Server can send to client devices. They are actually byte arrays you can link to commands. When BitVoicer Server recognizes speech related to that command, it sends the byte array to the target device. I created one BinaryData object to each pin value and named them ArduinoDUEGreenLedOn, ArduinoDUEGreenLedOff and so on. I ended up with 18 BinaryData objects in my solution, so I suggest you download and import the objects from the VoiceSchema.sof file below.
Voice Schemas are where everything comes together. They define what sentences should be recognized and what commands to run. For each sentence, you can define as many commands as you need and the order they will be executed. You can also define delays between commands. That is how I managed to perform the sequence of actions you see in the video.
One of the sentences in my Voice Schema is “play a little song.” This sentence contains two commands. The first command sends a byte that indicates the following command is going to be an audio stream. The Arduino then starts “playing” the LEDs while the audio is being transmitted. The audio is a little piano jingle I recorded myself and set it as the audio source of the second command. BitVoicer Server supports only 8-bit mono PCM audio (8000 samples per second) so if you need to convert an audio file to this format, I recommend the following online conversion tool: http://audio.online-convert.com/convert-to-wav.
You can import (Importing Solution Objects) all solution objects I used in this project from the files below. One contains the DUE Device and the other contains the Voice Schema and its Commands.
Solution Object Files:
-
4Step 4
Conclusion:
There you go! You can turn everything on and do the same things shown in the video.
As I did in my previous project, I started the speech recognition by enabling the Arduino device in the BitVoicer Server Manager. As soon as it gets enabled, the Arduino identifies an available Speech Recognition Engine and starts streaming audio to BitVoicer Server. However, now you see a lot more activity in the Arduino RX LED while audio is being streamed from BitVoicer Server to the Arduino.
In my next project, I will be a little more ambitious. I going to add WiFi communication to one Arduino and control two other Arduinos all together by voice. I am thinking of some kind of game between them. Suggestions are very welcome!
Speech Recognition and Synthesis with Arduino
Implements speech recognition and synthesis using an Arduino DUE


Discussions
Become a Hackaday.io Member
Create an account to leave a comment. Already have an account? Log In.