Close
0%
0%

Argon - Discovery Board - Servo - Adapter board

Adapter board to connect the Granite Devices Argon servo controller with the servo encoder and a STM32F4DISCOVERY board (OpenSimWheel)

Similar projects worth following
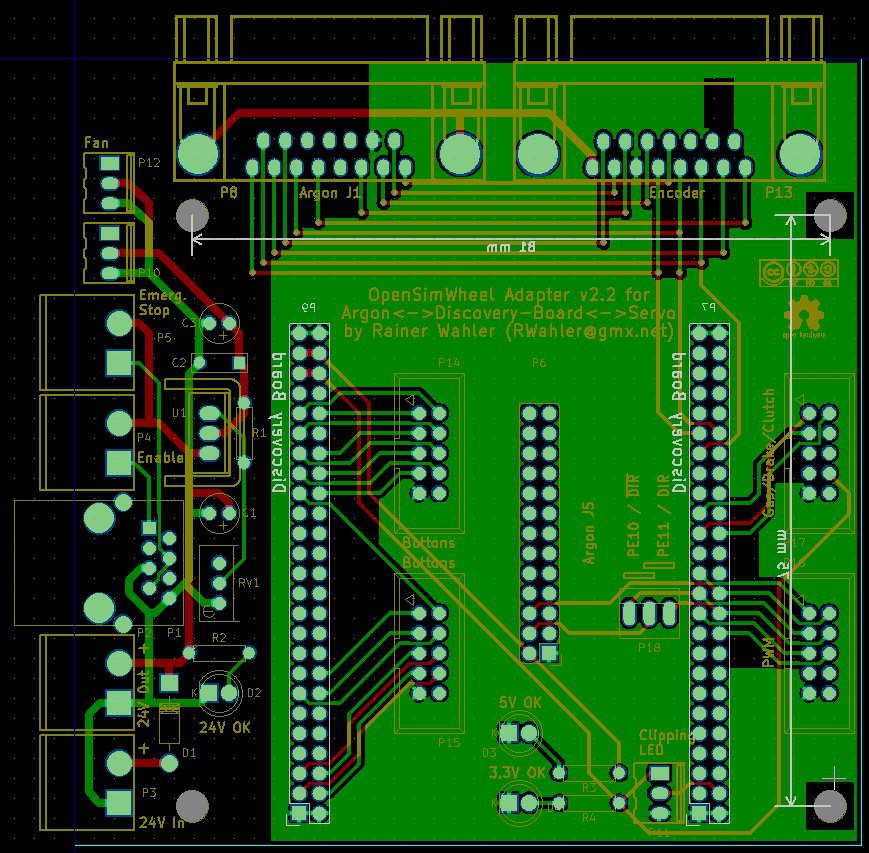
This adapter board simplifies the connection of the different components required to build a force-feedback wheel from the OpenSimWheel project. It connects the STM32F4DISCOVERY board with the encoder and the Argon servo controller the way it should be.

The Project is published under the CC BY-NC-SA 3.0 license.

This board is used to connect all required modules with each other in a simple way. It connects the Argon servo controller with the encoder on the servo motor (i.e.Mige) and the Discovery Board from ST. The wiring and whole idea of the project comes from the Open Sim Wheel project, which uses industrial servo motors to build a force-feedback wheel for car games.

The schematic, layout and 3d view were created in KiCad.

I attached the original source files to this project site and all components could be sourced by Reichelt (Supplier in Germany) where i created a basket for all parts.

Optional voltage regulator for external fans

There is an optional voltage regulator on board which could power up to two external fans. The voltage can be regulated between ~1,5V and ~22V with help of the potentiometer and is powered from the main 24V power supply. So if external fans should be used the total power consumption of the Argon and all attached fans should be considered for the power supply.

Connectors P10 and P12 have a pinout for typical 3 pin connectors of pc fans. But also normal fans with 2 pin connector should work. In case of pc fans the voltage should be set to ~12V. With help of the regulated voltage it is possible to adjust the noise level and air flow of the attached fans.


Assignment of all connectors

DescriptionConnection typeI/OFunction
P18 pin RJ45OutEmergency stop and enable wire to Argon at J2.2
P22 pin female headerOut24V for Argon at J3
P32 pin female headerIn24V from power supply
P42 pin female headerInArgon enable contact (shorted to enable)
P52 pin female headerInEmergency stop switch (shorted to work normally)
P626 pin headerOutPWM and DIR control signals to Argon at J5
P750 pin female headerIn/OutControl signals from Discovery Board
P815 pin d-sub maleOutRotary encoder signals to Argon at J1
P950 pin female headerIn/OutControl signals from Discovery Board
P103 pin headerOutExternal fan 1
P113 pin headerOutExternal clipping LED
P123 pin headerOutExternal fan 1
P1315 pin d-sub femaleInRotary encoder signals from servo motor
P1410 pin headerInOptional 8 external buttons
P1510 pin headerInOptional 8 external buttons
P1610 pin headerOutAll possible PWM signals
P1710 pin headerInAnalogue potentiometer (brake, clutch, gas)
P183 pin jumper-Jumper to select PE10 or PE11 for DIR signal

Pin assignment of P8 for rotary encoder

PinFunction
1
Motor ground
2+5V
30V
4CH A+
5CH B+
6CH Z+
7CH A-
8CH B-
9CH Z-
10CH U+
11CH V+
12CH W+
13not connected
14not connected
15not connected

argon_disco_adapter_v2.2.zip

KiCad Source Files

Zip Archive - 55.13 kB - 02/13/2016 at 13:01

Download

  • Changelog

    Rainer01/15/2016 at 14:09 0 comments

    Revisions

    • 1.0: First version from which i ordered boards from dirtypcbs. All wanted functions were integrated.
    • 2.0: There were a nasty error in the board. Because i didn't have the Discovery Board at hand when i designed the board i assumed the pin headers are on top of the board. But i found out they are at the bottom. So i had to redesign the board to fix this bug.
    • 2.1: The jumper selection of the "direction" signals was not correct. I used PE9 and PE10 but it was PE10 and PE11. Was only a minor fix to the board because PE10 is the standard signal.
    • 2.2: After changing the pin headers in v2.0 the spacing between them were not correct. The distance between them had to be 2.54mm nearer to each other which is now fixed.

View project log

  • 1
    Step 1

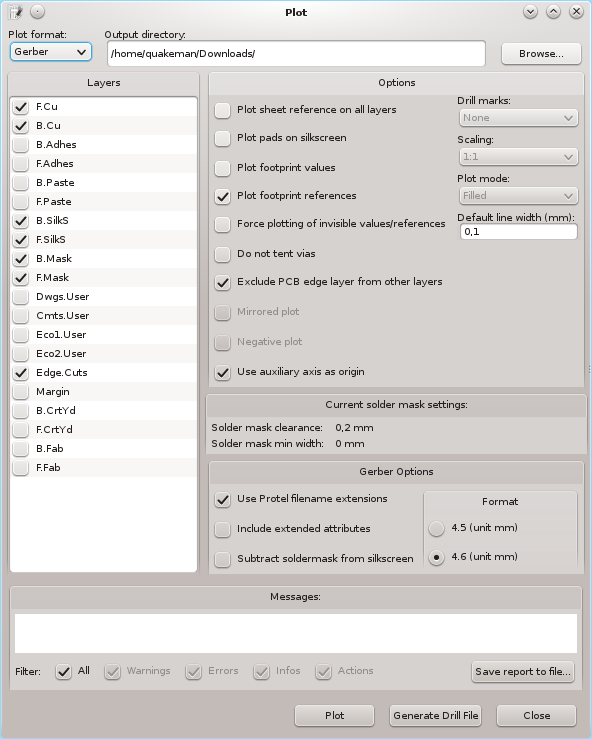
    To create the needed files for manufacturing the board load the project in KiCad. Then open Pcbnew and click file->plot to create the Gerber files. In the plot dialog select the following settings:

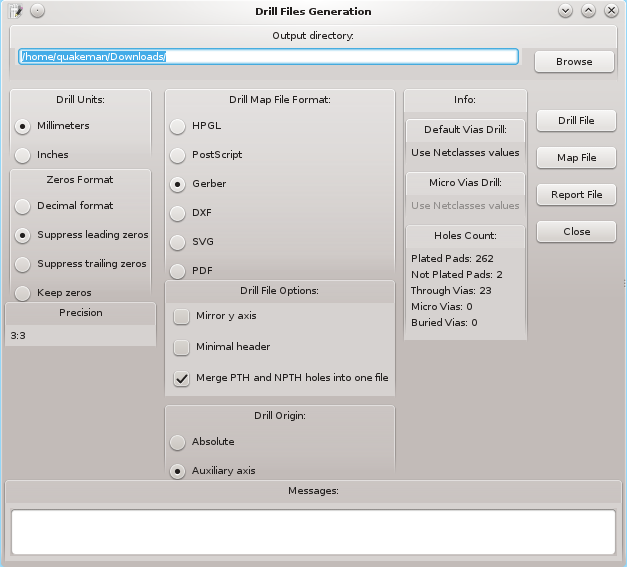
    Click on "plot" to create all needed Gerber file. Now click on "Generate Drill File" to open the next dialog window. Now you have to select the following settings:

    Click on "Drill File" to create the Exellon drill file. To group all files together it's a good idea to create an empty directory and select it in the "Output directory" field for both dialog windows.

    There is a little bug in KiCad where one of the created Gerber files has a false extension. To fix this you should rename the file with the ending *.gm1 to *.gml (One to lower case L).

    To be sure your files are correct you can verify them in the next step.

  • 2
    Step 2

    To verify your exported files in Gerbview, which is also part of KiCad, just start Gerbview and load the following Gerber files:

    argon_disco_adapter-B.Cu.gbl
    argon_disco_adapter-B.Mask.gbs
    argon_disco_adapter-B.SilkS.gbo
    argon_disco_adapter-Edge.Cuts.gml
    argon_disco_adapter-F.Cu.gtl
    argon_disco_adapter-F.Mask.gts
    argon_disco_adapter-F.SilkS.gto
    After that load the Exellon drill file "argon_disco_adapter.drl" and the final board should look like the following picture:

    The colors are not relevant but the origin of the board should be at the upper left corner. This is shown with the blue grid lines.

    Now you have all files you need to let the board be created by any pcb manufacturer. Just zip all files and send them in.

View all instructions

Enjoy this project?

Share

Discussions

Similar Projects

Does this project spark your interest?

Become a member to follow this project and never miss any updates