Peter Noyes
-
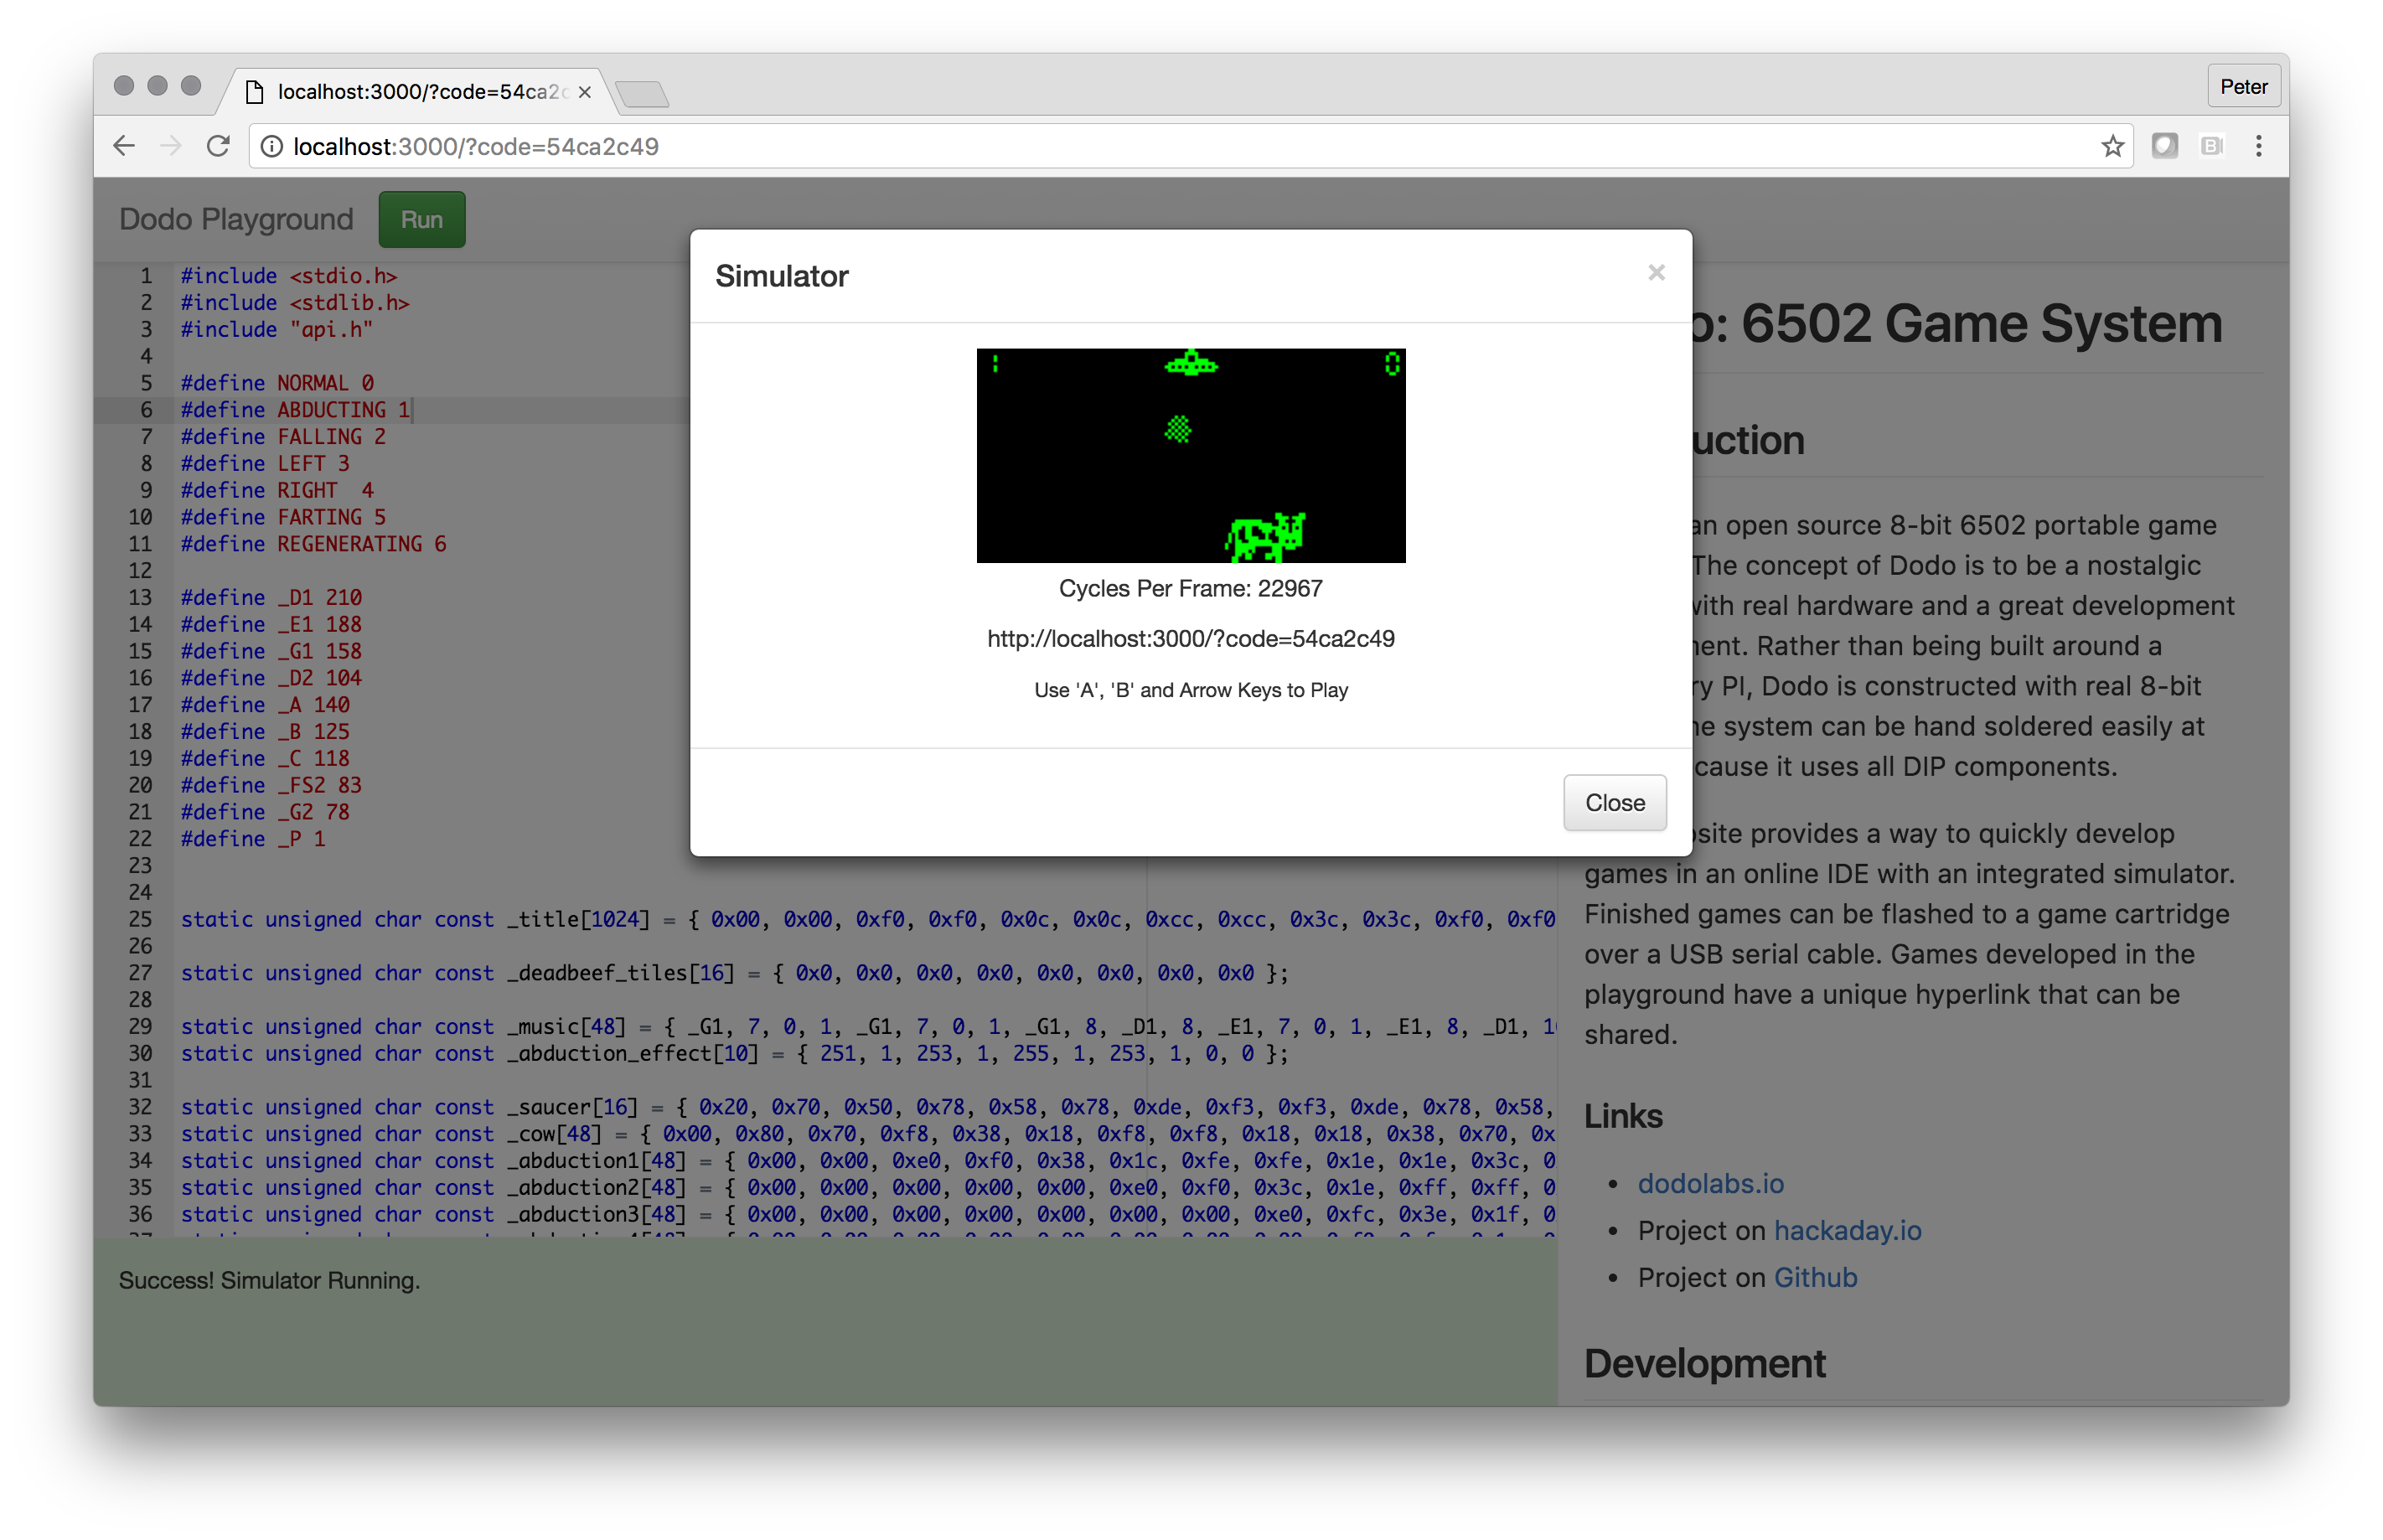
Playground
09/15/2016 at 05:03 • 8 commentsI am back! I had to take a hiatus from working on this project for the past several months, but over the past few weeks I have been busy. My most recent advancement is a playground!
![]()
The playground is a web application that simplifies developing games for Dodo by having an IDE and Simulator that run as a hosted service. For everything developed there is a shareable link that is generated.
For instance here is a a link to the game 0xDEADBEEF
Note that it is not playable on a mobile device at the moment
The playground was a concept that I wanted to pursue since the beginning of the project. I thought it would be awesome to bring 6502 development into the cloud era. Having a Web IDE with an integrated simulator lowers the barrier to entry to get people to experiment with the project, and for my own development it seriously improves the speed at which I can iterate.
The first step was to write a simulator, which I did a while back in the language Go. The initial simulator ran as a console application. I then developed a web version that used Websockets to stream the graphics from a backend server to the client in real-time. The approach of running the simulation in the cloud worked, but it just consumed too many resources and scaling it would be difficult.
The solution would need to have the simulator run locally on the client. I put the playground on the backburner because I really wanted to stick with Go as a language, porting to JavaScript is not my idea of fun. Thankfully, I randomly stumbled across the project GopherJS which transpiles Go code into JavaScript so that it can run locally in the browser. I could stick with Go! Using GopherJS wasn't competely seamless, because the simulator ran painfully slow at first. Also, my orginal code relied on multi-threading and JavaScript is single threaded. It took several passes at optimizing the code to achieve a playable framerate in most browsers. Chrome works the best.
The development language for Dodo is 'C' and it is compiled using cc65. The playground works by hosting cc65 in the cloud.
Here is roughly how the whole system works:
- The user vists the webpage and gets served the HTML file and the transpiled Go code which is now JavaScript
- The code starts by requesting the firmware from the website, as well as the 'C' code associated with the particular hyperlink
- The code is then placed within the Ace editor that is running locally in the browser
- When the user clicks Run it sends the 'C' code back up to the cloud where it attempts to compile it.
- The web service returns either with the compiled game as a chunk of bytes, or an error message
- If it gets the firmware it then fires up the simulator with the game and it all runs local
With this design the heavy lifting is mostly done by the client. The server just has to compile the code. This is also scaleable.
I also made some advancements with the simulator. Because there is an easy to use Audio API in most browsers, I was able to get sound simulated fairly easily. I also pulled it into its own library so it could be embedded in other contexts.
Here are some other playground links:
Proof of concept of bird version of space invaders 'Poovaders'
Here is the repository on Github
-
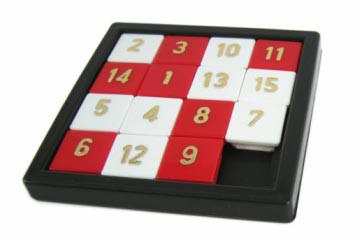
Mother's Day Slide Puzzle
05/14/2016 at 16:12 • 1 commentFor Mother's Day a few weeks ago I made my wife a game on Dodo! It is basically one of those plastic slide puzzle games like this:
![]()
The picture for the puzzle is of our two kids. My wife loves big band music so I set the background to 'Moonlight Serenade', which is her favorite. That era of music reminds her of her Grandparents. The game is written in 'C' and is only a few hundred lines of code. The screen is 128x64, so the puzzle is rectangular instead of square. At first I sliced the image up so that the puzzle would be 8x4 (32 pieces). This proved to be very difficult to solve, especially with the image being low resolution and dithered. Each piece is completely unrecognizable until it forms the final image and you look at it from a distance. I then changed it to 4x2 (8 pieces) which felt about right in terms of difficulty.
To load the image I found this great little project on Github that simulates the Atkinson Dithering from early the early Macs. I use this to create the bitonal image needed for Dodo.
http://gazs.github.io/canvas-atkinson-dither/
![]()
The game has the concept of a Cursor. If you click 'A' while the Cursor is on a piece next to the hole, the piece then moves to occupy that hole. To support the cursor I added the XOR drawing mode to the sprite drawing function. Repeatadly drawing a white block in XOR mode over the piece causes it to flash.
The music is encoded by hand in the following manner:
#define Cs1 224
#define D1  210
#define E1  188
#define F1  177
#define Fs1 168
#define G1  158
#define Gs1 149
#define A1  140
#define Bb1 133
#define C2  118
#define D2  104

static byte const _music[92] = { Cs1, 12, D1, 40, E1, 4, F1, 4, D1, 40, E1, 4, F1, 4, D1, 16, E1, 4, F1, 4, D1, 16, E1 ...
I have defined the various notes needed by the music. Each represents a number that is used by the VIA shift register to ultimately output the correct frequency. The music is a byte array alternating between notes and durations. A duration of 1 amounts to 50ms. For the tempo of the song, and to make it possible to encode triplets, I chose that a quarter note will be represented by 12.
![]()
Looking at the sheet music it starts with a quarter note of C#, which is encoded by Cs1, 12. The next note is tricky. It is a dotted half note that is connected to the first note in the triplet. A triplet as a whole is meant to fill the space of a quarter note. So the duration of each note in the triplet is 4 (12/3). The dotted half note is meant to then represent 3/4 of the total measure. Each measure is a total duration of 48, so the dotted half note should be 36, however because it is connected to the triplet it gets 4 added for a total duration of 40, the next two notes complete the triplet and have a duration of 4.
If a note of 0 is output, it represents silence.
As you can see, encoding music can be a touch complicated, but to me, it is actually pretty fun!
Thankfully my wife loved the present. I gave it to her on a game cartridge in a card! Here is the finished project:
-
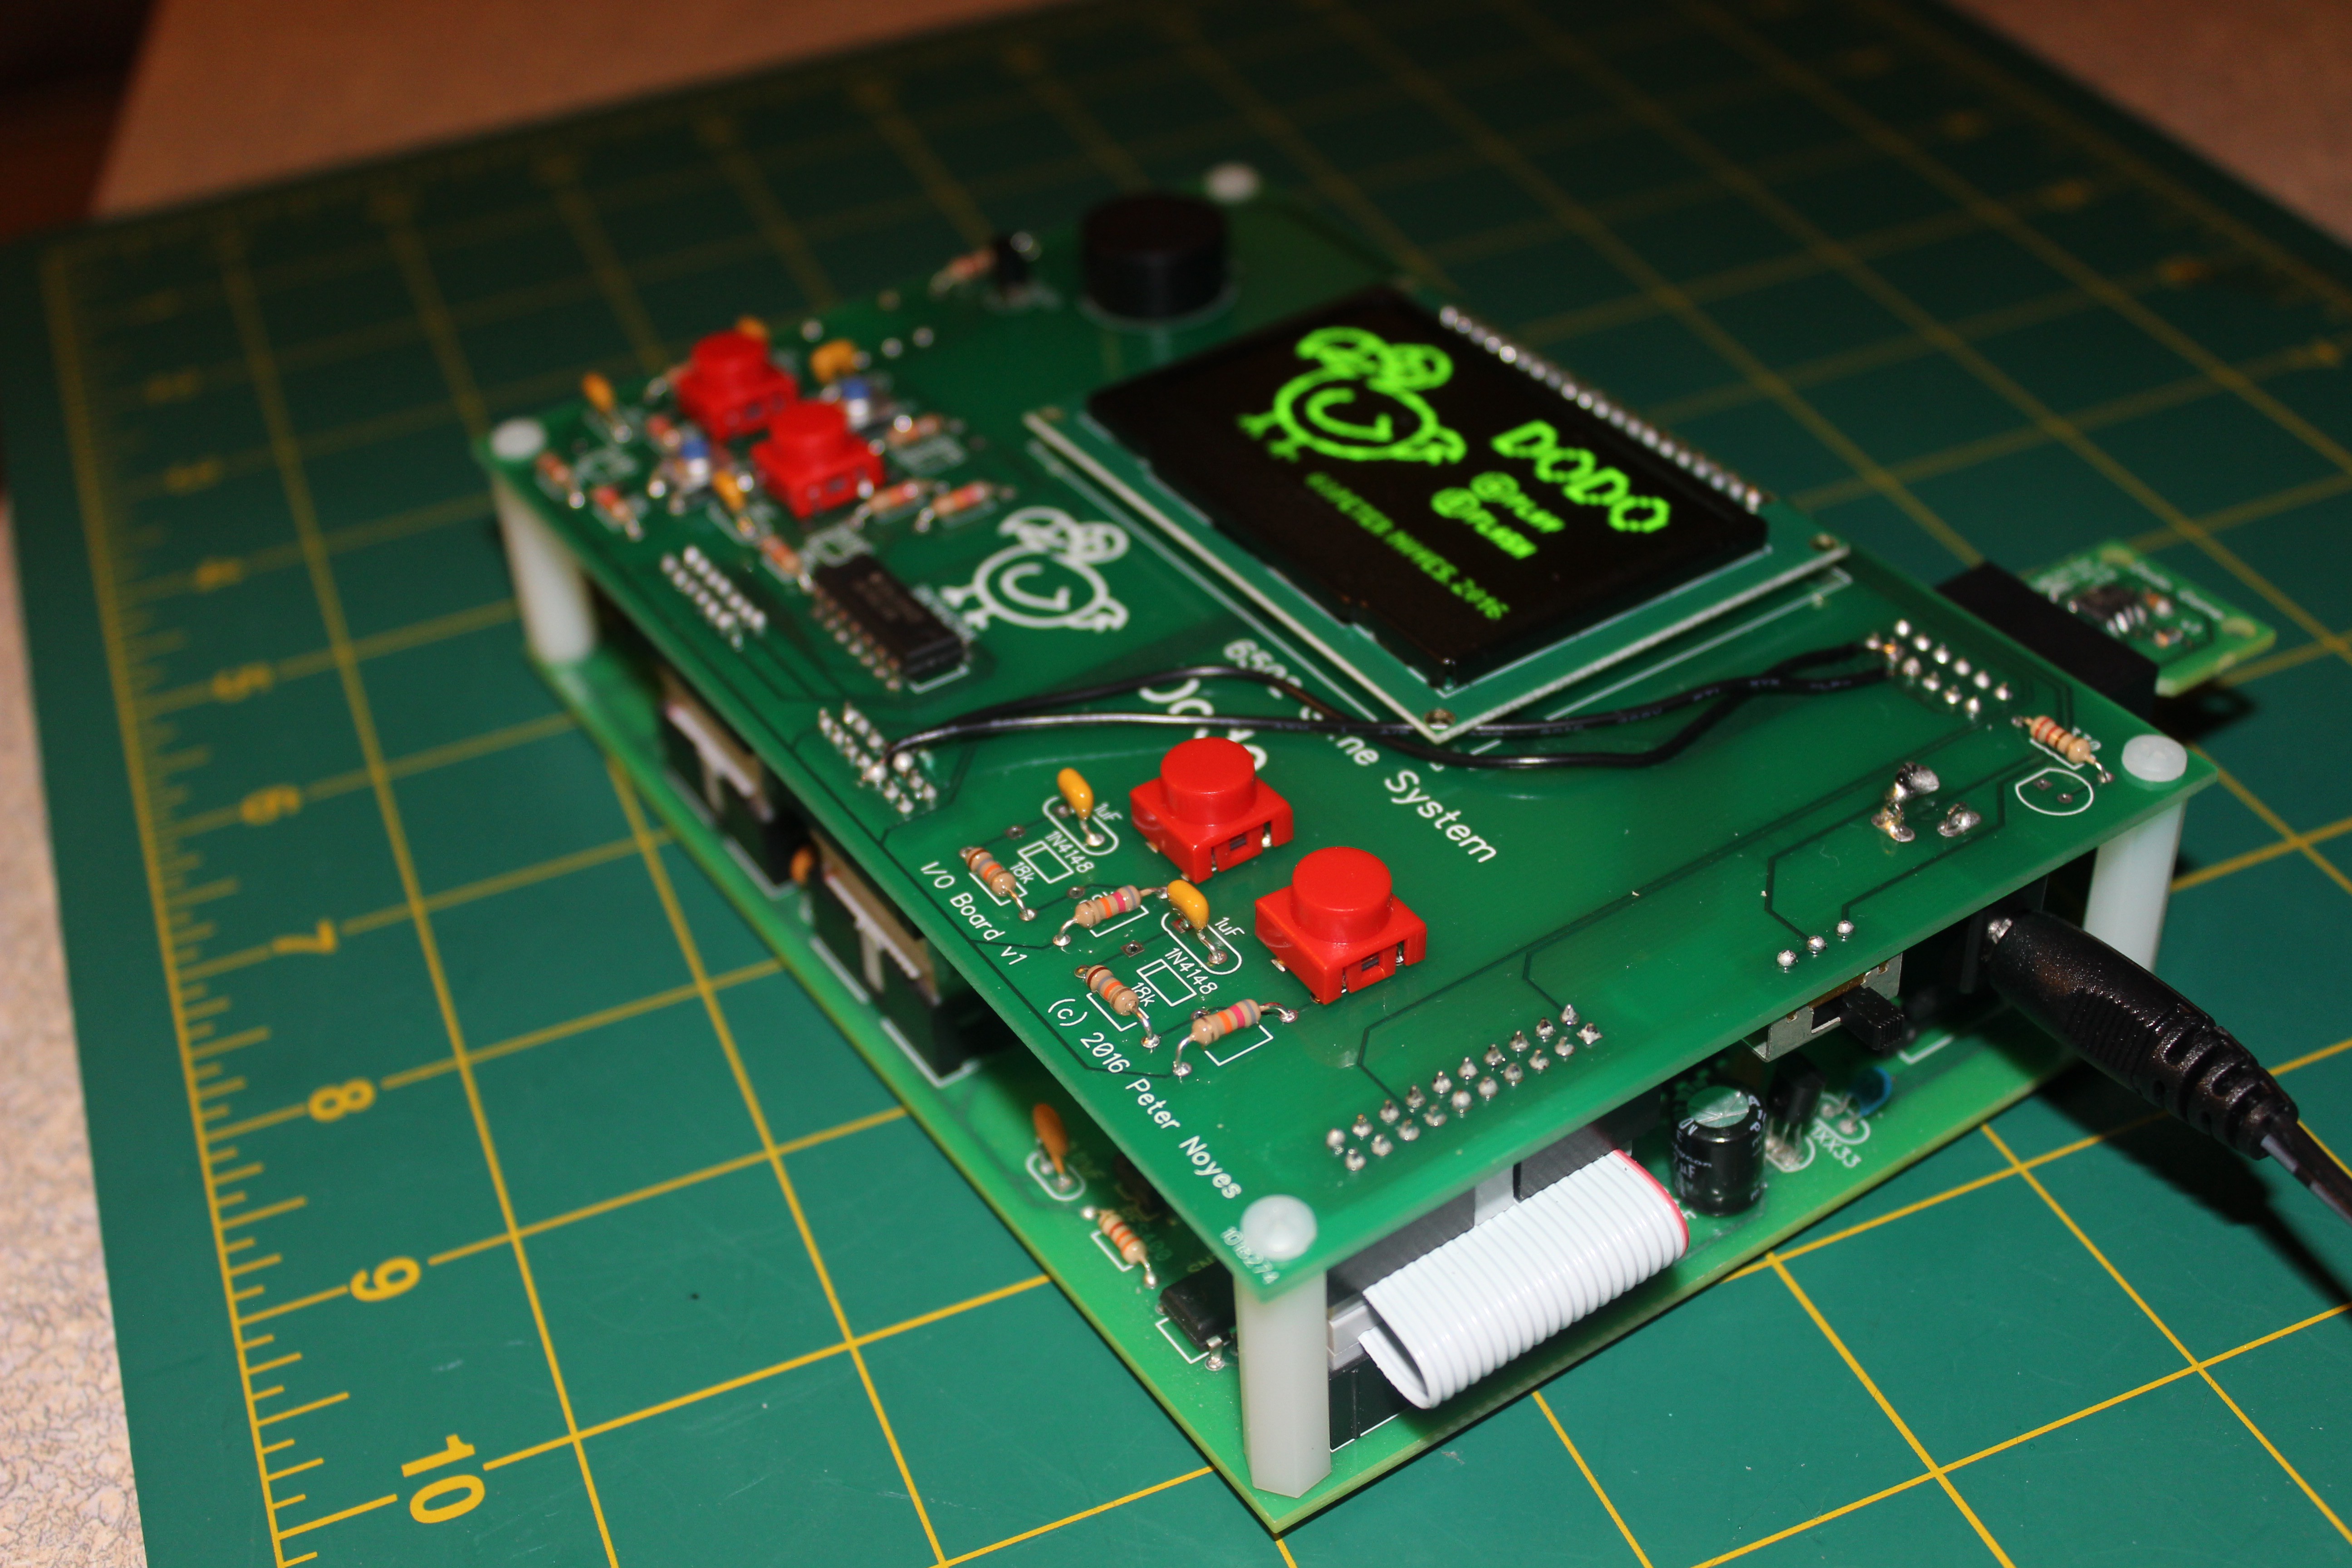
Prototype Assembled
05/13/2016 at 04:54 • 0 comments![]()
I went ahead and assembled the prototype even with the known flaws. I have learned a lot and I can't wait to refine the boards. I have now been working on this thing off and on for 6 months and I sort of just made it up as I went along. I now have a clear picture of what I want this thing to be and I know exactly what changes I want to make for the final version. (At least of Dodo I...) I can't help but think about an even more ambitious project.
Here is what I want to do to refine the boards:
- Ditch the 7805 voltage regulator and instead use a Max756 so that it will run off of AA batteries. It should be portable right? I will still provide a 5V connector for externally powering the board, but it will need to be regulated.
- Move the 3.3v regulator, level shifters, and a logic chip to the I/O board. That circuitry is only needed for the display and it would leave the main board more generic so that it could be used on other projects.
- Get rid of the IDC connectors and instead use a 20x2 pin header to directly mate the two boards. (This will get them closer together)
- Move the DB9 connector away from the the lower left corner, it interferes with gameplay.
- Move the edge connector to the main board
- Make a cutout in top board under the display (there are some critical jumpers under the display that should be accessible)
- Switch to better buttons (And be extra careful to space them appropriately!)
- Stop using the clock output of the 65C02 for the peripheral chips, WDC doesn't recommend it.
- Connect the RTS/CTS lines up from the 6551
- Wire the EEPROM so that it can be programmed on board, this way I can support flashing both system firmware and the game cartridges over Serial. Once the boards are mated using a ZIF socket won't be possible
-
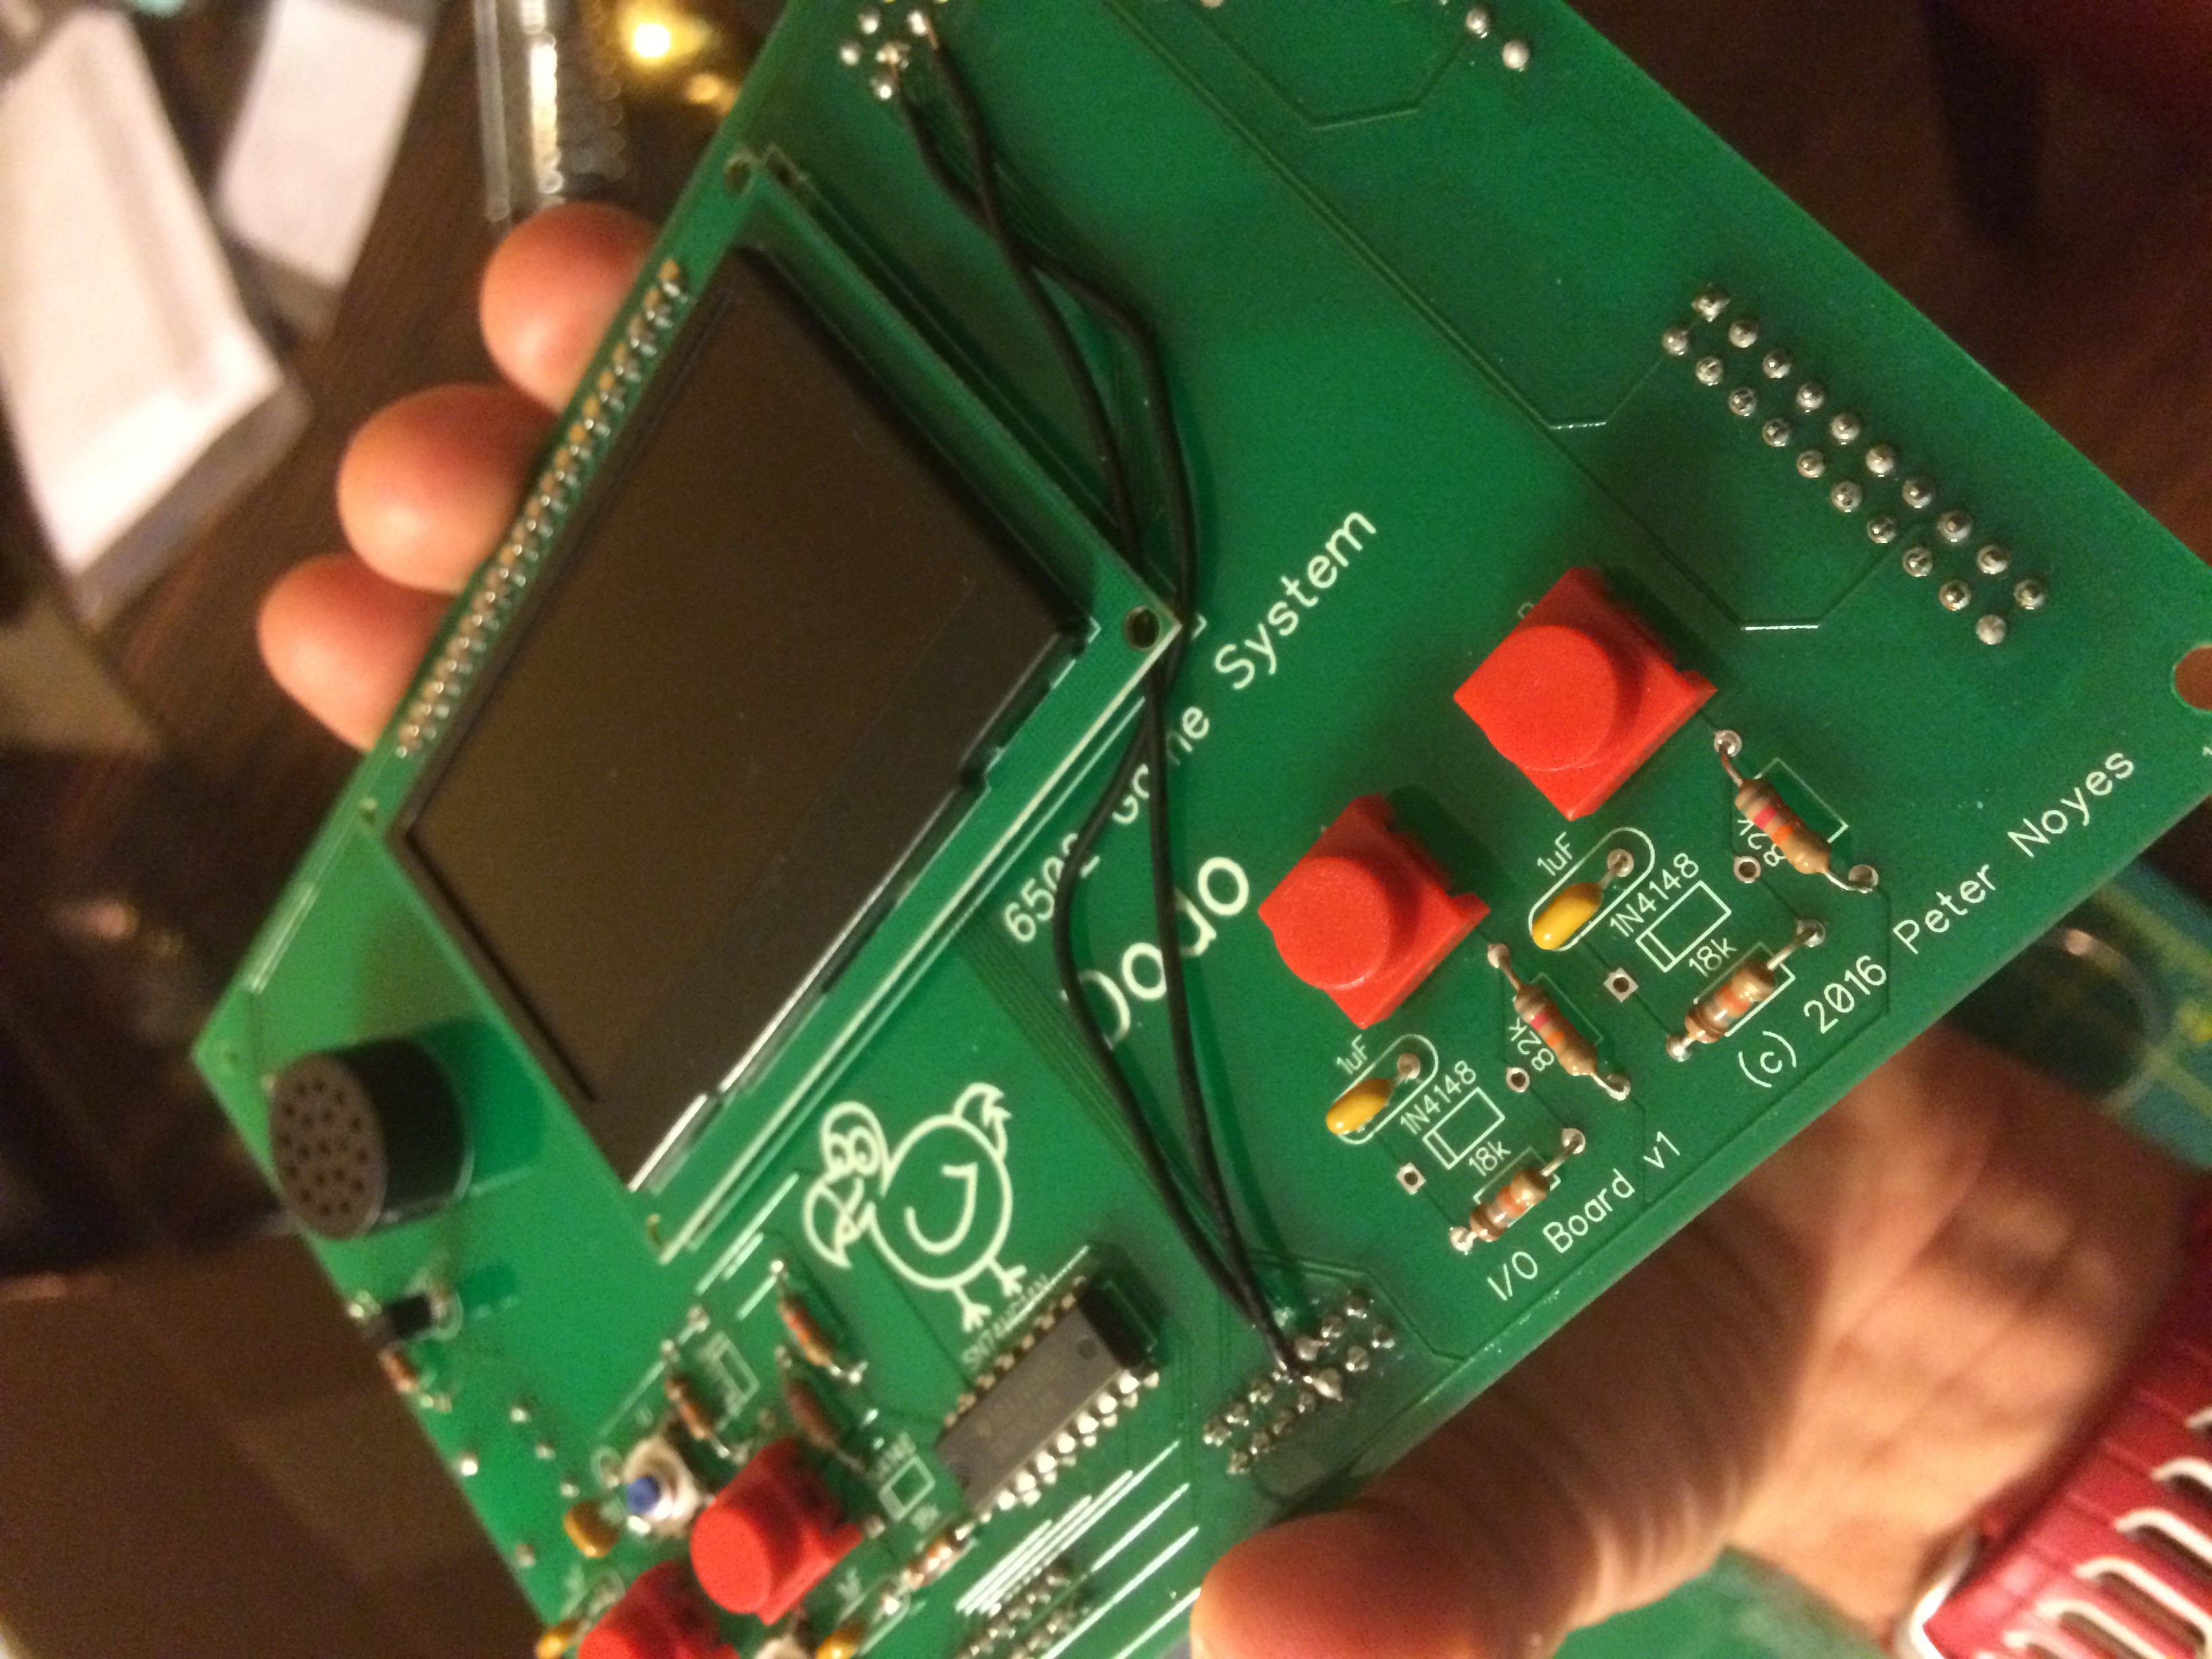
I/O Board
05/12/2016 at 05:15 • 0 comments![]()
Today I received the I/O board for Dodo. I patiently waited all day to assemble and test it. After a long evening of ups and downs it is now basically working. Unlike the main board, this new one has some serious design problems and will definitely need to be redone.
There are two large problems:
1. The Up/Down/Left/Right buttons are spaced too close and the caps do not fit as a result.
2. Two cartridge traces are incorrect. I was able to use a razor blade to cut the two traces and run new wires, but it is just a patch.
I also ran into a couple minor problems:
1. The mounting holes on the display are just a hair too small for the 4-40 machine screws I have. I will need to order different mounting hardware.
2. My LEDs have weird nubs on the leads that are preventing me from inserting them into the holes.
I now have a big decision to make. I was planning on eventually making more substantial changes to both boards to move some components from one to the other. Do I do that now? Or do I fix the known problems on this board and have it redone before making the bigger change? Something to sleep on.
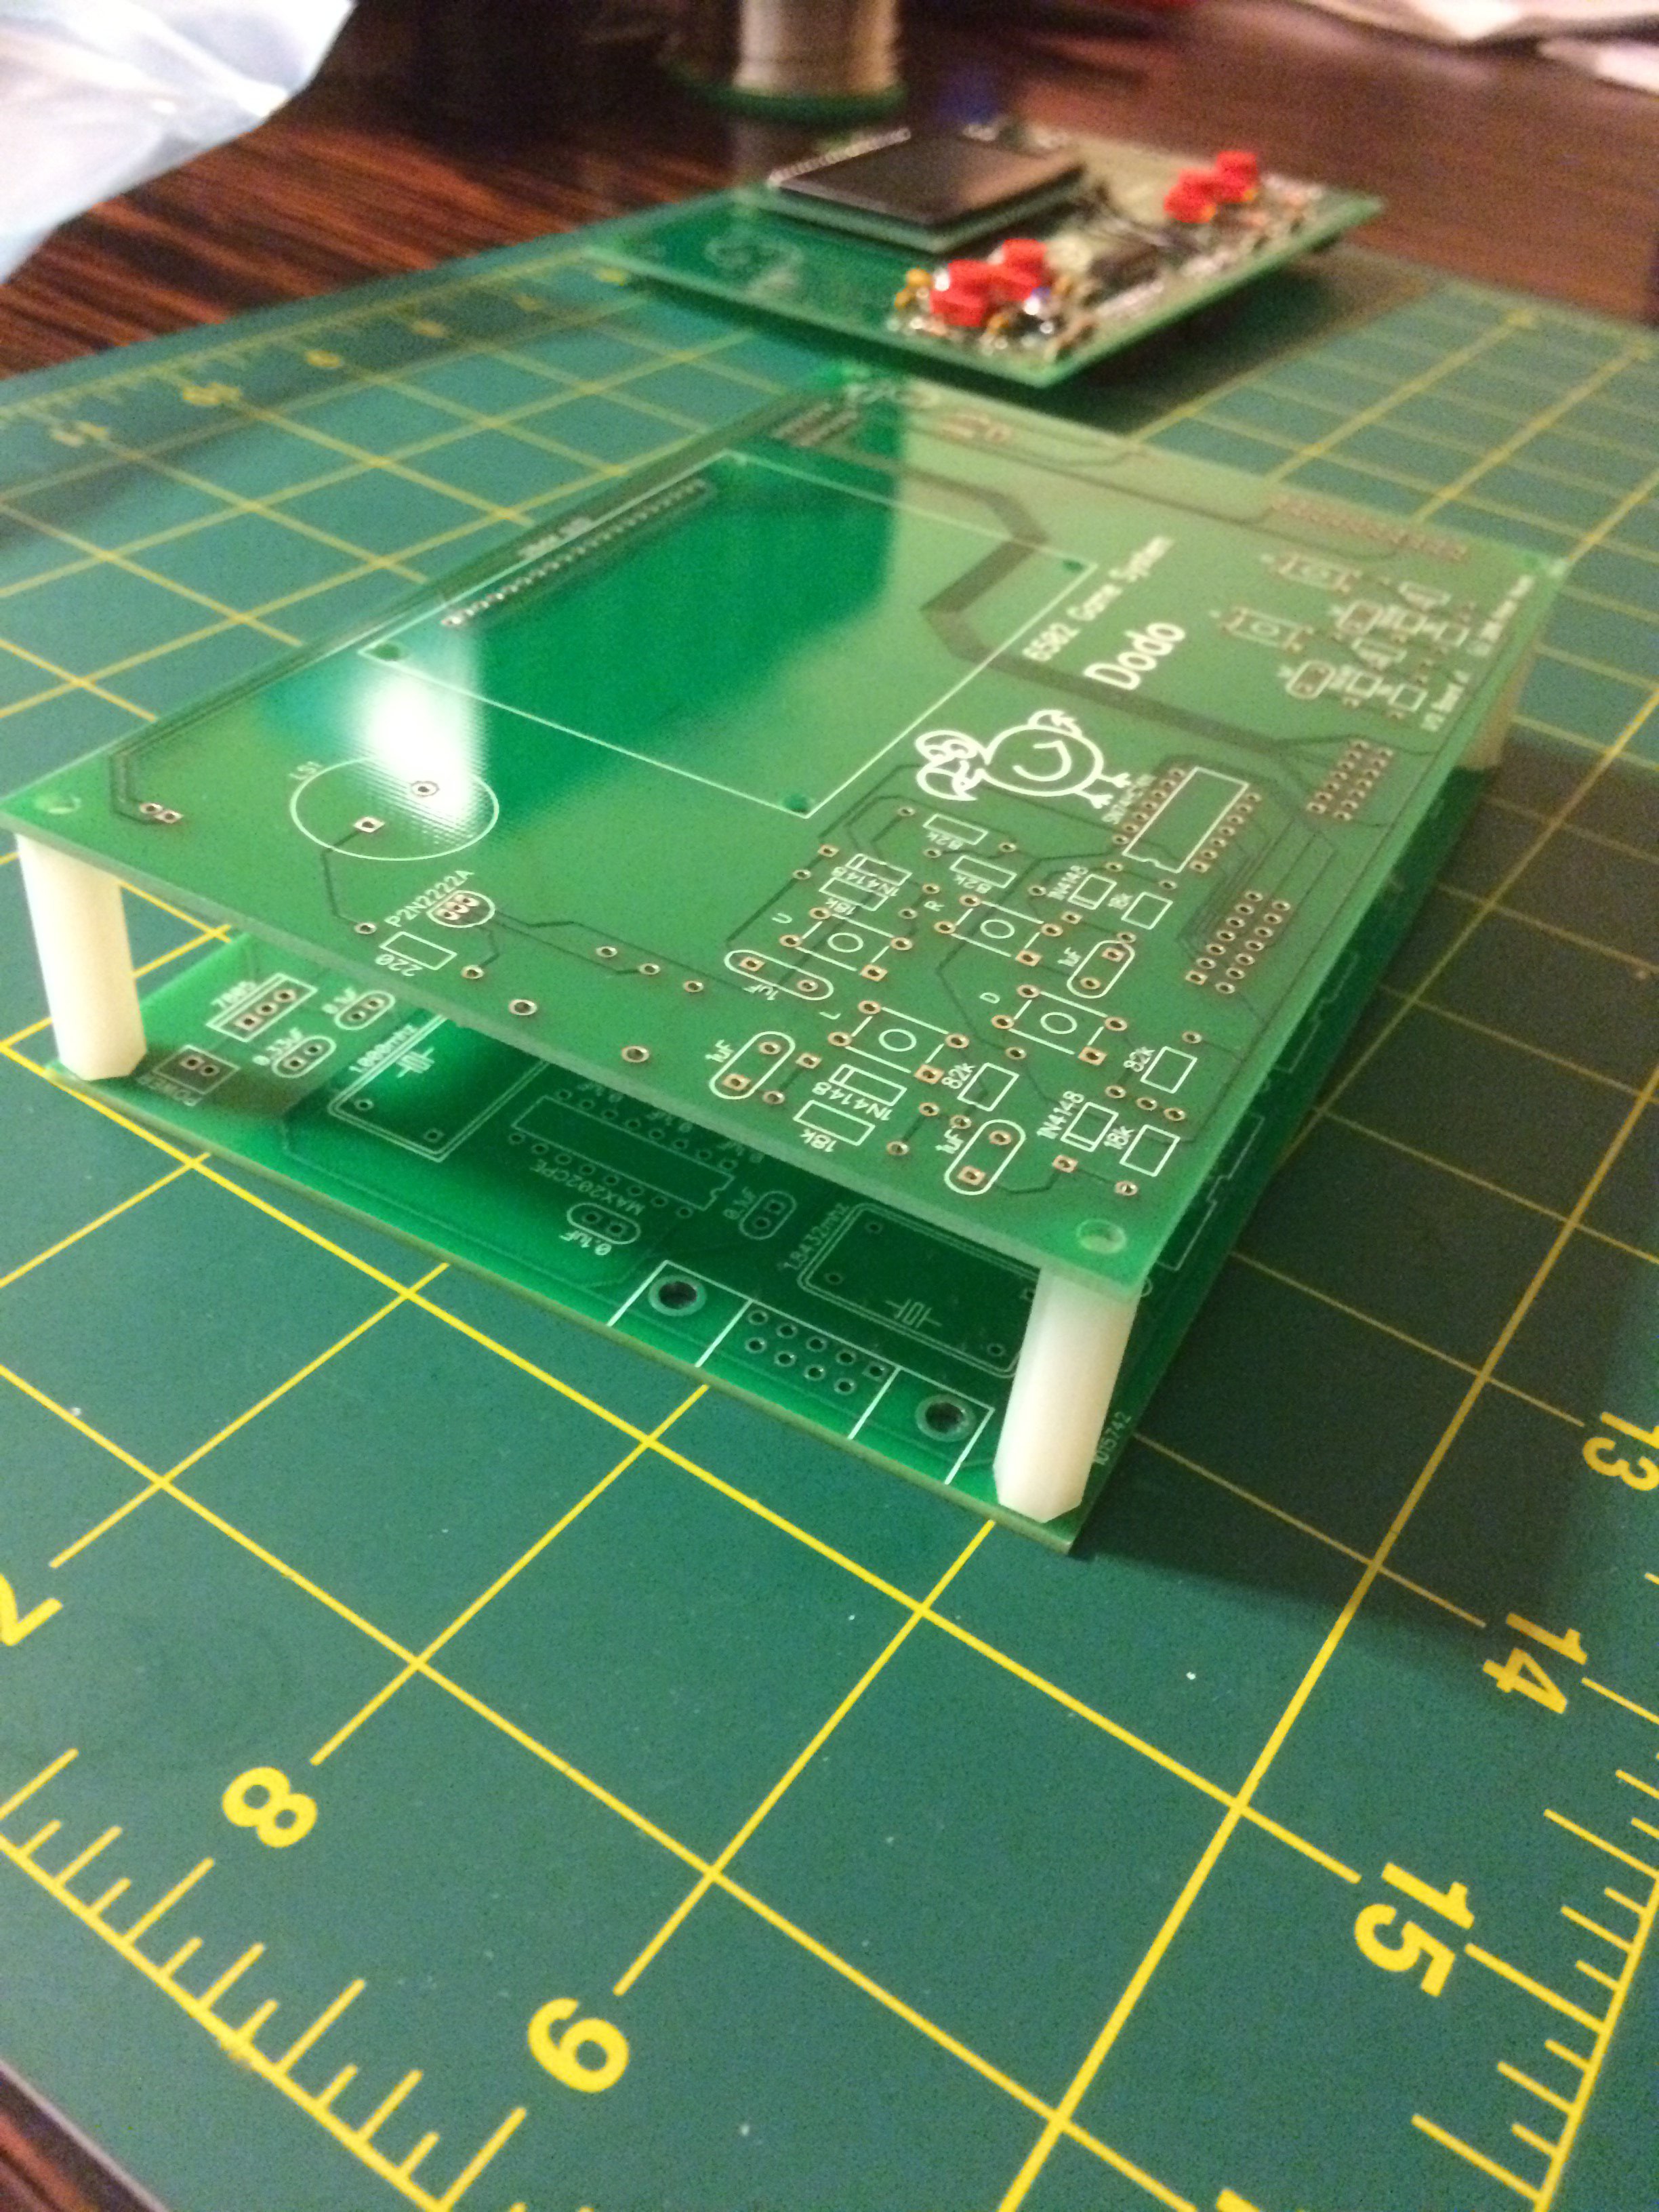
![]()
This shows how the two boards will stack. Part of the big change I want to make is to move the DB9 connector to the top to get it away from the buttons. I also want to be able to space the boards much closer together. I will abandon the IDC connectors and go with a single 20x2 header like on a Raspberry PI.
![]()
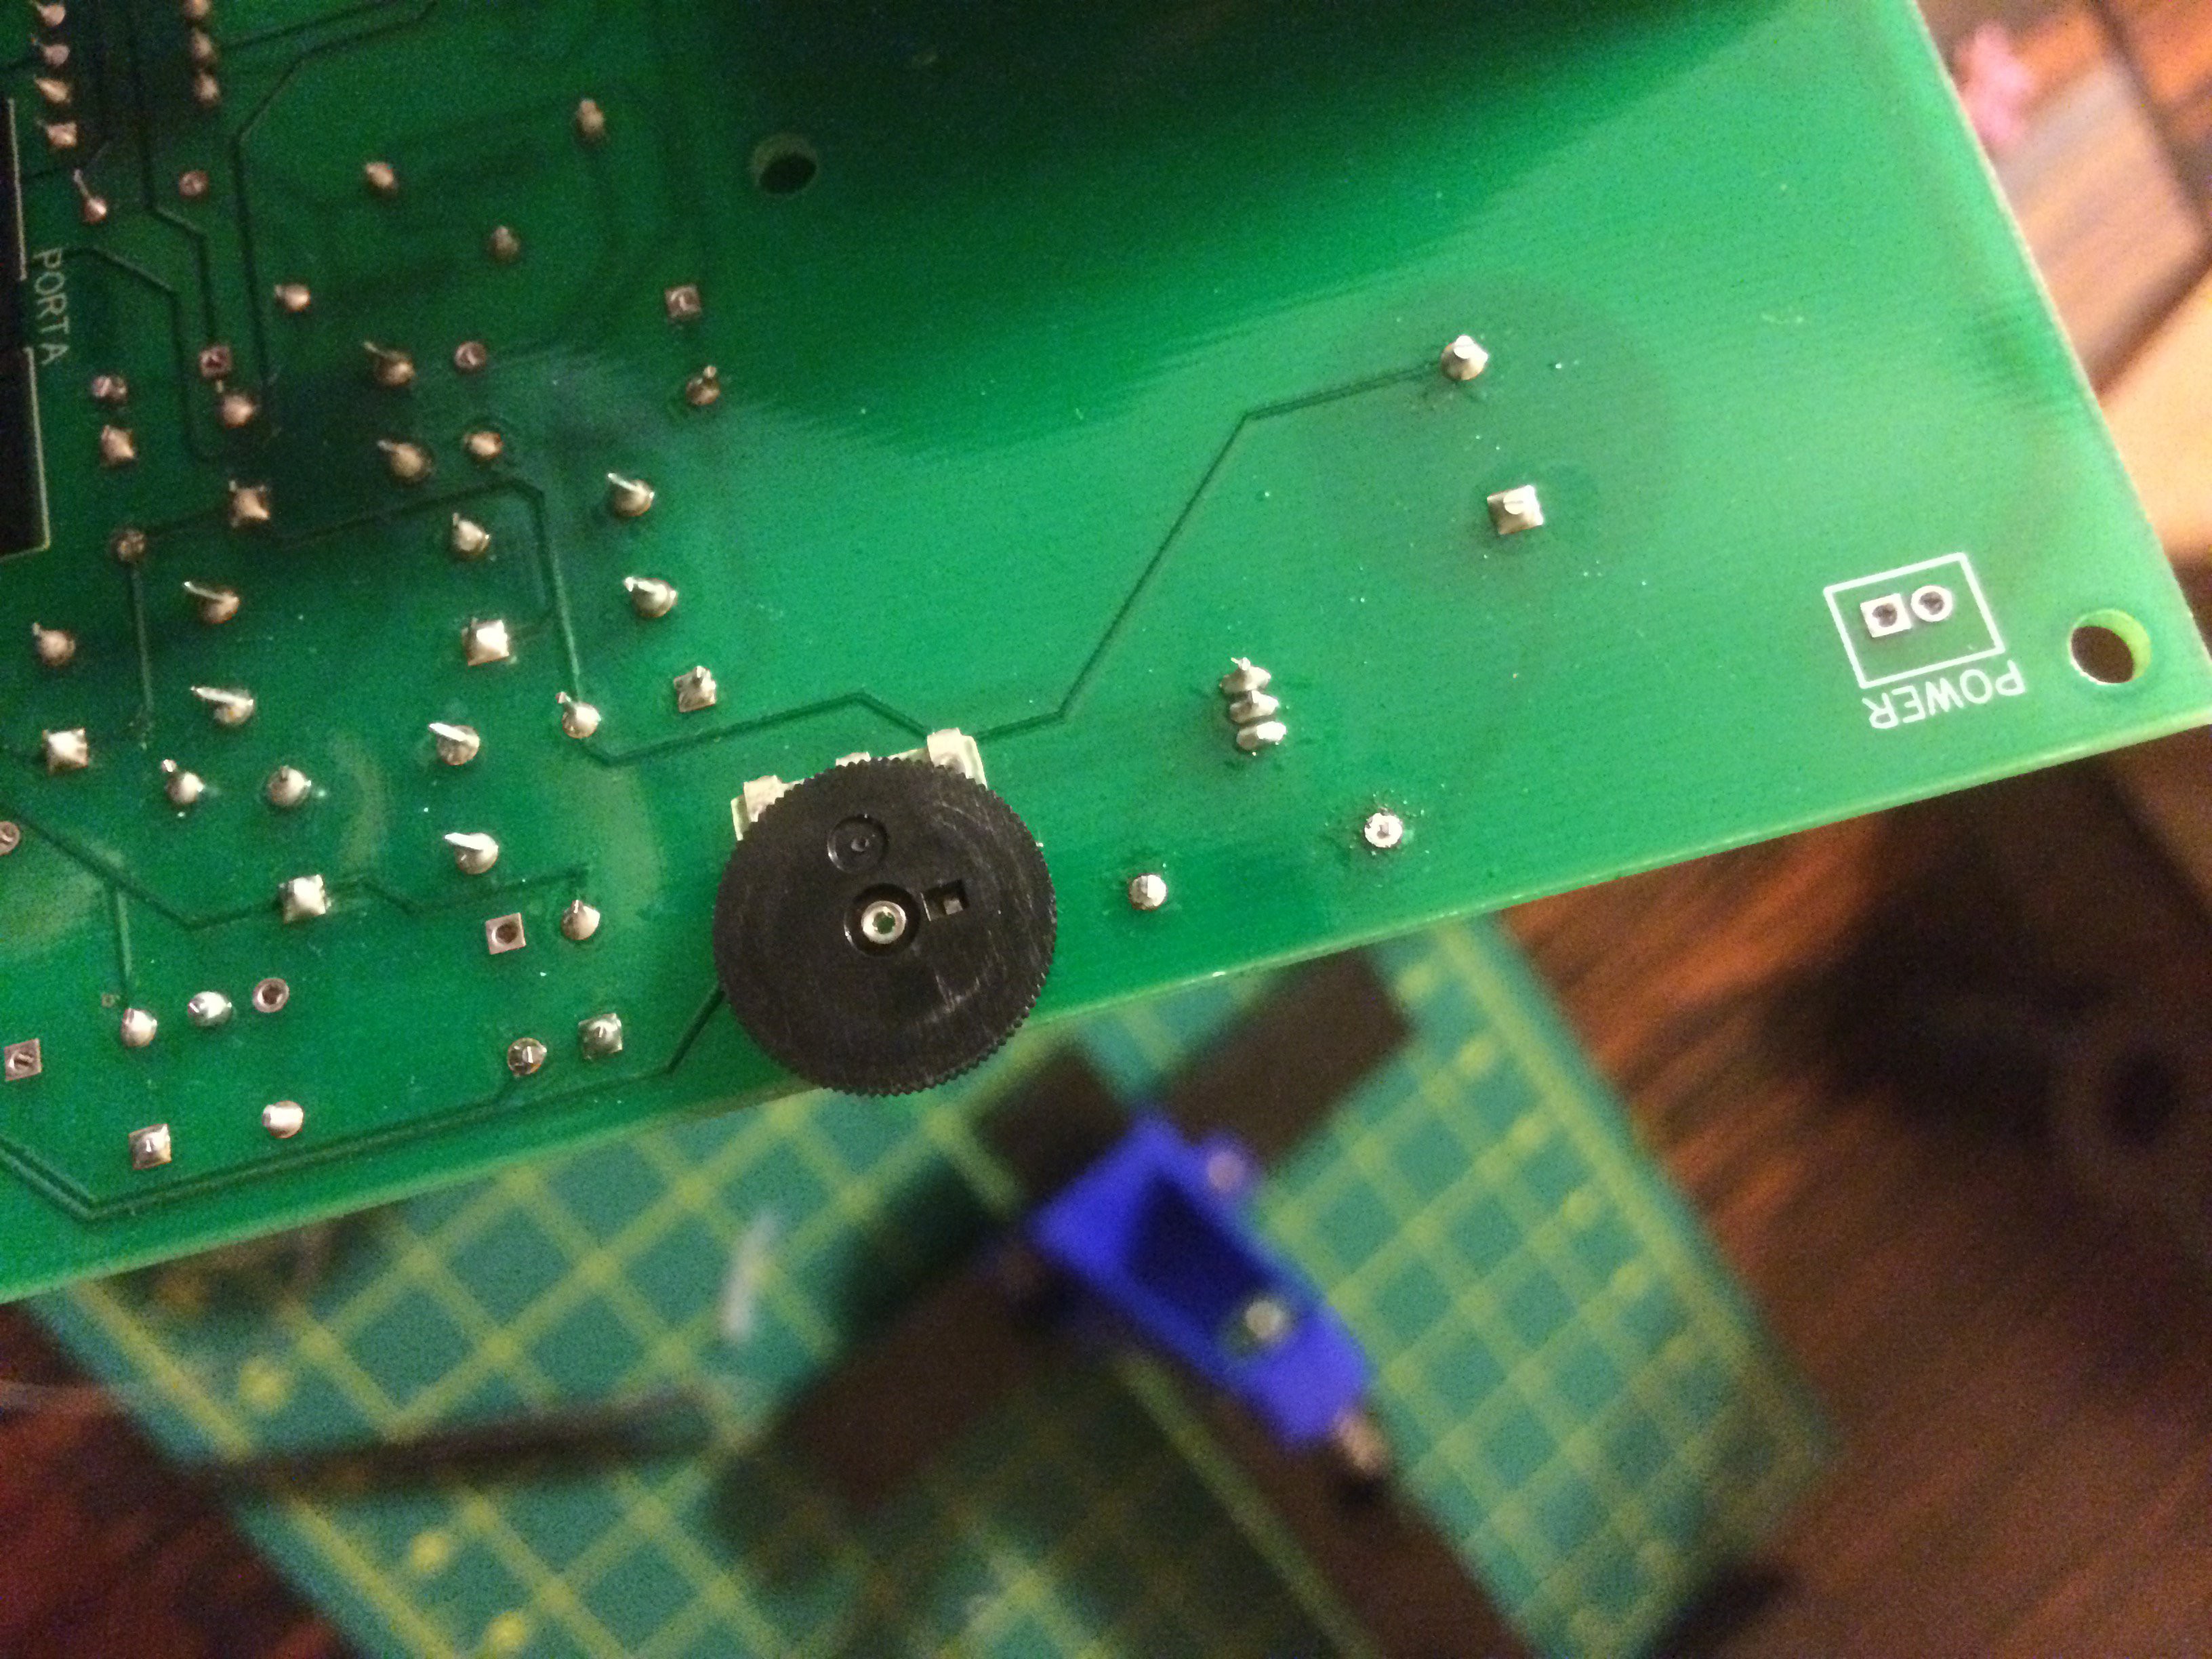
I am happy with the way the volume control worked out. The game cartridge also fits perfectly.
![]()
-
New Screen
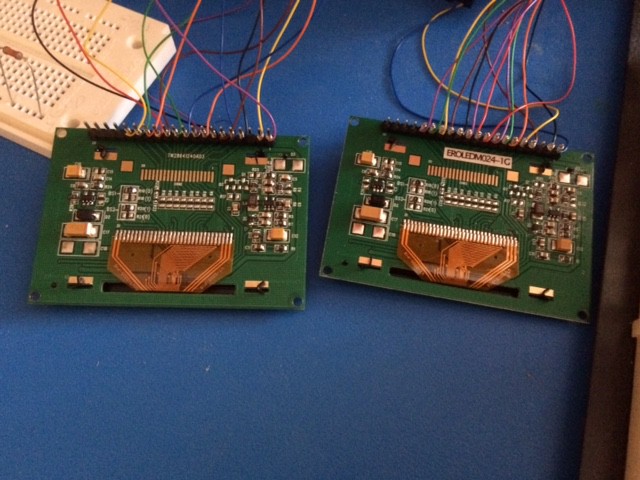
05/02/2016 at 15:56 • 0 commentsThis past weekend I tested an alternate display that I purchased from EastRising. It is pretty much the same screen as the Adafruit OLED except that the color is green, and it is irritatingly wired just slightly differently. Both displays use the SSD1305 controller which supports resolutions up to 132x64. My screens are 128x64 so 4 columns go unused. The Adafruit model uses columns 0-127 but the EastRising model uses 2-129. Ugh! I don't know if I got just a bad screen, if they are consistently different, or if perhaps even an Adafruit screen could vary. The modules appear identical physically so I am pretty sure that they both come from the same place. To support both options will be tricky. I might need to add hardware jumpers for configuration. At least I still have a few unused I/O lines I could use for this purpose.
![]()
The good news is that the screen looks really cool. The above picture doesn't do it justice. The screen makes me nostalgic for my old compaq portable which I did my first programming on when I was a kid. The other good news is that the screen is only 20$!
![]()
These are the two screen side by side. The EastRising screen is on the right and the Adafruit model is on the left.
UPDATE: I did get an e-mail back from EastRising and it is expected that their screen is hooked up using 2-129.
-
Game Cartridge is Alive
04/27/2016 at 05:03 • 1 commentToday I received the game cartridge boards and they came out great. The edge contacts are gold plated and the bottom edge of the board has a chamfer to aid in insertion. It should have taken a few minutes to test the board out, but like all things in life, it ended up taking well over an hour.
It did not work on the first try. I got my multi-meter out and found that a pin didn't make contact with the pad. I fixed this and it still didn't work. I then went into panic mode, pulled up the data sheet for the FRAM and double checked everything. The design looked good. Finally I decided to build a 2nd one and it worked perfectly. I guess I killed the first one. I am not sure if it was too much heat while soldering, or having perhaps VCC disconnected while trying to operate the rest of the chip?
In any case, at least I got it to work!
![]()
-
I/O Board
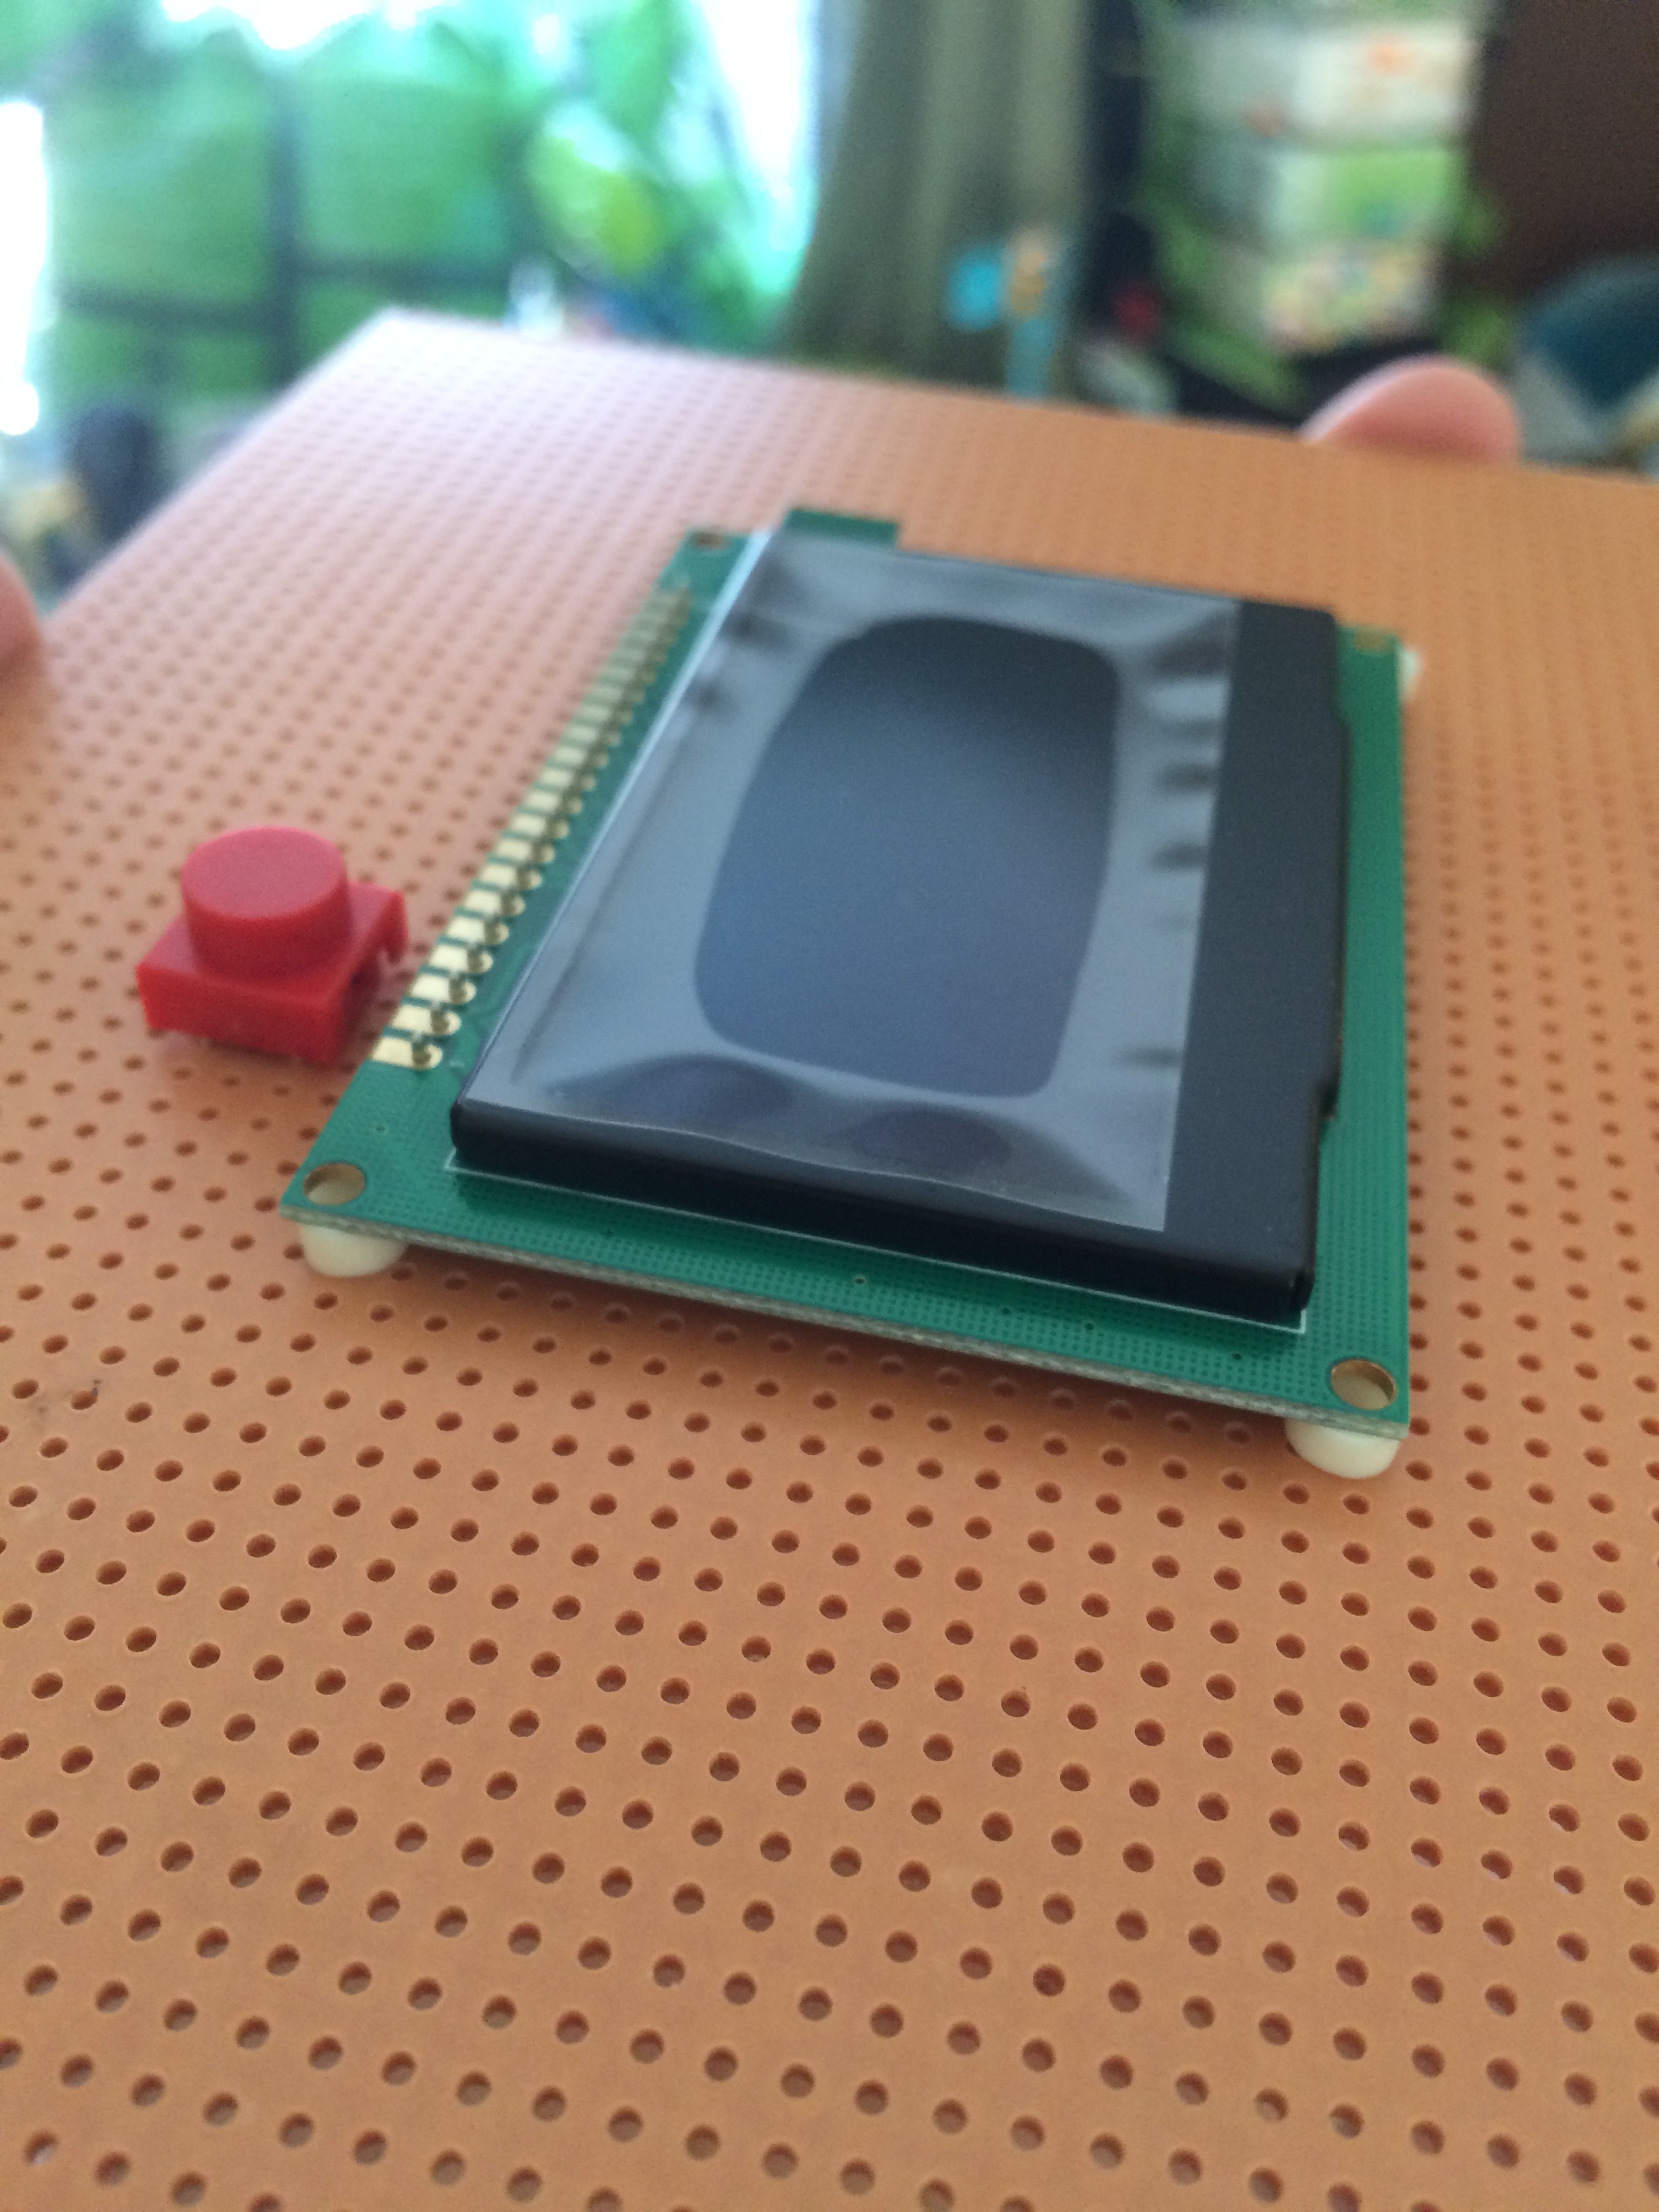
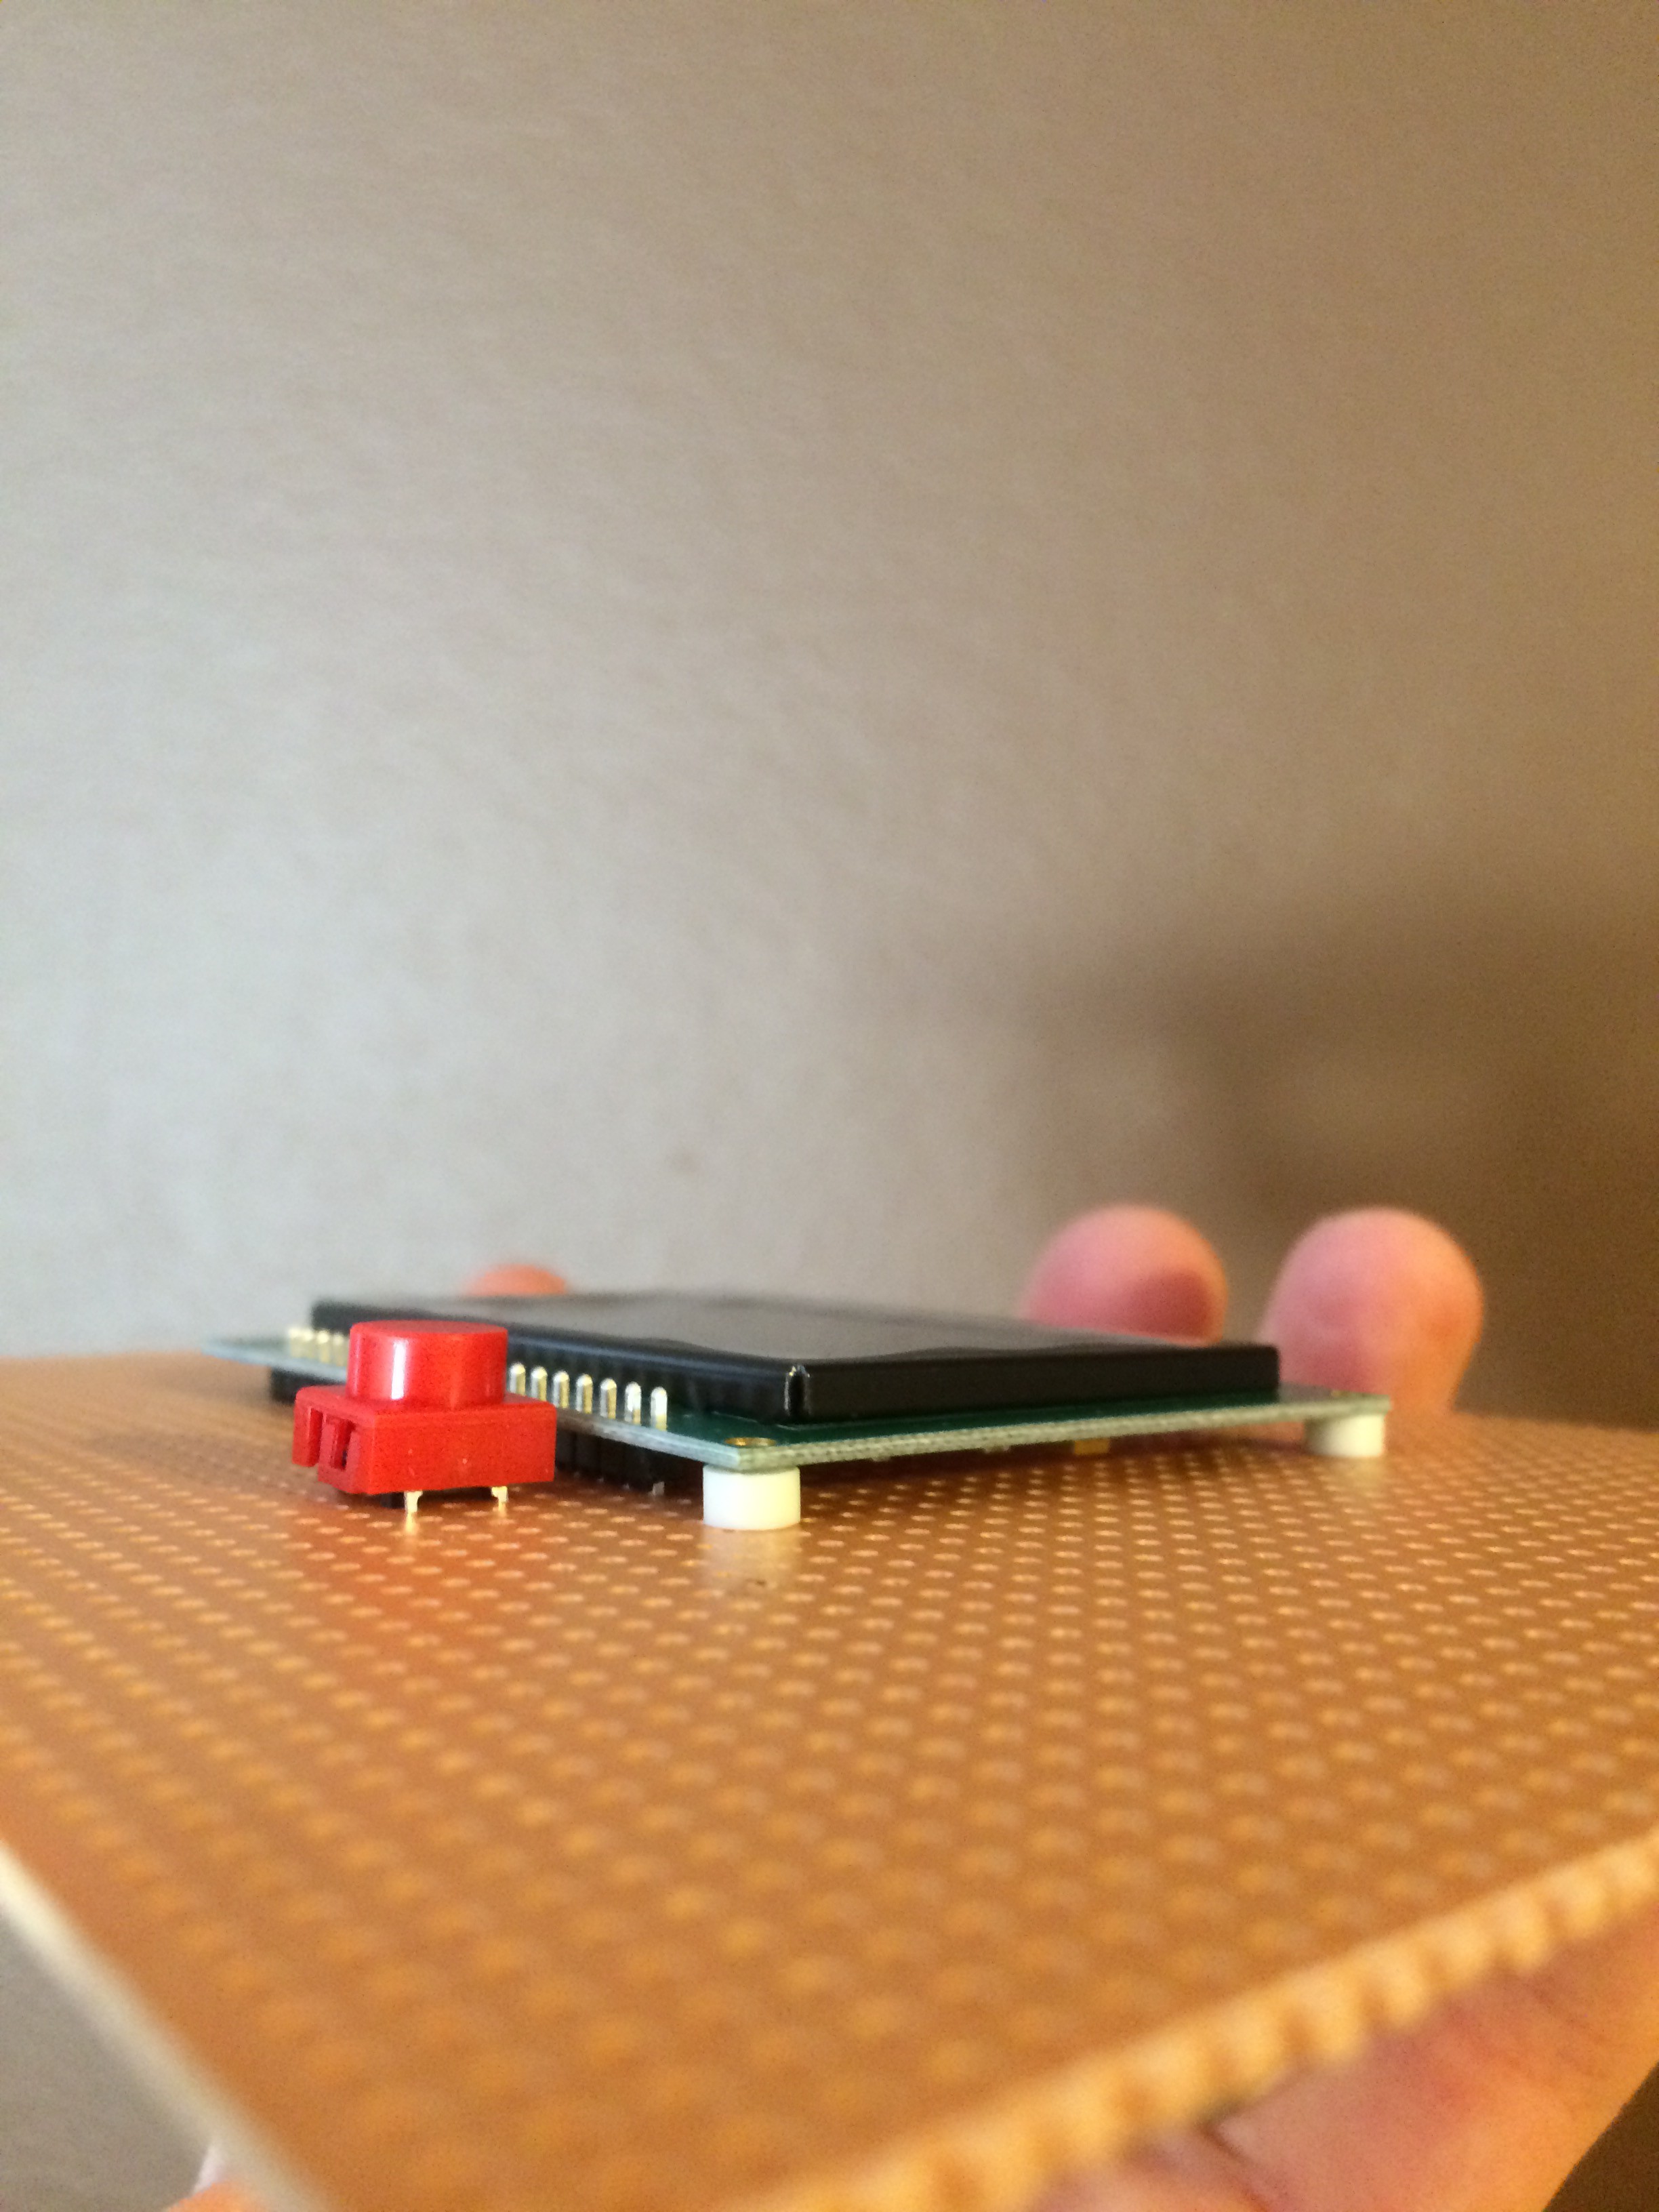
04/23/2016 at 20:26 • 0 commentsThe main PCB for Dodo has been complete for awhile now, but the game controller, sound amplifier, game cartridge, and screen mount are still in the prototype phase. I plan to create a second PCB that integrates all of this functionality. This board has less components than the main board, but it has the added complexity that it needs to support having a case with cutouts that fit perfectly so that the buttons can be pushed and the screen sits nicely. This means that the buttons need a height that matches the screen.
I am close to selecting the exact components that I will use for the board. The final piece that is needed is a thumbwheel potentiometer for volume control. Another detail that I am mulling over is how to deal with the solder joints on the top side of the screen. I either need to trim or grind them flush, or have a groove in the case to accommodate them.
The buttons, display standoffs, display mounting header, and card edge connector all seem like they will work well together.
![]()
![]()
![]()
-
Boolean Drawing
04/14/2016 at 04:24 • 2 commentsWhile waiting for the game cartridges I updated the sprite drawing capabilities. It now supports basic boolean operations. This allows sprite drawing such that certain areas are transparent so that the background can be seen right up against the edges of the sprite.
The 3 modes supported now are Replace, AND, and OR. The common technique to make use of these operations is to use a sprite mask. The mask contains a 1 for every pixel that is outside of the sprite and should allow the background to be seen, and a 0 for every pixel that covers the sprite. The mask is first drawing using the AND operation. The result of this operation is to erase a spot for the sprite. The final step is to draw the sprite using OR.
The above video shows the sprite drawing in action. The demo is running in the Dodo simulator in the console. To keep the performance of the sprite drawing function fast, a lot of code needed to be duplicated. The code duplication is to avoid having a series of tests for the drawing modes for each and every byte that contains a block of pixels. Instead, the code that loops over the bytes in video memory is duplicated for each mode. Also, the code did end up varying slightly in structure for a few of the complex cases.
A funny consequence is that in some cases the 'Replace' function is actually slower than AND or OR. This happens when y is not on a row that is divisible by 8. When a sprite is not aligned to a page boundary it spans multiple pages and is shifted into position. The shifting leaves a gap on the top of the 1st page, and the bottom of the last page that the sprite covers. I can only copy in whole bytes because the video memory is packed. The gaps needs to be filled with something so that the background doesn't get wiped out where the gaps are. For OR, I can just make sure the gaps are filled with 0s. For AND, I need to fill the gaps with 1s. For replace I need to effectively make sure that the existing background is in the gaps. The quickest way to do this is basically push two bytes in a row in, the first being a mask that gets AND'd into place, and the next is the byte that has 0s in the gaps and it gets ORd, a single byte version of the above masking technique.
-
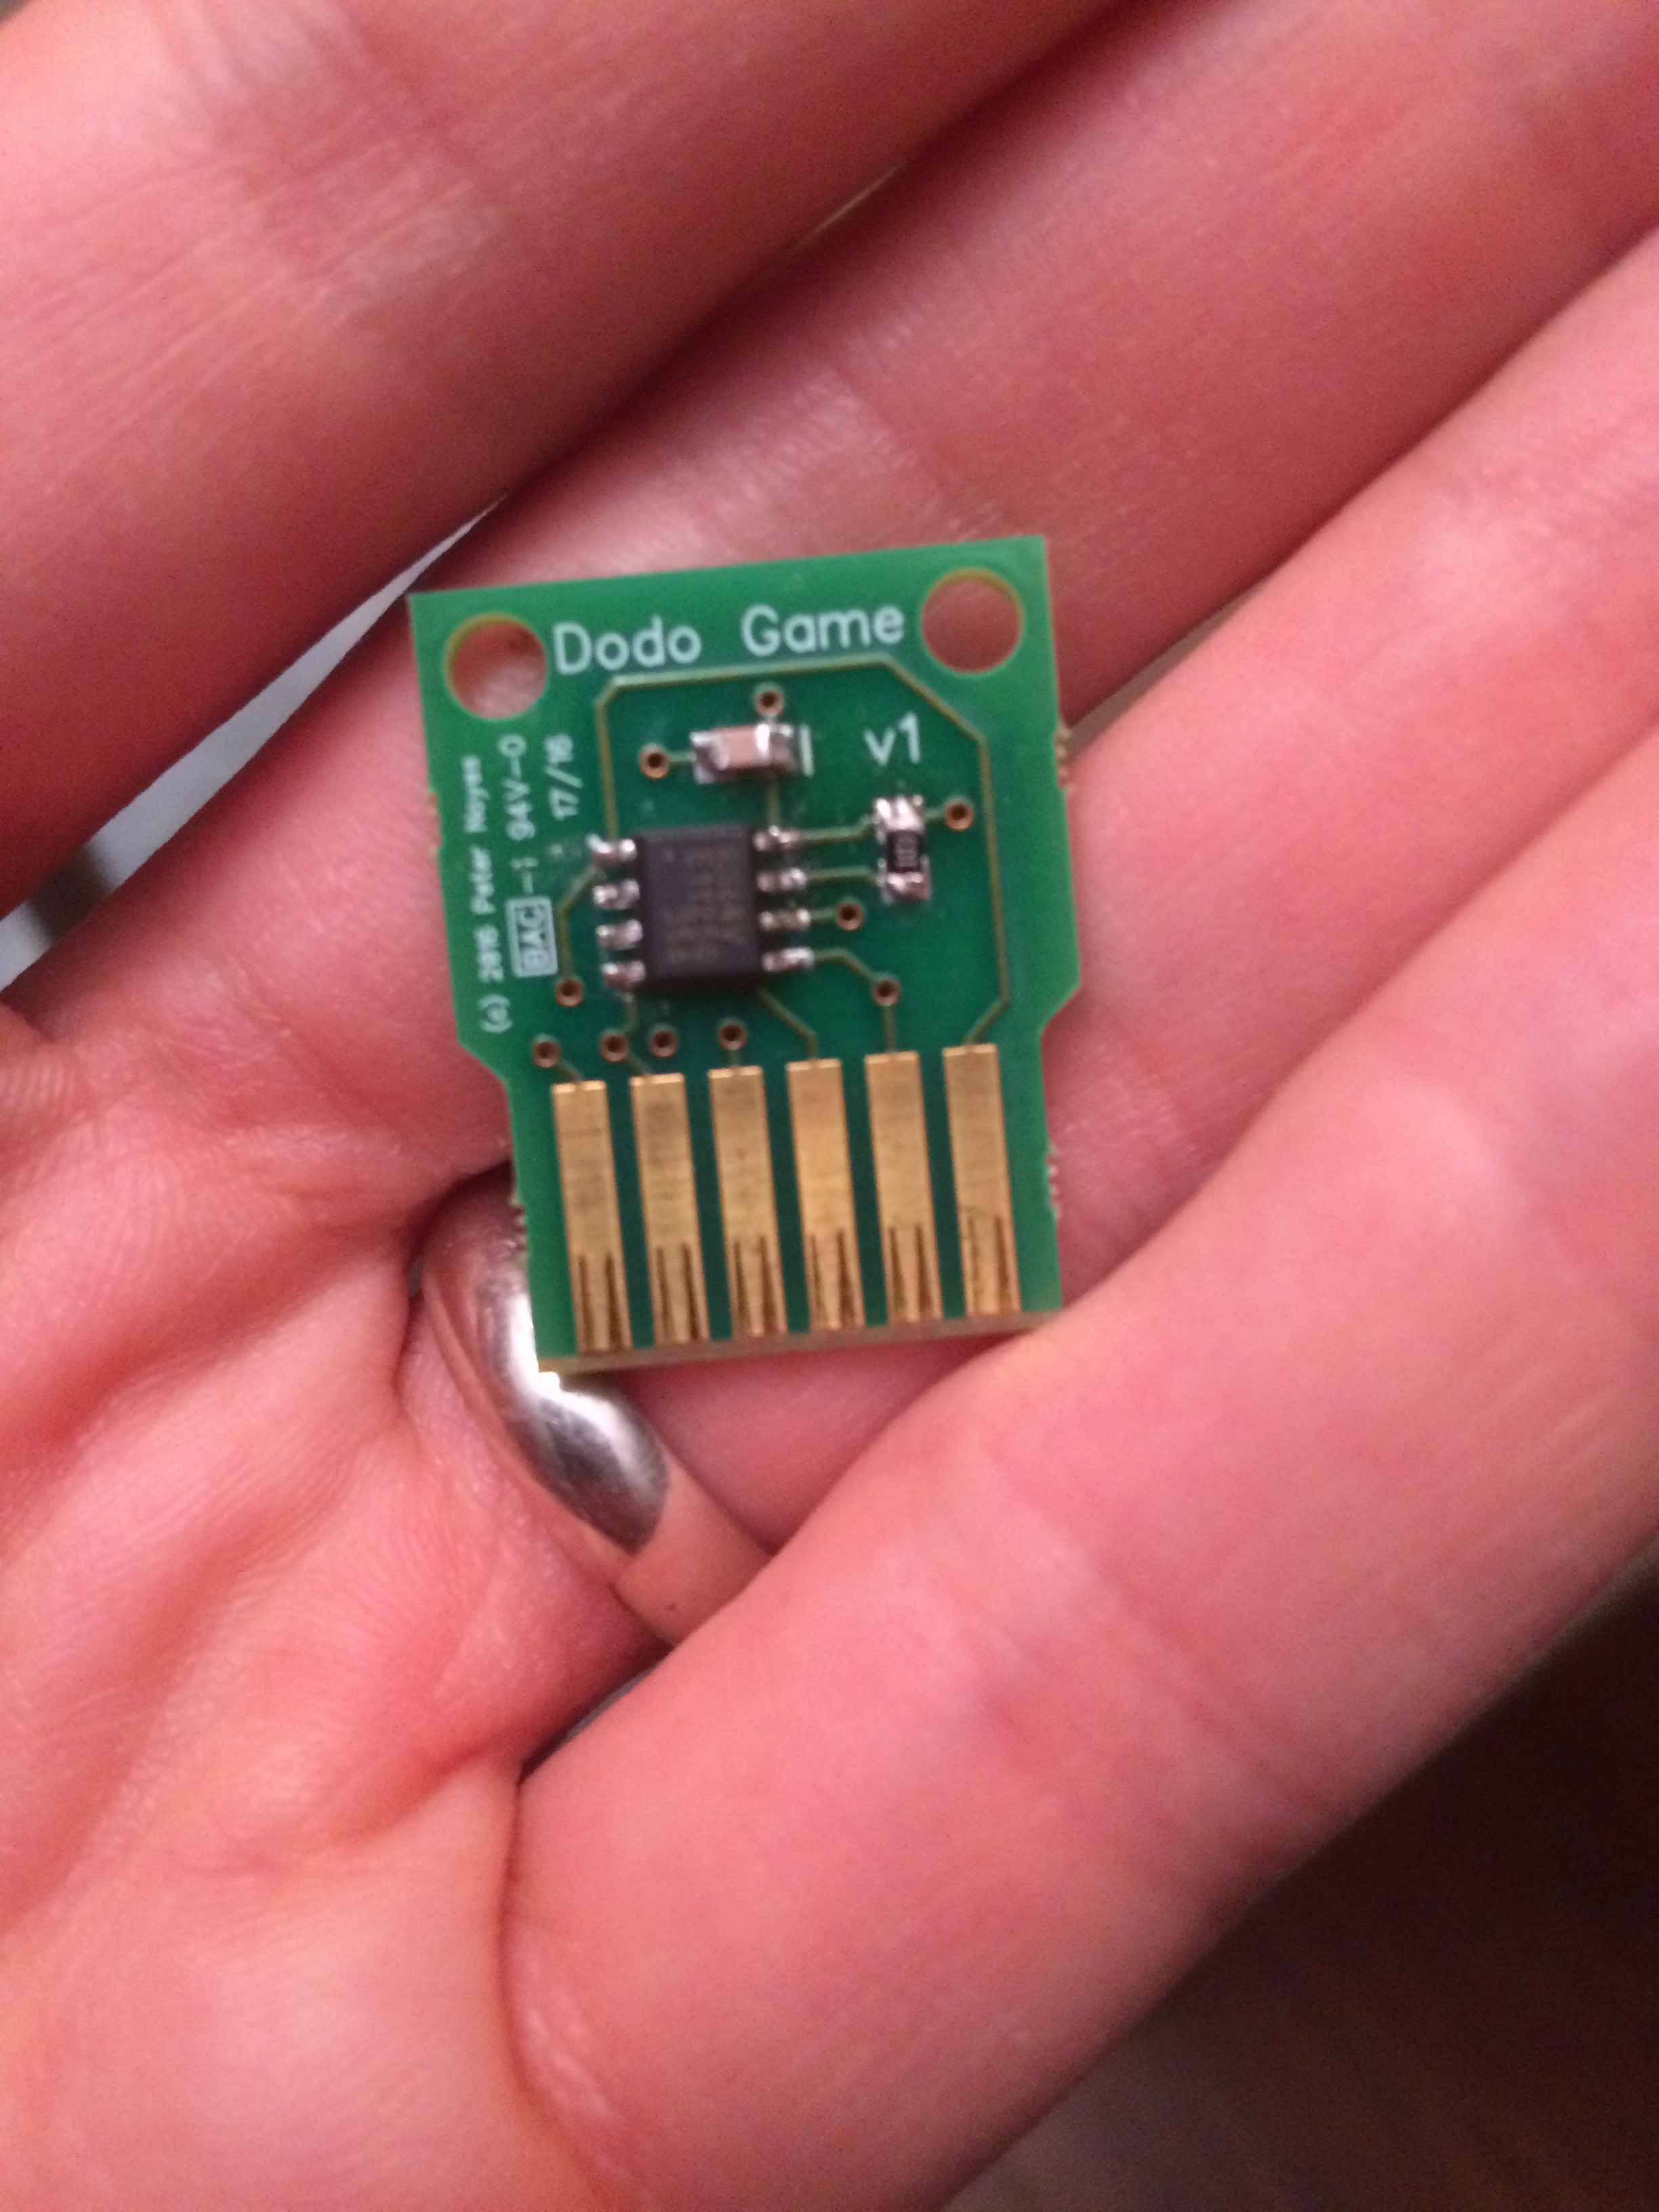
Game Cartridge
04/08/2016 at 05:13 • 3 commentsAfter developing a proof of concept that swappable game cartridges are possible, the trigger has been pulled on printing boards. The board houses the SPI FRAM chip and is designed to be inserted into a card edge connector, specifically the 7-5530843-6 from TE. I only need 6 pins in total. An edge connector with so few pins is not readily available so I decided to go with a 12 position edge connector and make the cartridge reversible.
![]()
-
ABI
04/03/2016 at 04:02 • 0 comments![]()
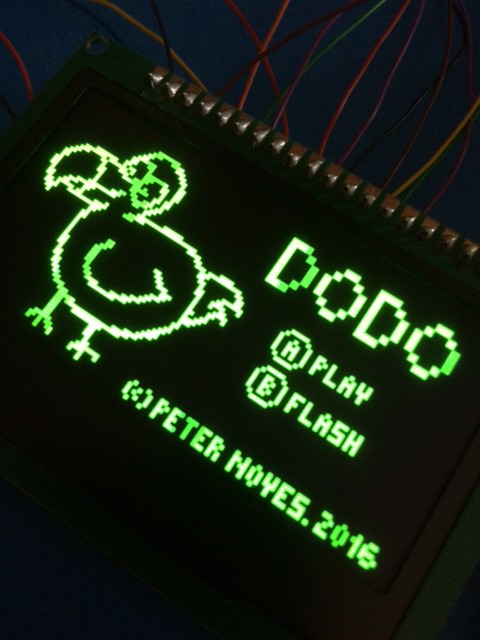
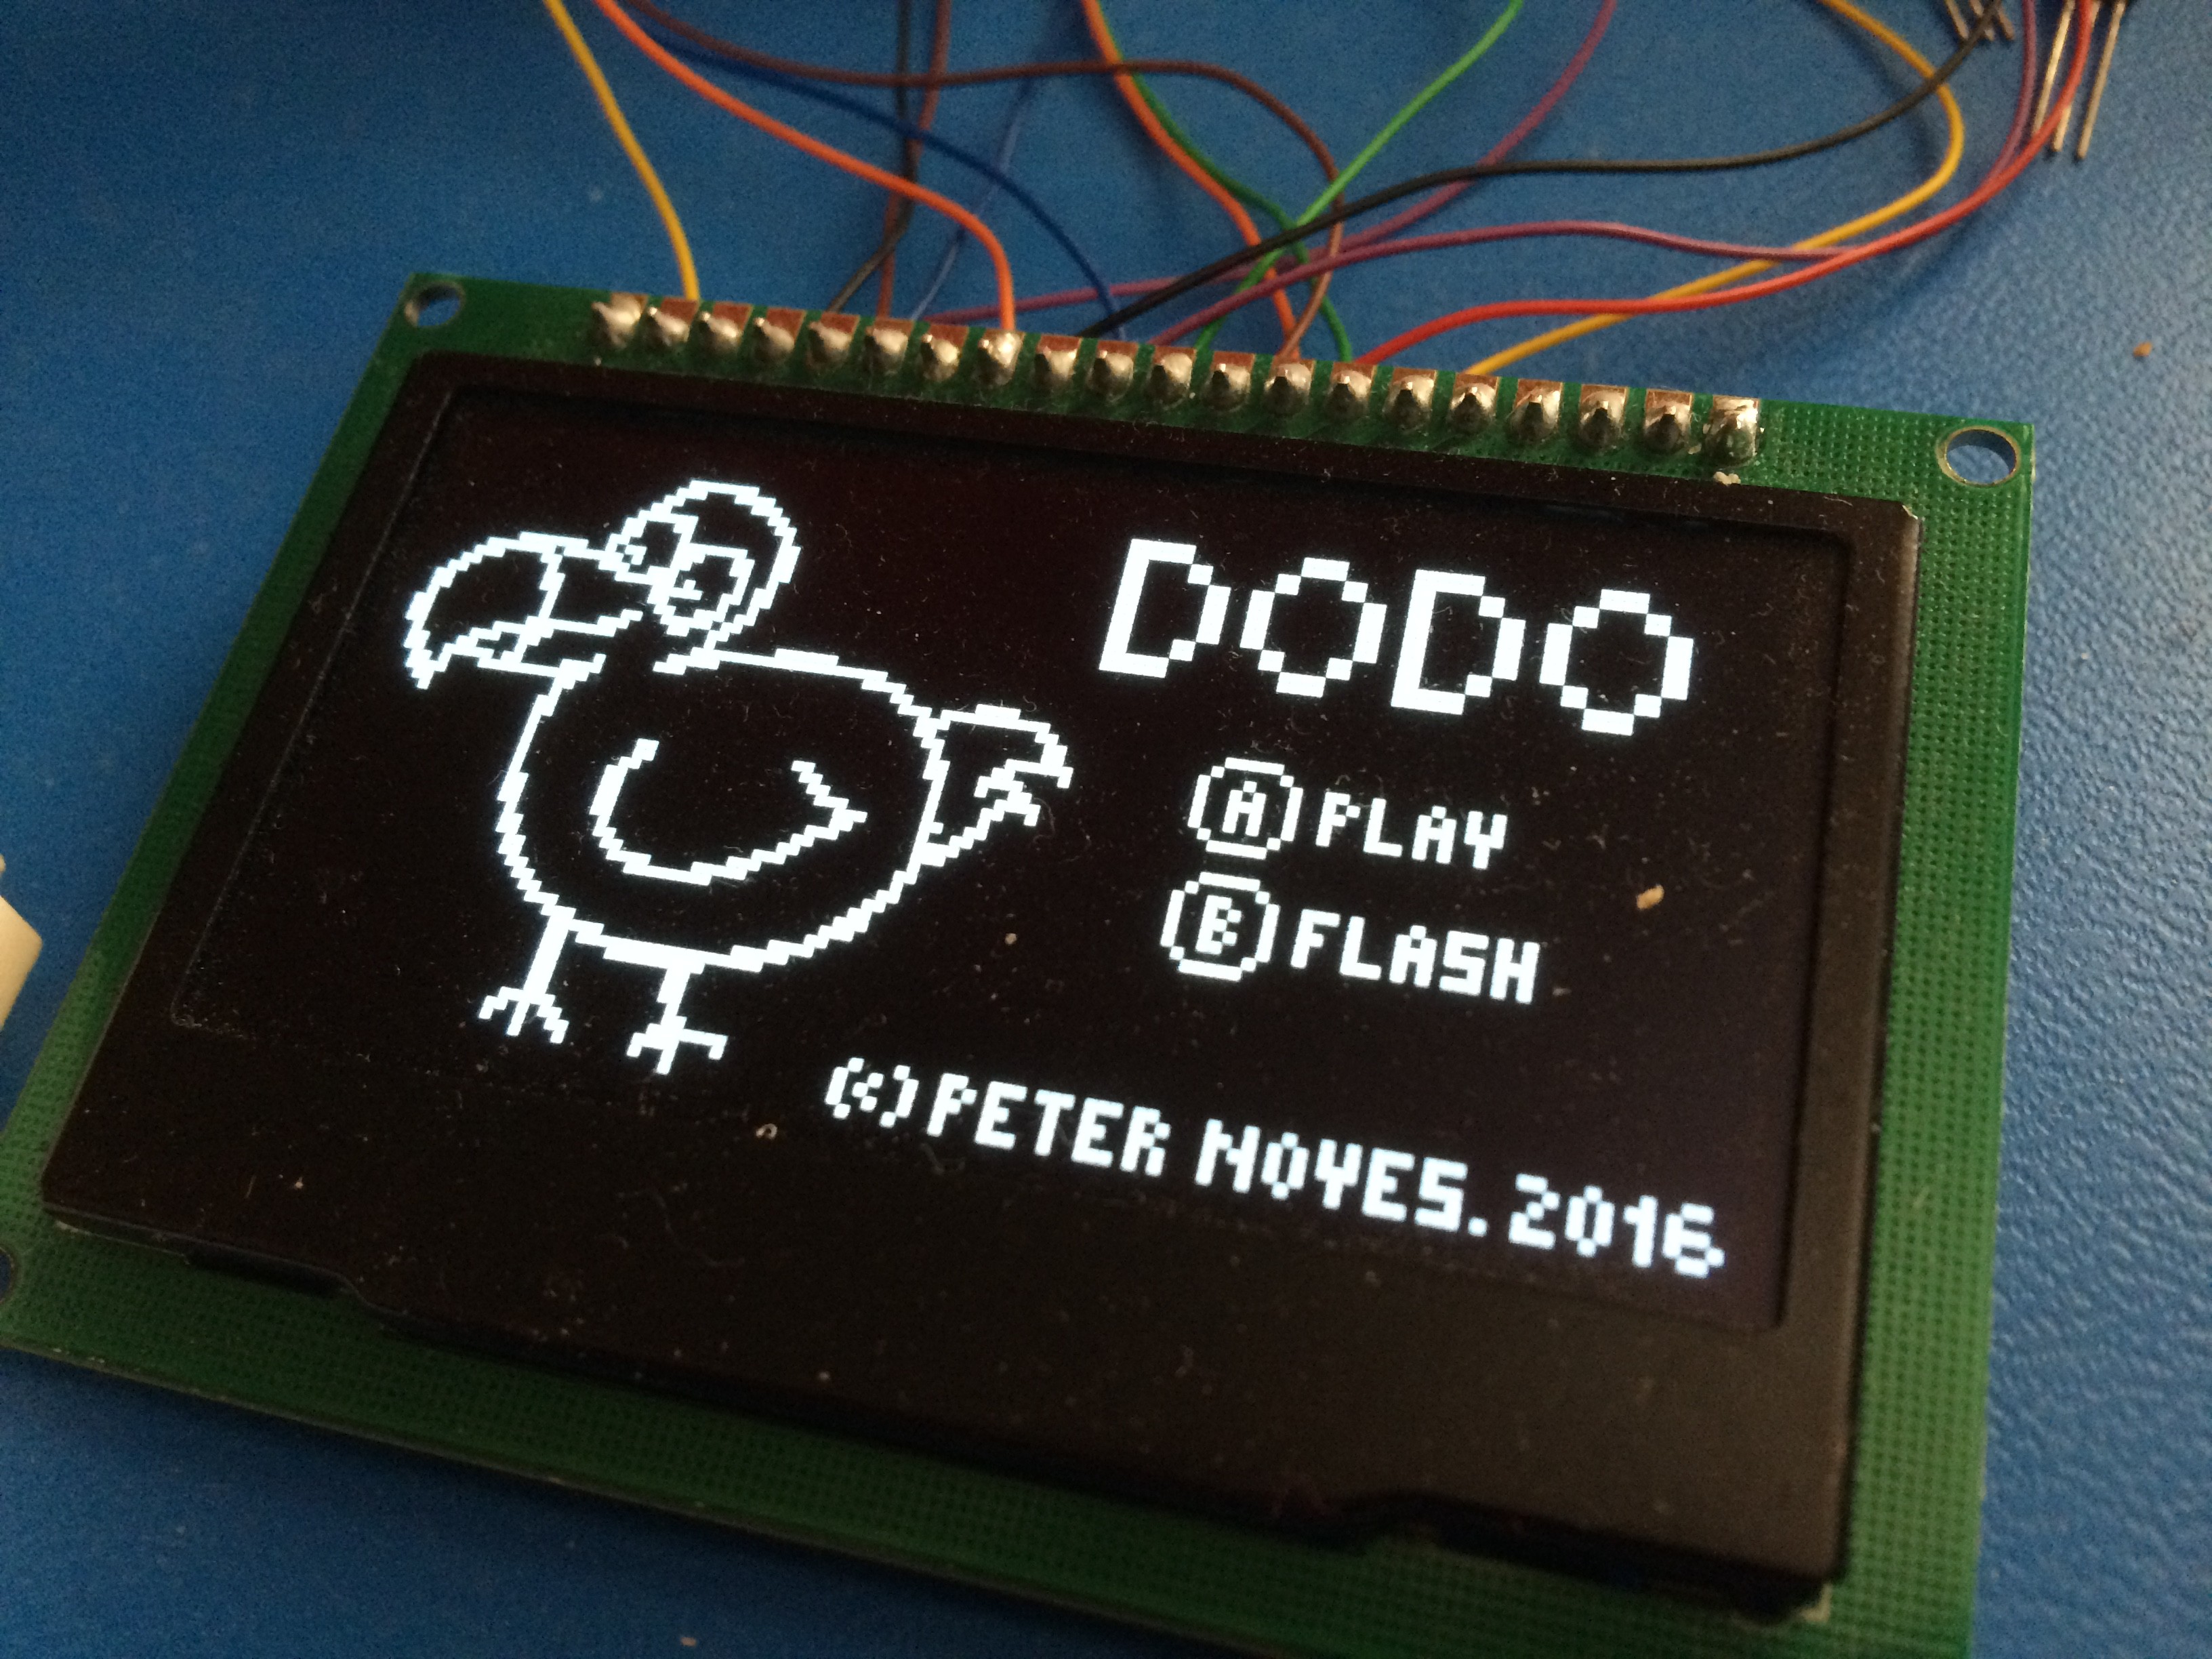
Dodo has now taken a big step forward and supports swappable game cartridges. To accomplish this a separation needed to be established between system calls and game logic. Up until now the game has been compiled and assembled monolithically into a binary that was run from the EEPROM. The goal was to get just the system calls on the EEPROM, and the game copied into memory from the SPI FRAM chip.
The best description for the set of system calls is an ABI (Application Binary Interface). It would be a stretch to call it an OS because it is not multi-tasking, there is no virtual memory and no file system. I guess it could also be considered a BIOS. Separating the ABI is tricky because the functions need to be in a consistent memory location so that they can be called by a the game which would now be separately compiled. I also want developers for Dodo to be able to make the system calls from C, so the functions need to remain compatible with the cc65 calling convention.
The 6502 looks to the last 6 bytes of memory for a special set of pointers for RESET, IRQ, and NMI. I decided to add one more custom vector of my own that points to what I am calling a trampoline function. I have created a header file which defines a series of function pointers with the correct prototype for each function, but they all point to the same memory location which is the trampoline. Each function has been assigned a unique index which is used to find the real pointer to the function in a jump table.
This is what some of the header file looks like now:
#ifndef _API_H
#define _API_H

#define byte unsigned char

#define SPI_WREN  0x06
#define SPI_WRDI  0x04
#define SPI_RDSR  0x05
#define SPI_WRSR  0x01
#define SPI_READ  0x03
#define SPI_WRIT  0x02
#define SPI_RDID  0x9F

#define DRAW_SPRITE(sprite, x, y, w, h, f) draw_sprite_proto(sprite, x, y, w, h, f, 0)
#define DISPLAY() display_proto(1)
#define CLEAR_SPRITE(x, y, w, h) clear_sprite_proto(x, y, w, h, 2)
#define SET_PIXEL(x, y, c) set_pixel_proto(x, y, c, 3)
#define DRAW_LINE(x0, y0, x1, y1, c) draw_line_proto(x0, y0, x1, y1, c, 4)
#define DELAY_MS(delay) delay_ms_proto(delay, 5)
#define LED_ON() led_on_proto(6)
#define LED_OFF() led_off_proto(7)
#define WAIT() wait_proto(8)
#define LOAD_MUSIC(music) load_music_proto(music, 9)
#define PLAY_EFFECT(effect) play_effect_proto(effect, 10)
#define SPI_ENABLE() spi_enable_proto(11)
#define SPI_DISABLE() spi_disable_proto(12)
#define SPI_WRITE(v) spi_write_proto(v, 13)

static void (*draw_sprite_proto)(byte*, byte, byte, byte, byte, byte, byte);
static void (*display_proto)(byte);
static void (*clear_sprite_proto)(byte, byte, byte, byte, byte);
static void (*set_pixel_proto)(byte, byte, byte, byte);
static void (*draw_line_proto)(byte, byte, byte, byte, byte, byte);
static void (*delay_ms_proto)(byte, byte);
static void (*led_on_proto)(byte);
static void (*led_off_proto)(byte);
static void (*wait_proto)(byte);
static void (*load_music_proto)(byte*, byte);
static void (*play_effect_proto)(byte*, byte);
static void (*spi_enable_proto)(byte);
static void (*spi_disable_proto)(byte);
static byte (*spi_write_proto)(byte, byte);


static unsigned char get_sp() {
	asm("lda #sp");
	return __A__;
}

void api_init() {
	byte* sp_ptr = (byte*)get_sp();
	__A__ = (byte)sp_ptr;
	asm("sta $0");

	draw_sprite_proto = (void (*)(byte*, byte, byte, byte, byte, byte, byte))(*(int*)0xFFF8);
	display_proto = (void (*)(byte))(*(int*)0xFFF8);
	clear_sprite_proto = (void (*)(byte, byte, byte, byte, byte))(*(int*)0xFFF8);
	set_pixel_proto = (void (*)(byte, byte, byte, byte))(*(int*)0xFFF8);
	draw_line_proto = (void (*)(byte, byte, byte, byte, byte, byte))(*(int*)0xFFF8);
	delay_ms_proto = (void (*)(byte, byte))(*(int*)0xFFF8);
	led_on_proto = (void (*)(byte))(*(int*)0xFFF8);
	led_off_proto = (void (*)(byte))(*(int*)0xFFF8);
	wait_proto = (void (*)(byte))(*(int*)0xFFF8);
	load_music_proto = (void (*)(byte*, byte))(*(int*)0xFFF8);
	play_effect_proto = (void (*)(byte*, byte))(*(int*)0xFFF8);
	spi_enable_proto = (void (*)(byte))(*(int*)0xFFF8);
	spi_disable_proto = (void (*)(byte))(*(int*)0xFFF8);
	spi_write_proto = (byte (*)(byte, byte))(*(int*)0xFFF8);
}
The index into the jump table is hidden as the last parameter for each function and is used by the trampoline to find the real function. The #define for each function is what hides the index.What I have working now is that when Dodo boots, it waits for button input. If the user presses 'A', it will go ahead and copy the game from FRAM into a block in memory and execute it. If the user presses 'B', it will flash the FRAM chip from a computer connected via RS232. The game developer only needs to reference the api.h file, and have just a bit of bootstrap assembly code. The developer can write almost the entire game in C and it should still have decent performance because the ABI calls are all written in assembly and optimized.