-
1Step 1
Connect the touchscreen to your Raspberry Pi
(We assume here that you already have all the parts listed in the Components section.)
Connect your Raspberry Pi to the official Pi touchscreen (watch this video if you need help: https://www.youtube.com/watch?v=6HvWXQsBeHk).
-
2Step 2
Install a Linux distribution on your Raspberry Pi
Install Ubuntu MATE (here's the useful link for that: https://ubuntu-mate.org/raspberry-pi/), or Raspbian (eXaDrums works best with Xfce). If you want Xfce, download and install Raspbian Jessie Lite, and install the xfce4 package).
Here's how I install Ubuntu MATE using the image provided on the official website (all done with my xubuntu desktop):
- Download the image and extract it (right click + etract). You now have a .img file.
- Format your SD card to a fat32 file system. I used Gparted for that (sudo apt-get install gparted).
- Copy the image to the SD card:
sudo dd bs=1M if=ubuntu-mate-16.04-desktop-armhf-raspberry-pi.img of=/dev/sdb
(you can use Gparted to verify the destination, but every time I did it, sdb was the name given to my SD card. - Insert the card in your Raspberry Pi (2 or 3 recommeneded), and start it.
- If the image is upside down, edit the /boot/config.txt file, and add that line at the end:
lcd_rotate=2
-
3Step 3
Connect your ADC and sensors
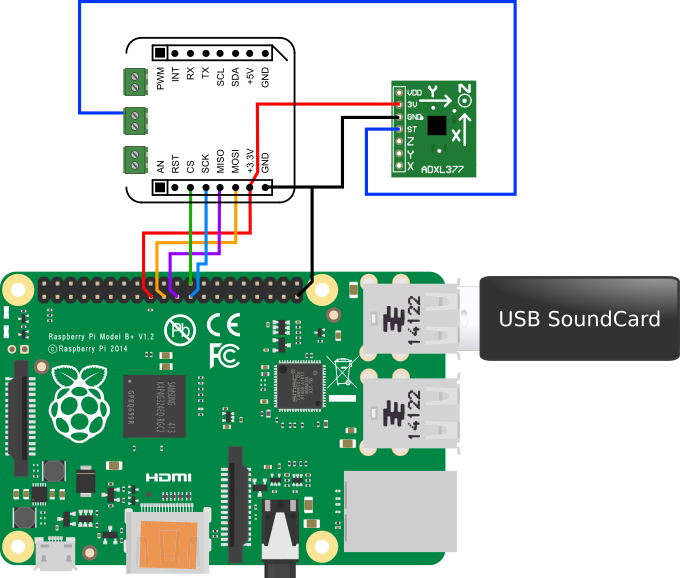
To wire an ADC to the SPI bus of the Raspberry Pi, you can follow those steps use the following diagram:
![]() FYI, that comes from my previous project RaspiDrums, and illustrates how you would connect an ADC click to a Raspberry Pi B+.
FYI, that comes from my previous project RaspiDrums, and illustrates how you would connect an ADC click to a Raspberry Pi B+.eXaDrums has been tested with MCP ADCs: MCP3008, MCP3204, and MCP3208. Nothing stops you from writing your own Sensor class and add support for other ADCs, check the source code on Github.
-
4Step 4
Install eXaDrums
We assume here that you have at least one sensor connected to your ADC, and that the ADC is properly wired to the SPI bus of your Raspberry Pi.
Installing eXaDrums is quite easy. You just need to the instructions of the Readmes found on Github. Make sure that you install libexadrums and exadrums.
-
5Step 5
Configure eXaDrums
Now that you've installed eXaDrums, it's time to configure it. The configuration is quite complex and relies on xml files, so this section won't go into much details, it's just their to make sure that you can use eXaDrums.
If you're running eXaDrums on a PC, the configuration isn't the same as the Raspberry Pi's, so you need to skip the next step.
-
6Step 6
If you're running eXaDrums on a Raspberry Pi
Sensors configuration
If you are running eXaDrums on a Raspberry Pi, it means that you have sensors connected to your Spi bus. The first thing to do is then to configure your sensors. To do so, you need to edit the sensorsConfig.xml file. The file contains the following:
<SensorsConfig>
    <SamplingRate>2000000</SamplingRate>
    <Resolution>12</Resolution>
    <Type>Spi</Type>
</SensorsConfig>
The current version of eXaDrums must use Spi to run on a Raspberry Pi, and you need an analog to digital converter connected to the GPIO port (MCP3008, 3204, and 3208 have been tested).
Soundcard configuration
If you are using a USB soundcard, which is recommended to get a decent sound and almost not latency, you need to have the following parameters in the alsaConfig.xml file:
<root>
    <device>plughw:1,0</device>
    <capture>0</capture>
    <format>SND_PCM_FORMAT_S16_LE</format>
    <sampleRate>48000</sampleRate>
    <nChannels>1</nChannels>
    <bufferTime>10000</bufferTime>
    <periodTime>5000</periodTime>
    <access>SND_PCM_ACCESS_RW_INTERLEAVED</access>
</root>
Note that the plughw:1,0 depends on your configuration, but if you have only one USB soundcard plugged in, that what it should be.
If you also want to run eXaDrums on your PC, you can read the next step, otherwise skip it to read about the other configuration files.
-
7Step 7
If you're running eXaDrums on a PC
Hdd sensor configuration
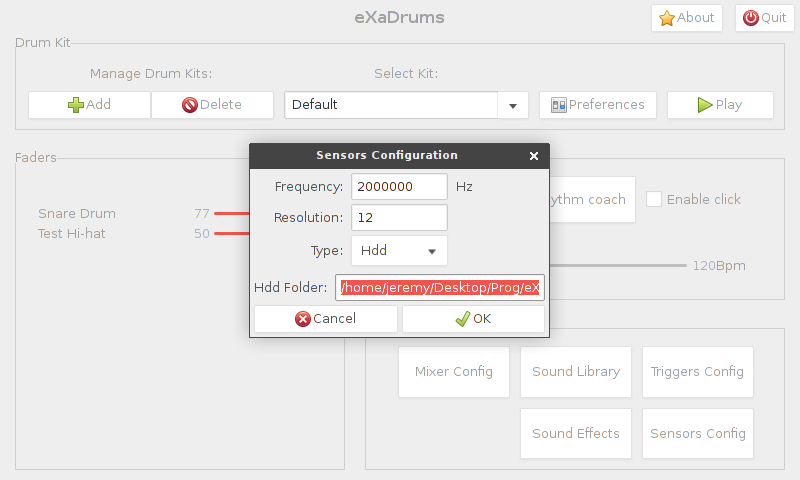
If you're running eXaDrums on a PC, you need to configure the sensors first. To that end, Click on the "Sensors Config" button (bottom right corner). You will see the following window.
![]()
Paste the path to the folder that contains the ".raw" files (hihat.raw, and out.raw) that contain the data I recorded from my snare drum. They are located in the "eXaDrums" sub-folder of the project.
It has to be the absolute path to the folder. Also, make sure that you add a forward slash at the end of that path. Once you click "OK", you'll ear the module play the recorded data as soon as you click on the "Play" button.
-
8Step 8
Advanced configuration
Triggers configuration
-
9Step 9
How to use eXaDrums
 Jeremy
 FYI, that comes from my previous project
Discussions
Become a Hackaday.io Member
Create an account to leave a comment. Already have an account? Log In.