Jeremy
-
eXaDrums Lite (2) & Rhythm Coach
02/12/2018 at 19:43 • 0 commentseXaDrums Lite
I've spent more time on eXaDrums Lite, and there's now an efficient way to communicate between the Raspberry Pi Zero W and my Android Tablet. They both use JSON-RPC, which is both very lightweight and easy to parse.
The app has evolved a bit too, as you can see:
![]()
It controls the start and stop button as well as the metronome's tempo.
Rhythm Coach
The next important thing in the development of eXaDrums is the rhythm coach. As I probably already said, it will be greatly improved.
In fact, I'd like to turn it into a proper training tool rather than just a rhythm coach. I have a plan for that, but I'll make sure it's feasible before I spoil you guys.
-
eXaDrums Lite: Android app + LM386
12/25/2017 at 12:42 • 0 commentsI have been working on a lite version of eXaDrums for weeks, and now is the time to share the results of this experiment.
Raspberry Pi Zero W
First of all, eXaDrums Lite uses a Raspberry Pi Zero W and is running Raspbian Stretch Lite. As you probably guessed, there's is no graphical user interface installed on the Pi Zero. So how does it work?
The Raspberry Pi runs libeXaDrums on a headless system. It's configured to behave as a wireless access point. An executable communicates (I will share it when it will be in a little more advanced state) with libeXaDrums and creates a socket server in order to receive messages from the user. The user sends those messages through a graphical user interface installed on an Android device that is connected to the Pi's wifi network.
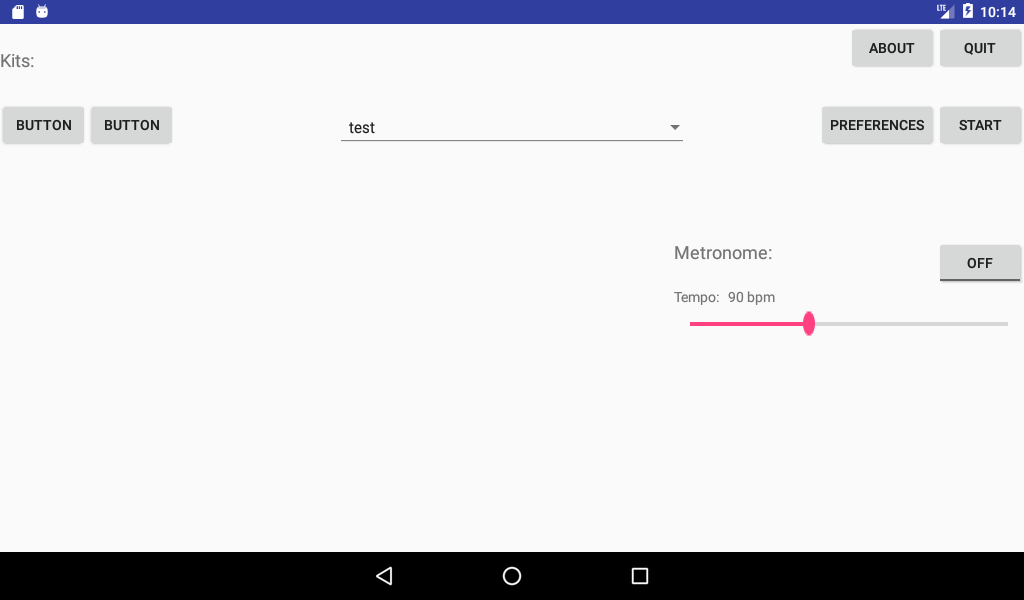
Android application
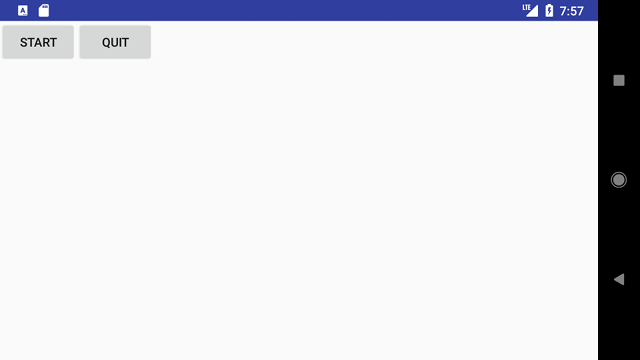
So far, the application is very minimalist and consists of a Start/Stop and a Quit button:
![]()
When you click on the Start button it sends a message to the Raspberry Pi, which starts the module, and gets a confirmation back. After the confirmation has been received, the button becomes a Stop button.
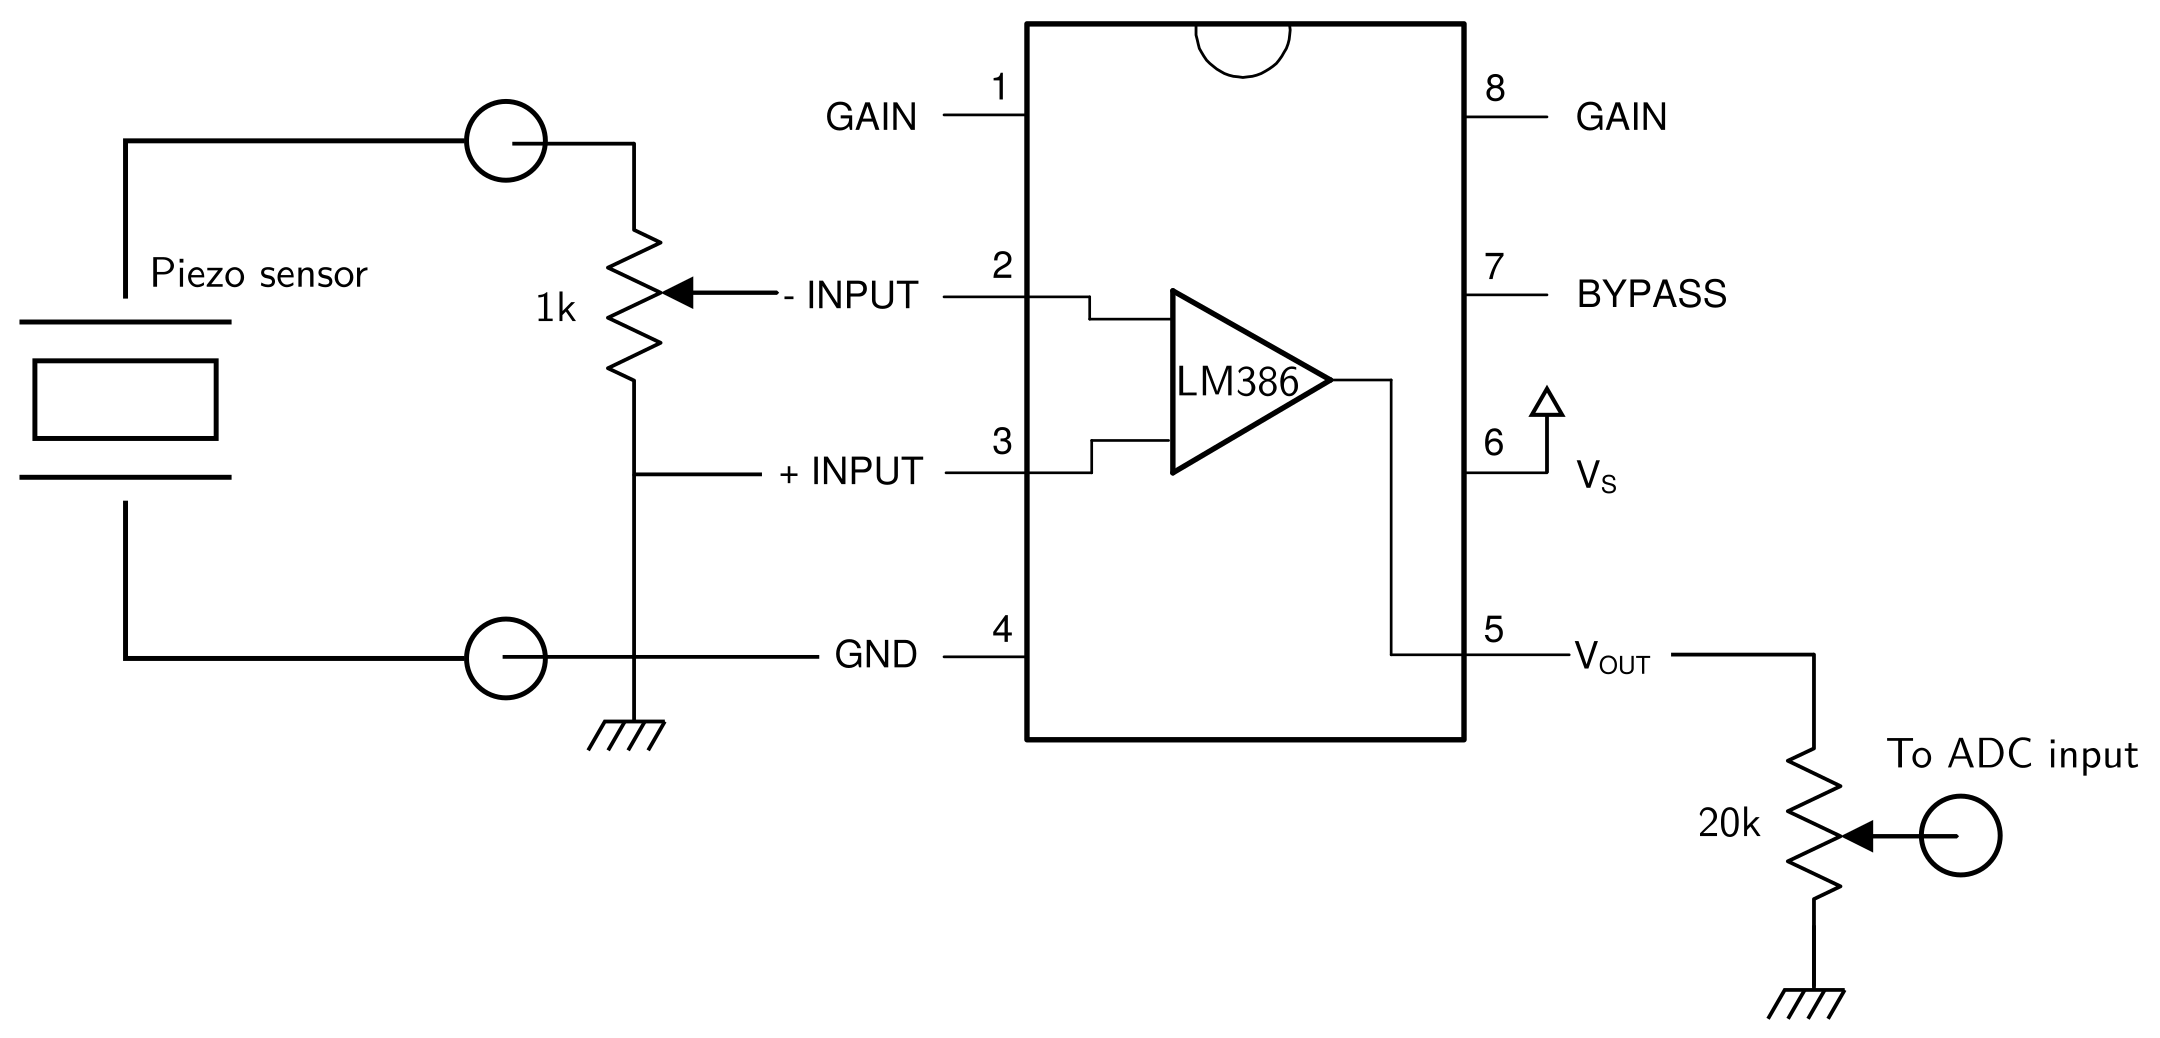
Signal conditioning with a LM386
In order to keep it compact, I've done my best to make everything fit on a RaspIO Analog Zero board. I needed something that can be connected to a standard drum pad, so I tried to use op amps to get a voltage that is compatible with the MCP3008 (0 to 3.3V).
As it turns out, the LM386 is a very good chip for that. I've found that people often use a resistor to reduce the drum pads piezo voltages, but I also need this voltage to have a DC component of 1.65V (3.3/2 V). The LM386 takes in a voltage that can vary between -0.4V to 0.4V, amplifies it and adds a DC component to the amplified voltage. Unfortunately, because of the supply's voltage range, that DC component is 2.5V. Not a problem, we can just add another potentiometer to lower it to 1.65V.
Thus, I ended up with the following schematic:
![]()
where the input potentiometer is used to reduce the output voltage of the piezo sensor to fit the -0.4V to 0.4V requirement, and the output potentiometer to set the output DC component to 1.65V.
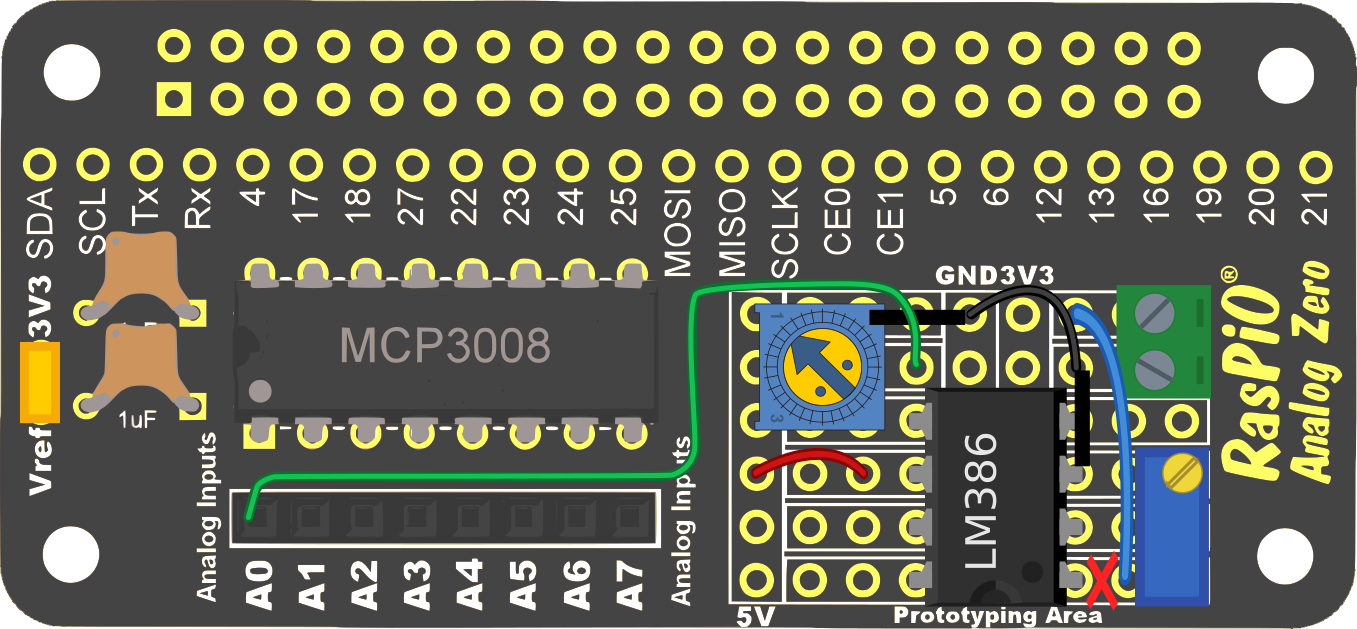
That leads to the following design, using the prototyping area of the RaspIO Analog Zero:
![]()
where the black lines represent connections between the pads (soldered together at the back of the board), and the red cross a cut track underneath the board (the blue wire must be disconnected from the first pin of the LM386).
That works perfectly for a single drum as the fast response of the LM386 adds up almost no latency.
If you wonder how that sounds like, check out this video:
eXaDrums Lite
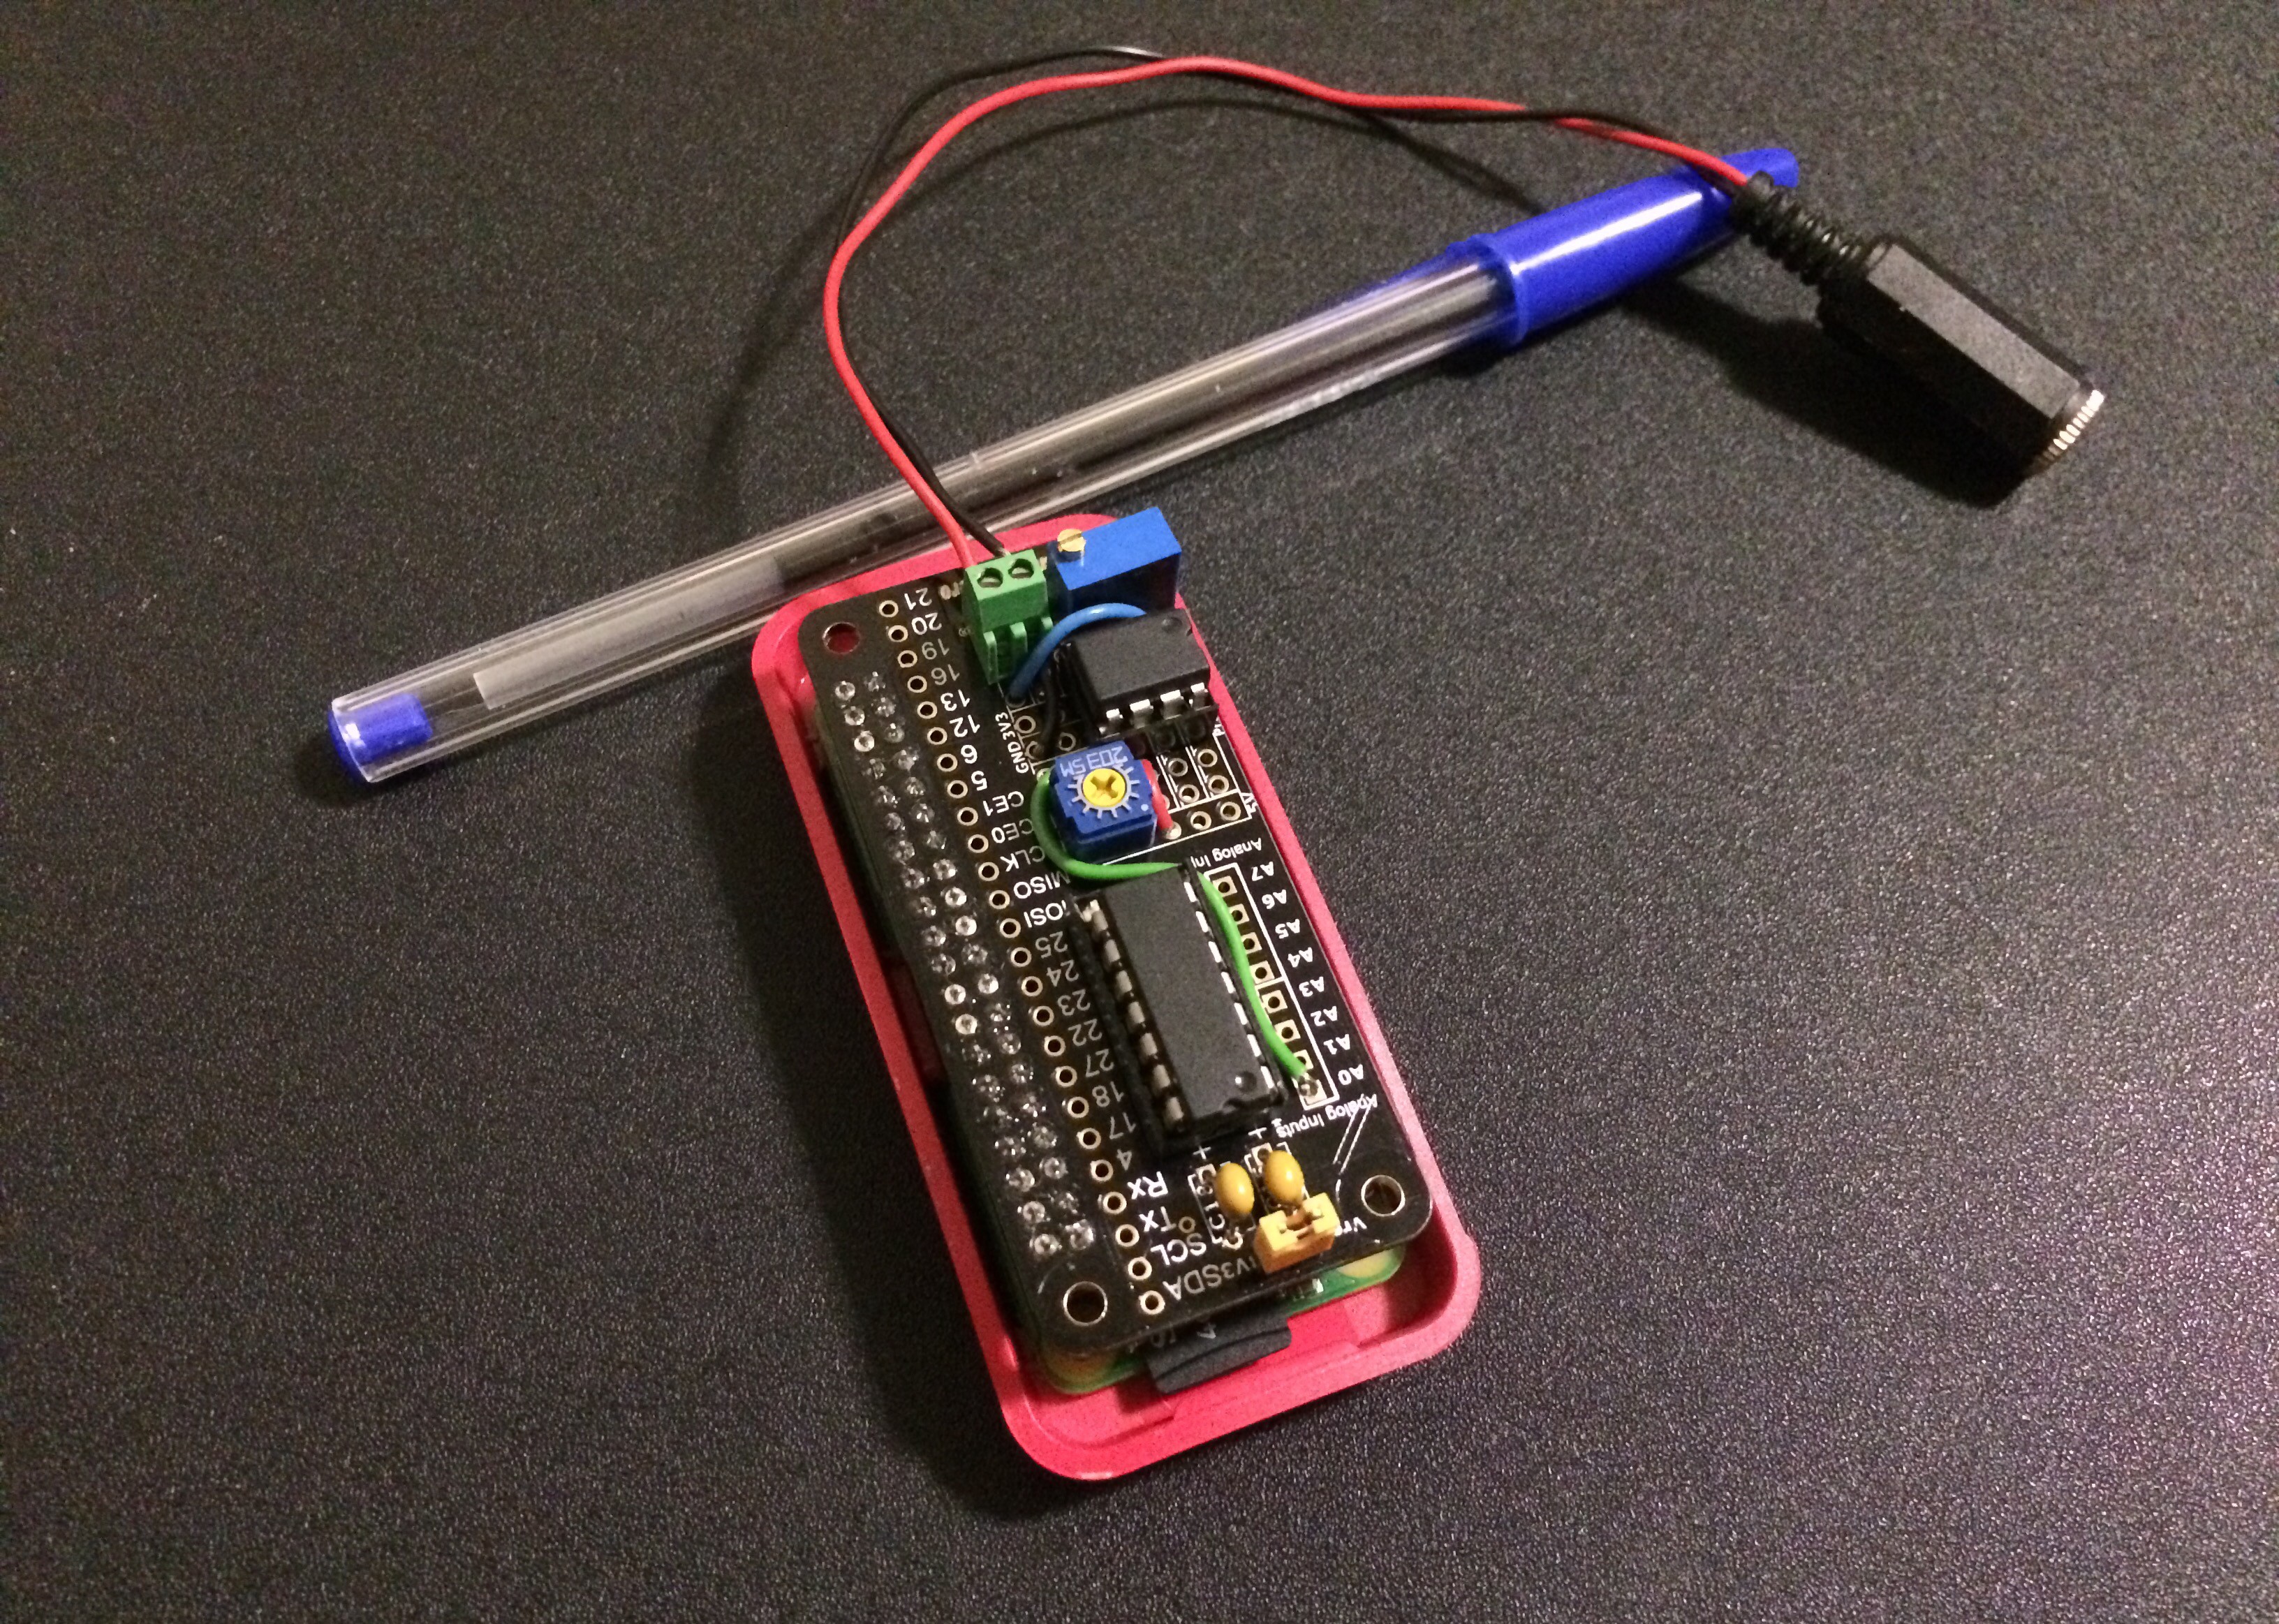
So here we go, this is a first test of a minimalist and cheaper version of eXaDrums. It's also a lot easier to build, so if you want to try eXaDrums but can't be bothered with all the complexity of the complete version, you can start by building yourself an eXaDrums Lite module like this one:
![]()
I'll keep working on the Android application and make it so that it can be used almost the same way as the full version of eXaDrums.
Needless to say that, as far as power consumption goes, eXaDrums Lite is way more efficient. In fact, even using a USB soundcard that draws about 80mA, the module runs continuously for more than 5 hours with a 3.7V 2200mAh battery. This is about 4 or 5 times more than the complete version of eXaDrums.
-
A little teaser
11/05/2017 at 20:02 • 0 commentsDo you want to make your own DIY drum module? I think it's fair to say eXaDrums is one of your best options. See for yourself:
Oh yeah, it is really working that well. I made a little board to play on my Roland TD4-KP, and here we are, the result is amazing, and feels like playing with a commercial drum module.
Still a few things to work on though... Here's a list:
- Error handling
- Make the mixer work in stereo
- Work with wav sound files
- Polish the user interface
- ...
Of course, I'll publish some schematics pretty soon, so that you can connect your electronic drums to your eXaDrums module.
Oh yeah, that's right, a longer video is coming soon. It will show more things, more features, more sounds, etc.
-
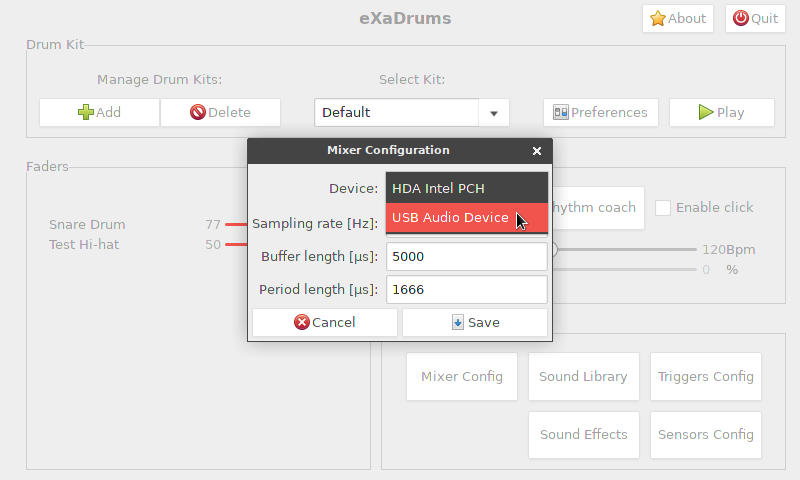
Configure your audio device...
10/08/2017 at 18:32 • 0 comments...without restarting eXaDrums.
The "Mixer Config" button is working and allows you to change your audio settings, such as buffer length, sampling rate, etc.
Below is a screenshot of the window that lets you do that:
![]() As you can see, all the sound cards are detected and you can choose the one you want to use.
As you can see, all the sound cards are detected and you can choose the one you want to use.
The best thing is that you don't even have to restart eXaDrums, you just select your sound card, set your parameters, click save and you're good to go.I've been working on eXaDrums for over two years now and it's all coming together nicely. I try to publish most of what I do on HaD, but I sometimes skip a few things. Just to let you know the things I've been working on lately, here's a (incomplete) list:
- Switched the whole project to C++14.
- Changed the way sounds are chosen from the instrument preferences window.
- Lots of testing (used gdb remotely to debug from the Pi over ssh) and bugs fixes.
- Designed a board to interface eXaDrums with piezo sensors.
The first three items can be found on Github. As for the last one, it's a bit of a tease, but I can already tell you that you can expect a demo on a real electronic drum kit at some point.
Cheers.
-
Some updates
07/27/2017 at 21:28 • 0 commentsNot a single day goes without me thinking about eXaDrums. Despite a few bugs to fix, the project is more and more mature, and it pleases me a lot. I have a feeling that I'll be playing drums with an eXaDrums module pretty soon!
I'm still working on the triggers, sensors and advanced features, as well as the rhythm coach, which is already working pretty well. The hardware is about to change a bit, as I need to make the module work with piezos instead of accelerometers (less expensive, and less noise too, but less controlled output...).
I've put a new installation script in the "Files" section, and slightly changed some of the instructions, and as far as the software goes, I'm currently focusing on error handling. It's been neglected a bit so far, but I've been working on it, and it looks it's going to be quite useful and easy to integrate. Once this and the rest of the Api are finished, I think we are going to get really close to a version 1.0.0.
-
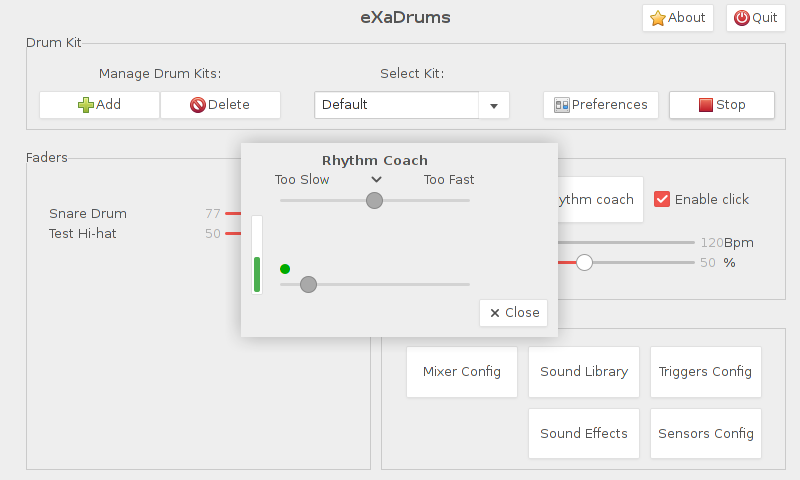
Rhythm Coach!
05/23/2017 at 19:05 • 0 commentsA rhythm coach is a great tool to improve your timing on the drums. It helps you progress, learn, and become more precise and consistent. Most drum modules have a built-in rhythm coach which is why eXaDrums had to have one! My first introduction to a rhythm coach was the Roland RMP-5, so in it's current state, eXaDrums' rhythm coach looks very similar:
![]()
As you can see, it's not finished, but it already has the most important features:
- It's synced to the click: the bottom plain circle moves from right to left just like a metronome.
- It has two virtual LEDs that blink on every click for the green one, and every first click of a bar for the red one (which isn't shown on the previous picture).
- It has a "velocity meter", located on the left side of the window. It gives you the strength of your hits.
- And finally, it has what you could call a "jitter monitor" which shows you if you're going too slow or too fast with regards to the click.
Of course, the user interface will be improved in the future, but I think that it's important to emphasis that pretty much everything exists in the code. The last updates allow to sync the metronome to the GUI, monitor the strength of the hits, and their delay with the clicks. Since it's already possible to modify the click's volume, it will be quite straightforward to add the quiet count training programs that commercial rhythm coaches offer. Basically, it'll be able to do everything a regular rhythm coach does!
-
Performance: the best you can get!
04/23/2017 at 19:34 • 0 commentsYeah that's true, it's probably the best you can get!
More than a year ago I managed to get the latency of eXaDrums (formerly RaspiDrums) below 10 ms: https://hackaday.io/project/7499-raspidrums/log/25077-latency-goes-below-10ms
Well actually, the latency was about 10ms... And I had to use nice to achieve that result...
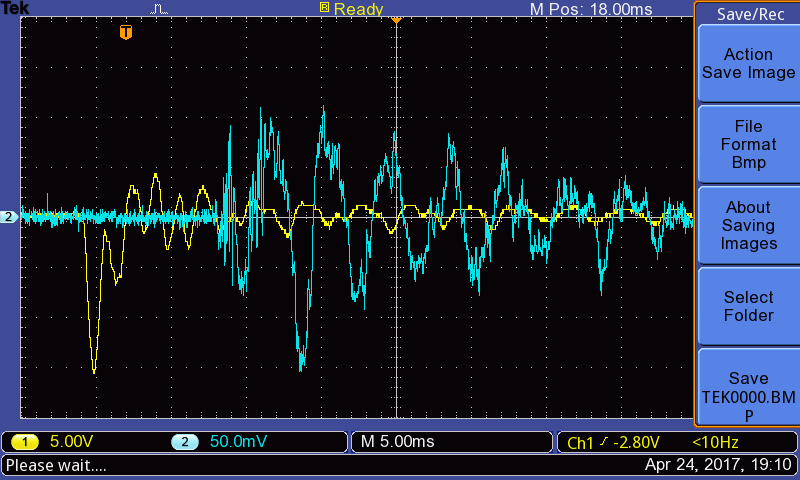
A few days ago I optimized the code quite a bit. The threads are now running with high priority, and the Mixer is completely lock-free! The result of that is an average latency of 8ms (it goes from 6ms to 9ms), and it's always less than 10ms. Always! See for yourself:
![]()
The yellow curve is the output of the piezo of one of my drum pads. The blue curve is the output of the soundcard of eXaDrums. They are both connected to an oscilloscope, and as you can see, there's a 8ms delay between the peak of the yellow curve, and the beginning of the rise of the blue curve.
The best part is that it's very repeatable, and most of the time around 8 ms, sometimes under 7 ms (I even got 6 ms a few times), and very rarely longer than 9 ms.
That test was ran on a Raspberry Pi 2 (the old one), with two sensors connected to the module, and with a soundcard buffer set to 2 ms.
-
Configure your triggers!
03/19/2017 at 11:35 • 0 commentsCymbal pads, mesh heads and normal drum pads don't output the same sort of signal. This is why you need to be able to configure the triggers of your electronic drums. It can be quite important to do it properly, which is why eXaDrums will allow you to configure everything.
This is not quite finished yet, but as you can see, you can configure every parameter of your triggers:
![]()
The buttons don't work yet, but that's a detail, as I'll keep working on it and let you know when they are functional. As you can see, there's also an "Apply" button, which means you can change a parameter and test the result straight away, without closing the window. That'd allow you to test the results of your modifications in real time.
-
Try eXaDrums on your PC!
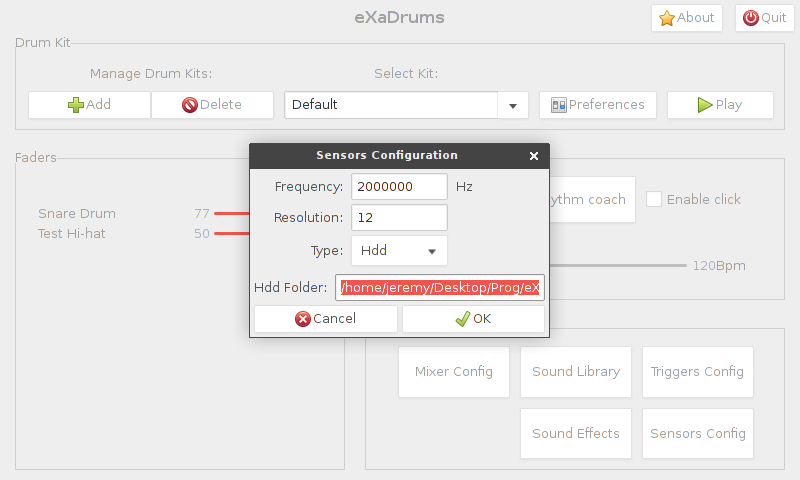
03/08/2017 at 15:17 • 0 commentsDid you know that you can try eXaDrums on your PC?
Actually, this feature was there at the very beginning, but it wasn't easy to use. Now it's pretty easy. I updated the instructions (step 8) so that they explain how to read sensors data from your hard drive. As described in the instructions, you can set the sensors to "Hdd" mode and specify the files path.
![]()
That makes eXaDrums very easy to install on a PC, as you only have to execute the script that is provided in the files section, and configure the "Hdd sensors".
I intend to work on the triggers configuration as well and some other things, but the really exciting stuff will be the rhythm coach. I'll keep you guys informed!
-
Drum kits management demo video
01/29/2017 at 22:21 • 0 commentsEven if it is still under development, eXaDrums is becoming a pretty usable drum module.
I recently made a lot of progress on the user interface, and it's now possible to add, modify and delete drum kits . See for yourself:
That adds up to the already functional metronome and the faders.
Two things are still missing from the GUI though: the rhythm coach and the "configuration frame". Those are the next two things I plan to focus on!
 As you can see, all the sound cards are detected and you can choose the one you want to use.