Sam P
Sam P-
Microcontroller SRAM, Sector size and MBED
05/10/2016 at 19:48 • 0 commentsI was worried this might happen. I've run into a situation where the Atmega32U4 microcontroller doesn't have enough memory for what I want to do with it.
The issue is that I want to control a serial flash memory IC which has a sector size of 4Kbyte. The microcontroller has 2.5Kbyte of SRAM to work in. To be able to program the flash I first have to read in an entire sector, erase that sector, then program in the new data along with the existing data. Obviously I can't do the read with 4Kbyte being greater than 2.5Kbyte.
I think the solution to this is either to use a flash memory IC with a smaller sector size, or switch to a removable SD card which have a sector size of 512bytes.
On an unrelated note I've been thinking about switching over to MBED as it's USB libraries are a lot easier to use. I think this issue is a perfect excuse to do so, and I already own an LPCXpresso LPC1347 board to get started with. As a bonus someone has already written a library that allows an SD card to be seen as a mass storage device, but which can also be accessed from the microcontroller itself.
-
Menus and improved text entry
05/02/2016 at 00:18 • 0 commentsHere is a quick update video showing the menu and input system working:
The menus include a text scrolling feature when it is too long to fit on the screen. I have still yet to decide upon a menu layout. I am thinking that the searching is probably too slow to be of any use, and the A-E, F-J etc groupings will probably be faster in the majority of cases. I am also thinking that eventually a favourites or often used menu might be useful. Let me know in the comments if you have other ideas.
The other change is text input. Any part of the text can now be changed, and a delete character can be selected to truncate the text up to that point. Although not shown in the video, the cursor also gives you an indication when you have reached a maximum string length. When scrolling, the cursor will stay in the middle of the screen until you reach the end where it will move to the right edge.
-
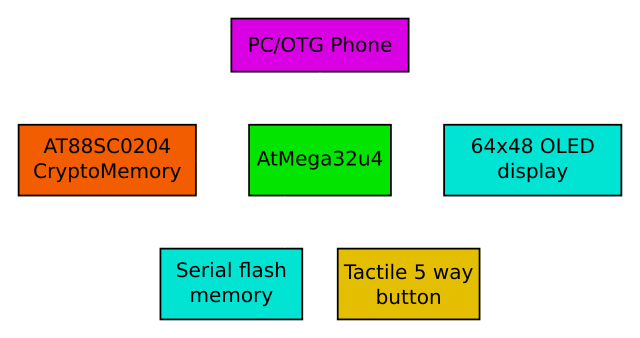
Architecture overview
04/25/2016 at 12:21 • 0 commentsThe AT88SC0202C ICs have arrived. After a few hours of programming and reading documentation I managed to get them working. These have 64 bytes per user zone, and 4 zones in total. Each zone will contain a 128bit encryption key, and will be locked by it's own password. This is handy for allowing different security levels so bank logins can be kept separate from forum logins for example. Interestingly the CryptoMemory® has 8 passwords (16 if you treat read and write passwords separately), allowing for more than one password per zone. I'm not sure what use this has, but it's there if needed.
For the device architecture I have settled on the following layout:
![Password manager overview]()
The serial flash is where all the login info and encrypted passwords will be stored. The microcontroller will use the encryption key stored on the CryptoMemory® to decrypt the password before typing it out over the virtual USB keyboard. The full process would be as follows:
- Send verify password command to CryptoMemory® and check if successful.
- Read the encryption key stored in the CryptoMemory® user zone.
- Read username/password from serial flash.
- Decrypt password using encryption key.
- Write username/password through the virtual keyboard.
My current task is to implement the input and menu system. Also I have switched over from using Arduino to using the LUFA library which allows for a lot more control over the USB stack. For example I am able to add a Generic HID alongside the keyboard for backup/restore of passwords, or even direct control of the device without having to use the on-board button.
-
Chip and pin style password management?
03/30/2016 at 16:03 • 0 commentsFrom my last post testing an input method I have realised that trying to enter a long password into a device without a real keyboard is always going to be tedious.
Instead I have been thinking about secure ways of using smaller passwords. One technology which already does this is chip and pin. This is secure since you only have a limited number of attempts to correctly guess the pin before the card self destructs.
After doing some research it seems Atmel sell a product that might do the job: http://www.atmel.com/devices/AT88SC0404C.aspx. This chip has a lot of features, but most importantly it has some Password Attempts Counter (PAC) registers which count the number of incorrect password attempts. After 4 incorrect guesses the password is disabled. Because there are multiple registers it is possible to set more than one password, so you could set a backup password if you manage to lock yourself out with the main one. I believe the chip is also available in a SIM card style packaging, so if a card does become fully "bricked" you can just replace it with another.
I think I shall send an email to Atmel sales to see if they will let me have a few samples to play with (and inevitably brick a few). It looks like they sell them in PDIP form too, so perfect for prototyping!
-
Testing character input
03/24/2016 at 22:40 • 0 commentsThe current solution is to use a 4 direction (+click) tactile switch to scroll through the list of characters. This seems a bit too slow (A whole minute to type "Hello World"), so I may investigate using a thumb stick to more quickly "spin" through the list.
-
Password manager use case
02/01/2016 at 13:26 • 0 commentsBelow is a quick description of a typical use case of the password generator with limited information on what is happening internally. That will be the topic of another post.
Adding a new website login:
- Plug the password manager into usb slot for power (could be a usb battery bank).
- Select "add new login" from menu.
- Enter website name and username.
- Optionally change password length and encoding (e.g. to select alphanumeric only)
- Save the new login. The device will randomly generate and store a password for you.
Using a login:
- Plug the password manager into the usb slot of the device you want to enter the password for (e.g. laptop, phone etc)
- Navigate to the website where you wish to login and place your cursor in the username field.
- Select the appropriate login on the password manager.
- Enter your master password.
- Wait until the login password has been decrypted and typed out (the generator acts as a usb keyboard).
- Login.
- Keep the password generator plugged in if you don't want to type the master password again for a pre-determined time (e.g. 10 minutes). Unplug it when you are done.
Keychain USB password manager
Tired of remembering passwords, and unable to install a traditional password manager? This may be the device for you.