-
CRT TV Destruction!
06/17/2014 at 23:41 • 0 commentsAs promised here is the destruction of a 27" CRT TV. Each shot is at about 130 feet per second.
I hope you enjoy!
-Jeff
-
Updates! Circuit boards! Mistakes! Upcoming Plans!
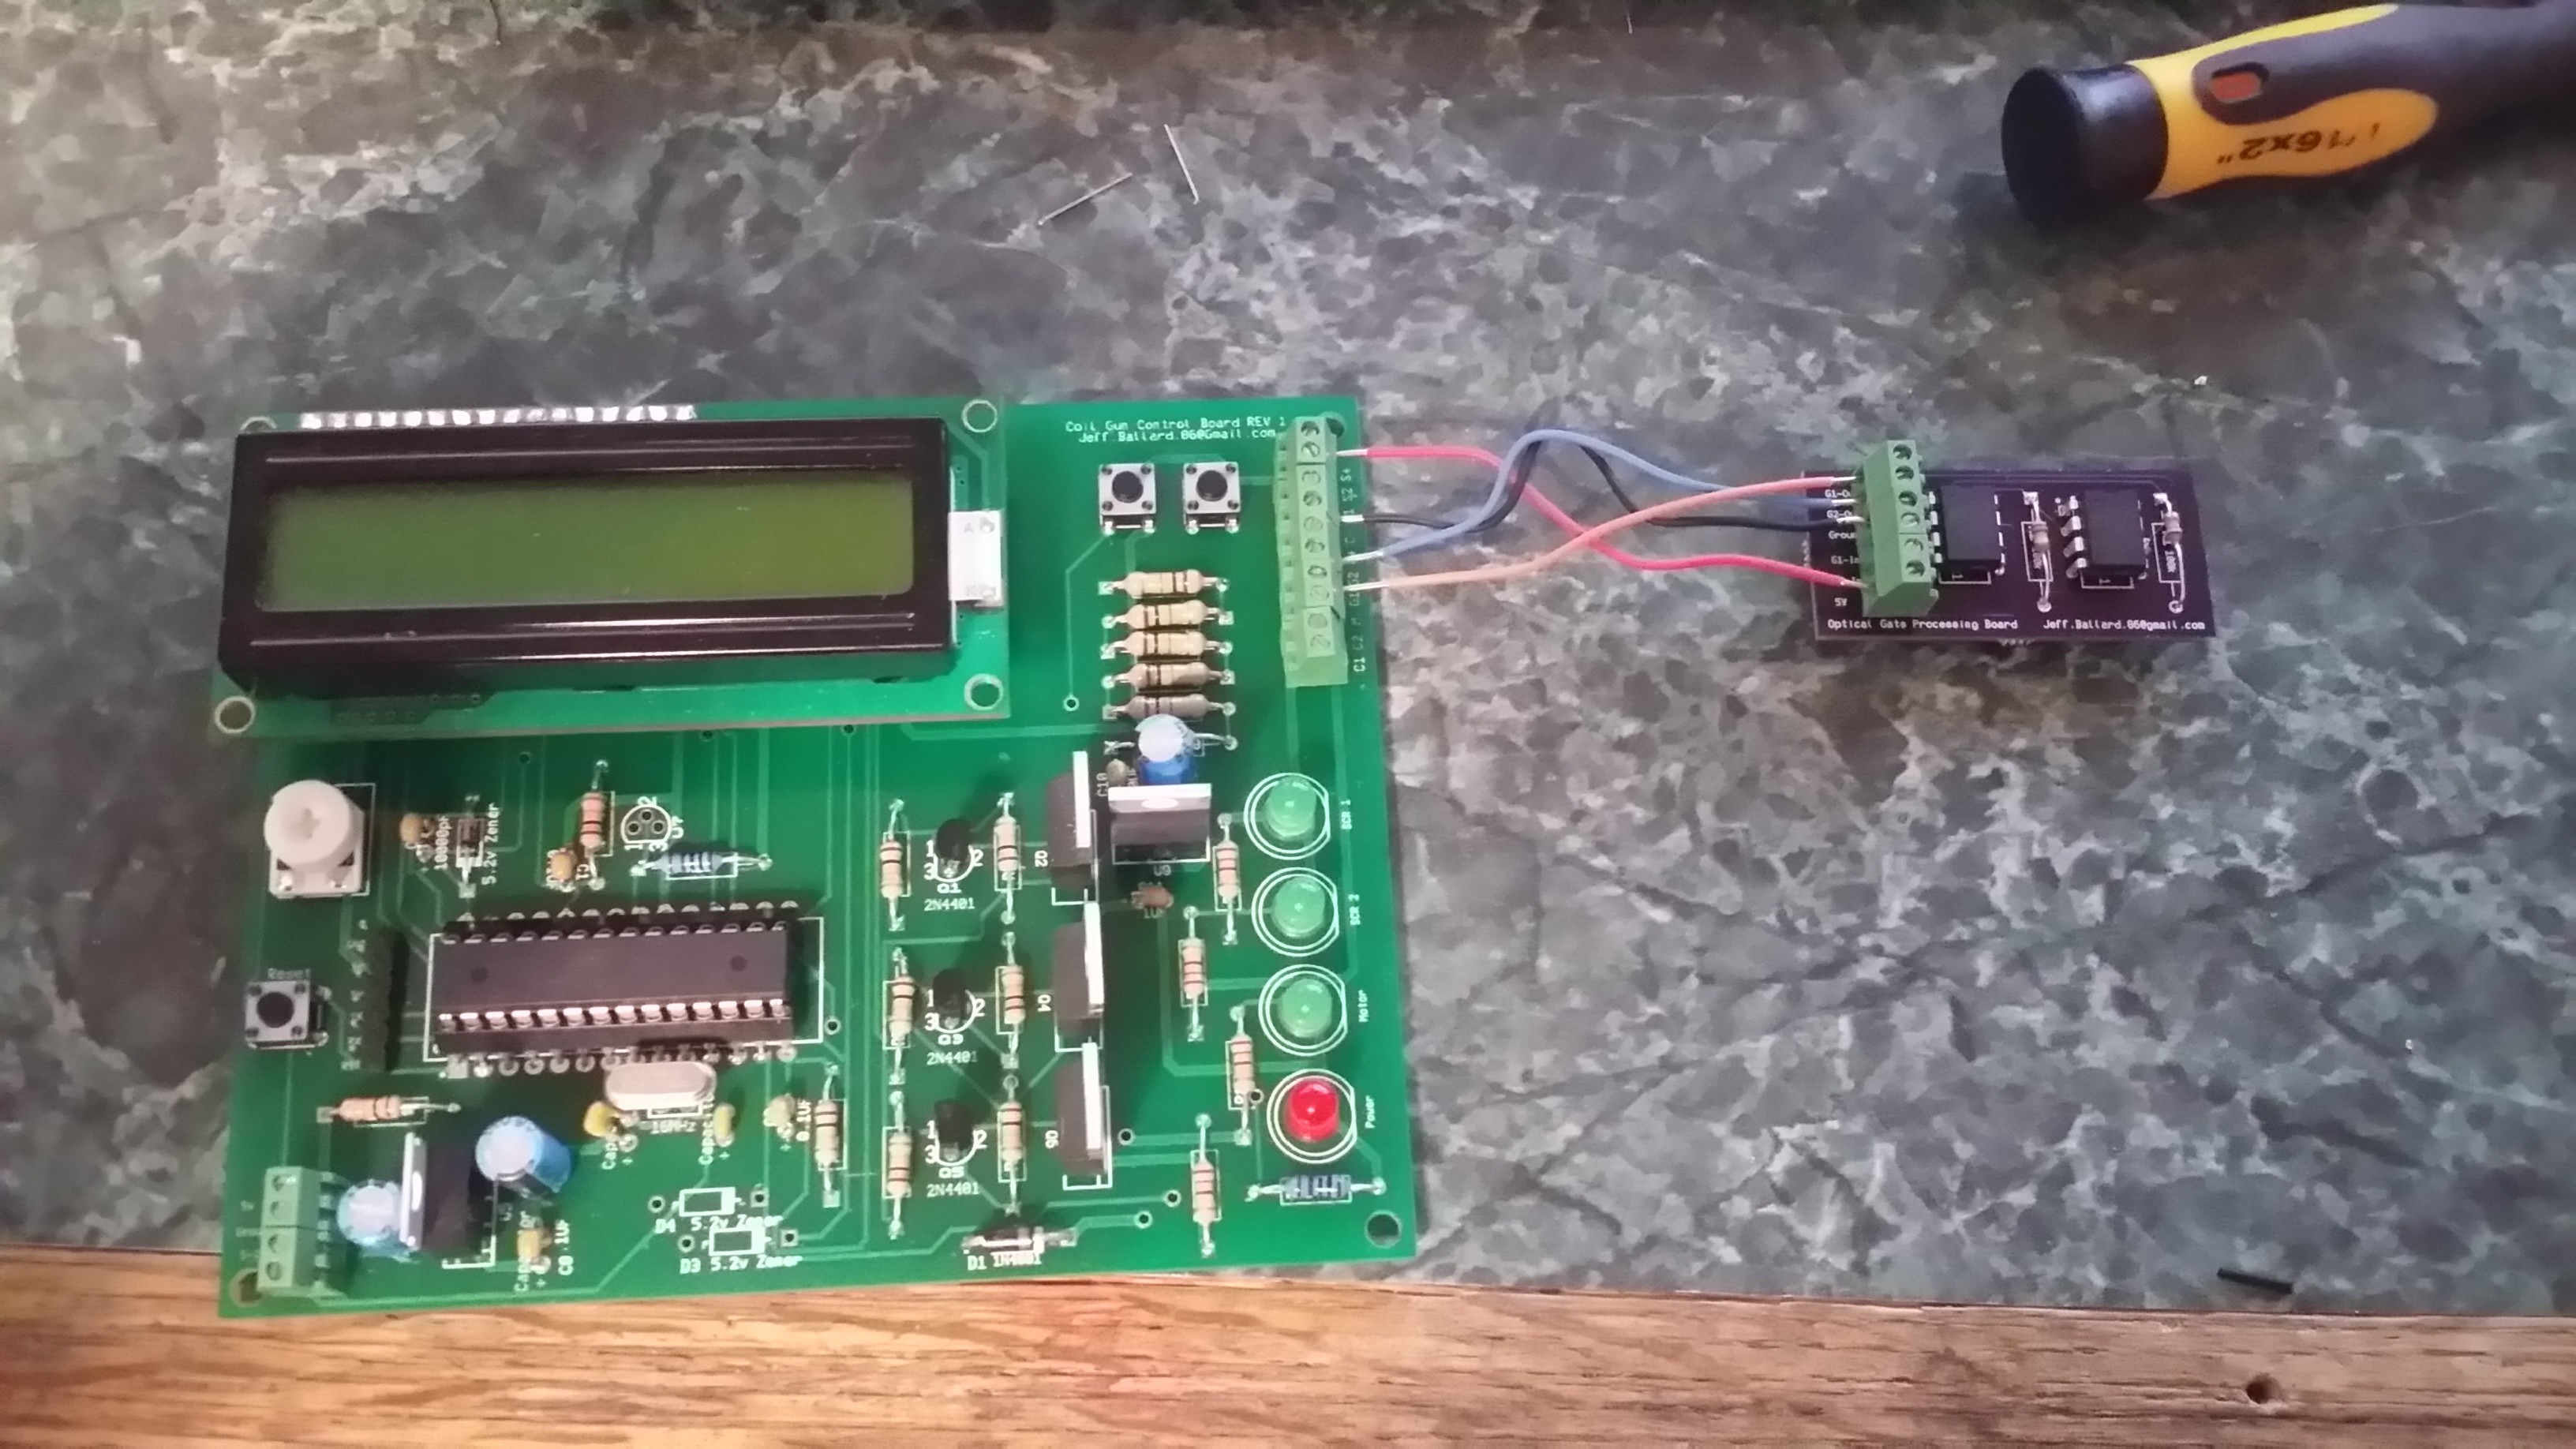
06/17/2014 at 18:06 • 0 commentsI ended up using 2 boards, because I ended up making changes to the optical gate circuits after I had sent off for the main board. Good news is that it was easy to just make a slave board for that portion of the circuit.
I made a few mistakes when making the main board:
1. The three mosfets in a row needed a 10k resistor between pins 1 and 3. I fixed this buy just soldering directly to the pins from under the board.
2. The blue cap in the middle right, the net wasnt connected for the positive lead. Luckily it was close by, so I just bent the lead over and soldered it to the appropriate place.
3. The Atmega168 foot print was way messed up, it was almost double the width as it should have been. I was able to fix it by using a large dip socket (with the center cut out) and manipulating the leads into the proper orientation.
All of these mistakes could have been caught if I had only just printed the board traces/footprints out and visually inspected it and placed certain parts on top of their foot prints.
There may be other mistakes, im new to designing my own boards, but this one functions as intended (so far.) I also need to order a variety of connectors because what im using is just a PIA.
Upcoming maybe today, at least within the next week:
A friend donated a 27" CRT TV for parts with the request that I destroy the tube is a spectacular manner. So I figured, why not shoot it with the coil gun. Once set up and filmed I will post here for your viewing pleasure.
I plan on testing projectile speed with different voltages, Im thinking that as Ive increased amperage, ive exceeded the capabilities of my projectile to absorb the forces applied to it from the coil. I can control the amperage (and hopefully magnetic field) by changing the voltage.
At some point a test rig to test fire a 1" diameter slug, just for the hell of it.
And as always, thanks for viewing, and let me know what you think.
-Jeff
-
The Hack a Day Prize
06/06/2014 at 14:24 • 0 commentsThis will be a short post talking about the Hack a Day prize and how my project is part of that contest.
It seams that the largest requirement for the prize is that the project is "connected" from what I have read, and heard one of the judges say this only means connected to something.
Since that is the case my project "Coil Gun/Gauss Cannon" is connected to a microcontroller (arduino). This microcontroller controls all functions of the gun, including: firing, timing, measurement of voltage, measurement of projectile velocity, and other features as they become necessary.
Another requirement is that the project is open. I have and will continue to post files that can be used to recreate my results.Lastly the contestant needs to actually build something, this is probably the easiest part. There are many pictures that I have already posted that show the build process of my project, and there will be plenty more.
Finally I'd like to wish everyone good luck, this is an excellent contest with extraordinary prizes.
-
Ballistic Stabilization Update
06/04/2014 at 02:14 • 1 commentThis will be a short update. EDIT: maybe not.
Recently while awaiting funds to buy another SCR and some 10 or 8 gauge magnet wire, I have been experimenting with Ballistic Stabilization.
If you read a few logs ago you may have seen that I purchased a 1/2" diameter 5v dc motor that unloaded can spin up to 12k RPM. I also 3D printed a motor mount and a magnet holder for the motor. When I installed this into the poly carbonate tubing without the coil it would spin perfectly. What im about to say should have been obvious to me, but didnt occur to me until I did it. When the coil gun was fully assembled I decided to test out my "Ballistic Motor" I would spin it up and then push it forward until about 1/4" of the projectile was inside the coil. That is when the projectile would slow to a stop and not move. I dont perfectly know whats going on, but I am assuming it is along the same principle of an electric motor. My assumption is that the coil and projectile are imparting a generator type effect. And this is effectively making it really hard to spin my little motor up.
So then I decided, ill use a more powerful motor. I then disassembled an old RC helicopter, and repeated the experiment with one of its much stronger/faster motors. Failure. But this time I was able to take at least one interesting measurement from the motor. At no load full RPM the motor pulled about .6A at 5v, at full load the motor would pull almost 6A at 5v, and become very hot very fast.
So over the past couple days I have been thinking of going with an even larger brushless motors, I have a couple 156kv 2200kw motors I could use. This comes with a couple problems: they would require much more voltage and they would also require a simi complicated mounting system. Lastly I decided to do some research on firearm projectile RPMs. I am astonished to say that a projectile in a modern hunting rifle can see RPMs in excess of 200k. Even for myself, a person highly knowledgeable with firearms I was really blown away.
So then I thought can I spin a 1/2" diameter steel rod even 100k? And I thought sure, I can get a high KV motor, give it lots of voltage, and some gears and I could spin it however fast I wanted to. I didnt think this for long, because I believe that its too complicated, it may not look it but I do believe in the K.I.S.S. principle.Im thinking I may experiment with some different projectile shapes and try to accomplish some sort of ballistic stabilization in some other manner, it may be revolutionary, it may be barbaric, who knows.
For those of you who may have skipped down here:
"To keep a long story short" Spinning a projectile while it is partially in a coil is not an easy feat, and has almost been given up on in its current form.
And again, thanks for visiting, reading, comenting, and whatever else you may do.
-
New Video!
05/28/2014 at 21:20 • 0 commentsNew video is a little blurry/short, I won a rebel T3I and well im used to camera phones so, maybe the next one will be better.
I finaly got the Optical gates working, and oscilloscope would have helped greatly :( I finally was able to get it working with some crude spice models + trial and error. I will post schematics at a later time.
In the video the projectile went clear through the plywood, the plywood is 3/8" thick, it also left a good sized ding on the wall behind it.
Projectile speed was measured at less than 150 fps which leads me to believe my 300 fps results from the previous gun was kind of fishy, especially since you can see the projectile moving in the above video.
this shot was at 400v, 10500uF x2 or about 1850 joules of stored energy, projectile energy was just over 30, which is close to a 2% efficiency. I may play with it and try to get more outr of it, but i want to up the Amperage again. Im thinking 10KA per coil with adjustable timers again.
I also tested the coil gun with one coil and then 2 coils to see what the differences would be:I decided to use 400v instead of 450v as the voltage. I used the same projectile. An lastly I made sure that the projectile was on the same spot with each shot. One coil averaged 70 fps while 2 coils averaged 130 fps. Close to a 45% improvement.
Please comment and let me know what you think, or advice is always welcomed!
-Jeff
-
New Schematic and Board Layout
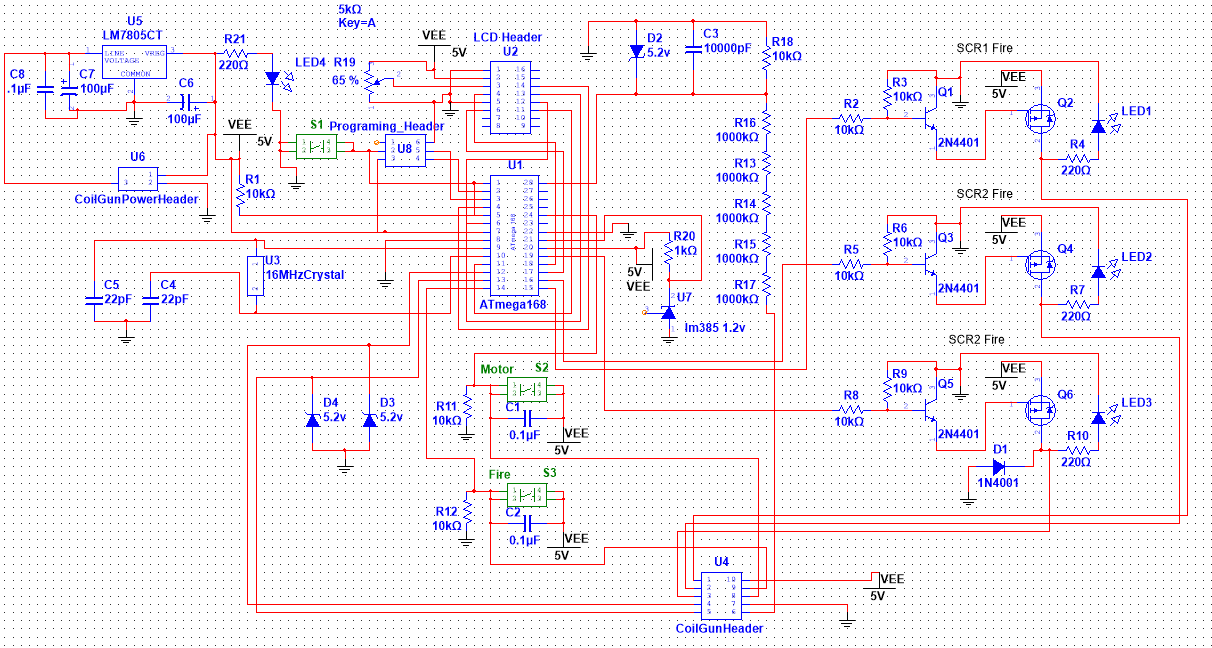
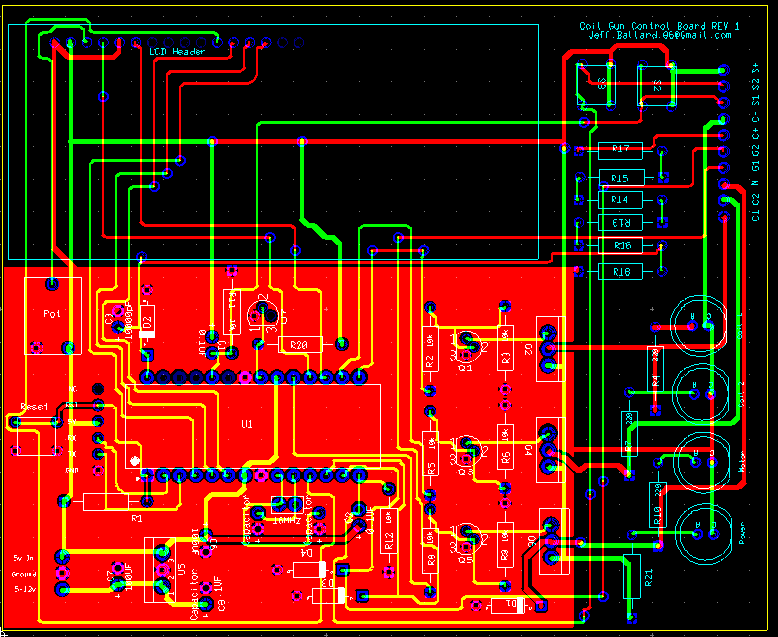
05/21/2014 at 17:39 • 1 commentRecently I have not had a lot of time to work on this project, but I have had time to finally record the actual circuit diagram and create a PCB. I will send off to have the PCB made in a few weeks. Warning: my schematic and PCB fab skills are not very good, proceed with caution. For many of the components I just made basic place holders for them, hopefully it can be followed. I also used an autorouter for about 90% of my traces.
Also the 2nd title that says SCR2 fire is actualy Ballistic Motor.I should also add that im debating on going back to a single coil design pushing 14KA through its single coil.
-
Ballistic Stabilization
05/06/2014 at 20:53 • 5 commentsSo I trimmed out my back door today, and then decided to make something for my coil gun.
I purchased some .5 id .625 od poly-carbonate tubing a while back, along with a little 6v motor. So I 3d printed a motor mount and a magnet mount (attaches a magnet to the end of the motor shaft.)The motor mount has a hole that I will thread with a 8-32 tap and it will except a threaded rod to be used as repositional stop so I can test projectile placement in relation to the coil.
The projectile will attach to the magnet, the motor/projectile assembly will then slide into the barrel, motor will spin up, coil gun will fire, and hopefully will have a stable ballistic path.
I also printed out some new coil endcaps that will also be used as my new photo gates. I expect to push nearly 4000 amps through each of the new coils, I am also hoping to reach projectile speeds in excess of 500 feet per second. -
Coil Schematic
05/01/2014 at 04:53 • 5 comments -
Explosion! Updated
04/30/2014 at 19:10 • 1 commentToday I switched out the photo transistors with photo diodes.
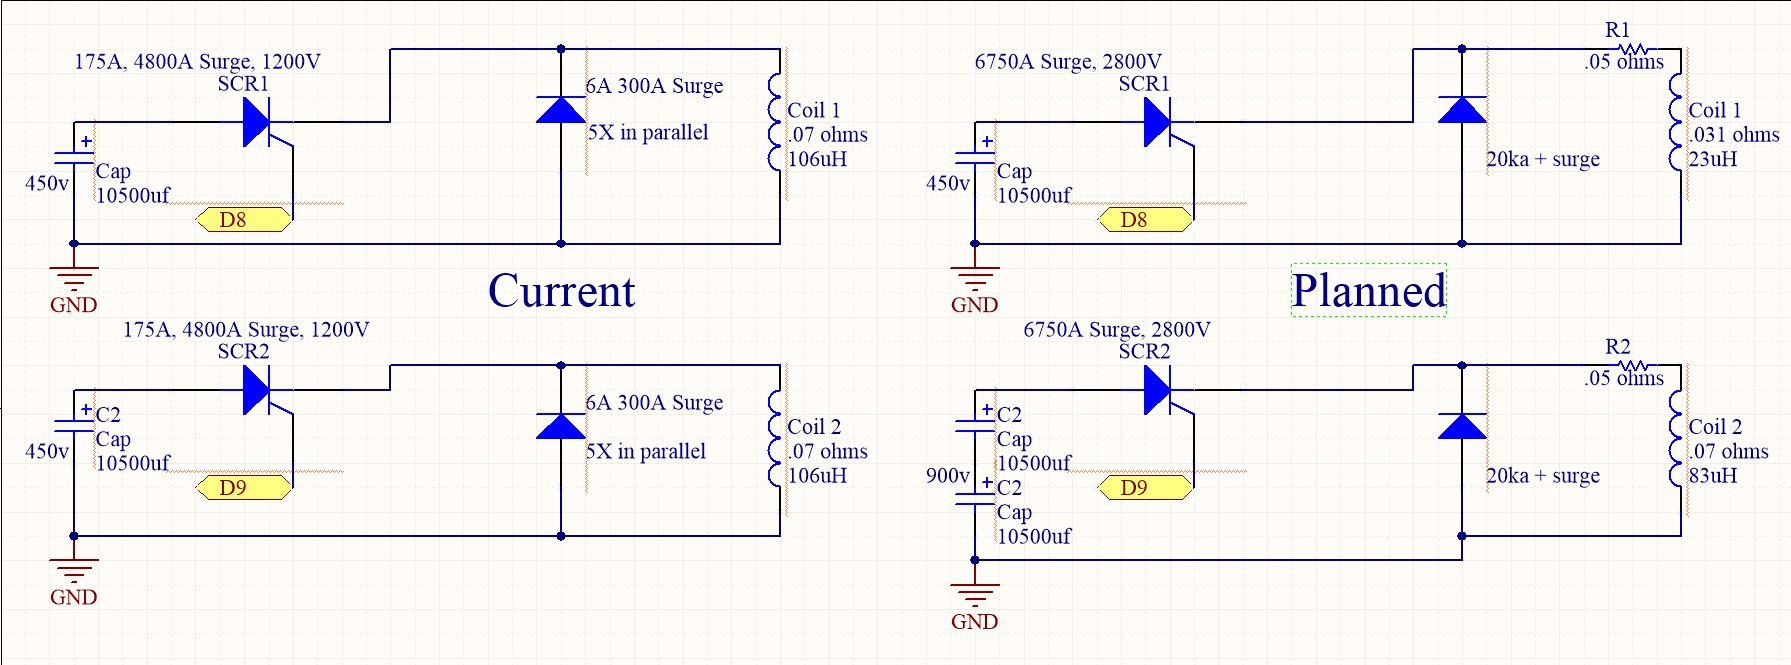
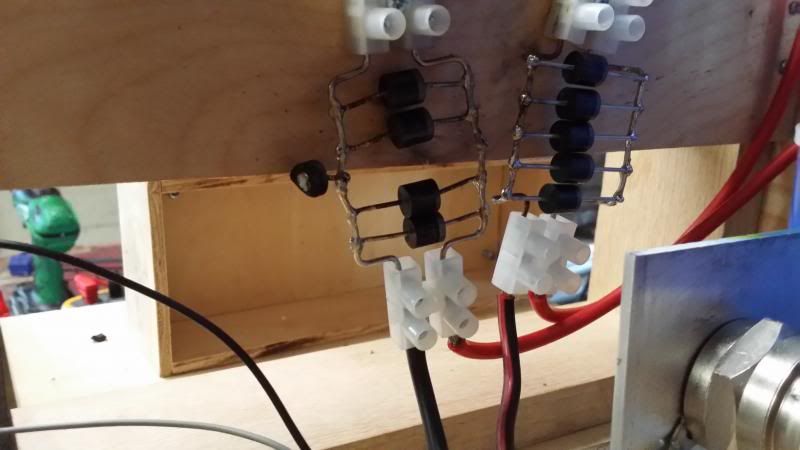
I then started testing. started at 100v, 150v, 200v...so on until i was up to 445v. On this test, I had a protection diode explode! My coil protection consists of 5 6A diodes with a 300A peak wired in parallel with the coil.
Sadly along with the loss of a single diode, I also must have blown some pins on my arduino, and/or the LCD. The arduino still seams to respond to some of my inputs.an hour later and my ears are still ringing, and im still expecting the police to show up asking about the noise...
UPDATE:
I went out to my garage to play with it a little, and what has happened is my second SCR has failed. I was aware that this SCR wasnt completely right because it took an extraordinary amount of current to make it conduct, compaired to the other SCR.
Also the Arduino and LCD screen are fine, after the min explosion, it didnt seam to be working correctly, so I just powered everything down, a power reset was all that was needed it would seem.
So I am now working with a single coil again, I will start to look for another SCR, and continue testing with the electronics.UPDATE 2:
I ordered 2 power diode modules, PN
LS412460 they have a 20kA+ surge capability, I will use these as my new SCR protection devices.
I also ordered 5 SCR modules, each SCR module has tow SCRs wired in series, I'll wire all three terminals in parallel and use one of each banks for each coil. -
Current Code
04/29/2014 at 16:33 • 0 commentsNow if you are looking at this remember I am a code noob, constructive criticism is highly encouraged.
Code:
#include <LiquidCrystal.h>
#include <EEPROM.h>
//variables
LiquidCrystal lcd(12, 11, 5, 4, 3, 2);
float time = 0;
unsigned long StartTime = 0;
unsigned long StopTime = 0;
float timer;
float gateD = 3.6; //distance between gates in inches
float gate = 0;
float fps = 0;
float seconds = 0;
int FireDelay; //second SCR fire Delay
int FireDelaySave = 0;
float Debounce = 50; //button debounce time
//pin states
int UpButtonState;
int DownButtonState;
int FireState;
int SaveButtonState;
int FireButtonState;
//pin labeling
const int Up = 30;
const int Down = 32;
const int Save = 36;
const int FireOne = 9;
const int FireTwo = 8;
const int FireButton = 31;
const int SecondCoilGate = 38;
const int SpeedTrapOne = 48;
const int SpeedTrapTwo = 50;
//EEPROM saving variables
int FireDelayAddress = 1;
int FireDelayMultiplierAddress = 2;
int FireDelayMultiplier;
void setup()
{
Serial.begin(9600);
lcd.begin(16, 2);
pinMode(FireTwo, OUTPUT); //Second SCR fire mosfet
pinMode(FireOne, OUTPUT); //First SCR fire mosfet
//digitalWrite(FireOne, HIGH);
//digitalWrite(FireTwo, LOW);
FireDelay = EEPROM.read(FireDelayAddress); //read FireDelay from eeprom
FireDelayMultiplier = EEPROM.read(FireDelayMultiplierAddress); //read multiplier from eeprom
if (FireDelayMultiplier != 1 | FireDelayMultiplier != 2 | FireDelayMultiplier != 3){ //1st boot up sequence if mulitiplier is not equal to 1,2, or 3, set to 1 and set default fire delay
FireDelayMultiplier = 1;
FireDelay = 500;}
if (FireDelayMultiplier == 1){
FireDelay = FireDelay;}
if (FireDelayMultiplier == 2){
FireDelay = FireDelay * 10;}
if (FireDelayMultiplier == 3){
FireDelay = ((FireDelay * 2)*10);}
}
void loop()
{
digitalWrite(FireOne, LOW);
digitalWrite(FireTwo, LOW);
if (digitalRead(Up) != UpButtonState) //Up Button Code
{
UpButtonState = digitalRead(Up);
if (UpButtonState == HIGH)
{
FireDelay = FireDelay + 20;
lcd.clear();
lcd.setCursor(0,1);
lcd.print("Fire Delay");
lcd.setCursor(11,1);
lcd.print(FireDelay);
lcd.setCursor(14,1);
lcd.print("uS");
delay(Debounce);
}
}
if (digitalRead(Down) != DownButtonState) //Down Button Code
{
DownButtonState = digitalRead(Down);
if (DownButtonState == HIGH)
{
FireDelay = FireDelay - 20;
if (FireDelay < 0) {
FireDelay = 0;
}
lcd.clear();
lcd.setCursor(0,1);
lcd.print("Fire Delay");
lcd.setCursor(11,1);
lcd.print(FireDelay);
lcd.setCursor(14,1);
lcd.print("uS");
delay(Debounce);
}
}
if (digitalRead(Save) != SaveButtonState) //save Button Code
{
SaveButtonState = digitalRead(Save);
if (SaveButtonState == HIGH)
{
if (FireDelay < 260) {
FireDelayMultiplier = 1;
FireDelaySave = FireDelay;
}
if (FireDelay <= 2500 && FireDelay >= 260) {
FireDelayMultiplier = 2;
FireDelaySave = FireDelay / 10;
}
if (FireDelay <= 5000 && FireDelay > 2500) {
FireDelayMultiplier = 3;
FireDelaySave = ((FireDelay/10)/2);
}
EEPROM.write(FireDelayAddress, FireDelaySave);
EEPROM.write(FireDelayMultiplierAddress, FireDelayMultiplier);
delay(100);
lcd.clear();
lcd.setCursor(0,1);
lcd.print("Saved");
delay(1500);
lcd.clear();
lcd.setCursor(0,1);
lcd.print("Fire Delay");
lcd.setCursor(11,1);
lcd.print(FireDelay);
lcd.setCursor(14,1);
lcd.print("uS");
}
}
if (digitalRead(FireButton) != FireButtonState) //Fire Sequence
{
FireButtonState = digitalRead(FireButton);
if (FireButtonState == HIGH)
{
//delay(Debounce);
digitalWrite(FireOne, HIGH); //fire first SCR
while (digitalRead(SecondCoilGate) == LOW) {
} //wait until projectile trips gate
StartTime = micros(); //FPS measurment start
digitalWrite(FireOne, LOW); //turn first SCR off
delayMicroseconds(FireDelay); //delay until projectile is in the perfect spot
digitalWrite(FireTwo, HIGH); //Fire Second SCR
delay(1); //delay to give secoond scr to start up
digitalWrite(FireTwo, LOW); //turn second SCR off
while(digitalRead(SpeedTrapTwo) == LOW) {
} //First sensor was tripped, now wait for second sensor to trip
StopTime = micros(); //second part of FPS measurment
time = StopTime - StartTime; //time elapsed between gates
seconds = time / 1000000; //find feet per second, math
gate = gateD / 12;
fps = gate / seconds;
//Serial.println(time);
//Serial.println(seconds);
//Serial.println(fps);
lcd.clear();
lcd.setCursor(0,0);
lcd.print("Feet Per Second");
lcd.setCursor(0,1);
lcd.print(fps);
}
}
//delay(1000);
}
Coil Gun/Gaus Cannon
A device that uses electricity to propel a projectile at a significant speed.
 jeff.ballard.86