NES Zapper Video Synth Theremin
Using a light gun to interact with a video synthesizer and produce sound.
Using a light gun to interact with a video synthesizer and produce sound.
To make the experience fit your profile, pick a username and tell us what interests you.
We found and based on your interests.
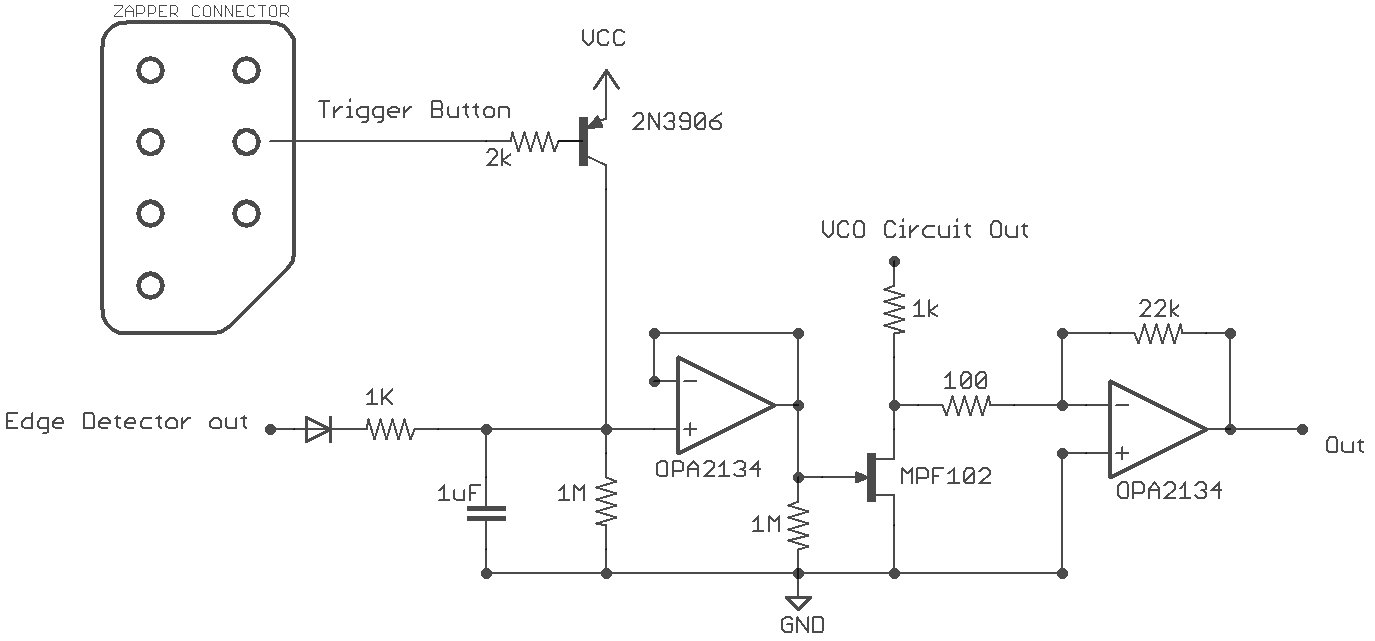
I really wanted to increase the audio->video->audio feedback loop effects so I built an audio amplifier that responds to the brightness of the area pointed at by the light gun. The rainbow video effect circuit takes input from the amplifier which produces another feedback loop.
This was the last step of the project and I hadn't done anything with the zapper's trigger button yet. I set it up to saturate the brightness input causing the amplifier to go full volume regardless of the light source.
The edge detector output is only on/off, it doesn't change in voltage levels based on the brightness of the monitor. It does give off more pulses per frame when the monitor is brighter because scanlines adjacent to the one it's pointed directly at give off enough light to produce a pulse. The first stage of this circuit generates an analog voltage based on pulses per frame by using each pulse to increasing the charge of a capacitor that is gradually discharging.
Project is complete. Here's me playing it at VIVO Media Arts.

I wanted the video output to respond directly to the X Y position values. This circuit uses two comparator window circuits to check when the X, Y voltages match the voltages in the corrosponding ramp circuits. I was expecting this to produce a crosshair, but there was a problem: When moving the gun from side to side the crosshair was always a few inches to the right. This is because of some delay between the zapper's phototransistor detecting the raster beam and the signal making it all the way to the sample-and-hold triggers. It's only a problem with the horizontal position because the vertical is a much slower signal.
I solved this by adding a 555 in astable mode and resetting it on window circuit output. The 555 outputs several vertical lines that move left and right in unison. The point where the 555 is reset doesn't matter so long as it moves linearly with the light gun. position
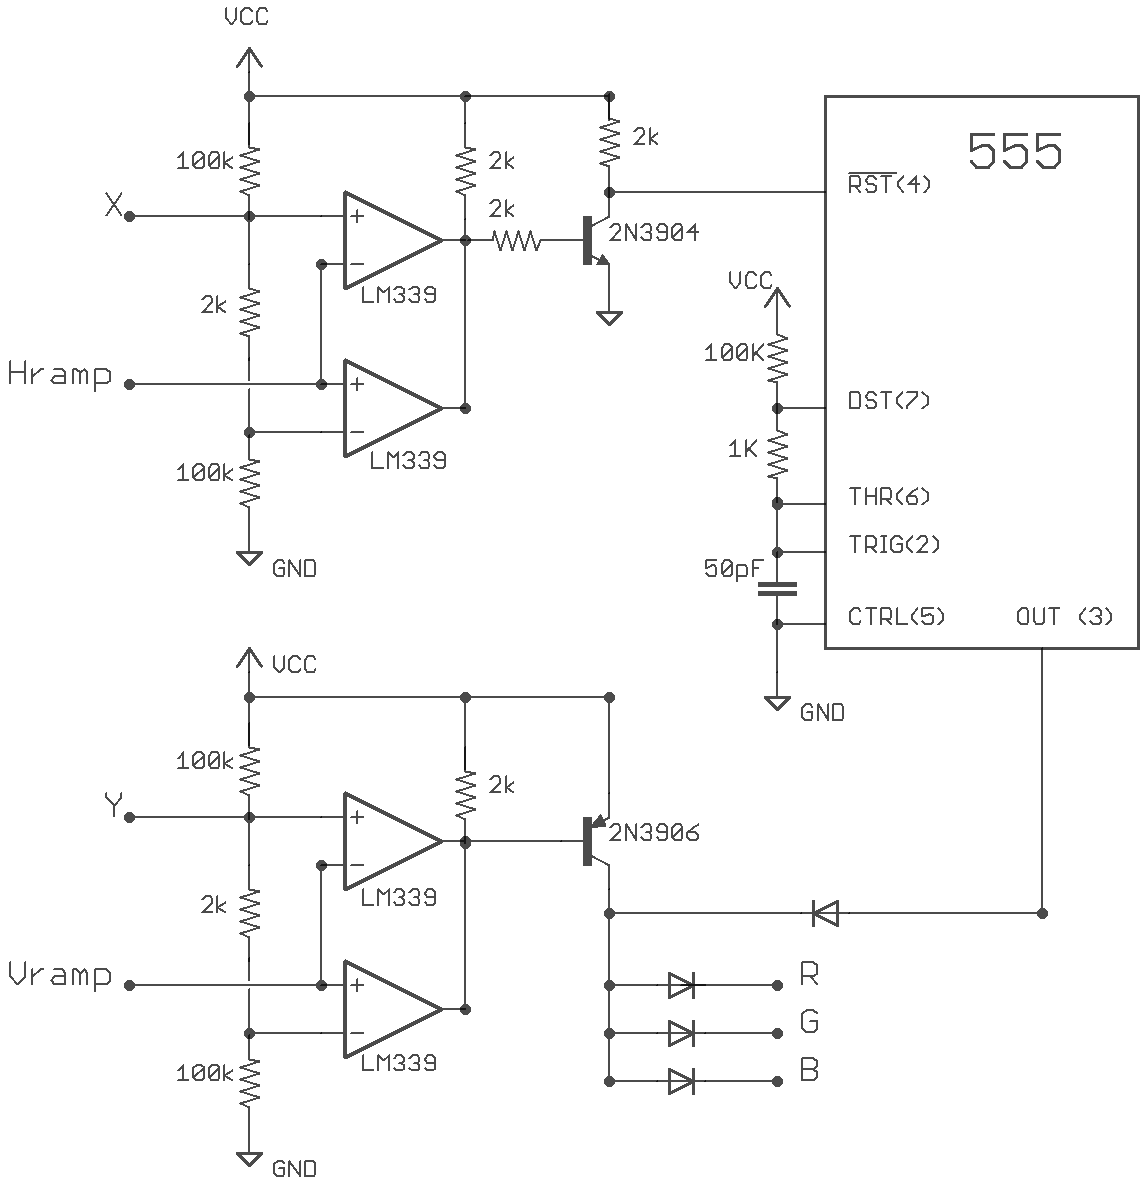
The diodes at the final stage of this circuit allow the lines to be white without tying the R G B wires together and killing the rainbow effect.
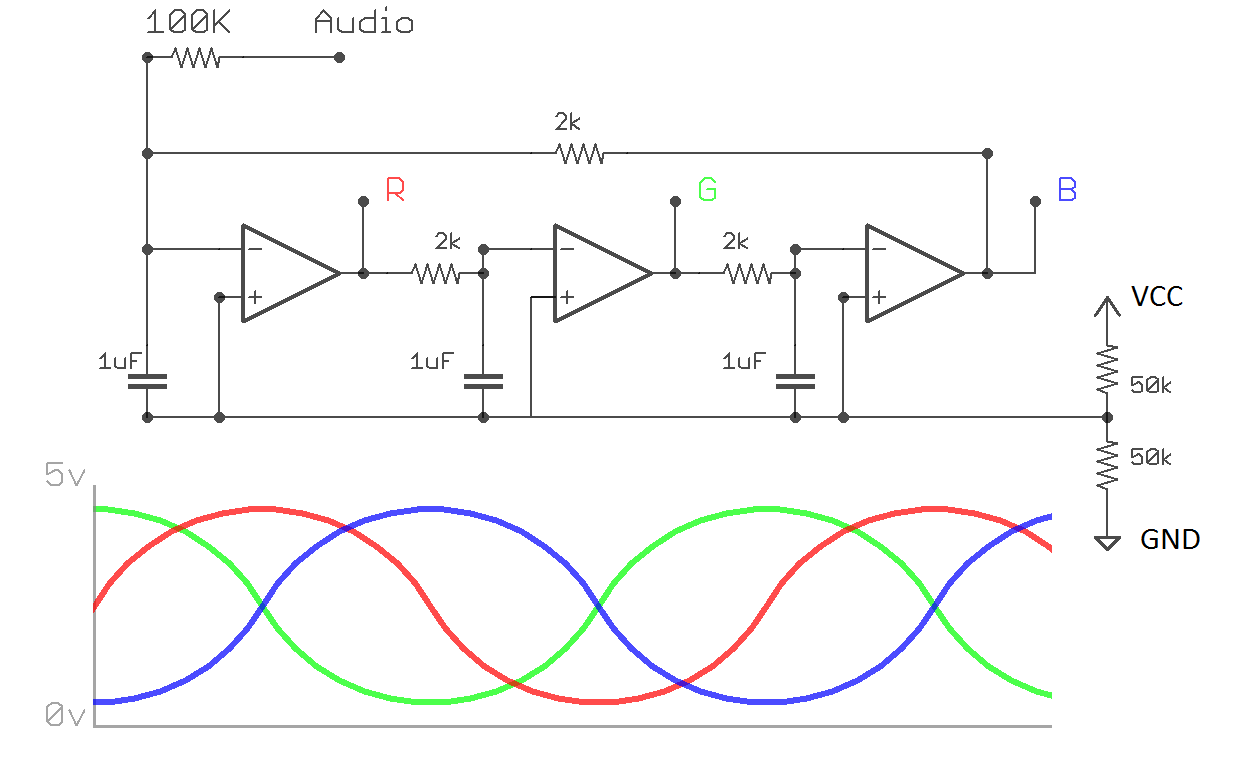
The rainbow-phase-shift circuit built in the previous step gets distorted by the output of this circuit.
I wanted a bright colourful video output that responds to the audio. What I came up with was a phase-shift-oscillator. It produces three sin waves each 120° out of phase with each other. This produces a rainbow effect when applied to the R,G,B inputs. The circuit produces vertical rainbow bars because it phase-aligns to the Hsync pulses due to a sympathetic oscillation with the porching circuit. By applying audio I can push the oscillation out of phase and produce responsive patterns.
I wanted to generate audio from the X and Y outputs. There are many voltage-controlled-oscillators that would have worked, but the VGA signal generation only used two of the four NAND schmitt gates in the 74HC4093 so I'm forming two VCOs with the remaining two gates.
The circuits use a rotary switch to change the base frequency by selecting the charge capacitor. A 10k linear potentiometer effects the range in frequency shifts created by the control voltage. The output can be square wave or sawtooth selectable by a switch. The square wave goes through a 1/3 voltage divider to bring its volume levels to the same range as the sawtooth.
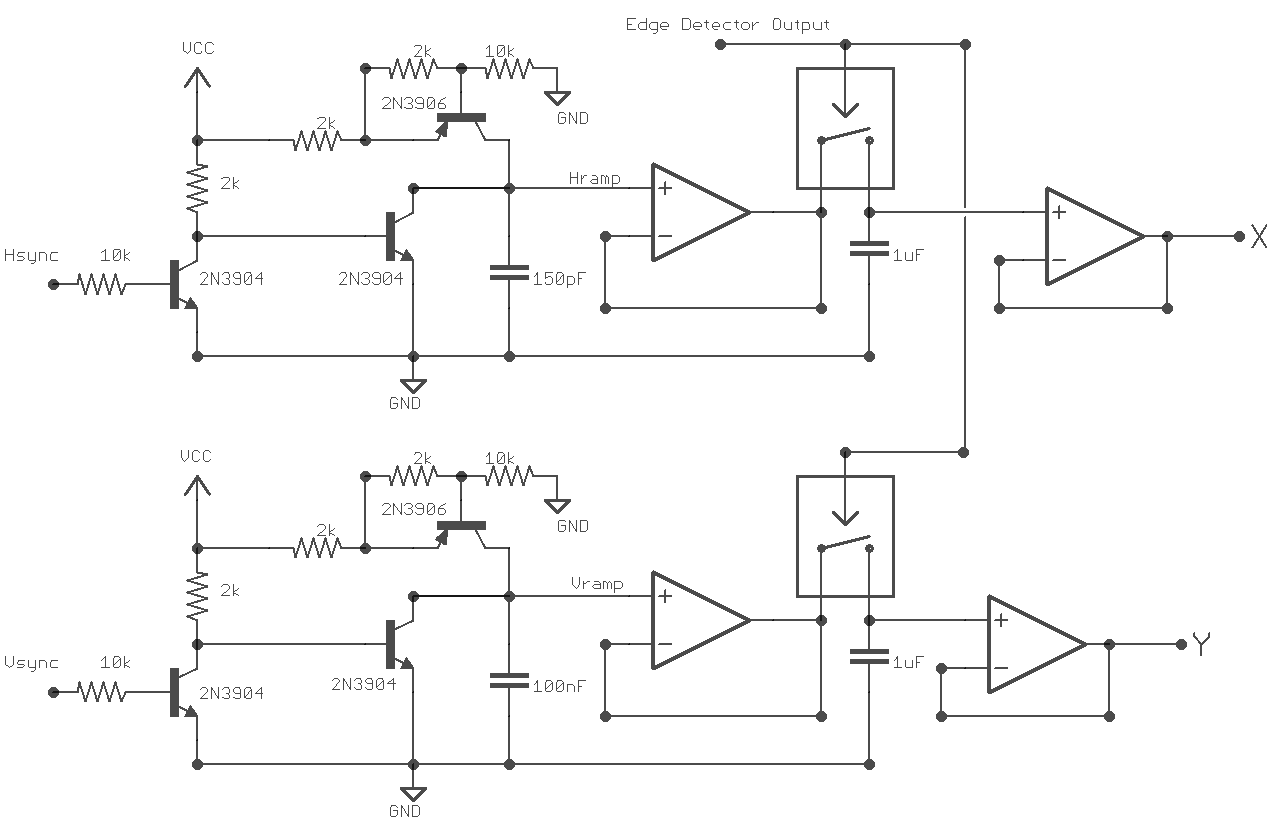
I'm assuming everyone knows how a light gun system works. That is not how this light gun system works. It works by generating two ramping voltages that follow the raster beam horizontally and vertically, then using two sample-and-hold circuits to store the ramping voltages when the zapper detects the raster beam. This produces two analog voltages that indicate the position of the zapper's aim on the monitor.
The ramp circuits use a 2N3904 trigger and a 2N3906 for current regulation. The current flowing to the ramp capacitors needs to be regulated to make the voltage across them rise linearly instead of the curved natural logarithm they normally exhibit.
The sample-and-hold is produced with another 74HC4066 quad analog switch and a TLC274 op-amp. I was originally using an LM324 op-amp, but I found it did a really bad job following the horizontal ramp. LM324 is an audio op-amp and the horizontal ramp frequency is much higher than human hearing.
scope showing Horizontal ramp. 5v between the scales..
Circuit showing the VGA signal generation, zapper edge trigger, ramp generators, and sample-and-hold.
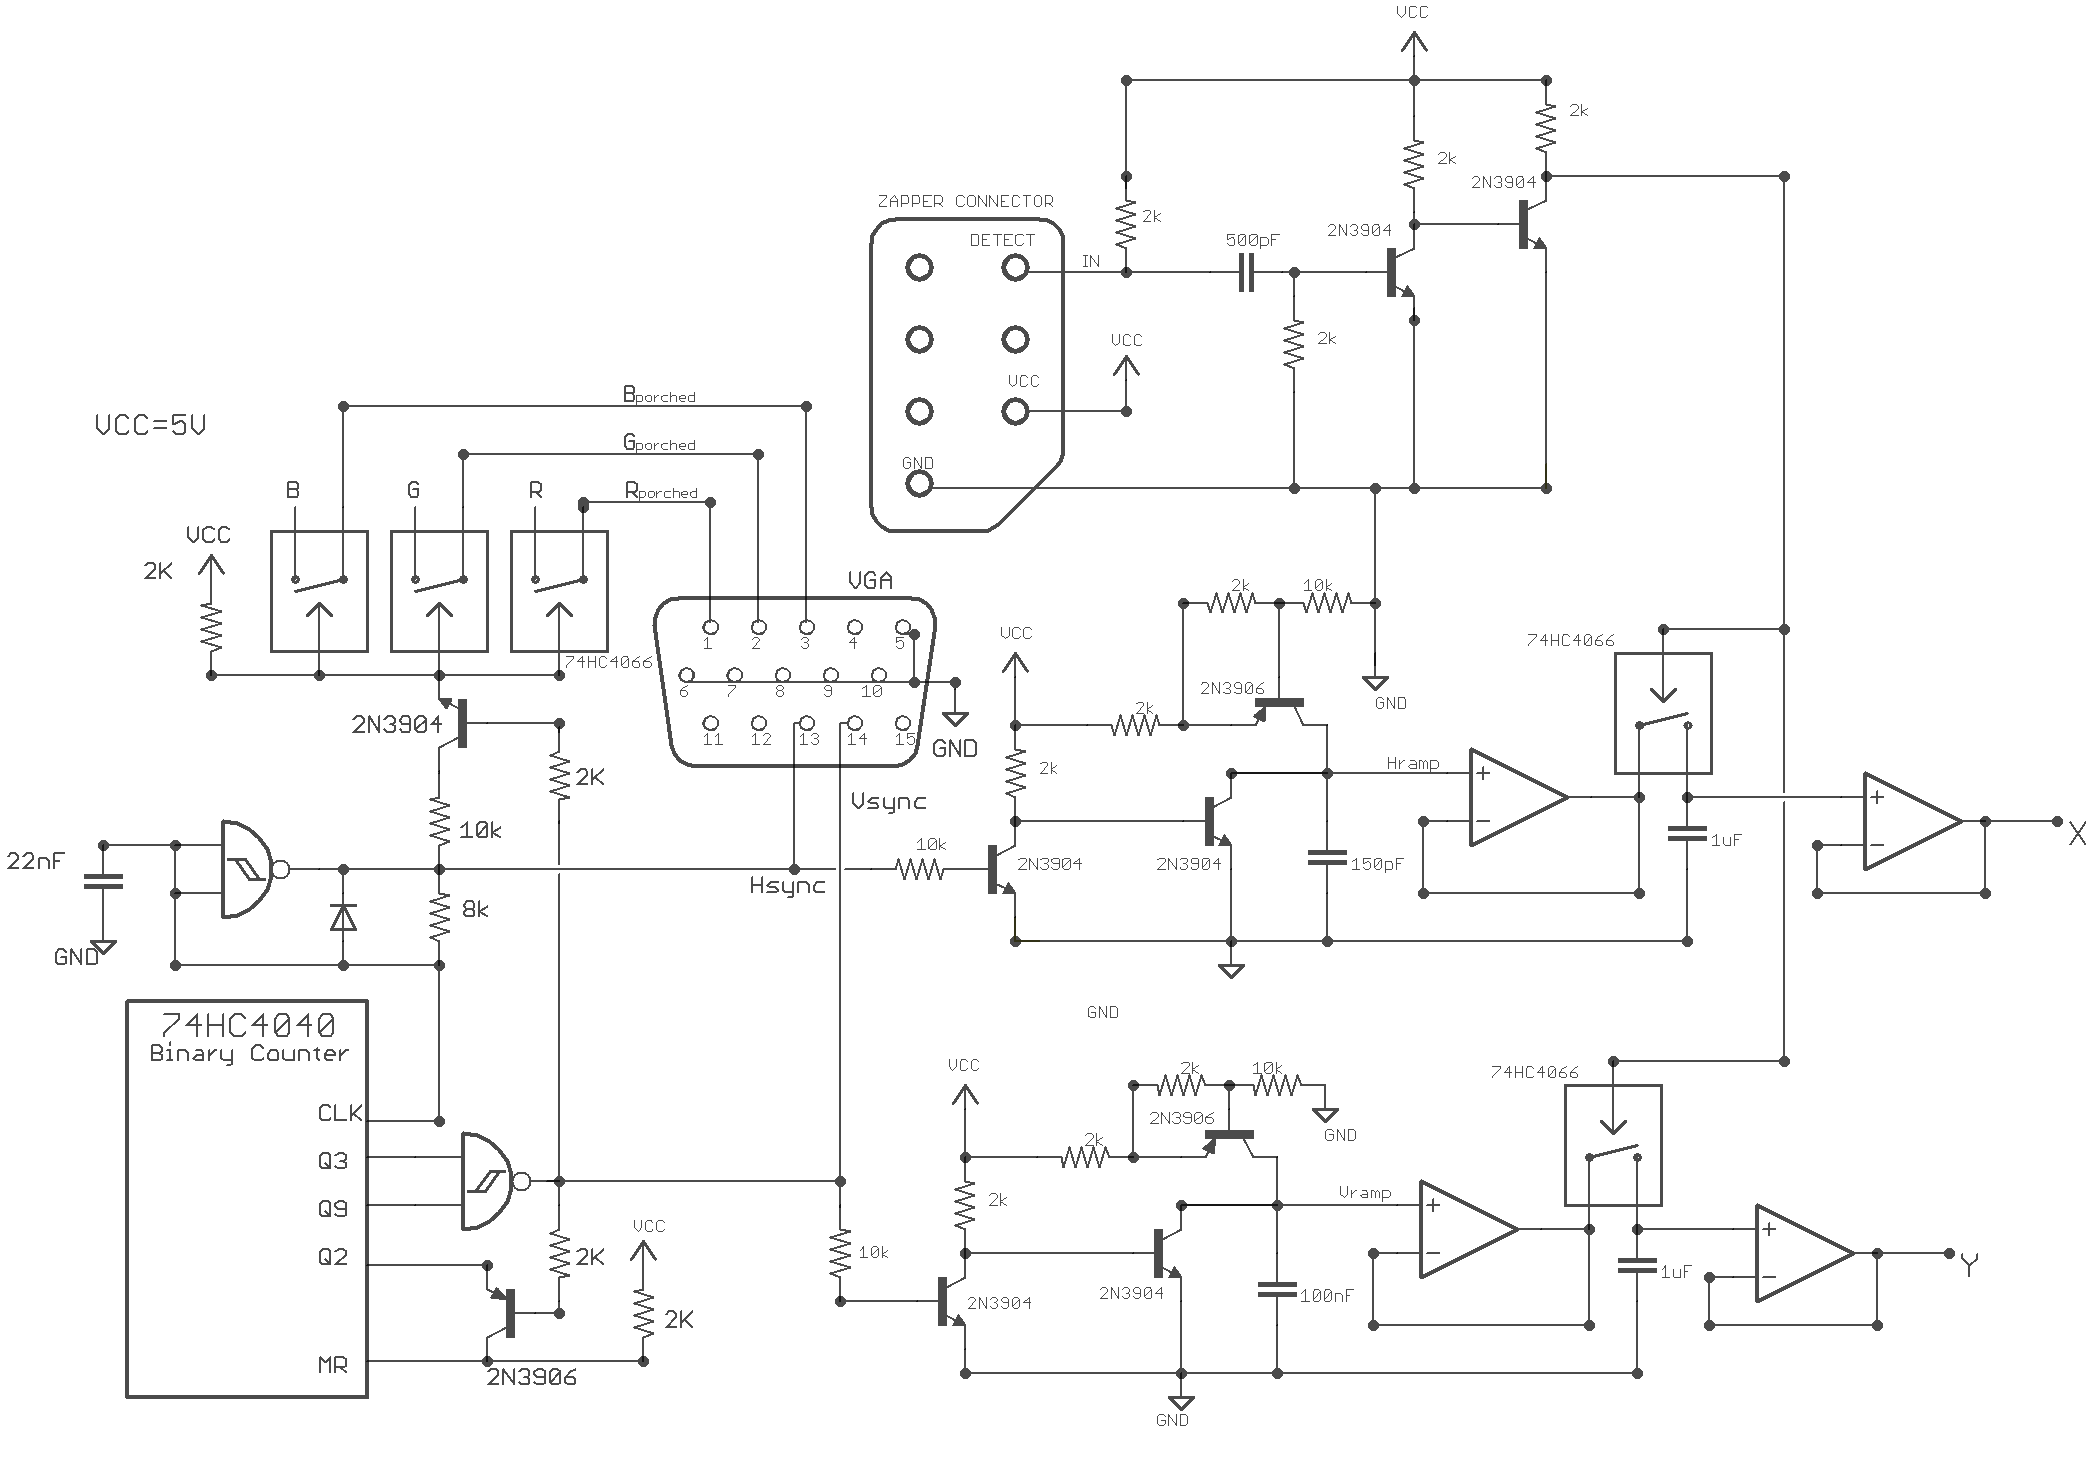
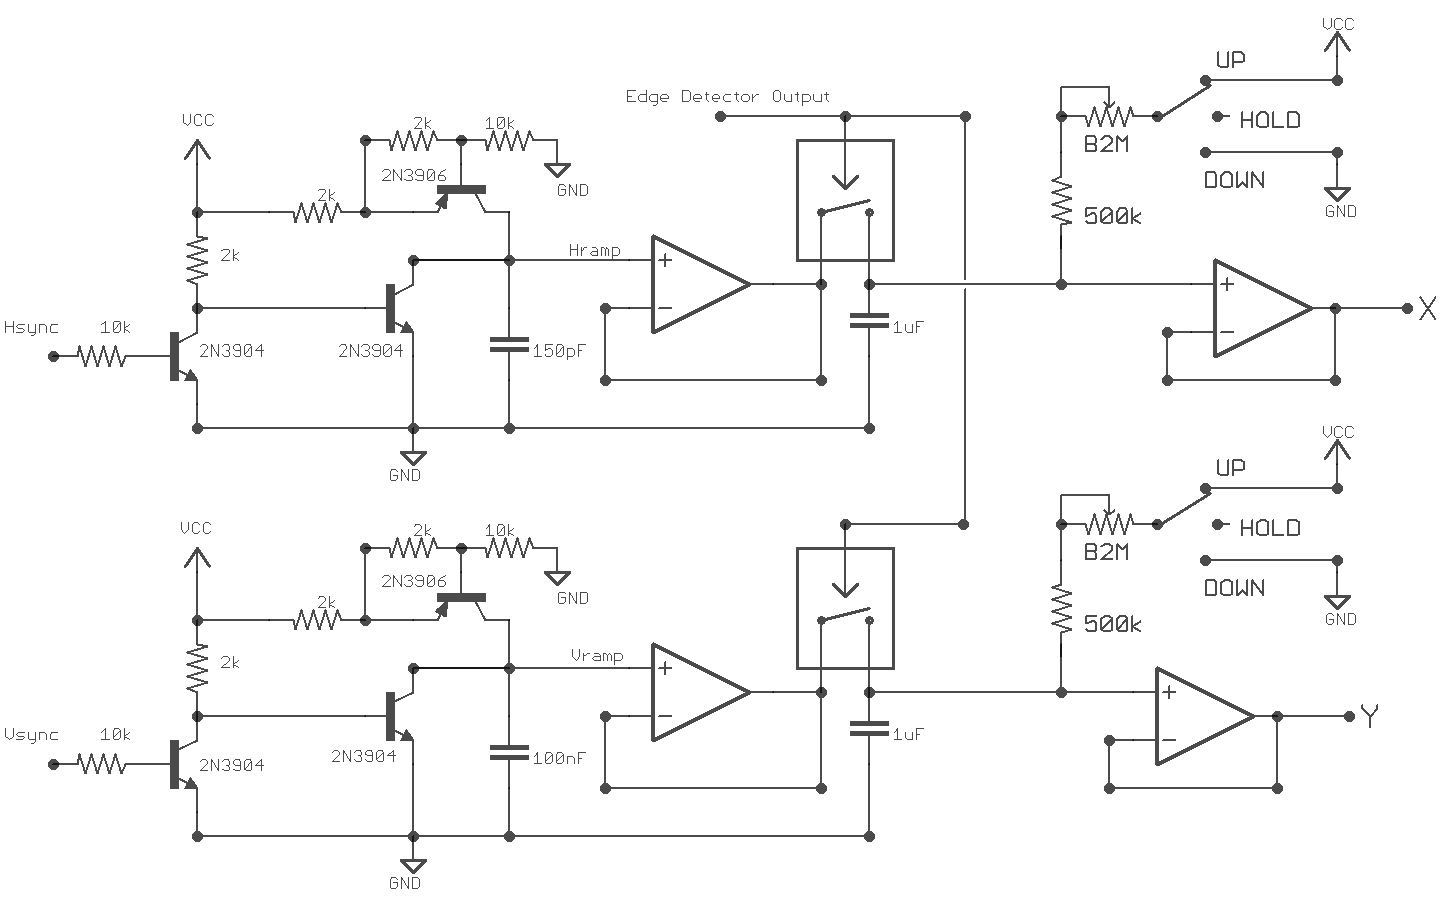
Next I added some additional controls to the sample-and-hold circuits. When the zapper is pointed at a dark area of the monitor or away from the monitor the holding voltage of each axis can remain unchanged, climb, or fall. This is selectable through a sp3t switch and the speed of the rise or fall is controlled with a potentiometer.
A higher control voltage results in a higher frequency from the VCO, which results in changes to the video output. The sample-and-hold output responds to a dark area of the screen differently than an illuminated one , so now there's a feedback loop that creates some very interesting sounds and video patterns.
With the Zapper modified I'm now able to get pulses out of its detector wire, but there's still a problem. The pulses are around 100 µs long which is about the time consumed drawing four entire scanlines. I need the pulse to be much shorter. You'll understand why later on.
The detector normally outputs high and pulses to ground so I built a falling edge detector which produces a pulse lasting about 1µs

After getting the monitor to turn on I pointed the zapper at the screen and started looking at the detector wire on an oscilloscope. To my surprise I wasn't getting any activity. At first I thought the zapper was broken, but after some research and hardware hacking I figured out the issue and fixed it.
With older light guns like those used by Atari 2600 and Sega MasterSystem you could cheat at any game by simply aiming at a bright light. The game console flashes a white rectangle over a target then thinks the light gun was pointed at the target because it picked up light. Nintendo didn't want it to be that easy to see the last level of Duck Hunt, so they designed the zapper to not be fooled by this trick. It only responds to flashes lasting about a millisecond so it will not be fooled by a static light source.
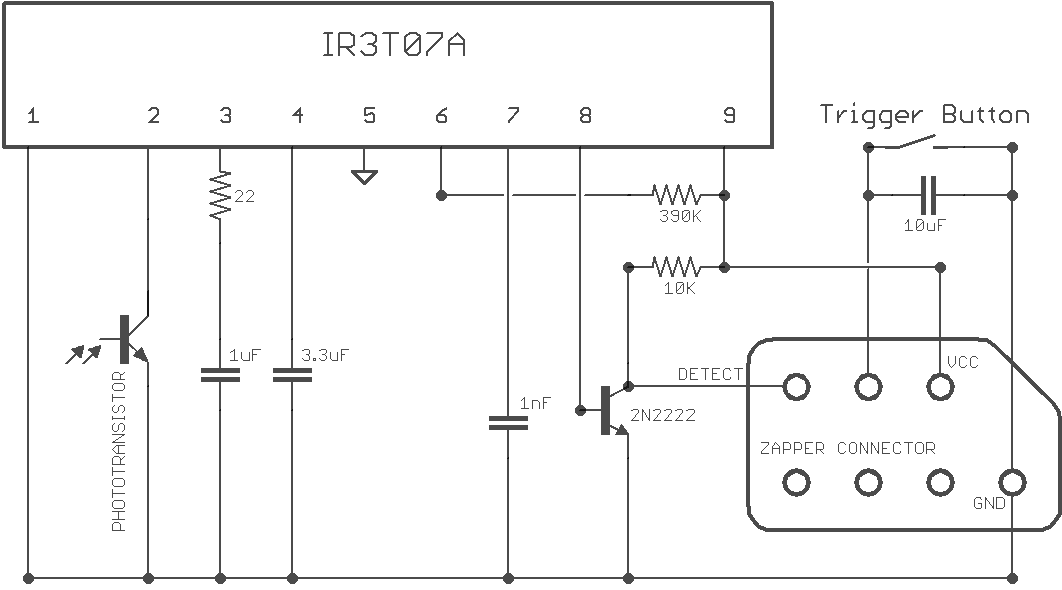
I opened up the light gun and drew out the circuit found inside. As you can see almost all the light detection work is done by an IR3T07A chip. I was unable to find any datasheets for this chip so I started poking around and trying to find a way to get the zapper to respond to static light sources instead of just flashes.
I eventually discovered I could get the results I wanted by removing the 1nF capacitor from the PCB. Strangely the light gun still doesn't respond to being pointed at a lightbulb, but it does respond to the CRT monitor. I think the 1nF capacitor sets the acceptable light flash duration. Removing it leaves a couple pF between the PCB traces, which makes the invisible 60Hz flicker of a CRT monitor acceptable, but not a static light source.
The monitor wasn't producing very bright colours in the previous step because I haven't implemented porching. In a VGA signal the R,G,B wires are supposed to be at 0v (Black) during the period where the raster beam is moving into position after the sync pulses.
Not all monitors respond to bad porching the same way. My monitor tries to automatically adjust brightness by using the 0v it expects during the porch as a reference which is why it's showing dim faded colours. Some monitors will show streaks across the display because the electron gun is firing when it shouldn't, some monitors don't care and generate porching internally based on the Hsync and Vsync pulses, and some monitors will completely shut down if porching isn't perfect because some assholes though that was good error-handling.
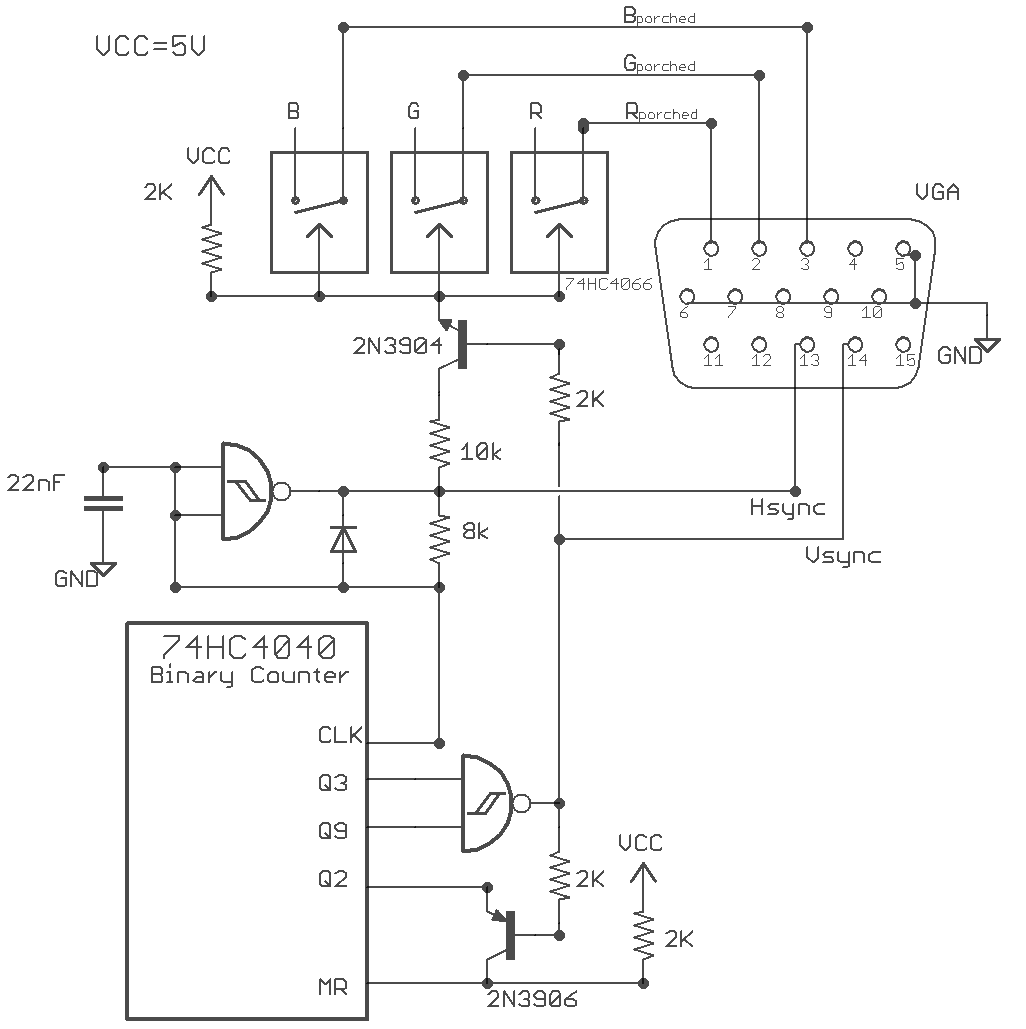
I implemented porching with a 74HC4066 (quad analog switch). The R,G,B signals run through the switches. The switches stop the R,G,B signals from reaching the VGA connector during the porch time.
I took some major liberties with the porching. The signal is only porched during the HSync and Vsync pulses. It's supposed to start shortly before the sync pulses and persist shortly after. The circuit works great with my monitor, but I can't guarantee it will function universally.
Monitor showing nice bright colours with porching implemented.
A VGA signal has two wires for Hsync and Vsync. Hsync is a short pulse that goes off at the end of a scanline to tell the raster beam to go back to the left of the screen, drop down a pixel, and start drawing a new scanline. Vsync is a longer pulse that goes off when the raster beam is in the bottom right corner to tell it to move to the top left corner and start drawing the screen again from the beginning. The sync signal timing must be constant and match the VGA standard.
I decided to use a 640x480 60Hz signal.
*the 640 is pretty meaningless to this project because an analog video synth doesn't use horizontal pixels.
I could have taken the Sync signals from my computer's VGA output, but I wanted this project to be self-contained. I've generated VGA signals with microcontrollers and FPGAs in the past, but I've been relying on those too much lately and decided to do it in discrete logic this time. I put a lot of thought into keeping part count and complexity down and realized I could do everything with a 74HC4093 (Quad 2-input NAND schmitt) and a 74HC4040 (Binary Counter).
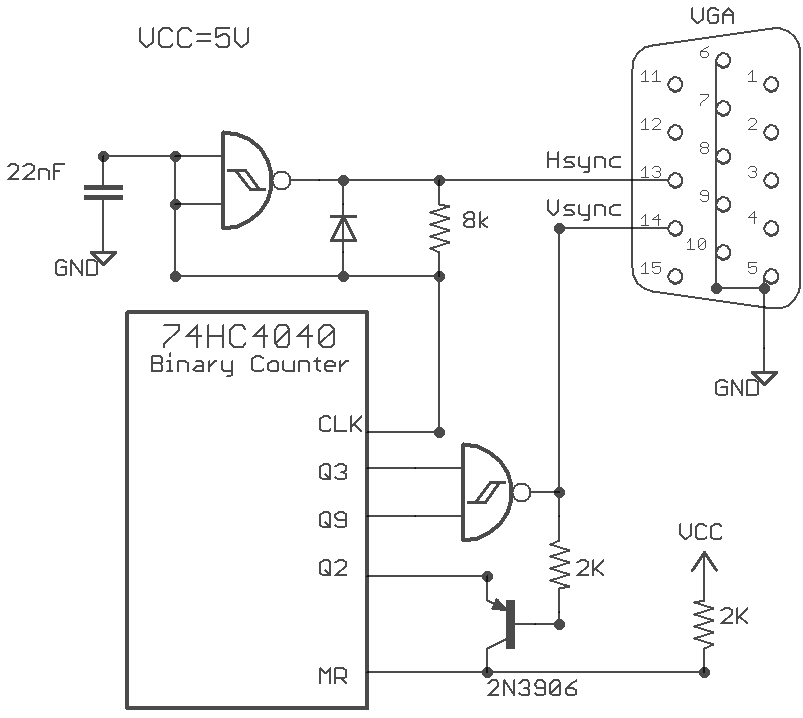
The Hsync pulse is generated by producing a Schmitt relaxing oscillator with one of the 4093's gates. The HSync pulse of a 640x480-60hz VGA signal has a frequency of 31.5 kHz. The signal is normally high, and pulses low for 3.8µs. In my circuit when the gate output is high it travels through the 8k resistor and charges the 22nF capacitor. When the 22nF capacitor is charged to 2/3 Vcc the gate output switches to low then very quickly discharges the capacitor to 1/3 Vcc and starts the cycle over again. I could have put a resistor in series with the diode to control the width of the low pulse, but no resistor was very close to the ideal 3.8µs.
The Vsync pulse needs to go off every 525 Hsync pulses. It's not 480 because there are 45 extra hidden lines in a VGA signal used to give the raster beam time to get into position. I use a binary counter to count the Hsync pulses. After 520 Hsync pulses the Vsync pulse is activated. After 524 pulses the counter resets which turns of the Vsync pulse. This logic is implemented with one of the NAND schmitt gates (behaving like a regular NAND) and a PNP transistor.
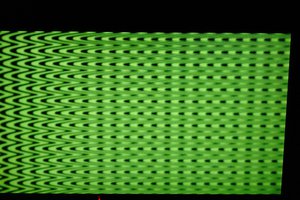
With this circuit I can get the VGA monitor to turn on. The horizontal bars in this image are produced by running some of the binary counter's outputs to the RGB VGA inputs. The bars are very faint because I haven't implemented porching yet.
See the build log.
Create an account to leave a comment. Already have an account? Log In.
Awesome! Old school, noisy, and well-executed. Kudos!
Become a member to follow this project and never miss any updates
 roberts.trops
 Russell Kramer
 Zach Armstrong
Awesome!