-
MQTT/openHAB - Resolution
05/01/2016 at 01:56 • 0 commentsSo just what was the problem w/ my openHAB-MQTT integration? Turns out, I was just too tired and too tied into the project at the time to see the problem; needed time away from it to clear my head, slow down, read a bit closer, and think it through. In short, I had made mistakes in the openhab.cfg file and in my syntax in the item/sitemap files.
Troubleshooting - Confirm mosquitto is working correctly
I searched Google for openhab and mqtt problems, and use this forum post to confirm my Mosquitto installing was working as expected: https://www.raspberrypi.org/forums/viewtopic.php?f=28&t=125532
On openhab.local
mosquitto_sub -h localhost -v -t "\$SYS/#"

mosquitto_sub -h localhost -v -t test/topic &
mosquitto_pub -h localhost -t test/topic -m "hello"
On gdoPi.localmosquitto_pub -h openhab.local -t test/topic -m "hello from gdo"
If you see message from gdoPi show up on openhab, its mosquitto is working just fine. Can also check that it works both ways by having gdoPi subscribe to a message topic, and then have openhab publish to said topic. The key thing to notice here is that the -h sets which host is acting as broker; so both need to be pointing to same one. For my setup, I want openhab.local to be broker.Troubleshooting - Correct openHAB configurations
Now that I was confident mosquitto was working correctly, I moved onto openHAB's MQTT binding. The big thing here was rereading openHAB wiki closely on MQTT binding, openHAB Items syntax and openHAB sitemaps syntax. Then use one of their examples and see if the message comes across on mosquitto CLI as seen above.
Configurations on openhab.local:
- /etc/openhab/configurations/openhab.cfg
mqtt:mosquitto.url=tcp://localhost:1883
mqtt:mosquitto.clientId=openha
- /etc/openhab/configurations/items/gdoPi.items
/* MQTT - Garage Door Opener RPi */ Switch relay {mqtt=">[mosquitto:/house/garage/gdoPi/doorRelay:command:ON:1],>[mosquitto:/house/garage/gdoPi/doorRelay:command:OFF:0]"}- /etc/openhab/configurations/sitemaps/gdoPi.sitemap
sitemap nest label="My House"
{
  Frame label="Garage Door Opener" {
	Switch item=relay label="Open/Close Garage Door"
  }
}
Testing & Debugging on openhab.local:
In new terminal window, execute:
tail -f /var/log/openhab/openhab.log
In another new terminal window, execute:
tail -f /var/log/openhab/events.log
In original terminal window, execute:
mosquitto_sub -h localhost -v -t /myhouse/#
Now in browser, go to http://openhab.local:8080/openhab.app?sitemap=gdoPi. Click on your switch a few times and watch what happens. Errors/Warnings/Info about what openHAB is doing and experiencing will be recorded in openhab.log. Event messages coming across the openHAB Event Bus will be recorded in events.log. We've already done the mosquitto thing, but this will tell us what we should expect to parse on the other RPi when ready.Confirm gdoPi.local can see events also:
mosquitto_sub -h openhab.local -v -t /myhouse/#
If all this is working, then openHAB is talking MQTT and both Pi's can sub/pub as well. Now just build up the code on gdoPi w/ relay and camera.
-
Project Conclusion - Beta Release
04/30/2016 at 21:32 • 0 commentsMonday, I went to bed thinking I'd have to give up on openHAB until another day and would just have to either A) get the web GUI to work LAN-only (w/ a follow-on security addition to use away from home), or B) convert the project to an all-SMS interface solution (text "open" and "close" for the system to respond.)
I was covered up with a long day at work Tuesday, but the options kept working through my head. I took Wednesday off to devote to this project, but before I got started, something was nagging me about having given up on the openHAB/MQTT solution too quickly. So I decided to start the day off by entertaining 30-min to tweaking around openHAB and MQTT to get it out of my system... about 1-1.5 hrs later I had it up and working! This then led to a number of break throughs most of the morning, and by evening I had things pretty well ironed out "on the bench" and was ready for installation in the garage.
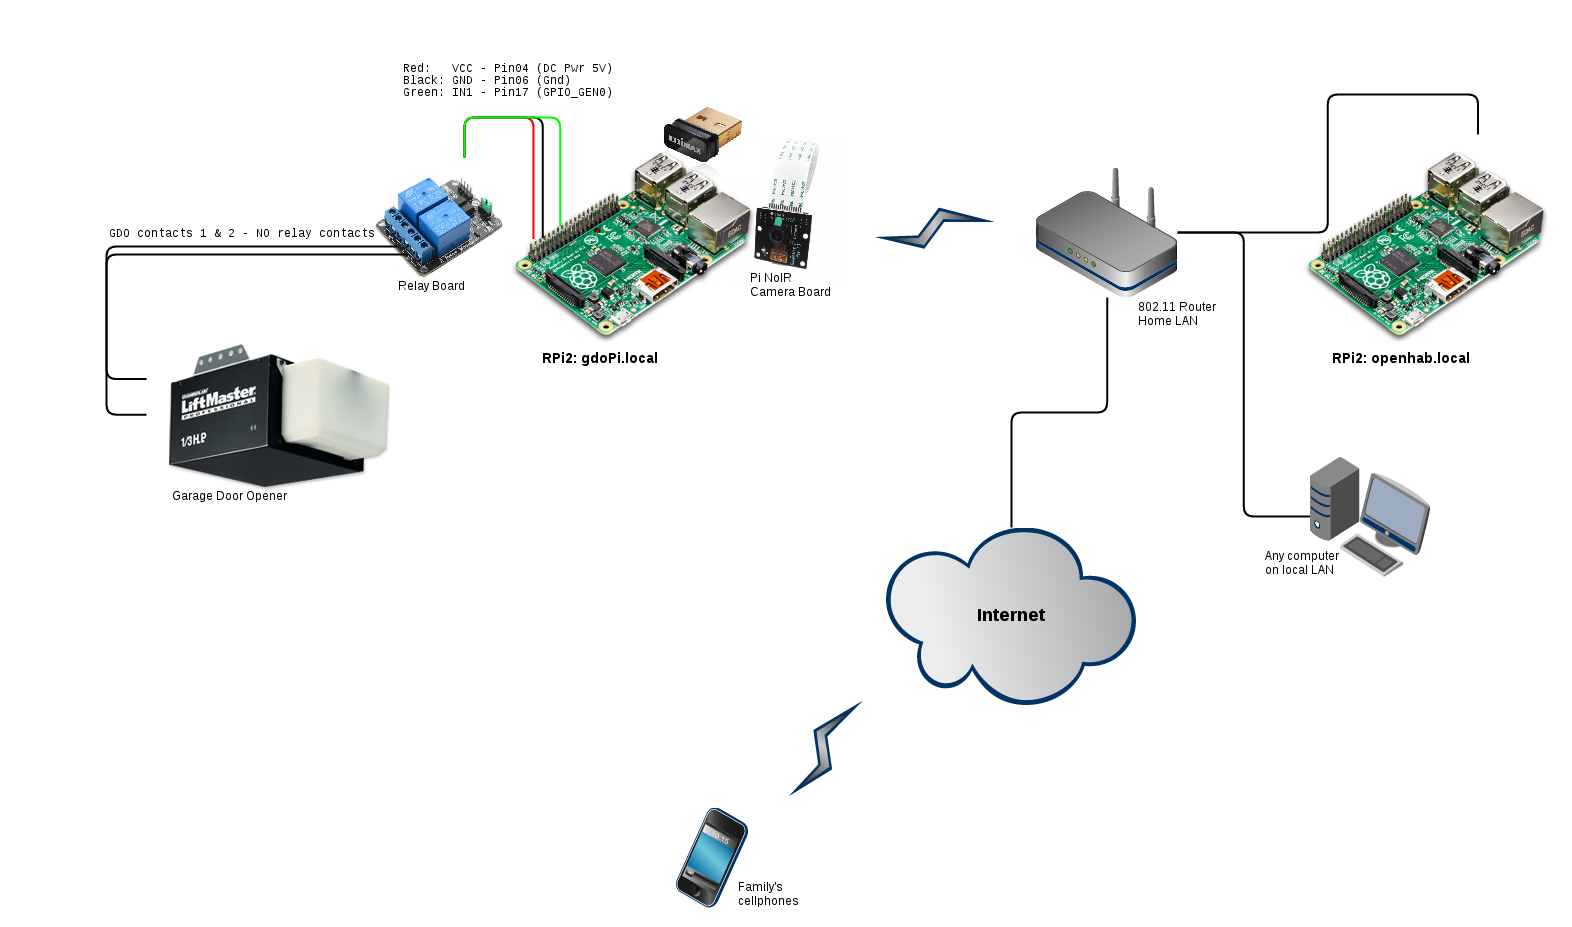
Anyway, the beta release is now installed and functioning. I'm calling it "beta," b/c while it is functioning and stable, I am finding moments when there's a delay in delivery due to all the wireless communication links and synchronizations that must occur, plus the software is not as refined as I'd like. All that, and I still have a few remaining Phase 2 & 3 components I'd like to integrate over time plus I've thought of a few more improvements to refactor into the design in the coming months.
Here's the high level architecture diagram.
![]()
-
Custom Web GUI vs openHAB/MQTT... also piCam
04/25/2016 at 22:51 • 0 commentsIn desperation to try to get this project functional and ready for install by the end of April 2016, I have been bouncing back-n-forth a bit on trying to complete the Baseline (Phase 1) as-is vs. mushing major components from Phases 2&3 into a refined baseline. In other words, if I could get openHAB working, I wouldn't need to develop my own web interface or certain aspects of web security as it provides those for me. Not only that, but I would gain the expansion capabilities of a full-blown home automation backend to grow. I could also provide some additional sanity checks by ensuring I get text notices on my/wife's phones whenever the system is used to trigger the garage door--just in case someone did hack in, or if I had a floating pin problem, etc.
Web GUI
Why I hate the web GUI component of this project...
Over the course of this project, my biggest frustration has been trying to recreate multiple projects' web interfaces to control the RPi GPIO. I have many years of on-again-off-again experience w/ both static and responsive web design and manually coding in HTML4/5 and CSS2/3. However, I somehow never got around to truly learning the depths of Javascript or its multiple spin-offs, so unfortunately this hurts me when trying to troubleshoot some of the more complex dynamic web designs used in many of these sample projects.
On the flipside though, I know from experience that properly coding a webpage to "look right" on multiple web browsers (and especially nowadays on multiple devices w/ varying screen resolutions, input methods AND running multiple browsers) can be very time-consuming. This is why I was really hoping to find a good existing framework to remove a lot of that overhead work and yet provide a clean, responsive, secure, and robust web interface that was still flexible and simple enough to modify to interface w/ the needed RPi GPIO code layer.
When trying to recreate projects I had found similar to mine, I did my best to follow their instructions, but I found the instructions were either:
- Lacking in enough detail to complete all the steps, or
- So dated that the underlying software packages were outstripped by current releases, or
- So dated that the underlying frameworks' projects had died (I'm looking at you WebIOPi!), or
- Too complicated/complex to meet my requirements to be long-term, easily sustainable.
- (or some combination of these)
However, there were two that I was able get to mostly interact w/ my Pi's GPIO to trigger the relay, and of those, only the following Instructable was completely repeatable. It was also simple enough for me to easily modify for the triggering behavior I desired for the relay to imitate a momentary button push. However, while it was a rather ingenious design for the purpose the author was implementing, it ultimately was not ideal for the components and look-n-feel I was after.
WebIOPi, node.js, javascript, jQuery, PHP...?
So, I spent much of the weekend digging through which new framework(s) I could learn from scratch quickly enough to turn this project around. I dug through Adafruit, Instructables, Hackaday, Element14, MakeUseOf, various Google searches, etc. Again, WebIOPi came up a lot, too bad it's not supported any longer; also these projects all referenced older RPi models/Raspbian installs**. I spent some time trying out node.js and Jade; a lot of projects are moving in that direction. But it was going to take a bit more time than I had to learn and properly write a web server app w/ all the security features needed to open this up to access from across the Internet--probably something I'll want to learn eventually though.
**FOOTNOTE: Why does this matter? Granted, even if WebIOPi were still relevant, I could pretty easily tweak the code to match any changes in GPIO layout (26-pin prior to B+ models vs 40-pin on newer models). The bigger problem would likely be in major changes from Raspbian "Wheezy" to "Jessie"; this transition is a lot like moving from RHEL6 to RHEL7, the classic UNIX System V architecture has been superseded by systemd. So many of the software packages have been updated and the way the userland interoperates w/ kernel space is different. In other words, too many changes for a safe bet the instructions would still be repeatable on current hardware/software.
Pi Camera
During all this, I did expand my existing hack of "TheFreeElectron" 's webinterface to take a photo with the original (IR-filtered) RPi camera board and publish it to the webpage, but to see it, the webpage needed to be manually refreshed.
openHAB/MQTT
So, not being happy w/ my webpage hacking, I returned to openHAB exploration. I posted earlier how I got it installed on a second RPi2 and initially working w/ the Nest Thermostat bindings, but I'm still new to openHAB and having to learn its ways. I also had not yet determined how to "bind" a homemade project into the openHAB event bus.
MQTT
This is where MQTT comes in. It is a lightweight publish-subscribe messaging protocol for use on top of the TCP/IP. Multiple home automation projects are using it for IP based communications w/ homemade sensor networks. While I am familiar w/ the concept of pub/sub messaging protocols, I have never personally implemented one before. (At my previous job, I worked w/ some folks who were modernizing our system's architecture, and a key component to their new design was the utilization Data Distribution Service (DDS)--which is an open standard "machince-to-machine" middleware (m2m) for real-time systems.)
So, I started my foray into MQTT at the behest of the following MakeUseOf guide.
Aside: Formerly MQTT=Message Queue Telemetry Transport--"formerly" b/c historically the MQ came from IBM's MQ messaging queuing product line, but technically queuing is not required to be supported in the ISO standard.
Mosquitto & MQTT.fx
Anyway, I installed Mosquitto (open source MQTT client/broker set readily available in Raspbian repos) on both RPi's and decided to try and figure out what I would expect to see on the messaging layer. For that, I installed MQTT.fx on my Fedora workstation; it's free and came up regularly in my Google searches on beginner learning of this protocol. This is a Java based GUI MQTT client--think of it as something similar to Wireshark, but instead of listening in on IP traffic, you can listen in on MQTT messaging traffic and sub/pub to them as well; it also gives a good overall breakdown of the traffic data such as how many clients are currently subscribed to the broker, how many bytes of data transitioned the message bus, etc.
- MQTT.fx: http://mqttfx.jfx4ee.org/
In the end, I was successful in getting MQTT.fx to publish and subscribe to the Mosquitto broker on the OpenHAB RPi, but I could never get my OpenHAB configuration to publish onto the virtual MQTT bus.
After a frustrating few hours of trying to get MQTT w/ openHAB to work tonight, I'm torn where to go next. I don't know if the problem is because I'm using Mosquitto instead of Paha MQTT, or if I just don't understand something about MQTT or openHAB in general. Are my configurations for openHAB to talk to the Mosquitto broker wrong? Are my openHAB Items/Sitemaps files referencing MQTT bindings wrong? Am I just too tire to see the mistakes?
WHERE TO NEXT?...
I need to get something working by this weekend. The way I see it, I have 4 options:
- Continue in frustration w/ OpenHAB/MQTT
- Try openHAB w/ a different binding
- Revert back to web GUI frustrations and just get it working for now only internal to my LAN. Add the security for external access later.
- Try something new, and expand the Twilio capability to receive texts that trigger the GPIO in addition to just sending notifications out.
-
OpenHAB...getting there...
04/22/2016 at 22:18 • 0 commentsOkay... After a few hours of digging, trial-n-error, and frustration, I sorta' have some things working w/ my Nest Thermostat. Still some work ahead, but here's what I've done to get this far:
As stated earlier, I started w/ this article (but jumped around stuff like Samba; not a big fan of it or M$ Windows, and I don't need it since I'm running everything at home on Linux, Mac, or iOS): http://www.makeuseof.com/tag/getting-started-openhab-home-automation-raspberry-pi/
Also the Phillips Hue example didn't do much for me, so jumped at that point to OpenHAB's wiki on Nest Bindings: https://github.com/openhab/openhab/wiki/Nest-Binding
Steps:
(Steps 2 & 3 take about 20 minutes by themselves.)
- Fresh install of Rasbpian "Jessie" full version (includes Java stuff needed; OpenHAB is built on Java.)
- Ensure RPi's firmware up-to-date:
rpi-update - Ensure running latest software:
sudo apt-get update -y
sudo apt-get upgrade -y - Install OpenHAB runtime. (Not real keen on this since diverges from original project, but shortest path to proof of concept and all that; perhaps I'll rebuild from scratch once I get things working.)
wget -qO - 'https://bintray.com/user/downloadSubjectPublicKey?username=openhab' | sudo apt-key add -
apt-key add -
echo "deb http://dl.bintray.com/openhab/apt-repo stable main" | sudo tee /etc/apt/sources.list.d/openhab.list
sudo apt-get update
sudo apt-get install openhab-runtime
sudo update-rc.d openhab defaults - Correct ownership of files:
sudo chown -hR openhab:openhab /etc/openhab
sudo chown -hR openhab:openhab /usr/share/openhab - Start tracking log file in new terminal window:
tail -f /var/log/openhab/openhab.log - Confirm OpenHAB is running and webpage is ready to work (just missing the guts, so expect error listing.)
URL: http://raspberry.local:8080 - Download the demo site form OpenHAB.org, unzip, move files to where belong, correct ownership:
sudo cp -r configurations/ /etc/openhab
sudo cp -r addons/ /usr/share/openhab
sudo chown -hR openhab:openhab /etc/openhab
sudo chown -hR openhab:openhab /usr/share/openhab - Confirm it works:
URL: http://raspberry.local:8080/openhab.app?sitemap=demo - Now install Nest Binding Add-on (actually first downloaded latest stable from OpenHAB w/o thinking, then went back and grabbed from apt-get source added earlier in instructions):
sudo apt-get install openhab-addon-binding-nest
sudo chown -hR openhab:openhab /usr/share/openhab/addons - Copy openhab_default.cfg to openhab.cfg.
cd /etc/openhab/
sudo cp openhab_default.cfg openhab.cfg - Using the Nest-Binding directions, Convince Google to let you tinker w/ your own device:
- Register as a developer.
- Register your "product".
- Gather your nest:client_id and nest:client_secret codes.
- Use the Authorization URL to get your pin_code.
- Edit open.cfg: uncomment out the three lines of code for the data you just gathered under the Nest section, and add said data to those lines.
- Using Vim (sudo apt-get install vim -y) , copy code samples of nest.items and nest.sitemap from https://github.com/openhab/openhab/wiki/Nest-Binding and paste into new files w/ these names in their respective directories. Since I do not own the Smoke+CO alarm, left this extra code out. Also did the trick they used in copying existing icons to newly named representations for Nest controls.
- Change names of thermostat and references to item to match what was registered already w/ Nest account. In other words, their demo uses "Dining Room" and "dining_room*"; if your thermostat is name, "Yo Mama", then either edit manually or use something like this:
sed -i '/Dining Room/c\Yo Mama' /etc/openhab/items/nest.items
sed -i '/dining_room/c\yo_mama' /etc/openhab/items/nest.items
sed -i '/dining_room/c\yo_mama' /etc/openhab/sitemaps/nest.sitemap
(I would still recommend cat/less your files out to double-check yourself when done.) - Test and tweak...
NOTES:
- The log files will catch regular errors about "rrd4j" and and some other stuff related to the demo files installed. Once comfortable w/ demo stuff, best to get it off RPi (or at least out of the directories driving OpenHAB.)
- When rebooting, will need to start OpenHAB via CLI cmd: sudo systemctl start openhab; will fix this to autostart once get the bugs worked out.
- Webpage requires manual refresh to see changes you've made by clicking buttons. From what I understand, the smartphone apps are more auto-refresh responsive.
-
Phase 3+1 - OpenHAB
04/22/2016 at 15:16 • 0 commentsSo I got to looking more closely at OpenHAB and began to realize that if I could get that working w/ my RPi, it has the potential to meet both my objectives for Phase 1 viewing from website (plus readily available OpenHAB smartphone apps for iPhone and Android) as well as a major step forward into Phase 3 design objectives.
Not only that, but I finally caved on finding a quick solution for a web front-end that both functions and looks good. I did accomplish getting two different web page designs from other projects working or partially working but was never satisfied that they would meet my end-goal design requirements completely.
So... onward w/ OpenHAB. I've installed a fresh copy of Raspbian Jessie (full version 8) on a separate RPi2, and am initially following this guide for installation of OpenHAB: http://www.makeuseof.com/tag/getting-started-openhab-home-automation-raspberry-pi/
Wish me luck!
-
Web Interface Tweaks - Attempt #1
04/21/2016 at 20:29 • 0 commentsWebIOPi... Don't even bother!
Alright... frustration... just wasted at least an hour or so trying to get WebIOPi working on RPi2, only to learn that more or less the WebIOPi project is dead. Apparently the developer behind it was hired away by a company called myDevices to use WebIOPi as the backend for their product Cayenne. The developor, Eric Ptak, stated back on 1 Sep 2015 that "That’s a very good news for all of you as I have to work for the DIY and makers communities as a part of my new job position."
However, that was 8-months ago, and the project has not updated since. It was never updated for RPi2 much less the newest RPi3. In other words... DEADEND! If you'd like though, you could "Get Started for Free" on Cayenne, but I'm not risking getting half-way down that path and having to pay to finish my project nor do I wish to get shoehorned into a proprietary solution. One goal here is to be as open sourced as possible.
Next...
-
SMS Garge Door Status - Attempt #3
04/21/2016 at 18:00 • 0 commentsThis is part 3 of searching for an SMS notification solution. See SMS Garge Door Status - Attempt #1 of this project log for part 1.
Twilio.com
This is a company that a lot of various projects requiring SMS use. They not only provide SMS gateway service but offer options for tying voice, SMS, and/or MMS (Multimedia Messaging Service) into homemade projects and professional business services alike. It's much like what we used to have with Google Voice, but the downside is it isn't free. That said, it also isn't particularly expensive for what you get.
The "trial account" is free, but to send a text you'll have to upgrade to a paying account. To get started, that means prepaying a minimum of $20 and then adding a new phone number to it for $1/number. That leaves you w/ a $19 balance to charge each msg against. The going rate is not bad either: only $0.0075 per "text." So it should last me a while.
Twilio provides official API libraries/SDKs for PHP, Ruby, Python, C#, Java, Node.js, and Salesforce. They also link to community-provided libraries for Django, Go, and C++. It's REST API are protected w/ HTTP Basic authentication, requiring account SIDs and authentication tokens--this is one way of not only preventing someone else from boosting your account and burning your balance, but also a means to prevent the spamming problem that Textbelt is currently experiencing.
Anyway, I downloaded their sample PHP code, tweaked it a bit, and confirmed that works. Now I just have to integrate it into the rest of my project pieces.
Phase 2: Send SMS notification of new door status... CHECK!
Thanks to this project for first time I saw Twilio suggested...
http://www.instructables.com/id/Raspberry-Pi-SMS-Garage-Door-Butler/?ALLSTEPS -
SMS Garge Door Status - Attempt #2
04/21/2016 at 18:00 • 0 commentsThis is part 2 of searching for an SMS notification solution. See SMS Garge Door Status - Attempt #1 of this project log for part 1.
Google Voice
At one time there were solutions for using an RPi to text through Google Voice, but no more. Unfortunately, the wind-down of Google Voice includes them having already turned off the ability for generic third-party access like that. (Thanks again Microsoft for the roll you played Google's decision to shut Voice down!)
-
SMS Garge Door Status - Attempt #1
04/21/2016 at 15:31 • 0 commentsI'm getting a bit ahead of myself here, but I've devoted pretty much all day today to working on this project. Figured I'd pseudo-multitask: work on one area until I hit a roadblock, then attach another path; rinse-repeat, and eventually round-robin my way back to addressing each roadblock w/ a fresh sense of perspective.
So... here's one from "Phase 2"...
Texting via SMS
In Phase 2, I stated that I wanted the garage door to send me a Short Message Service (SMS) notification anytime the state of the garage door changes. Another thought I've had since then is it might be also be a good idea to send me a "text" when the door has been left open for more than say 1-hr. Rarely do we intend to leave it open long-term, so this would let us know we probably forgot and should maybe close it... BUT, it does NOT mean the RPi is going to automatically close it. Who knows, I might actually decide to clean out the garage one day over and would not want the door close on me prematurely.
SMS Services
Textbelt.com
So I thought I already had this one figured out, but not really a good solution for me at this point in time. A few months ago, I was working in the home office and desired to text my wife on other end of the house. (I know, lazy, right?) Unfortunately, I'd left my phone in the same bedroom where she was, so on a whim I quickly searched the web and found how to text from CLI for free using Textbelt.com.
It's really simple actually:
curl http://textbelt.com/text \
-d number=5555555555 \
-d "message=Hello, World!"
Unfortunately, when I tried it a week or two ago for this project, it returned a "success", but the message never got through. I thought it might be a system crash or something since it was a Sunday afternoon and no one around to fix it, and that I'd just try again later. Well, tried again this morning, and still no msg sent.
A quick Google search provided this: https://github.com/typpo/textbelt/issues/76
Turns out, the developer of this utility is traveling abroad and unable to fix this for a few days at least (already been 13 days since original bug issue filed.) The underlying problem is a known recurrence; from time-to-time, some jerk(s) will come along and abuse it to spam as many people as possible. When that happens, the mobile carriers (Verizon, AT&T, T-Mobile, etc.) block the Textbelt IP address, and thus the working-yet-dead service.
The easy fix is to change Textbelt's IP address, which he's done before. Unfortunately, I don't see that as a reliable long-term solution: it's already happened before; it's happening now; it'll happen again. I'm grateful this guy is offering this service for free, but if I want reliable notifications I need another solution.
One I would like to consider implementing later is to host my own Textbelt server--which is totally possible; his code is at https://github.com/typpo/textbelt open sourced and free for the taking. However, I don't have time right now to go off on a tangent project. Pin this one for a later date...
TextBelt (http://textbelt.com) is a REST API that sends outgoing SMS. It is available as a public service or as an internally self-hosted server. Textbelt uses carrier-specific gateways to deliver your text messages for free, and without ads. The service is fairly reliable and has sent over 1 million texts.
-
Phase 1 Nearly Done...
04/17/2016 at 21:00 • 0 commentsI know you're getting tired of hearing this (I'm certainly tired of having the excuse to give), but I was on business travel again all last week. Got back Friday afternoon and was able to spend some more time on this project Saturday. I hope I'm done traveling for a few weeks at least, so expect to see some significant updates this week and next.
In general, the RPi-triggering-physical-interface-w/-garage-door is ready. I spent Saturday walking through several projects' options of web interfacing, and part of this required me converting my Bash GPIO cmds to C-based WirePi commands to work right. Again, I keep seeing a lot of projects using multiple layers of web frameworks/languages, and unfortunately, very few so far do a good job of explaining the details of how to implement all the various pieces. I know some HTML5/CCS3, but I'm no expert in JavaScript, node.js, jQuery, WebIOPi, etc, and I don't really want this to become a big web programming project.
In the end, I have been able to get a simple web interface to trigger the relay from inside my LAN via web browsers on both iPhone and computer. So while I'm not quite happy w/ it yet, I have at least demo'd a working prototype. If I have time, I would like to incorporate a simple "take photos" or "stream live video" kind of thing during the operation of the door open/close transitions, but I don't want to get too bogged down on the web interface when I might be ditching it entirely for OpenHAB or some such thing anyway. We'll see...
Also, I received my SECO-LARM SM-226L-3Q Overhead Door Mount magnetic reed switch while I was gone.
At this point, to finish up Phase 1, I simply have to:
- Test out the reed switch and integrate it into the code.
- Finalize an initial-use webpage.
- Permanently mount/wire everything in the garage.
- Final integration testing.
Home Automation - Garage Door Opener
Extract best practices from existing garage door projects. Build version that suites my needs; eventually integrate into other HA efforts.