deʃhipu
-
This is not the robot you are looking for
03/15/2023 at 23:10 • 0 commentsApparently there are some rumors that this is a robot we are going to be building at a workshop in Berlin during the 2023 Hackaday conference. That is not true.
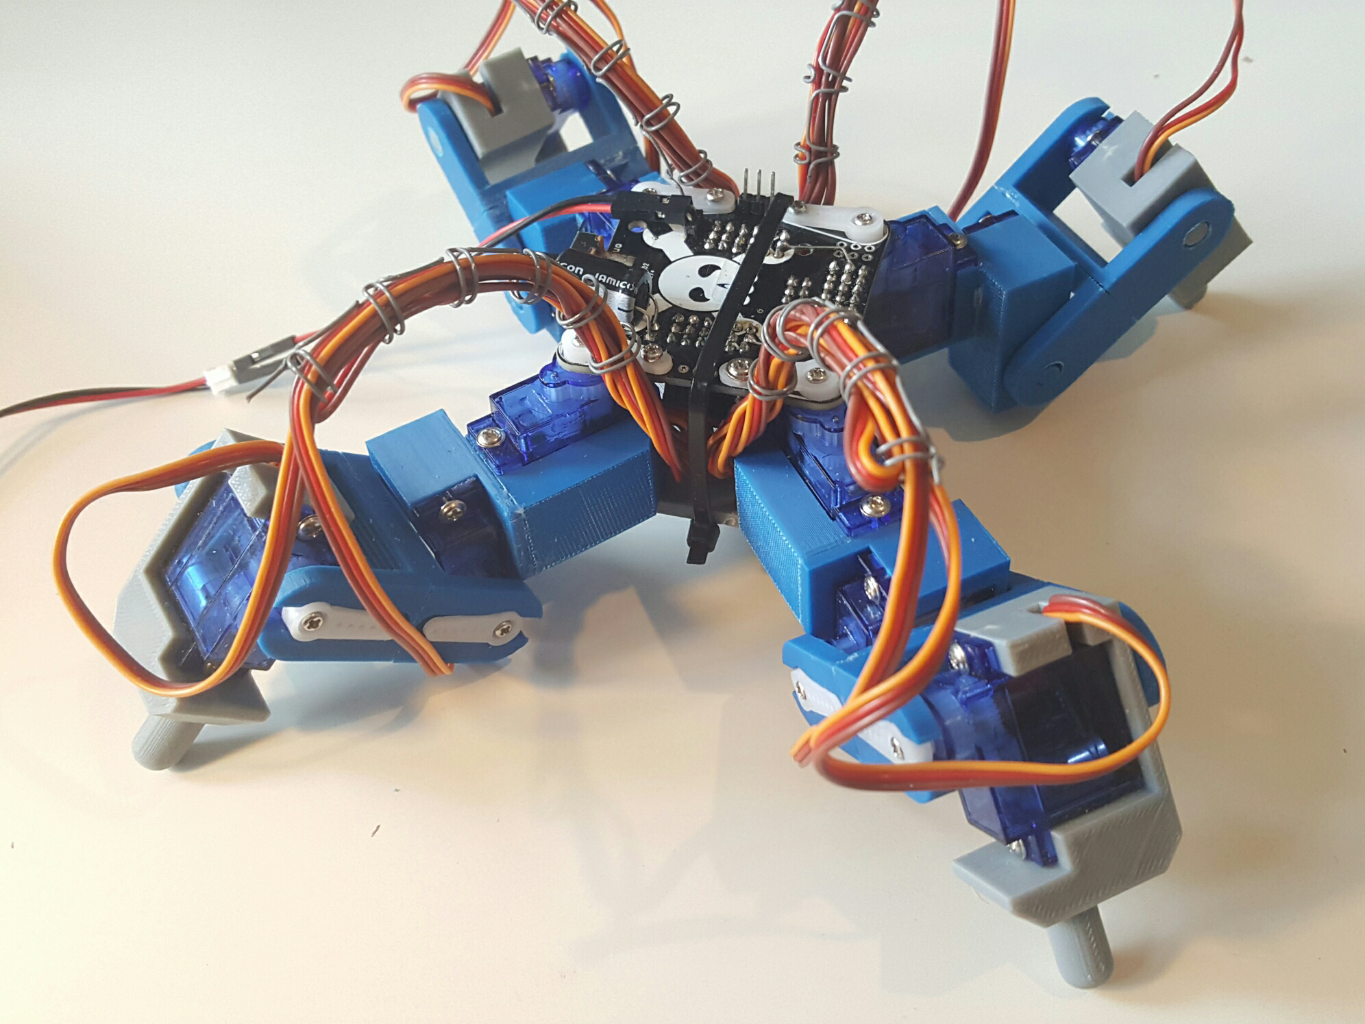
This is the robot we were building back in 2016 in Belgrade.
Yes, there is going to be a robot-building robot in Berlin, but we are going to be building #Fluffbug, which is a newer design with many improvements.
-
3D printed body
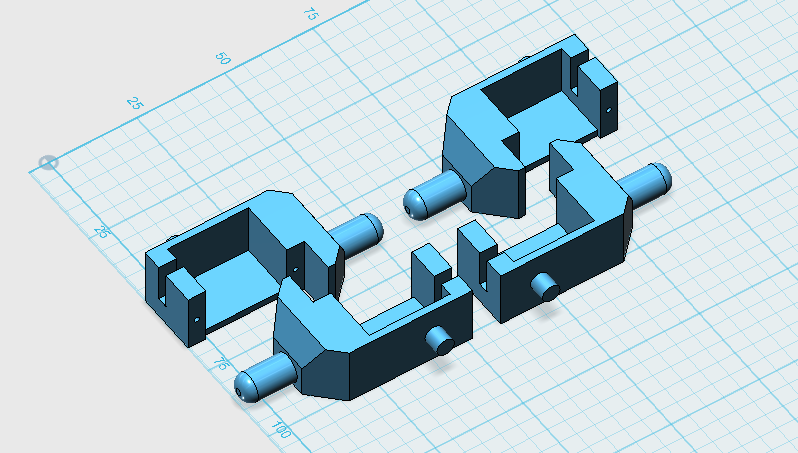
04/16/2016 at 14:20 • 3 commentsHey all, @davedarko writing. As you might have seen at the #Hackaday | Belgrade event - I've brought my Tote with 3d printed legs along to the workshop. There I was asked for the files and @Radomir Dopieralski told me I could share them in a log. It took me a while to chamfer some edges and fix the hip orientation of my design, but now I finally have all the parts in a presentable state. You can find the STL files for printing in the file section. The design files are made with 123D Design by Autodesk. That's the 3rd time I completely disassembled my Tote.
![]()
![]()
These are the hip parts, that you have to glue together. I've marked them with text so it is easier to spot how to glue them together. You will need 2 of each displayed parts.
![]()
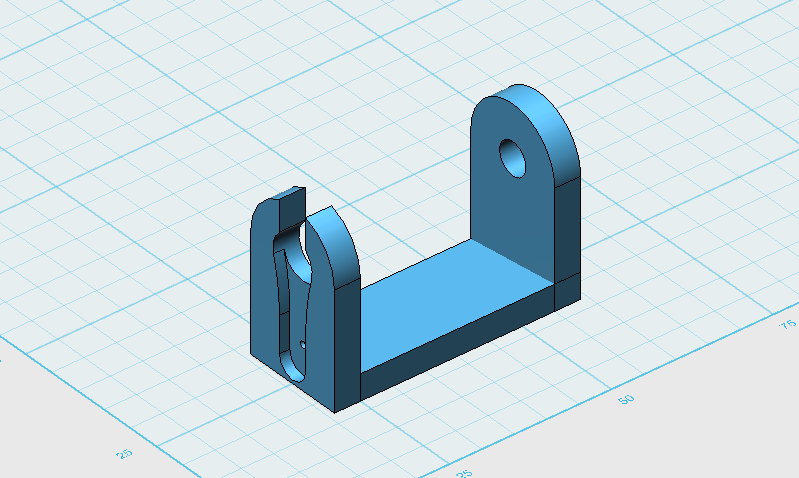
You will need to print two of each version of which there are two. These are the feet by the way.
![]()
Print the legs part 8 times and glue them back to back, so that the servo mounts are on the same side.
![]()
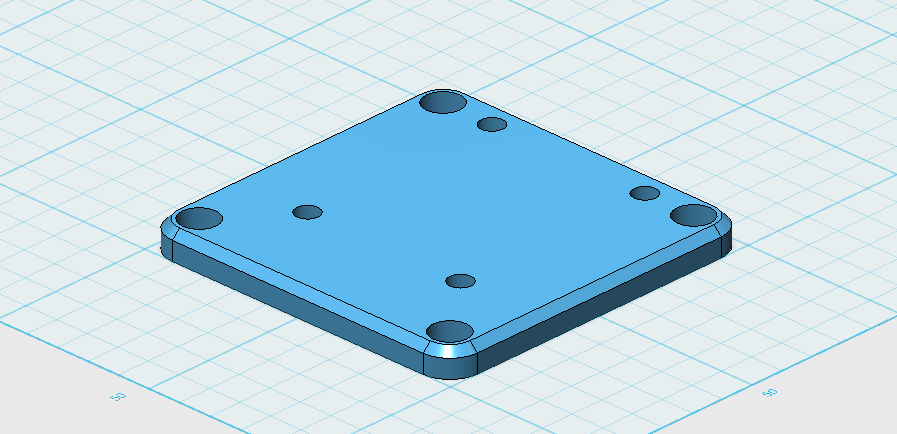
This is the baseplate that sadly doesn't connect to anything. You have to hold everything together with one or two zipties wrapped around everything, since the holes are blocked by the legs and servo mounts.
![]()
-
Compiling Your Own Firmware
04/13/2016 at 22:16 • 0 commentsFor anyone who wants to build their own version of firmware, here's a really quick howto:
- Clone the Tote-HAD repository from https://bitbucket.org/thesheep/tote-had
hg clone https://bitbucket.org/thesheep/tote-had - Clone the Micropython repository from https://github.com/micropython/micropython/
git clone https://github.com/micropython/micropython.git - Follow the README.md for the ESP8266 port to setup the build environment. You can also follow one of the guides at http://forum.micropython.org/viewforum.php?f=16
- Before compiling, copy or link the files from the python directory of Tote-HAD to esp8266/scripts
- Compile and flash normally, as the README says.
You can also skip the main.py file (it's the file that gets executed on the board start), and instead create it after flashing -- this way you will be able to modify it without recompiling the firmware:
with open("main.py", "w") as f:
    f.write("import server; server.main()")
There are some tools that make it easier to upload files to the ESP8266, like here: https://github.com/wendlers/mpfshell - Clone the Tote-HAD repository from https://bitbucket.org/thesheep/tote-had
-
Fixed Firmware
04/11/2016 at 20:50 • 28 commentsAs promised, I fixed the firmware for the robot -- now it will start walking immediately after being switched on, and after connecting you can control it. Below are flashing instructions.
- Download the firmware-combined.bin file, and save in the current directory.
- Download the esptool.py file, and save in the current directory.
- Connect the USB2TTL to the pins on the side of the robot:
- gnd ↔ gnd
- rx ↔ tx
- tx ↔ rx
- Connect together two pin holes (or pins, if you soldered pins in there) on the other side of the robot (leave the third pin alone):
- gnd ↔ sda
- Connect the USB2TTL to your computer.
- Switch on the robot.
- Run the flashing command:
$ python esptool.py --port /dev/ttyUSB0 --baud 460800 write_flash --flash_size=8m 0 firmware-combined.bin - Wait for the firmware to flash. If you get an error, try again.
- Switch the robot off.
- Remove the connector from the pin holes.
- Switch the robot on and see it walk. Congratulations, you have the new firmware.
On Windows/Mac change the path to the USB2TTL port accordingly.
Note, that flashing new firmware will not delete the network information from the board, if you had the robot connect to some network. If you want to do that, you can with this command (before flashing the firmware):
$ python esptool.py --port /dev/ttyUSB0 erase_flash -
Command Line
04/10/2016 at 20:05 • 0 commentsThe robots are built, but due to a bug in the communication code, they didn't walk "straight out of the box". The bug makes them wait for a connection before they start walking, and I will be fixing this soon, and I will provide new firmware to flash soon.
In the mean time, you can play with your robots by using a serial connection. In fact, you will have access to the Python console on them. All you need is a 3.3V USB2TTL converter (I gave out a couple at the workshop, it's that red thing with USB plug on it). If you don't have one, I highly recommend you get it anyways, because they are extremely useful in debugging all sorts of projects anyways, and you will also need to to flash the new firmware, both for the Arduino and the ESP8266 parts of the robot.
Connecting
To connect the serial interface of the ESP8266 on your robot to your computer, you will need to use the three pins on the left side of the robots. If you look at the bottom side of the board, you will see they are labeled, from front to back, "gnd", "tx" and "rx". Use three female-female dupont cables, and connect the "gnd" pin on the robot with the "gnd" pin on the USB2TTL, the "rx" pin of the robot with the "tx" pin on the USB2TTL, and the "tx" pin on the robot with the "rx" pin on the USB2TTL.
- gnd ↔ gnd
- rx ↔ tx
- tx ↔ rx
Next, plug the USB2TTL into your computer (or even better, a USB hub connected to your computer), and open a serial terminal with speed 115200 on the serial port that appears. On Linux, I use the screen program for that, with the command:
$ screen /dev/ttyUSB0 115200On Windows you can use PuTTY for that (you might need to have the drivers for the USB2TTL installed first). I have no idea how to do that on macs, but there must be some way. Once you do that, you should see black screen... Then switch on the robot, and you should see something like this:
rll��|�l�|�l�b|����r�b�b��nn�lnn���bplblrlp�n��lbn�|쌌��b��nn�l��l`�nnl`nr���nr�`p�n�r�����bn�|lb��nn�l`�nnl`nr���nrrl`p�n�r�����쌜bn�|쌎b��nn�l`�nnl`nr���nl`r��nl`�l��|��rrnb��l��b�lb쌜���l��b�lrldon't use rtc mem data
ll��|��rrnb��ll�p�b�b쌜���l��b��lrl�l��|��rrnb��ll�|�b�b쌜����b�lblrl��rl���bl�br|�bll���lb��n�nn��l�|�l�l��l������l`�n��
That's the booting messages of the ESP8266 received at a wrong baud rate. Don't worry about that. Now, if you press Ctrl+C, the program that is executing on the robot will be interrupted, and you will see this:
MicroPython v1.6-374-g2c407bc-dirty on 2016-04-07; ESP module with ESP8266
Type "help()" for more information.
>>>
That's the Python console prompt, also known as the REPL console. You can type Python code in there, and it will get executed on the robot.
Walking
So how do you make it walk? Type in this code:
from robot import Robot
from gait import Creep
robot = Robot()
gait = Creep(robot)
for frame in gait.run():
    pass
That should get the robot creeping forward. To change the directions you can set the dx, dy and rotation attributes on the gait object, and repeat the for loop.Network
By default the robot will create its own network, and act as an access point -- that's because I didn't know what networks will be available at the conference, and of course I wanted the robots to still work after you have taken them home. Unfortunately, when I tested the code, I did it with the robot connected to my home network, for convenience. That's how the bug crept in -- I didn't test it in the access point mode, just assumed it would work the same way.
But that means that you should be able to work around the bug by connecting the robot to your home network. Here is how to do it. First, disable the "access point" interface:
import network
network.WLAN(network.AP_IF).active(False)
Then enable the "station" interface:wlan = network.WLAN(network.STA_IF) wlan.active(True)
And then make it connect to your network:wlan.connect("ssid", "password")The robot will remember this, and will re-connect to that network automatically on every boot from now on.Remote Control
The robot has very simple remote control through WiFi for now. Once you restart it, you should be able to connect to it on port 1010 with Telnet or Netcat, and send it "wasd" letters for arrows, and space for "stop". Depending on the program you use, you might need to press enter after each of the letters. To simplify that, there is a client.py program in the repository, which uses PyGame to read the arrow keypresses, and sends them to the robot. You run it with the IP address of the robot as the first argument.
Moving Individual Legs
There isn't much other functionality implemented yet, but if you want, you can make the robot move its legs however you want from Python, and even make it dance or do something else... You can do it using the "robot" object above. For instance, to make the front left leg move 20mm forward and 10mm up, you would do:
robot.legs[0].move_to(0, 20, -10)
robot.update()
The "update" step is where the command is actually sent to the servos. The coordinate system for the legs is simple: X axis is left-right, with negative numbers being closer to the body, and positive numbers further from it. The Y axis is front-back, with positive numbers being forward, and negative -- backward. The Z axis is up-down, with positive being down, and negative -- up. The (0, 0, 0) position is the robot's starting position, with all servos centered.
Updates
I will definitely fix the bug, and maybe even figure a better way to control the robot remotely. When I do, the new firmware and instructions for flashing it will be available here on this project page. I will also make updates as the amazing developers of Micropython add more features to it. At the moment they are working on a web-based interactive Python console, including file upload, which should make hacking on this robot super-convenient. However, this is all still in the alpha stage of development at the moment, so we will have to make do with what we have now.
-
Quick Notes
04/09/2016 at 18:12 • 10 commentsThe workshop just finished, and I will have more to say about it, but for now I need to take a couple of notes for improving things, in case I will be doing it again.
- Cheap screwdrivers are useless,
- The screws that come with servos are really bad for this, make sure to use the 1.5x3M screws,
- Check the software also in the AP mode, not just when it's connected to your home WiFi,
- Investigate the glue-less approach to making feet,
- Provide more detailed instructions. Separate instructions for left and right legs, better instructions for what to plug where, mark the colors for B&W prints,
- Tell people to use the servo horns that came in the bag with the servo, as they differ very much for servos from different sources.
- Order plastic bags and divide the parts into kits. Make sure to use servos from the same source in each kit,
- Add instructions for cutting off the servo "ears" for the hip servos,
- More detailed instructions for centering the servos,
- Tell the organizers about the upper limit on the number of people in advance. Order everything at once, in bulk,
- The cheap LiPo chargers are 1A, not good for batteries smaller than 1000mAh,
- Have enough USB2TTLs for everyone to use,
- Double-check all the boards for soldering errors and missing parts,
- Bringing a soldering iron and basic tools was a great idea,
- Send the kits to the organizers as a package, to avoid customs problems at the airport,
- Tell people to bring laptops,
- Add web interface,
- Have it blink LEDs in different patterns to indicate different stages and/or errors,
- Print the address of the project website on the instructions and the PCB,
- Have a helper for every 10 people,
- 4h is barely enough to assemble everything, forget about programming them,
- If servos are erratic, check the battery,
- People who came are amazing! Thanks!
-
Software
04/07/2016 at 15:22 • 0 commentsI finished the Arduino code and flashed to all the boards, and now I'm in the process of flashing the Python code onto all the ESP-01 modules, and setting their SSIDs.
As usual, the software doesn't do all that I wanted it to do. By default it makes the robot walk forward and listen for connections. I wrote a small PyGame program that lets you control the robot from your computer with the keyboard. That's it.
Things I wanted but didn't have time to do:
- there is only the "creep" gait, no "trot" gait,
- the communication with the Arduino controller is one-way, no telemetry,
- thus, no battery voltage monitoring,
- there is no remote Python console, for that you have to connect the serial cable.
However, all that can come in the future versions of the software. During the workshop I will show you how to modify and flash the software for both of the microcontrollers, so hopefully you will be able to perform the updates when new versions become available here.
Oh, the code repository is at: https://bitbucket.org/thesheep/tote-had/src
-
First Steps
04/04/2016 at 20:52 • 0 commentsWith the kits all soldered and ready, I'm focusing on the software development. As usual, I won't have everything I wanted there at first, so expect software updates after the workshop. However, the basic walking is a must, so I'm focusing on that. The Micropython for ESP8266 is actually usable enough now, and I only needed a small patch to slow down the I²C communication, so that the Arduino can keep up without clock stretching. After doing that, and adding the Python code to the scripts directory, I compiled a working version of the firmware. Here are the first steps of the robot:
Of course for now the walking is slowed down (with long pauses between movements) and the leg reach is small -- it should be much faster and smoother when I tune it. I will also need to add a way to control it over WiFi, and to read any sensors connected to the Arduino. By default, there is going to be only one telemetry value you can read, the battery voltage, but of course you can connect pretty much any sensor you can think of.
Also note that the front left hip servo is broken and only moves into two positions -- that's because I had to use recycled servos for the prototype. On the workshop we will use the new servos that just arrived, and they should all be fine.
-
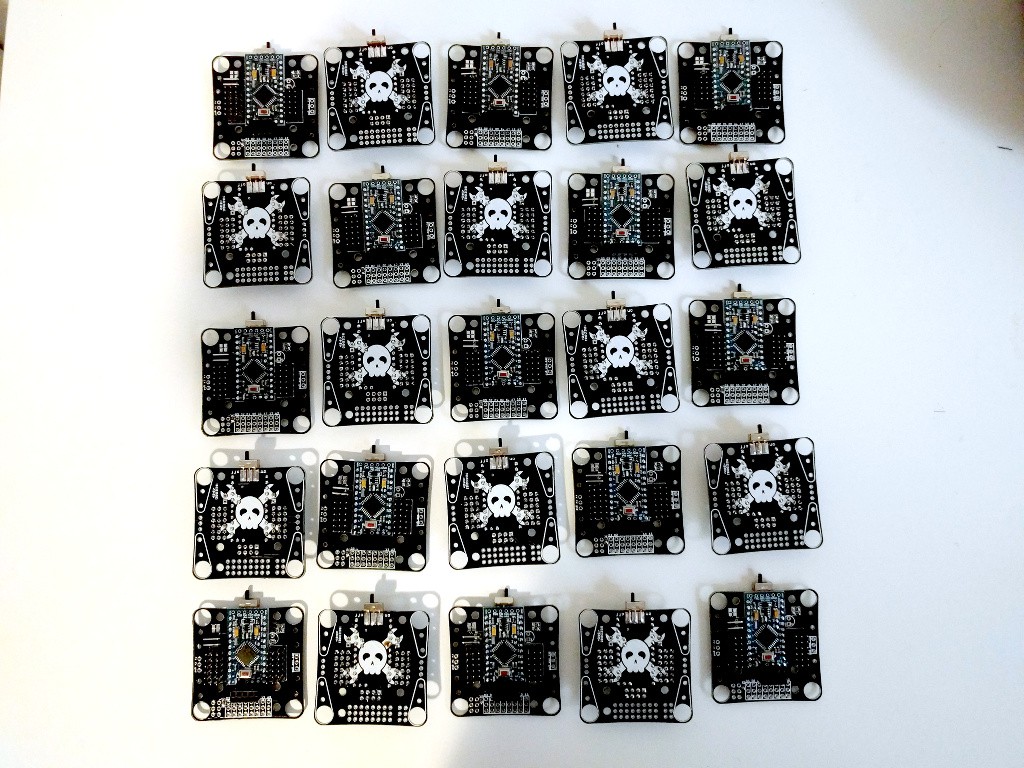
Mass Production
04/02/2016 at 17:05 • 0 commentsThis was a productively spent day.
![]()
-
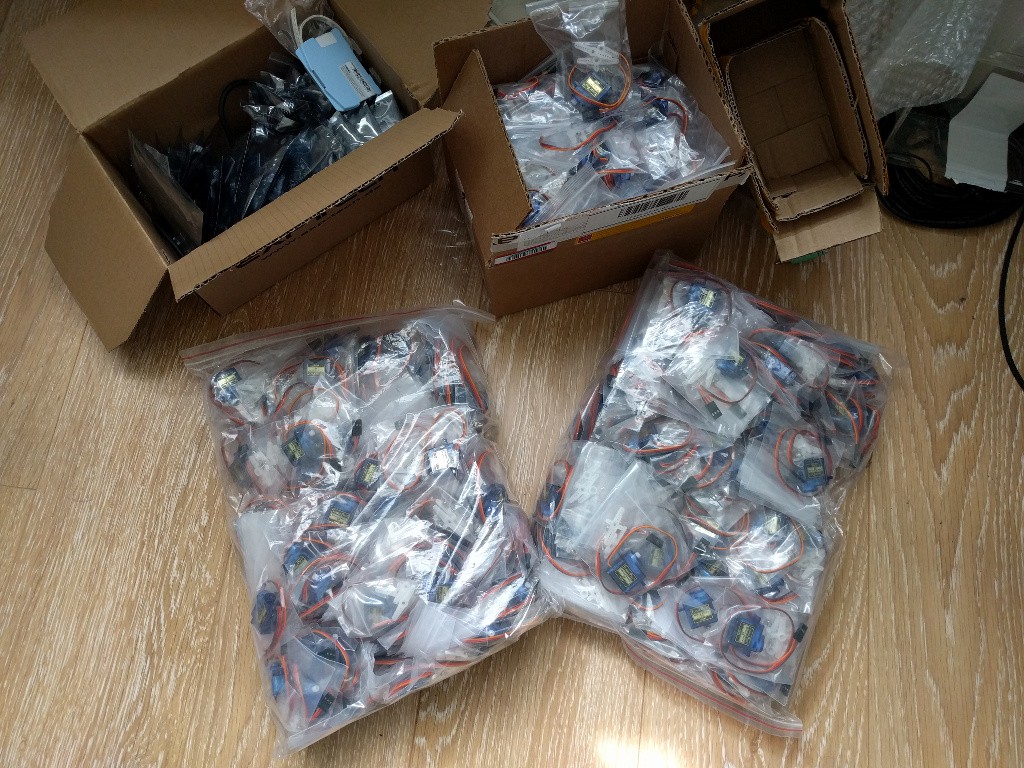
1 Done, 24 More To Go
04/01/2016 at 11:43 • 0 commentsThe remaining parts just arrived, including the package of 200 servos:
![]()
I'm still waiting for 20 batteries, but hopefully they will arrive sometime next week.
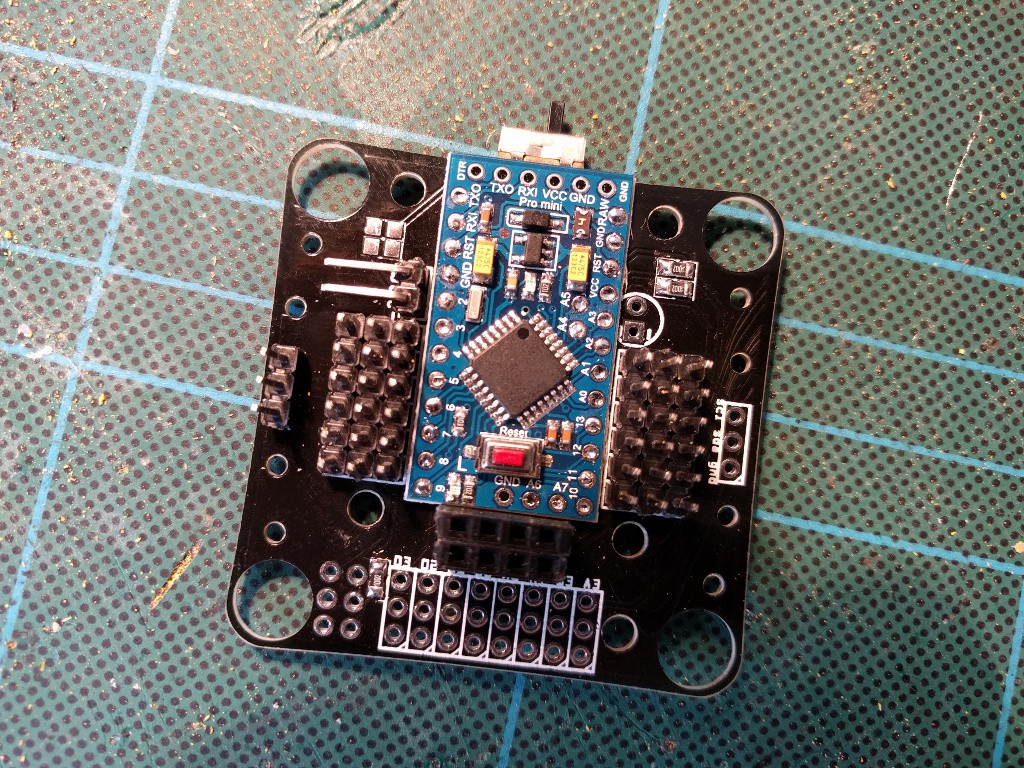
I finally can start assembling the PCBs for the kits. I already did the first one:
![]()
You can see some unpopulated headers and footprints there -- that's because they are optional, and the parts I got are not enough to fill them on all 25 boards. But that also means that you can improve your robot even further once you take it home. I will be posting detailed instructions here about each optional feature, so that hopefully this will be easy. We can also talk about this on the workshop, if there is time.