Close
0%
0%

GimbalBot

Gimbaled thrusters, aerospace-grade adhesives, carbon-fiber-reinforced polymers, and inertial measurement units. This is a space project!

Similar projects worth following
[note, as of 10/9/2016: this project is in 'deep storage' and has been for some time now. I may re-engage with it at some point but for now consider GimbalBot to be a cautionary tale in ambitious aerodynamics.]

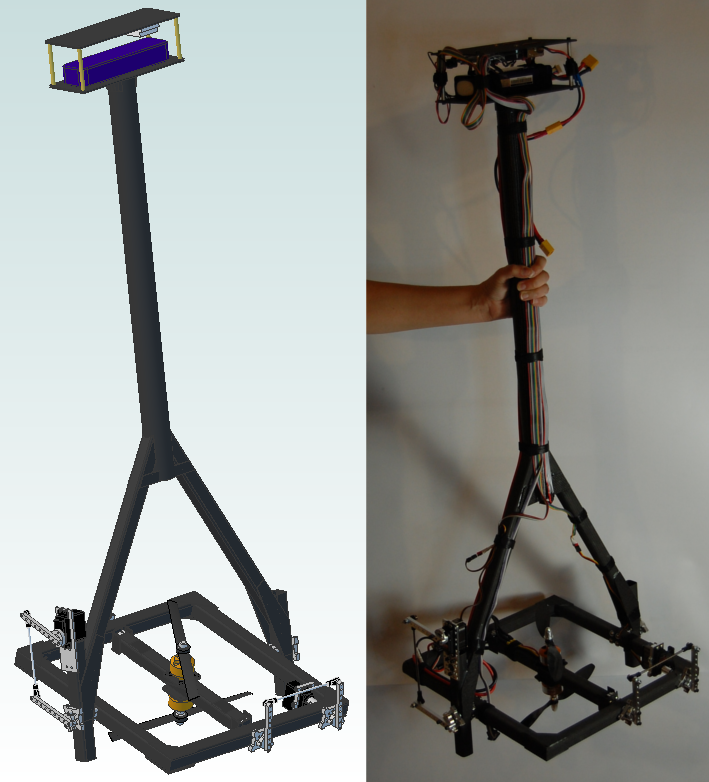
GimbalBot is a stabilized UAV that hovers and balances on a contra-rotating gimbaled fan powered by off-the-shelf RC brushless motors. The vehicle is constructed from commercially available carbon-fiber-reinforced polymer (CFRP) plates, angles, and tubes, fastened together using aerospace-grade epoxy. Attitude control is accomplished using differential thruster RPM and servo-actuated thruster tilting. A MEMS IMU running through a Kalman filter provides angular orientation data to a vehicle-mounted Arduino Due for control.

Everything about the project--schematics, iterations, mistakes, decisions, firmware, CAD models, BOMs, costs, board layouts, crashes, calculations--will be shared.

Overview

I started the GimbalBot project on April 30, 2014. GimbalBot is an open source unmanned aerial vehicle intended to explore a diverse range of topics including airframe design, aerodynamics, composites manufacturing, embedded systems, sensor fusion, and stability control. The craft combines characteristics from ball-balancing robots, rocket-stabilized landing vehicles, and single/dual-propeller drones that use actuated fins for attitude control. 

GimbalBot's unique vectored fan design isn't meant to win any awards for efficiency, speed, maneuverability, cost, or other performance targets traditionally driven by business needs. Rather, I hope to share my own process of discovery and learning as I research and apply new (to me) concepts to a real-world project. If GimbalBot actually manages to get off the ground, I will be truly ecstatic.

System Design
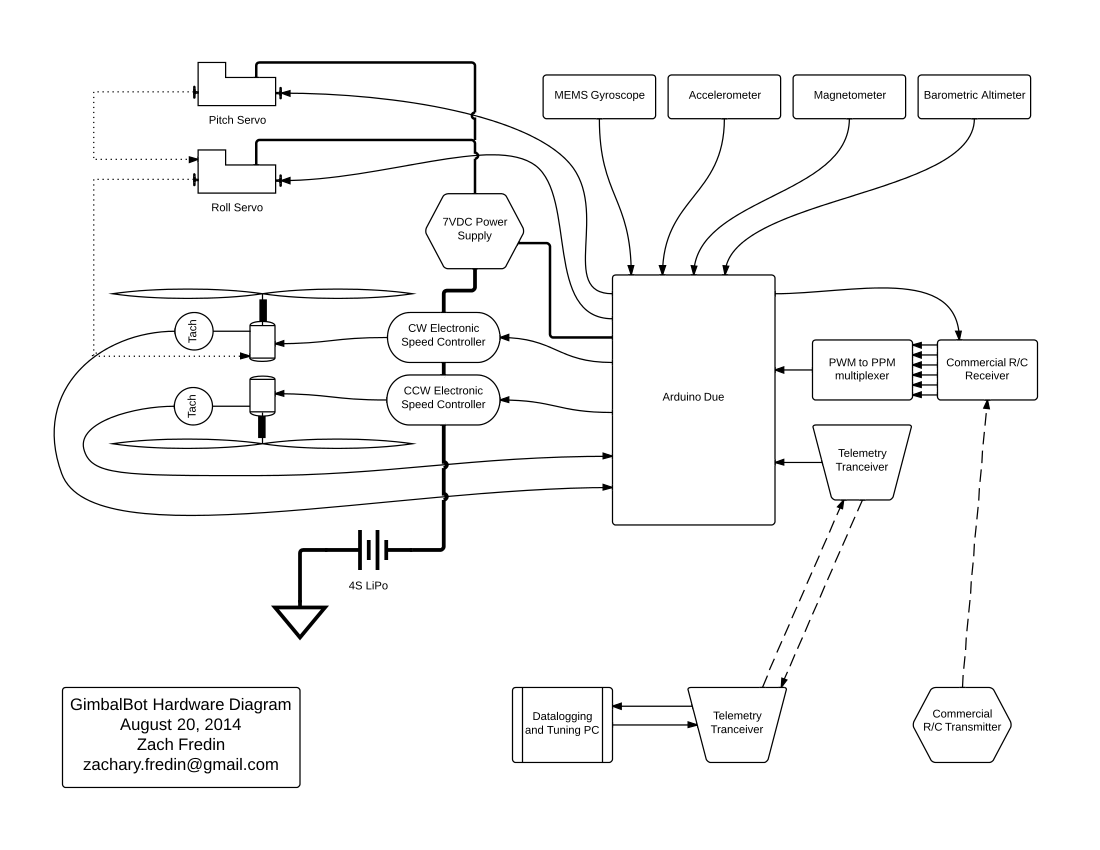
GimbalBot Hardware System Design (*.pdf)
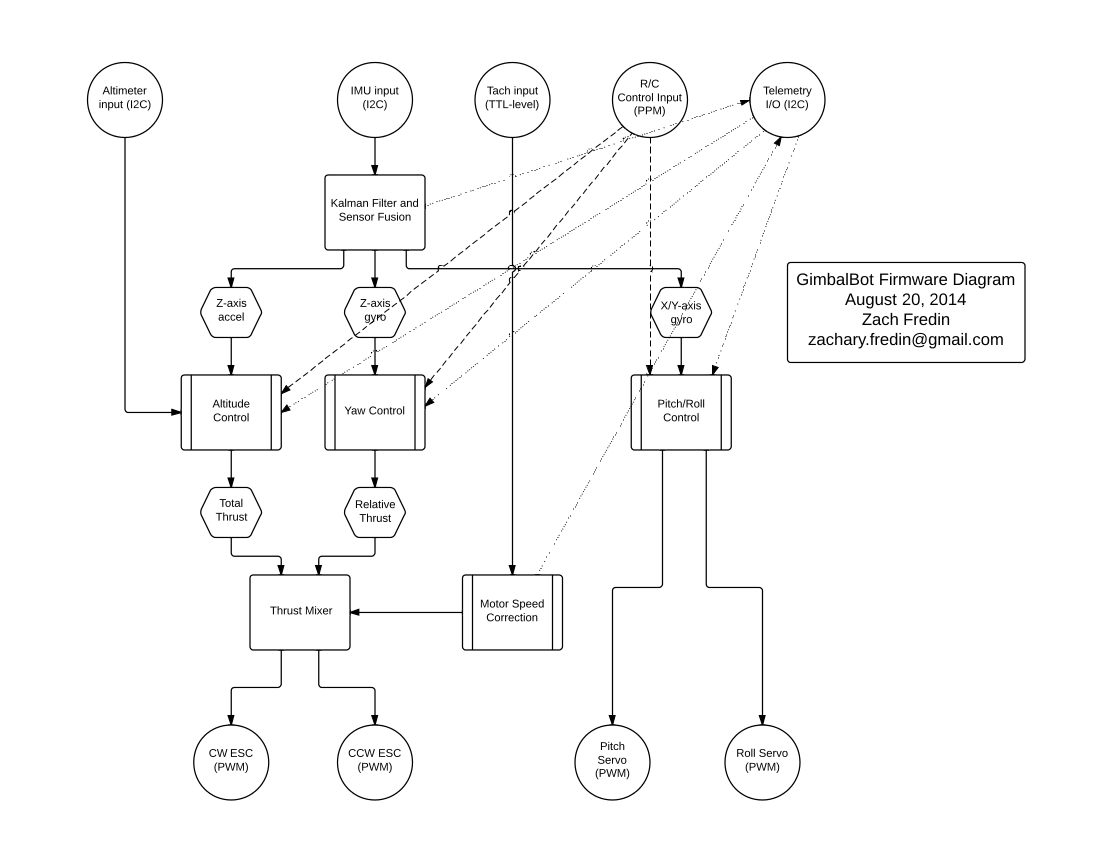
GimbalBot Firmware System Design (*.pdf)

Hackaday Prize Entry Video - Phase 1

Openness

GimbalBot is Open Hardware. Every aspect of this project is open, and this has been a fundamental design decision since day one. By sharing early concepts and models via a constant stream of project logs, I've been able to gather a vast number of invaluable suggestions that have been integral to the success of the project to date. I hope that by keeping my methods and decisions in the public eye, someone might learn from my mistakes and build on what I have learned from GimbalBot.

Connectivity

In its current iteration, GimbalBot isn't a connected device in that the craft does not directly interface with the Internet. However, the project does feature several local systems that are connected in various important ways.

Sensors

GimbalBot uses several sensors to keep tabs on its orientation in space, including a 3-axis accelerometer, a 3-axis MEMS gyroscope, a 3-axis magnetometer, and a barometric altimeter. All of these sensors communicate digitally with the Arduino Due over I2C and provide data at a rate of 50-100 Hz. I2C interpretation will be handled using the standard Arduino Wire library.

Actuation

The pitch ring servos and brushless motor electronic speed controllers (ESCs) are all off-the-shelf hobby R/C products, and as such use a standardized PWM interface for control. The standard Arduino Servo library will be used for encoding these signals.

Controls

I'm reinventing the wheel enough with this project; for now, I'll be using a commercially available (and as-of-yet unselected) R/C setup with a dedicated receiver. While these systems often have sophisticated mixing and scaling features in the controllers, I plan to feed the raw receiver output through a PPM converter (to save on I/O lines) to the Arduino and deal with scaling issues in firmware. Since the RF protocols for these systems are generally proprietary, I'll keep the receiver interface open to ensure cross-compatibility with other radio platforms.

Telemetry

One of the most interesting parts of the GimbalBot project involves the control loops used for altitude, pitch, roll, and yaw control. In order to study and understand the interactions between these control systems and GimbalBot's various sensors, the craft will be fitted with a dedicated high-speed telemetry system for gathering sensor data and changing loop tuning parameters on the fly. While this system has not been designed in detail, I plan to use something like the XBee-PRO with a suitable computer interface.

License

I plan to release GimbalBot under the MIT license. This license will cover the on-board firmware, computer-side software, and all CAD part models, drawings, assemblies, and *.stl files. In other words, if you want to build a GimbalBot and sell it--please do. I still need to double check the licenses on the libraries I'm using for compatibility, so this may change in the near future; in any case, everything I do here will be entirely open and free for anyone to use without restriction.

Tools 

In addition to a lot...

Read more »

  • 2 × Suppo 2810/9 brushless motor 1350kV, 500 watt maximum power
  • 2 × KDE XF UAS 35A+ ESC 35amp+ brushless ESC
  • 2 × Gemfan 9x4.7 CFRP prop
  • 1 × ZTW 12A external BEC Power supply for servos and board
  • 2 × Hitec HS-8360TH servo Titanium gears, 0.06 sec/60 deg, 16 kg-cm torque, digital.

View all 16 components

  • Bit the bullet, bought RC gear

    zakqwy03/02/2015 at 04:12 3 comments

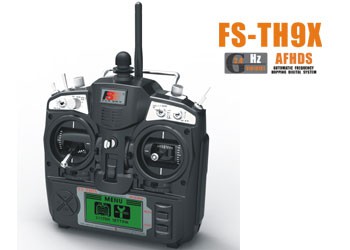
    Should have happened 6 months ago. I got sick of putzing about with short range USB toys; time to step up my control game. Next week this shows up. The FlySky FS-TH9X isn't the fanciest transmitter around, but enough people seem to like it that I think I'll be happy. Extra bonus for getting 8 analog channels with a receiver for under $100. Excitement levels are building!

  • Hover Test Follow-Up

    zakqwy02/25/2015 at 23:32 0 comments

    Okay, I was pretty excited when I posted the last video. First tethered hover test! Yay!

    Lots of stuff to figure out prior to the next hover test(s):

    1. Power: Enough with the damn LiPo setup and the 4-minute test limitation. I need shore power that will let me do sustained tests.
    2. Control: The USB mouse setup was hilarious but less than ideal. It may be time to bite the bullet and buy the RC gear (transmitter and receiver). Or spend another ten frustrating hours trying to get a damn Xbox360 dongle to talk to my Due.
    3. Safety: Thicker tethers that can't break, and (most importantly) a bit more distance between me and GimbalBot. I wasn't concerned with the previous test; while I did snap one cable, I still had the other, and the camera angle made it seem closer than it was. Even so--GimbalBot is scary and needs to be treated with respect.
    4. Data: Time to start gathering massive amounts of it. At the very least, I want throttle position, X/Y gimbal position, and IMU data at a fairly high rate. That means, most likely, serial datalogging via USB. My desktop PC isn't terribly mobile so I'll need to come up with another setup--maybe an old laptop, of which I have several.

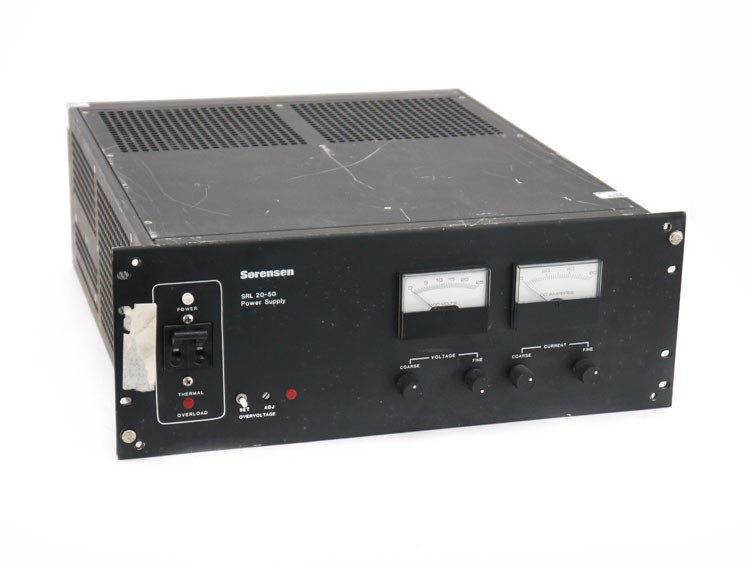
    Thus far, I've made significant progress towards solving (1) by purchasing this today:

    Yup, it was time to step up my power supply game: 0-20 VDC, 0-50 A. I'll be able to comfortably emulate the 4S LiPo (16ish VDC) and provide plenty of current for both motors. I've been needing an excuse to install a 220 VAC drop in my basement, so... this will do. Shipping was more expensive than the actual power supply; either way, it should be here next week.

  • FIRST TETHERED HOVER TEST

    zakqwy02/19/2015 at 00:48 9 comments

  • Frustratingly close

    zakqwy02/17/2015 at 05:22 1 comment

    GimbalBot is hanging by an elastic band from the rafters in my basement, secured below using steel cables with plenty of slack. My benchtop power supply, a massive LiPo battery, and a hastily thrown together USB mouse based (no joke) interface are all strapped to an adjacent sawhorse. Everything is ready to go for the inaugural hover test.

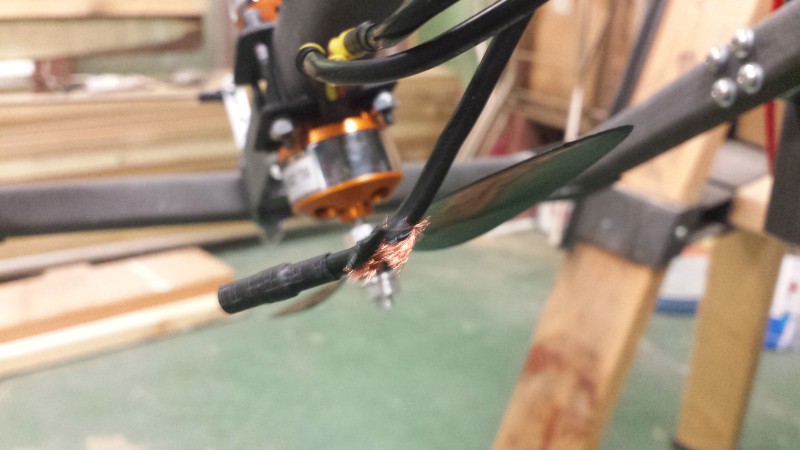
    Something had to go wrong, right? Well... I didn't quite take enough slack out of one of the ESC leads, and it got sucked into the lower prop upon first startup:

    Time for bed. More testing Wednesday.

  • Thermal Performance Testing, Part 2

    zakqwy01/27/2015 at 03:09 12 comments

    TL;DR: back to the drawing board. Or maybe it's time to try for a hover test, and tell thermal issues to go to hell?

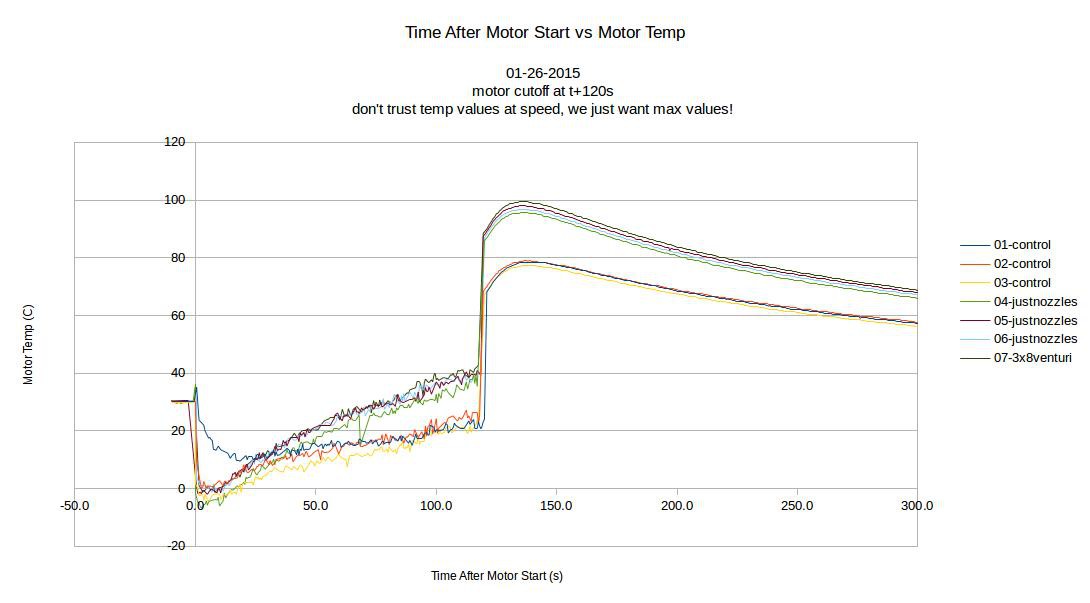
    I ran seven tests this evening. Main changes since yesterday:

    • Increased the motor pwm signal to 110 degrees. I wanted to put some heat into the coils!
    • Changed the program around a bit--now the button starts a 120-second test.
    • Tried to be a bit more consistent between runs--I started each new run once the temp hit ~30 C.

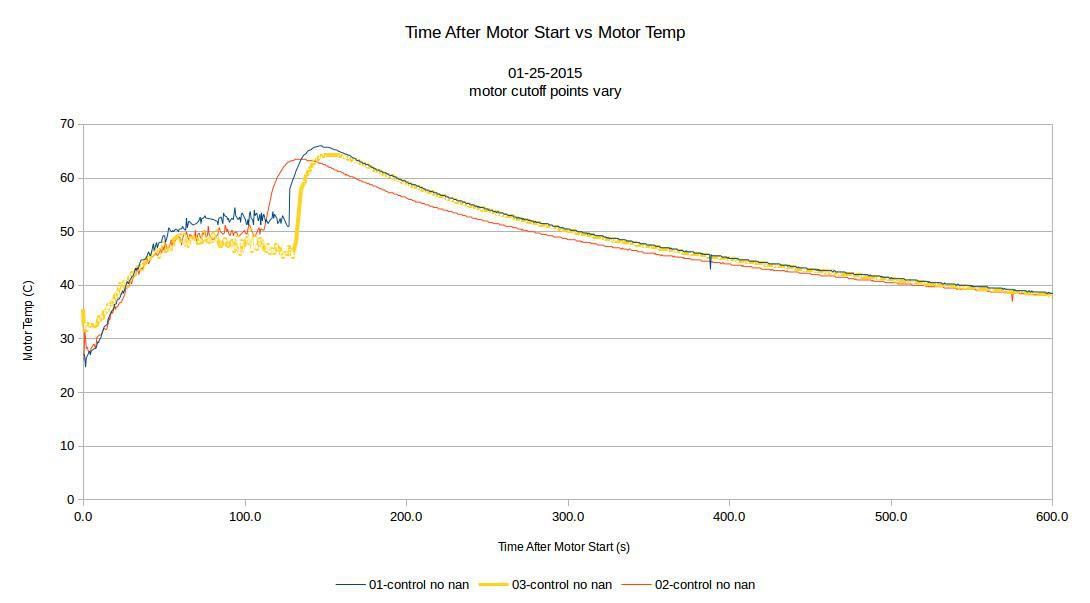
    All data is in the repo; here's the summary graph:

    So--what's up with the jagged lines during the actual motor run? Well... seems when I went from 100 degrees to 110, the TC signal got totally garbled. I backed off to 100 degrees and the problem seemed to go away; however, the presence of the 'NAN' (not a number) results from the MAX board makes me more suspicious of the temp data. Hence the subtitle on the graph: "don't trust temp values at speed, we just want max values!" I made a habit out of unplugging the ESC power supply as soon as the run finished, which helped keep the post-run ramp up to Tmax nice and clean.

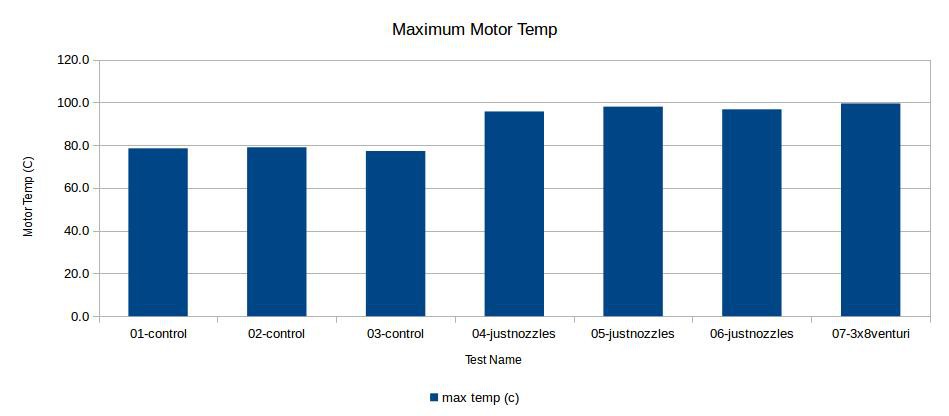
    Okay, enough chitchat. Maximum motor temperature values for each run:

    So... max temp increased by 20 C or so going from the control group to just using the nozzles. Worse, the venturi didn't seem to improve anything; I ran out of time before rounding out the tests, but I'm guessing the difference between the nozzle runs and the venturi run isn't statistically significant. Clearly, the motors do better without cooling ducts, and it doesn't seem like the venturi did anything!

    Other details: I measured current (via a shunt) and voltage going into the ESC and it remained almost completely stable. Thrust dropped by 50-100g for the last four tests; maybe the motor overheating caused issues here? I'm not surprised that the venturi test dropped the thrust a bit, since the 3D printed insert does cast a bit of a 'shadow' downstream of the propeller.

    So what's the takeaway here?

    • Lots of smart people probably spent a lot of time designing the cooling system for the motors, so it's probably pretty good as-is. Keep it simple, stupid!
    • I learned a lot about serial data acquisition on the cheap, thermocouple noise, 3D printing (first 3D printing project!), and... well, you know how it goes when an experiment doesn't work as planned. I've learned this before, but I was reminded about how important it is to try out ideas even when there's a good chance they will fail. It's also just as important to share the results with the world--if nothing else, maybe this will add a data point for someone else trying to improve the cooling system for their quad.

    I'll put it to a vote--if you've made it this far reading, what do you think I should do? Put GimbalBot back together and see if it will fly?

  • Thermal Performance Testing, Part 1

    zakqwy01/26/2015 at 01:28 0 comments

    Ha! This project isn't dead! Just resting.

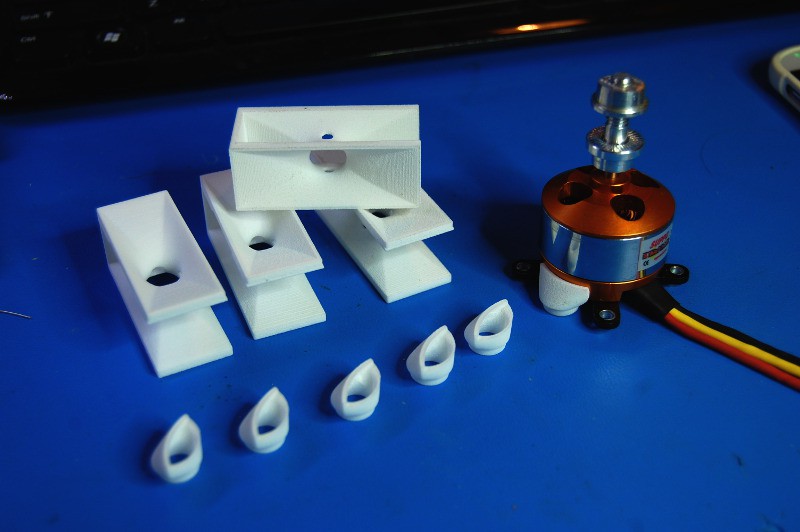
    I finally got started on thermal performance testing. To review: Using the larger (9") props seems to give me adequate thrust, but the motors heat up a bit too quickly. I went on a severe tangent designing and 3D printing motor cooling ducts and various venturis, and modified the motor mount to accept these new parts.

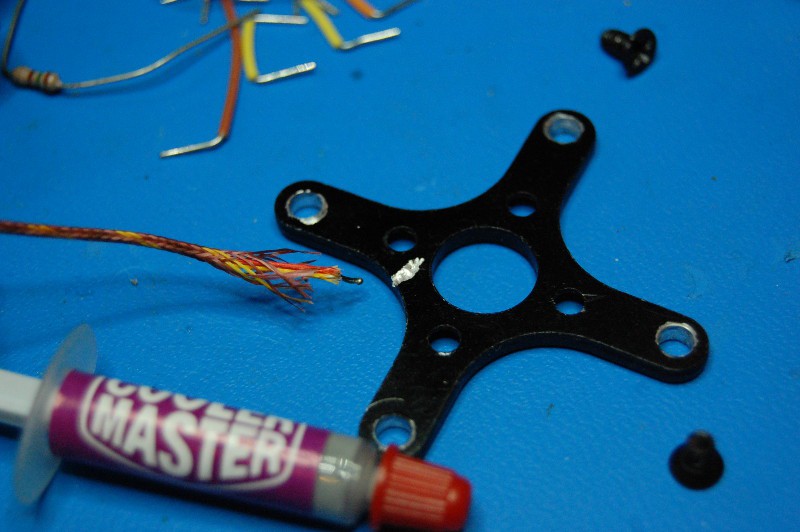
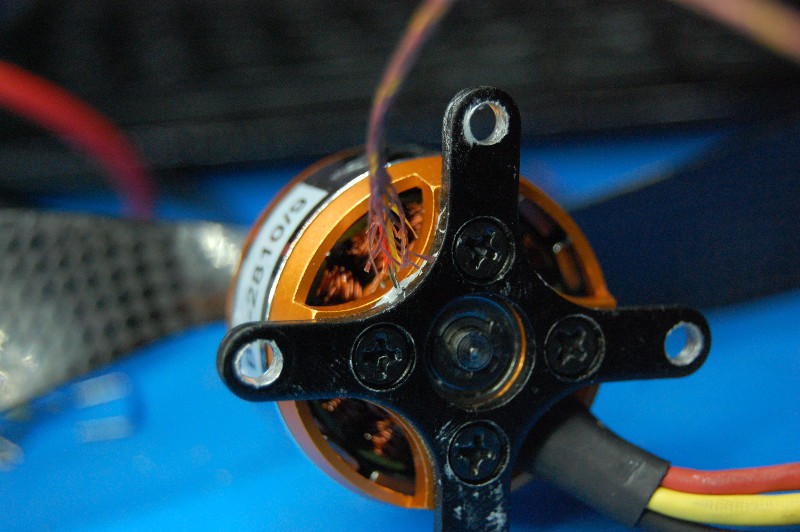
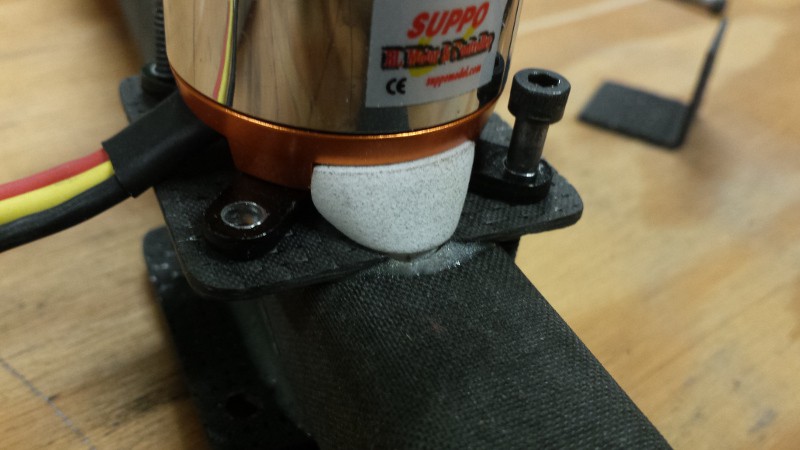
    In order to prove (or disprove) the efficacy of the parts, I also embedded a thermocouple in the motor frame to track its temperature in real time during tests. Okay, to be fair--embedded is a bit of an exaggeration. I filed a groove in the motor bracket, globbed on some thermal transfer compound, and smashed it against the back of the motor frame:

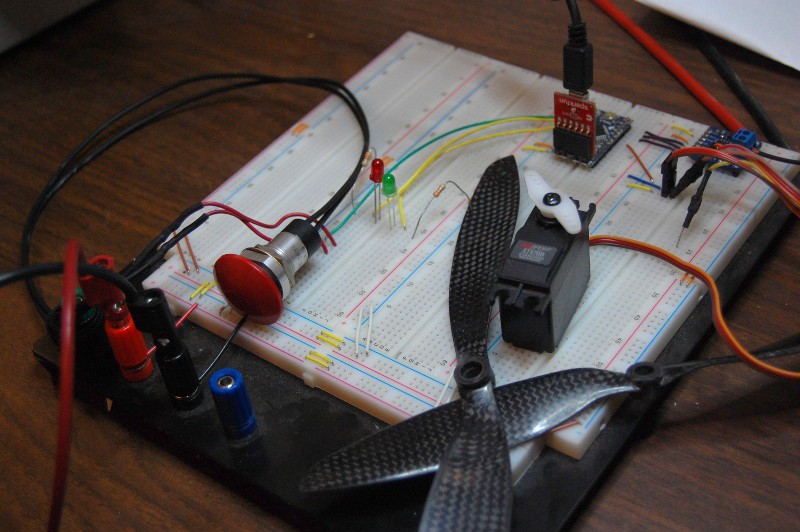
    I also put together a pretty simple data acquisition and control setup using a Pro Mini, Adafruit's MAX TC board, and a handy serial datalogging program called GtkTerm. I included a few run status LEDs, a button (yup, it's my favorite giant red button) to start the prop rotating, and a servo to indicate the current ESC signal:

    The first test was hilarious. It's been awhile since I've worked on GimbalBot so my work area wasn't quite to prop-safe levels of cleanliness. I ramped the motor up for the first time and heard a loud BANG--never a good sign. The prop had sucked up a stray Home Depot receipt and exploded it:

    I broke for a bit of cleaning and then started running instrumented tests. Since the last time I've posted, I've finally entered the 21st century--I've got a GitHub repo now! The Dropbox directory still holds pictures, models, and old code; however, I'm going to start using the repo for firmware if not other stuff moving forward. Navigate to GimbalBot/data for the first performance tests, or just look at this graph:

    Details:

    1. 3 runs under identical conditions
      1. Motor PWM output: 100 degrees
      2. 8" props (nothing crazy yet)
      3. Thrust: 1210-1215 g
      4. No fancy cooling setup--cooling ducts removed, holes taped over
    2. x=0: motor turn-on from ~25ish C
    3. Various motor cutoff points, shown by the temp spike (I estimated these)
    4. Some data points eliminated due to noise (the TC board returned 'nan', or 'not a number')--hence, somewhat jagged spikes. Linear extrapolation for missing data.
    5. Data acquisition rate: 2 Hz

    The program is set up as a "dead-man's switch"; that means I had to keep the button down to keep the motor running. I did this mostly for safety reasons; in the future, I'd like to standardize the test time so the cutoffs happen at the same point. A few takeaways:

    • The motor temperature stabilizes eventually, but the approximate stability point varies by ~10 degrees or so across 3 runs. I'm not sure if this is due to thermocouple drift or air temperature variations or something else; maybe I should run more tests with identical conditions.
    • The slope of the heat-up seems pretty consistent. I should probably quantify this with an error and use that to compare performance.
    • Motor temperature takes a big spike up as soon as the prop stops rotating! Looks like the motor's built in cooling ducts are already doing something here; the temp rise after motor shutdown is 15+ C, and it happens fast.

    Okay, hypothesis time!

    • Cooling ducts vs taped over holes will be an improvement with venturis or no venturis. More airflow, right? Hopefully?
    • Best performance will happen without any venturi insert (just an open hole). Why? I think my venturi design will restrict airflow too much and the venturi won't generate enough DP to flow very much air through the relatively small holes in the elements' necks.

    Stay tuned..

  • A few on-the-fly changes...

    zakqwy10/21/2014 at 01:51 0 comments

    It's a hacking project, right? That means unexpected last-minute changes! Also, lots of updates that lack significant progress. Oh well, one step at a time.

    First of all, I apologize for the quality of these pictures. My cheap but effective camera seems to have a dead battery (I forget to charge it on occasion), so these were taken with my phone. I wasn't terribly careful so they might be somewhat blurry. I'll let the photos and italic captions tell the story.

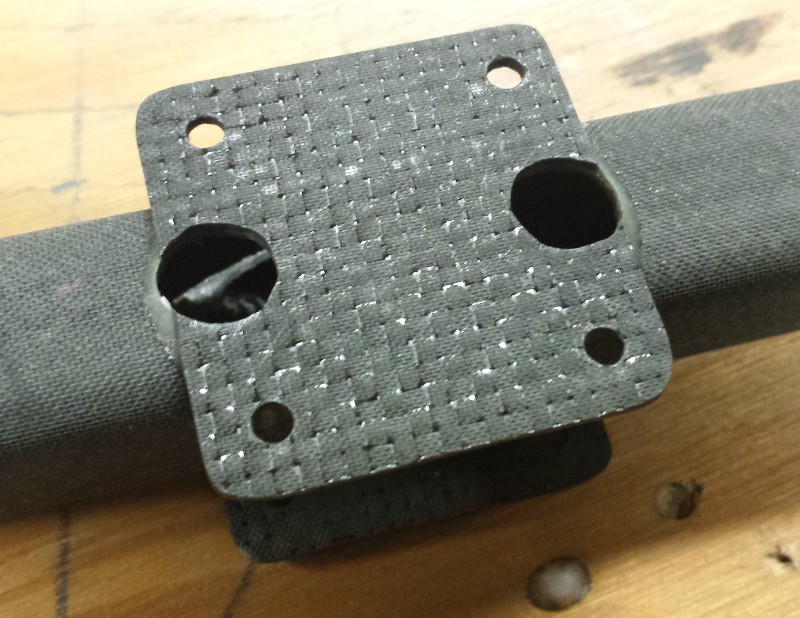
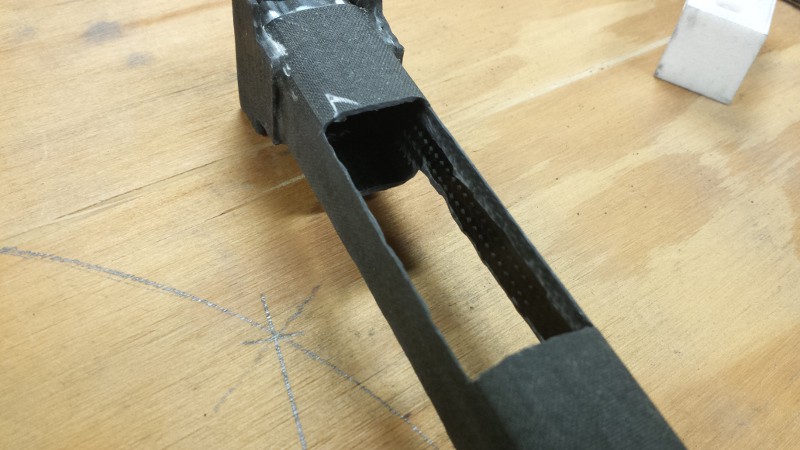
    I used the Dremel with a skinny diamond bit to carve a pair of diagonal slots under the motor mount plates as per the CAD drawing; however, I ran to some issues with getting the 1.6mm CFRP plate to slide into the slot cleanly. It fits tightly for most of the length of the slot, but I had some issues at either end--it's tough to get the bit in without buzzing through the motor mount plate. Worse, even after a fair amount of work with a thin metal hacksaw blade (now extremely dull), I realized that the CFRP plate was quite close to the outlet of one of the cooling ducts. I don't want to create an unnecessary pressure drop. Then it hit me... I don't need the slot at all. Or the CFRP insert. I don't need to divide the exhaust from the motors between the two venturi tubes at all. Man, I wish I'd thought of that before severely compromising the structural integrity of the motor mount. Oh well, nothing a sketchy patch can't fix, right? For testing, I'll probably cover the slots with tape.

    No real drama cutting the vent holes for the motor, although I did almost mark them improperly when mocking everything up with the motors. Rather than further dulling my HSS drill bits I opted to cut these using the diamond bits.

    Fitment is right on the money. Yes, CFRP dust tends to get caught in SLS parts, so they look dirty. The vent inserts stay in pretty well so I probably won't glue them in for testing; once I've got everything sorted I might epoxy them and use some silicone to make a form-in-place gasket to reduce leakage around the motor connection. Or likely not.

    This cut went fairly well. Again, I used diamond rotary bits for everything and checked fitment several times.

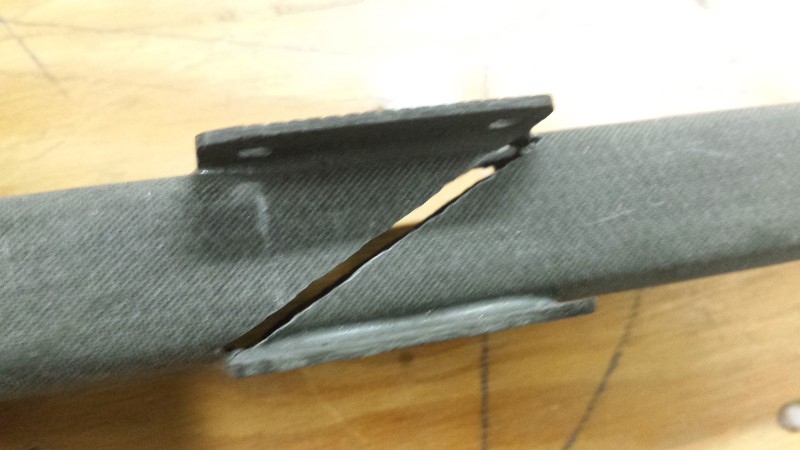
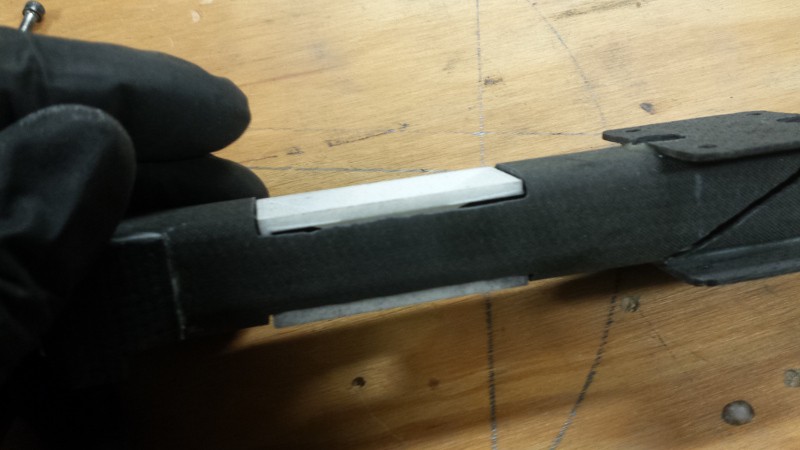
    Uh oh! Yup, you guessed it--I wasn't able to maintain a sharp edge around the curved portion of the square tube and ended up losing a few millimeters of height. The air gap would be a serious issue, unfortunately. I was afraid this would happen, but it's a good excuse to install a few reinforcing strips that should probably be there anyway.

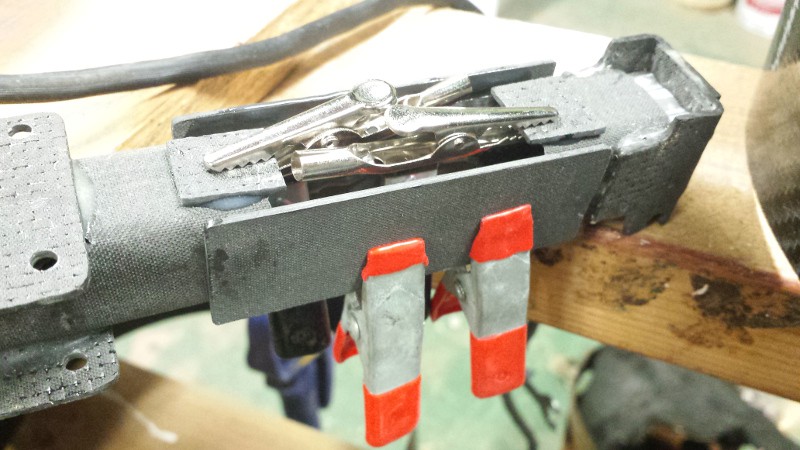
    Several chunks of CFRP getting glued a clamped here: two side pieces for reinforcement and air sealing (I'll use RTV or something to ensure a good seal) and two tiny scraps to prevent the venturi from falling through. I thought about leaving a tab when I cut the CFRP, but I didn't really have a good way to interface that tab with the venturi insert without some modification of the SLS parts. Man, the rapid prototyping department should really spend more time communicating with the composites department.

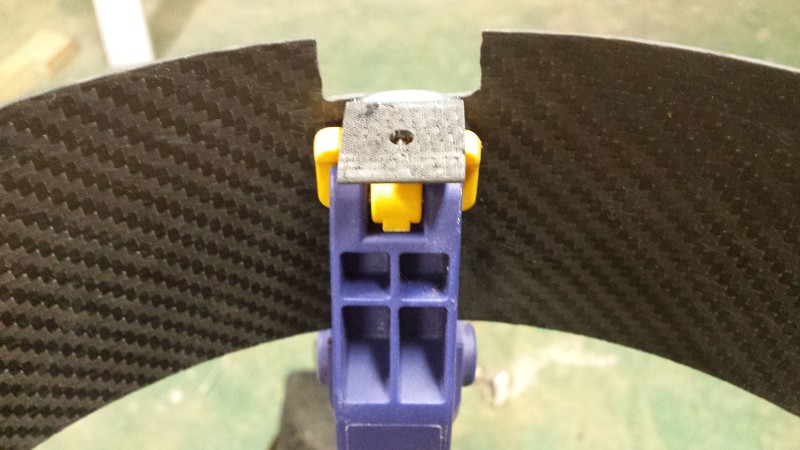
    I had the glue out, so I also glued a few tabs that I'd cut earlier onto the fan shrouds. I'll need to drill matching holes in the motor mount to hold these on during testing.

  • Thrust Testing Rig v2.0

    zakqwy10/09/2014 at 02:48 0 comments

    The fun thing about over-engineering stuff (or not really engineering it at all--just over-building it) is that you can throw things together without much regard for precision. The updated thrust testing rig fits this description nicely. I also managed to build the rig with minimal additional cash outlay--I grabbed a pillow block at my handy neighborhood surplus store, but most of the other stuff was already floating around my basement.

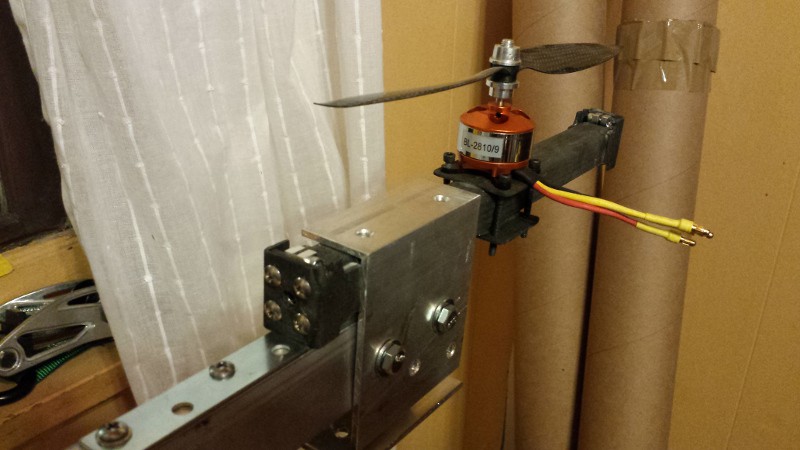
    The new rig is designed specifically to test a single propeller on the motor mount, leaving room for motor cooling venturi tubes and such. I thought about recreating the motor mount with a spare chunk of CFRP square tube, but this seemed a bit wasteful. As such, the clamping mechanism is a bit awkward (especially since I re-used the aluminum extrusion from v1.0), but it's easy to use and quite secure:

    The two bolts aren't tightened in the picture, but when I torque them down the motor mount is fairly secure. Well, minimal rattling.

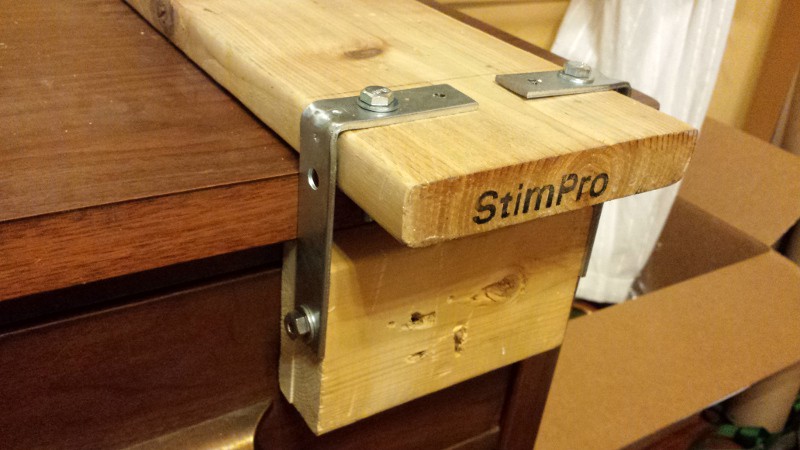
    Thrust Testing Rig v1.0 was heavy, mostly because its base was a ~5' 2x8 I had left over from another project. For v2.0, I used a mounting bracket scheme that fits to my desk; the rear part loops around the (annoyingly narrow) lip of the desk's surface, and the front bit uses a few removable brackets so I can take it off easily for transport:

    I might move this down a bit so the drawer is accessible again. Who am I kidding--I don't use drawers, I just leave stuff in piles. Ha!

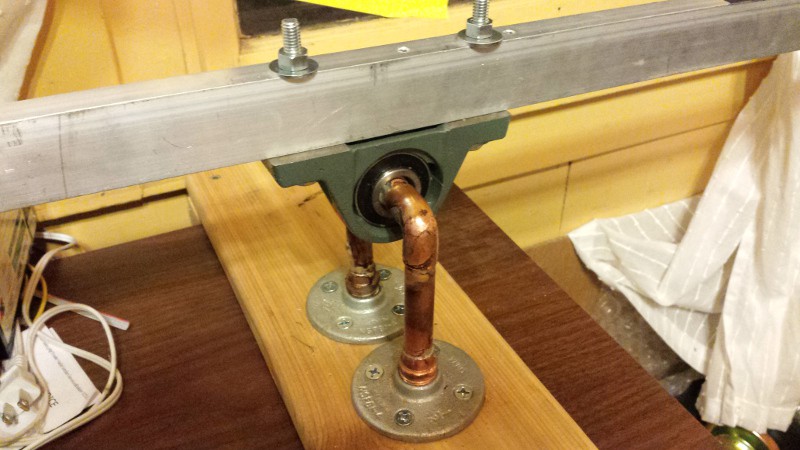
    I had a few copper fittings left over from a plumbing project that fit the pillow block fairly well. The bearing has a few set screws that I was able to tighten securely; the shaft rotation isn't very centered, but I just needed a relatively low-friction pivot point that was also quite rigid. This definitely fits the bill:

    It's fun to do a bit of 'big kid soldering' after playing around with 0402 resistors. The pillow block rides on a slip coupling fit over 1/2" copper pipe; one of the elbows is just dry fitted so I can pull the bearing out. Also, I didn't want to sweat pipes around the bearing.

    So! FINALLY ready for the next round of thrust tests! My wife and I are headed to the Bay Area through 10/19 for a conference and a vacation; with luck, I'll be able to play around with motor cooling and fan ducts before the end of October. Stay tuned!

    -zach

  • Back to work!

    zakqwy09/27/2014 at 01:56 2 comments

    I didn't realize how much of a sprint I was in leading up to the Hackaday Prize Phase 1 submission deadline. Looking back through the project, it's a bit nuts to see how many log updates I put together in July and August. The break has given me a bit of time to work on some house projects; they aren't wrapped up in the least, but I'm ready to start balancing them with GimbalBot again. The lack of deadline means this balance will likely be a bit more sustainable. 

    Not much has happened in the way of design progress (at least outside of my head) or construction since the run up to August 20th. However, a few key items have been added to my shelves.

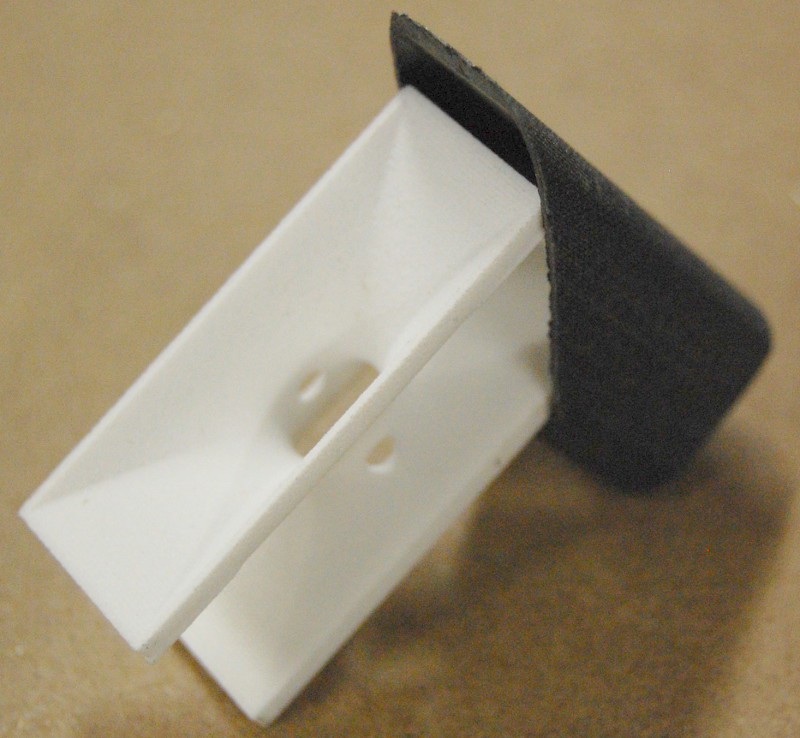
    First of all, the venturi tubes (I think this is a more correct name) and motor ducts arrived. They look great; no obvious voids or flaws beyond the duct not fitting the curvature of the motor perfectly. I may add a thin layer of RTV (or some type of form-in-place gasket material) to the end of the ducts so they seal up well against the motor base. I'm particularly happy with the smoothness of the venturi tube curves; I'll probably use the pieces as-is without any sanding, at least for initial testing. The accuracy spec on the material is +/- 0.15mm (I'm guessing the build height is something like this, or maybe 0.1mm), so I expected pretty good results. 

    Most importantly, the venturi tube width appears to be right for a tight fit in the slots I'll cut in the square tube stock:

    I should be able to leave a ~0.5mm lip at the bottom of the square tube slots to hold the venturi tubes in place, at least for testing purposes.

    Something else has been added to the collection as well. Something I'm quite excited about.

    Without getting into too much detail, I get to work with some pretty interesting stuff. My employer sells various bits of industrial equipment--valves, instruments, pumps, etc--that are all amazingly engineered and meticulously crafted, but typically far outside the budget for a personal project. When I started a bit more than four years ago, an item we previously worked with caught my eye in the warehouse. I noted its location and continued to watch it.

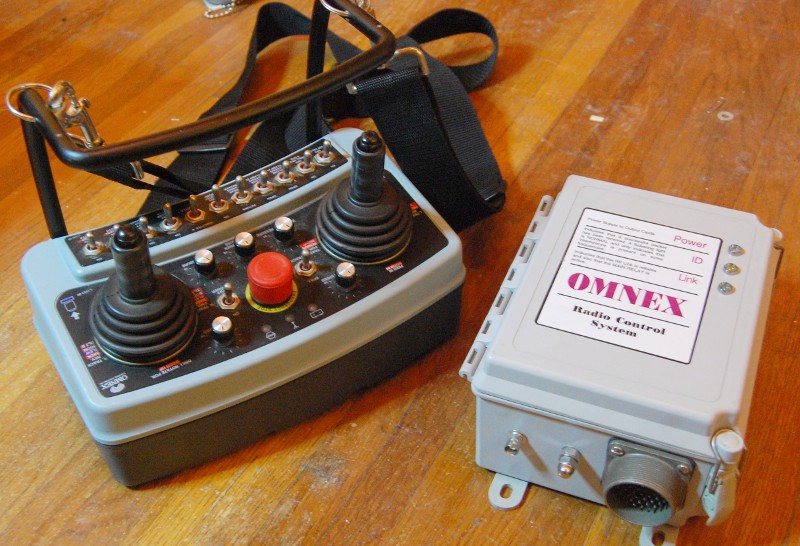
    It's the radio control belt pack and receiver for an extremely large piece of mobile outdoor industrial equipment. These devices were engineered-to-order; while the radio circuitry and basic configuration options (dual analog joysticks, E-stop, enclosure, etc) were standardized across the product line, we provided the systems with a customized set of switches and knobs along with a beefy Amphenol connector for easy integration into existing equipment. My boss gave it to me when I offered to buy it. Awesome!

    I'm excited about this platform because the hardware is ridiculously awesome. The belt pack is designed to work year-round outside in Minnesota; the switches all have rubber sealed boots, and the joysticks are extremely rugged. While the first course of action is clearly to take it apart, my basic plan is to update the RF and I/O guts to make it more suitable for GimbalBot. The receiver weighs a few pounds and communicates via Modbus over RS485; a great protocol if you need to go far in a noisy environment, but I need something that weighs fifty grams or less (I'm guessing the connector alone would exceed that).

    Unlike some of my other hack-apart-and-sorta-fix-up projects, I want to do this one right. I don't want to add any new penetrations to the transmitter's enclosure, allowing me to comfortably maintain its environmental protection capability. Realistically, I could see installing a few heavy-duty bulkhead connectors for things like an external antenna. 

    The cross bar--in addition to acting like stool legs when you flip the entire unit upside-down to use as a chair--would make a great mount for an FPV monitor. Other than that, I want to keep all the modifications internal and ideally use the existing battery compartment for its original purpose. I'm hoping that the internal switch connections use screw terminals, so...

    Read more »

  • Project Morpheus

    zakqwy09/03/2014 at 00:46 2 comments

    During a conversation earlier today, Arsenio Dev mentioned Project Morpheus. I recall occasionally seeing videos of the vehicle online in the last few years, but I hadn't closely followed its progress over the last few months. He recommended that I take a look at some of the videos related to tethered testing. I'm glad I did:

    First of all, the music is amazing. Secondly, if you fast-forward to 2:10 or so (although you should really watch the whole thing), you'll see the test craft suspended from an overhead crane and anchored at four points to the ground. It's a great setup; the craft is constrained in all axes but still free to apply forces to the cables. I think a setup like this could be ideal for early GimbalBot tests, as I could insert gradual amounts of cable slack as the control algorithms improve. Maybe I could use a series of cheap spring-loaded scales to characterized the thrust vector produced by the craft. Either way, I'm still starting with static (fully constrained) tests.

    Time to go watch more Morpheus videos; the archive is quite awesome indeed. 3D printed parts shipped today, so we're on schedule to start crudely instrumented experiments shortly.

View all 70 project logs

Enjoy this project?

Share

Discussions

Benjamin wrote 05/02/2014 at 18:32 point
Well done man! Cheers to you!

  Are you sure? yes | no

zakqwy wrote 05/02/2014 at 19:12 point
Thanks! Still a long way from a prototype, but I'm looking forward to the journey.

  Are you sure? yes | no

Benjamin wrote 05/02/2014 at 19:15 point
And that is what makes you great! Keep the good work!

  Are you sure? yes | no

curtis.layton wrote 05/02/2014 at 13:09 point
You can use brushless motors and controllers from the quad rotor scene. There are also a ton of different props to choose from.

You could look into using a voice-coil type actuator (like what controls the arm on a hard disk) for your gimbals. Hobby servos have also gotten really excellent, especially the pricey ones. I would stay away from steppers I think, they are heavy.

We have been using the RTOS ChibiOS for the snakes running on an ARM Cortex M4 processor (STM32F4). If you use an STM32 discovery board, this is a very powerful and also very cheap solution.

http://www.chibios.org/dokuwiki/doku.php
http://www.digikey.com/product-detail/en/STM32F4DISCOVERY/497-11455-ND/2711743

As far as sensing, combined mems gyros and accelerometers are a dime a dozen these days. We use this model in the snakes: https://www.sparkfun.com/products/11486. It also has a compass. The actual IC costs less than $10. The accelerometer will give you an absolute gravity vector, and the gyro will give you fast angular velocity measurements that you can integrate. It seems like there are a lot of good resources out there for combining the data.

This is an awesome way to implement an inverse pendulum! The more weight to you move to the tip, the easier it will be to balance. I remember doing the math for this in school. In the class, if I remember correctly, we used LQR control. It was one of those things that took me a long time to understand and about 30 seconds to forget.

  Are you sure? yes | no

zakqwy wrote 05/02/2014 at 19:21 point
Thanks for the comments Curtis, both here and elsewhere. A few notes:

The microprocessors I've used in other projects: ATtiny44as and 45s, ATmegas of various sorts, and [as you surely remember] BASIC stamps definitely lack the horsepower for this type of project. Without doing much research, I'm taking your word on the ARM Cortex M4, so I ordered a few of those fantastically cheap discovery boards from DK. I'm looking forward to learning more about ChibiOS too, an open-source RTOS is such a great concept!

My experience with voice-coil type actuators was for a laser light show project way back in the day; trying to build DIY galvonometers. I think you're right though, that's the correct solution here; ideally, I'd be able to mount a pair of opposing rotary voice coil actuators on the second ring to control propeller tilt.

The sensor I've got stashed in a drawer on the bench is another Sparkfun breakout board; I think it's an older model as it separates the accelerometer, gyroscope, and magnetometer into three chips. Probably time to dust it off and see what it can do.

  Are you sure? yes | no

Similar Projects

Does this project spark your interest?

Become a member to follow this project and never miss any updates