Close
0%
0%

Vertically mounted Arduino for Breadboard

This is an Arduino-compatible, vertically-mountable microcontroller board made entirely of TH components

Similar projects worth following
I personally love the concept of electronic boards connected in "slots" (vertically attached to a horizontal board), like most industrial-grade PLC's or even our desktop's expansion cards (video, sound memory): it saves a lot of space and adds more functions to the system, all at once!.
This is yet another Arduino compatible stuff, but with an interesting difference: it is meant to be vertically mounted to a breadboard or PCB, different from the Arduinos we see out there (that you attach horizontally to the breadboard or PCB).
The schematic diagram is based on the Arduino UNO schematic diagram from arduino.cc website, except that I have removed all USB-to-Serial circuitry, making it more like an "Arduino Pro Mini" compatible.
I tought this concept might be interesting to breadboard prototipying, since it doesn't spread components all around the breadboard and also does no occupy both sides of it.

Basically what I did was download Arduino UNO design files from the Arduino.cc website and strip down all parts and circuits I didn't need; I also replace most parts for similar/compatible ones from Adafruit/SparkFun/SeeedStudio Eagle CAD libraries.

My final goal was to creat an all-Through-Hole (TH) board that could be assembled by virtually anyone with a soldering iron and some will to do it.

The result of this work would be (I tought) an Arduino-compatible (vertically)- attachable prototipying board for breadboards or final products.

DSC_0025.JPG

JPEG Image - 1.97 MB - 03/15/2016 at 17:23

Preview

DSC_0028.JPG

JPEG Image - 2.05 MB - 03/15/2016 at 17:23

Preview

  • 1 × ATMEGA328P-PU Microcontroller
  • 1 × 16MHZ crystal Oscillator/ressonator
  • 1 × 7805 Linear voltage regulator
  • 1 × LED Red 3mm for power and Green 5mm for PIN13
  • 1 × P4 jack Power jack for VIN input

View project log

Enjoy this project?

Share

Discussions

sypniewski wrote 12/30/2016 at 17:16 point

I just received your board. I see that there are five components listed and I know where on the board they go but the board contains many other connections for other components. What are they for? Can I leave them disconnected?

  Are you sure? yes | no

Clovis Fritzen wrote 01/01/2017 at 15:45 point

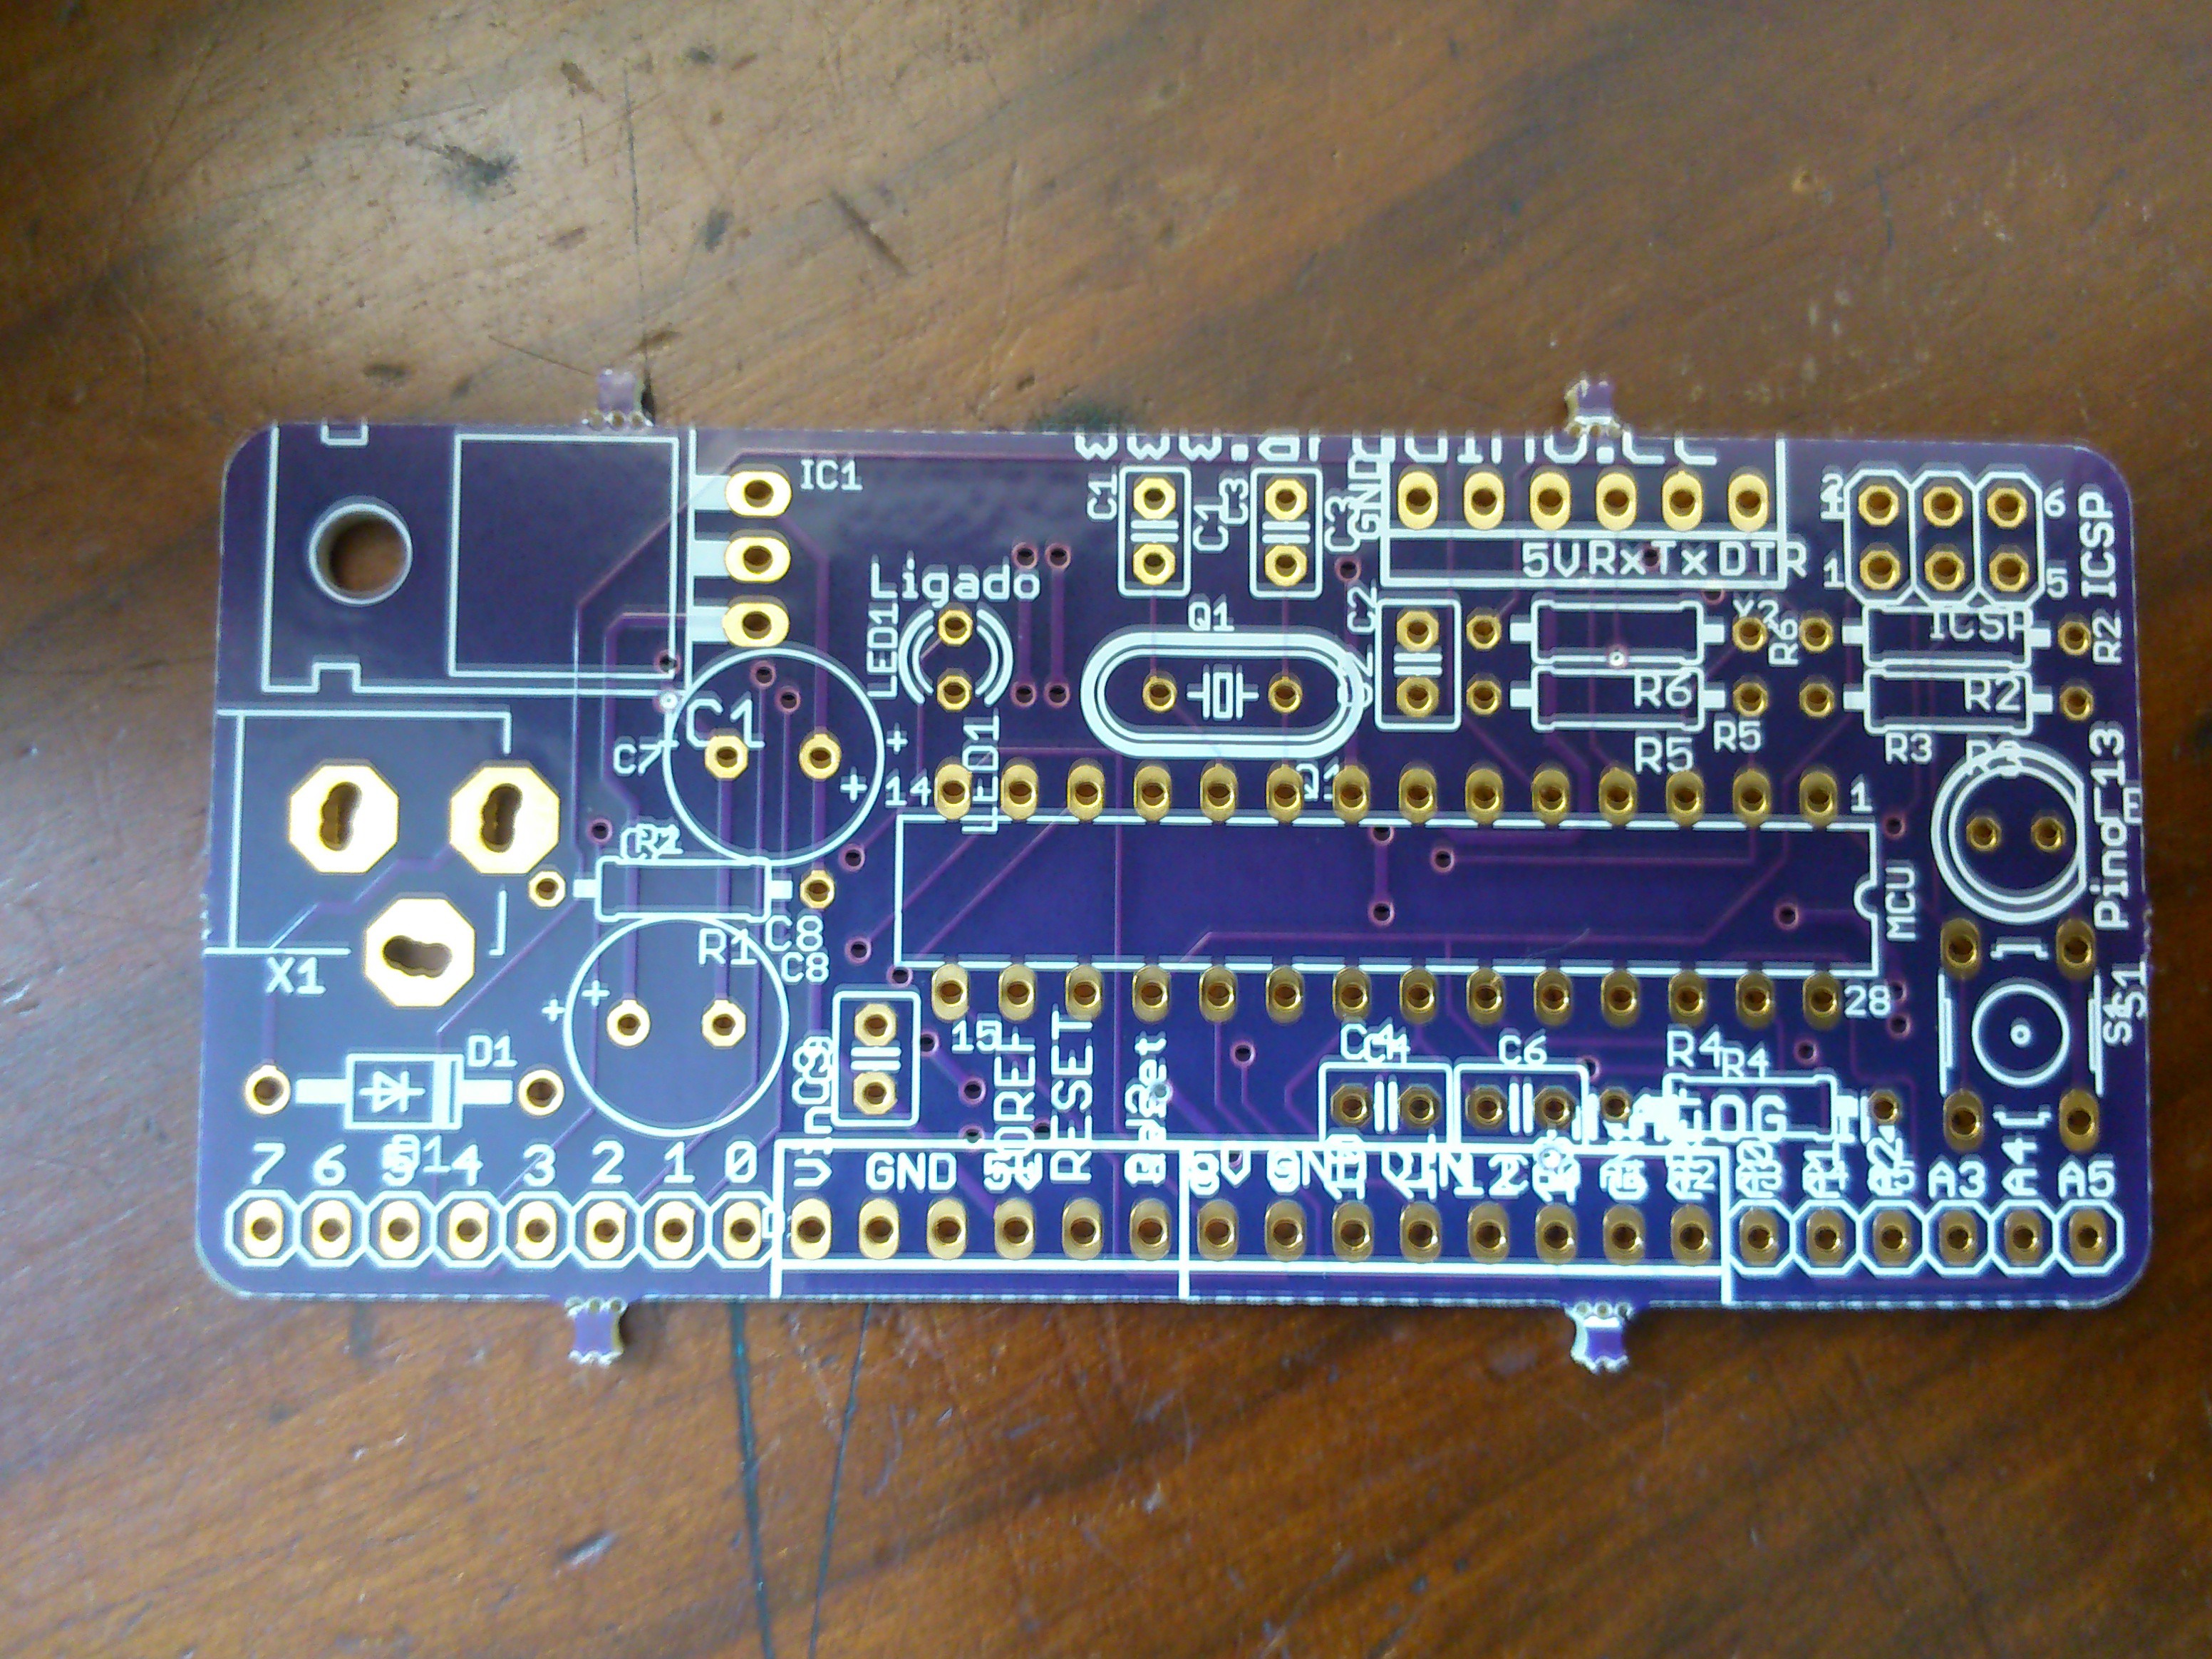
Hey, what a good news!. Look at this image: (
) there are 6 resistors (R1..R6, all 1k), two 22pF capacitors (C1, C3, for the cristal), 4 100nF capacitors (C2, C4, C6, C9), two 10-47uF capacitors (polarized). The top-right 6-pin connector is ICSP (same as Arduino UNO) and the 6-pin header by the side is for serial communication (USB-serial converter). If you have Eagle CAD installed, you can open the .sch file available here: https://github.com/FritzenLab/Fritzen_Proto-controller

  Are you sure? yes | no

Gabriel wrote 03/09/2016 at 12:45 point

Awesome work! 

Ive been doing the same for years but with PICs (not trying to Hipster/hate).

Its an awesome way to prototype and im glad to see other people reaching the same conclusion.

  Are you sure? yes | no

Clovis Fritzen wrote 03/09/2016 at 14:08 point

Thank you! that's true, vertically mounting PCB's on onther PCB is not a  new concept, and I'm impressed to learn that so many people are still into it. Thank you!

  Are you sure? yes | no

Mike Maluk wrote 03/07/2016 at 19:41 point

I love this idea, absolutely brilliant.

  Are you sure? yes | no

Craig Hissett wrote 03/07/2016 at 15:24 point

This is great.

I'm currently working on a project that has components mounted in a DIN enclosure that I am struggling to fit everything in. a Vertical mounting board is a great idea!

  Are you sure? yes | no

Clovis Fritzen wrote 03/07/2016 at 16:19 point

That's true, with the horizontalization of things (board) people sometimes forget the can be put in vertical as well ! hahaha

  Are you sure? yes | no

Craig Hissett wrote 03/07/2016 at 16:34 point

Ha ha!, It's more the way vertical and horizontal can be place side by side in perfect harmony that I most admire :)

  Are you sure? yes | no

krahabors wrote 03/07/2016 at 09:29 point

I just did exactly same thing for ESP-12 module, as existing breakouts are not usable on single standard width breadboard.

  Are you sure? yes | no

danjovic wrote 03/07/2016 at 02:45 point

Vi o seu post no HAD e bolei um também: #SILSpark

  Are you sure? yes | no

Clovis Fritzen wrote 03/07/2016 at 03:33 point

Nice work, I'm glad to inspire people on their own hacks!. Followed you and will be looking for progress on your project.

  Are you sure? yes | no

Nico Verduin wrote 03/05/2016 at 14:28 point

Good effort!! Although I doubt I'd use it in a final product. You would still need a base board and that would make it more fragile. If I would just use an Arduino as a finalproduct, I would remove the connectors or buy a mini pro and solder screw terminals on it. Making it more rugged

  Are you sure? yes | no

cyplesma wrote 03/04/2016 at 04:42 point

Nice. It would be easier to get these on a back plane of some sort to have several work together.

  Are you sure? yes | no

Similar Projects

Does this project spark your interest?

Become a member to follow this project and never miss any updates