Joel Fairstein
-
Blondes have more fun.
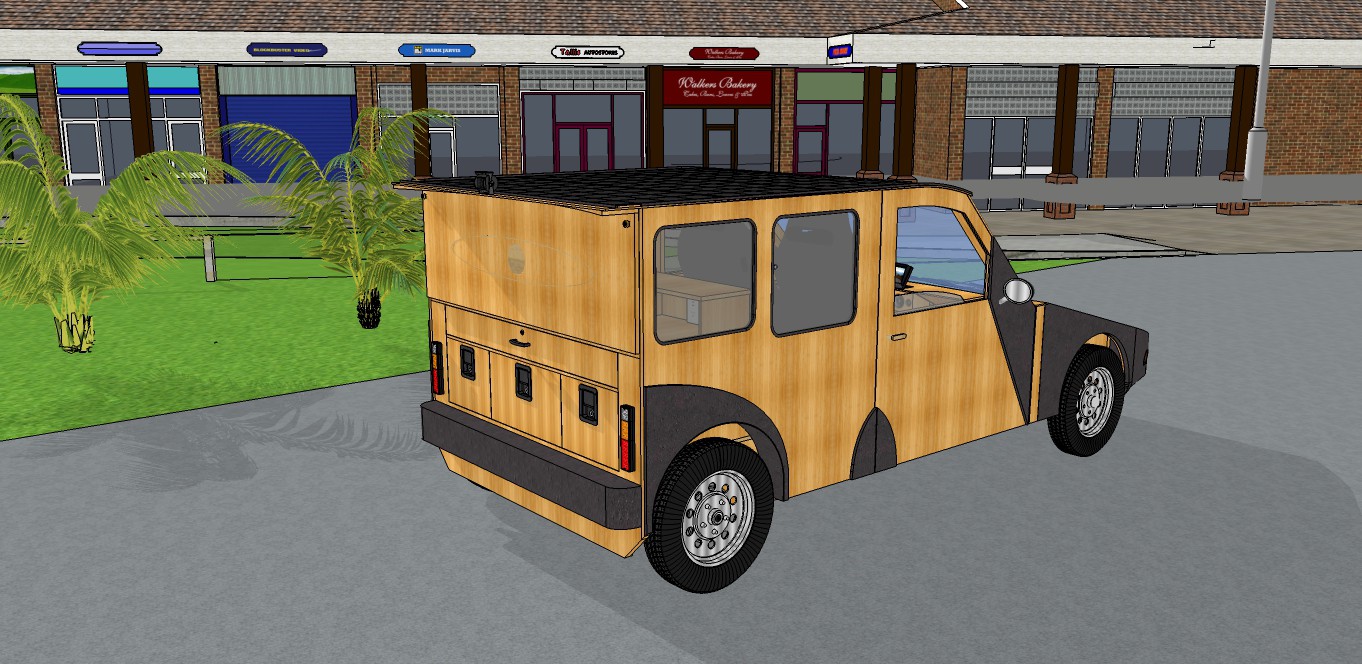
06/10/2016 at 08:09 • 0 commentsI've decided the wood finish should be more of the natural blonde or strawberry blonde color of douglas fir rather than a stained cherry finish. This will save some time and money and also keep the car cooler inside.
![]()
I've renamed the project A practical solar car for $15k to emphasize its low cost rather than its wood construction.
-
Image tweaks and build plans
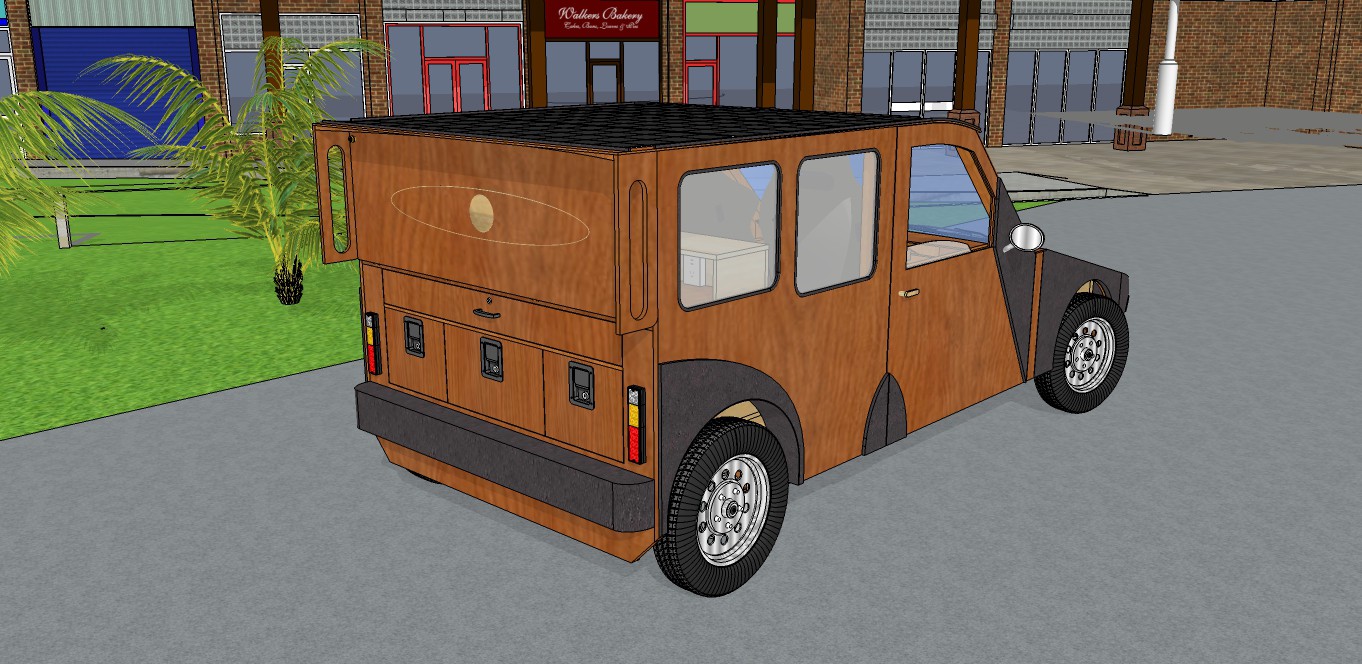
05/23/2016 at 10:14 • 0 commentsI changed the wood finish to a dark cherry and made some better scene renders, which I hope are a little more pleasing to the eye than my earlier Sketchup exports. As far as building this thing, first I need to move my family back to the US from China this Fall and find a house with a decent garage or workshop area. If I can secure some modest funding, I'll start the build, which I figure will take about eight months. After that, another four months of testing and corrections, then I can release the final plans free and clear to the public.
![]()
I'm anticipating some areas of difficulty:
1) Door and work area clearances. Temperature doesn't affect wood dimensionally as much as does humidity, so I'll measure clearances between the door and body on different days in order to track and predict changes. If I use marine-grade plywood, this won't be much of an issue.
2) Integration or solar charging and AC charging. Not sure if there will be a switch between the two or if they be rigged to can charge concurrently. Also, the MPPT (maximum power point tracker) has to be set up just right for the solar charging.
3) Suspension tuning. I hope the suspension design parameters are close enough that I can take the car to a good alignment shop and have them do their thing. I'm using adjustable coilover shocks with the lightest springs available, but the ride may still be stiff since the design is so lightweight.
4) Hub motor setup and performance. The car may be under-powered with only two 3000w motors, but there's not much range of product out there that's affordable. I'd rather have a lower top speed in exchange for good starting torque, if that solves the issue.
-
Floated the front bumper
05/21/2016 at 07:29 • 0 commentsA real issue with any car is the likelihood extensive damage even after low-speed collisions. I totaled a Ford Taurus once in a parking lot doing only 5 mph. The bumper and front molding cracked, various metal parts behind that were bent, and the radiator burst. I couldn't believe how bad the damage was. So, with the solar car of wood I've designed a bumper that floats on four inches of expanded polypropylene foam, which has shape memory. That's in addition to the existing 2" foam block in front of the bumper. There's also another 2" hump in front of that as well as 1" foam above and below the lights. The fender corners are also floated on four inches of foam and the fenders themselves are polypropylene over wood. The front bumper will be held by heavy-duty spring fasteners, since polypropylene adheres poorly to other materials. My hope is this car can withstand a 5 mph collision with no damage and possibly a 10 mph collision with minimal damage. This, I believe, is really important in a city car!
![]()
-
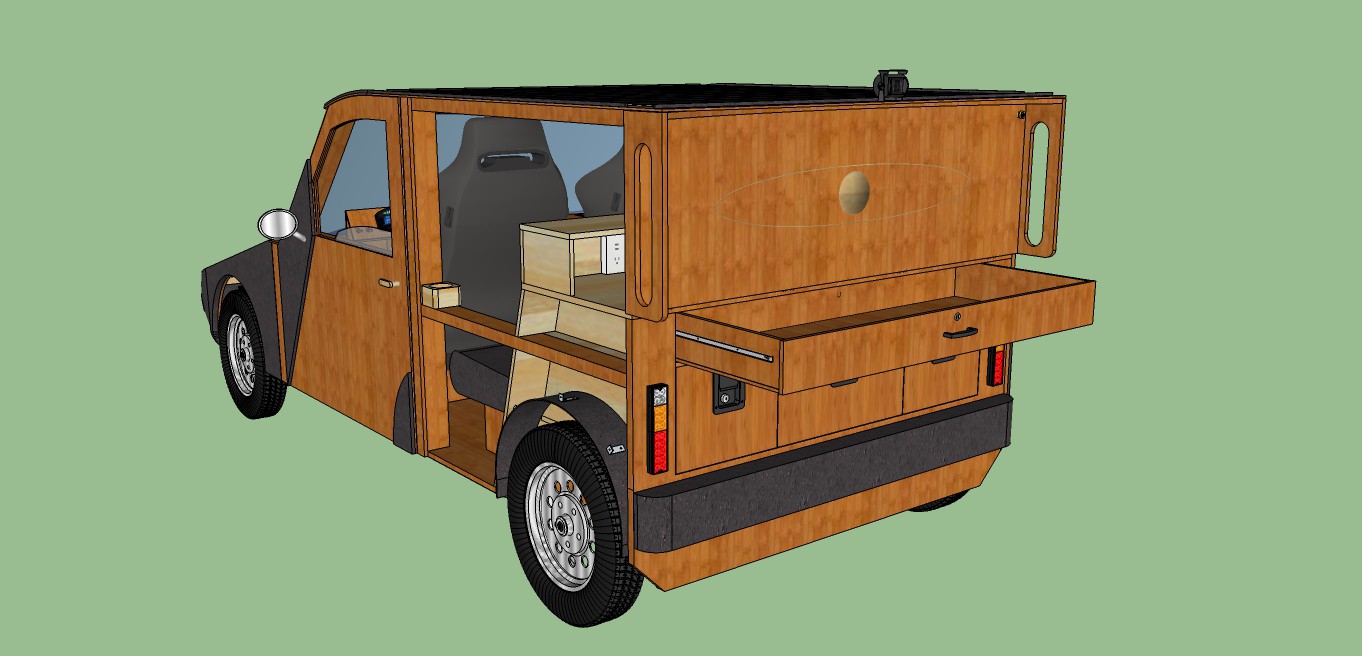
Cargo area improvements
05/12/2016 at 03:55 • 0 commentsThe front cargo area (light colored wood) now has a diagonal board for better fore-aft bracing. In back, a 48"-wide drawer for long items or artwork replaces three desk drawers . When pulled out, it can also help support the fold-down work surface. The lower drawers on either side are now standard file-size for carrying documents--handy for doing business or real-estate. The larger drawer in the middle can be insulated for food and beverage. All drawers are equipped with high-quality slides, and the lower drawers have locking latches.
![]()
-
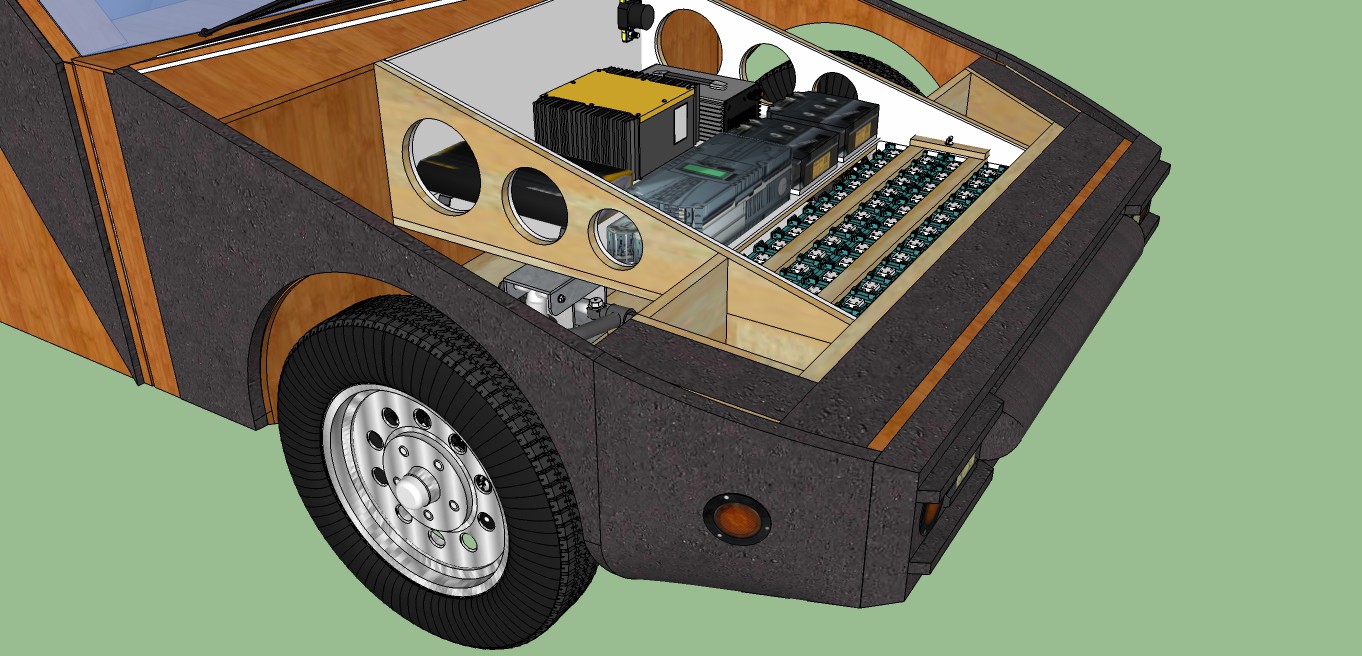
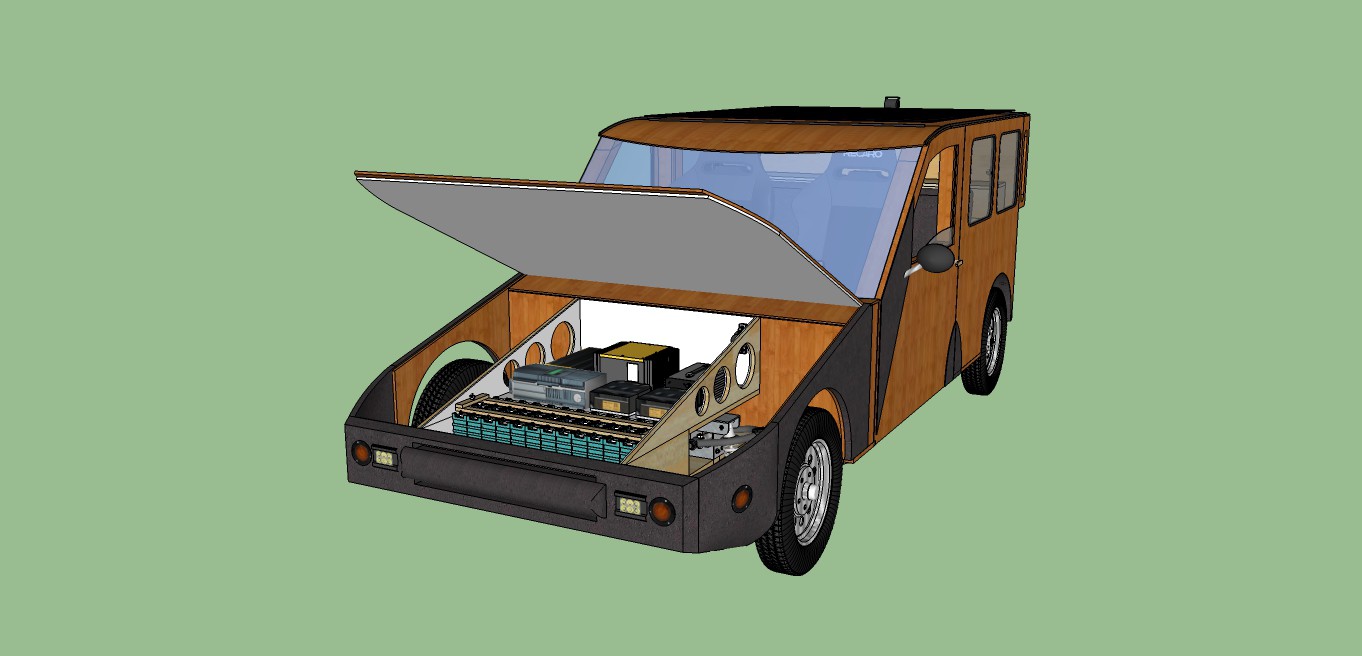
Batteries, safety features, and other improvements
05/08/2016 at 05:54 • 0 commentsI made several design changes for safety and practicality:
- Batteries moved lower and forward.
- Reinforced electrical area under the hood and opened up air channels.
- Reshaped fenders for wheel clearance.
- Enlarged front bumper and added vent slots.
Added rear strut rods and emergency brakes.
![]()
With these changes, I hope I've addressed most of the practical and safety concerns of making a solar car out of wood. My thought process now will be about the wood joinery and how to reduce weight as much as possible without sacrificing structural integrity.
-
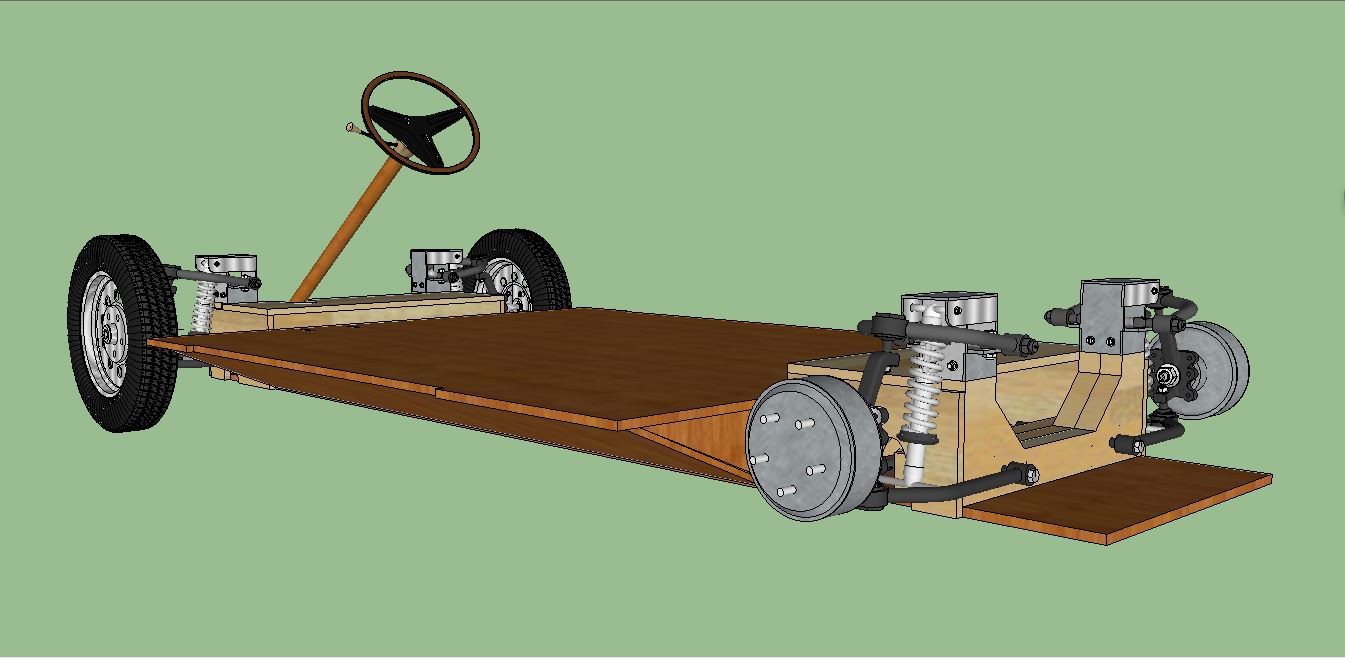
Redesigned rolling chassis
05/05/2016 at 01:15 • 0 commentsThe rolling chassis has been re-designed to integrate the new suspension geometry. An under-carriage trapezoidal box frame connects the front and rear suspension modules, which are themselves boxed into the chassis. Longitudinal torsional stiffness, my main concern before, should be more than adequate. The idea from here on out is keeping vehicle weight down, currently around 1300 pounds, as any weight savings translates into increase battery range.
Several other changes were made since the last update:![]()
Integrated hub motors into rear suspension with custom metal brackets.
Wheel diameter increased 2" to accommodate modern disc brakes.Increased track width by 5".
Raised body 5". -
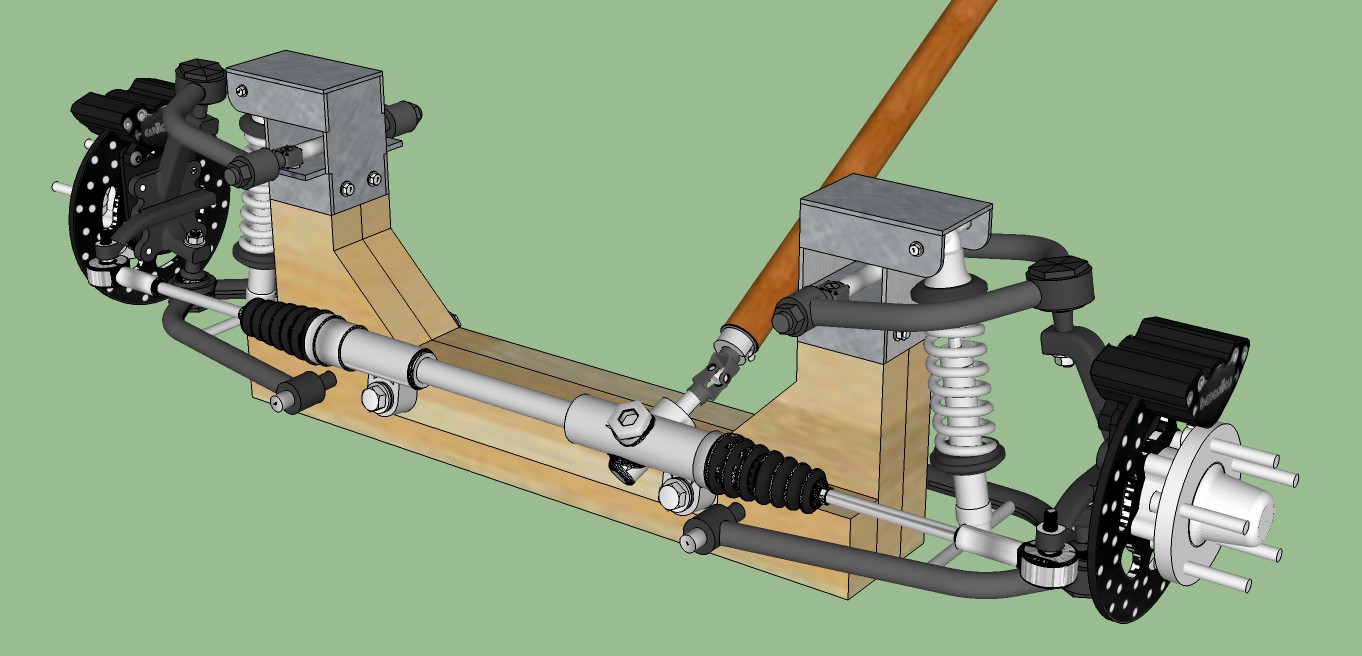
Suspension designed
04/22/2016 at 02:43 • 0 commentsThe suspension design has so far been the most challenging task. I've designed a front double-wishbone suspension with a triple-laminated cross member. Rear suspension will be narrowed to accommodate the width of the hub motors. The shock tower boxes will be fabricated from 3/16" steel and attached to each side of the crossmember. The brakes are Wilwood drag-racing brakes to save weight. The QA1 coilover shocks have ride height and rebound damping adjustments. This baby should really handle! The next challenge will be to rigidly integrate the suspension to the rest of the frame.
![]()
-
Waiting for suspension measurements
03/17/2016 at 02:46 • 0 commentsAt this point, I've designed the entire car in 3d but with only an approximated suspension. Suspensions are notoriously difficult to design, so I'm waiting on a set of plans based around the Mustang II double wishbone suspension, which is the go-to suspension for street rods. I've even seen it used in VW type 1 and type 2 bolt-on kits. It's a proven design and aftermarket parts are readily available.
I'll build the cross members to spec using box beams and then attach all the metal parts in the correct locations. This way, front and rear suspensions are modules that can be attached to the box beam frame member. That said, I will probably extend the suspension side walls longitudinally to form a longer bond surface to the frame.