Close
0%
0%

ViaConnect Circuit Board Test Tool

Have a via on a circuit board that needs to be tested, but can’t or don’t have a connector? just use the ViaConnect.

Similar projects worth following
More people are interested in electronics than ever. But some struggle to get started. Software developers are often intimidated by the hardware & may not have soldering equipment (or interest!). Educators want safer, easier ways to get students using circuit boards. Engineers & circuit board designers want simple assistive widgets on their desks for quick prototyping. All could benefit from ViaConnect.

ViaConnect joins a wire directly to a circuit board via through a removable jumper. It is designed for prototyping, education, & hobby electronics—whenever speed & flexibility are important, or whenever soldering is impractical. Think, the “plug and play” of header connectivity.

The ViaConnect enables people to use boards that don't have headers (e.g. Teensy, Raspberry Pi Zero & Trinket) without soldering. It enables the quick test point that I have been waiting many years for in my work as a Sr. EE, electronic hobbyist, and tutor.

ViaConnects plug directly into plated vias that are sized for 0.1” headers. It’s like a “Dupont” jumper wire, but for boards that don't have headers. It works by conductive fingers making contact inside the barrel of a via.

Project Goals:
*Removable, temporary [goal met]
*Eliminates the need to solder [goal met]
*Connection to standard .1" spaced vias [goal met]
*Causes little or no damage to the via [goal met, multiple mates did not show any difference in the via copper pillar under a 20X scope]
*Easily producible [very achievable as contacts used are already in production]
*20MHz frequency at min. [goal met with passing a 20MHz sine wave through the pin]
*100mA min. current capability [goal met. Additionally, the datasheet states 2 Amps!]

The original CAD files are located here: https://github.com/SpinInven/ViaConnect. The instructions to build a working prototype are below. The contact used is detailed here with a 3D model: http://www.te.com/usa-en/product-2-173983-7.html.

In the movie "Hudsucker Proxy," the lead character Norville Barnes draws a circle on paper and says “You know, for kids.” Like Barnes’ hula hoop, sometimes something that should be obvious just needs to get the right attention. The ViaConnect is a great tool for any electronics toolbox. It fills a true gap; I don't know of anything else that accomplishes the same goal.

I hope you find it useful and use it for your next hack!

ViaConnectDraft1.stl

Concept, see instructions for current solution

Standard Tesselated Geometry - 439.91 kB - 05/28/2016 at 03:38

Download

licence.txt

This project uses the CERN Open Hardware License v1.2

plain - 8.94 kB - 05/28/2016 at 03:37

Download

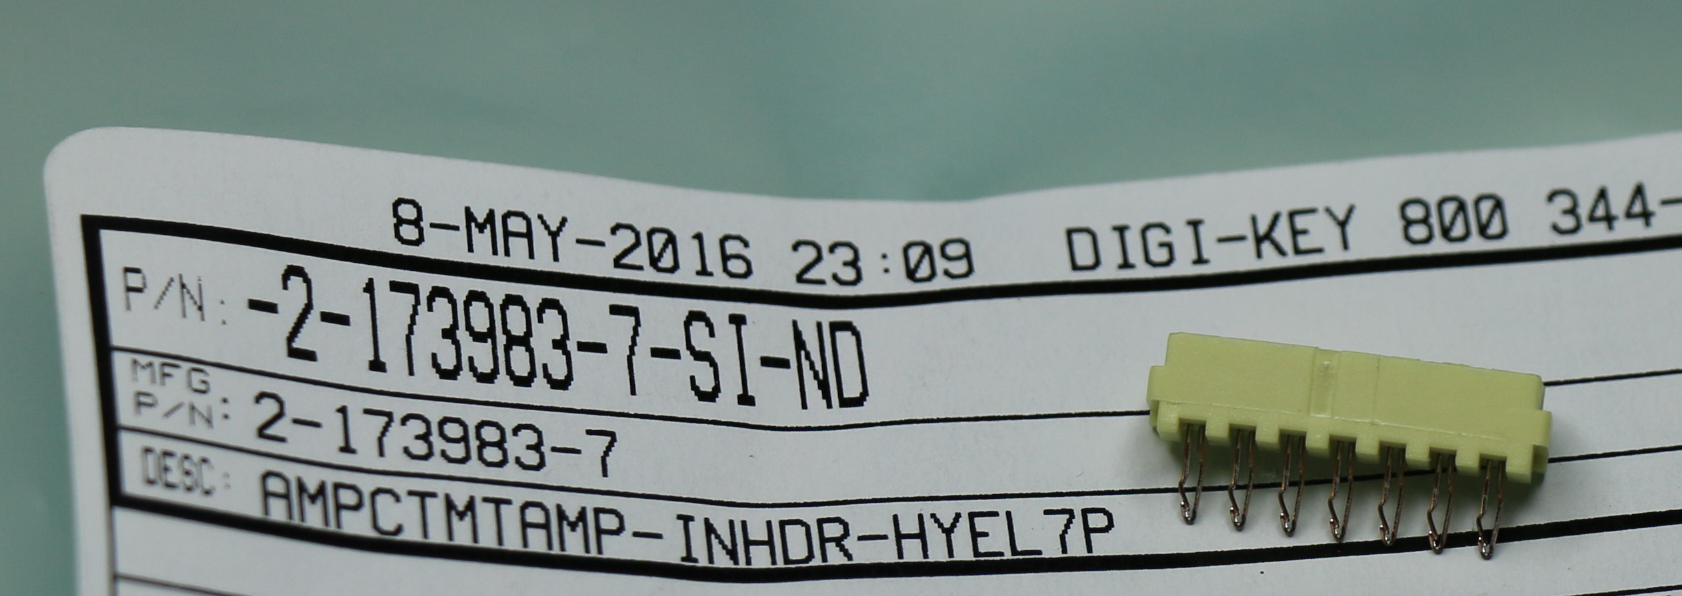
  • 1 × TE Connectivity 2-173983-x (where x=2,3,4,5,6,7,8, or 9) The contacts are used to connect to the vias
  • 1 × Dupont Jumper Wire Cable Male Pin Connector Used to connect to the wire
  • 1 × Dupont Connector Housing Female 2.54mm 1x1P Standard housing
  • 1 × 24 to 28 AWG wire use any length you wish
  • 1 × solder only need a small amount to connect the TE contact to the Dupont connector

View all 6 components

  • Back to Hacking

    David Spinden08/18/2016 at 01:21 2 comments

    After a summer "break" of staining a deck, hanging with the family, and submitting a change to GPS for a warning message, I am back with an update. I wanted to show how this can automates a process.

    Several evaluation and prototyping boards including the Teensy do not include connectors. Adding connectors require soldering...until the Viaconnect. If you are not sure you want to commit something to solder, the ViaConnect can allow you to test.

    Say you get a ding and dent item from Sparkfun that just has 0.1" connector vias. How do you test this without soldering a connector? The ViaConnect automates the process of testing to see if the board is working much faster than adding connectors via soldering.

  • On top of the World

    David Spinden06/04/2016 at 03:10 0 comments

    I am pleased to say that this project made the HaD blog:

    http://hackaday.com/2016/06/01/hackaday-prize-entry-you-know-for-kids/

    What an honor! Both the write-up and comments were kind and helpful. I have some good questions to answer on my description, but for now, it is great to see that other people get the concept and find useful as I do.

    Feeling on top of the world,

    David

    P.S. I am honored that Hackaday posted my project again: http://hackaday.com/2016/07/09/hacklet-115-more-quick-tool-hacks/. It is like bringing a ladder to Mt. Everest...on top of the top.

  • The Art of Finishing

    David Spinden05/30/2016 at 03:13 1 comment

    I am happy to say, that I met all my goals for this project. Not only that, but I finished the project before the deadline. What a rewarding experience for me. This is the first project that I set out to do with the mindset of making it open and documenting it. It was no surprise to me that the video and pictures took the largest part of the project's time. I hope that they are of benefit to many others. For me, it has been a great education.

    It was aslo rewarding to carry an idea from concept to prototype. I get to see my products as work go through the steps, but I am often out of the loop of many of the steps. This project was defined and small enough that I was able to see each step through and learn along the way.

    This project is complete. That said, I am still looking for someone to manufacture it. I would love to have this taken to the next level where the contact is even stronger and maybe sized for other vias (such as the some of missing connections on a Raspberry Pi Zero). Know any leads?

    I look forward to the next project that I can share and learn. Until then, happy hacking!

  • End to End Solution

    David Spinden05/30/2016 at 02:38 0 comments

    The ViaConnect works for standard 0.1"/2.54mm header vias (about 35mils wide), but what about the other end? To name a few, It can be:

    • 24-32 AWG to 32 AWG wire
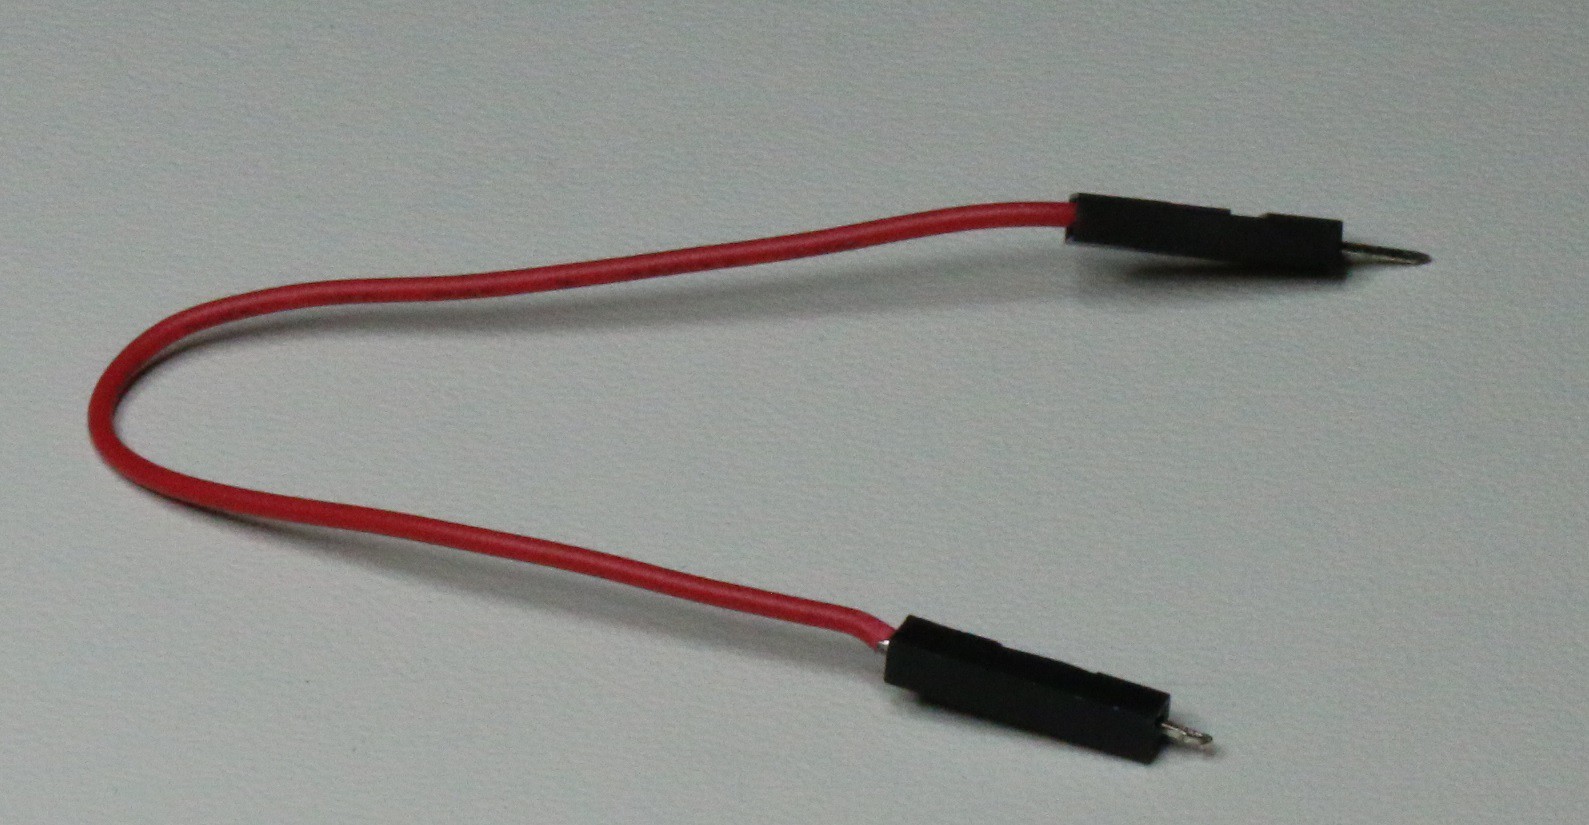
    • A standard Dupont header or socket
    • RF connectors such as BNC and SMA with one ViaConnect being the ground
    • Banana Jacks or JST connectors for power applications

    Here is a picture showing a Dupont header in the back as an example:

  • If a Picture is Worth 1000 Words, What About a Video?

    David Spinden05/19/2016 at 02:46 0 comments

    Here is a quick video showing the ViaConnect snaping into an Arduino Leonardo:

  • Of Current Frequency

    David Spinden05/18/2016 at 03:21 0 comments

    Two goals of this project are:

    *20MHz frequency at min.
    *100mA min. current capability

    I tested the 100mA requirement with a 42 Ohm resistor and a 5V power supply. I am happy to report that it could handle 120mA without any issue. I am sure that it can handle more, just was short on time yesterday.

    The 20MHz frequency requirement is beyond any test equipment that I have at home. I was able to test 200kHz with a Tsunami Arduino board and my TPI 185 multimeter (it maxes out at 200kHz). I hope to test it at work, but for now, I can say that it will do basic PWM out of an Arduino.

    Making progress...

    Update, one day later I was able to borrow a frequency generator and an oscilloscope to verify that a 20MHz sine wave can make it through the TE contact!

    Mission accomplished!

  • Reusing Connectors

    David Spinden05/14/2016 at 19:10 0 comments

    After ordering more than a dozen connectors and pins off of Digikey, I found a connector that is just what I am looking for, the TE 2-173983 series connectors. I got the -7 at Digikey, but any of the series has the same contacts. The key is that the board mate is not a solid loop, but two separate fingers somewhat like a rock climbing carabiner. This gives it some spring on the board mount section, perfect for this project. That said, the top half of the contact is all wrong. It is designed for a wire press fit, so I'll need to do some hacking.

    It took more than 10 hours of searching to find this one, but excited about the results.

  • About Vias

    David Spinden04/30/2016 at 02:08 0 comments

    In talking with my wife about this project, more information about vias may be needed. Contextual Electronics' latest email covers the topics well in this video: Vias.

    In this project, we likely will be grabing the copper of the barrel to make the conductive connection.

    Hopes this helps.

  • Still Reserching: More things to Hack?

    David Spinden04/24/2016 at 13:35 0 comments

    The ViaConnect need to grab the copper on the barrel of the via somehow.

    Here are some possible existing solutions that might be adapted (i.e. may need to be shrunk) or hacked:

    • Dowel pin
    • Spring pin (coiled or slotted)
    • A fastener similar to ear rings
    • Cotter pin
    • Taper pin

  • Hack my way?

    David Spinden04/10/2016 at 19:31 0 comments

    This weekend, I ordered a Dupont crimper tool and a Dupont Connector Kit. I did not realize that these connectors were called Dupont connectors until trying to avoid buying 2.54mm housings from fishy Chinese sites...and found what I was looking for on Amazon.

    Next step is to see how easy it is to hack different connector male pins into one of the Dupont housings. This connector seems hopeful: TE Connectivity AMP Connectors 2-173983-2. The datasheet show a 0.9mm body that might have some spring to it. Can it be hacked? I'm doing some more searching on DIgikey to see if there are other connectors that having something like it before ordering to try to keep shipping costs down.

    That is all for now.

View all 11 project logs

  • 1
    Step 1

    Step 0: First will start with the supplies

    Parts List:
    •Dupont Jumper Wire Cable Male Pin Connector
    •Dupont Connector Housing Female 2.54mm 1x1P
    •TE Connectivity 2-173983-x (where x=2,3,4,5,6,7,8, or 9)-->Called the TE connector from here on
    •24 to 28 AWG wire
    •solder
    •masking tape

    Tools:
    •Dupont Crimping tool
    •Soldering Iron
    •Wire Cutter
    •Razor Blade Knife
    •Needle Noise Pliers

    Note: This documentation describes Open Hardware and is licensed under the CERN OHL v. 1.2.

    You may redistribute and modify this documentation under the terms of the CERN OHL v.1.2. (http://ohwr.org/cernohl). This documentation is distributed without any express or implied warranty, including of merchantability, satisfactory quality and fitness for a particular purpose. Please see the CERN OHL v.1.2 for applicable conditions.

  • 2
    Step 2

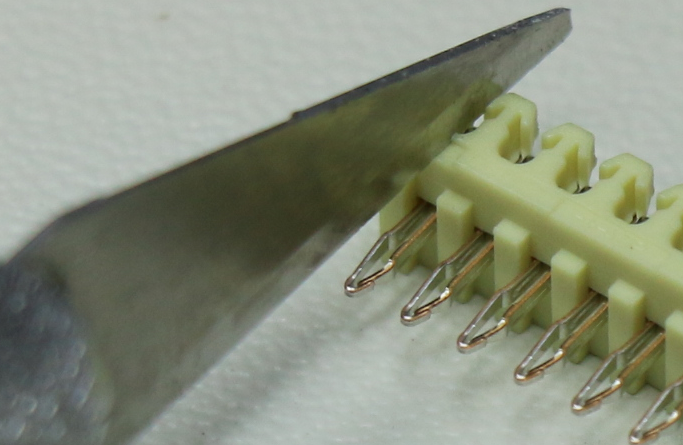
    Step 1: Remove the contact from the TE connector.

    Using a razor blade, cut into the TE connector as shown above. You do not have to use much force. The goal is just to loosen the plastic so that the contact can be removed. As seen below, I stopped cutting right above the contact.

    To remove the contact after cutting the plastic, just push on the bottom of the contact up through the connector.
  • 3
    Step 3

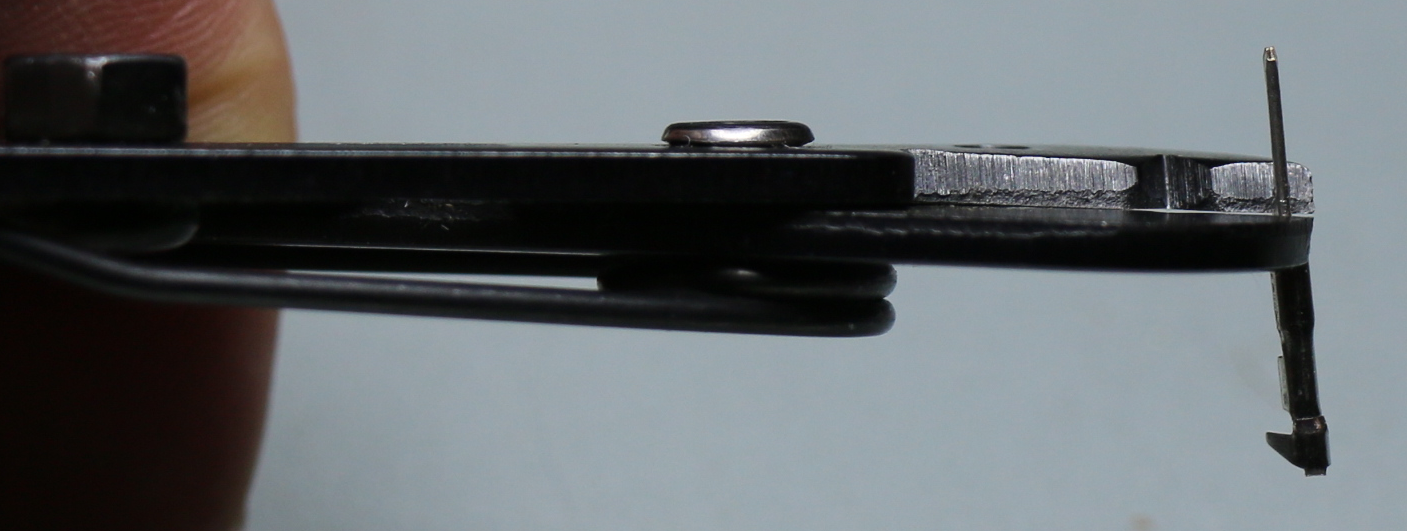
    Step 2: Prep the Dupont Connector

    Take the Dupont Jumper Wire Cable Male Pin Connector and cut most of the pin off using the wire cutters. The second picture shows how much to cut.

View all 6 instructions

Enjoy this project?

Share

Discussions

perigalacticon wrote 10/23/2017 at 07:41 point

So much better than a header because you can see exactly where your pin is connected to instead of trying to line up rows of black voids with the silk print below from a funny angle in dim lighting.  Please make millions.  

  Are you sure? yes | no

Mjolinor wrote 06/01/2016 at 12:03 point

I do this:

Sorry, someone deleted the link, I assume it is against soem rule or another.

I thought everyone did.

  Are you sure? yes | no

David Spinden wrote 06/01/2016 at 17:12 point

Excellent hack!  I have never seen or heard of doing anything like that with those kind of clips.  You are not exposing the wire on the blue wire, correct (the blue wire is just for holding the clip)? 

Thanks for sharing. 

  Are you sure? yes | no

Mjolinor wrote 06/01/2016 at 17:50 point

The wire is just holding the clip. I actually use filament that comes out of the nozzle of my 3d printer but there was non handy this morning when I set the picture up.

  Are you sure? yes | no

Eric Hertz wrote 06/01/2016 at 22:33 point

Seconded. It probably helps to reform those clips back to normal after excessive normal use, as well. Definitely throwing this in the bag 'o tricks. OTOH, not nearly as compact as your project, David. Would be difficult to do this in two rows, for example... and I'd be afraid too much torque (like the sorts I apply to my test-clips far too often) would break 'em.

  Are you sure? yes | no

David Doyle wrote 05/24/2016 at 13:30 point

You should have gotten a patent for this.  

  Are you sure? yes | no

David Spinden wrote 05/24/2016 at 17:46 point

Glad you think it is a good idea! While it would be nice to get a patent, I want this to be a tool that lots of people use to make and learn so much more.

  Are you sure? yes | no

Simon wrote 08/15/2016 at 19:15 point

Check out also "press fit" connector widely used in automotive industry. I'm not sure if this can be patented due to this fact. Any way good idea!

  Are you sure? yes | no

Eric Hertz wrote 05/18/2016 at 10:15 point

Ah hah, kinda a home-made Pogo(?) 

Nice find on those pins, and nice hackery!

  Are you sure? yes | no

David Spinden wrote 05/18/2016 at 17:51 point

Thanks! Exactly, except all the pogo pins I have seen spring in the vertical direction. I want this to spring in the horizontal direction inside the via.  

  Are you sure? yes | no

Similar Projects

Does this project spark your interest?

Become a member to follow this project and never miss any updates