-
New mold idea and Automate everything
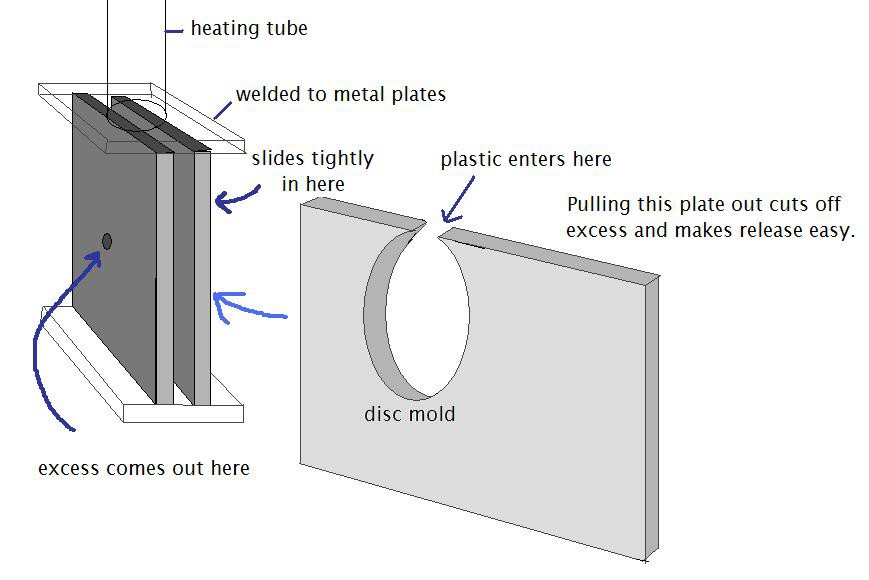
08/21/2016 at 12:50 • 0 commentsI've been distracted by another project, but I'm making progress. I tried to build a mold to attach to the heating tube, but my welder decided against it. I figured out what was broken and I'm waiting for a part to arrive so I can fix it. Then the real fabrication can finally get under way. Anyway, here's the idea.
![]()
Let's automate everything!
In the spirit of the automation round, here are some grand dreams of automating this whole machine.
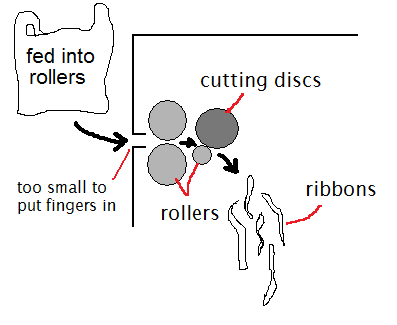
Automatic bag feeding - The bag is fed into simple rollers that pull the bag into the machine. Directly after the rollers the bag passes through a series of very sharp circular cutters that slice the bag into thin ribbons. The ribbons go into the heating tube... automatically. That's a tricky part.
![]()
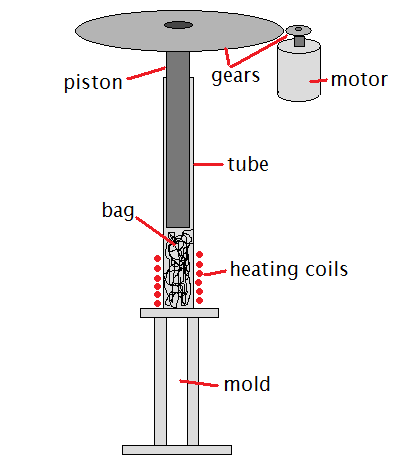
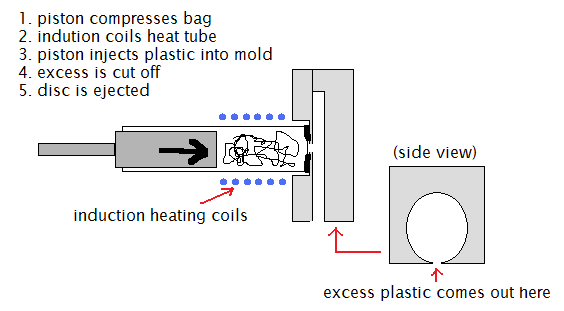
Automatic heating and injecting - The tube is heated inductively up to 180C and is held there for about three minutes to melt the plastic. The piston requires a lot of pressure which could be provided by a substantially geared down motor turning a thick threaded rod.
![]()
Automatic disc ejection and entertainment - After injecting the disc and cooling for a moment, the mold plate is pulled out of the sandwich(see figure at top). This cuts off any extra bits and allows the disc to be easily popped out. To pull the plate out another heavily geared down motor could drive a lever connected to the plate. When the plate slides out, it causes a rod to knock the disc from the mold. The disc falls down into the entertaining apparatus.
To be honest, there will not be that much automation in the final product. I like the idea of having the user pull levers and get involved in the process. It is more fun that way.
-
First squeeze!
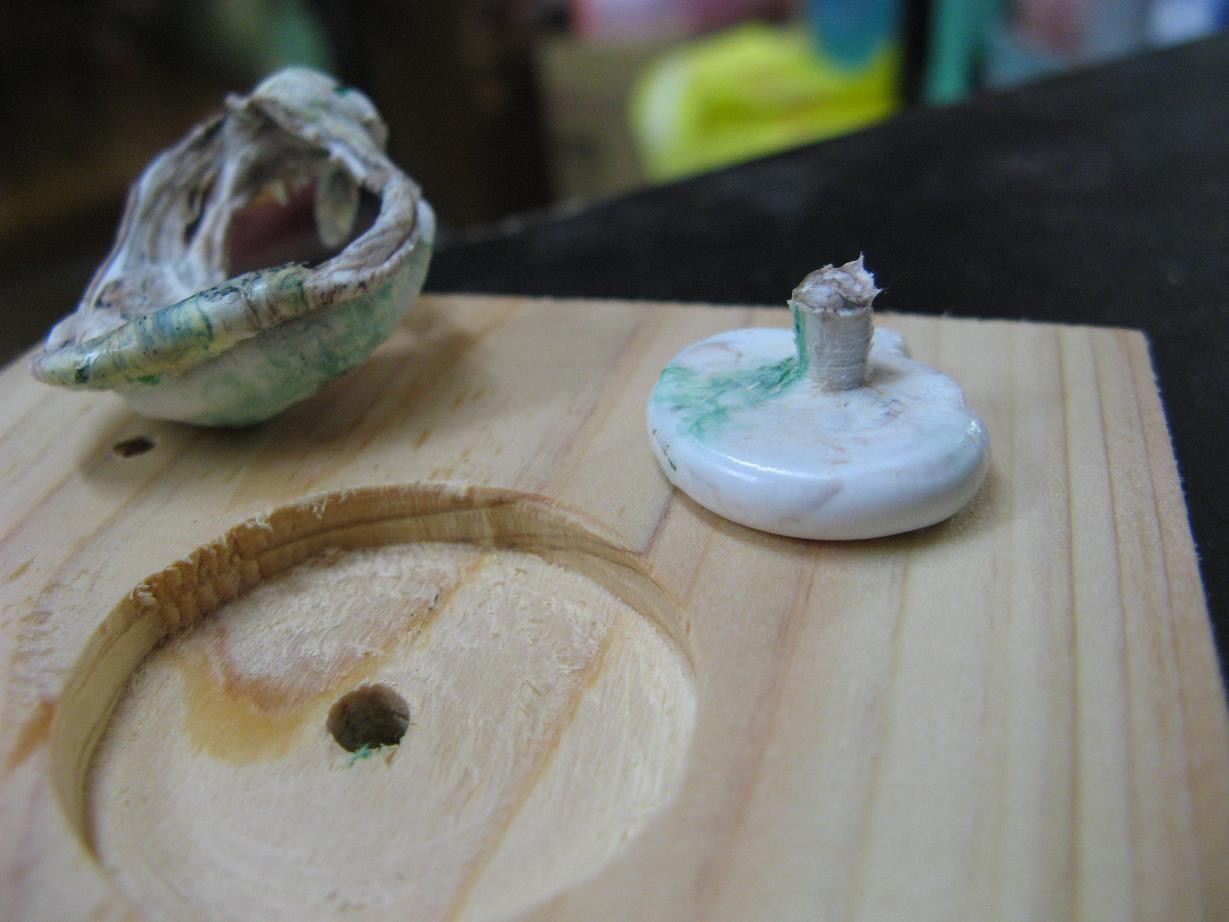
07/24/2016 at 05:08 • 0 commentsI didn't get my welder working properly, but I managed to attach the head of the piston with some really awful looking welding. Then it was time to test! Don't laugh now, it was just a test to see if things work. It was successful. This is the squeezed(injection molded) bit on the right and a big blob of leakage on the left.
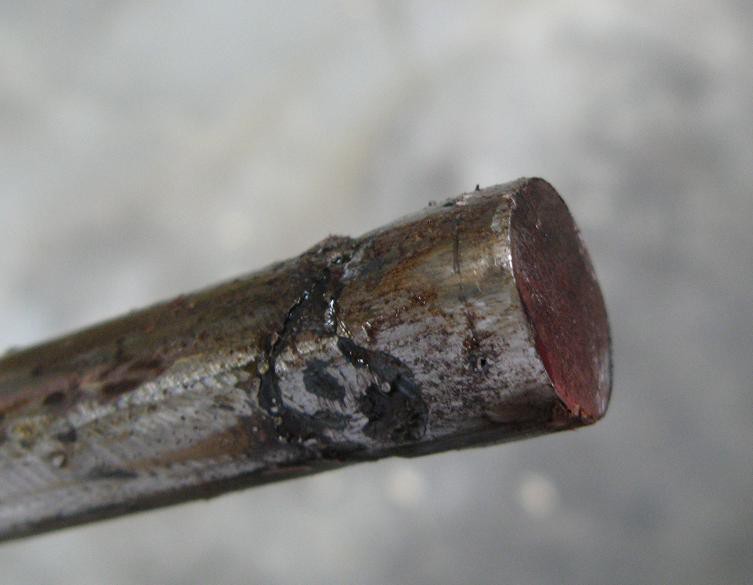
Now for the details. Here is the poorly welded piston.
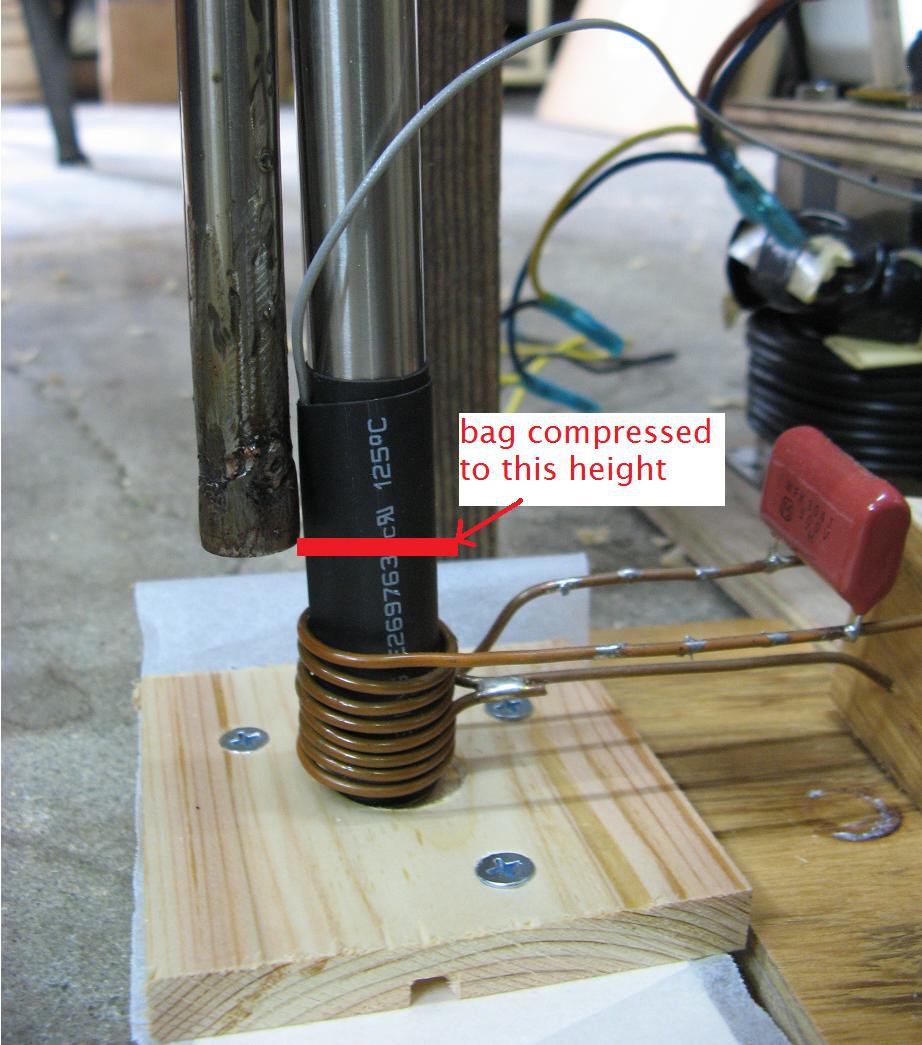
I set it up with the heating tube just sitting on a very roughly made wooden mold. Don't laugh. Then I stuffed in a medium-small bag and compressed it down to the height shown. It sticks up too far above the heating coil, so the top might not melt as quickly. I'll have to consider this problem.
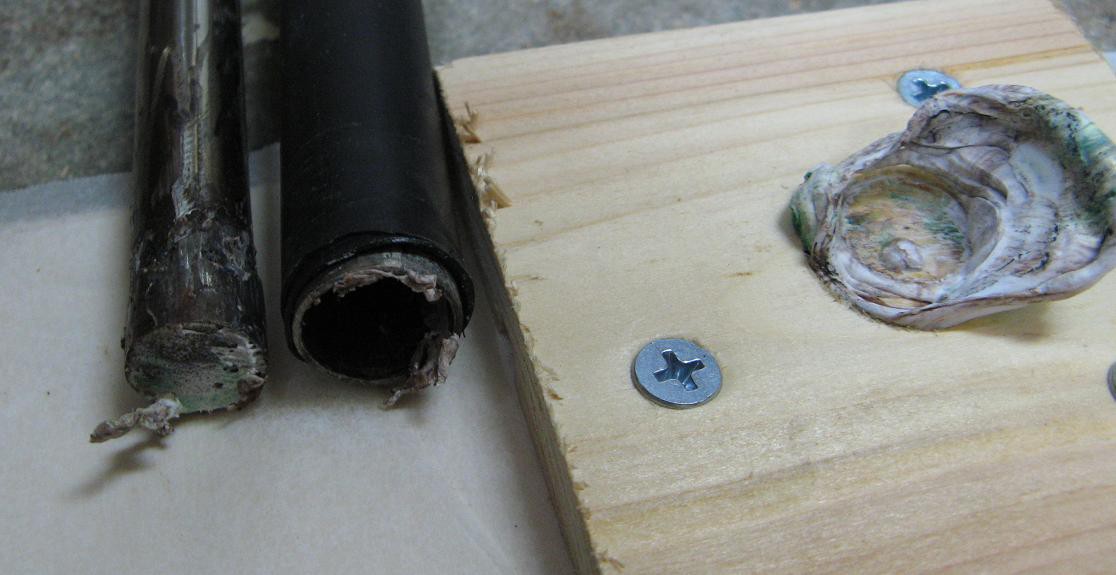
It took 63 seconds to reach 180C. I then let it sit for about 2 minutes before pressing the piston. It took quite a bit of pressure, but should be no problem if properly levered. I was just pushing down with my hands. When the piston would move no further, I shut it down and let it cool just a minute before disassembling things. This was what I saw.
I was pleased that not much stuck on the piston or tube. I was less pleased by the leakage, but that was to be expected. Upon opening the mold I had to laugh.
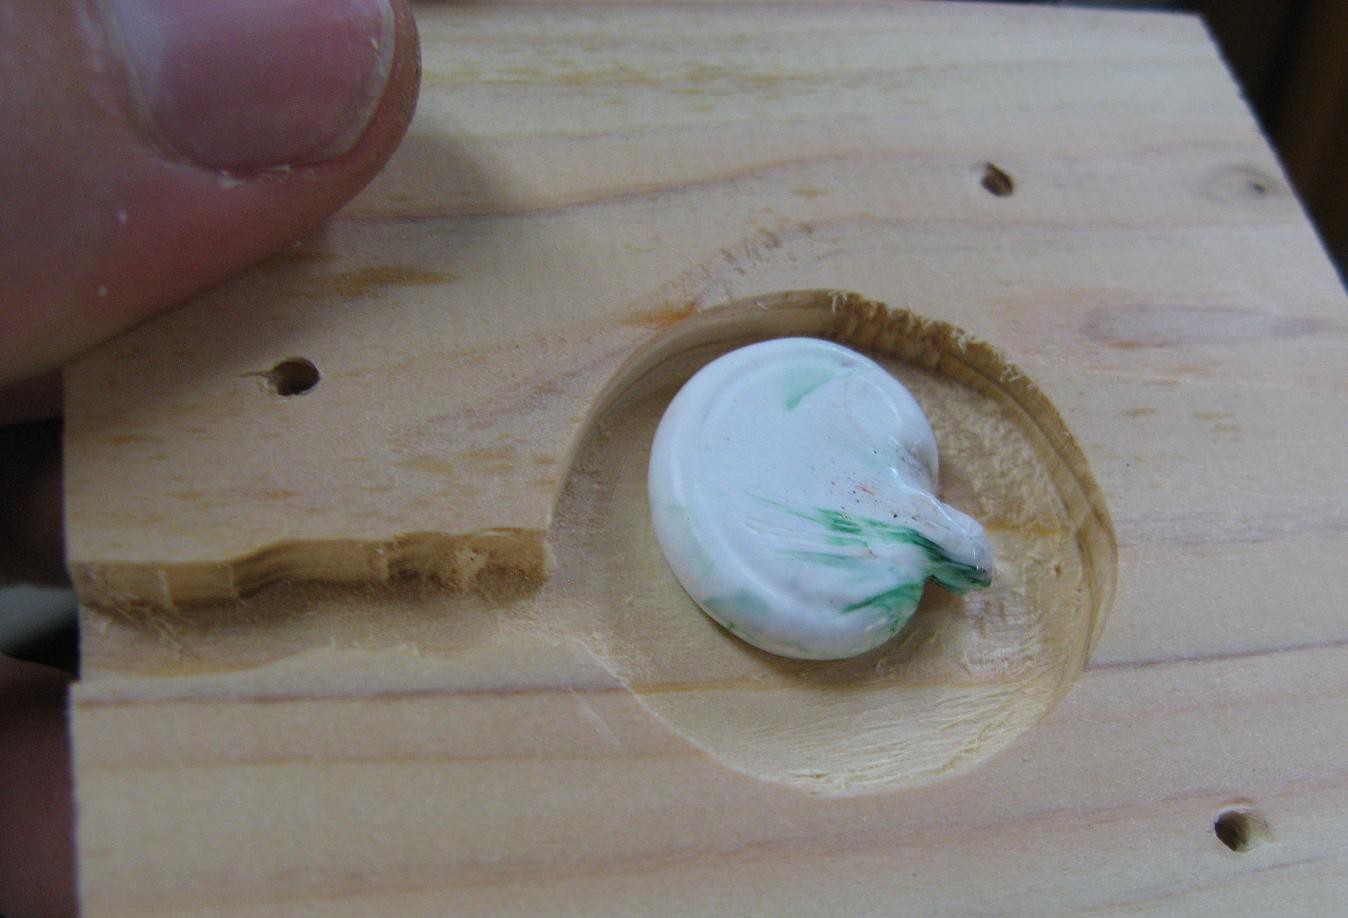
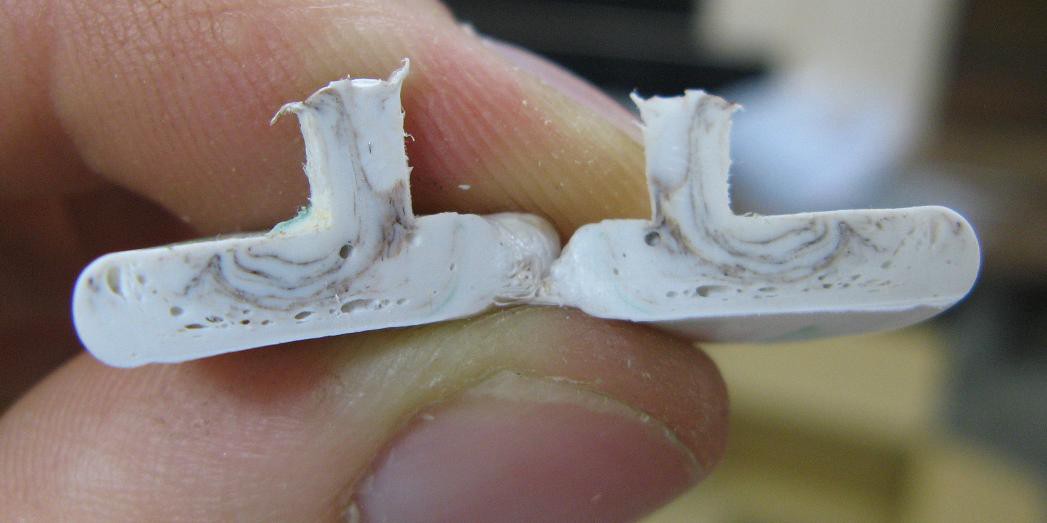
I cut it open to inspect the quality. Not bad. It does have bubbles, but it's reasonable and expected. Overall I'm happy with the test and learned some things. Next I will make a proper metal mold and weld it onto the heating tube so there will be no leakage. Actually, wood turned out to be a much better mold material than I expected. It didn't stick as I thought it would. That's cypress by the way.
-
Heater redesign
07/03/2016 at 10:03 • 0 commentsSorry It has been a few weeks. I've been struggling with other projects, but I'm getting back to work now. Last test I had a problem with things overheating. First it was the power mosfets and rectifier. I stuck them on a nice heatsink with a fan, and they barely got warm, but then I noticed the transformer was getting too hot. So I tore everything apart and rebuilt everything to handle lots of power.
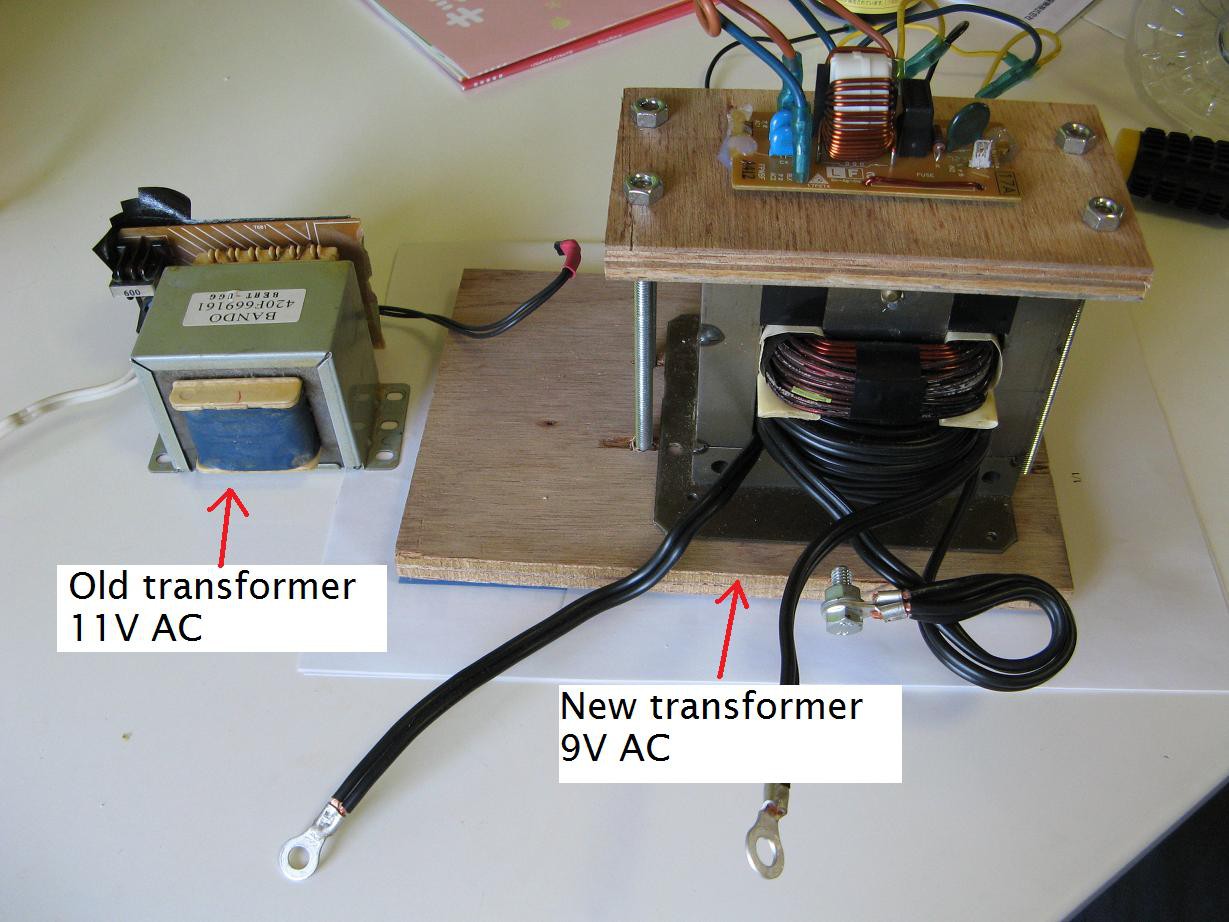
The transformer had to go. I replaced it with a rewound microwave oven unit that I was using as a welder. You can see the difference here.
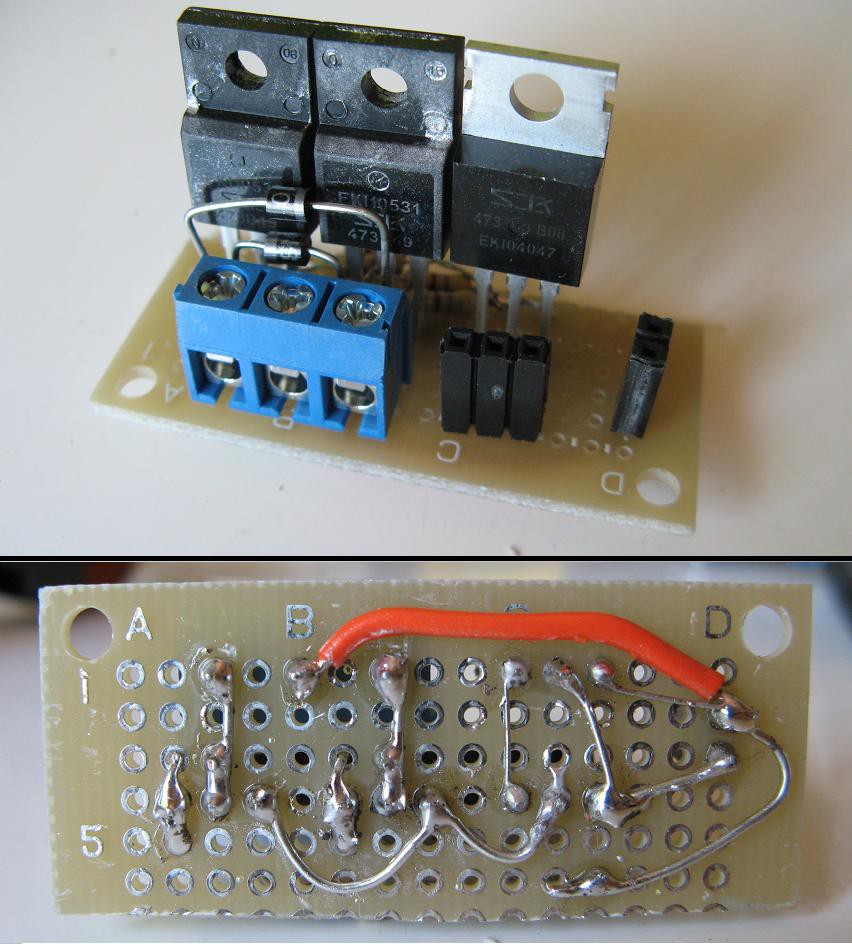
With the transformer troubles gone, I needed to mount the mosfets and rectifier on a good heatsink. I started by rebuilding the circuitry so everything would fit. It still matches the schematic I used before.
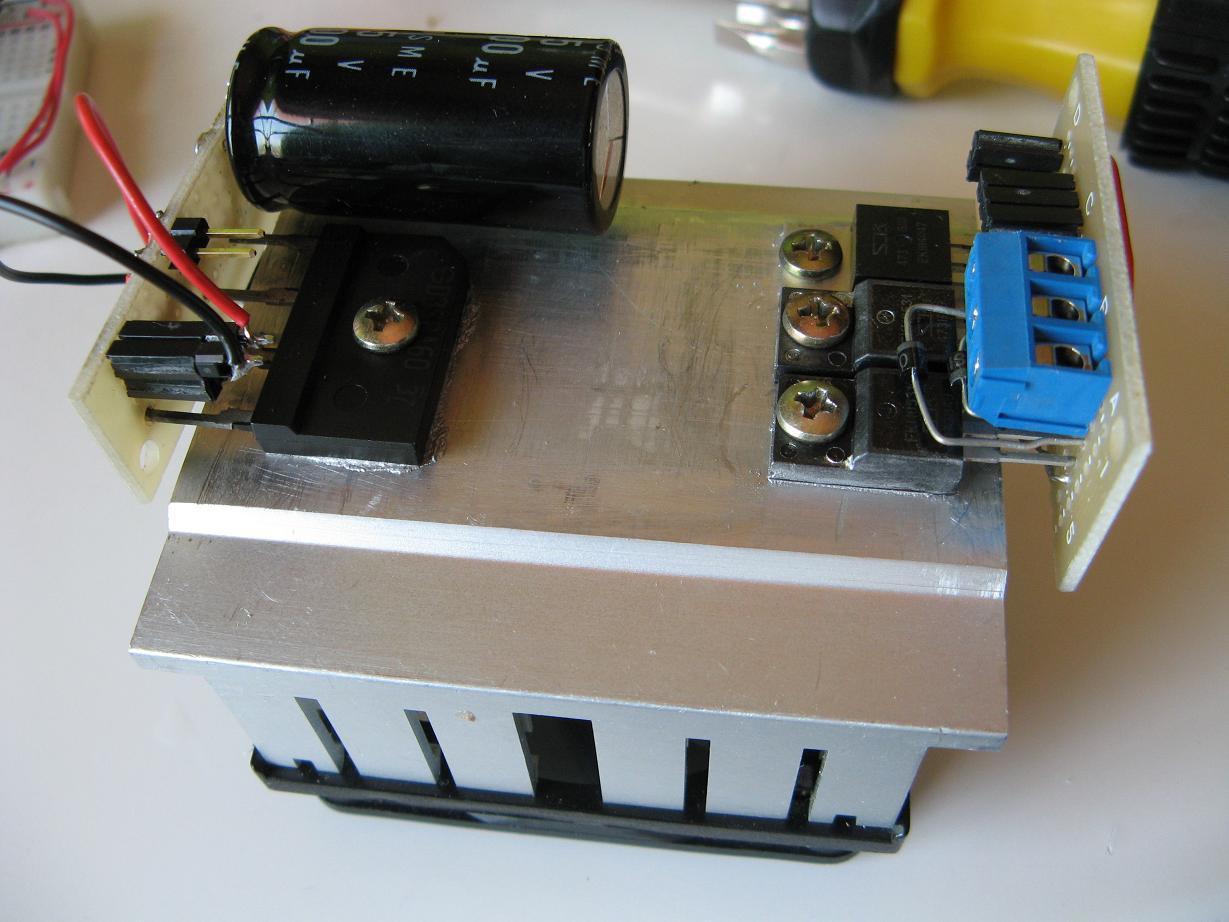
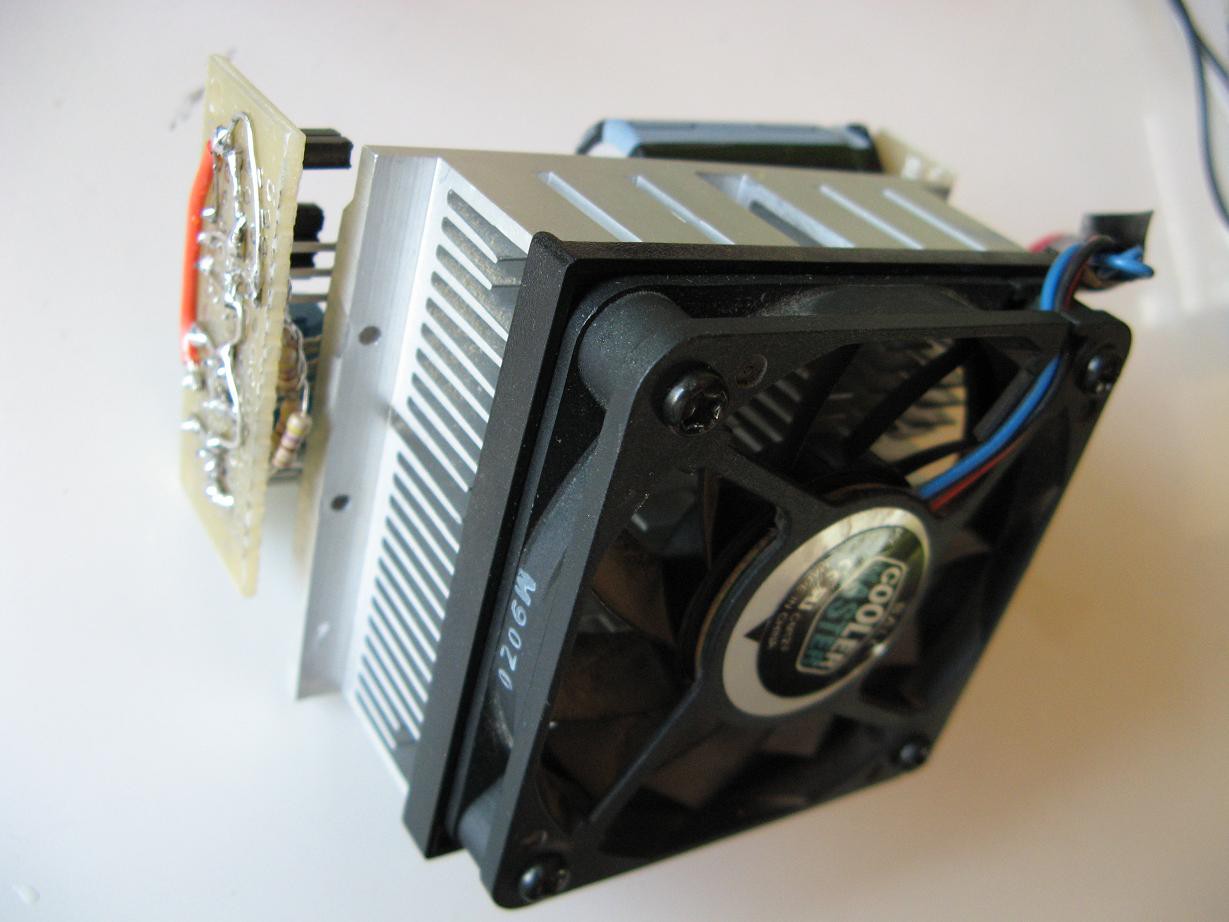
And here it all is on the heatsink that has a fan attached. I pulled it off a really old cpu from a junk computer.
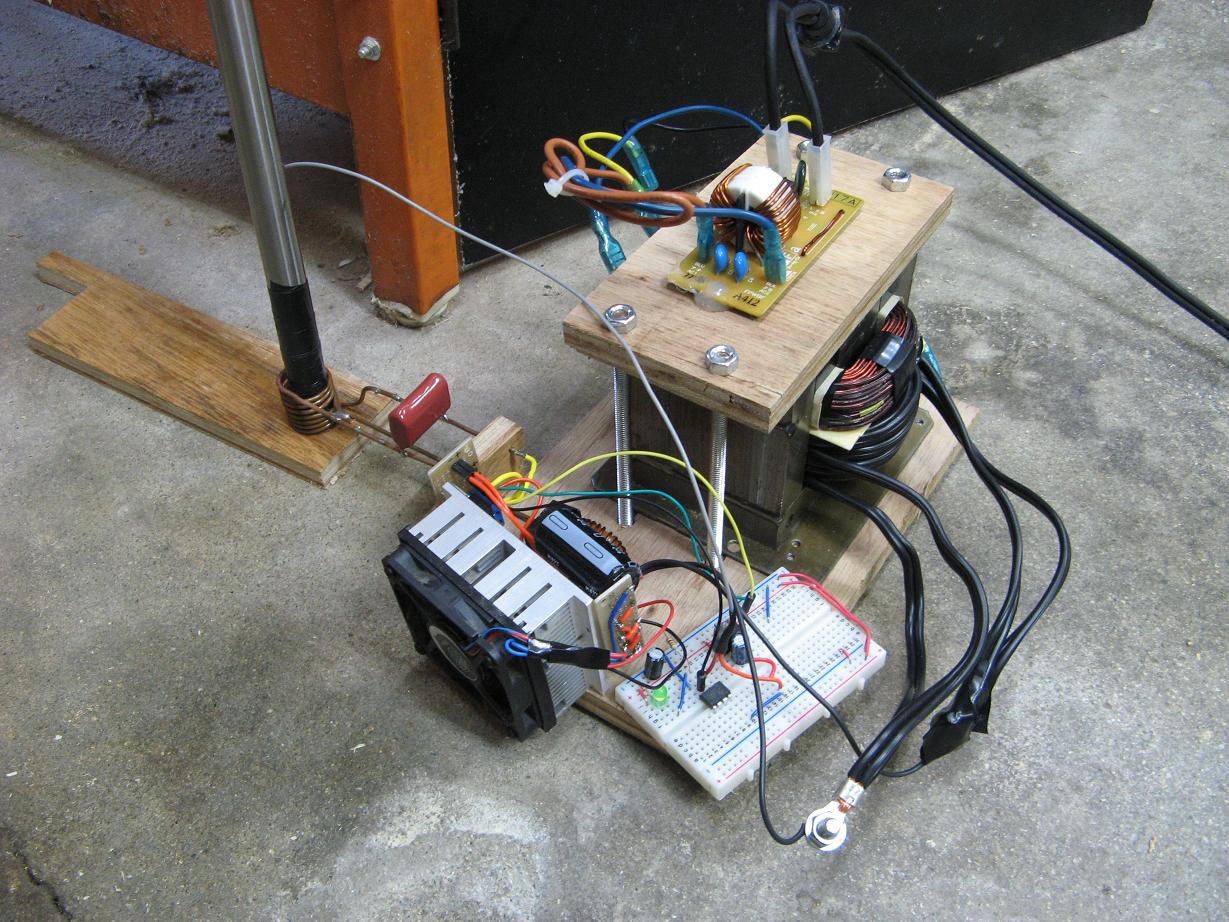
I set everything up for a test run like so. Notice the controller is still on a breadboard. It will stay there until I have a final design ready.
It works -
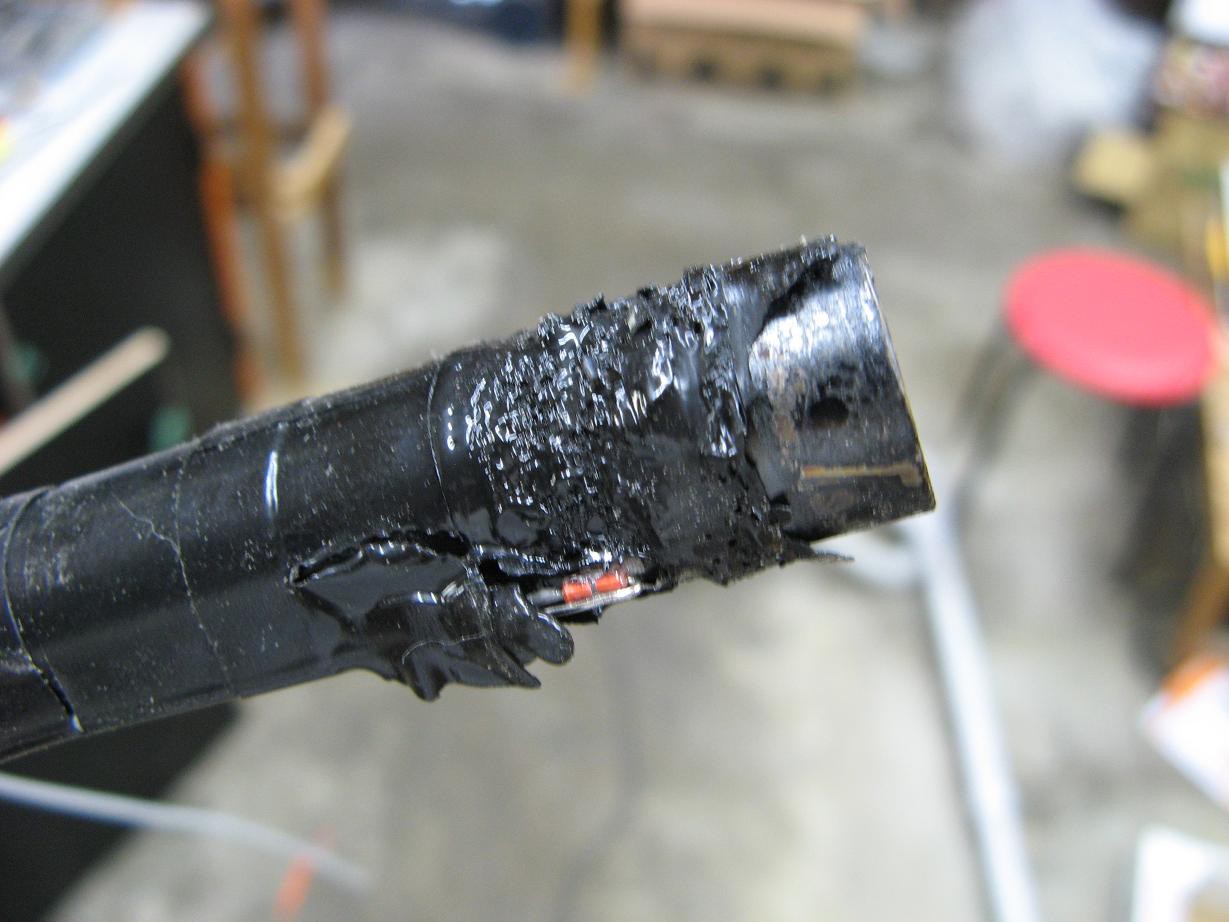
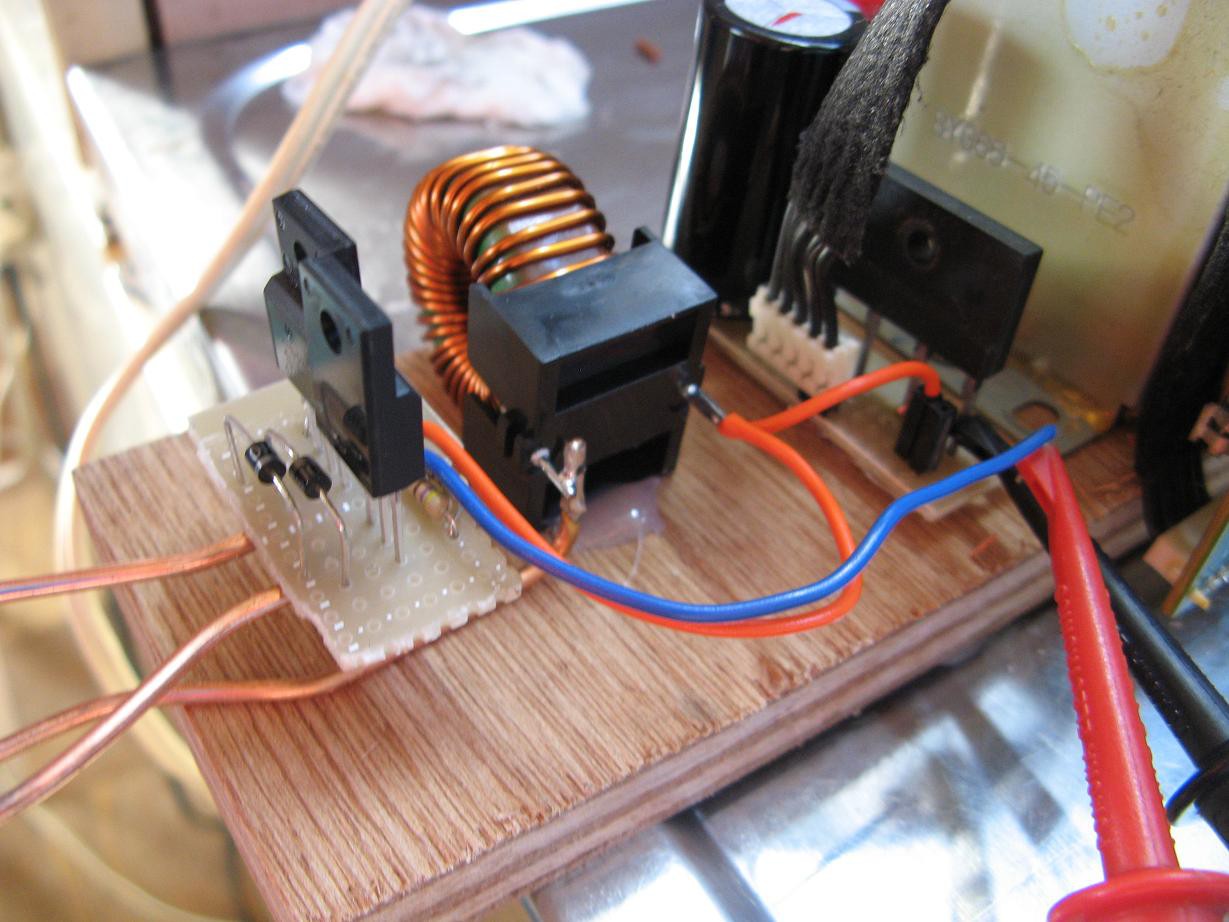
Yep, it works alright. It shot right up to the target of 180C in less than 30 seconds. Honestly I think it got hotter than that because the wood got a little burned and the electrical tape ended up like this.
I guess it is time to look for large heat shrink tubing. I couldn't find any big enough at the store, so I'll have to order some.
As for the rest of the hardware, I tried making the piston and discovered that my welder is not working. I'll have to figure out what's wrong before I can get much further because the project really depends on a functioning welder.
-
Code uploaded, some hardware details figured out
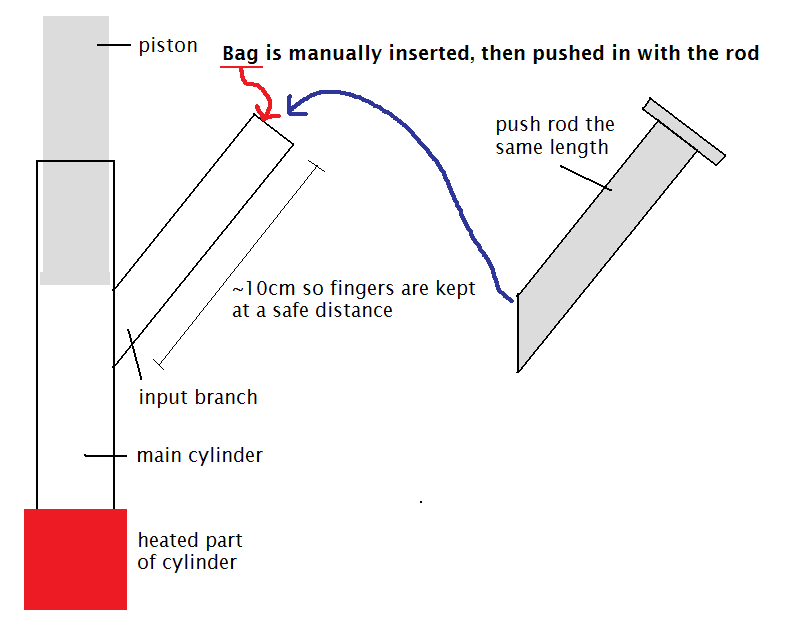
05/29/2016 at 12:58 • 0 commentsFor a while I've been pondering the problem of getting a bag into the tube and I think I've decided on something that works. The bag will initially be inserted, at least partially, into a short length of tube branching off the main cylinder. A push rod of just the right length will be used to push the bag the rest of the way in. When the rod is fully inserted, the bag will be completely in the main cylinder. I think a picture is needed here.
![]()
I've also figured out a piston. I got a length of steel pipe that fits inside the main cylinder with about 1mm of play. On the end of this pipe I will weld a thin disc that is machined to fit snugly in the cylinder. I don't want it too snug because I want air to escape around it, but it needs to be snug enough to keep pressurized plastic inside.
Code uploaded
It's not much, but the code I have for the induction heater controller is up on the git. It will surely be updated and merged into the main device controller code eventually, but here it is if you're interested.
-
First tube heating test
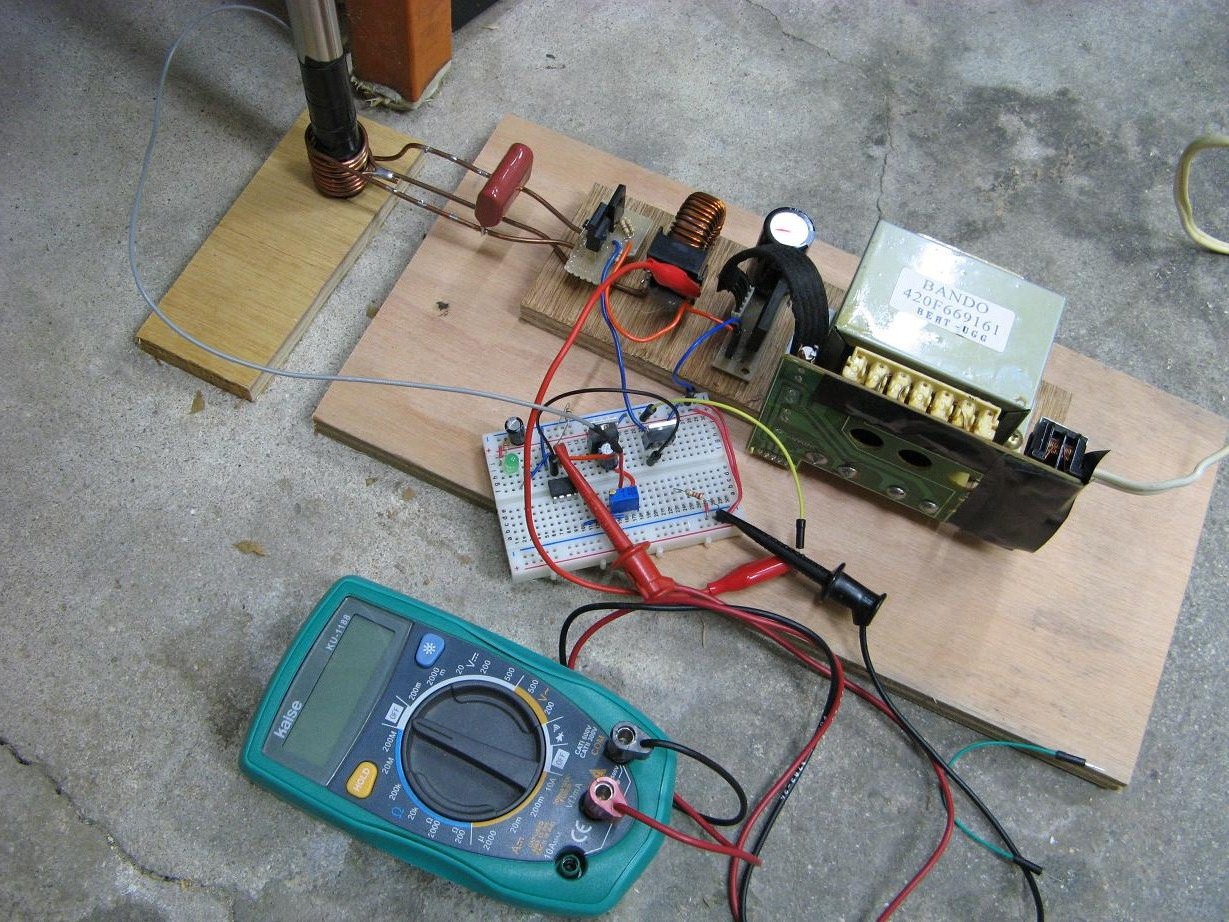
05/23/2016 at 14:02 • 0 commentsFinally, some heat. Today I set up the induction heater described previously with some control circuitry including an ATtiny85, mosfet to switch the heater on and off, and a thermistor attached to the tube. I'll start by showing you the setup.
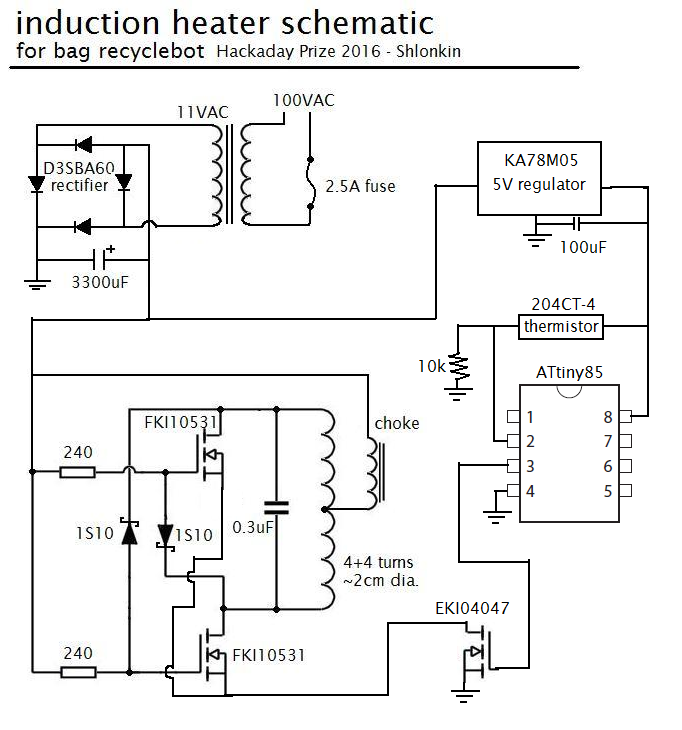
And here's the schematic.
![]()
The test was a partial success. Everything worked. The tube warmed up to about 150C in 30 seconds or so and would have continued on to the target of 180 if I had let it. But I saw a faint wisp of of smoke rising from the rectifier. Indeed the rectifier and the two mosfets in the heater were very hot. So I investigated and found that it was drawing around 6.5A with the tube which is more than double the current when I was heating a screwdriver. Although it is well within the specs of the parts, I will have to attach some hefty heat sinks before I try again.
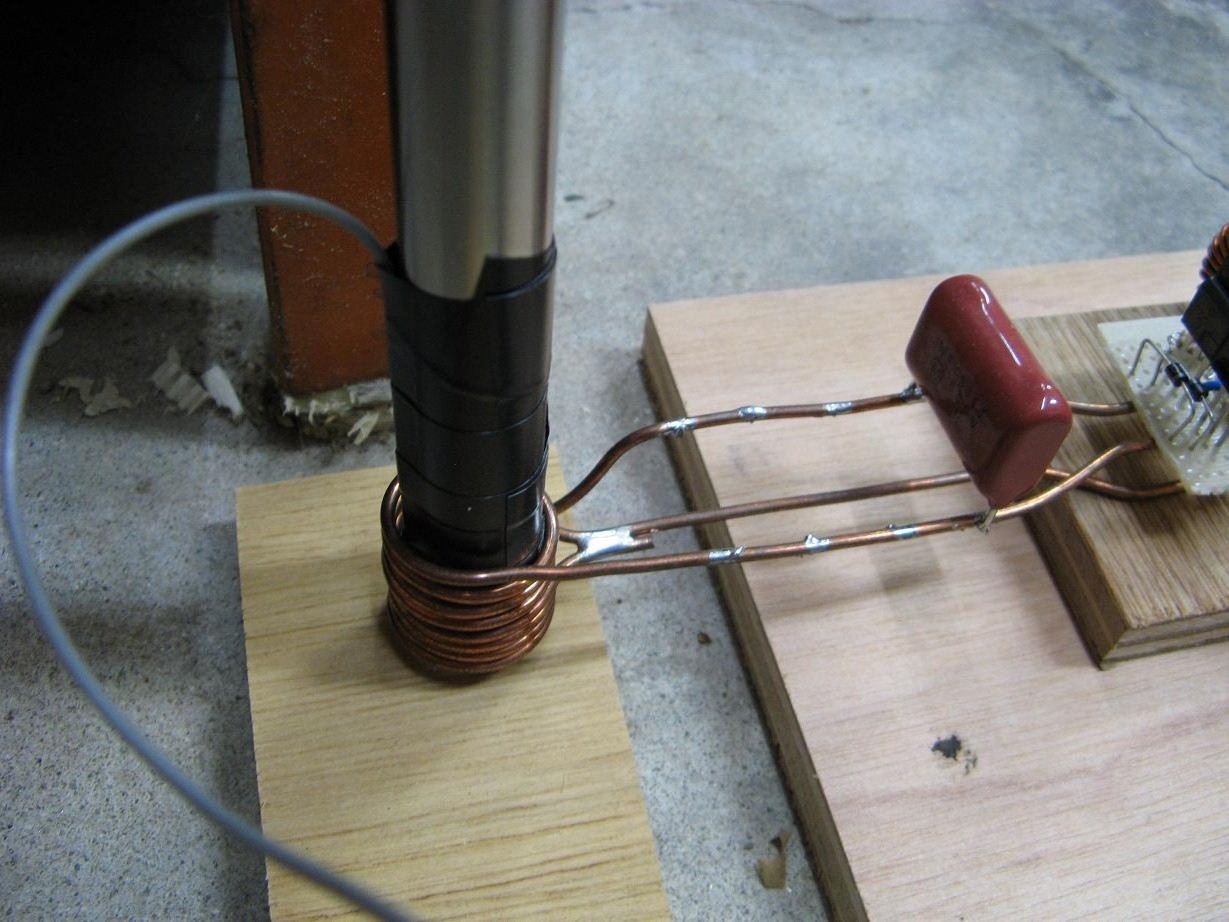
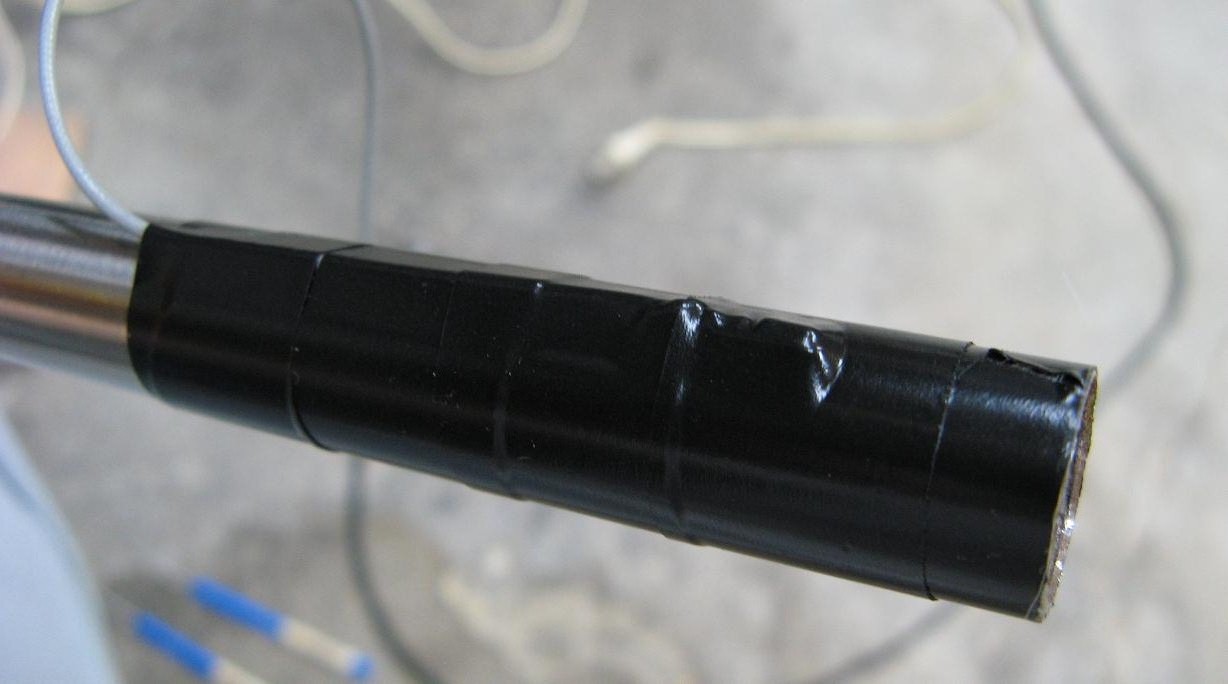
More details - The tube is 16mm OD, 1mm thick steel. The thermistor is connected to very small coaxial cable as close as possible to the sensor to avoid any loops that the magnetic field could sneak through. The tube is wrapped in electrical tape and a small hole was cut in the tape for the thermistor and a small dab of thermal conducting grease. The thermistor was them wrapped in tape. Here are a couple more pictures.
-
How much plastic is in a bag? And how to get it into a tube.
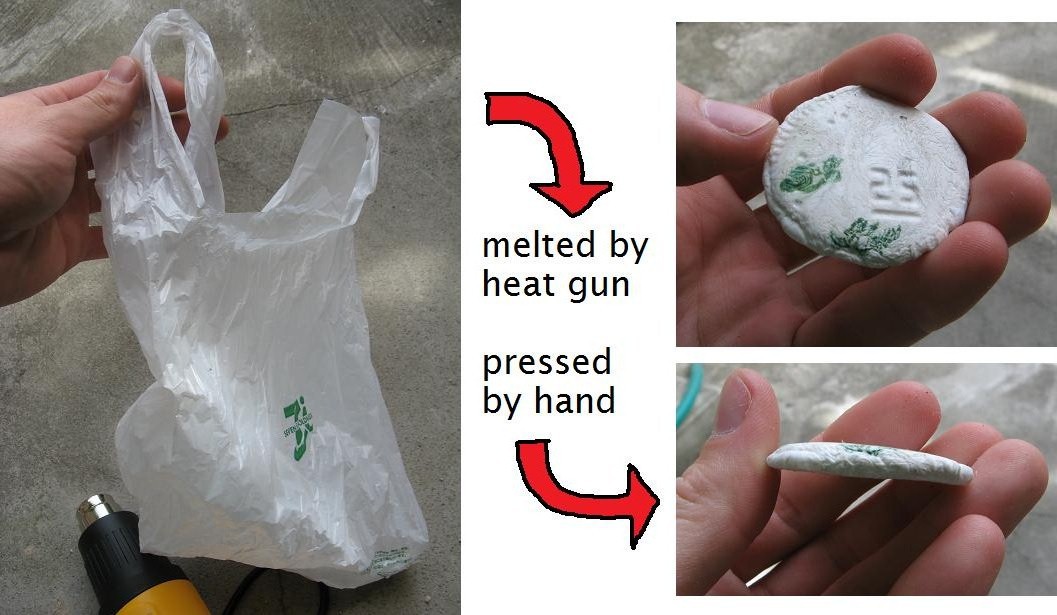
05/09/2016 at 13:46 • 0 commentsHow much plastic are we talking about? Just to see, I grabbed a medium size bag and melted it down with a heat gun. When it was nice and gooey I pressed it flat with a jar that apparently had the number 25 cast on the bottom. This is what it looked like.
![]()
It weighs about 5 grams and is probably loaded with air bubbles. If it were properly compressed before melting it would probably have much less air and thus be much smaller. Ideally it would be shredded into small bits and compressed so there would be no trapped air inside, but shredding is not as easy as it sounds. Just to see if it were possible I ran a bag through my paper shredder and then spent 30 minutes pulling out bits of plastic that were wedged between the cutters.
How do I get it into the tube? That's a big question. I've been thinking about it and experimenting with various ideas.
- Use a vacuum to suck the bag into the tube. Nope, the bag just gets stuck on the end of the tube.
- Use a funnel with the vacuum idea to guide it in. Nope, same problem.
- The pin idea, which I've described before. Maybe, but it's not so easy to get the bag to wrap tightly as it just slips on the rotating pin. There are ways to make it stick better, but then how would I get the pin out? Plus, this adds lots of moving parts and complexity.
- Remus's idea of the input rollers feeding directly into the tube. Maybe. I haven't tried it because I don't have a set of rollers figured out.
But after much effort trying to get a bag into a tube I found that by far the easiest, simplest, and most reliable way to do it is by hand.
- Roll, crumple, or otherwise manage to stick a little of the bag into the tube. Use a narrow rod to push it the rest of the way in. It slides in easily and works every time. It also does away with the need for input rollers.
There are some downsides to this method. Since the human is responsible for sticking the thing in the place it is necessary for the human to be intelligent and not want to break the machine for fun. That's asking a lot of the general masses. But for the sake of prototyping and getting a working device built, I will assume it's possible. If this turns into a realistic recycling option, I'll have to be more careful.
-
My first induction heater: lots of lessons and eventual success
05/04/2016 at 15:50 • 0 commentsI want to start by building a heated tube with piston and orifice. That way I can get a feel for what it takes to melt a bag and squeeze the plastic through a hole before I put too much effort into the rest of the design. For that purpose I acquired a couple of internally smooth steel pipes, and set to work making a heater.
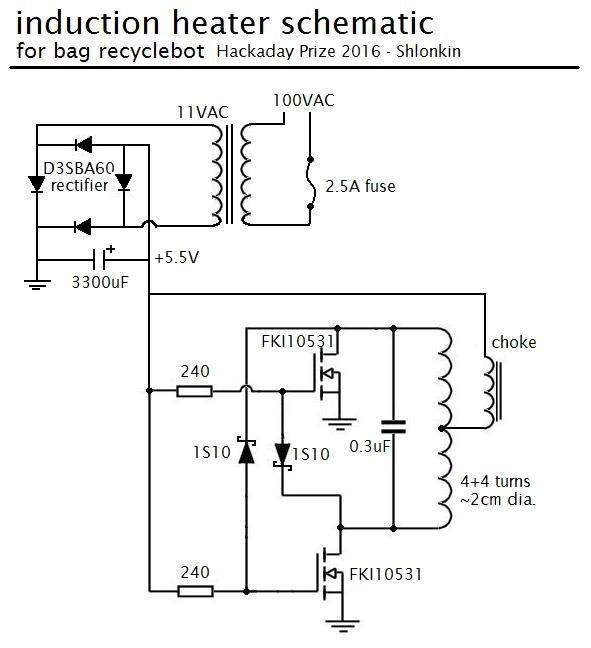
First, research induction heaters. There are many tutorials and videos about DIY heaters. One I found particularly useful was: http://www.rmcybernetics.com/projects/DIY_Devices/diy-induction-heater.htm . I based my design off theirs and even copied parts of their schematic, so I must give them some credit. Here is my schematic.
![]()
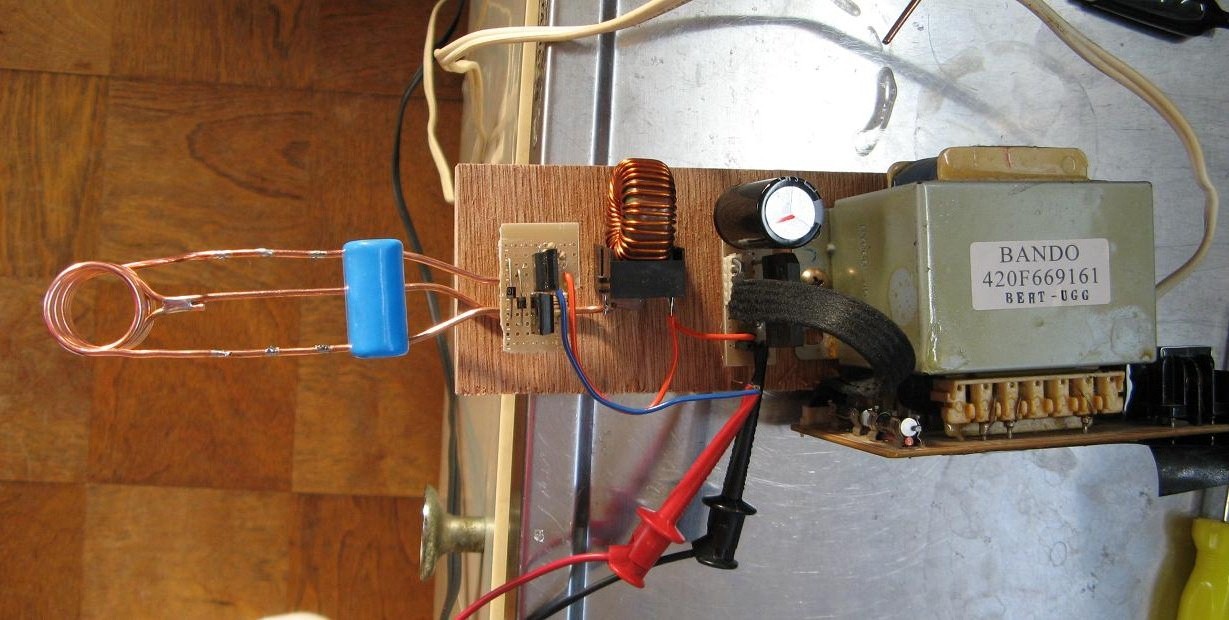
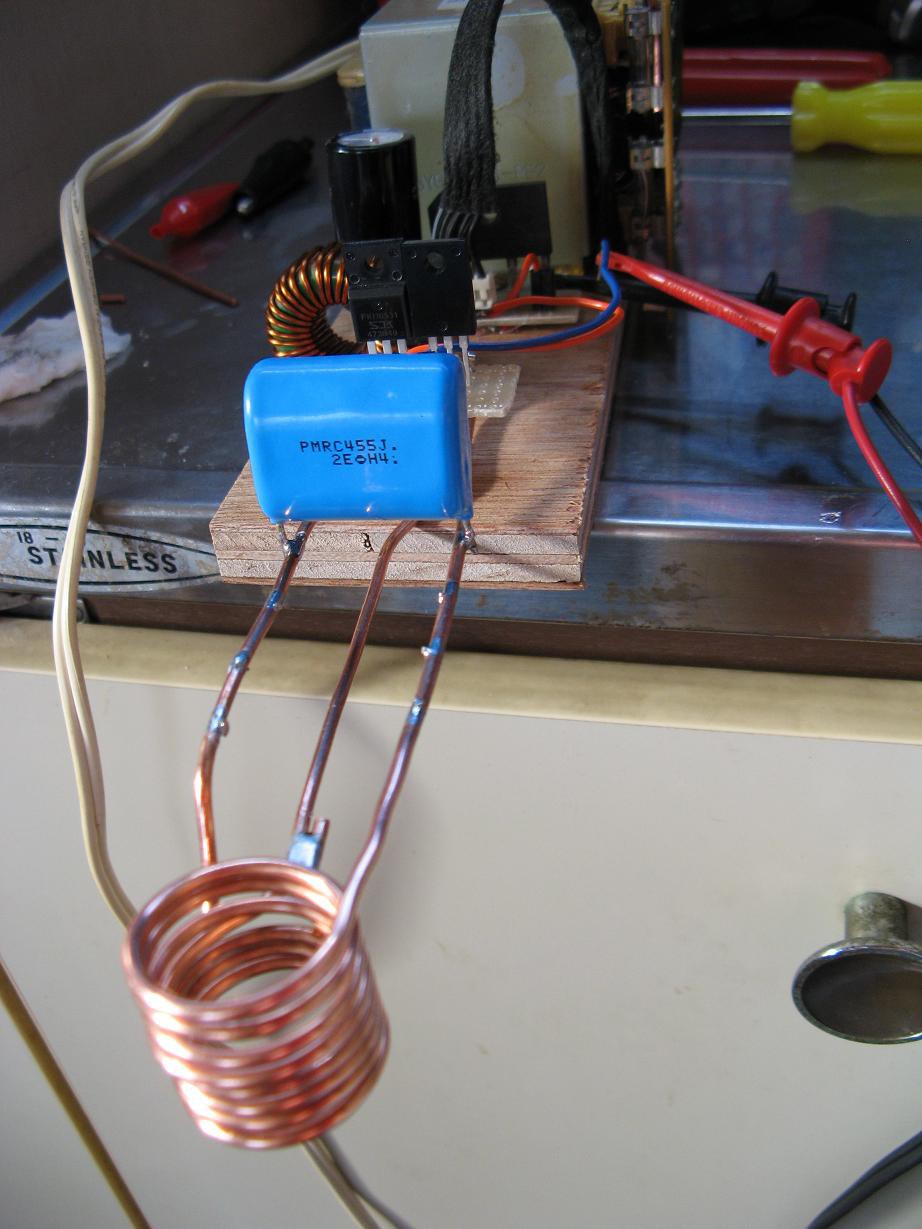
Second, salvage the necessary components and just give it a try. The power supply consists of a heavy transformer salvaged from something I don't remember, a rectifier from a microwave oven, and a large capacitor. The Schottky diodes are rated for 100V and 1A, and the MOSFETs are 100V and 18A. At first I just grabbed a few high frequency/voltage capacitors for the oscillator part of the circuit and put things together without thinking too much about frequency or power. I figured I'd tune those details once I got something working. Here are some pictures after removing most of the oscillator capacitors as I'll explain below.
Third, make it work well. When I first plugged it in I had 18uF worth of capacitors and somewhere around 1uH of inductance. There was no smoke, explosions or obvious issues, so I tried sticking a screwdriver in the coil. I immediately knew something needed to be changed because I could feel the vibration in the handle and a couple seconds later the fuse blew. I sat down to calculate my frequency, which I know I should have done in the beginning, and found it to be about 37kHz unloaded and lower when loaded. Not so unreasonable for a high power heater, but no good for this project.
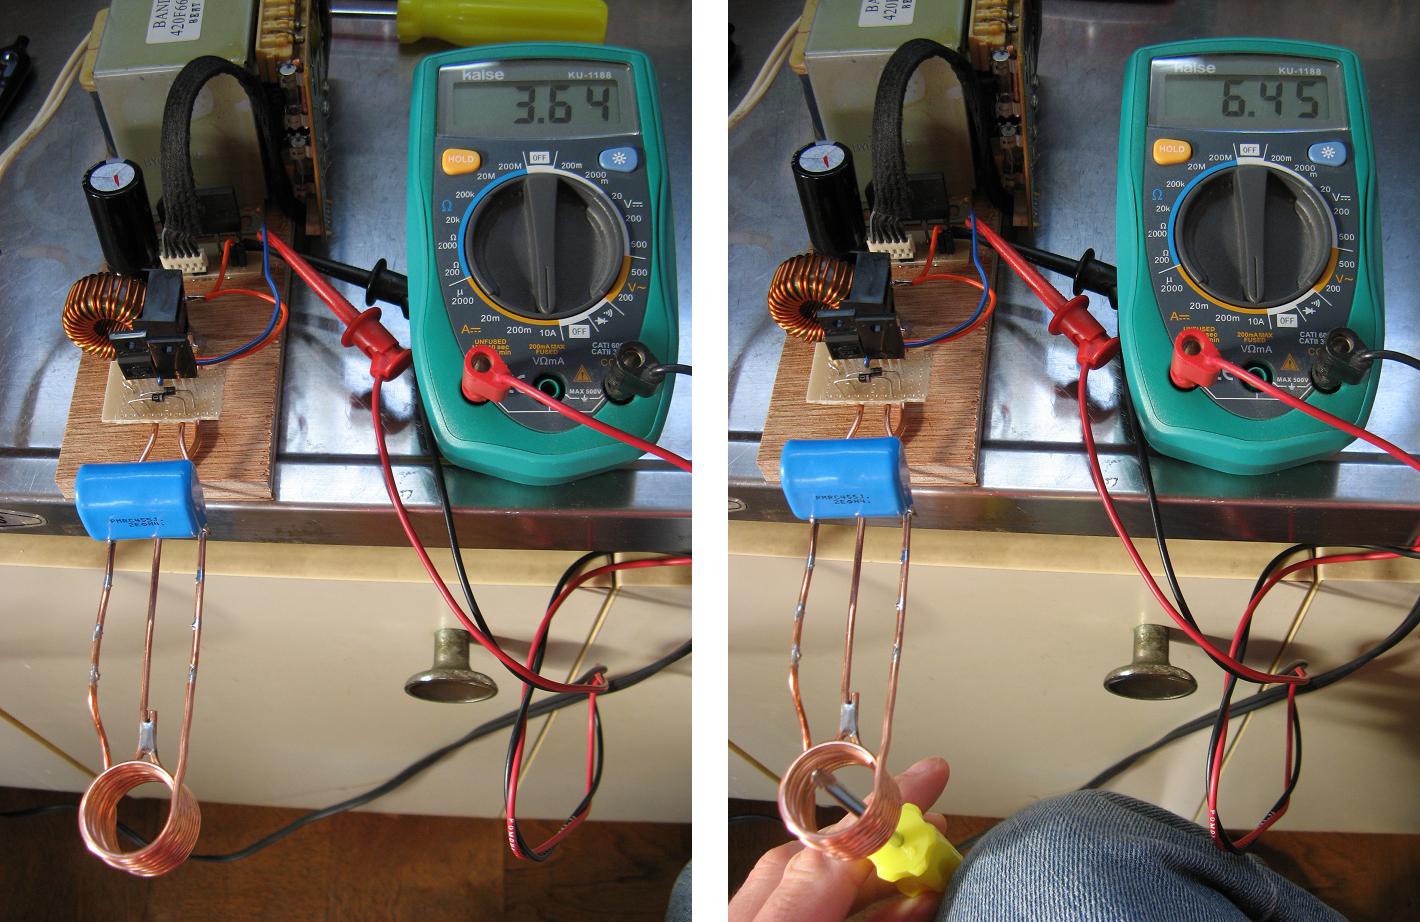
So I removed most of the caps leaving 4.5uF which should double the frequency. It worked much better. It was silent, vibrationless and didn't blow a fuse. But everything was getting too warm (rectifier, mosfets, coil). I measured the current and found this. 3.6A no heating, 6.5A heating
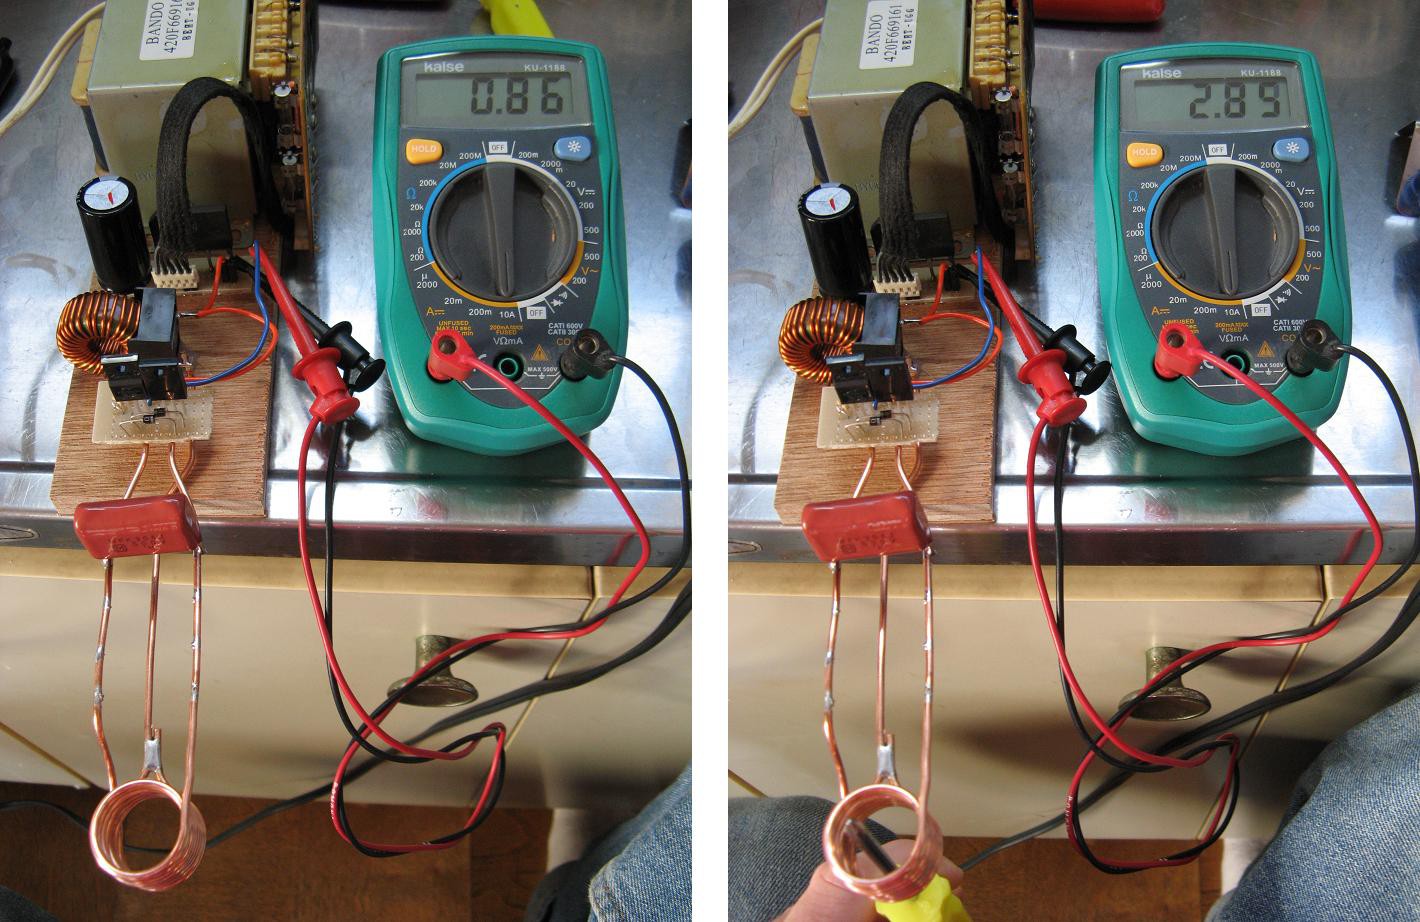
I needed to tune it further. I reduced the capacitance to 0.3uF which should give a frequency somewhere around 290kHz, which is a very rough estimate. The result was nice. 0.86A no heating, 2.9A heating, and the components were just slightly warm.
So how about power? For my application I do not need much power. I need to get a short section of thin steel tube up to 180C and hold it there. This circuit will easily do that. The screwdriver was smoking after less than 5 seconds and a paperclip was glowing red one or two seconds after being inserted into the coil.
I will regulate temperature by sticking another mosfet on the supply output and switching it with a microcontroller. It doesn't need to be anything fancy. It could switch off above 180C and on again below 175C or so. Of course I'll have to take care not to switch too quickly. Maybe the minimum interval between switching could be a second or so.
Next I need to attach it to the pipe and figure out how to measure temperature in this noisy environment.
-
Slightly more refined concept and first steps
04/16/2016 at 08:13 • 0 commentsThank you to the people who sent me feedback about this project. It is much appreciated.
After spending some time pondering and researching I have a design that is a bit more refined than the diagram in the description, not that that's saying much.
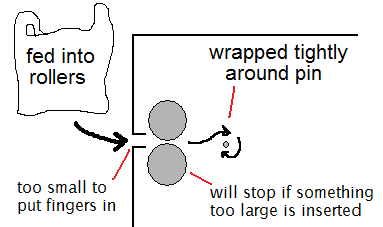
- Bag input mechanism - The bag is fed into a tight set of rollers. The rollers are weakly driven and if something too thick is inserted, such as a folded up bag or a non-bag object, the machine stops and spits it back out. Ideally the bag is fed in flat and straight. After the rollers the bag is wrapped tightly onto a thin metal pin. Exactly how to make that happen is still a challenge I'm thinking about.
![]()
- Heating tube - Once the bag is wrapped tightly on a pin, it is inserted into a steel tube and the pin is removed. A steel piston presses the bag down into the end of the tube, which is still cool. That end of the tube is wrapped in the coils of a relatively low power induction heating circuit which is then turned on. The tube is kept at about 180C until the bag is melted. I'll need to experiment to see how long that should take
![]()
- Injection molding - When the plastic is molten, the piston pushes it through a nozzle into a disc shaped mold. One side of the mold has a small opening that excess plastic escapes through. Once the plastic has had a chance to solidify, the excess is chopped off and the mold opens to eject the disc.
![]()
- Entertaining apparatus - This is still a topic a lot of possibilities. There have been some good suggestions, such as esot.eric's plinko idea where there is a chance the disc could be won as a reward. Another idea is a Rube Goldberg type contraption that is just entertaining to watch. Another is an interactive game where the person tries to make the disc fall into a target or... well, I'm still thinking about it. I want to have a good brainstorming session/log about this, but haven't found the time.
One concern that was mentioned by Remus is that heating the tube will cause trouble with the fit of the piston due to thermal expansion, but a quick calculation shows that the tube will only expand roughly 0.002% over the relevant temp. range which is small enough that I'll ignore it.
So how about those first steps I mentioned. Well, I've been researching small induction heating designs and gathering parts to make a prototype heated tube. Then I can get an idea about the feasibility of melting a bag in a tube. Sorry I don't have a working schematic or pictures yet, but I'll post them once I do.
- Bag input mechanism - The bag is fed into a tight set of rollers. The rollers are weakly driven and if something too thick is inserted, such as a folded up bag or a non-bag object, the machine stops and spits it back out. Ideally the bag is fed in flat and straight. After the rollers the bag is wrapped tightly onto a thin metal pin. Exactly how to make that happen is still a challenge I'm thinking about.
-
Some challenges, potential problems, and ideas
04/07/2016 at 14:47 • 0 commentsHere are just a few challenges and solutions:
- How to get the bag from your hand into the cylinder. Bag is fed into rollers and is then wrapped tightly around a pin. The pin and bag go into the cylinder and the pin is pulled out. See the project log coming very soon for more details.
- How to heat the plastic. The tube is heated either by induction or a resistive element. It needs to get to about 180C. The bag doesn't have a lot of mass, so it should melt quickly and won't require too much energy.
- Bags are not all the same size. If the bag is too big, excess plastic goes out the side of the mold and is cut off. If it is too small, the disc will not be complete. The entertainment device has to be able to handle irregular discs.
- Sometimes there is stuff in the bag. The rollers should be rigid and tight enough that no solid chunks of stuff can get in. The injection nozzle should be large enough that things can't clog it. The result should be assumed to contain impurities.
- What about different kinds of plastic? It will have to be up to the user to determine if their bag is PE or something else. Signs, examples, and people who know the difference could help here.
- This is a whole lot more expensive than a simple bin and it will require maintenance. Well, yes. But that bin isn't doing the job. Plus, if this is located at a store it might attract customers. You could even put it in the entrance of a toy store. That's something people will pay for.
Of course this list will grow substantially as I develop the concept further. Let me know if you think of any more potential problems or have any advice.
Dad, let's recycle the bag! Can I recycle the bag?
entertainment, warm fuzzy feelings, and a little reward for recycling that plastic bag
 shlonkin