 Friedrich Menges
-
1Step 1
Using the software, step by step
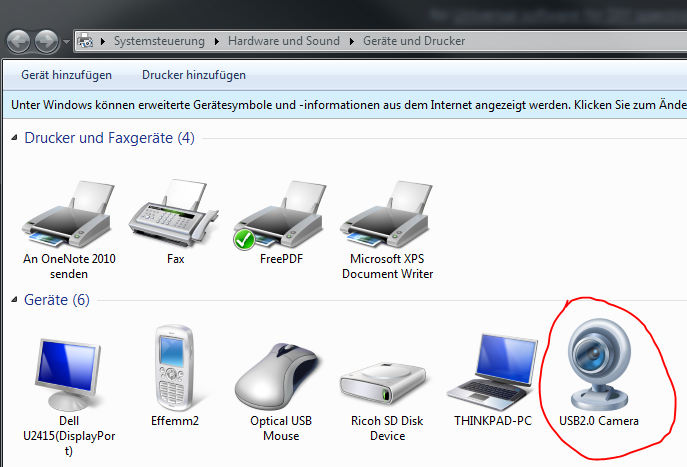
- Install software. Make sure there is write access to the program folder! Start Software. Plug in your USB camera. Make sure it is recognized by Windows as USB device.
![]()
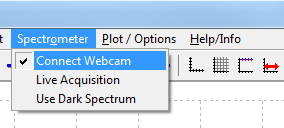
- Connect Spekwin32 with webcam by using "Connect Webcam" from the "Spectrometer" menu. You might additionally by asked by Windows to select the webcam. A new window will pop up, with the webcam image plus some controls. A first image cross-section will be displayed in the spectral plot window.
![]()
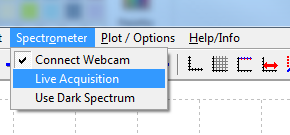
- Start live data acquisition by using "Run Acquisition" from the "Spectrometer" menu. You will now see the spectrum plot continously updating.
![]()
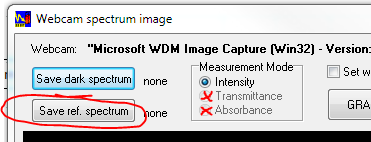
- For measuring emission spectra, it might be useful to subtract a background, in order to get rid of ambient lighting and/or detector offset. For this, switch off your light source and press the [Save dark spectrum] button from the webcam image window. Afterwards, activate "Use Dark Spectrum" from the "Spectrometer" menu.
![]()
- For measuring transmittance/ absorbance, you have to first acquire a reference spectrum. Do so by removing any sample from the light path, have the light source turned on and press the [Save reference spectrum] button from the webcam image window. Afterwards, the two measurement modes become acessible. By choosing them, the spectral display changes accordingly. Without a sample inserted, the transmittance curve will sit at 100%, while the absorbance curve will sit around zero. Having a look into this helps to learn about the longer-term stability of your measurement.
![]()
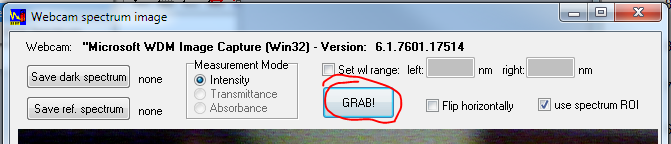
- For single frame pictures, use the [GRAB] button instead of Live Acquisition.
![]()
- To invert your spectrum picture, activate the "flip horizontally". Needed for all setups, where there is red on the left side of the picture.
- If the spectrum part does not fill the webcam image completely, use the white frame to define the region for calculating the cross-secting. It can be shifted around with left mouse and also resized, by grabbing the corner handles.
- As last step, after setting the ROI, use the "set wavelength range" to create a linear wavelength scale... Try with live acquisition and "Show Peak Labels" activated and a spectrum with some known peaks, to get reasonable results.
- Install software. Make sure there is write access to the program folder! Start Software. Plug in your USB camera. Make sure it is recognized by Windows as USB device.
Universal software for DIY spectrometers
Hooking up a DIY spectrometer to professional spectroscopy software

Discussions
Become a Hackaday.io Member
Create an account to leave a comment. Already have an account? Log In.