-
1Step 1
Step 1 sets up a safe and healthy environment for the snails! These are pond snails so in nature, they reside in bodies of water with slow moving current. This can be reproduced with a tank filled with 2 gallons of water (rule of thumb is 2 gallons per 20 snails), a bubbler to keep the water moving, rocks on the bottom and moss that floats on top to encourage good bacteria to grow, and a constant temperature area around 70F. The rocks and moss aren't totally necessary but all my snails have been living very happily so I'd recommend it if you don't have a lot of time to let an ecosystem build naturally.
-
2Step 2
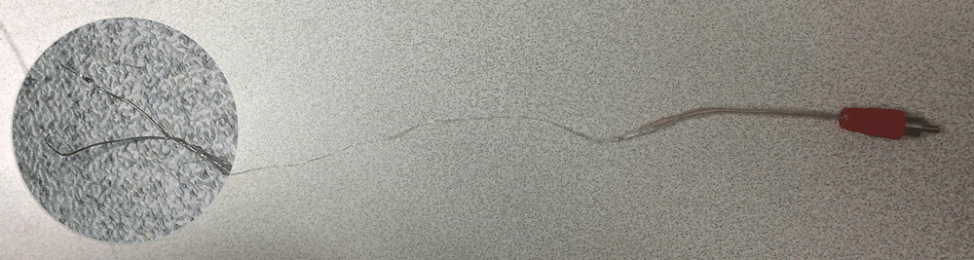
Step 2 involves preparing the electrode for implantation. Take about 2 feet of your 25 micron-diameter wire, fold it in half, and wrap it around itself. Determine which end is going into the snail and the other will go into the channel of the SpikerBox.
On the side going into the snail, start by removing the insulation from the ends to reveal the stainless steel wire beneath (my insulation was Teflon PFA and could be carefully burned away). Curl one end into a little hook and let the other one hang next to it but NOT touch. The hook will go around the neuron and the other will act as a ground electrode inside the snail's medium.
On the other end of the wire, make two more ends to attach onto the male RCA channel connection (if this is the side where the bend is, you can just cut that bend to make two wires). Again, remove the insulation from these ends as well. Using a voltage meter, figure out which end on this side is connected to the hook on the snail side. That one will attach to the smaller metal stand inside connector. The ground will attach to the taller metal stand. Finish the connections by soldering the wires to the connectors.
**Note: I attached my electrode to two slightly larger wires that in turn connected to the RCA connector. It made things a little easier because the electrode wire was so small and could also be elongated using these wires.
**Note: I also insulated my entire wire with silicone glue in case it was ever in touch with water; this is up to choice.
**Reference: inspiration was taken from Cullins et al. 2010 paper.
![]()
-
3Step 3
Step 3 prepares the snail for surgery. Start by injecting the snail with 1.5-2 mL of magnesium chloride (50 mmol/liter) to anesthetize them. This should plump them up enough to have them hang out of their shell just a wee bit and allow for easier navigation of the neurons. From experience, make sure to use a really sharp needle or you will be frustrated for a long time!! A beveled needle used for injecting insulin should do the trick.
-
4Step 4
Step 4 involves the surgical process of cutting them open and locating the buccal ganglia below the radula. While the paper put electrodes around 3 neurons, I’m working with just 1 neuron, the lateral and ventral buccal nerve, which is a solid trunk at the ganglia but branches off into the respective nerves. Use lots of pins to specifically locate the ganglia and make sure it doesn't disappear into the snail!
-
5Step 5
Step 5 is the implanting of the electrode onto the neuron. Place the hook electrode around either the ipsilateral or contralateral ET, glue it with spray super glue for easy drying, surround it in a Vaseline and mineral oil mixture, and let the connection ease back into the snail. Place the snail in a ringer solution or water with special minerals in it to help the snail heal (I used SmartWater that has a good amount of electrolytes for the snail). Leave the snail alone to heal for a day or 18-24 hours.
-
6Step 6
Step 6 is hooking up the electrode to the Backyard Brains SpikerBox and the SpikeRecorder software on the computer and watching the neuron spike away! These spikes should align with when the snail opens its mouth and rasps for food or cleaning.
Zombie Snails: Mindless Methodical Movement
A study on central pattern generators (CPGs) that control eating behaviors in pond snails.
Discussions
Become a Hackaday.io Member
Create an account to leave a comment. Already have an account? Log In.